DiveNav Cootwo User manual
Dual-gas
Oxygen and Carbon Monoxide
SMART Analyzer
User Manual

cootwo User Manual – Rev. 20170512 ©2017 DiveNav, Inc. – www.divenav.com Page 2
TABLE OF CONTENTS
1WELCOME......................................................................................................................3
2COOTWO OVERVIEW....................................................................................................3
3WARNINGS.....................................................................................................................3
4BEFORE FIRST USE......................................................................................................3
5QUICK GUIDE.................................................................................................................4
6SETTINGS.......................................................................................................................4
6.1 BUTTON............................................................................................................................4
6.2 DISPLAY ...........................................................................................................................4
6.3 MENUS NAVIGATION..........................................................................................................4
7OXYGEN SENSOR .........................................................................................................5
7.1 O2 SENSOR CALIBRATION.................................................................................................5
7.2 O2 SENSOR REPLACEMENT...............................................................................................6
8CARBON MONOXIDE SENSOR.....................................................................................6
8.1 CO SENSOR BUMP TEST ...................................................................................................6
8.2 CO SENSOR CALIBRATION ................................................................................................6
8.2.1 ZERO POINT CALIBRATION ................................................................................................6
8.2.2 SPAN CALIBRATION .........................................................................................................7
8.3 CO SENSOR REPLACEMENT ..............................................................................................7
9BATTERY........................................................................................................................7
10 WARRANTY....................................................................................................................7
10.1 LIMITATION OF LIABILITY....................................................................................................7
10.2 EXCLUSIONS AND LIMITATIONS ..........................................................................................7
10.3 REMEDY ...........................................................................................................................8
10.4 WARRANTY DISCLAIMER....................................................................................................8
10.5 OBTAINING WARRANTY SERVICE .......................................................................................8
11 FCC.................................................................................................................................8
11.1 FCC COMPLIANCE STATEMENT..........................................................................................8
11.1 FCC CAUTION...................................................................................................................8
12 COPYRIGHT NOTICE.....................................................................................................8

cootwo User Manual – Rev. 20170512 ©2017 DiveNav, Inc. – www.divenav.com Page 3
1 WELCOME
Thank you for purchasing cootwo, the world first dual-
gas Oxygen and Carbon Monoxide Analyzer specifically
designed for Scuba divers.
You can use cootwo either as a stand-alone device or
connected to your smartphone via Bluetooth.
When you use cootwo together with the My Nitroxbuddy
App you can analyze your scuba tanks using your
smartphone or tablet. You can also save logs of your
analysis and add to them useful information such as
images, tank info, fill cost, and dive operator.
You can also use the My Nitroxbuddy App to determine
the Maximum Operating Depth and the Equivalent Air
Depth. Check on our website how to get the My Nitroxbuddy
app.
2 COOTWO OVERVIEW
cootwo can analyze gasses with Oxygen content from
0.3% to 99.9% and is optimized to detect Carbon Monoxide
in the 0 to 20ppm range.
cootwo features a user rechargeable Li-Ion battery, a
Dot-matrix LCD display and a Bluetooth low energy
transceiver so it can be programmed and/or controlled with
a smartphone or a tablet.
The cootwo housing includes an integrated tank adapter
so it can be used to analyze a gas directly from a SCUBA
tank. Additionally DiveNav offers a low pressure BC adapter
accessory that mounts directly on the housing.
3 WARNINGS
Note: Please note that this User Manual is applicable
only to cootwo analyzers equipped with firmware released
on or after May 1, 2017.
To check the firmware revision of your cootwo, connect
to it with a smartphone or a tablet equipped with the My
Nitroxbuddy app and then go to the Device Info screen.
If you have a cootwo with an older version of firmware
please contact DiveNav for procedures and costs to
upgrade your unit.
WARNING: Scuba Diving is a dangerous activity.
Diving with an incorrect breathing gas mix could lead to
serious personal injury and even death. Make sure you
know how to properly calibrate and use your cootwo.
Read and follow the instructions contained in this
manual.
WARNING: cootwo includes an Oxygen sensor that
must be calibrated before each use. An improper
calibration may result in the use of an incorrect
breathing gas mix, which could lead to serious personal
injury and even death.
WARNING: Do not use cootwo if you are not Nitrox
certified.
WARNING: Do not use cootwo if it is not calibrated.
WARNING: Keep cootwo away from heat sources.
WARNING: Do not expose cootwo to direct sunlight.
WARNING: Do not dive if your breathing gas mix
contains Carbon Monoxide.
WARNING: Do not place cootwo under heavy object
such as scuba tanks.
WARNING: Store cootwo in a dry place.
WARNING: Do not immerse cootwo underwater.
WARNING: cootwo includes an electrochemical
sensor containing potassium hydroxide which can
cause burns if it comes in contact with eyes, skin and
other body parts. Dispose of sensors according to local
regulations.
WARNING: cootwo is designed for use at
atmospheric pressures only. It is not designed for use
in a hyperbaric chamber. Use of cootwo in a hyperbaric
chamber will result in incorrect readings and may
damage the unit.
4 BEFORE FIRST USE
When you unpack your cootwo make sure you have
received all the accessories; if you have ordered a basic
cootwo you should have received also an USB charging
cable. If you have ordered a cootwo DELUXE, in addition to
the USB cable you should have also received a carrying
case and the Low Pressure Inflator adapter. Please note
that the carrying case is NOT waterproof.
Before you use your cootwo for the first time make sure
that it has not been damaged during shipping or that internal
components did not came loose. First check cootwo for any
sign of damage then gently shake it and listen for any
rattling sound.
Now turn ON your cootwo by pushing the activation
button and check for the battery symbol to be full. If not,
place cootwo under charge for a couple of hours.
If cootwo shows a Carbon Monoxide value higher than
zero it could be due to the fact that the analyzer might have
been exposed to high values of Carbon Monoxide during
shipping. In this case just place cootwo in an area well
ventilated and away from possible sources of Carbon
Monoxide and let it recover for an hour or so.

cootwo User Manual – Rev. 20170512 ©2017 DiveNav, Inc. – www.divenav.com Page 4
5 QUICK GUIDE
To turn ON your cootwo just push the activation button;
cootwo will first show a welcome screen and then, if there
are no errors or warnings conditions, will enter the main
screen.
See the SETTINGS section for more details on errors or
warnings conditions and the various operating screens
supported by cootwo.
There is no need to turn OFF your cootwo as it will
automatically go to sleep after a couple of minutes. You can
program the sleep time using the My Nitroxbuddy app.
cootwo comes with a Carbon Monoxide sensor that is
already factory calibrated and its calibration should last
about 1 year from the factory shipment date.
See the CARBON MONOXIDE SENSOR section for
more info on how to calibrate the Carbon Monoxide sensor.
The Oxygen sensor calibration lasts only few hours, so,
before you can use your cootwo you must calibrate its
Oxygen sensor. In fact, it is good practice to calibrate the
Oxygen sensor before each use.
With cootwo you can perform an Oxygen sensor
calibration either with the stand-alone unit or with the
assistance of a smartphone.
The stand-alone, manual Oxygen calibration is limited
to air, it is time based and it takes 1 minute while the
smartphone assisted Oxygen calibration has more flexibility;
as an example, using the My Nitroxbuddy app you can
calibrate the Oxygen sensor using any single reference gas
or you could even perform a 2-point calibration using two
reference gasses. See the My Nitroxbuddy app tutorial on
www.divecomputertraining.com for more information.
To perform a manual Oxygen sensor calibration with the
stand-alone unit, first turn the unit ON by pushing the
activation button, then, once cootwo is in the main screen,
HOLD the button for 2 or more seconds to enter the main
settings screen. From there, push the button once for about
1 second to select O2 CAL and then HOLD the button to
enter the O2 calibration screen.
During an Oxygen sensor calibration it is very important
to expose cootwo to a known source of gas flowing at a
constant rate. If you plan to perform an Oxygen sensor
calibration by exposing cootwo to ambient air MAKE
SURE cootwo acclimates for at least 5 minutes as the
gas flow within the device is reduced and a shorter
period might produce incorrect results.
Now, position your cootwo in front of the valve of a
scuba tank containing air and open the tank valve slowly so
to limit the gas flow to few liters per minute. If you have
ordered the Low Pressure Inflator adapter then you can
connet your cootwo directly to the low pressure hose. Once
you are ready PUSH the activation button to start the
Oxygen sensor calibration.
As mentioned above, the stand-alone, manual Oxygen
calibration is limited to air, it is time based and it takes 1
minute.
Now that cootwo is calibrated, go ahead and use it; if
the unit is asleep turn it ON by pushing the activation button,
then, once cootwo shows the main screen, position your
cootwo in front of the valve of the scuba cylinder containing
the breathing gas you want to analyze and open the tank
valve slowly so to limit the gas flow to few liters per minute.
Hold steady and after few seconds you will see the
value of Oxygen and CO updating on the display. We
recommend to hold the analyzer in position for about 60
seconds.
Once the analysis is completed you have the option to
hold the results on the screen for about 60 seconds; to do
so, just push the button until you see the letter “H” next to
O2 on the top of the display.
6 SETTINGS
6.1 Button
cootwo ‘s single button has two modes: PUSH or HOLD.
PUSH is when you push the button for about one
second and then you release it.
HOLD is when you push the button for more than 2
seconds and then you release it.
For multiple pushes, like when navigating a sub-menu,
you will need to wait about one second between
consecutive pushes.
6.2 Display
Cootwo is equipped with a Dot-Matrix LCD display with
user programmable backlight; you can program the intensity
of the backlight and its duration.
The image below shows the Normal Operating Mode
screen.
The bluetooth symbol could be either OFF, ON or
flashing. When it is flashing it means that cootwo is
advertising its presence and it is ready to be connected to a
smartphone equipped with the My Nitroxbuddy app.
If the bluetooth symbol is always ON it means that
cootwo is actually connected to a smartphone.
If the bluetooth symbol is OFF it means that the radio is
sleeping.
To awake the bluetooth radio just PUSH the activation
button and the bluetooth symbol will begin to flash and will
continue to do so for about 2 minutes. After that period that
bluetooth radio will go back to sleep.
6.3 Menus Navigation
The navigation among the various menus is done via a
combination of HOLD and PUSH. In general a HOLD enters
a sub-menu while a PUSH moves the cursor to the next
item in the menu.
To enter the Main Settings menu from the Normal
Operating Mode just HOLD the button.
Please note that the stand-alone settings are accessible
only when cootwo is NOT connected to a smartphone.
cootwo User Manual – Rev. 20170512 ©2017 DiveNav, Inc. – www.divenav.com Page 5
If you try to access the Main Settings menu while the
analyzer is connected to a smartphone, the analyzer will
display a warning screen and will give you the option to
disconnect from the smartphone.
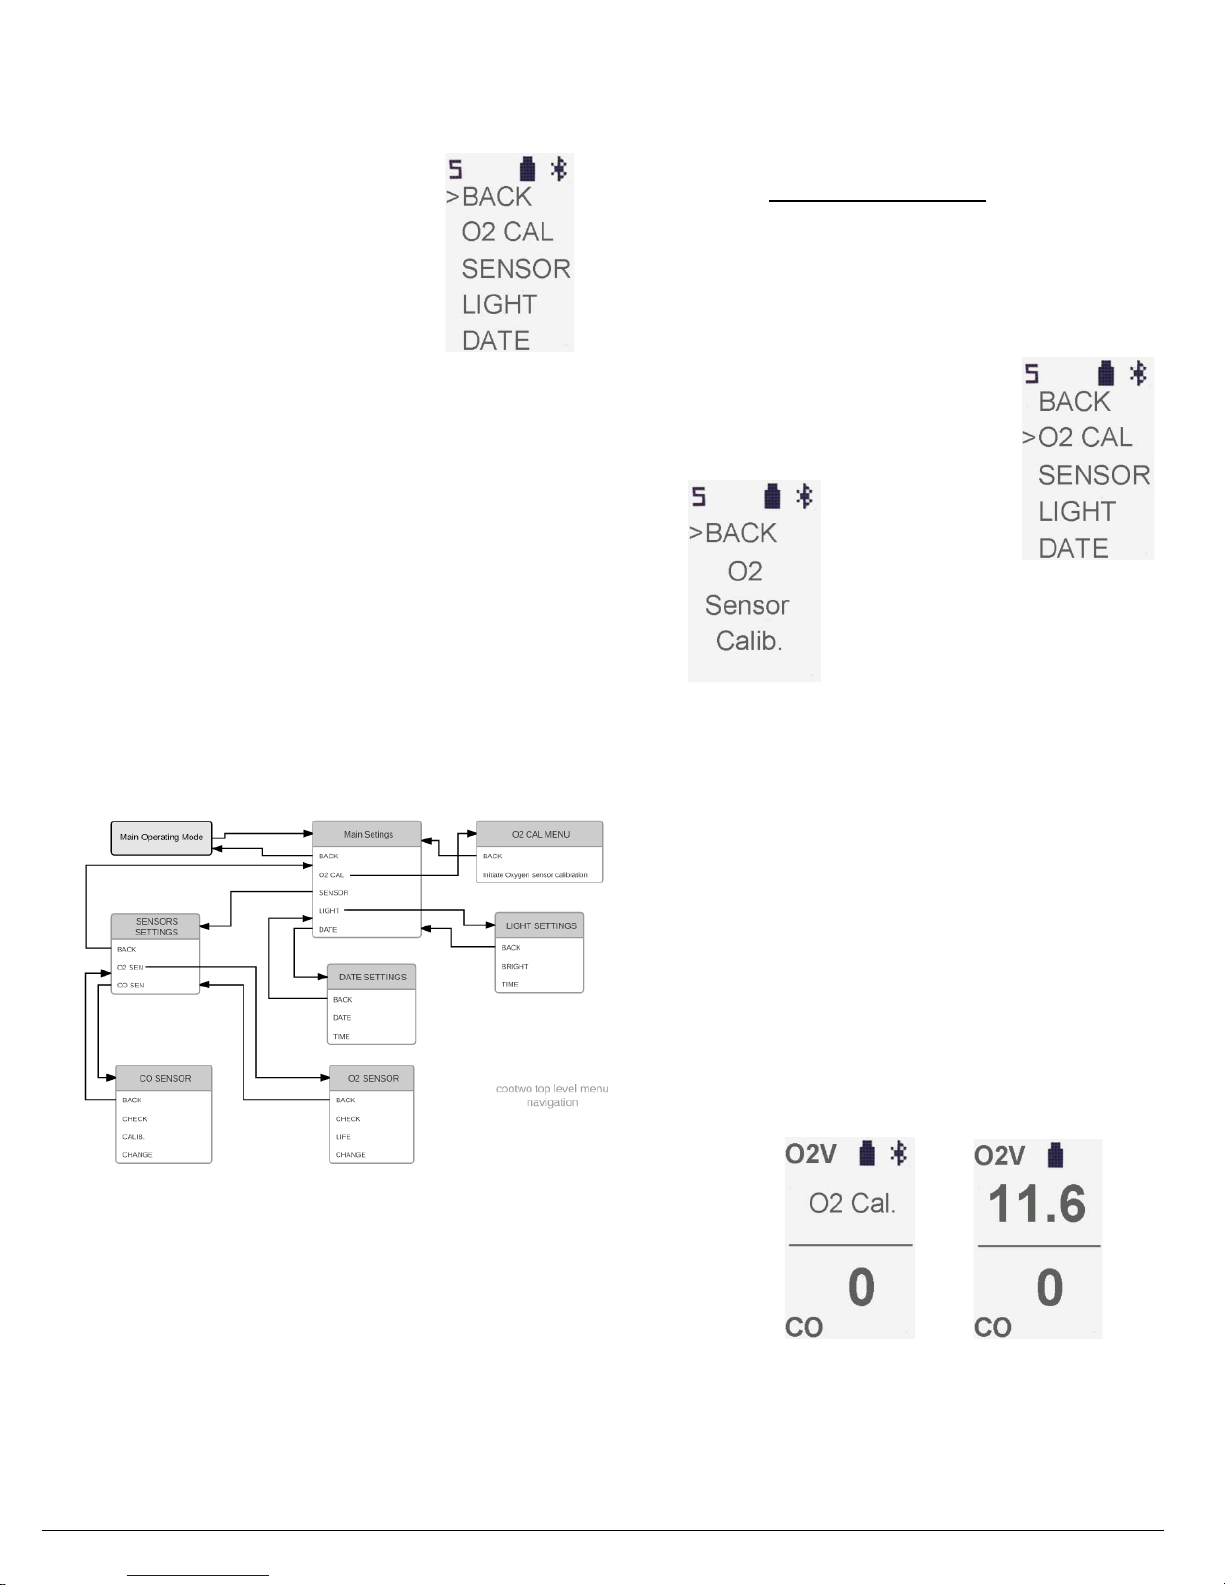
This image on the right shows the
Main Settings menu.
This menu contains 5 sub-menus:
BACK, O2 CAL, SENSOR, LIGHT and
DATE.
To access a sub-menu first position the > pointer on the
line you want to select by as many PUSH as required then
enter the sub-menu by a HOLD.
If you HOLD when BACK is selected you will go back to
the previous menu. In the case of the image above you will
go back to the Normal Operating Mode.
The S symbol on the top row indicates that you are in
the settings operating mode.
The O2 CAL sub-menu allows you to perform an
Oxygen sensor calibration.
The SENSOR sub-menu allows you to access settings
for either the Oxygen sensor or the Carbon Monoxide
sensor.
The LIGHT sub-menu allows you to program intensity
and duration of the backlight.
The DATE sensor allows you to program date and time.
Please note that the settings available in stand-alone
mode are a sub-set of the full set of settings available with
the My Nitroxbuddy app.
See below the top level view of cootwo menus.
7 OXYGEN SENSOR
cootwo comes equipped with an electrochemical
Oxygen sensor. The life of an Oxygen sensor is difficult to
estimate as it might be affected by several factors such as
usage, exposure to a gas with high content of Oxygen,
temperature and humidity.
Also, an Oxygen sensor does not die immediately but
slowly degrades over time.
We recommend to replace the factory installed Oxygen
sensor every 12 months. But, if you are in the middle of a
dive trip you can simply extend the life of the O2 sensor by
simulating a replacement either in stand-alone mode or via
the My Nitroxbuddy app.
Please note that it is YOUR responsibility to set the
sensor life correctly. The analyzer only provides you a
reminder but it has absolutely no knowledge if the lifetime
you entered is correct for the O2 sensor you are using.
7.1 O2 Sensor Calibration
As indicated earlier, with cootwo you can perform an
Oxygen sensor calibration either with the stand-alone unit or
with the assistance of a smartphone.
To calibrate the Oxygen sensor while in stand-alone
mode, first turn the unit ON.
Then, while the unit is in the Normal Operating Mode,
HOLD the button and enter the Main Settings menu.
Now, PUSH the button to position
the pointer on the O2 CAL sub-menu as
per image on the right.
Now, HOLD the button to enter the
Oxygen Sensor calibration sub-menu
show in the image on the left.
As indicated earlier, HOLD enters the sub-menu
selected by the pointer while a PUSH moves to the next line
down. In this specific case, HOLD will go back to the
previous menu while PUSH will start the calibration of the
Oxygen sensor.
During an Oxygen sensor calibration it is very important
to expose cootwo to a known source of gas flowing at a
constant rate.
WARNING: If you plan to perform an Oxygen sensor
calibration by exposing cootwo to ambient air MAKE
SURE cootwo acclimates for at least 5 minutes as the
gas flow within the device is reduced and a shorter
period might produce incorrect results.
Now, position your cootwo in front of the valve of a
scuba tank containing air and open the tank valve slowly so
to limit the gas flow to few liters per minute. If you have
ordered the Low Pressure Inflator adapter then you can
connect your cootwo directly to the low pressure hose.
Once you are ready PUSH the activation button to start
the Oxygen sensor calibration and cootwo will alternate the
2 screens below until the O2 calibration is completed.
As mentioned above, the stand-alone, manual Oxygen
calibration is limited to air, it is time based and it takes about
one minute.

cootwo User Manual – Rev. 20170512 ©2017 DiveNav, Inc. – www.divenav.com Page 6
7.2 O2 Sensor Replacement
In order to replace the Oxygen sensor you will need first
to open cootwo by removing the 3 screws on the back of the
unit and the large O-ring on the tank adapter.
Then disconnect the molex connector from the old O2
sensor and connect it to the new one.
Make sure you also install on the new O2 sensor the 2
extra O-rings that were previously mounted on the old O2
sensor as they are needed to keep the sensor in place
inside the enclosure.
Once you are done, go the Main
Settings menu and PUSH the button to
position the pointer on the SENSOR
sub-menu.
HOLD the button to enter the
SENSOR sub-menu.
Then select the O2 SEN sub-menu
and enter it.
Scroll down to select the CHANGE
sub-menu and enter it.
Now, PUSH the button to confirm that
you have replaced the Oxygen sensor
and cootwo will acknowledge it and turn
off after a few seconds.
Please note that when you replace the Oxygen sensor
while in stand-alone mode, cootwo will automatically assign
to the O2 sensor a lifetime of 12 months.
WARNING: the Oxygen sensor contains chemicals
which can cause burns if they come in contact with
eyes, skin and other body parts. Dispose of the Oxygen
sensor according to local regulations.
8 CARBON MONOXIDE SENSOR
cootwo comes with a Carbon Monoxide sensor that is
already factory calibrated and its calibration should last
about 1 year from the factory shipment date. More often you
calibrate the CO sensor and more accurate it will be.
cootwo uses an extremely sensitive CO sensor
designed to operate below 100ppm but if it is exposed to a
very high concentration of CO (like putting it behind the
tailpipe of a car - or riding for a long time in heavy traffic) the
CO sensor could take few hours to go back to zero and it
could also get permanently affected as the zero baseline
could go up a bit - but this could be easily solved by
performing a zero calibration.
If you do not have access to certified calibration gasses
or if you do not want to perform the Carbon Monoxide
sensor calibration yourself you can return your cootwo to us
and we will calibrate it for you. Please check with DiveNav
customer service for costs and procedures.
8.1 CO Sensor Bump Test
It is good practice to periodically verify if the Carbon
Monoxide sensor is working properly. The simplest way to
do so is to perform a bump test using your breath.
According to a paper from Ryter and Choi, the exhaled
Carbon Monoxide value of non-smokers could be about 3
ppm while the mean value of exhaled Carbon Monoxide for
smokers was 17 ppm.
Before you perform a bump test, you might want to
enable the display of the decimal digit (to display "0.0"
instead of just "0"). To do so, connect to your cootwo with a
smartphone equipped with the My Nitroxbuddy app, go to
the settings and enable "Display Decimal".
Now, take a long breath .... hold it as long as you can ....
and then slowly exhale it into your cootwo.
If you are a non smoker you might see values up to 3
ppm. If you are a smoker the CO value could be much
higher. The other thing you will notice is that the O2% value
will change too (decrease).
More you hold your breath before exhaling and more the
CO and O2% values will change (CO will increase and O2%
will decrease).
8.2 CO Sensor Calibration
As indicated earlier, with cootwo you can perform a
Carbon Monoxide sensor calibration either with the stand-
alone unit or with the assistance of a smartphone.
To calibrate the Carbon Monoxide sensor while in stand-
alone mode, first turn the unit ON.
Then, while the unit is in the Normal Operating Mode,
HOLD the button and enter the Main Settings menu.
Now, PUSH the button to position the pointer on the
SENSOR sub-menu and HOLD the button to enter it.
Then select the CO SEN sub-menu and enter it.
Scroll down to select the
CALIBRATION sub-menu and enter it.
In this menu you can perform either
a ZERO point calibration or a SPAN
calibration.
8.2.1 ZERO point Calibration
The ZERO point calibration could be used to take care
of the slow aging of the Carbon Monoxide sensor as it
resets the CO display to zero.
In order to perform a ZERO point
calibration you need to have a reference
gas with 0 ppm such as a scuba tank
containing good air or just ambient air.
In the CO CALIBRATION sub-menu
select the ZERO sub-menu and then
enter it.
Now, expose cootwo to a reference
gas with 0 ppm and, when ready,
PUSH the button; cootwo will show the
screen on the right and initiate a 60
seconds countdown.
During a Carbon Monoxide sensor
calibration it is very important to expose
cootwo to a known source of gas
flowing at a constant rate.

cootwo User Manual – Rev. 20170512 ©2017 DiveNav, Inc. – www.divenav.com Page 7
WARNING: If you plan to perform an Carbon
Monoxide sensor calibration by using ambient air make
sure you are far from sources of pollution like cars,
trucks, boats and that you let cootwo ambient for at
least 5 minutes before performing the calibration as the
gas flow within the device is reduced and a shorter
period might produce incorrect results.
We recommend you perform the ZERO point calibration
frequently.
8.2.2 SPAN Calibration
The procedure to perform the SPAN calibration is similar
to the one used for the ZERO point calibration; the most
notable difference is that you will need to use a certified
calibration gas containing 20ppm of Carbon Monoxide.
8.3 CO Sensor Replacement
You can replace the Carbon Monoxide sensor yourself
or send your cootwo back to us for service and sensor
replacement.
If you want to replace the CO sensor yourself you will
need first to open cootwo by removing the 3 screws on the
back of the unit and the large O-ring on the tank adapter.
Then unplug the CO sensor from the board and replace
it with the new one and close the unit.
WARNING: the Carbon Monoxide sensor contains
chemicals which can cause burns if they come in
contact with eyes, skin and other body parts. Dispose
of the Carbon Monoxide sensor according to local
regulations.
After you have physically replaced the sensor you will
need to properly program the analyzer; to do so go to the
CO SEN sub-menu, scroll down to the CHANGE sub-menu
and enter it.
Now, PUSH the button to confirm
that you have replaced the Carbon
Monoxide sensor and cootwo will
acknowledge it and turn off after a few
seconds.
Please note that when you replace the Carbon
Monoxide sensor you will need to calibrate the new sensor;
first you will need to perform the ZERO point calibration
using a gas containing 0 ppm CO and then you will need to
perform the SPAN calibration.
WARNING: After replacing a Carbon Monoxide
sensor you will need to make sure that cootwo is
properly powered (battery is almost full) and wait at
least 4 hours before you can proceed with the CO
sensor calibration. Performing a CO sensor calibration
too soon after a sensor replacement might produce
incorrect results.
9 BATTERY
cootwo is equipped with a user replaceable LIR 10440
AAA 3.7V rechargeable battery that can be easily recharged
using the provided USB cable. We strongly recommend you
keep the battery properly charged all times.
WARNING: If you do not keep the battery properly
charged the battery might die off and you might not be
able to recharge it all.
WARNING: If you let the battery become very empty
or even die, it might take several hours to recharge it.
WARNING: If you let the battery die, the Carbon
Monoxide sensor might loose power. When the Carbon
Monoxide looses power it will loose its bias. Once you
re-apply power to the Carbon Monoxide sensor it might
need several hours to recover its original status.
10 WARRANTY
DiveNav, Inc. (the “Company”) warranty obligations for
cootwo (the “Product”) are limited to the terms set forth in
this document as well as those set forth in the Warranty
section of the company website.
Company warrants the Product against substantial
defects in material and workmanship under normal use for a
period of one (1) year from the date of original purchase
(the “Limited Warranty”).
This Limited Warranty is non-transferable and covers
only the original purchaser.
An original or copy of the sales receipt from the original
sales retailer or Company website is required to validate the
warranty coverage.
This Limited Warranty does not cover the battery and
products purchased through non-authorized dealers.
Warranty claims must be made directly to the Company.
10.1 Limitation of Liability
IN NO EVENT SHALL COMPANY, NOR ITS
AFFILIATES, NOR ITS EMPLOYEES, OFFICERS,
DIRECTORS, AGENTS, CONTRACTORS,
DISTRIBUTORS, SUPPLIERS OR ASSIGNS (THE
“RELEASED PARTIES”) BE LIABLE TO YOU OR ANY
THIRD PARTY FOR ANY INDIRECT, INCIDENTAL,
CONSEQUENTIAL, SPECIAL, EXEMPLARY OR PUNITIVE
DAMAGE ARISING OUT OF THE USE OF THE
PRODUCT, INCLUDING, WITHOUT LIMITATION,
PROPERTY DAMAGE, LOSS OF VALUE OF THE
PRODUCT, DEATH, INJURY OR ANY OTHER DAMAGES
THAT MAY BE CAUSED TO YOU, YOUR FAMILY, HEIRS,
ESTATE OR ASSIGNS. NOTWITHSTANDING ANY
DAMAGES THAT YOU MIGHT INCUR FOR ANY REASON
WHATSOEVER (INCLUDING, WITHOUT LIMITATION, ALL
DAMAGES REFERENCED HEREIN) AND ALL DIRECT
OR GENERAL DAMAGES IN CONTRACT, TORT
(INCLUDING NEGLIGENCE AND OTHERWISE), THE
ENTIRE LIABILITY OF THE COMPANY SHALL BE
LIMITED TO THE AMOUNT ACTUALLY PAID BY YOU
FOR THE PRODUCT. SOME STATES DO NOT ALLOW
THE EXCLUSION OR LIMITATION OF INCIDENTAL OR
CONSEQUENTIAL DAMAGES, SO THE ABOVE
LIMITATIONS OR EXCLUSIONS MAY NOT APPLY TO
YOU.
10.2 Exclusions and Limitations
Company’s Limited Warranty applies only to the
Product. The warranty does not apply to any non-Company
products, even if packaged or sold with the Product. This
warranty does not apply to damage caused by abuse,
misuse, accident, tampering, force majeure, or modifications
of the Product.

cootwo User Manual – Rev. 20170512 ©2017 DiveNav, Inc. – www.divenav.com Page 8
10.3 Remedy
Your sole and exclusive remedy for a breach of this
Limited Warranty, and Company’s sole and entire liability is,
at Company’s discretion, to repair or replace the defective
Product or refund the purchase price of the defective
Product within thirty (30) calendar days of the date of
purchase. Repair or replacement (including part and labor)
shall be made at Company’s expenses. Company reserves
the right to send you a replacement product that is the
same or an equivalent substitute. Replacement products will
be furnished only on an exchange basis. Replacement
products are warranted as above for the reminder of the
original applicable Product warranty period.
10.4 Warranty Disclaimer
EXCEPT AS SET FORTH ABOVE IN THIS LIMITED
WARRANTY, THE PRODUCT IS PROVIDED ON AN “AS
IS” BASIS AND THE COMPANY MAKES NO OTHER
EXPRESS OR IMPLIED WARRANTIES TO THE EXTENT
PERMITTED BY LAW AND SPECIFICALLY DISCLAIMS
AND EXCLUDES ALL IMPLIED WARRANTIES,
INCLUDING, WITHOUT LIMITATION, THE IMPLIED
WARRANTIES OF MERCHANTABILITY AND FITNESS
FOR A PARTICULAR PURPOSE. IF SUCH DISCLAIMER
OF ANY IMPLIED WARRANTY IS NOT PERMITTED BY
LAW, THE DURATION OF ANY SUCH IMPLIED
WARRANTIES IS LIMITED TO THE DURATIONS SET
FORTH IN THIS LIMITED WARRANTY. SOME
JURISDICTIONS DO NOT ALLOW THE EXCLUSION OF
IMPLIED WARRANTIES OR LIMITATIONS ON HOW
LONG AN IMPLIED WARRANTY MAY LAST, SO SUCH
LIMITATIONS OR EXCLUSIONS MAY NOT APPLY TO
YOU.
10.5 Obtaining Warranty Service
If you whish to make a claim under this warranty with
respect to the Product, you can do that either by using our
website or by sending an e-mail to
customer.service@divenav.com with the following
information:
1) Attach photocopy of original purchase receipt.
2) Provide purchase date, product UPC code, and serial
number.
3) Write brief description of the problem.
4) Provide a telephone number and e-mail address at
which you can be reached during normal business hours.
All of the above information is required before a
warranty claim will be accepted. Once Company validates
your claim, we will issue you an RMA (Return Material
Authorization) number and shipping information.
11 FCC
11.1 FCC Compliance Statement
FCC ID: RSY2015COOTWO
This device complies with Part 15 of the FCC Rules.
Operation is subject to the following two conditions:
(1) This device may not cause harmful interference and
(2) this device must accept any interference received,
including interference that may cause undesired operation.
This equipment has been tested and found to comply
with the limits for a class B digital device, pursuant to part
15 of the FCC Rules.
These limits are designed to provide reasonable
protection against harmful interference in a residential
installation.
This equipment generates, uses and can radiate radio
frequency energy and if not installed and used in
accordance with the instructions, may cause harmful
interference to radio communications. However, there is no
guarantee that interference will not occur in a particular
installation. If this equipment does cause harmful
interference to radio or television reception, which can be
determined by turning the equipment off and on, the user is
encouraged to try to correct the interference by one or more
of the following measures:
* Reorient or relocate the receiving antenna.
* Increase the separation between the equipment and
receiver.
* Connect the equipment into an outlet on a circuit
different from that to which the receiver is connected.
* Consult the dealer or an experienced radio/TV
technician for help.
11.1 FCC Caution
The user is cautioned that changes and modifications
made to the equipment without the approval of
manufacturer could void the user’s authority to operate this
equipment.
12 COPYRIGHT NOTICE
This manual is copyrighted and it may not be copied,
reproduced, translated or transformed into any electronic
format without prior written consent of DiveNav, Inc.
Table of contents
Other DiveNav Measuring Instrument manuals

Popular Measuring Instrument manuals by other brands


VERIS INDUSTRIES, INC.
VERIS INDUSTRIES, INC. E31E Series installation guide

Leica
Leica RANGEMASTER 1200 scan Specifications

Agilent Technologies
Agilent Technologies 4349B manual

GE
GE Centricity SP1001 user manual

Keysight Technologies
Keysight Technologies N9020A Installation note

Graytechnos
Graytechnos photom MiNi 219 instruction manual


