DIVIMATH HDZero User manual

HDZero Goggle User Manual
Rev 1.0
11/24/2022
For more product information, please visit:
www.hd-zero.com
All Rights Reserved

Table of Contents
Introduction ..................................................................3
Diagram.....................................................................3
Features ....................................................................3
Specification..............................................................4
Included Accessories .................................................4
Setup.............................................................................5
Power Switch.............................................................5
Power Input/Consumption........................................5
XT60 Cable ................................................................5
Face Plate/Padding Foam ..........................................5
Optical Adjustment ...................................................5
Head Strap ................................................................6
HDMI input................................................................6
HDMI Output.............................................................6
AV input ....................................................................6
HT Output .................................................................7
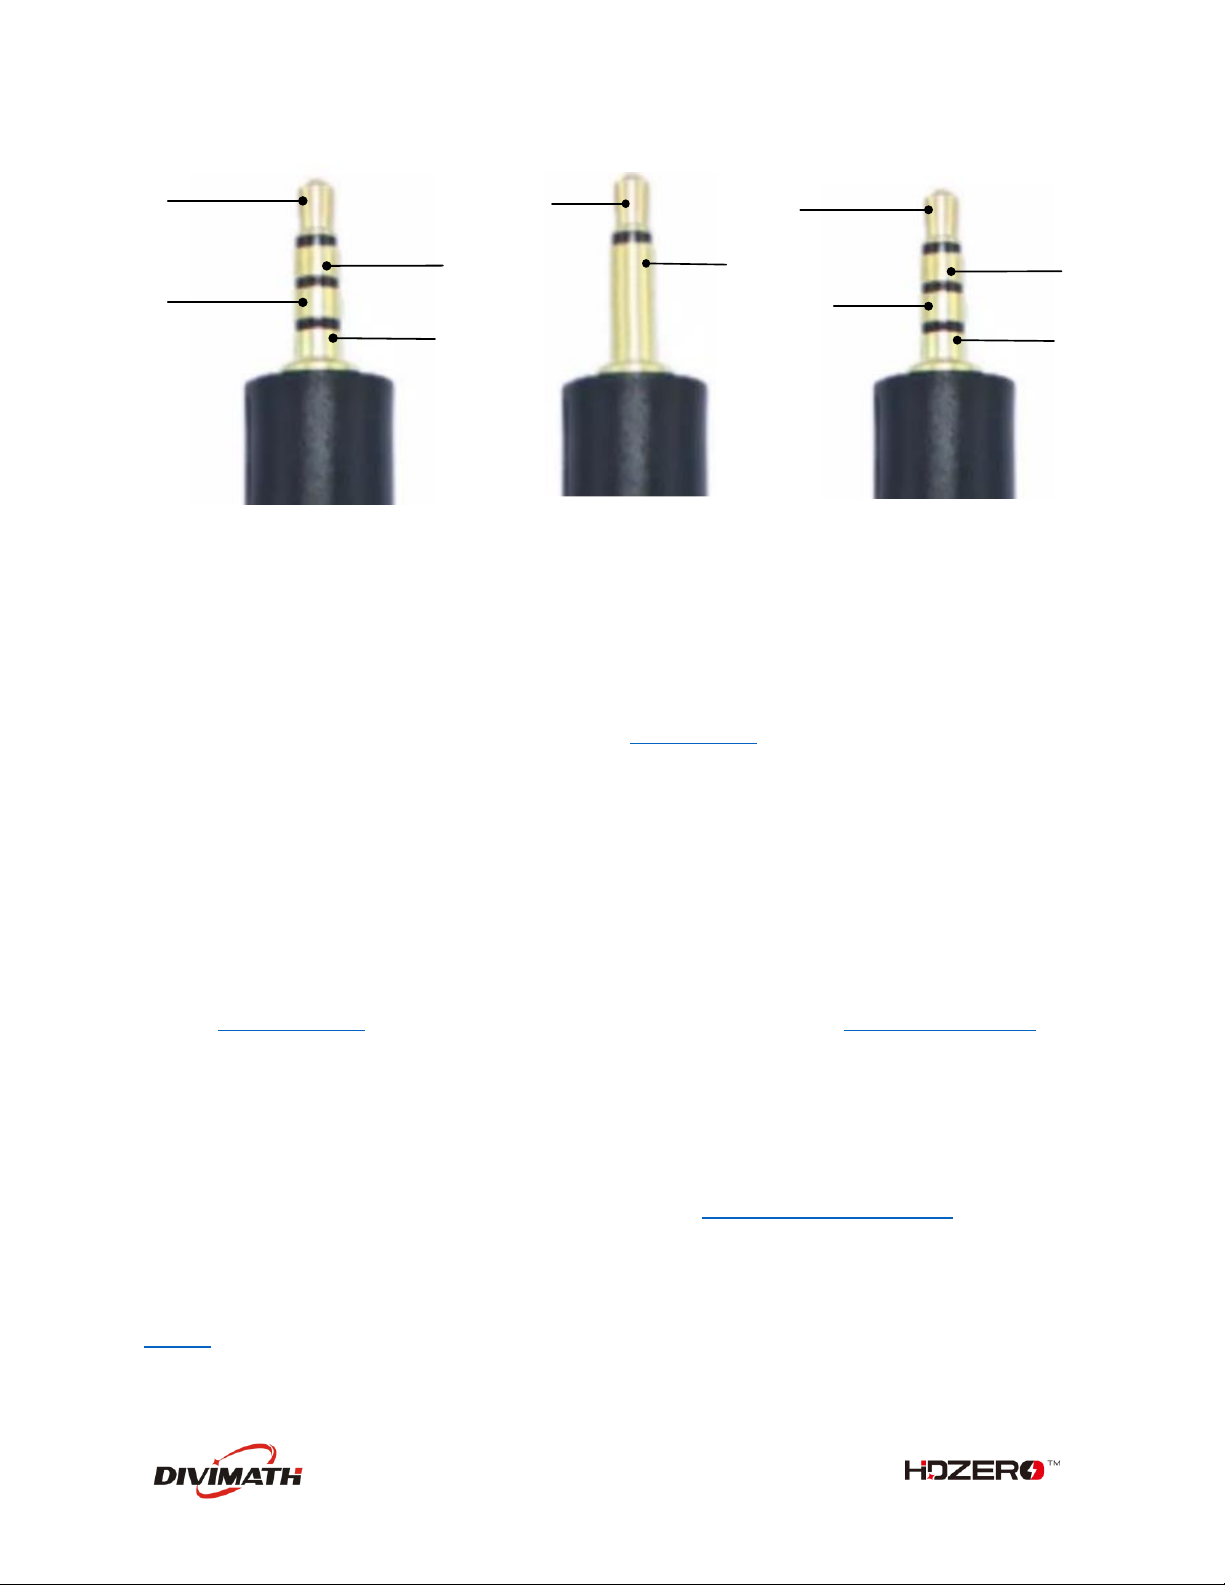
Audio Line In/Line Out...............................................7
Mounting Rails ..........................................................7
FW Port .....................................................................7
Open Source..............................................................7
HDZero Goggle Operation .............................................8
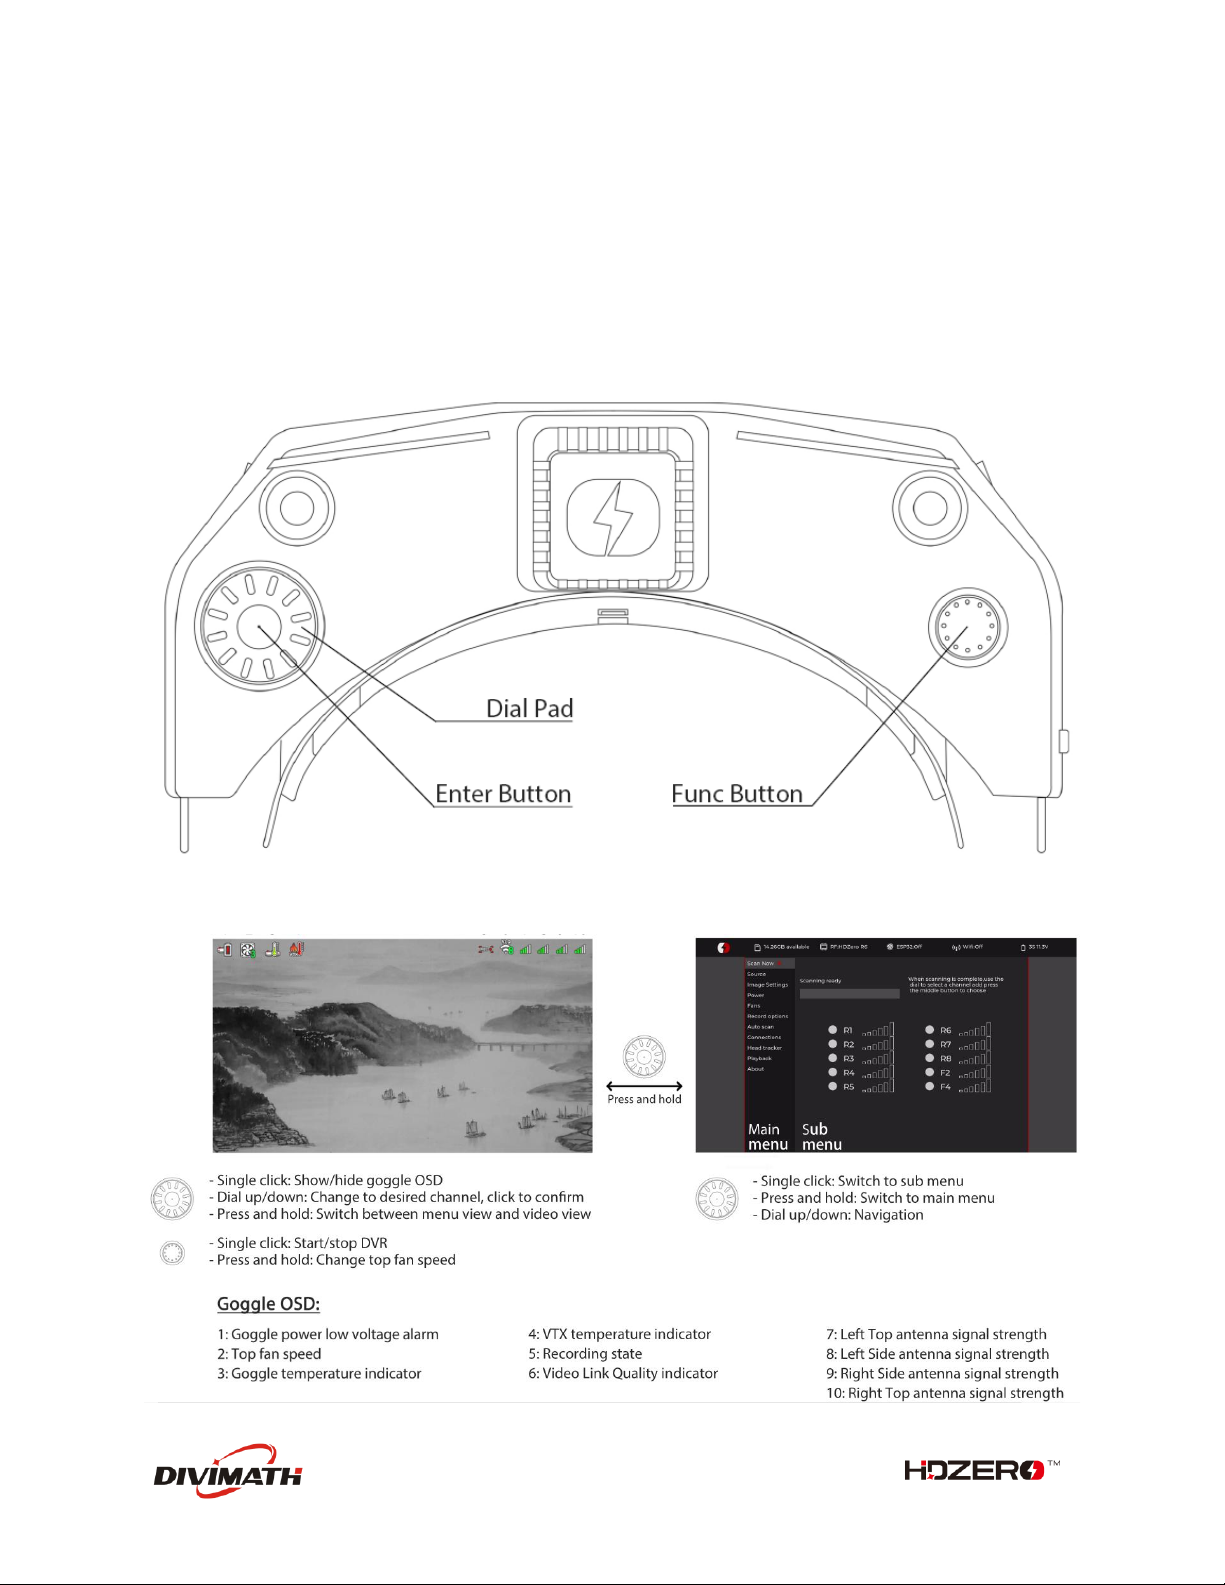
Controls.....................................................................8
Video view and Menu view .......................................8
Video Source .............................................................9
HDZero Digital Receiver.............................................9
Analog Input..............................................................9
Fan Management.....................................................10
Image Settings .........................................................11
OLED Control .......................................................11
DVR..........................................................................11
Playback...................................................................12
OSD..........................................................................12
HDZero Firmware Update ........................................12
Flashing Firmware to a HDZero VTX .....................13
Flashing Firmware to the Goggle..........................13
Troubleshooting.......................................................16
Warranty .................................................................17

3
Introduction
The HDZero Goggle is an all-in-one FPV goggle for digital, analog and HDMI video. Please take the time
to read through this operating manual thoroughly before using.
Diagram
Features
●Power on/off sliding switch –be confident that the goggle is on or off at a glance or by
feel
●Designed for open source, the new goggle runs Linux. All code for the user interface is
new and open source
●Support diopter lens inserts
●90Hz 1080p OLED screens with sliding IPD adjustment and dials for focus adjustment
●By integrating the entire goggle display pipeline with HDZero’s fixed-latency video
transmission, these goggles achieve 3ms glass-to-glass sub-frame latency with no jitter
or dropped frames
●Mounting rails for patch antennas or whatever else you might want to mount
●Recessed front SMA jacks so no need to remove antennas when packing the goggle
away
●Three independently addressable fans work in combination to cool the internals and
prevent fogging. They are soft mounted to prevent screen vibration and noise
●HDMI input and HDMI output
●Built-in microphone for DVR

4
●3.5mm combination headphone / microphone jack for audio and external mic
●3.5mm analog video/audio input for use with ground station inputs
●Integrated 2D deinterlacer that adds no delay for analog input
●Built-in ESP32
●Built-in H.265 DVR
●6-axis smart inertial measurement for head tracking pan+tilt support
●Add-on side-mounted analog module bay that accepts most of today’s analog modules
●Add-on 2.4Ghz WiFi video streaming module for live streaming
Specification
●HDZero Camera glass-to-goggle glass latency: <3ms
●Adjust IPD range: 57-70mm
●Adjustable focus range: +6 to -6 diopter
●Full HD 1920x1080p 90fps OLED micro display
●FOV: 46deg
●Input voltage: 7V-25.2V
●Power consumption: 14.5W (with HDZero RF on), or 8.4W (with AV In)
●Weight: 294g
●Dimension: 185x81x66mm
Included Accessories
●1x HDZero goggle
●1x wide face plate
●1x narrow face plate
●1x foam padding
●1x goggle strap
●1x 1200mm XT60 cable
●1x 150mm HDZero VTX programing cable
●1x Thick Canvas Goggle Bag
●1x Lens cloth

5
Setup
The HDZero goggle has many features that can be customized to the individual pilot.
Power Switch
There is a sliding power switch on the right side of the goggles. You may use it to turn on/off
the goggle, or just leave it on and plug/unplug the DC barrel plug to turn the goggle on and off.
Power Input/Consumption
The goggle supports 2S-6S (7-25.2V) power input. Please make sure the power polarity is
correct before powering on the goggle.
TABLE 1. Power Consumption
Mode
Power Consumption
1
HDZero Digital
1.2A@12V
2
Expansion module+ IRC RapidFire1
0.9A@12V
3
AV In
0.7A@12V
4
HDMI in
0.7A@12V
Note: RapidFire is a product of ImmersionRC limited. It is not included.
XT60 Cable
The goggle includes a 1200mm XT60 cable for connecting a battery in your pocket. You may
also purchase a shorter 90mm cable on HDZero shop if you wish to locate your battery on the
goggle head strap.
The XT60 cable (either 1200mm or 90mm) has no voltage regulator. The cable passes voltage
directly through the goggle.
Note: Do not connect an over 6S battery to the goggle, as the maximum voltage rating of the
goggle is 6S.
Face Plate/Padding Foam
The goggle includes both a wide face plate and a narrow one. You may choose the appropriate
one to fit your face, and use the included 7mm thick foam padding for both comfort and
preventing light leakage.
Optical Adjustment
After goggle is powered on, you will see an image on the OLED displays. Complete the following
steps to adjust the optics:
1. Focus adjustment: Close one eye and slowly twist the focus knob on that side of the goggle
until the image comes into focus. Once it works well with one eye, repeat the process with
the other eye.

6
2. IPD adjustment: Close one eye and slide the knob to center the image. Once the image is
centered, repeat the process with the other eye.
3. Fine adjustment: Open both eyes and look at the merged image. Make small adjustments to
the focus and IPD for each eye until it feels visually comfortable and merges into a single
clear picture.
Note: Do not expose the lens directly to sunlight. Otherwise, the OLED displays might be
damaged.
Head Strap
The goggle includes a 50mm (2 inch) wide head strap with battery pocket. Once you have
configured the face plate and padding foam for your preferred face fit, put on the head strap
and adjust the tightness to your preference.
HDMI input
The HDZero goggle includes a single port HDMI 1.4b receiver though a mini HDMI port. The
incoming HDMI video is routed to the OLED display without adding any frame buffer latency.
Please note that most HDMI connectivity issues are due to either incorrect monitor settings or a
faulty HDMI cable. If you encounter issues using the HDMI input, try connecting with
alternative HDMI sources and alternative cables to rule out these common causes.
HDMI Output
The HDZero goggle includes a high-performance single channel HDMI transmitter that is fully
compliant with HDMI 1.3a through a mini HDMI port.
The HDMI output will display exactly the same content as what appears on the OLED displays.
TABLE 2. HDMI Output Format
Input Source
HDMI Output format
1
HDZero 60fps Camera
1280x720x60fps
2
HDZero 90fps Camera
1280x720x90fps
3
NTSC
1280x720x59.97fps
4
PAL
1280x720x50fps
5
HDMI in
Same as HDMI in
AV input
The HDZero goggle supports AV input through a 3.5mm AV jack. The pinout is shown in FIG 1.
The AV input cable is not included. It is available on the HDZero shop and other online stores.

7
HT Output
The HDZero goggle has a 6-axis smart inertial measurement unit for head tracking pan+tilt
support. The HT output jack pinout is shown in FIG 2.
The HT cable is not included. It is available on the HDZero shop and other online stores.
Audio Line In/Line Out
The HDZero goggle has a CTIA standard 3.5mm Line in/Line out jack for microphone and
headphones. The pinout is shown in FIG 3.
Mounting Rails
The HDZero goggle has a unique mounting rail for patch antennas or whatever else you might
want to mount.
Here is mount adapter for TrueRC patch antennas by Ryan Quellet, and ball joint rail mount by
userzero1.
FW Port
The FW port is used for flashing firmware to HDZero VTXes. A 150mm programming cable is
included.
The instruction for flashing VTX firmware is described on HDZero Firmware Update section.
Open Source
The HDZero Goggle is open source. You can find the SoC Firmware and Goggle CAD files at
Github.
Audio Left
Audio Right
Video
Ground
HT PPM
Output
Ground
Audio Left
Audio Right
MIC
Ground
FIG 1. AV input Jack FIG 2. HT output Jack FIG 3. Line In/Out Jack

8
HDZero Goggle Operation
This section describes the general operation of the HDZero goggle.
Controls
-Dial Pad
-Enter Button
-Func Button
Video view and Menu view

9
Video Source
The HDZero goggle can display video from any of 4 sources:
-Built-in HDZero digital receiver
-AV in
-Expansion Module in (such as with an analog video receiver)
-HDMI in
HDZero Digital Receiver
The “Scan Now” option on the main menu will scan channels R1-R8, F2, and F4 for an HDZero
video signal. It will:
-Lock on to the channel if there is only one valid channel with a signal, or
-Let you choose between the channels if it has found two or more channels, or
-Continue to scan after 5 seconds if no signal is detected, or
-Wait for a long press of the Enter button to exit to the main menu
The HDZero goggle provides the lowest and fixed latency when used with the HDZero Nano 90
camera.
Analog Input
The HDZero goggle takes analog video input from either the AV input jack or the external
Expansion Module (not included, available on the HDZero Shop). The goggle processes analog
video from either of these inputs in the same way, but the Expansion Module provides an easy
plug-and-play experience if you are using a standard FPV analog module.
The HDZero goggle uses a novel approach to process the analog input, resulting in improved
analog video quality:
-It uses a video decoder with an adaptive comb filter to separate Y/C from the composite
video;
-It uses a deinterlacer to convert fields to frames, instead of doubling the interlaced
lines;
-It uses an upscaler to record and display the video;

10
DEMUX
AV in
Expansion
Module In
Video Decoder
w/ adaptive
Comb Filter
De-Interlacer Up
Scaler
DVR
OLED
720x240x60
Field per second
720x480x60
Frame per second
1280x720x60
Frame per second
Analog
Composite Video
FIG 4. Signal Processing Path for Analog Input
Fan Management
There is one fan on the top of the goggle and one fan on each side of the goggle. All fans are
soft mounted to reduce vibration and noise. There are three temperature sensors on top and
sides of the goggle.
These fans are critical to goggle performance:
-The top fan provides cooling for the OLED displays and defogging for the optical lens;
-The side fans provide cooling for the IO and RF boards inside the goggle
They will prevent goggle from being too hot, improving OLED life span and ensuring maximum
HDZero RF performance.
Each fan can be set to a 0-5 level, corresponding from off state to max speed.
There are two fan control modes:
-Automatic mode: Goggle firmware will automatically speed up/down the fan on each
side;
-Manual mode: You can manually set the speed for each fan. (0=off, 5=max);
-Regardless of the current mode, the goggle firmware will enter into rescue mode under
these situations:
otemperature sensor on top reports hot: top fan goes to max speed;
otemperature sensor on left/right reports hot: left/right fan goes to max speed;
Please note that only the side fans have automatic mode. The top fan is always in manual mode
unless it is in rescue mode.
You can change the top fan speed by pressing and holding the Func Button while in the Video
view. You can monitor the fan speed changes on the goggle OSD to quickly change the amount
of air blowing onto your face and the optic lenses.
Note: It is recommended to use automatic mode for side fans, and set top fan speed as desired.

11
Image Settings
The HDZero goggle has an image processor to fine tune video before feeding to DVR and display. It
includes:
-Brightness
-Saturation
-Contrast
OLED Control
For OLED display, you may set OLED brightness to the desired level. Note that the OLED brightness
setting applies to the OLED display only.
If the HDZero goggle detects no movement or no key input for programmed time (3/5/7 minutes), it will
dim the OLED display as an alarm, and it will wait for another one minute before turning off both the
display and HDZero digital receiver with a short beep. The OLED display and HDZero receiver will resume
normal operation if the goggle detects movement or any key input. This feature can be disabled by
setting the waiting time to “Never”.
DVR
The HDZero goggles integrates a DVR for both the HDZero digital receiver and analog input. These are
the DVR options:
-Automatic Record: DVR will start to record when it detects there is valid HDZero RF on the
current channel, and stops recording when the signal is no longer detected. Note that automatic
recording is not available for the analog input, you will need to click Func button to start/stop
recording.
-Manual Record: DVR will start/stop only if Func button is clicked.
-MP4 format or TS format: MP4 format is better supported by many video editing applications.
However, MP4 files can be corrupted if the goggle loses power before the file is closed after
recording, which can happen if the goggle runs out of battery or the power cord is unplugged
unexpectedly. Unlike the MP4 format, the TS format saves the stream instantly to DVR without
any risk of corrupted files, even if the goggle suddenly loses power.
-H264/H265. The DVR must use the H264 format when recording 90fps video (it records in
1280x720x90 for better quality). It uses the H265 format in all other cases.
-Audio: You can choose to record audio or not. There are 3 audio sources that can be recorded:
oBuilt-in microphone
oLine in (From Line in/out Jack)
oAV in (From AV in Jack)

12
TABLE 3: DVR resolution
Input Source
Recording resolution
Encoder
1
HDZero 60fps Camera
1280x720x60fps
H.265
2
HDZero 90fps Camera
1280x720x90fps
H.264
3
NTSC
1280x720x59.97fps
H.265
4
PAL
1280x720x50fps
H.265
5
HDMI in
No recording
No recording
Playback
The HDZero goggle can play back DVR recordings.
-The player lists the recent recording first. Use Dial up/down to select a file, and click to play it
-On controller bar, use Dial Up/Down to seek video (5 seconds forward/backward), and click to
play/pause
-Long press the Enter button to exit the controller bar, and long press Enter again to exit the
player.
Note: The player will ignore files that are less than 5MB.
OSD
The goggle supports OSD from flight controller (FC OSD) and OSD of its own status (Goggle OSD). You
may select if both OSD should be recorded with video stream at Record Options sub-menu.
Goggle OSD can be shown/ hidden by clicking the Enter button under Video view. The positions of
Goggle OSD items are fixed on current firmware.
The goggle has built-in OSD fonts for BetaFlight, Arduino and iNav. It will automatically load the
corresponding font according to type of flight controller that is connected with HDZero video
transmitter. You can also customize FC OSD by putting bitmap files under SD card root
directory/resource/OSD/FC.
HDZero Firmware Update
Download the latest firmware from HDZero download site. The firmware package Rev_ddmmyyyy.zip
contains firmware for all of the HDZero products.
TABLE 4. Products and their Firmware
Product Name
Firmware Zip file
Firmware Name
Freestyle VTX
FreestyleVTX.Revddmmyyyy.zip
HDZERO_TX.bin
Whoop Lite VTX
WhoopLiteVTX.Revddmmyyyy.zi
p
HDZERO_TX.bin
Whoop VTX
WhoopVTX.Revddmmyyyy.zip
HDZERO_TX.bin
Race V1
RaceV1VTX.Revddmmyyyy.zip
HDZERO_TX.bin

13
Race V2
RaceV2VTX.Revddmmyyyy.zip
HDZERO_TX.bin
Goggle
HDZGOGGLE_Revddmmyyyy.zip
HDZERO_GOGGLE_xx.yy.zzz.bin
HDZGOGGLE_EMG_Revddmmyy
yy.zip
HDZGOGGLE.img
HDZGOGGLE_RX.BIN
HDZGOGGLE_VA.BIN
Flashing Firmware to a HDZero VTX
The HDZero goggle can flash firmware to a HDZero video transmitter via its FW port. Here are the steps:
To flash a single VTX:
1. Copy HDZERO_TX.bin to root directory of a SD card that is formatted as FAT32
2. Power on the goggle
3. Connect the VTX and HDZero goggle with the included programming cable
4. Go to Main menu | About | Flash VTX, the display will show the status of the flashing process
5. Disconnect the VTX
6. This VTX is now flashed with the latest firmware
To flash multiple VTXes of the same type:
1. Copy HDZERO_TX.bin to root directory of a SD card that is formatted as FAT32
2. Power on the goggle
3. Connect one VTX to the HDZero goggle with the included programming cable
4. Go to Main menu | About | Flash VTX, the display will show the status,
5. Disconnect the VTX, this VTX is flashed
6. Repeat 3-5 for the other VTXes
Note: HDZERO_TX.bin will *not* be removed from SD card after programming so that you can flash
multiple quads without copying file to SD card.
Flashing Firmware to the Goggle
The HDZero runs on Linux. Its firmware contains the customized Linux distribution and its application
software. We only need to update the application instead of updating the whole OS and application in
most cases. However, there are some rare cases where the OS could become corrupted, such as losing
power during update process. It is also possible that changes may have to be made to the OS in the
future to add new functionality.
The HDZero goggle firmware consists of:
-HDZGOGGLE_xx_yy_zzz.zip. This is the application firmware. You should only need this in most
cases.
-GoggleEmergency_Revddmmyyyy.zip. This is the complete package including OS and application
software for emergency recovery only.

14
Normal Goggle Firmware Update Process
1. Disconnect all cables from the goggle. Keep the power cable only;
2. Copy HDZGOGGLE_xx.yy.zzz.bin to root directory of a SD card that is formatted as FAT32, and
make sure there is no previous firmware in the root directory;
3. Power on the goggle;
4. Go to Main menu | About | Flash Goggle, the display will show the status;
5. Wait for the completion (about 3 minutes);
6. Power the goggle off and then on again
Goggle Emergency Firmware Update Process
You need to download PhoenixCard.zip from the HDZero Download site, and extract it to a location on a
Windows machine, for example, C:\PhoenixCard. This is a one-time process. There is no Mac or Linux
version for now.
You need to download GoggleEmergency_Revddmmyyyy.zip zip from the HDZero Download site, and
extract to your local drive, i.e. C:\Tmp.
1. Launch C:\PhoenixCard\PhoenixCard.exe;
2. Follow the steps on FIG.5 to make a bootable SD card;
FIG 5. Make a bootable SD Card
3. Eject the SD card from Windows, and insert the SD card into the SD card slot of the goggle;
4. Unplug all of the cables, i.e., HDMI in/out, Line in/out, AV in. Keep the power cable only. Power
on the goggle, you will hear a long beep immediately. Wait for 3 minutes and you will hear
another long beep;
5. Power off the goggle, and pull out the SD card from the goggle. (Do not power on goggle now);
6. Follow the FIG.6 to restore the SD Card from BOOT mode, and format it as FAT32 on Windows;

15
FIG 6. Restore a SD Card
7. Copy HDZGOGGLE_RX.bin and HDZGOGGLE_VA.bin to the SD card;
8. Insert SD card into goggle, power on the goggle, wait for 2 minutes, and there will be a long
beep;
9. (Optional) Pull out the SD card, and check SD card contents on the PC. The 2 files should be
removed if flash process is successful;
10. Power the goggle off and then on again.
Note. A bootable SD card has a hidden partition that Windows Explorer will not show. And it can’t be
removed even SD card is formatted with Windows Explorer. It means the goggle will flash itself from the
bootable SD card unexpectedly and mess up goggle firmware if a bootable SD card is inserted when the
goggle is powered on.
Step (6) must be followed strictly to get rid of the hidden bootable partition. Otherwise, it will brick the
goggle when goggle is powered with this SD card inserted. If this happens, you will need to repeat the
emergency firmware update process described in this section.

17
Warranty
The HDZero Goggle can be exchanged for a new unit within 7 days for any manufacturing defects if
returned in new condition. The optic module will be warrantied for repair for 6 months, and all other
components, for 2 years, if there are no signs of excessive use. Buyer will be responsible for shipping
costs. If beyond the warranty period, we will provide repair services for a cost. For assistance with
Other manuals for HDZero
2
This manual suits for next models
1
Table of contents