Divine DL-1040 DLX User manual

© June, 2011 | Divine Hot Tubs™ Deluxe | spa manual, US/Canada, Divine Hot Tubs Deluxe 2-1-13
P.O. Box 2140 | Woodinville, WA 98072 | www.divinehottubsdeluxe.com
live better | feel better
DELUXE
Divine Hot Tubs™ Deluxe
SPA MANUAL
Deluxe Series

2
“We reserve the right to improve our product without notice”
Copyright © 1/1/11 Divine Hot Tubs
™
Deluxe (A division of Hydra Plastics, Inc.). All
rights reserved. Specications may change without notice. International products
may be congured dierently to meet local electrical requirements.

3
TABLE OF CONTENTS
5 INTRODUCTION
5 ICON Key
6 IMPORTANT SAFETY INSTRUCTIONS
6 Read and Follow All Instructions
8 STEPS FOR A SUCCESSFUL INSTALLATION
8 Delivery
9 Site Selection and Preparation
9 Installation – Placing Your Spa
11 Electrical Hook-Up Requirements
13 Filling Your Spa
14 TOPSIDE CONTROL - TURNING ON YOUR SPA
14 Topside Control Button Reference Display
19 WATER PURITY & FILTRATION
19 Keeping The Water Clean
20 Spa Chemistry 101
22 How To Use the Chemicals
22 Usage Denitions
23 Starting A Chemical Maintenance Program
25 Filtration
25 Ozone Generator
26 JETS
26 Types Of Jets
27 Jet, Air & Water Controls
27 Cleaning The Rotating Jets
27 Jet Removal

4
28 MAINTENANCE
28 Pillows
28 Spa Skirt
28 The Shell
28 Spa Cover
29 Winterizing
30 Draining The Spa
31 Energy Eciency
32 APPENDIX A
32 Troubleshooting
32 System Trouble
32 Controls
33 Pumps
33 Jets
33 Water
35 Frequently Asked Questions
36 Warranty

5
INTRODUCTION
Congratulations on your purchase of a new Divine Hot Tubs
™
Deluxe spa! Your spa is designed and manufactured with the
nest components available and is engineered with comfort,
low maintenance, and durability in mind.
You will enjoy your spa for many years to come if you are diligent
with the care and maintenance of your spa. This manual will
help you to determine the best way to take care of your spa
based on the amount of use and the type of environment your
spa is installed.
It is very important for you to read the entire manual before
attempting to use your spa. Contained in this manual are im-
portant
maintenance and start-up procedures as well as safety
precautions that must be followed to ensure the prolonged life
of your spa and the safety of the people using the spa. Failure
to follow start-up procedures may damage your unit and void
your warranty.
Please feel free to contact Divine Hot Tubs™ Deluxe if you have
any further
questions after reading this manual. We hope you
enjoy many years of fun and relaxation in your new Divine Hot
Tubs
™
Deluxe spa.
ICON Key
The Icon key on the side of this page denes the type of information
boxes that will appear throughout the manual. The boxes high-
light helpful information that contains useful tips or warnings
that apply to the use and care of your spa.
Warning!
Safety Tip
Key Point
ICON KEY

6
Safety
Warning!
SAFETY FIRST
IMPORTANT SAFETY INSTRUCTIONS!
READ AND FOLLOW ALL INSTRUCTIONS.
SAVE THESE INSTRUCTIONS.
When installing and using this electrical equipment it is recom-
mended that a licensed and bonded electrician perform the work.
Basic safety precautions should always be followed, including the
following:
• A pressure wire connector is provided on the outside of
the control box to permit the connection of a solid copper
bonding wire between the spa and any metal equipment,
metal enclosures of electrical equipment, metal water
pipe or conduit within 5 feet of the spa as needed to
comply with local requirements.
• A green colored terminal (or a wire connector marked
“G”, “GR”, “Ground”, or “Grounding”) is provided. To reduce
the risk of electric shock, connect this terminal to the
grounding terminal of your electric service or supply
panel with a continuous green insulated copper wire
equivalent to the circuit conductor supplying this
equipment.
• The electrical supply must include a suitably rated
Ground Fault Interrupter Circuit to open all underground
supply conductors to comply with section 422-20 of the
National Electrical Code. ANSI/NFPA 70-1987. The power
supply cut o must be readily accessible to the spa
occupant, but installed at least 5 feet from spa water.
• Test the performance of the GFCI according to manufac-
turers recommendations. If the GFCI does not perform
correctly, there may be a ground current owing indicating
the possibility of electric shock. Disconnect the power
until the fault has been identied and corrected.
• DANGER –RISK OF ELECTRIC SHOCK. Install at least 5
feet from all metal surfaces.
• DANGER – RISK OF ELECTRIC SHOCK. Do not permit any
electric appliance such as a light, telephone, radio or
television within 5 feet of a spa or hot tub.
• WARNING –RISK OF CHILD DROWNING. Extreme caution
must be exercised to prevent unauthorized access by
children. To avoid accidents, ensure that children cannot
use a spa or hot tub unless they are supervised at all times.
Electrical
Warning!
Electrical
Warning!

7
• DANGER – To reduce risk of injury, do not remove suction
ttings.
• Installation should provide drainage of the electrical equipment
area to prevent electrical shortage.
• Store all chemicals in a cool dry area and keep out of children’s
reach.
• To reduce the risk of injury:
A. Spa heat can cause hyperthermia and unconsciousness! The
water in a spa or hot tub should never exceed 104° F (40° C).
Water temperatures between 100° F (38° C) and 104° F (40° C)
are considered safe for a healthy adult. Lower water tem-
peratures are recommended for extended use (exceeding
10 –15 minutes) and for young children.
B. Since excessive water temperatures have a high potential for
causing fetal damage during the early months of pregnancy,
pregnant or possibly pregnant women should limit water
temperatures to 100° F (38° C) and consult their physician.
• The use of alcohol, drugs, or medication before or during spa or
hot tub use may lead to unconsciousness with the possibility of
drowning.
•
Persons suering from obesity or with a medical history of heart
disease, low or high blood pressure, circulatory system problems
or diabetes should consult a physician before using a spa or hot tub.
• Persons using medication should consult a physician before
using a spa or hot tub since some medication may induce
drowsiness while other medication may aect heart rate, blood
pressure, and circulation.
• Before entering a spa, the user should measure the water
temperature since the tolerance of water temperature-
regulating devices varies.
WARNING
PREVENT DROWNING
1. SUPERVISE CHILDREN AT ALL TIMES.
2. ATTACH SPA COVER AFTER EACH USE.
3. SPA HEAT CAN CAUSE HYPERTHERMIA AND
UNCONSCIOUSNESS.
4. SPA HEAT IN CONJUNCTION WITH ALCOHOL,
DRUGS, OR MEDICATION CAN CAUSE
UNCONSCIOUSNESS.
PREVENT ELECTROCUTION
1. NEVER PLACE ANY ELECTRIC APPLIANCE
WITHIN 5 FEET OF SPA.
NOTE: THIS MARKING IS TO BE REMOVED ONLY BY THE CUSTOMER.
!
r
Safety
Warning!

8
STEPS FOR A SUCCESSFUL INSTALLATION:
1. DELIVERY
Your Deluxe Series hot tub will be delivered to the curbside of your home.
You will need to arrange to have your hot tub placed in your desired location
and the connection of the electrical circuits. In most cities, permits are
required for the installation of electrical circuits.
When your hot tub delivery company calls to set up a
delivery appointment, you may choose to make ar-
rangements with them to place your hot tub for an
additional fee. If that is not a service they can pro-
vide, we recommend consulting professionals who
have experience moving large items.
Review the path that your hot tub will take through
your property along with the size of the hot tub to
ensure you have enough clearance. Refer to the
chart below for the height, width and depth of a
packaged hot tub on a pallet. If there are stairs or
other obstacles, the spa will have to travel over to get
to the site, additional clearances may be required. Use the supplied measure-
ments to help you determine the best location for your new spa.
Hot Tub Size of Hot Tub Only
(Width, Length, Height)
Size of Hot Tub on Pallet
(Width, Length, Height)
DL-1040 DLX 38" x 92.5" x 92.5"
(96.5 x 235 x 235 cm)
43.5" x 95" x 98"
(110 x 241 x 249 cm)
DL-420 DLX 35" x 76" x 84"
(89 x 193 x 198 cm)
38" x 87" x 82"
(97 x 221 x 208 cm)
We have listed some key points to installing your spa that will help eliminate
some of the unforeseeable situations that could occur.
• Avoid installing too close to a building or structure.
• Leave enough room around all sides to allow access to
service panels.
• Install on a load bearing, level platform.
• Do not install less than 5 feet from ground conductors.
• Use non-conductive conduit for all wiring.
• If installing below a deck surface, leave enough room
to access and remove service panels.
We recommend a level 4” thick concrete pad if you are installing on land (ver-
sus deck or platform). The dimensions of the pad should be at least the out-
side dimension of the spa. You should also accomodate for steps or other
items around the spa. Allow a few days for curing the cement when calculat-
ing your scheduled delivery date.
Balconies and upper decks are not recommended for spa installations, but if
you choose to do so, keep in mind that a large lled spa with 6 people can

9
weigh as much as three tons. Balconies and decks must be constructed to
current state and local building codes and must support at least 100 pounds
per square foot.
If you are building a deck around the spa, be sure that the deck does not cover
any of the service panels to the spa. If you are building stairs for getting up to
the spa, it is recommended that they be installed in such a way that they can
be moved out of the way if entrance to the service panels is required.
The most obvious thing to remember is to plan your installation in a loca-
tion where it will be easy to move from the delivery truck to the location site.
Spas are typically transported on a mover’s dolly lying on their side. Check for
adequate gate clearance and remove any fence panels if necessary to allow
access to the installation site.
2. SITE SELECTION AND PREPARATION
The location of your hot tub is entirely up
to you. Carefully read these instructions
for various ideas of locations that your
new hot tub may be placed.
By the time you have made your hot
tub purchase, you probably have a spot
already picked out. Prior to the hot tub
delivery, please verify the following:
• Always place the hot tub on a compacted and level surface. The best surface
is a level concrete pad. A hot tub, full of water, can weigh a great deal. Please
ensure the spot can support the weight.
• Make sure to level your spa before lling it.
• Locate the equipment panel. The system pack, drain valve, owner’s manual
and optional ozone generator are usually located all in the same area.
Be sure that the connections are tightened during draining. Water inside
the system pack will cause the pack to fail and the breaker to trip.
• The panels, on all four sides, are removable. Be sure to have access on all
four sides.
• Be sure to have easy access to the circuit breaker in the sub panel (240 volt
models).
• Never let water into the sub panel (240 volt models),
or into the electrical
outlet that your spa is plugged in to. Your 240 volt hot tub’s sub panel is
rain tight when installed correctly with the door closed.
3. INSTALLATION PLACING YOUR SPA
Outdoor and patio installation
To position the spa correctly in your backyard is very important. The reason
is your hot tub’s warranty. The warranty on a spa is voided if the site is not
level. If you install your hot tub outdoors, a concrete pad is the best method
for a stable and level surface. The concrete pad should be four inches thick.
All Divine Hot Tubs Deluxe hot tubs may be installed on a deck, providing the
load rating can handle a full spa with people in it.

10
Deck installation
When placing the hot tub on a deck, please
ensure the maximum load capacity of the
deck. Consult a qualied deck builder or
structural engineer before you place the hot
tub on an elevated deck or indoors. To de-
termine the weight of your hot tub, please
refer to the specications on the website.
This weight must not exceed the structural weight of the deck.
Indoor installation
When installing a hot tub indoors, there are some special considerations. The
combination of heat and moisture will accumulate on the oor and surround-
ing the hot tub. The ooring material needs to provide a grip when wet. The
location also needs proper drainage to prevent water build-up around the hot
tub. When building a room for your hot tub, it is best to have a oor drain
installed. The humidity of a room with a spa can become a problem if there is
not enough proper ventilation. Otherwise, problems such as dry rot, mildew
or other problems may occur.
Ground preparation
Your hot tub has been engineered to rest on a variety of surfaces. The insu-
lated hot tub oor base gives you the ability to nd the perfect place. A con-
crete slab is the best for long term. There are other options available as long
as the surface is level prior to delivery. The alternatives are 5/8 minus crushed
packed rock, or a deck that is rated for the load.
Brick pavers
Cement
Decorative cement, stained
Packed/crushed gravel: 5/8” minus
Stone, slate, granite
Decking: wood, synthetic
Decorative cement & bricks
Marble, travertine
When placing a tub on
crushed rock, the easiest
way to maintain its form is
to build a frame and ll it
with the crushed packed
rock. Remember, if the
spa is placed on grass or
dirt, debris will get inside
the spa as the users enter
and exit.
It is incredibly important
to the operation and
draining of the tub that it
is level once it is installed.
Failure to have the spa
level prior to adding water
can aect the warranty.

11
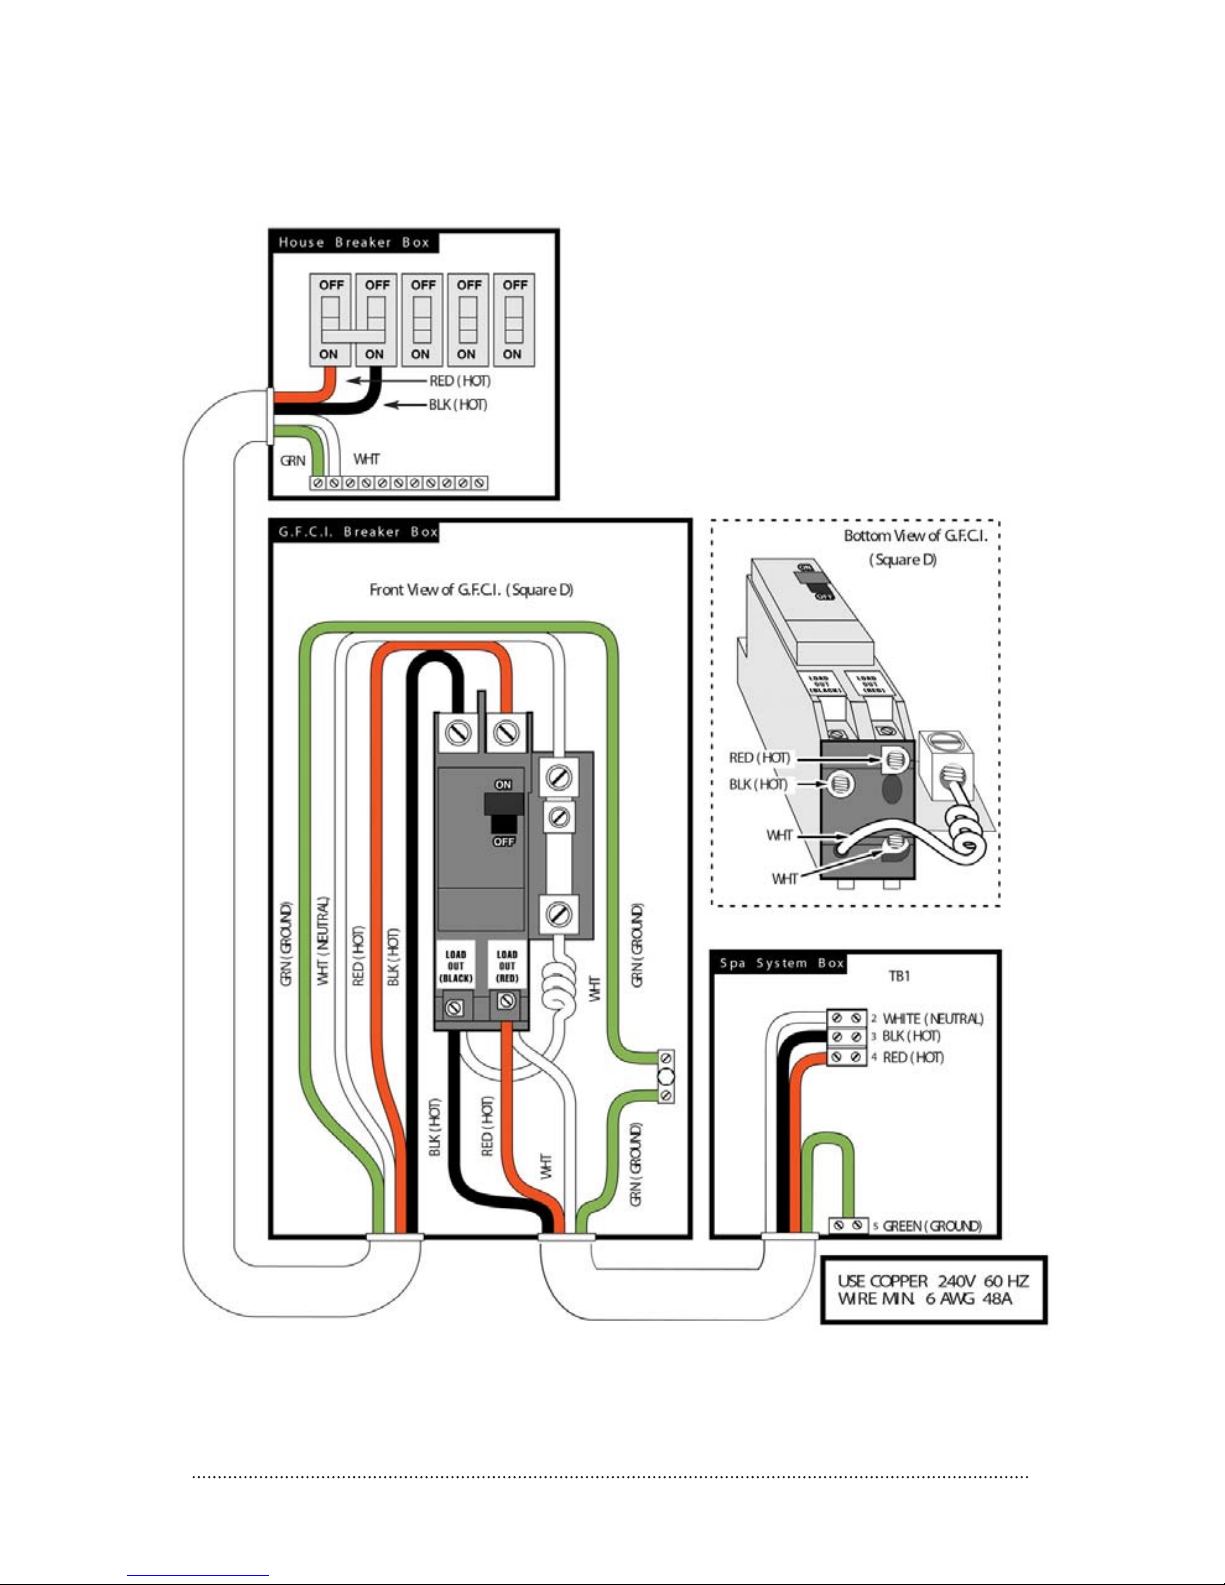
4. ELECTRICAL HOOKUP
REQUIREMENTS 240V
Removing spa panels
1. Remove the plastic
‘tap-cap’ decorative
screw head covers from
screws on access spa
panel.
2. Unscrew the screws
from the access spa
panel.
3. Remove the spa panel
for access to spa com-
ponents. Reverse these
steps to re-attach the
spa panel.
Electrical connections by licensed personnel
To ensure you will have an opportunity to use your hot tub soon after
delivery, it is very important that the required electrical service has
been installed.
IMPORTANT: Electrical connections must be made by qualied,
licensed personnel. Please contact a licensed residential electri-
cian for these services.
All models require a 50 amp single phase, 240 volt circuit breaker in
the main electrical service panel. NOTE: WE RECOMMEND THAT A
SUB PANEL BE USED TO SUPPLY POWER AND PROTECT THE HOT
TUB. All 240 volt Divine Hot Tubs™ Deluxe spas must be wired in
accordance with applicable local electrical codes, and all electrical
work must be done by a licensed electrician. A licensed electrician
should install a four-wire electrical service (two line voltages, one
neutral, one ground) from the main electrical service panel to the
sub-panel, and from the sub-panel to the spa per the appropriate
wiring diagram as illustrated below. The grounding conductor must
be at least #6 AWG. Your electrician should mount the sub-panel in
the vicinity of the hot tub but it should not be closer than ve (5)
feet from the hot tub water edge (NEC 680-38 to 41-A-3).
WARNING: Removing or bypassing the GFCI breakers in the sub pan-
el at any time will result in an unsafe spa and will void the warranty.
WIRE SPECIFICATION NOTE: Long electrical runs may require a larg-
er gauge feed wire than stated. We recommend that a maximum
voltage drop of 3% be used when calculating the larger wire size.
Refer to the Wiring Diagrams (gure 1-1) for the electrical require-
ments of the 240 volt models.
Do not turn on power to the spa when the tub is not lled.
The closer you
locate the spa
to the main
service panel,
the less money
you will have to
spend on wire.
Wire can become
expensive if you
run long lengths.
Always shut o
power at the
source when
working with any
electrical power!!
Failure to do this
could result in
serious injury or
even death!
12
ELECTRICAL REQUIREMENTS 240V (cont.)
IMPORTANT: Electrical connections must be made by qualied, licensed personnel.
Please contact a licensed residential electrician for these services.
Figure 1-1
240 volt wiring conguration from the house to the spa

13
5. FILLING YOUR SPA THROUGH
THE FILTER CHAMBER
Before you begin to ll your spa, it is advisable to have your water tested
for hardness (water rich in calcium and mineral content). Wells usually
contain harder water than urban water supplies. Mineral and metal im-
balances in your water can shorten the life of the equipment in your spa.
Contact your local utility/water provider for proper water analysis.
We recommend that you purchase a high quality “Water Test Kit” for checking
pH and sanitizer levels. Test the water daily until your “user load” is deter-
mined.
Make sure there is no dirt or sediment at the bottom of the tub and that
there is nothing inside the lter compartment before lling with water.
Filling the spa through the lter housing will help to prevent air locks
(trapped pockets of air) in pumps on start up.
1. Place your garden
hose into the lter
housing. This will ensure
that air bubbles are
removed from the lines
while you ll the spa.
2. Turn the water on so
that most of the water
enters through the lter
chamber.
3. Fill the water to the
proper level – half way
up the lter housing as
shown in picture above.
IMPORTANT!
Improperly
balanced
water may
damage your
spa and void
your warranty!
IMPORTANT!
Do not ll your
tub with water
from your hot
water heater!
14
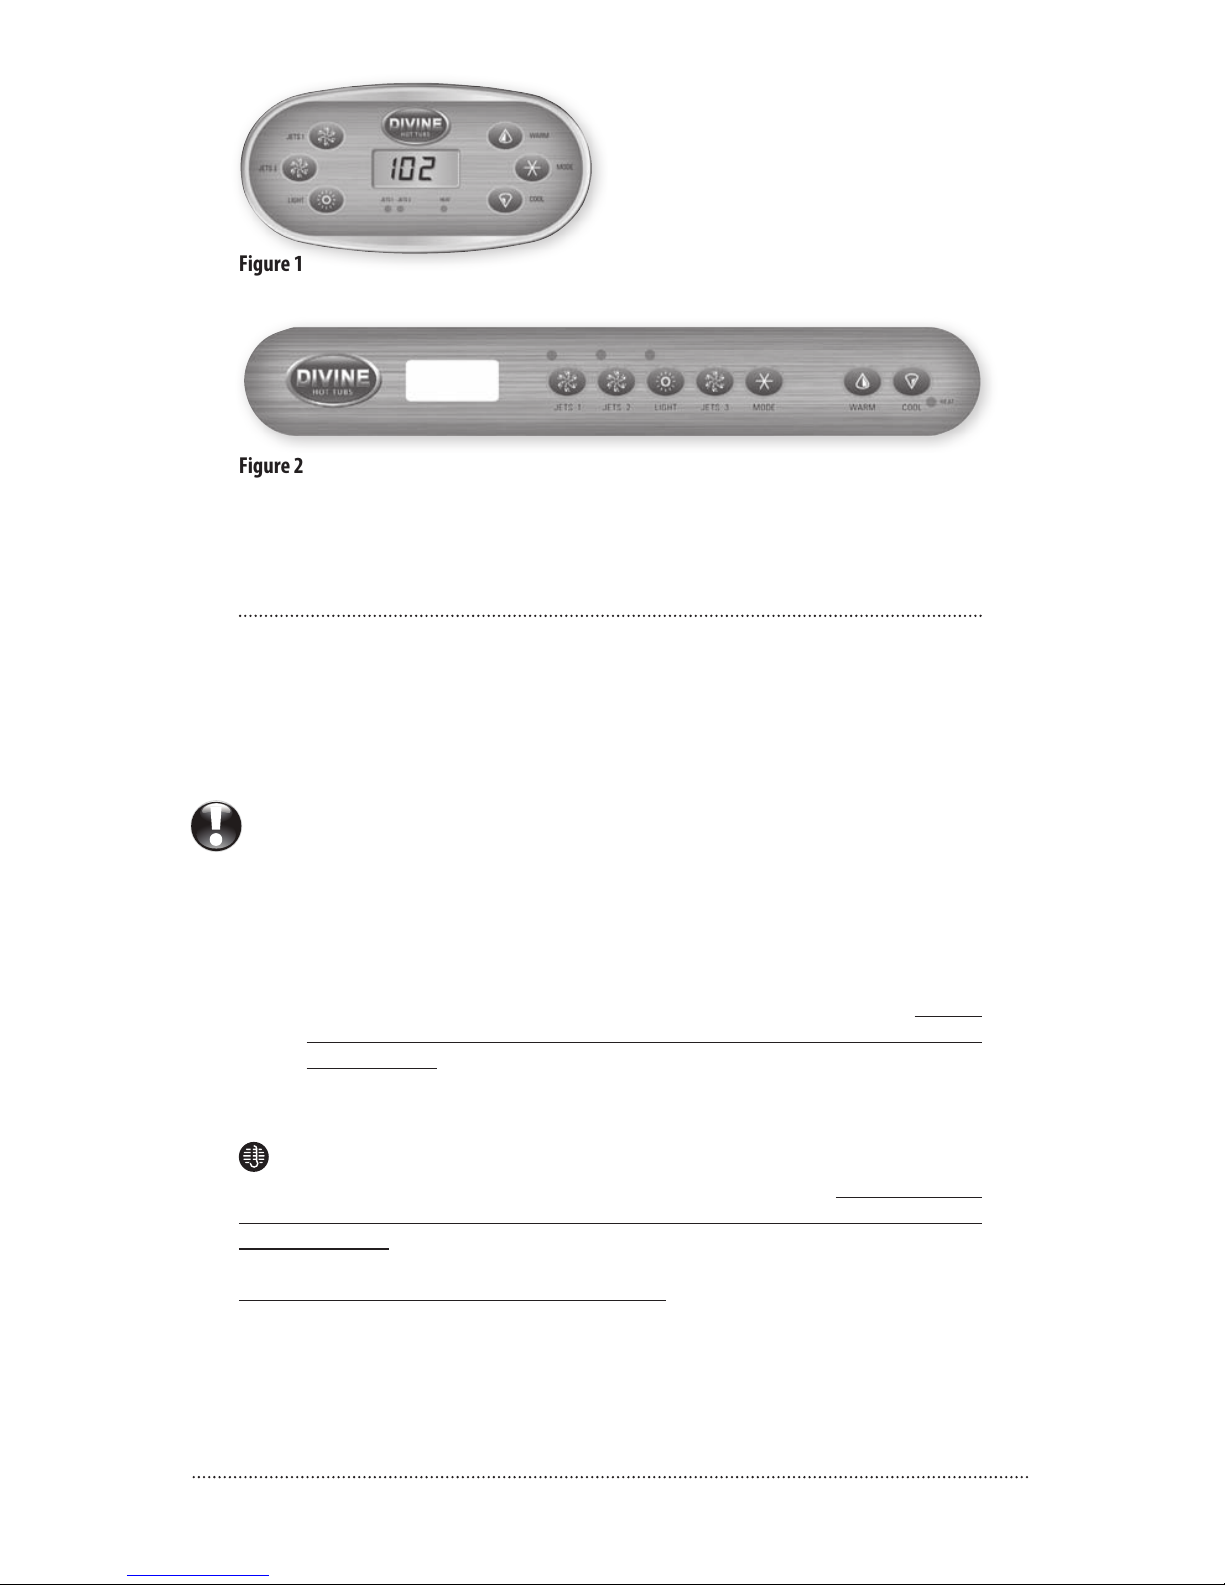
Figure 1
6-Button topside control panel
Figure 2
7-Button topside control panel
TOPSIDE CONTROL TURNING ON YOUR SPA
Topside control button reference display
Identify your topside 6-button control (gure 1) or 7-button control (gure 2).
After you identied your topside control system, and the spa is lled, turn your
power on and go to your controller spa operations.
Power on
It’s time to turn on the power. Set the breaker at the main service panel
to the on position. Now set the breaker at the service panel or spa dis-
connect outside the spa to the on position. Then proceed to Initial
Start-up referencing your specic control system.
Initial start-up
Your spa will enter Priming Mode (‘PR’) when it is energized. During
Priming Mode, press “Jets” button(s) repeatedly and be sure all pumps
are free of air. Priming Mode lasts less than 5 minutes. Press “Warm” or
“Cool” to exit sooner. After Priming Mode, the spa will run in Standard
Mode (see Mode section).
Temp control (80°F-104°F/26°C-40°C)
The last measured water temperature is constantly displayed. The water tem-
perature displayed is current only when the pump has been running for at
least 2 minutes.
On panels with “Warm” and “Cool” buttons, to display the set temperature,
press “Warm” or “Cool” once. To change the set temperature, press a tempera-
IMPORTANT!
Do not turn
power on until
tub is full of
water and all
valves are open!

15
ture button again before the display stops ashing. Each press of “Warm” or
“Cool” will adjust the set temperature. After three seconds, the display will
stop ashing and begin to display the current spa temperature.
Jets 1
Press “Jets 1” to turn pump 1 on or o. The device will turn o after 15 minutes.
Jets 2
Press the “Jets 2” to turn pump 2 on or o. The device will turn o after 15
minutes.
Jets 3 (7-button topside control panel)
Press the “Jets 3” to turn pump 3 on or o. The device will turn o after 15
minutes.
Light
Press “Light” to operate the spa light. Turns o after 4 hours.
Mode
Mode is changed by pressing “Warm” or “Cool,” then pressing “Mode.”
Standard Mode maintains set temperature. ‘STD’ (Std) will be displayed
momentarily
when you switch into Standard Mode.
Economy Mode heats the spa to the set temperature only during lter cycles.
‘Ecn’ (Ecn) will display when water temp is not current, and will alternate with
water temp when the pump is running.
Sleep Mode heats the spa to within 20°F/10°C of the set temperature only
during lter cycles. ‘SLP’ (SLP) will display when water temp is not current, and
will alternate with water temp when the pump is running.
Preset lter cycles
The rst preset lter cycle begins 6 minutes after the spa is energized. The
second preset lter cycle begins 12 hours later. Filter duration is programmable
for 2, 4, 6, or 8 hours or for continuous ltration (indicated by ‘F ILC’). The
default lter time is 2 hours. To program, press “Warm” or “Cool” then “Jets 1.”
Press “Warm” or “Cool” to adjust. Press “Jets 1” to exit programming.
PLEASE NOTE: For circulation systems, the circ pump and the ozone genera-
tor (if installed) run 24 hours. In hot environments, the circ pump may turn
o if the spa water is 3˚F higher than the set temperature, except during lter
cycles. At the beginning of each lter cycle all other equipment will run briey
to purge the plumbing.
16
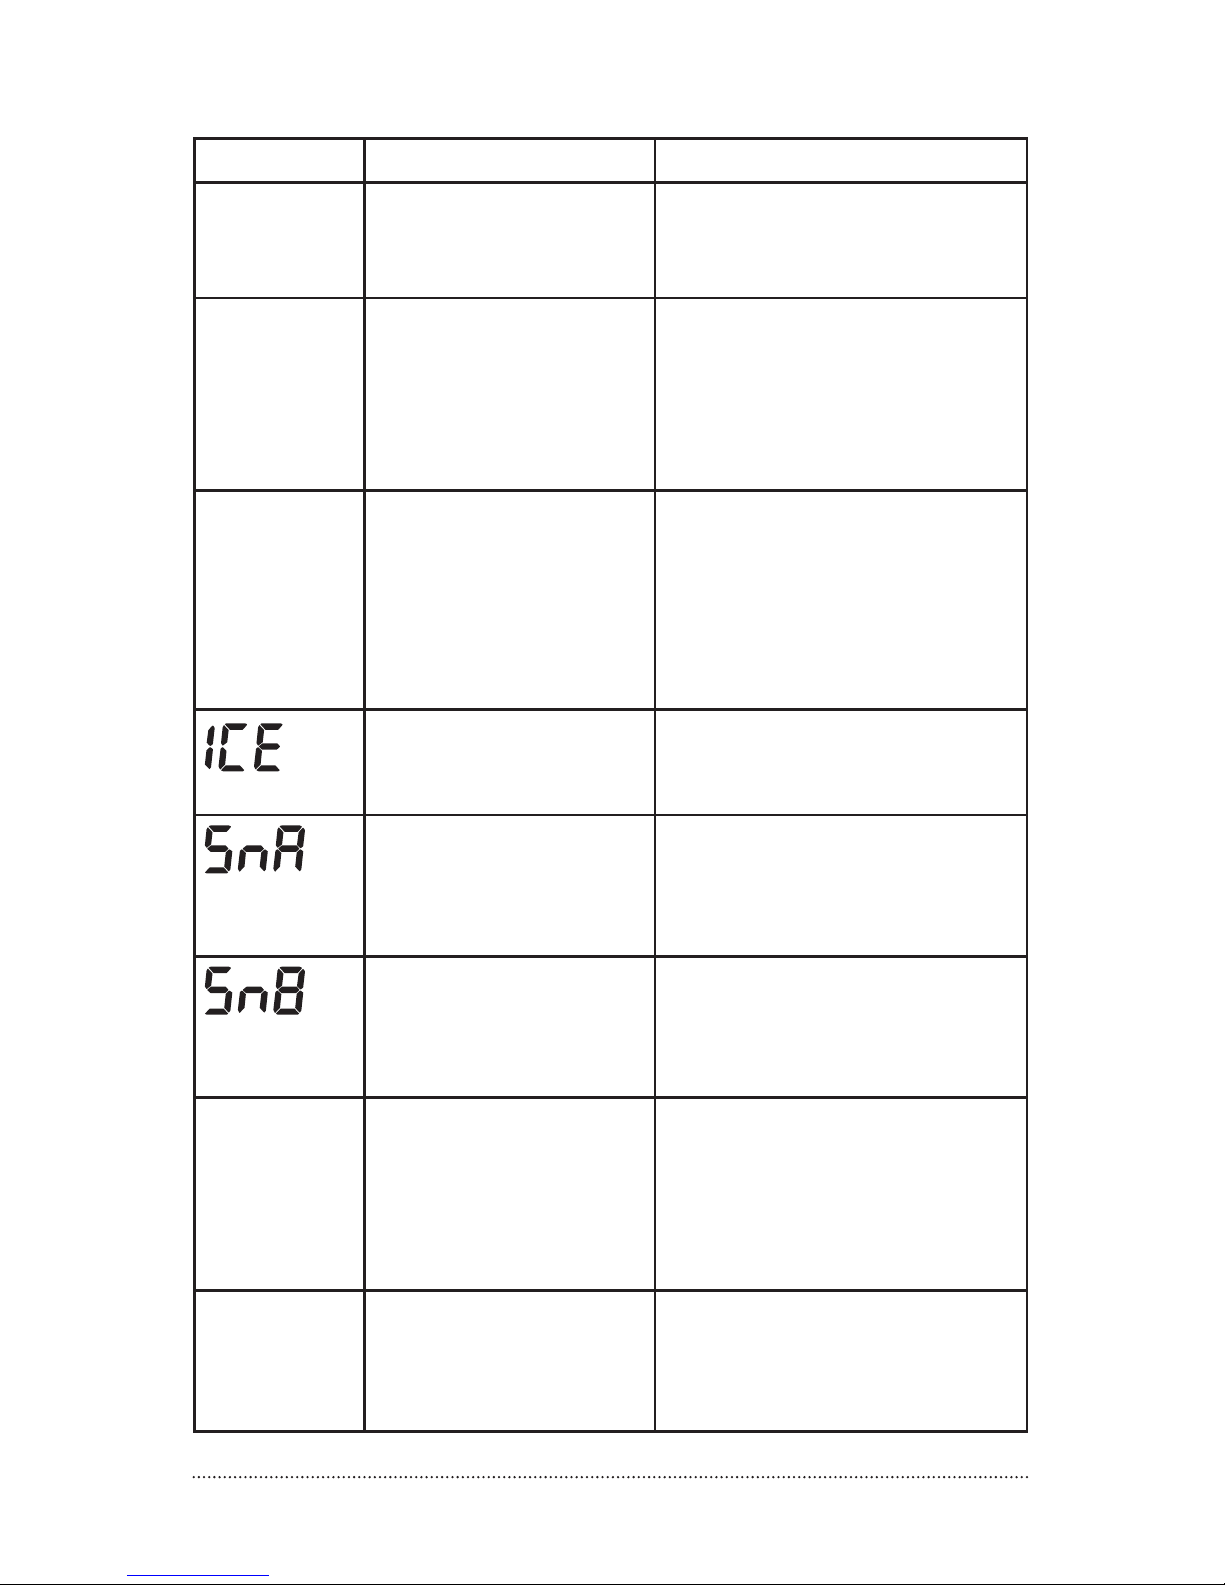
Diagnostic messages
MESSAGE MEANING ACTION REQUIRED
No message on display.
Power has been cut o to
the spa.
The control panel will be
disabled until power returns.
Settings are preserved until the
next power-up.
0XX
(OHH)
“Overheat” - The spa has
shut down. One of the
sensors has detected 118°F
(approximately 47.8°C) at
the heater.
Remove the spa cover and
allow water to cool. Once the
heater has cooled, reset by
pushing any button. If spa does
not reset, shut o the power to
the spa and contact customer
service for assistance.
0XS
(OHS)
“Overheat” - The spa has
shut down. One of the sen-
sors has detected that the
spa water is 110°F (approxi-
mately 43.3°C).
DO NOT ENTER THE WATER.
Remove the spa cover and
allow water to cool. At 107°F
(approximately 41.7°C), the spa
should automatically reset. If
spa does not reset, shut o the
power to the spa and contact
customer service for assistance.
(ICE)
“Ice” - Potential freeze
condition detected.
No action required. The pumps will
automatically activate regardless of
spa status.
(SnA)
Spa is shut down. The
sensor that is plugged into
the Sensor “A” jack is not
working.
If the problem persists, contact
customer service for assistance..
(May appear temporarily in an
overheat situation and disappear
when the heater cools.)
(SnB)
Spa is shut down. The
sensor that is plugged into
the Sensor “B” jack is not
working.
If the problem persists, contact
customer service for assistance.
(May appear temporarily in an
overheat situation and disappear
when the heater cools.)
SnS
(SnS)
Sensors are out of balance.
If this is alternating with the
temperature, it may just be
a temporary condition. If the
display shows only this mes-
sage (periodically blinking),
the spa is shut down.
If the problem persists, contact
customer service for assistance.
XFL
(HFL)
A substantial dierence
between the temperature
sensors was detected.
This could indicate a ow
problem.
Check water level in spa. Rell if neces-
sary. If the water level is okay make
sure the pumps have been primed.
If the problem persists, contact cus-
tomer service for assistance.

17
MESSAGE MEANING ACTION REQUIRED
LF
(LF)
Persistent low ow
problems. (Displays on
the fth occurrence of
“HFL” message within 24
hours.) Heater is shut down,
but other spa functions
continue to run normally.
Follow action required for “HFL”
message. Heating capacity of the
spa will not reset automatically; you
may press any button to reset.
If the problem persists, contact
customer service for assistance.
dr
(dr)
Inadequate water ow
detected in the heater
(indicates not enough
water in the heater).
Check water level in spa. Rell if
necessary. If the water level is okay
make sure the pumps have been
primed. Press any button to reset.
0rY
(DrY)
Inadequate water detected
in heater. (Displays on third
occurrence of “dr” message.)
Spa is shut down.
Follow action required for “dr”
message. Spa will not automatically
reset; you may press any button to
reset.
PR
(Pr)
When your spa is rst
actuated it will go into
Priming mode.
The Priming mode will last for up
to 4 minutes and then the spa will
begin to heat and maintain the
water temperature in the Standard
mode.
-- Temperature not yet
known.
This is normal within the rst few
minutes of the spa power-up.
STD
(Std)
The spa is operating in
Standard Mode.
Press “Warm” or “Cool” then press
“Mode”
Ecn
(Ecn)
The spa is operating in
Economy Mode.
Press “Warm” or “Cool” then press
“Mode”
SLP
(SLP)
Sleep Mode has been
activated by pressing a
button combination on
the user panel.
Press “Warm” or “Cool” then press
“Mode”
Warning! Shock Hazard! No User Serviceable Parts. Do not attempt service of this control system. Follow all owner’s
manual power connection instructions. Installation must be performed by a licensed electrician and all grounding
connections must be properly installed. Contact customer service or for assistance.

18
energy efficient spas
engineered with
technology
SAVE ENERGY | SAVE MONEY | SAVE OUR PLANET

19
WATER PURITY & FILTRATION
Keeping the water clean – chemical sanitizers
One of the bigger reasons that people require service on their spa is because
they haven’t followed a chemical application regiment. Water can accumulate
impurities that worsen the performance or even damage the ltration system
if
chemicals are not applied on a regular basis. The water can even become
un-
healthy if chemicals are not used to sanitize. Improper pH levels or calcium
levels can cause either corrosion of parts or scale build-up.
We recommend that you begin a routine of applying chemicals that
you can get comfortable with and follow all the time. If you get into
a scheduled regiment, it will be easier to remember when to apply
the chemicals.
Your spa comes with an ozonator that will do a very good job at kill-
ing bacteria and oxygenating the water, but chlorine or bromine are
used to compliment the job of the ozonator.
Finally, the best way to keep the water clean over long periods of
time is to change the water four times a year. Connect a hose to the
drain valve and open it all the way to allow the tub to drain all the
way. Use a shop-vac to remove any standing water and debris at the bottom
of the tub. Refer to the maintenance section for instructions on cleaning the
tub before relling it.
IMPORTANT!
Always read
directions on
chemical
container
thoroughly
before
using spa
chemicals.

20
Spa Chemistry 101
At rst, trying to understand spa chemistry can seem like a daunt-
ing task to say the least. We intend on helping you understand spa
chemicals so that you can maintain the health of your spa at the best
level possible.
There are three basic principals to spa water chemistry.
1. Sanitize/Disinfect (kill viruses, germs, etc.)
2. Oxidize (break down organic compounds like oils and sweat)
3. Maintain slightly base (alkaline) water (pH of 7.4 - 7.6). This
controls the corrosiveness of the water, prevents excessive
scaling (mineral formation on surfaces exposed to water, and
insures that the water is comfortable to the skin.
Once you have a good understanding of the chemicals that are used in
your spa, you will be able to maintain proper water balance. Water bal-
ance is reached when all elements (pH, total alkalinity, calcium hardness
and total dissolved solids) are within their proper ranges.
The following denitions for chemicals will help you understand what
the chemical is and what it is used for:
Sanitizers
CHLORINE - Chlorine is widely used as a sanitizer or disinfectant in pool
and spa water to kill bacteria, viruses and algae, and oxidizes ammonia
and nitrogen compounds such as swimmer waste. Its formal name is
Sodium
Dichlor and is referred to as a chlorinated concentrate. Sodium
Dichlor is a fast-dissolving, granular, stabilized organic chlorine com-
pound
providing either 56% or 63% available chlorine. Cyanuric acid
and/or stabilizers are added to prevent U.V. light destruction of the chlorine
by the sun.
Chlorinated concentrate produces chlorides and chloramines, which are
formed when chlorine has combined with ammonia and nitrogen in pool
and spa water. Chloramines exude a foul, “chlorine” odor and causes skin
and eye irritation.
BROMINE – Bromine is the other commonly used sanitizer or disinfec-
tant in pool and spa water to kill bacteria and algae, and oxidizes am-
monia and nitrogen compounds such as swimmer waste. This chemical
does not eliminate swimmer waste unless it is combined with an oxidizer
(non-chlorine shock). It is very susceptible to direct sunlight, therefore is
not ecient in outdoor pools. Bromine is sometimes used as an alterna-
tive for people whom are allergic or sensitive to chlorine products.
Bromine products are available as sodium bromide and bromine tablets.
The bromide ion has no eective disinfectant or sanitizing capabilities
without the use of nonchlorine shock (potassium monopersulfate). Po-
tassium monopersulfate is added to oxidize, or activate, bromide ion to
The pH scale
goes from
0 to 14, with
zero being
extremely
acidic and 14
being extremely
base (alkaline).
Seven is
considered
neutral pH.
This manual suits for next models
1
Table of contents
Other Divine Hot Tub manuals


