Diy Kyoto Wattson User manual


3
Congratulations on choosing wattson, your personal energy-saving device.
Wattson lets you monitor your electricity consumption, giving you the
motivation to use less.
With both numbers and colours, wattson shows you how much electricity
your home is using at any given moment. Wattson can also store up to 4
weeks of energy-use history which can be downloaded to your computer
and viewed using software available from our website.
www.diykyoto.com/holmes
For such an ingenious device, wattson is really easy to install and even
easier to use and the instructions are completely free of techno-babble.
We hope you’ll experience your wattson to the full and that you’ll find a
nice spot for it in your home.
Wattson itself is a very safe product but installing wattson could be
dangerous if done incorrectly. Extreme care must be taken when working
with electrical equipment as touching exposed electrical wires or
components may result in electrocution causing death.
Warning: Never pull on the electricity cables while fitting the clip,
watch out for any exposed wiring and if in any doubt consult a qualified
electrical installer for advice.
What does
wattson do?
Contents
What does wattson do? 3
What’s in the box? 4
How does wattson work? 6
Installing the sensor and transmitter 8
The wattson display unit 12
View your energy-use history 18
Troubleshooting 19
Safety guide 20
Looking after wattson 22
Warranty 23
DON’T FORGET
TO RECYCLE MY
PACKAGING

1 / Sensor clip
The sensor clip measures the amount of electricity coming into your home.
It only takes a minute or two to install and requires no expert skills or
tools. (For people with three-phase or sun/wind power systems, extra
sensors clips can be purchased from www.diykyoto.com).
2 / Transmitter
The transmitter takes the signal from the sensor clip, converts it
to a digital signal and sends it wirelessly across your home to
the wattson display.
3 / Wattson display unit
The wattson display unit receives data from the transmitter and shows
your total electricity usage at any given time in watts, £s, or colour
changing light.
4 / Transmitter batteries
We have included 4 AA alkaline batteries that will power the transmitter
for up to 6 months.
5 / Display charger
The charger supplies power to the wattson display as well as charging
its internal batteries.
6 / The USB lead
The USB lead connects your wattson to your Mac/PC so you can view
your energy-use history with our software. (Available for download at
www.diykyoto.com/holmes)
What’s in the box? 4 5
2
3
4
5
1 6
HERE
ARE
MY BITS

Wattson measures the total amount of electricity being used in your home
at any given time, and shows this value on an easy-to-read display.
A home’s electrical system is made up of several circuits, such as ring
mains, lighting circuit, cooker circuit etc. These circuits are all connected
together at the main electricity entry point to your home, through the
meter and the fusebox. This is where the sensor clip measures the
power entering your home.
The sensor clip is connected to the transmitter which sends the data
wirelessly to the wattson display. The display is portable, so can be
located anywhere in your home (up to 100 meters away through air, or
30 meters through walls).
The wattson display unit can be positioned anywhere you like in your
home 1, as long as it is within range of the transmitter 2. We think the
best place for it is somewhere in your living room, so you can watch
the pulsing coloured lights and keep an eye on your consumption.
Wattson works with any type of UK domestic electricity meter
(240V/415V, single or 3 phase).
How does
wattson work?
6 7
Kwh
2
1
PUT ME
ANYWHERE IN
YOUR HOME

Installing the sensor
and transmitter.
1 / Insert the batteries into the transmitter.
The transmitter takes 4 AA batteries. Make sure the end of the battery
marked +goes in the end of the tray marked +.
2 / Make sure the aerial on the transmitter is extended.
3 / Plug in the sensor lead.
There are 4 sockets on the transmitter. Plug the sensor lead into the
one marked
.
Warning: Do not connect to the socket marked which is reserved for
renewable energy systems.
4 / Attach the sensor clip.
The sensor clip can be attached to either of the 2 cables running from
the electricity meter to the fusebox. If your meter is a long way from your
fusebox (as you might find in a block of flats), connect the clip to the
cable where it enters the fusebox, so that the transmitter is as near as
possible to where you will be using the wattson display. Simply undo the
clip and fit it around the cable. Make sure the clip top is firm and secure
in the clip base.
Warning: The leads running from the meter to the fusebox must be
accessible for the sensor clip to be fitted - if they are not, please
consult a qualified electrician. Further information on www.diykyoto.com
5 / Place the transmitter.
The transmitter can go on the wall next to the meter (or fusebox), or
on a nearby shelf if there is one. If your meter is in a meter box, the
transmitter may work best if it’s outside of it. If the sensor lead does not
reach outside, it will work from inside the box but the range may not be
as good.
Warning: The transmitter must not be left hanging from its lead as this
puts strain on your wiring and may result in the transmitter coming loose
or falling. The transmitter must be protected from water and the elements
and must not be used outdoors - this will invalidate your warranty.
8 9
Kwh
2
3
4
5
1
HOW TO
GET UP AND
RUNNING

The button on the transmitter changes the rate at which the transmitter
sends new information to the wattson display unit (the update rate).
The update rate can be set to low, medium or high. The slower the rate,
the less often the information will change on your wattson display but the
longer your batteries will last. Using the low update rate could extend
the life of your batteries by up to 12 months. The light on the transmitter
will indicate the update rate by pulsing in time.
What is the transmitter button for?
The transmitter uses an AM radio module and can transmit up to 100
meters through air and up to 30 meters through walls, depending on
the structure of the building. The range will be shorter in buildings with
thicker walls.
How far does the signal go?
How much power does wattson use?
4-5 watts in modes 1, 2 and 3 and less than 1 watt in low power mode
(see page 14-15 for more information).
How is the wattson display powered?
Wattson has an internal battery pack that will provide power for
between 5 hours and several weeks depending on what mode it is
set to (see pages 14-15 for more information).
The power charger supplied will charge the batteries fully in 12 hours.
Alternatively it can be used as a permanently connected power supply.
Wattson can also be powered via it’s USB lead (though the batteries will
not be charged this way).
10 11
100m
30m
WHAT’S
GOING ON
INSIDE

The wattson
Wattson has been designed to be positoned on its feet 1,or on either
face 2.Through the magic of tilt technology the digits will always be
positioned the correct way up. A backward tilt changes between £s
and watts 3.
By tilting wattson the unit of measurement changes from watts to
‘£s per year’, and a £ sign will appear. This figure indicates how much
the electricity would cost if you left everything in the house exactly as
it is for a whole year. The figure is calculated using an average tariff
that is factory set (currently 13p/kwh). This can be easily updated with
the tarriff from your supplier via the wattson software.
Display options using tilt technology.
12 13
Once you have installed the transmitter and found a nice place for
wattson display unit, connect the power charger and switch wattson
on by pressing the button once.
button
reset button
air vent
USB socket
feet
DC socket
front face
back face
display unit.
HERE’S
HOW
I WORK
2
3
1

Wattson only has 1 button.
When you first turn wattson on, the display will show the amount of power
your home is using in watts. This is the total number of watts your home
is consuming at that given moment.
By pressing the button once changes between the 4 main display modes.
To turn the display unit off, press and hold the button down for a
few seconds.
(If renewable energy functionality has been activated via the software
then more modes are made available through the pressing of this button.
These modes will be listed in the special renewable energy manual).
Display options using the button. 14 15
Mode 1 / Numbers only.
Mode 3 / Colours and numbers.
Mode 4 / Night Mode.
Mode 2 / Colours only.
1 / Numerically in watts or £s (how much your electricity would cost if
you left everything in the house exaclty as it is for a whole year).
2 / In softly glowing coloured light, which changes from blue, low usage
through purple, medium to red, high. This option turns wattson into a
rather lovely mood light.
3 / Both numerical display and coloured light together.
4 / This mode turns off the number display and reduces the number
of lights that are on as well as their brightness. Wattson continues to
receive and store data in this mode.
People measuring their wind/solar generated electricity have a further 3
options, Net Power (Used–Generated), Generated and Total Generated to
date. These options on wattson are turned on via the software, available
from www.diykyoto.com/holmes
HOW I
COMMUNICATE

16 17
How do I turn wattson off ?
If you need to reset the display unit for any reason (see Troubleshooting
on page 19), insert a pin into the middle air vent hole above the button.
To charge wattson plug the charger into the DC socket.
To turn the display unit off, press and hold the button down for
a few seconds.
How do I reset wattson?
How do I charge wattson?
The wattson has a lovely system of coloured lights which can change to
reflect the amount of electricity being used at the time.
Low Usage.
A pure blue colour with a gentle breathing behaviour indicates that the
electricity being used is low, maybe just a light or two.
Mid Usage.
If the colour is showing purple and is a little more active, then maybe the
TV or stereo are on.
High Usage.
If the light is bright red and it is very active then a lot of electricity is
being used - one or more high power appliances may be on, such as
kettles, cookers, heaters or tumble dryers.
Colour display.
Special messages.
Wattson also displays the following messages:
OUT OF RANGE Means there is no communication from the transmitter.
LOW SENSOR BATTERY Means the transmittor battery is running low.
LOW MAIN BATTERY Means the wattson display unit battery is low.
Note: when the battery gets within 5 minutes of going dead the
wattson will drop into low power mode.
button
reset button
DC socket
front face
back face

Troubleshooting.
No lights on your wattson when
you switch it on.
Your wattson displays ‘out of range’
The sensor clip is chattering.
Can’t attach the sensor clip
to your electricity wire.
If this Try this
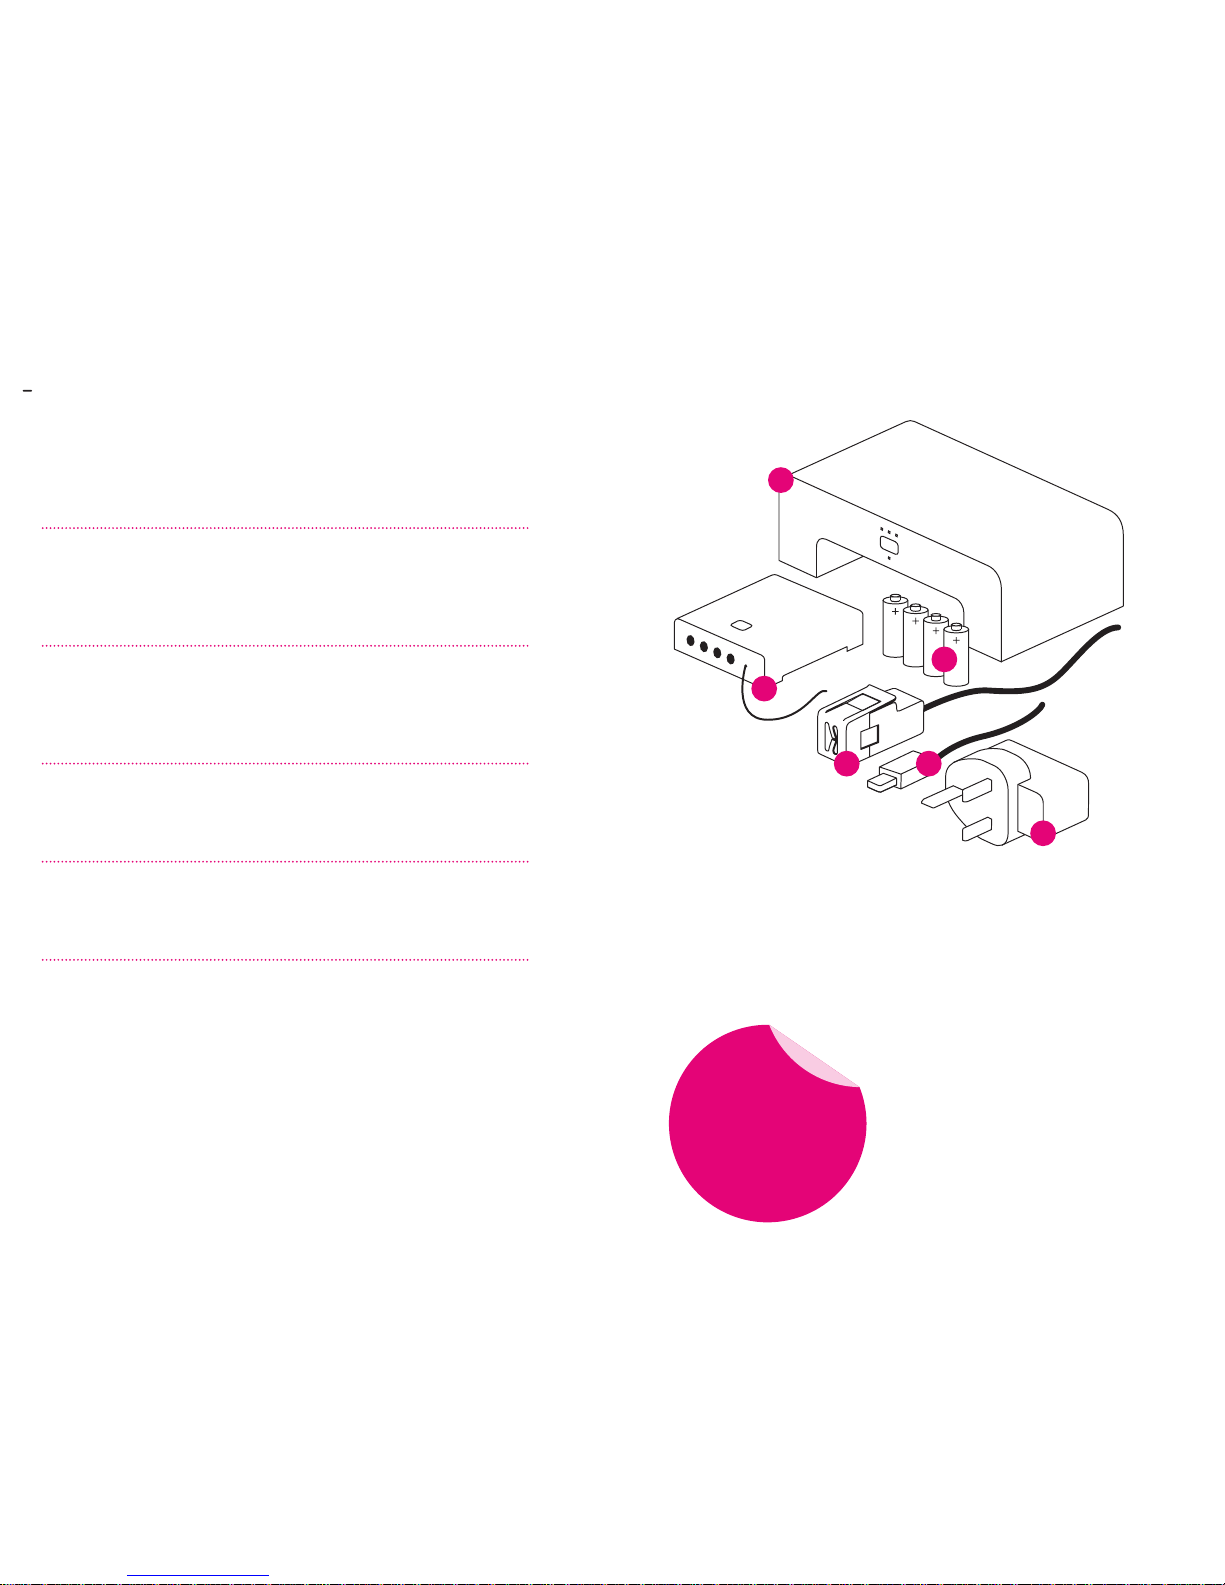
1 / Make sure the display unit is
fully charged. Full battery charge
takes around 12 hours but wattson
can still display your energy use
whilst it charges.
2 / Reset wattson manually
(as described on page 16)
If wattson hasn’t heard from the
transmitter for a little while it
will show ‘out of range’ on its
display. The display turns itself
off after 30 seconds, but will turn
itself on when it hears from the
transmitter again.
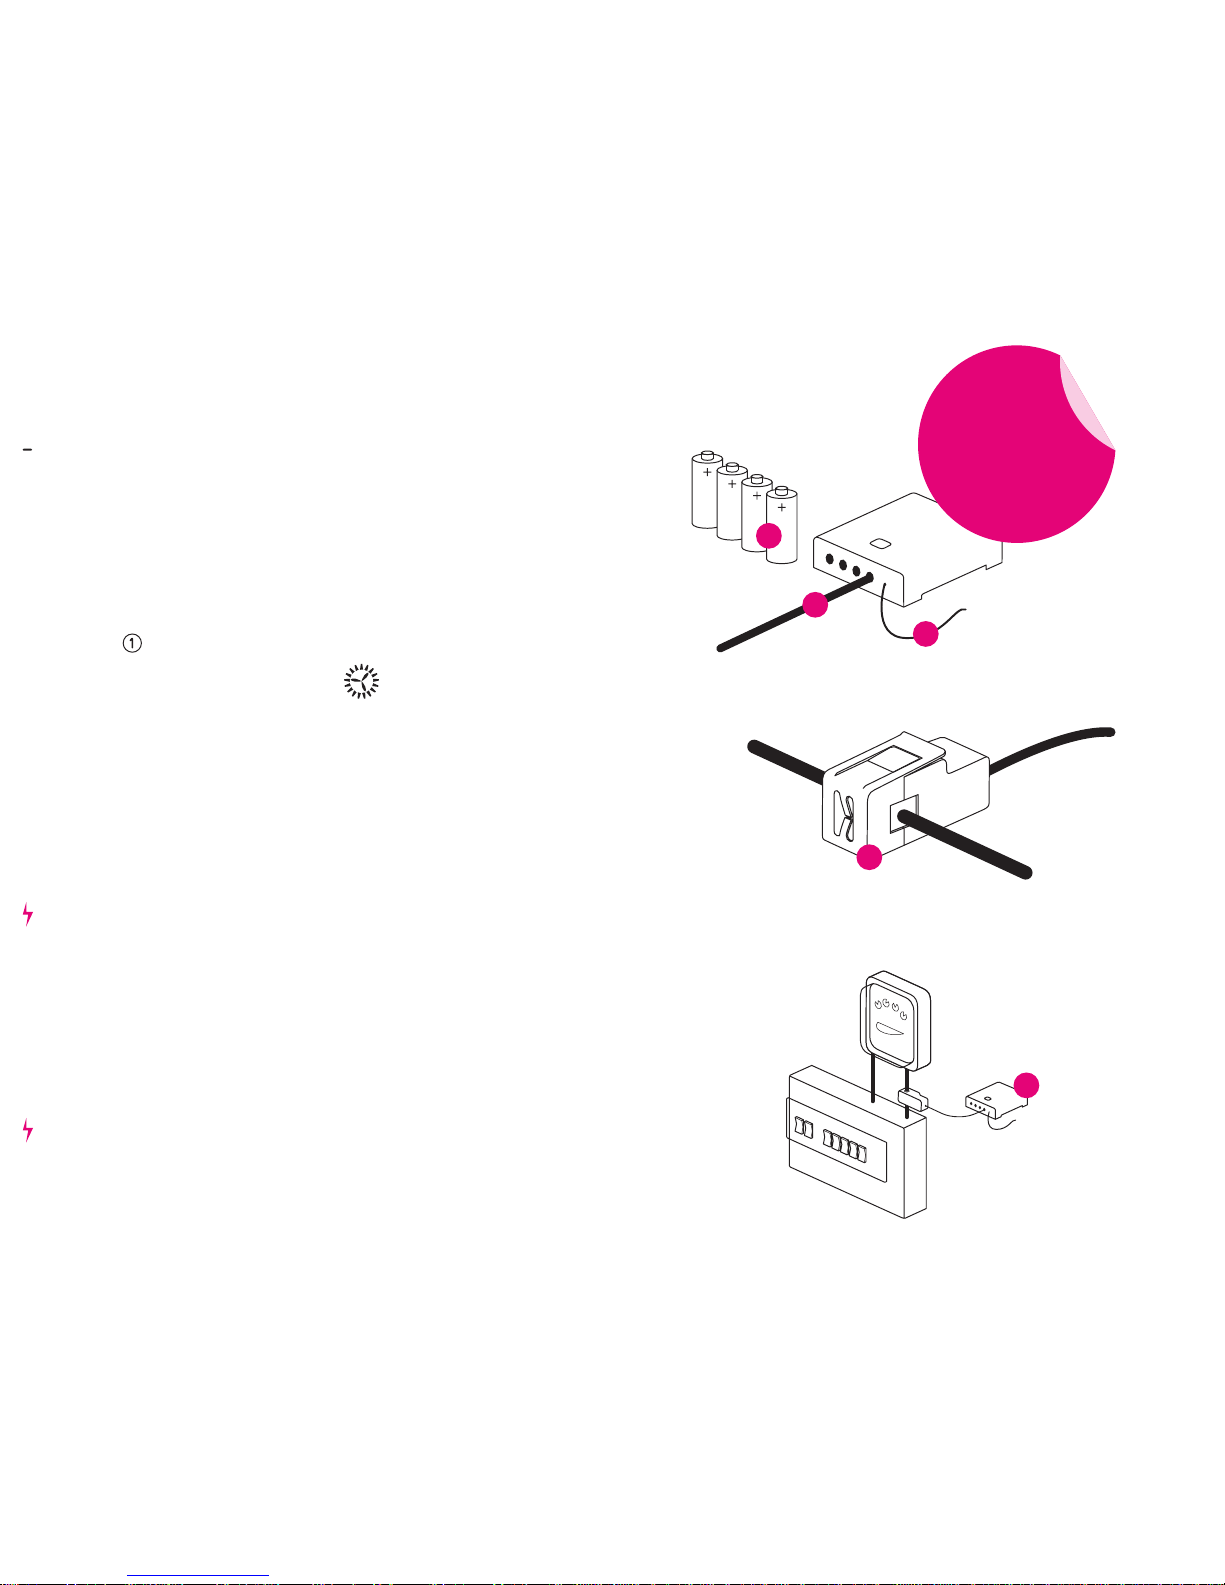
1 / Take wattson closer to
the transmitter.
2 / Check the batteries in the
transmitter are correctly inserted
and if necessary change
the batteries.
Try reconnecting the clip.
Make sure the clip top is secure
in the clip base.
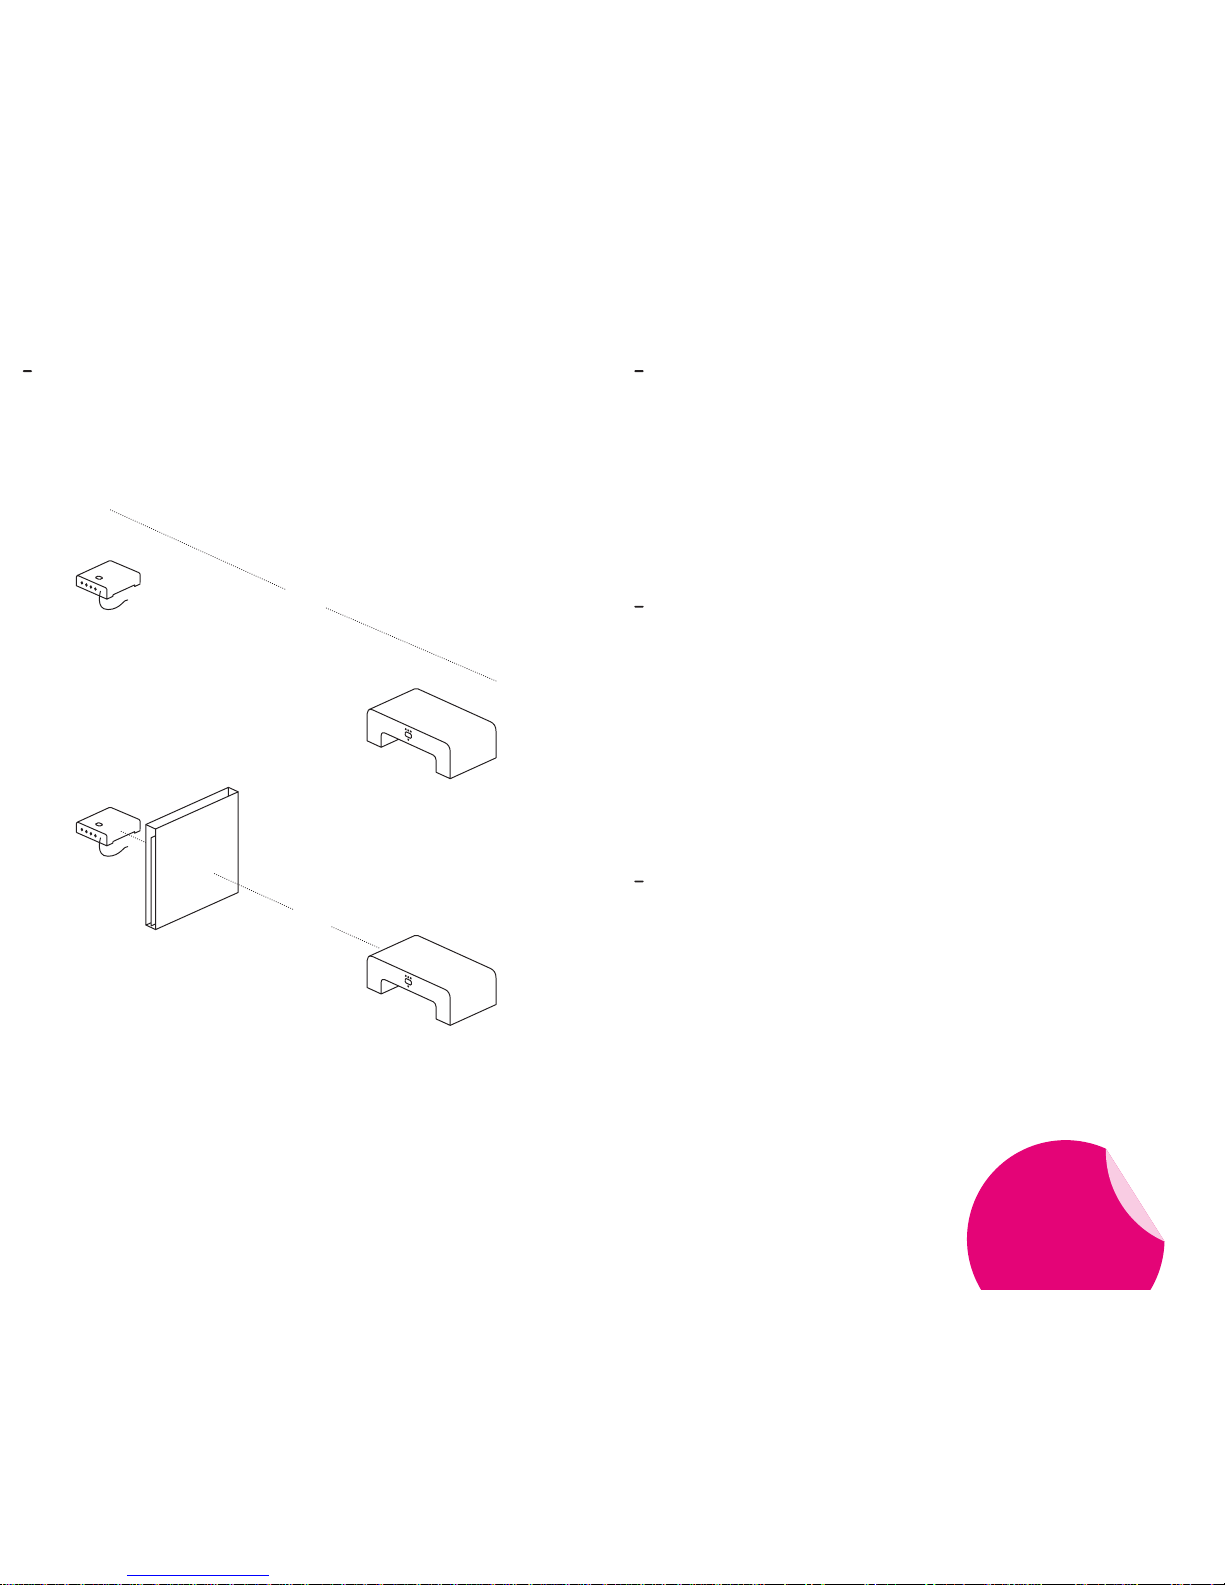
If there is not enough space to
simply attach the clip to one of
the wires please consult a certified
electrician. They may be able to
fit the clip within your fusebox or
distribution unit. DO NOT under any
circumstance attempt this yourself.
View your energy-use
Wattson can store up to 4 weeks of energy-use history which can be
uploaded to your computer via the USB lead.
We have developed easy-to-use software (holmes) for your PC/Mac which
will allow you to look at the history of your electricity use over a period
of days, weeks or months. Please visit the users’ page on
www.diykyoto.com/holmes to download the software.
The USB lead connects via the
socket on wattson’s face.
18 19
history.
USE YOUR
COMPUTER TOO
OOOPS!

Safety guide.
To avoid power surge disruption,
disconnect the cable between the
sensor clip and transmitter during
any electrical storm.
Keep wattson away from
heat sources such as radiators,
stoves, heaters and any other
heat-generating products.
Do not use wattson in or near water
or in high moisture areas such
as the bathroom.
Do not use the sensor clip and
transmitter outside. Outside usage
of the wattson will invalidate
your warranty.
Do not subject your wattson to
impact or shock. Do not leave old/used batteries in
the transmitter unit for any length
of time as they may leak and
cause corrosion.
Do not obstruct the holes on
wattsons face, doing so can cause
overheating and lasting damage.
Do not expose or touch the
electronic circuitry of your
wattson. Doing so may result
in electric shock.
Sufferers of epilepsy should be
aware that wattson has bright
flashing lights that could
potentially trigger a seizure.
20 21
If wattson is misused or you do not follow these
instructions DIY Kyoto ltd can not be held responsible
for any losses or injury that may result.

Looking after wattson.
To get the best out of wattson for years to come, please follow
these guidelines:
Clean the plastic parts of wattson with a damp cloth only.
The holes are designed to keep wattson cool and should not be blocked
or covered. Blocking the vents can cause wattson to overheat and damage
the circuitry.
Please contact us or an authorised repair agent if any repairs are needed,
and use only the replacement parts we recommend. For details on
returns policy please check the customer service section on our website
Please do not attempt to repair the product or modify the circuitry yourself
as this will invalidate your warranty.
Find out more information about using your wattson and join the online
community of wattsowners at www.diykyoto.com
22 23
DIY Kyoto declares that this
wattson conforms to:
EN 61558-1:1998
EN 61558-2-17:1998
The Restriction of Hazardous
Substances (RoHS)
Directive
EN 55014 Part 1 Emissions
EN 55014 Part 2 Immunity
BS 1363 Plugs
Jon Sawdon Smith, Director
DIY Kyoto Ltd
1 Temple Yard
Temple St
London
E2 6QD
The DIY Kyoto team is confident of the quality of its products. We offer
a 1-year warranty, which is in addition to and in no way prejudices your
statutory rights. This warranty is valid for products purchased in the UK.
If a DIY Kyoto product becomes defective due to faulty materials,
workmanship or lack of conformity within 12 months from the date of
purchase, DIY Kyoto guarantee to replace defective parts (except replace-
able batteries), repair products subject to fair wear and tear or replace
such products to ensure minimum inconvenience to the customer unless:
1 / The product has been used for trade, professional or hire purposes.
2 / The product has been subjected to misuse or neglect, such as
installing it outdoors.
3 / The product has sustained damage through foreign objects,
substances or accidents.
4 / Repairs have been attempted by persons other than authorised repair
agents or DIY Kyoto staff.
5 / The product was used outside of the UK and Ireland or attached to
an electricity supply that is not single phase 240V, 50Hz.
DIY Kyoto will not be responsible for indirect, consequential or incidental
damages, and reserves the right to change specifications or designs
described in this manual without notice or obligation.
To claim this warranty, you will need to submit proof of purchase to
the seller or an authorised repair agent. For details on our returns
policy please check the customer service section on our website
Signed:
Warranty

Table of contents