DJ-Tech UBM SOLO User manual

USER MANUAL---------------------------------------------------------------------------------1-26

1
PREFACE
Congratulations on your purchase of the UBM Solo instru ent a plifier with UBM Studio software.
This is a versatile and easy-to-use package that is right at ho e in a practice roo , s all
perfor ance, or recording studio. UBM Solo's unique USB functions and UBM Studio software enable
a wide variety of applications. Included in this package:
- 1 UBM Solo instru ent a plifier
- 1 UBM Studio CD
- 1 USB cable
- 1 User anual
TABLE OF CONTENTS
PREFACE …………………………………………………………………………………………………………….1
SAFETY INSTRUCTIONS ……………………………………………………………………….……………………2
UBM SOLO FEATURES…...……………………………………………………… …………………………………3
Top Panel Layout ……...……...………………………………………………………… ……………………….3
Rear Panel Layout……… …………………………………………………………………………… ………….4
USING THE UBM SOLO..……………………………………………………………………………………………5
The UBM Studio Main Window ………………………………………………………..…………. ……………6
The Channel Strip ……………..…………………………………………………………….…….… …………..7
Installation of UBM studio software…….……………………………………………………… ……………..8
USING UBM SOLO WITH UBM STUDIO….…..……………………………………………..… …………………9
USING THE VST PLUG-INS………………….……………………………………. ………………………………11
TROUBLESHOOTING………………………….………………………………………… ………………………..12
SPECIFICATIONS……………………………….…………………………………………… ……………………13

2
SAFETY INSTRUCTIONS
The apparatus shall not be exposed to dripping or splashing and that no objects filled with liquids,
such as vases, shall be placed on the apparatus.
WARNING: TO REDUCE THE RIS OF FIRE OR ELECTRIC SHOC , DO NOT EXPOSE THIS APPLIANCE TO
RAIN OR MOISTURE.
1. Caution: To reduce the risk of electric shock, do not re ove
cover(or back). No user-
serviceable parts inside. Refer servicing to
qualified personnel.
2. Do not install the equip ent in a place exposed to direct sunlight.
3. Do not install the equip ent in a dusty, da p or poorly ventilated
place.
4. To prevent da age to the equip ent, please
unplug fro the
power outlet if not in use.
5. To unplug the equip ent, always handle the power cord using the
plug. Do not pull out the plug by tugging the cord.
6. Place the equip ent on a stable surface and avoid placing other
objects on top.
7. Cleaning c
are: Use a soft, dry cloth for cleaning. For stubborn dirt,
soak the cloth in a weak detergent solution; wring well and wipe to
re ove the dirt. Do not use volatile agents such as benzene or paint
thinner, as they ay da age the surface finish of the equip ent.
8. Please do not block the cooling vents to avoid overheating.
9. No naked fla e sources, such as lighted candles, should be placed
on the apparatus.
The lightning flash with arrowhead sy bol inside an equilateral triangle is intended to alert
User
that the presence of uninsulated "hazardous voltage"within the product’s enclo
sure, which
ay be of sufficient agnitude to induce a risk of electric shock to persons.
The excla ation ark inside an equilateral triangle is intended to alert user that the presence
of i portant operating and ai
ntenance (servicing) instructions in the literature acco panying
the product.

3
UBM SOLO FEATURES
TOP PANEL LAYOUT
The top panel controls as shown in the above figure:
1. Input Jack.
This is an XLR “Co bo” jack and can accept the following types of input:
- 1/4” guitar cable
- 1/4” icrophone cable
-XLR balanced icrophone cable
2. Gain.
This controls the input level of the input jack. It has a wide range to acco odate a variety of
inputs (instru ent, guitar, bass, or icrophone)
3. Parameter.
This is used with the UBM Studio software and is used to change or edit settings in the software. It has
2 functions:
-Turn to increase/decrease the selected value.
- Press the knob to ove to the next para eter in the UBM Studio window
4. Preset.
This is used with the UBM Studio software and is used to change the currently selected preset.
5. Master.
This knob controls the overall volu e of the UBM Solo.
6. Power LED.

4
REAR PANEL LAYOUT
The rear panel connections as shown in the above figure:
1. Power Switch.
Mains power for UBM Solo.
2. Mains cable.
Connect to a 230V ains source.
3. Line Out.
Stereo RCA outputs to connect UBM Solo to an external a p or recording device.
4. Aux In.
Stereo RCA line-level input to connect an external source such as a CD player, iPod, or other
instru ent.
5. Pedal.
Input connection to the optional foot pedal controller.
6. Headphone.
Stereo headphone output.
7. USB.
USB connection to the host co puter

5
ESING THE UBM SOLO
The UBM Solo is designed to be easy to set up and use. There are 2 basic ways to use the UBM Solo:
standalone ode and USB ode. UBM Solo auto atically switches odes, depending on whether
the USB is connected or not.
Standalone ode: The UBM Solo can be used as a “nor al' a plifier without a USB connection. Just
leave the USB cable unconnected and the UBM Solo will function as a nor al instru ent a plifier.
USB ode: Connect the UBM Solo with a USB cable to a host PC running UBM Studio software. The
audio input is routed through the host PC and with the UBM Studio software, it is possible to ix,
record and add effects on the co puter. In USB ode, realize that the UBM Solo is a co plete USB
Audio Interface + an integrated speaker and a plifier. Using the input and stereo Line Outputs will
give the sa e function as a basic USB audio interface.
Using UBM Solo in standalone mode
Connect an instru ent, guitar or icrophone to the input on the front panel. The GAIN knob can be
used to set the input to the best operating volu e so the input is not distorted. Then adjust the
MASTER volu e knob to a co fortable level.
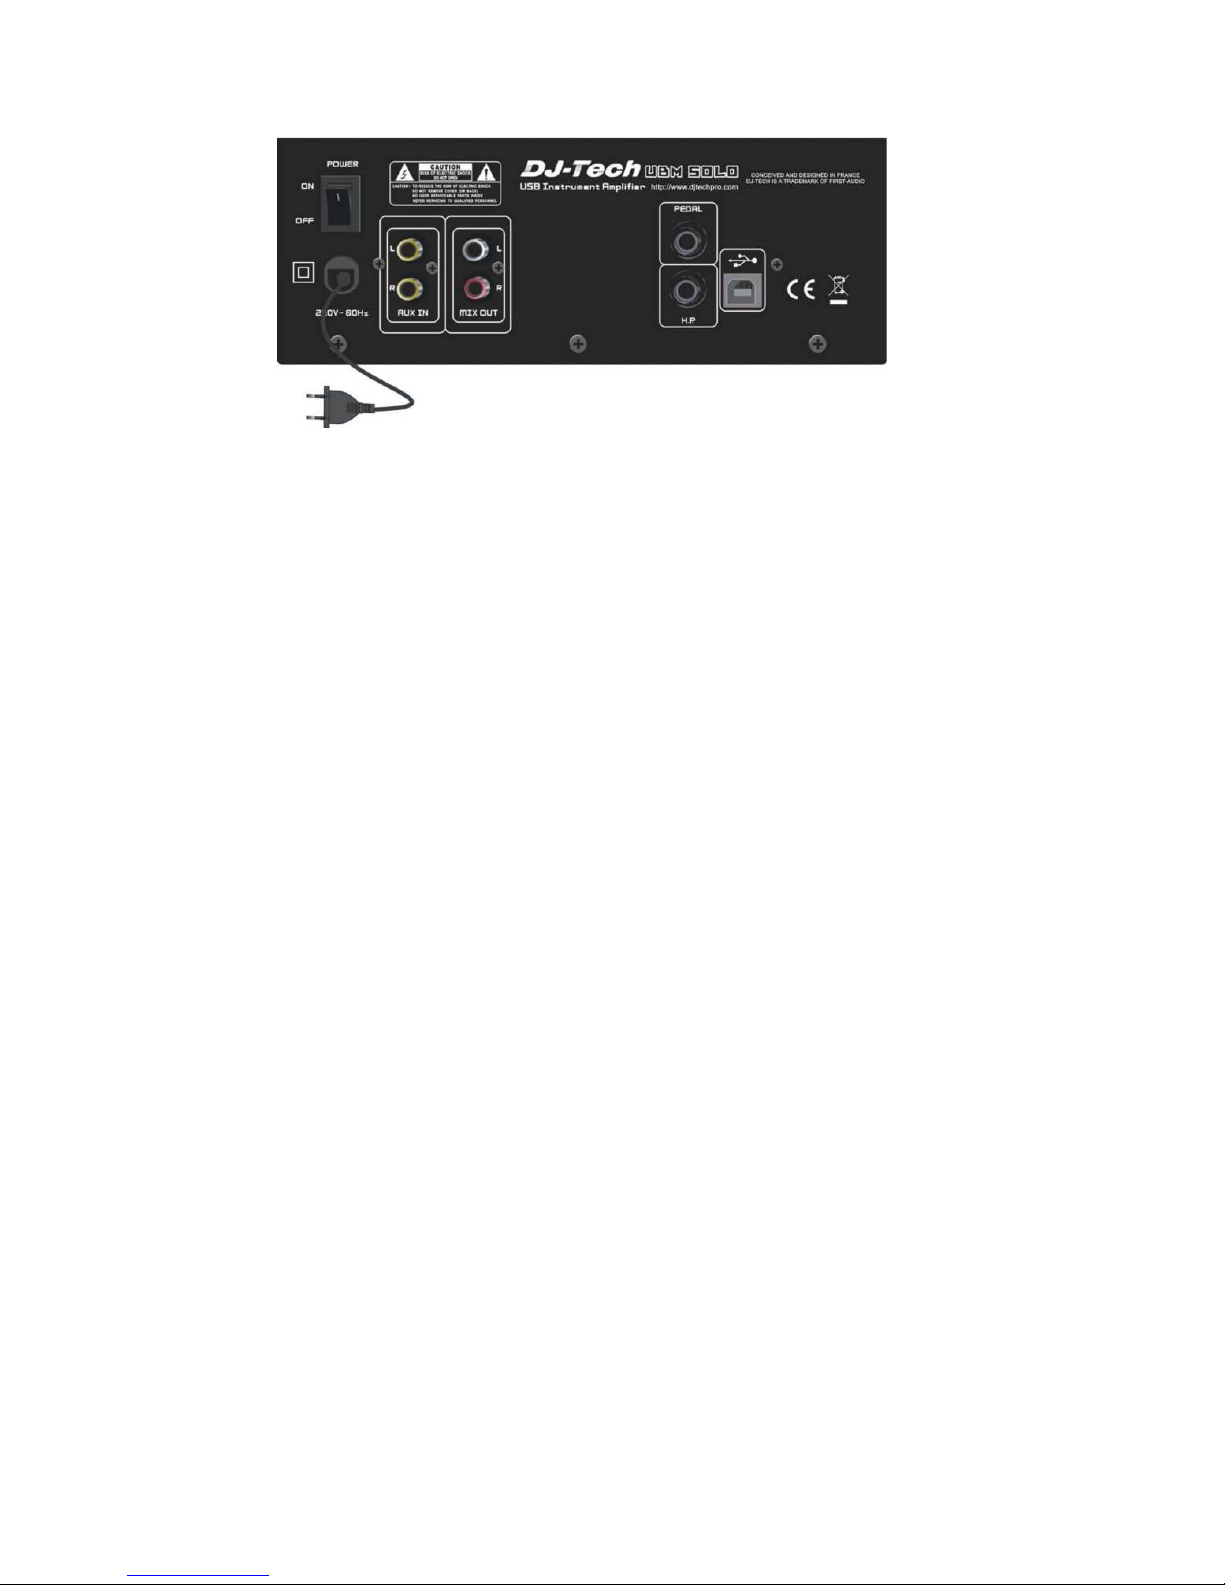
Auxiliary Input
The AUX jack can accept a stereo line-level audio source to allow playing along with pre-recorded
usic. Connect a CD player, iPod, or another audio source to the input. The GAIN knob and the
volu e control on the input source can be adjusted to ix the levels. The AUX input can also be
used as a second input for an instru ent with a line-level output such as a keyboard or synthesizer.
Line Out
UBM Solo can be connected to an external ixer, a plifier, or recording device using the Line Out
connection. Note that the Line Out is tapped before the internal audio a p, so the level of the
MASTER volu e knob does not affect the Line Out level.
Pedal
An external pedal unit can be connected to the UBM Solo to allow foot control of the UBM Studio
software features. Please refer to the UBM Pedal anual for ore details.
Headphones
Headphones can be used for private listening and the speaker will be turned off when a pair of
headphones are connected to the UBM Solo.
Software
The UBM Solo package includes a suite of software applications called UBM Studio. This is a
full-featured application that allows you to add effects, record, and play audio files on your
co puter through the UBM Solo. Also included is the Native Instru ents Guitar Co bo package for
a plifier si ulation.

6
The UBM Studio main window:
1. Plug-in window.
This shows the effects interface, allowing the editing of effects presets.
2. Play list window.
Shows currently loaded usic file for playback. You can click on this window to browse and select
audio file. MP3 and other co on audio file for ats are supported. It is also possible to si ply drag
'n drop files into this window.
3. LOAD button.
Allows loading of an audio file. This is the sa e as clicking in the playlist window.
4. MUTE button.
Mutes the usic file audio.
5. Vol.
Music file volu e can be used to adjust the ix of audio input and usic file when playing along.
6. Transport controls.
Controls start, stop, rewind, and looping of usic files. Record button allows the recording of audio
input on the UBM Solo to a WAV audio file.
7. Main.
This is the aster volu e for the UBM studio software.
8. Link.
This switches the Master slider between a co bined stereo pair or separate L/R controls.

7
The Channel Strip
1. Input Level Meter with Noise Gate Threshold Control.
The Noise Gate helps to suppress audible noise when the input signal is below the threshold. Drag
the GATE label to an opti ized threshold position that cuts unwanted noise while keeping tone
dyna ics.
2. Mute.
Mutes the input signal. Note that the signal still goes to the VST plug-in allowing silent tuning and level
adjust ents
3. Instrument selector.
Choice of Guitar, Bass or Microphone that loads VST plug-ins opti ized for these types of inputs.
4. Edit.
This launches the VST plug-ins so they can be edited.*
5. Bypass.
Bypasses the effects for a “clean” tone.
6. Preset Selector.
This is where you select the effects preset. The PRESET knob on the UBM Solo can be used to change
these presets directly fro the a p.
7. Save.
Allows the current configuration to be saved in any of the 64 preset locations.
8. Cho/Flg/Trm.
Controls the effect depth of the Chorus, Flanger, and Tre olo effects.
9. Pan.
Left/Right stereo balance of the input signal.
10. Vol.
Master volu e for this input channel.
*
The first time Native Instruments Guitar Combo is launched, the plug-in will ask you to register the software
Please follow the directions in this window to complete the registration process Serial number for registration
can be found on the UBM Studio CD-ROM plastic bag

8
Installation of UBM Studio software
1. Insert the CD into your PC. It will auto atically start the installation procedure. If the driver
software does not auto atically start, go the CD in the Windows Explorer and double-click on
Setup.exe.
IMPORTANT! For the driver installation, do NOT connect and turn on UBM before the installation! In the
driver install procedure, the installer will alert you when UBM should be connected
2. Follow the installation instructions in the installer. This will require you to have the UBM Solo
available to install the drivers properly. Connect the UBM Solo to the PC with a USB cable when
instructed to do so by the installer.
IMPORTANT! During the installation process, a window will appear that says the UBM Studio software has not
passed Windows Logo Testing This is normal and not a problem Click on “Continue Anyway” and continue
with the software installation
3. Start UBM Studio if it is not auto atically done by the installer. Short-cuts will also be placed on the
Desktop, and in Progra Menu –> DJ-Tech –> UBM Studio.
4. A setup screen will appear allowing advanced configuration if needed. Nor ally, the default
settings should work without odification. This window can be opened at any ti e fro the Option
-> Setup... enu or pressing the F12 key.
* Note that you should always use the sa e USB port on the PC when using UBM Solo. Changing to a
different USB port will start the hardware discovery and installation process over again, and will
require the software to be reinstalled for the new USB port.

9
USING USM SOLO WITH UBM STUDIO
UBM Studio was designed to be easy to use. Follow these steps to get started:
1. Connect the PC to a UBM Solo with the included USB cable.
2. Connect an instru ent or icrophone to the input jack on the UBM Solo and set GAIN to
id-position.
3. Launch the UBM Studio application and turn on the power to the UBM Solo. Note: If UBM Studio is
started without a UBM Solo connected, the plug-in windows will be blank. This is nor al.
4. The first plug-in window will beco e active and you should see the activity on the level eter.
5. Adjust the MASTER output levels id-position. You should now hear your instru ent or ic through
the UBM Solo.
Loading and playing audio files
Audio files can be loaded into UBM Studio and played back along with the a plifier input for
play-along or Karaoke functions.
Click the LOAD button or drag 'n drop an audio file into the playlist window. Then you can use
transport controls to play back the audio file. The volu e fader can be used to adjust the balance
between audio input and the audio file being played back.
Using the Effects window
UBM Studio has its audio input routed through a “channel strip” si ilar to a ixing console. UBM
Studio supports only 1 channel strip for UBM Solo because it only has 1 audio input. With the channel
strip you can add/change/edit sound effects to the input signal, save and recall presets, and
launch windows to edit the VST plug-ins.
The instru ent select button pre-configures the channel strip and plug-ins for the best settings for
that type of input. Choose Guitar, Bass, or Microphone, depending on what is plugged into the UBM
Solo.
If you edit a preset to your liking, it can be saved using the SAVE button into 1 of 64 preset locations
so it can be instantly reloaded next ti e.
Preset and Parameter knobs
The UBM Solo has 2 knobs on the top panel that allow “re ote control” of UBM Studio. This is useful to
change the settings without having to use a ouse. Use these controls to change the settings in the
UBM Studio plug-in window. Pressing the Para eter knob or the Preset knob will advance the control
to the next para eter in the plug-in window. Turning the Preset knob will change effects presets.

10
Advanced Setup window
The UBM studio setup ay need to be changed based on your PC setup. Press F12 or choose Option
-> Setup... fro the ain enu. The window will be shown as above. Many of these options are
advanced configuration features so be aware of the consequences when odifying these settings.
In the setup window it is possible to odify the audio buffer and latency values. A large value will
give very stable quality but ore latency, and a s aller value will i prove latency and audio
perfor ance, but ay ake audio unstable depending on CPU speed and configuration. Note
that this can affect perfor ance of the UBM Solo, so adjust it only if you have previous experience
with tuning the drivers.
VST plug-in file pathna es can be odified if you choose to install and run VSTs other than the
bundled software. Follow VST installation procedures fro the VST anual to get the required setup
and path infor ation. Controller setup and the assign ent of pedal functions for the UBM Pedal are
odified in this section of the window. Use the drop-down enu ite s to select the desired pedal
function. Knob Sensitivity affects the sensitivity of Para eter encoder knob, aking ore detailed or
wider adjust ents easier.
Other menu items are described below:
- Load/Save Scene – loads/saves current setting of all channels into external SCN file.
- Mini u /Nor al/Full-screen View – adjusts the appearance of the window.
- Factory Reset – resets all presets. It can be used to initialize UBM Studio to be default settings if
necessary.
- Help – View Manual (F1) – shows this user anual on-screen.

11
USING THE VST PLUG-ING
Native Instruments Guitar Combos
Plexi Co bo fro Native Instru ents is bundled with UBM SOLO and is installed and set as the
default VST plug-in for guitar. De o of AC Box Co bo and Twang Co bo are also included. The
setup files can be found in folder “Progra Files\DJ-Tech\UBMStudio\bundle\”. Please refer to the
Guitar Co bos anual for ore infor ation. The user anual can be found in “Progra Menu –>
Native Instru ents Plexi Co bo –> Docu entation” after the installation of Guitar Co bos Plug-ins.
BASiliSk
This is a VST for bass guitar.
- Tuner. A built-in tuner allowing you to tune up. The note display shows the note being played and
the tuning eter shows tuning to +/- 50 cents. It is possible to use the MUTE button in the channel strip
for “silent” tuning.
- Co pressor/li iter. This is used to suppress the transients in the bass signal, allowing ore gain and
“punch.” The Gate knob sets the threshold when the co pressor starts to activate. The Co p knob
adjusts the co pression ratio, or how uch the signal is “squeezed.”
- EQ. BASiliSk has a 4-band Equalizer to odify the tone of the signal. Knobs are Bass, Mid, Treble and
Presence. The Low Cut button cuts the low frequencies for a “punchier” sound.
- Reverb. The button on the botto enables or disables the Reverb effect. Dry/Wet knob controls the
balance of reverb and original signal. Ti e knob sets the delay ti e for a shorter or longer reverb
sound. The Tone knob controls the tone of the reverb signal.
- Volu e. This is the aster volu e for the signal. For best sound, adjust it so there is no distortion on
the level eter above the knob.
MIChelangelo
This is a VST specially designed for voice.
Compressor/limiter. This is used to suppress the transients in the mic signal. The Gate knob sets the threshold
when the compressor starts to activate. The Comp knob adjusts the compression ratio, or how much the signal is
“squeezed.”
EQ. MIChelangelo has a 4 band Equalizer to modify the tone of the signal. Knobs are Bass, Mid, Treble and
Presence. The Low Cut button cuts the low frequencies which are usually nodded so important for human voice.
Delay. The button on the bottom enables or disables the Delay, or echo effect. Dry/Wet knob controls the balance
of delayed and original signals. Time knob sets the delay time for a shorter or longer delay time. The Feedback
knob controls the number of repeats of the echoes.
Reverb. The button on the bottom enables or disables the Reverb effect. Dry/Wet knob controls the balance of
reverb and original signal. Time knob sets the delay time for a shorter or longer reverb sound. The Tone knob
controls the tone of the reverb signal.
Volume. This is the master volume for the signal. For best sound, adjust it so there is no distortion on the level
meter above the knob.

12
TROUBLESHOOTING
Problem Solution
No sound (standalone) 1. Is power cable connected? Is power switch turned on?
2. Check instru ent volu e, GAIN setting, MASTER volu e
No sound (USB ode) 1. Is power cable connected? Is power switch turned on?
2. Check instru ent volu e, GAIN setting, MASTER volu e
3. Check the volu e on windows ixer
4. Check UBM Studio’s volu e/ ute setting
5. Try to install the driver again.
Audio Glitches 1. Change audio driver and output; adjust buffer size and the nu ber of
IRPs setting.
Cannot load usic file 1. Unsupported for at, corrupted file or codec proble .
2. Install the proper codec or use other files.
Distorted sound 1.Adjust input/output gain lower.
Cannot record 1. Check the te porary folder in the setup for the correct path.
2. Check the free space of hard disk drive.
PC tries to reinstall UBM
Solo hardware
1. Use the original USB port where the UBM Solo was plugged into during
software installation.
UBM Studio not
functioning
1. Uninstall UBM Studio SW and install again.
Other problems Please contact technical support at www.djtechpro.com and check the online FAQ.

13
SPECIFICATIONS
Acoustic Specifications
·Woofer: 5.25" paper cone woofer
·2 x Tweeter: 1'' silk do e Neo agnet with Ferro Fluid
·A plifier power: 10 Watts RMS / 20 Watts Max
·Frequency Response: 90Hz ~ 20 kHz
·SPL: 92dB@1 /1W
·Cabinet di ension: 260W×162D×242H
Hardware Specifications
·Line output: stacked stereo RCA jacks
·Aux input: stacked stereo RCA jack
·Headphone out: 1/4" stereo jack
·USB type B jack for co puter connection
·Support for optional foot pedal controller via 1/4" stereo jack
·ADC 90dB SNR, DAC 100dB SNR
Software: UBM Studio
·USB Host-Plug / HID Control
·NSPTM Audio Strea ing Host (PC)
·32-bit IEEE floating-point processing / Integrated DSP Plug-ins:
·EQ, Delay, Tre olo, Reverb, Chorus, Flanger
·Wave/ p3/AIFF/WMA/AU playback (2ch.)
·Audio Recording (2ch.)
·Total Recall: presets load and save
·Guitar Co bos Native Instru ent bundled with GC Plexi with 64 Presets for each plug-in + Tuner
Minimum PC configuration
·Windows XP
·Intel Pentiu IV co patible or higher CPU
·256MB RAM
·One available USB port
·100MB free disk space
Recommended PC configuration
·Windows XP
·Intel Pentiu IV co patible or higher CPU
·512MB RAM
·One available USB port
·100MB free disk space

14
CONSIGNES DE SÉCURITÉ ET RECYCLGE………………………………………………………………….….…14
AMPLI USB POUR INSTRUMENTS……………………………………………………………………………….….15
DÉTAILS DU PRODUIT………………………………………………………………………………………………..16
Dessus………………………………………………………………………………………………………………...16
Arrière………………………………………………………………………………………………………………...16
FONCTION……………………………………………………………………………………………………………17
INSTALLATION DU LOGICIEL…………………………………………………………………………………..…..18
LE STUDIO VIRTUEL D‘ENREGISTREMENT………………………………………………………………………….21
Description…………………………………………………………………………………………………….…….21
La fenêtre a pli……………………………………………………………………………………………………22
Le enu des options……………………………………………………………………………………..……….24
DÉPANNAGE……………………………………………………………………………………………….……….26
CONSIGNES DE SÉCURITÉ ET RECYCLGE
• Ce ode d’e ploi vous per et de vous servir correcte ent du produit.
Gardez-le précieuse ent afin de pouvoir le consulter à tout o ent.
• Ne dé ontez pas l‘appareil, sous peine de perdre toute garantie.
• N‘essayez pas de réparer l‘appareil vous- ê e. Ne le odifiez pas. Risque de blessure!
• Faites attention lorsque vous anipulez votre produit. Une chute ou un coup peuvent l‘abî er.
• Ne l‘exposez pas à l‘hu idité ni à la chaleur. Ne pas recouvrir. Ne le plongez pas dans l‘eau.
• Maintenez hors de portée des enfants. Ce produit n’est pas un jouet.
ATTENTION: N’utilisez l’appareil que comme indiqué dans la notice Aucune garantie ne pourra être
appliquée en cas de mauvaise utilisation Nous ne sommes pas responsables des conséquences inhérentes à
un dommage Le fabricant se réserve le droit de modifier les caractéristiques techniques sans notification
préalable pouvant ainsi entraîner des divergences dans ce manuel
Conseil important concernant le recyclage
Cet appareil électronique ne doit PAS être jeté dans la poubelle de déchets énagers.
Votre nouveau produit a été développé avec le plus grand soin et avec des co posants de haute qualité. Il
devra cependant être un jour recyclé. Le sy bole de la poubelle barrée signifie que votre produit devra être
recyclé séparé ent des ordures énagères à la fin de sa durée de vie. A l’avenir, veuillez a ener tous les
appareils électriques ou électroniques aux points de ra assage publics de votre unicipalité.
Ceux-ci prennent en charge vos déchets pour un recyclage écologique. Vous évitez ainsi les conséquences
négatives sur l’ho e et l’environne ent pouvant découler d’une auvaise prise en charge des produits à la
fin de leur durée de vie.
Les détails concernant l’e place ent de tels points de ra assage et des éventuelles restrictions de quantité
existantes par jour/ ois/année ainsi que sur des frais éventuels de collecte sont disponibles dans votre
unicipalité.

15
AMPLI USB POUR INSTRUMENTS
Chère cliente, Cher client,
Nous vous re ercions pour l’achat de cet a plificateur USB. Cet a plificateur pour instru ents
s’utilise de anière classique ou pour créer un studio d’enregistre ent avec votre PC.
Afin d’utiliser au ieux votre nouvel appareil, veuillez lire attentive ent ce ode d’e ploi et
respecter les consignes et astuces suivantes.
Caractéristiques
• S’utilise co e a pli classique ou en USB
• Puissance du signal d’entrée réglable pour une qualité sonore opti ale
• Port pour pédale de contrôle externe (non fournie)
• Studio virtuel
Contenu
• A pli USB pour instru ents
• Mode d’e ploi
• Câble USB
• CD pilote et logiciel
Système requis
Processeur: Pentiu IV ou équivalent/supérieur
Mé oire vive: 256 Mo de RAM
Connectique: port USB libre
Lecteurs: CD ou DVD
Mé oire: 170 Mo d’espace disque libre
Systè e d’exploitation: Windows XP ou Windows Vista
Données techniques
• Enceinte de basses: 5,25“ Paper Cone
• Enceinte d’aigus: 1“ Silk Do e, Ai ant Neody iu
• Puissance: 10 Watt RMS/20 Watt Maxi u
• Ga e de fréquences: 90 Hz à 20 kHz
• Pression acoustique: 92 dB @ 1 / 1 W
• Taille (La x Lo x Ha): 260 x 162 x 242
• Entrée Aux: Port stéréo Cinch
• Sortie casque: Port stéréo 1/4“
• Entrée USB: Type-B USB 1 Port
• For ats de lecture: Wave / p3 / AIFF / WMA / AU playback (2 canaux)
• Poids: env. 4,5 kg

16
DÉTAILS DU PRODUIT
Dessus
• INPUT - Port instru ents
Ce port XLR „Co bo“ est co patible avec les connecteurs suivants:
- câble guitare 1/4“
- câble icro 1/4“
- câble icro XLR
• GAIN - Réglage amplification
Réglez ici la puissance d’a plification du signal d’entrée. Ceci per et de régler l’a plificateur USB
pour différents appareils co e guitare et icrophone.
• PARAMETER - Réglage logiciel
Effectuez des réglages sur le logiciel UBM si l’a plificateur est branché sur votre ordinateur.
- Tournez le bouton pour odifier la valeur sélectionnée vers le haut ou le bas.
- Appuyez sur le bouton pour passer à la valeur suivante.
• PRESET - Bouton Plug-In
Modifie les réglages des Plug-Ins si vous les avez installés.
- Tournez le bouton pour odifier la valeur sélectionnée vers le haut ou le bas.
- Appuyez sur le bouton pour passer à la valeur suivante.
• MASTER - Réglage volume
Modifiez le volu e de l’a plificateur USB (volu e d’entrée).
Arrière
• POWER - Interrupteur Marche/Arrêt
Allu er et éteindre l’a pli USB.
• 230 V ~ 50 Hz - Alimentation
Câble de branche ent électrique.
• AUX IN - Port Stéréo
Port d’entrée des signaux stéréo externes co e lecteur CD ou MP3.
• PEDAL - Port Pédale
Vous pouvez brancher une pédale.
• H.P. - Port casque
Vous pouvez brancher un casque directe ent sur l’a pli USB.
NOTE: Quand un casque est branché à l’ampli USB, les haut-parleurs se désactivent automatiquement
• USB - Port USB
Vous pouvez brancher un câble USB vers votre ordinateur.

17
FONCTION
Vous pouvez utiliser l’a pli USB de deux anières différentes. L’appareil passe auto atique ent
d’un ode à l’autre quand vous branchez ou débranchez la prise USB.
Variante 1: Amplificateur classique pour instruments
Branchez la prise électrique et allu ez l’a plificateur en plaçant l’interrupteur Marche/Arrêt en
position „ON“. Branchez votre instru ent ou icro sur l’a pli USB. Utilisez le bouton d’a plification
pour une qualité opti ale.
Les ports Cinch per ettent aussi d’utiliser l’a pli USB co e haut-parleur stéréo. Ici aussi, utilisez le
bouton d’a plification pour une qualité opti ale.
Variante 2: Boîtier de connexion pour PC et studio virtuel
Installez le pilote et le studio d’enregistre ent depuis le CD fourni. Voir les consignes du chapitre
„Installation du logiciel (voir p. 42). Branchez la prise électrique et allu ez l’a plificateur en plaçant
l’interrupteur Marche/Arrêt en position „ON“. Branchez le câble USB fourni pour relier l’a pli à votre
PC.
Branchez votre instru ent ou icro sur le port instru ents de l’a pli USB. Utilisez le bouton
d’a plification pour une qualité opti ale. Toutes les fonctions du studio d’enregistre ent virtuel
sont aintenant à votre disposition. Respectez les consignes du paragraphe „Le studio
d’enregistre ent virtuel“ dans le chapitre „Logiciel“ (voir p. 42). Si vous utilisez l’a pli USB ainsi, vous
pouvez aussi brancher une pédale pour co ander les fonctions du studio virtuel sans avoir à
lâcher votre instru ent des ains.
Le port USB per et aussi d’utiliser l’a pli USB co e haut-parleur pour un appareil de diffusion à
connecteur USB.

18
INSTALLATION DU LOGICIEL
Préparation: Vérifiez que l’a pli USB ne soit pas encore branché à votre ordinateur. Insérez le CD
fourni dans un lecteur CD ou DVD de votre ordinateur. Si l’assistant d’installation ne s’ouvre pas
auto atique ent, sélectionnez le lecteur sur le poste de travail, faites un clic droit puis „Explorer“.
Exécutez le fichier „DJ-Tech_UBMStuido_1_0_2_win“ en double cliquant dessus.
Attendez que l’assistant d’installation soit chargé. Cela peut prendre quelques inutes. Choisissez
ensuite la langue „English“ puis cliquez „OK“.
Cliquez ensuite sur „Next“.
Choisissez aintenant l’e place ent d’installation du progra e „UBMStudio“. Le dossier par
défaut est „C:\Progra e“. Cliquez sur „Browse“ pour utiliser un autre e place ent. Cliquez
ensuite sur „Install“.
Quittez tous les autres progra es et vérifiez que l’a pli USB ne soit pas branché à l’ordinateur.
Cliquez ensuite sur „Next“.

19
Choisissez aintenant l’e place ent d’installation de „ESI- UBM Audio Driver“. Le dossier par
défaut est „C:\Progra e“. Cliquez sur „Browse“ pour utiliser un autre e place ent. Cliquez
ensuite sur „Next“.
La fenêtre suivante vous signale que Windows pourrait afficher un essage d’avertisse ent
pendant l’installation. Cliquez sur „Next“.
Le essage suivant peut apparaître plusieurs fois pendant l’installation:
Ceci signifie unique ent que Windows ne reconnaît pas ce progra e. Cliquez à chaque fois sur
„Continuer l’installation“ pour continuer.
Les pilotes sont alors installés. Allu ez l’a pli USB En plaçant l’interrupteur Marche/Arrêt en
position„ON“ et branchez-le au PC via le câble USB fourni. Attendez que votre ordinateur affiche le
essage „Nouveau atériel détecté“ en bas à droite. Ceci peut prendre plusieurs secondes.
Cliquez ensuite sur „Next“.
L’assistant co ence alors l’installation des pilotes. Ceci peut prendre plusieurs inutes.
Vous pouvez aintenant installer une version de dé onstration du progra e „Native Instru ents
Plexi Co bo“. Ce progra e per et l’édition d’enregistre ents icro et guitare. Cliquez sur
„Next“ pour installer le progra e ou sur „Cancel“ pour annuler.
NOTE: L’installation du programme principal „UBMSutdio“ nécessaire pour le fonctionnement de l’ampli
Table of contents
Languages:
Other DJ-Tech Amplifier manuals