manuals.online logo
Brands
  1. Home
  2. •
  3. Brands
  4. •
  5. DJI RONIN
  6. •
  7. Transmitter
  8. •
  9. DJI RONIN RavenEye User manual

DJI RONIN RavenEye User manual

DJI RONIN
2020.10v1.0
RavenEye Image Transmission System
User Guide
使用说明
使用說明
ユーザーガイド
사용자 가이드
Bedienungsanleitung
Guía de usuario
Guide de l'utilisateur
Guida dell'utente
Gebruiksaanwijzing
Manual do utilizador
Guia do usuário
Руководство пользователя
1
Contents
EN
KR
IT
CHT
ES
NL
CHS
DE
PT
PT-BR
JP
FR
RU
User Guide 2
使用说明 8
使用說明 14
ユーザーガイド 20
사용자 가이드 26
Bedienungsanleitung 32
Guía del usuario 38
Guide de l'utilisateur 44
Guida dell'utente 50
Gebruiksaanwijzing 56
Manual do utilizador 62
Guia do usuário 68
Руководство пользователя 74
2
EN
In the Box
Introduction
DJI RONINTM RavenEye Image Transmission System is used to transmit a wireless video signal so that users can
access the camera view remotely. When used with DJI RS 2 or DJI RSC 2, users can also track subjects with
ActiveTrack 3.0 and use remote control features. RavenEye also supports Ronin-S and Ronin-SC and can be used
separately with the camera only.
Image Transmitter × 1
USB-C to USB-C Cable (20cm) × 1
Mini-HDMI to Micro-HDMI Cable
(20cm) × 1
Cold Shoe to 1/4” Screw Adapter
× 1
Mini-HDMI to HDMI Cable (20cm)
× 1
M4 Screw (10mm) × 2
USB-C Cable (40cm) × 1
Mini-HDMI to Mini-HDMI Cable
(20cm) × 1
Allen Wrench (3mm) × 1
1. Antennas
Transmit the wireless signal.
2. HDMI Port (Mini HDMI)
For connecting to the HDMI port of the camera.
3. RSS Camera Control Port (USB-C)
For connecting to the shutter control port of the camera
when not used with DJI RS 2 or DJI RSC 2.
4. Battery Level Indicators
Indicate the battery level.
5. Status LED
Indicates the system status.
6. Power Button
Press and hold to power on or off. Press six times
to reset the default Wi-Fi password to 12345678 (the
1
2
7
3
4
5
6
8
9
3
EN
Installation and Connection
There are three ways to use RavenEye.
Method 1: use RavenEye with DJI RS 2 or RSC 2 (DJI RS 2 is used as an example below)
1. Attach the image transmitter to the gimbal via the cold shoe. Adjust the antennas as shown and keep them
away from motor.
2. Connect the HDMITM port of the image transmitter to the HDMI port of the camera using the provided HDMI
cable according to the camera model.
3. Connect the power/communication port of the image transmitter to the image transmission port of the gimbal
using the provided USB-C to USB-C cable.
If the cold shoe of the gimbal is not available, you can attach the cold shoe to 1/4” screw adapter with
the image transmitter and use with a device that has a 1/4" screw hole.
HDMI
4. Connect the shutter control port of the camera to the RSS camera control port of the gimbal.
battery level indicators will blink three times when
the password is successfully reset. A new password
must be set in the Ronin app). Press and hold for 10
seconds to force shutdown.
7. Cold Shoe
For connecting to the gimbal or camera.
8. Power/Communication Port (USB-C)
For charging and communicating with DJI RS 2 and
RSC 2.
9. Reserved LED
Reserved LED currently without a function.
4
EN
Method 2: use RavenEye with Ronin-S or Ronin-SC (Ronin-S is used as an example below)
1. Attach the image transmitter to the camera.
2. Connect the HDMI port of the image transmitter to the HDMI port of the camera using the provided HDMI cable
according to the camera model.
3. Connect the shutter control port of the camera to the RSS camera control port of the image transmitter or to the
RSS camera control port of the gimbal. If connected to the RSS camera control port of the image transmitter,
the camera can only be controlled in the Ronin app. The buttons on the gimbal cannot control the camera. If
connected to the RSS camera control port of the gimbal, the camera can be controlled using the buttons on
the gimbal as well as in the Ronin app.
Refer to the official DJI website for the most updated Camera Compatibility List and DJI Ronin
RavenEye Image Transmission System Compatibility List to select the proper HDMI cable and camera
control cable.
The gimbal needs to be balanced after mounting RavenEye.
When used with Ronin-S or SC, you can use the Ronin app to control the camera and access
the camera view. Gimbal movements cannot be controlled and ActiveTrack and Force Mobile are
unavailable.
HDMI
5
EN
Method 3: use RavenEye with only the camera
1. Attach the image transmitter to the camera.
2. Connect the HDMI port of the image transmitter to the HDMI port of the camera using the provided HDMI cable
according to the camera model.
3. Connect the shutter control port of the camera to the RSS camera control port of the image transmitter.
Connect the mobile device and the image transmitter via Wi-Fi. You can use the mobile device to control the
camera and access the camera view.
HDMI
RSS
It is recommended to turn off the Bluetooth on your mobile device to avoid interference.
The camera view can also be accessed on the touchscreen of DJI RS 2. Slide down on the
touchscreen from the top to enter the camera view.
Status LED Descriptions
Power on the gimbal, camera, and image transmitter. The Status LED indicates the status of the image transmitter.
Status LED Descriptions
Solid red Not connected
Solid blue HDMI or Wi-Fi connected and the Ronin app launched
Solid green Both HDMI and Wi-Fi connected, and the camera view can be accessed on the Ronin app
When using RavenEye with DJI RS 2, disconnect the Bluetooth connection between the mobile
device and gimbal and connect the Wi-Fi in order to use the Ronin app and RavenEye.
Using RavenEye via the Ronin App
Launch the Ronin app. Tap “Connect to RavenEye” and follow the onscreen instructions to start.
6
EN
100100
02:30
02:30
800
800
1/800
1/800
F 2.8F 2.8
1. Battery Level Display
100
100
100 : indicates the battery level of the image transmitter.
2. System Settings
: tap to set the parameters.
RavenEye Assistant: tap to enable the display of RavenEye Assistant.
Guide Frame: tap to choose from 3 x 3, 6 x 4, or Golden Ratio.
Aspect Marker: tap to choose from 2.35:1, 1.82:1, 16:9, 9:16, or 4:3.
Safety Zone Marker: tap to choose from 96%, 93%, 90%, 88%, 85%, or 80%.
Focus Peaking Threshold: tap to adjust the focus accuracy. The smaller the value, the larger the detected edge.
Center Marker: tap to choose from Center Point, Diagonals, or Center Point+Diagonals.
Marker Color: tap to choose from red, green, blue, white, or black.
Marker Width: tap to choose the marker width.
Shutter: tap to set the function of the shutter button. Select Shoot to set the shutter button to start shooting,
Cache to start caching, or Shooting Plus Cache to start shooting and caching simultaneously.
Max Cache: tap to choose from 1 GB, 2 GB, 4 GB, 8 GB, and none.
Wi-Fi Settings: tap to set the Wi-Fi name, password, frequency, and channel. Reconnect the Wi-Fi if the Wi-Fi
name or password are changed.
About: tap to view the serial number and the firmware version of RavenEye.
3. Shooting Mode
: tap to switch between photo or video mode.
4. Shutter/Record Button
: tap to take a photo or start or stop recording.
5. Playback
: tap to view photos and videos.
1 2
3
4
5
67
8
9
7
EN
6. RavenEye Assistant
: tap to open RaveEye Assistant.
Zebra Pattern: helps to identify if the subject is overexposed or underexposed. The Zebra Pattern indicates
overexposure.
False Color: helps to identify underexposure and overexposure. Blue indicates underexposure. Red indicates
overexposure.
Focus Peak: the edge of the focus area displays red.
LUT: users can import a LUT file to the UserLut folder of the Ronin app (iOS) or the Ronin/UserLut folder in
the root directory of the mobile phone (Android) to add a filter.
Single Color: tap to check the RGB and view the quality of the exposure according to the noise of the video.
7. Camera Settings
8001/800F 2.8 : displays aperture, shutter speed, and ISO settings.
8. Remote Control
: tap to use Virtual Joystick or Force Mobile.
9. ActiveTrack
: When tracking a person, it is recommended to select and confirm the person in the center of the camera
view by pressing the trigger once. When tracking an object, it is recommended to select and confirm the object
by dragging a box around it in order to recognize the object better. The gimbal begins to track after recognizing
the object successfully.
For optimal performance, it is recommended to set the ActiveTrack speed to 20 when using a lens with an
equivalent focal length of 24 mm (tested with Sony α7 III). Increase the ActiveTrack speed when using a lens
with an equivalent focal length less than 24 mm. Decrease the ActiveTrack speed when using a lens with an
equivalent focal length more than 24 mm.
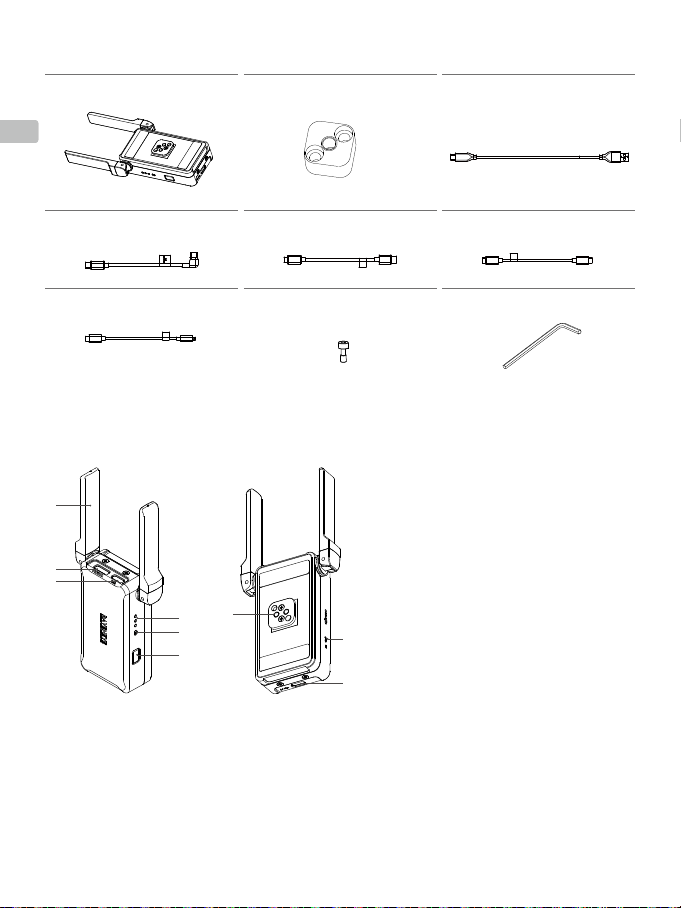
Operating Frequency 2.400-2.4835 GHz; 5.725-5.850 GHz
Weight 126 g
Dimensions 82×63×24 mm
Transmitter Power (EIRP) 2.400-2.4835 GHz: <25 dBm (FCC), <20 dBm (CE/SRRC/MIC)
5.725-5.850 GHz: <25 dBm (FCC/SRRC), <14 dBm (CE)
Battery Capacity 2970 mAh
Compatible Charger 5 V/2 A
Charging Time Approx. 2 hr and 30 min
Runtime Approx. 3 hr and 30 min
Max Transmission Distance
(unobstructed, free of interference)
200 m (SRRC/FCC)
100 m (CE)
Latency 60 ms
Operating Current/Voltage 900 mA/3.7 V
Operating Temperature 0° to 45° C (32° to 113° F)
Specifications
8
CHSCHS
物品清单
图传发射器 ×1
USB-C 转USB-C 线(20 cm)× 1
C 口转 D 口HDMI 线(20 cm)×1
冷靴转 1/4”螺丝孔转接件 ×1
C 口转 A 口HDMI 线(20 cm)× 1
M4 螺丝(10 mm)×2
USB-C 线(40 cm)×1
C 口转 C 口HDMI 线(20 cm)×1
扳手(3 mm)×1
1. 天线
传输无线信号。
2. HDMI 接口(Mini HDMI)
用于连接相机 HDMI 接口。
3. RSS 相机控制接口(USB-C)
不连接 DJI RS 2/DJI RSC 2 使用时,连接相机快门
接口以控制相机。
4. 电量指示灯
指示当前图传发射器电量。
5. 状态指示灯
指示系统状态。
6. 电源按键
长按开、关机。六击重置Wi-Fi 密码为
12345678(电量指示灯闪烁三次表示恢复成
功),恢复后需要在 Ronin App 上修改为强
密码后才能使用。长按 10 s 以上强制关机。
7. 冷靴接口
用于安装至云台的冷靴接口或相机的热靴接
口。
8. 充电 /通信接口(USB-C)
充电接口,以及实现与 DJI RS 2/DJI RSC 2
的通信。
9. 预留指示灯
预留。
1
2
7
3
4
5
6
8
9
简  介
DJI RONINTM 鹰眼图传可无线传输视频信号,通过手机可远程查看相机拍摄画面,以及搭配 DJI RS 2/RSC 2 使
用实现智能跟随 3.0 以及远程控制功能。DJI Ronin 鹰眼图传还可支持 Ronin-S/SC 云台,以及单独配合相机使用。
9
CHSCHS
安装连线
Ronin 鹰眼图传有三种使用方式。
方式一:搭配相机和 DJI RS 2/RSC 2 云台使用(图示以 DJI RS 2 为例)
1.通过冷靴接口安装至云台。建议使图传有天线的一端远离俯仰轴电机,如图所示。
2.根据相机的 HDMITM 接口类型,选择包装中对应的 HDMI 线,连接图传发射器的 HDMI 接口与相机 HDMI 接口。
3.使用 USB-C 转USB-C 线(20 cm),连接图传发射器的充电 /通信接口与云台图传接口。
若云台的冷靴接口被占用,可通过冷靴转1/4''螺丝孔转接件,将图传发射器安装在有1/4''螺纹的设
备上使用。
4.使用快门控制线。连接云台上的 RSS 相机控制接口(USB-C)和相机上的快门接口。
HDMI
方式二:搭配相机和 Ronin-S/SC 云台使用
1.固定图传发射器至相机顶端。
2.根据相机的 HDMI 接口类型选择包装中对应的 HDMI 线,连接图传的 HDMI 接口与相机 HDMI 接口。
3.根据实际需求,若连接图传的相机控制接口与相机的快门接口,仅可通过 Ronin App 控制相机,云台机身按键
命令无效。若连接云台相机控制接口与相机快门接口,则可通过云台按键控制相机。
10
CHSCHS
请查看DJI RS 2或DJI RSC 2相机兼容网页,选择相应的HDMI线和快门控制线。
完成图传发射器的安装连线之后,需要对云台进行平衡调节。
配合Ronin-S/SC云台使用时,可以通过Ronin App控制相机快门,并且通过手机查看图传画面。注意
手机无法通过图传发射器控制云台运动,无法使用智能跟随功能、远程控制等功能。
方式三:仅搭配相机使用
1.固定图传发射器至相机顶端。
2.根据相机的 HDMI 接口类型,选择包装中对应的 HDMI 线连接图传的 HDMI 接口与相机 HDMI 接口。
3.连接图传的相机控制接口与相机的快门接口。通过手机 Wi-Fi 连接图传之后,可以控快门,查看相机画面并调
整部分参数。
HDMI
HDMI
RSS
连接图传使用时,建议用户在手机系统设置里关闭蓝牙,防止干扰。
DJI RS 2触摸屏显示图传画面。在DJI RS 2的触摸屏从上往下滑,即可显示图传画面。
11
CHSCHS
状态指示灯信息
开启云台、相机和图传发射器。可通过状态指示灯判断图传发射器的工作状态。
状态指示灯 描述
红色 未连接
蓝色 HDMI 连接或 Wi-Fi 连接,Ronin App 打开
绿色 HDMI 连接,Wi-Fi 已连接,Ronin App 可显示图传画面
连接DJI RS 2时,需断开手机与云台的蓝牙连接,并打开Wi-Fi连接,连接Ronin App与图传发射器。
Ronin App 图传功能
运行 Ronin App,在首页点击“连接图传”, 根据界面提示连接图传 Wi-Fi, 即可进入图传相关功能页面。
1. 电量显示
100
100
100 :显示图传发射器的电量。
2. 图传系统设置
:点击进入图传设置。
辅助功能开关:开启后可控制 FPV 界面的图传辅助功能条显示。
构图辅助线:有 3×3、6×4和黄金比例三种。
画幅比例标记:在画面上标记对应的画幅比例框,可选 2.35:1、1.82:1、16:9、9:16、4:3。
画面安全标记:在画面上添加安全框范围显示,可选 96%、93%、90%、88%、85%、80%。
峰值对焦阈值:用以辅助对焦,提升对焦精确度。百分比数值越低检测的边缘越多,边缘处显示的对焦范围越大。
中心标记:在画面中心添加中心点和对角线标记,可选中心点,对角线或中心点 +对角线。
标记颜色:画面标记的颜色,可选红、绿、蓝、白、黑。
标记线宽:标记线宽度。
快门选项:有三种选择,拍摄、缓存、拍摄 +缓存。拍摄表示按下快门后相机开始录像。缓存表示按下快门
后手机开始缓存。拍摄 +缓存表示按下快门后相机开始拍摄,手机 App 开始缓存。
100100
02:30
02:30
800
800
1/800
1/800
F 2.8F 2.8
1 2
3
4
5
67
8
9
12
CHSCHS
缓存可设置上限:1GB、2GB、4GB、8GB、不设置缓存上限。
Wi-Fi 设置:点击设置 Wi-Fi 名称、密码,选择频段及信道。修改 Wi-Fi 名称或密码后需要重新连接图传 Wi-Fi。
关于: 可查看图传序列号和图传固件版本。如果有新固件时会在 App 中提示用户升级。
3. 拍摄模式
:点击切换拍照和录像。
4. 拍摄按键
:点击拍照或开始 /停止录像。
5. 回放
:点击查看已拍摄视频。
6. 图传辅助功能条
:点击展开图传辅助功能条。
斑马纹:辅助用户判断拍摄主体是否过曝或曝光不足,判断曝光调节。过曝部分用黑白纹理表示。
伪彩色:辅助判断曝光调节,过暗为蓝色,过亮为红色。
峰值对焦:对焦位置的边缘会有红色描边。
LUT:用户可以加载导入自己下载的 LUT 文件到 Ronin App 的UserLut 文件夹 (iOS) 或手机根目录下的 DJI-
Ronin-UserLut 文件夹(安卓),实现实时加载滤镜效果。
单色:指 RGB 色彩模式下单独的红色 R、绿色 G、蓝色 B通道的图像。用于观察视频图像的噪点,并对整
体的曝光质量进行判断。
7. 相机参数
8001/800F 2.8 :显示相机光圈、快门速度、ISO。
8. 远程控制
:点击使用虚拟摇杆和体感控制功能。
9. 智能跟随
:跟随人物时,建议使用扳机键,根据屏幕中心点选中被摄主体。跟随物体时,在屏幕中框选被摄主体,
以更好的识别物体。目标识别成功后即可开始跟随目标以及拍摄。
使用智能跟随功能时,需要根据拍摄场景设置合适的跟随速度。跟随速度设置过高会导致云台晃动,从而丢失
目标;跟随速度设置过低,则不能拍摄理想的效果。
为了获取更平滑的画面,建议在使用等效焦距为 24 mm 的镜头时,将跟随速度设为 20(使用索尼 α7 III 测得 )。
若相机和镜头等效焦距小于 24 mm 则调高跟随速度值,反之则调低。
工作频率 2.400-2.4835 GHz,5.725-5.850 GHz
重量 126 g
体积 82 mm ×63 mm ×24 mm
发射功率(EIRP)2.400-2.4835 GHz:< 25dBm(FCC),<20dBm(CE/SRRC/MIC)
5.725-5.850 GHz:< 25dBm(FCC/SRRC),<14dBm(CE)
电池容量 2970 mAh
适配充电器规格 5V/2A
充电时间 约 2.5 小时
续航时间 约 3.5 小时
规格参数
13
CHSCHS
传输距离 200 m (SRRC/FCC 标准下,无干扰无遮挡环境)
100 m (CE 标准下,无干扰无遮挡环境)
延时 60 ms
工作电流 /电压 900 mA/3.7 V
工作环境温度 0℃至 45℃
14
CHT
物品清單
影像傳輸發射器 ×1
USB-C 對USB-C 傳輸線(20 cm)
×1
C 端口轉 D 端口 HDMI 傳輸線
(20 cm)× 1
冷靴轉 1/4" 螺絲孔轉接配件
×1
C 端口轉 A 端口 HDMI
傳輸線(20 cm)× 1
M4 螺絲(10 mm)× 2
USB-C 傳輸線(40 cm)× 1
C 端口轉 C 端口 HDMI
傳輸線(20 cm)× 1
扳手(3 mm)×1
1. 天線
傳輸無線訊號。
2. HDMI 連接埠(Mini HDMI)
用於連接相機 HDMI 連接埠。
3. RSS 相機快門控制連接埠(USB-C)
未連接 DJI RS 2/DJI RSC 2 使用時,連接相機快門
連接埠以控制相機。
4. 電量指示燈
指示目前影像傳輸發射器電量。
5. 狀態指示燈
指示系統狀態。
6. 電源按鈕
長按以開、關機。點擊六次將重設 Wi-Fi 密碼
為12345678(電量指示燈閃爍三次表示恢復
成功),恢復後需要在 Ronin 應用程式上修
改為強度密碼後才能使用。長按 10 秒以上即
強制關機。
7. 冷靴介面
用於安裝置雲台的冷靴介面或相機的熱靴介面。
8. 充電 /通訊連接埠(USB-C)
充電連接埠,以及執行與 DJI RS 2/DJI RSC 2
的通訊。
9. 預留指示燈
預留。
1
2
7
3
4
5
6
8
9
簡 介
DJI RONINTM 鷹眼影像傳輸可無限傳輸影片訊號,透過手機可遠端查看相機拍攝畫面,若搭配 DJI RS 2/RSC 2
使用即可執行智慧跟隨 3.0 以及遠端控制功能。DJI Ronin 鷹眼影像傳輸還可以支援 Ronin-S/SC 雲台,以及單獨
搭配相機使用。
15
CHT
安裝連線
Ronin 鷹眼影像傳輸有三種使用方式。
方式一:搭配相機和 DJI RS 2/RSC 2 雲台使用(圖示以 DJI RS 2 為例)
1.透過冷靴介面安裝至雲台。建議將影像傳輸有天線的一端遠離俯仰軸馬達,如圖所示。
2.根據相機的 HDMITM 連接埠類型,選擇隨附的 HDMI 傳輸線,連接影像傳輸發射器的 HDMI 連接埠與相機
HDMI 連接埠。
3.使用 USB-C 轉USB-C 傳輸線(20 cm),連接影像傳輸發射器的充電 /通訊連接埠與雲台影像傳輸連接埠。
若雲台的冷靴介面被占用,可透過冷靴轉 1/4'' 螺絲孔轉機配件,將影像傳輸發射器安裝在有 1/4''
螺紋的裝置上使用。
4.使用快門控制線。連接雲台上的 RSS 相機控制連接埠(USB-C)和相機上的快門連接埠。
HDMI
方式二:搭配相機和 Ronin-S/SC 雲台使用
1.將影像傳輸發射器固定至相機頂端。
2.根據相機的 HDMI 連接埠類型,選擇隨附的 HDMI 傳輸線,連接影像傳輸發射器的 HDMI 連接埠與相機 HDMI
連接埠。
3.根據實際需求,若連接影像傳輸的相機控制連接埠與相機的快門連接埠,僅可透過 Ronin 應用程式控制相機,
雲台機身按鈕命令無效。若連接雲台相機控制連接埠與相機快門連接埠,則可透過雲台按鈕控制相機。
16
CHT
請查看 DJI RS 2 或DJI RSC 2 相機相容網頁,選取對應的 HDMI 傳輸線和快門控制線。
完成影像傳輸發射器的安裝連線之後,需要對雲台進行平衡調整。
配合 Ronin-S/SC 雲台使用時,可以透過 Ronin 應用程式控制相機快門,並且透過手機查看影像
傳輸畫面。注意手機無法透過影像傳輸發射器控制雲台運轉,無法使用智慧跟隨功能與遠端控制
等功能。
方式三:僅能搭配相機使用
1.將影像傳輸發射器固定至相機頂端。
2.根據相機的 HDMI 連接埠類型,選擇隨附的 HDMI 傳輸線,連接影像傳輸發射器的 HDMI 連接埠與相機 HDMI
連接埠。
3.連接影像傳輸的相機控制連接埠與相機的快門連接埠。透過手機 Wi-Fi 連接影像傳輸發射器之後,可以控制快
門,以及查看相機畫面並調整部分參數。
HDMI
HDMI
RSS
連接影像傳輸使用時,建議使用者在手機系統設定裡將藍牙關閉,以防止干擾。
DJI RS 2 觸控螢幕顯示影像傳輸畫面。在 DJI RS 2 的觸控螢幕從上往下滑動,即可顯示影像傳輸
畫面。
17
CHT
狀態指示燈資訊
開啟雲台、相機與影像傳輸發射器。可透過狀態指示燈判斷影像傳輸發射器的運作狀態。
狀態指示燈 描述
紅色 未連接
藍色 HDMI 連接,或 Wi-Fi 连接,Ronin 應用程式開啟
綠色 HDMI 連接,Wi-Fi 已連接,Ronin 應用程式可顯示影像傳輸畫面
連接 DJI RS 2 時,需要中斷手機與雲台的藍牙連接,並打開 Wi-Fi 連接,以連接 Ronin 應用程式與
影像傳輸發射器。
Ronin 應用程式影像傳輸功能
執行 Ronin 應用程式,在首頁點擊「連續影像傳輸」,根據介面提示連接影像傳輸 Wi-Fi, 即可進入影像傳輸相關
功能頁面。
1. 電量顯示
100
100
100 :顯示影像傳輸發射器的電量。
2. 影像傳輸系統設定
:點擊進入影像傳輸設定。
輔助功能開關:開啟後可以控制 FPV 介面的影像傳輸輔助功能條顯示。
構圖輔助線:有 3×3、6×4 和黃金比例三種。
畫幅比例標記:在畫面上標記對應的畫幅比例框,可選擇 2.35:1、1.82:1、16:9、9:16、4:3。
畫面安全標記:在畫面上新增安全框範圍顯示,可選擇 96%、93%、90%、88%、85%、80%。
峰值對焦閾值:用以輔助對焦,提升對焦精準度。百分比的數值越低則檢測邊緣越多,而邊緣處顯示的對焦範
圍越大。
中心標記:在畫面中心新增中心點和對角線標記,可選擇中心點、對角線或中心點 +對角線。
標記顏色:畫面標記的顏色,可選擇紅色、綠色、藍色、白色、黑色。
標記線寬:標記線寬度。
快門選項:有三種選項;拍攝、快取、拍攝 +快取。拍攝表示;按下快門後,相機開始錄影。快取表示;按
100100
02:30
02:30
800
800
1/800
1/800
F 2.8F 2.8
1 2
3
4
5
67
8
9
18
CHT
下快門後手機開始快取。拍攝 +快取表示;按下快門後,相機開始拍攝,手機應用程式開始快取。
可設定快取上限:1GB、2GB、4GB、8GB、不設定快取上限。
Wi-Fi 設定:點擊設定 Wi-Fi 名稱、密碼、選擇頻段及頻道。修改 Wi-Fi 名稱或密碼後需要重新連接影像傳輸
Wi-Fi。
關於: 可查看影像傳輸序號和影像傳輸韌體版本。如果有新韌體時會在應用程式中提示使用者升級。
3. 拍攝模式
:點擊切換拍攝和錄影。
4. 拍攝按鈕
:點選拍照或開始 /停止錄影。
5. 重播
:點選即可查看已拍攝的影片。
6. 影像傳輸輔助功能條
:點擊以展開影像傳輸輔助功能條。
斑馬紋:輔助使用者判斷拍攝主體是否過曝或曝光不足,以及判斷曝光調節。過曝部分以黑白紋理表示。
假色:輔助判斷曝光調節,過暗為藍色而過量為紅色。
峰值對焦:對焦位置的邊緣會有紅色描邊。
LUT:使用者可以加載以將自行下載的 LUT 檔案導入到 Ronin 應用程式的 UserLut 檔案資料夾 (iOS) 或手機
根目錄下的 DJI-Ronin-UserLut 檔案資料夾(Android),以執行即時加載濾鏡效果。
單色:指 RGB 色彩模式下的單獨紅色 R、綠色 G、藍色 B 頻道的影像。用於觀察影片影像的噪點,並對
整體的曝光品質進行判斷。
7. 相機參數
8001/800F 2.8 :顯示相機光圈、快門速度、ISO。
8 遠端控制
:點擊以使用虛擬搖桿和體感控制功能。
9. 智慧跟隨
:跟隨人物時,建議使用板機鍵,根據螢幕中心點來點選被攝主體。跟隨物體時,在螢幕中框選被攝主體,
以對物體進行更佳的識別。目標識別成功後即可開始跟隨目標與拍攝。
使用智慧跟隨功能時,需要根據拍攝場景設定合適的跟隨速度。跟隨速度設定過高會導致雲台晃動,進而丟失
目標;跟隨速度設定過低,則無法拍攝理想的效果。
為了能夠獲取更平順的畫片,建議在使用等效焦距為 24 mm 的鏡頭時,將跟隨速度設定為 20(使用索尼 α7
III 測量而得 )。若相機和鏡頭等效焦距小於 24 mm,則調高跟隨速度值,反之則調低。
運作頻率 2.400 - 2.4835 GHz、5.725 - 5.850 GHz
重量 126 g
體積 82 mm ×63 mm ×24 mm
發射功率(EIRP)2.400 - 2.4835 GHz:< 25dBm(FCC)、< 20dBm(CE/SRRC/MIC)
5.725 - 5.850 GHz:< 25dBm(FCC/SRRC)、< 14dBm(CE)
電池容量 2970 mAh
適用充電器規格 5V/2A
充電時間 約 2.5 小時
規格參數

Popular Transmitter manuals by other brands

Dwyer Instruments Series 616 Installation and operating instructions

Dwyer Instruments

Dwyer Instruments Series 616 Installation and operating instructions

Crestron HD-TXA-4KZ-101-1G Getting started

Crestron

Crestron HD-TXA-4KZ-101-1G Getting started

Omega EWS-RH user guide

Omega

Omega EWS-RH user guide

ABB LMT100 Operation instructions

ABB

ABB LMT100 Operation instructions

TeleEye III+ installation guide

TeleEye

TeleEye III+ installation guide

Burkert SE56 instruction manual

Burkert

Burkert SE56 instruction manual

BT Redcare Secure Mk3 Installation, maintenance and operation manual

BT Redcare

BT Redcare Secure Mk3 Installation, maintenance and operation manual

Peavey PROCOMM operating manual

Peavey

Peavey PROCOMM operating manual

Siemens SITRANS TF2 quick start guide

Siemens

Siemens SITRANS TF2 quick start guide

LRS Butler II TX-1605-5 Programming manual

LRS

LRS Butler II TX-1605-5 Programming manual

Emerson Rosemount 3051 quick start guide

Emerson

Emerson Rosemount 3051 quick start guide

ROHRBACK COSASCO SYSTEMS CORRATER 9020 user manual

ROHRBACK COSASCO SYSTEMS

ROHRBACK COSASCO SYSTEMS CORRATER 9020 user manual

Easy wave RTS03 operating instructions

Easy wave

Easy wave RTS03 operating instructions

Emerson Rosemount Oxymitter 4000 Reference manual

Emerson

Emerson Rosemount Oxymitter 4000 Reference manual

Crown FM250G user manual

Crown

Crown FM250G user manual

Niorfnio Niodesktop TB Series quick guide

Niorfnio

Niorfnio Niodesktop TB Series quick guide

Halemeier S-Mitter basic MultiWhite2 manual

Halemeier

Halemeier S-Mitter basic MultiWhite2 manual

urmet domus E2BPX manual

urmet domus

urmet domus E2BPX manual

manuals.online logo
manuals.online logoBrands
  • About & Mission
  • Contact us
  • Privacy Policy
  • Terms and Conditions

Copyright 2025 Manuals.Online. All Rights Reserved.