dji ZENMUSE L1 User manual


1
Contents
EN Quick Start Guide 2
DE Kurzanleitung45
ES Guía de inicio rápido 54
FR Guide de démarrage rapide63
IT Guida rapida 72
NL Snelstartgids 81
PT-BR Guia de Início Rápido 99
RU Краткое руководство 108
CHS 快速入门指南 11
JP クイックスタートガイド27
CHT 快速入門指南 19
KR 퀵스타트가이드36
PT-PT Guia de início rápido 90
Compliance 117

2
EN
Disclaimer and Warning
Congratulations on purchasing your new DJITM product. The information in this document aects your
safety and your legal rights and responsibilities. Carefully read this entire document and all safe and lawful
practices provided by DJI. Visit the DJI ocial website (http://www.dji.com) to download the full version
of the user manual and carefully read all instructions and warnings therein before assembling, setting
up, and using this product. Failure to read and follow instructions and warnings in the above documents
or a lack of strong awareness of safety during the operation may result in serious injury to yourself or
others, or damage to your DJI product or damage to other objects. This document and all other collateral
documents are subject to change at the sole discretion of SZ DJI Technology Co., Ltd. (DJI). They may be
updated, changed, or terminated without prior notication. For up-to-date product information, visit http://
www.dji.com and click on the product page for this product.
DJI is a trademark of SZ DJI TECHNOLOGY CO., LTD. and its aliated companies. Names of products,
brands, etc., appearing in this document are trademarks or registered trademarks of their respective
owner companies.
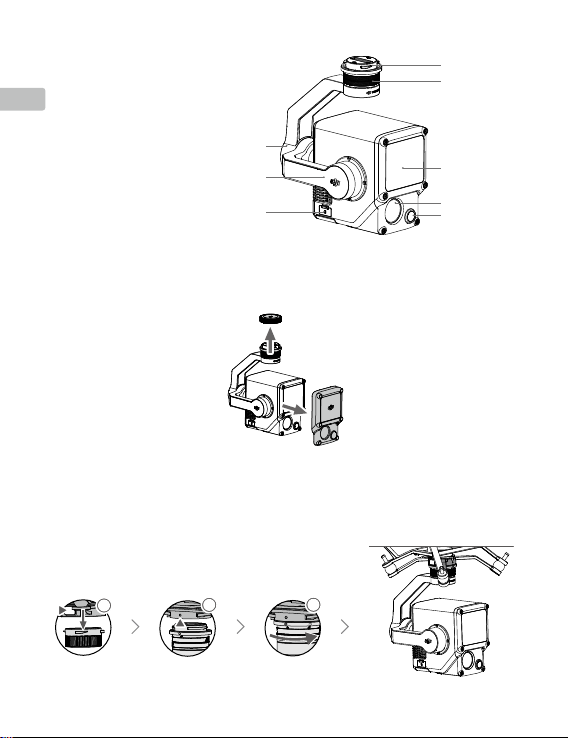
Do Not Modify or Alter the Gimbal and Camera
The ZENMUSETM L1 has been calibrated specically for the designated camera and lens before leaving the
factory. No physical or mechanical modication or adjustment of the gimbal is required or recommended. Do
not add any other component or device to the camera such as a lter or lens hood.
The L1 is a delicate instrument. Do not disassemble the gimbal or camera as this will cause permanent
damage.
Only Use Compatible Aircraft
Only use the L1 with specied compatible DJI aircraft. The L1 will be compatible with more aircraft in
the future. Check the Zenmuse L1 User Manual for the latest information on compatible aircraft. To
optimize the performance of the gimbal, download the latest DJI Pilot app and update to the latest aircraft
rmware. Otherwise, the L1 may not function properly.
Safe Use
Make sure to operate your aircraft in the safest manner possible. Observe the procedures contained in the
user manual and the online tutorials to mount and connect the gimbal to your aircraft. Respect the AMA
Model Aircraft Safety Code.
By using this product, you hereby signify that you have read this disclaimer and warning carefully and
that you understand and agree to abide by all terms and conditions of this document and all relevant
documents of this product. You agree that you are solely responsible for your own conduct while using
this product, and for any consequences thereof. You agree to use this product only for purposes that

3
EN
are proper and in accordance with all applicable laws, rules, and regulations, including international and
domestic airspace regulations, and all terms, precautions, practices, policies, and guidelines DJI has
made and may make available.
DJI accepts no liability for damage, injury, or any legal responsibility incurred directly or indirectly from the
use of this product. The user shall observe safe and lawful practices including, but not limited to, those
set forth in the user manual.
Warnings
1. Be careful when using the L1 in conditions with low visibility such as foggy or stormy weather. In such
conditions, the detection range may be reduced.
2. DO NOT touch the optical window of the L1. Dust and stains on the optical window can negatively
aect the performance. Use compressed air, isopropyl alcohol, or a lens cloth to clean the optical
window correctly. Refer to the user manual for more information on how to clean optical windows. DO
NOT use substances containing alcohol, benzene, thinners, or other ammable substances to clean or
maintain the RGB Mapping Camera or Auxiliary Positioning Vision Sensor.
3. DO NOT drop the L1.
In the Box
Gimbal and Camera
(inc. microSD card) × 1 Storage Case × 1 Lens Cleaning Cloth × 1
Introduction
The Zenmuse L1 integrates a LIVOXTM LiDAR module, a high-accuracy IMU, and an RGB mapping
camera on a 3-axis stabilized gimbal. When used with specified compatible DJI aircraft and DJI
TERRATM, the L1 offers a complete solution that gives real-time 3D data throughout the day, which
efciently captures the details of complex structures and delivers highly accurate reconstructed models.

4
EN
Overview
1. Gimbal Connector
2. Pan Motor
3. LiDAR
4. RGB Mapping Camera
5. Auxiliary Positioning Vision
Sensor
6. microSD Card Slot
7. Tilt Motor
8. Roll Motor
1
3
6
7
8
4
5
2
2. Press the button on the aircraft used for detaching the gimbal and camera. Rotate the gimbal cap on
the aircraft to remove.
3. Align the white dot on the gimbal with the red dot on the aircraft and insert the gimbal.
4. Rotate the gimbal lock to the locked position by aligning the red dots.
Installation
1. Remove the gimbal cap and lens protector.
2
113

5
EN
• Make sure the gimbal connector on the aircraft is positioned correctly when mounting.
Otherwise, the camera cannot be mounted.
• Only remove the L1 after powering off the aircraft.
• Remove the L1 by pressing the button on the aircraft used for detaching the gimbal
and camera.
• Make sure the microSD card slot cover is firmly in place to prevent dust or moisture
entering during usage or transportation.
• To avoid burns, DO NOT directly touch the camera case when powering on.
• Detach the gimbal from the aircraft during transportation or storage. Otherwise, the
service life of the damper balls may be shortened or they may even be damaged.
Camera Controls
Remote Controller
The MATRICETM 300 RTK remote controller is used as an example below. Adjust the tilt of the
gimbal using the left dial and adjust the pan using the right dial. Press the shutter button or
record button to take photos or record video. Toggle the 5D button to adjust the EV value. The
customizable C1 button can be used to recenter the gimbal and the customizable C2 button can
be used to switch between the main and auxiliary screen.
1. Left Dial
2. Record Button
3. Shutter Button
4. Right Dial
5. 5D Button
6. Customizable C2 Button*
7. Customizable C1 Button*
1
23
4
57
6
* The function of this button can be customized.

6
EN
DJI Pilot App
The touch interface can be used for capturing photos, recording videos, and viewing playback.
Professional photography congurations are also available.
1. Live HD Video
2. Camera Type
3. Camera Parameters
4. Focus Mode
5. Auto Exposure Lock
6. Camera Settings
7. Recording Mode (Shutter/Video Record/Point Cloud Record)
8. Shooting Button (Shutter/Video Record/Point Cloud Record)
9. Playback
10. Parameter Settings
* The software interface may need to be updated. Make sure to update to the latest version.
In-Flight (RTK)
19:29
AE
ISO
100
Shutter
1/1000
EV
-0.3
AF-C
N
E
W
S
3
6
12
15
21
24
30
33
20
222m
05.2
SPD
m/s
WS 04.0
130.2 ALT
m
VS2.5 ASL1234.5
CAMERA
LiDAR
SBS MENU3.72V
RTK44 5.8G
R
55%
56%
3.72V
1260
1 2 3 5
6
7
8
9
10
11
12
4
3.72V
19:29
RTK44 5.8G
N
E
W
S
3
6
12
15
21
24
30
33
20
222m
05.2
SPD
m/s
WS 04.0
130.2 ALT
m
VS2.5 ASL1234.5
1260
SBS
LiDAR
CAMERA
22:02
MENUIn-Flight (RTK) R
55%
56% 3.72V
3.72V
1413 15
16

7
EN
11. Camera/LiDAR Toggle
12. Single/Side-By-Side View Toggle
13. Calibration Flight Button
14. Color Palette
15. Model Preview Button
16. Pause Button
Usage
Users can create a ight mission to record point cloud data in DJI Pilot and import the recorded data into
DJI Terra for high-precision model reconstruction.
Preparation
1. Make sure the L1 is installed correctly on the aircraft and that the aircraft and remote controller are linked
after powering on.
2. Go to camera view in DJI Pilot, select , then RTK, choose the RTK service type, and make sure that
the status of RTK positioning and heading both display “FIX”.
3. Before recording data, it is recommended to warm up the L1 for 3 to 5 minutes after powering on.
Conrmation will be received in the app when the payload INS IMU has warmed up.
Setting Camera Parameters
1. Go to the camera view in DJI Pilot and select CAMERA .
2. Select to adjust the camera parameters according to the surroundings. Make sure the photo will be
well exposed.
Recording Point Cloud Data
To record point cloud data, create a Mapping or Linear Flight Mission or begin a manual ight. A Mapping
Mission is used as an example.
1. Enter the mission ight screen in DJI Pilot, select Create Mission, and then to choose a Mapping
mission.
2. Tap and drag on the map to adjust the area that will be scanned.
3. Edit the parameters for a LiDAR Mapping mission or Photogrammetry mission. A LiDAR Mapping mission
is used as an example.
A. Select Zenmuse L1 and then LiDAR Mapping.
B. Set the Advanced Settings, Payload Settings, and other parameters. It is recommended to set the
Side Overlap (LiDAR) to 50% or above, the Scanning Mode to Repetitive, the altitude to 50-100 m, the
ight speed to 5-10 m/s, and enable Calibration Flight.
4. Select to save the mission and select to upload and execute the ight mission.

8
EN
Specications
General
Product name ZENMUSE L1
Dimensions 152×110×169 mm
Weight 930±10 g
Power Typical: 30 W; Max: 60 W
IP Rating IP54
Supported Aircraft Matrice 300 RTK
Operating Temperature Range -20° to 50° C (-4° to 122° F)
0° to 50° C (32° to 122° F) (when using RGB mapping camera)
Storage Temperature Range -20° to 60° C (-4° to 140° F)
System Performance
Detection Range 450 m @ 80% reectivity, 0 klx
190 m @ 10% reectivity, 100 klx
Point Rate Single return: max. 240,000 pts/s
Multiple return: max. 480,000 pts/s
5. Power o the aircraft after the mission is completed and remove the microSD card from the L1. Connect
it to a computer and check the point cloud data, photos, and other les in the DCIM folder.
Read the Zenmuse L1 User Manual for more information about manual ight, setting parameters
for a Photogrammetry mission, and recording point cloud data by Linear Flight Mission.
Reconstruction in DJI Terra
Follow the steps below to reconstruct point cloud data in DJI Terra.
1. Launch DJI Terra, select New Mission, and create and save a point cloud post-processing mission.
2. Select in the mission editing view and import the folder from the microSD card. The folder will be
named after the time the point cloud data was recorded.
3. Click to start reconstruction and wait until it is completed.
4. In the reconstruction page, users can open the current mission folder using the keyboard shortcut
“Ctrl+Alt+F” to nd the le and check the result of the reconstruction.
Read the DJI Terra User Manual for more information about how to configure and use
reconstruction in DJI Terra.

9
EN
System Accuracy (RMS 1σ)* Horizontal: 10 cm @ 50 m
Vertical: 5 cm @ 50 m
Real-Time Point Cloud Coloring Coding Reectivity, Height, Distance, RGB
LiDAR
Ranging Accuracy (RMS 1σ)* 3 cm @ 100 m
Maximum Returns Supported 3
Scan Modes Non-repetitive scanning pattern, Repetitive scanning pattern
FOV Non-repetitive scanning pattern: 70.4° (horizontal) × 77.2°
(vertical)
Repetitive scanning pattern: 70.4° (horizontal) × 4.5° (vertical)
Laser Safety Class 1 (IEC 60825-1:2014) (Eye Safety)
Inertial Navigation System
IMU Update Frequency 200 Hz
Accelerometer Range ±8 g
Angular Velocity Meter Range ±2000 dps
Yaw Accuracy (RMS 1σ)* Real-time: 0.3°, Post-processing: 0.15°
Pitch/Roll Accuracy (RMS 1σ)* Real-time: 0.05°, Post-processing: 0.025°
Auxiliary Positioning Vision Sensor
Resolution 1280×960
FOV 95°
RGB Mapping Camera
Sensor Size 1 in
Eective Pixels 20 MP
Photo Size 5472×3078 (16:9), 4864×3648 (4:3), 5472×3648 (3:2)
Focal Length 8.8/24 mm (equivalent)
Shutter Speed Mechanical shutter speed: 1/2000-8 s
Electronic shutter speed: 1/8000-8 s
ISO Video: 100-3200 (auto), 100-6400 (manual)
Photo: 100-3200 (auto), 100-12800 (manual)
Aperture Range f/2.8 - f/11
Supported File System FAT (≤32 GB); exFAT (>32 GB)
Photo Format JPEG
Video Format MOV, MP4
Video Resolution H.264, 4K: 3840×2160 30p
Gimbal
Stabilized System 3-axis (tilt, roll, pan)
Angular Vibration Range ±0.01°
Mount Detachable DJI SKYPORT

10
EN
Controllable Range Tilt: -120° to +30°, Pan: ±320°
Operation Modes Follow/Free/Re-center
Data Storage
Raw Data Storage Photo/IMU/Point cloud/GNSS/Calibration les
Supported microSD Cards microSD: Sequential writing speed 50 MB/s or above and UHS-I
Speed Grade 3 rating or above; Max capacity: 256 GB
Recommended microSD Cards** SanDisk Extreme 128GB UHS-I Speed Grade 3
SanDisk Extreme 64GB UHS-I Speed Grade 3
SanDisk Extreme 32GB UHS-I Speed Grade 3
SanDisk Extreme 16GB UHS-I Speed Grade 3
Lexar 1066x 128GB U3
Samsung EVO Plus 128GB
Post-Processing Software
Supported Software DJI Terra
Data Format DJI Terra supports exporting standard format point cloud
models:
Point cloud format: PNTS/LAS/PLY/PCD/S3MB
This content is subject to change.
Download the latest version from
http://www.dji.com/zenmuse-l1
DJI is a trademark of DJI.
Copyright © 2021 DJI All Rights Reserved.
* The accuracy was measured under the following conditions in a DJI laboratory environment: after a
5-minute warm up, using Mapping Mission with Calibration Flight enabled in DJI Pilot, and with the RTK
in FIX status. The relative altitude was set to 50 m, ight speed to 10 m/s, gimbal pitch to -90°, and each
straight segment of the ight route was less than 1000 m. DJI Terra was used for post-processing.
** The recommended microSD cards may be updated in future. Visit the DJI ocial website for the latest
information.

11
CHS
免责声明与警告
感谢您购买 DJITM 产品。本文所提及的内容关系到您的安全以及合法权益与责任。组装、设置和使用本产
品之前,请仔细阅读本文档,并访问 DJI 官方网站(http://www.dji.com)下载完整版《用户手册》且仔
细阅读其中的所有说明和警告,以确保对产品进行正确的设置。不遵循和不按照上述文档的说明与警告来
操作,或操作过程中不具备强烈的安全注意意识,可能会给您和周围的人带来伤害,损坏本产品或其它物
品。本文档及所有相关的文档最终解释权归深圳市大疆创新科技有限公司(“DJI”或“大疆创新”)所有。
如有更新、改版或终止,恕不另行通知。请访问 DJI 官方网站以获取最新的产品信息。
DJI 是深圳市大疆创新科技有限公司及其关联公司的商标。本文出现的产品名称、品牌等,均为其所属公
司的商标或注册商标。
请勿自行调整云台结构
ZENMUSETM L1 云台相机出厂前已根据其所搭载的相机和激光雷达完成调试。请不要自行调整云台或者
改变其机械结构,也不要为相机增加其它外设(如滤镜、遮光罩)。
L1 负载结构精密,请勿自行对 L1 负载作任何拆装,否则将会导致云台相机工作异常。
务必安装负载至指定飞行器
L1 负载适配指定飞行器。请升级飞行器至最新固件,并下载使用最新版本的 DJI Pilot App 以获得最佳体验。
使用安全
请确保正确安全地使用您的飞行器。请在 DJI 官方网站或 DJI Pilot App 仔细阅读用户手册与观看教学视频,
以正确地安装云台至飞行器。
一旦使用本产品,即视为您已经仔细阅读免责声明与警告,理解、认可和接受本文档及本产品所有相关文
档中的全部条款和条件。您承诺对使用本产品以及可能带来的所有后果负全部责任。您承诺仅出于正当目
的使用本产品,并且同意 DJI 制定的任何相关条例、政策和指引。
DJI 对于直接或间接使用本产品而造成的损坏、伤害以及任何法律责任不予负责。用户应遵循包括但不限
于本文提及的所有安全指引。
警告
1. 在空气能见度较差的情况下(例如雾霾、暴雨天气),激光雷达的有效检测范围将会减小,使用时请
格外小心。
2. 切勿用手触摸激光雷达窗口。若激光雷达窗口上有污点或灰尘等杂质,请使用压缩空气除尘罐,酒精
以及镜头清洁布进行清洁(具体清洁方式,请查看用户手册),以免污点灰尘等影响产品性能。但切
勿使用含酒精等易挥发成分的液体清洁测绘相机和辅助定位相机的镜头。
3. 切勿摔落 L1 负载。

12
CHS
物品清单
简介
Zenmuse L1 是一款一体化的行业激光负载,集成了 LIVOXTM 激光雷达、高精度惯导以及测绘相机,可快
速生成高精度点云和模型。配备三轴云台,可安装至 DJI 指定飞行平台,支持 DJI Pilot App。配合大疆智
图(DJI TERRATM)软件,形成一体化解决方案,能够全天候、高效实时完成现场三维重建以及复杂场景的
高精度三维重建。
部件说明
云台相机(含 microSD 卡) ×1 收纳箱 ×1 镜头布 ×1
1. 云台接口
2. 平移轴电机
3. 激光雷达
4. 测绘相机
5. 辅助定位相机
6. microSD 卡槽
7. 俯仰轴电机
8. 横滚轴电机
1
3
6
7
8
4
5
2

13
CHS
2. 按住飞行器的云台相机解锁按钮,移除飞行器云台接口保护盖。
3. 对齐云台相机上的白点与飞行器接口的红点,并嵌入安装位置。
4. 旋转云台相机接口至锁定位置(红点对齐),以固定云台。
安装云台相机
1. 移除云台接口保护盖和镜头保护盖。
• 如无法安装云台 , 请检查插头是否被意外扭转 , 若由于意外扭转导致不平齐,请手动拨平
后再装入云台。
•务必关闭飞行器电源后,再移除云台相机。
•如需移除云台相机,请先按住飞行器的云台相机解锁按键,再旋转移除云台相机。
•使用或存储过程中,请盖好 microSD 卡保护盖,以免水汽或灰尘进入。
•通电过程中请勿直接触碰相机外壳,避免烫伤。
•飞行器存储与运输过程中,需要将云台相机从飞行器上取下,否则将导致减震球使用寿命降低
甚至损坏。
相机功能
遥控器控制
以MATRICETM 300 RTK 遥控器为例,遥控器左、右拨轮分别控制云台的俯仰和平移角度;通过拍照、
录影按键控制相机拍照和录影;五维按键可调节 EV 值;自定义按键 C1 可使云台回中,而自定义按键
C2 可切换主辅画面。
2
113

14
CHS
DJI Pilot App 控制
除控制拍照、录影与回放外,还提供专业拍摄配置。
19:29
AE
ISO
Shutter
1/1000
EV
-0.3
AF-C
N
E
W
S
3
6
12
15
21
24
30
33
20
222m
05.2
SPD
m/s
WS 04.0
130.2 ALT
m
VS2.5 ASL1234.5 MENU3.72V
RTK44 5.8G
R55%
56%
3.72V
分屏相机 100
1260
1 2 3 5
6
7
8
9
10
11
12
4
1. 左拨轮
2. 录影按键
3. 拍照按键
4. 右拨轮
5. 五维按键
6. 自定义功能按键 C2*
7. 自定义功能按键 C1*
1
23
4
57
6
* 按键功能可进行自定义设置。

15
CHS
1. 实时画面
2. 相机类型
3. 相机参数
4. 对焦模式
5. 自动曝光锁定
6. 相机设置菜单
7. 拍照 /录影 /点云录制切换按键
8. 拍照 / 录影 / 点云录制按键
9. 回放
10. 拍摄参数设置
11. 相机 /点云切换按键
12. 单屏 /双屏切换按键
13. 标定飞行按键
14. 调色板
15. 模型预览按键
16. 暂停按键
3.72V
19:29
RTK44 5.8G
N
E
W
S
3
6
12
15
21
24
30
33
20
222m
05.2
SPD
m/s
WS 04.0
130.2 ALT
m
VS2.5 ASL1234.5
22:02
MENUR
55%
56% 3.72V
3.72V
分屏
1260
相机点云1413 15
16
软件界面可能会更新,请以最新版本为准。
使用
用户可通过 DJI Pilot App 创建飞行任务录制点云数据,再使用 DJI Terra 进行点云数据处理。
使用准备
1. 确保 L1 负载正确安装于飞行器,依次开启飞行器和遥控器电源,并确保两者已对频。
2. 进入 DJI Pilot App 手动飞行界面 > > RTK,选择对应 RTK 服务类型,确保 RTK 的定位和定向状态
均为 FIX。
3. 建议 L1 负载启动后先预热 3-5 分钟,App 界面和语音提示负载惯导预热已完成,再开始数据采集。
设置相机参数
1. 进入 DJI Pilot App 手动飞行界面 > 相机 ,选择相机界面。
2. 点击 ,根据光线条件调整相机参数,确保照片曝光正常。

16
CHS
规格参数
总体参数
产品名称 ZENMUSE L1
尺寸 152×110×169 mm
重量 930±10 g
系统功耗 30 W(典型值),60 W(最大值)
防护等级 IP54
支持机型 Matrice 300 RTK
工作温度 -20℃至 50℃(测绘相机工作温度为 0℃至 50℃)
存储温度 -20℃至 60℃
录制点云数据
创建航线飞行(建图航拍和航带飞行)或手动飞行任务以录制点云数据。以建图航拍为例:
1. 进入 DJI Pilot App 航线飞行界面 >“创建航线”,选择 创建建图航拍任务。
2. 调整地图上所需扫描的区块。
3. 编辑 LiDAR Mapping(点云测绘)或 Photogrammetry(摄影测量)任务的参数。以点云测绘任务为例:
A. 选择相机为“Zenmuse L1”,然后点击“ LiDAR Mapping”。
B. 完成页面各参数设置、高级设置以及负载设置。推荐激光旁向重叠率为 50% 以上,扫描模式为重复
扫描,飞行高度为 50-100 m,飞行速度为 5-10 m/s,开启“标定飞行”。
4. 点击 保存任务,点击 上传航线并执行飞行任务。
5. 飞行任务结束后关闭飞行器电源。取出 L1 的microSD 卡并连至计算机,可在 DCIM 文件夹中检查所录
制的点云文件、所拍摄的照片以及其它文件。
阅读 Zenmuse L1 用户手册,了解摄影测量任务参数设置、使用航带飞行和手动飞行录制点云数
据等内容。
DJI Terra 建图
请按照以下步骤对点云数据进行处理。
1. 运行 DJI Terra >“新建任务”,创建激光点云后处理任务并保存。
2. 在任务编辑界面,点击 ,选择 microSD 卡中以采集时间命名的文件夹。
3. 点击“开始建图”,等待处理完成。
4. 使用快捷键 Ctrl+Alt+F 打开当前任务的文件夹,确认结果文件。
阅读 DJI Terra 用户手册,了解 DJI Terra 应用配置和使用方法。

17
CHS
系统性能
量程 450 m @ 80%,0 klx
190 m @ 10%,100 klx
点云数据率 单回波:最大 240 000 点/秒
多回波:最大 480 000 点/秒
系统精度(RMS 1σ)*平面精度:10 cm @ 50 m
高程精度:5 cm @ 50 m
实时点云上色模式 反射率,高度,距离,真彩
激光雷达
测距精度(RMS 1σ)*3 cm @ 100 m
最多支持回波数量 3
扫描模式 非重复扫描,重复扫描
FOV 非重复扫描:70.4°(水平)× 77.2°(竖直)
重复扫描:70.4°(水平)× 4.5°(竖直)
人眼安全等级 Class 1 (IEC 60825-1:2014)
惯导系统
IMU 更新频率 200 Hz
加速度计量程 ±8 g
角速度计量程 ±2000 dps
航向精度(RMS 1σ)*实时:0.3°,后处理:0.15°
俯仰 /横滚精度(RMS 1σ)*实时:0.05°,后处理:0.025°
辅助定位相机
分辨率 1280×960
FOV 95°
测绘相机
传感器尺寸 1英寸
有效像素 2000 万
图像尺寸 5472×3078(16:9);4864×3648(4:3);5472×3648(3:2)
焦距 8.8 mm / 24 mm(等效)
快门速度 机械快门:1/2000 - 8 s
电子快门:1/8000 - 8 s
ISO 视频:100 - 3200(自动),100 - 6400(手动)
照片:100 - 3200(自动),100 - 12800(手动)
光圈 f/2.8 - f/11
支持文件系统 FAT(≤32 GB);exFAT(>32 GB)
图片格式 JPEG

18
CHS
视频格式 MOV,MP4
录像分辨率 H.264,4K:3840×2160 30p
云台
稳定系统 3轴(俯仰,横滚,平移)
角度抖动量 ±0.01°
安装方式 DJI SKYPORT 快拆
可控转动范围 俯仰:-120° 至+30°,平移:±320°
工作模式 跟随 /自由 /回中
数据存储
原始数据存储 照片 /IMU/ 点云数据 /GNSS 数据 /标定文件
支持的存储卡类型 microSD 卡;最大支持 256 GB 容量,顺序写入速度 ≥50 MB/s, 传输速
度达到 UHS-I Speed Grade 3,请使用指定推荐用卡。
推荐存储卡类型 ** SanDisk Extreme 128GB UHS-I Speed Grade 3
SanDisk Extreme 64GB UHS-I Speed Grade 3
SanDisk Extreme 32GB UHS-I Speed Grade 3
SanDisk Extreme 16GB UHS-I Speed Grade 3
Lexar 1066x 128GB U3
Samsung EVO Plus 128GB
后处理软件
支持软件 大疆智图
数据格式 大疆智图支持标准格式点云模型导出:
点云格式:PNTS/LAS/PLY/PCD/S3MB 格式
* 精度由大疆实验室在以下条件测得:L1 负载上电预热 5分钟,使用 DJI Pilot 航线任务为建图航拍(开
启标定飞行),RTK 状态为 FIX,任务相对高度为 50 m、飞行速度为 10 m/s、云台俯仰为 -90°、航线
中每个直线段不超过 1000 m,使用 DJI Terra 进行后处理。
** 后续可能更新,请访问 DJI 官网进行查询。
内容如有更新,恕不另行通知。
您可以在 DJI 官方网站查询最新版本
http://www.dji.com/zenmuse-l1
DJI 是大疆创新的商标。
Copyright © 2021 大疆创新 版权所有
Other manuals for ZENMUSE L1
2
Table of contents
Other dji Camera Accessories manuals