dji Droplet Analyzer DA4231 User manual

User Guide
使用说明
ユーザーガイド
사용자 가이드
2017.05V1.0
Droplet Analyzer

EN
2
Disclaimer
Thank you for purchasing Droplet Analyzer (hereinafter referred to as the
“Product”). Read this disclaimer carefully before using this Product. By using
this Product, you hereby agree to this disclaimer and signify that you have
read it fully. Please use this Product in strict accordance with the manual
and be sure to pay attention to the Warnings. SZ DJI TECHNOLOGY CO.,
LTD., and its afliated companies assume no liability for damage(s) or injuries
incurred directly or indirectly from using, installing or refitting this product
improperly, including but not limited to using non-designated accessories
such as a battery, test paper or app.
DJITM is a trademark of SZ DJI TECHNOLOGY CO., LTD. (abbreviated as “DJI”)
and its afliated companies. Names of products, brands, etc., appearing in
this manual are trademarks or registered trademarks of their respective owner
companies. This Product and manual are copyrighted by DJI with all rights
reserved. No part of this Product or manual shall be reproduced in any form
without the prior written consent or authorization of DJI.
This disclaimer is produced in various languages. In the event of divergence
among different versions, the Chinese version shall prevail when the Product
in question is purchased in China, and English version shall prevail when the
Product in question is purchased in any other region.
Warnings
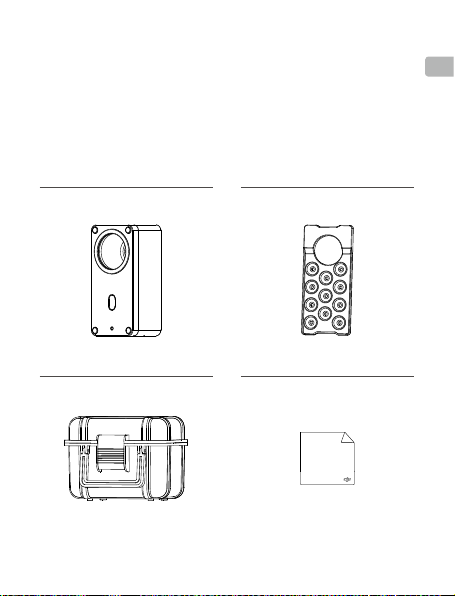
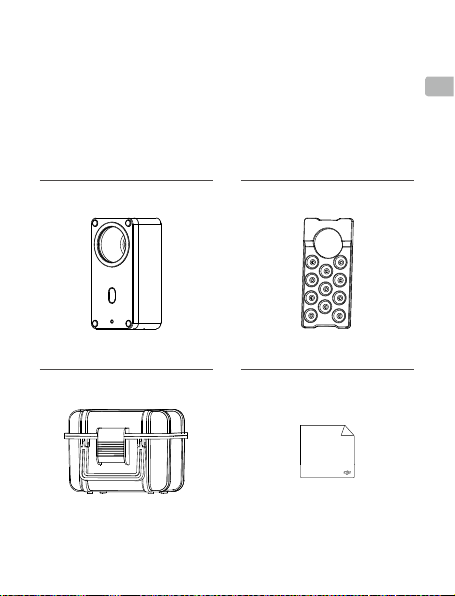
1. The Droplet Analyzer does not come with a battery. Please purchase an
approved 9 V battery. DO NOT use leaking or damaged batteries.
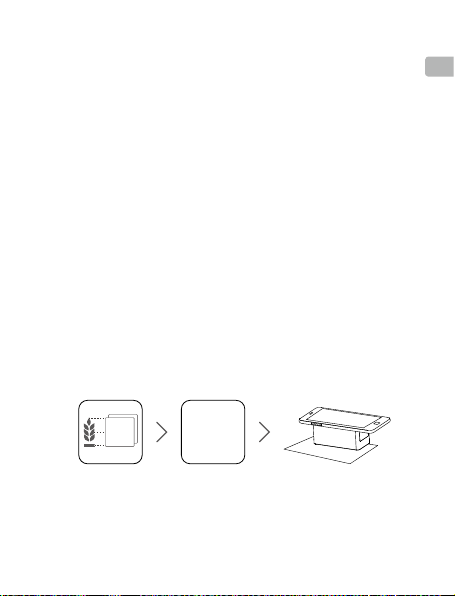
2. The Droplet Analyzer analyzes droplet information after obtaining a sample
on the test paper. Analysis results may vary according to different types of
test paper. Use water-sensitive paper from an established manufacturer to
reduce research bias.
3. Be sure to keep the lens clean. If dirty, wipe it with the lens cleaning cloth
included.
4. Remove the battery from the analyzer and put it into the toolbox if unused
for extended periods.

EN
3
Introduction
The Droplet Analyzer comes equipped with a high-precision lens module
designed for agricultural applications, with the ability to take photos with a
smart mobile device. Droplet information is easily obtained and analyzed with
the DJI Droplet Analyzer app, providing reliable data support for precision
agriculture. Its compact structure and easy-to-use features make it ideal for
single-person droplet analysis.
In the Box
Droplet Analyzer × 1
Toolbox × 1
Suction Cup Set × 1
Lens Cleaning Cloth × 1

EN
4
Overview
Lighting
System
Power Button
Power
Indicator
Lens
Suction
Cups
Battery
Compartment
Cover
Usage
Download the DJI Droplet Analyzer
Search “Droplet Analyzer” in Google Play, and download the app to your
mobile device.
The app supports Android 5.0 or later.
Binding Device
The app can only be used by binding it to the analyzer via the Internet.
1. Scan the QR code on the body of the analyzer or type in the serial number.
Each QR code or serial number will bind the app to up to ve mobile devices.
2. To unbind the Droplet Analyzer, tap the icon in the upper right corner of
the app then, Bound Device > Unbind.
Installing the Battery
A 9 V battery is required.

EN
5
1. Push the battery compartment cover out.
2. Insert the 9 V battery into the compartment. Check that the positive and
negative terminals are correctly aligned. Push again to ensure secure
installation.
3. Remount the cover.
Turning the Analyzer On/Off
Turning On: Press and hold the power button for two seconds to turn it on.
The lighting system will switch on, and the power indicator will show a solid
green light, indicating a normal start. A solid red light indicates low battery
level. Replace the battery as soon as possible.
Turning Off: Press and hold the power button for two seconds to turn it off.
The power indicator and the lighting system will turn off. The analyzer will turn
off automatically if idle for more than eight minutes after being switched on.
Fixing the Analyzer
1. Align the lens of the analyzer to the camera of your mobile device with the
suction cups facing the device. Press the analyzer to x it on the mobile
device via the suction cups.
2. Adjust the position of the analyzer so that all the suction cups are attached
to the mobile device sticking to the analyzer.
Droplet Analysis
Droplet
Analyzer
App
Place the test paper where you want to do droplet analysis on the plants. Spray
the liquid, then run the app and follow the instructions below for droplet analysis.
Data Collection
1. Tap “New Task”.

EN
6
2. Type “Task Name”, “Operator”, “Time”.
3. Select “Area of Test Paper”.
4. Type “Ground Length” and “Sample Space”. The app will display the value
of “Estimated Sample Number”.
5. Tap “+” under “Import Photo” to enter Shooting View.
a. Place the test paper onto a at surface. Align the lens of the analyzer to
the desired shooting area and stick the analyzer to the paper.
b. Roll the menu in the lower right corner of the screen to change the
sample location.
c. Tap the screen to select an area for focusing, then tap the shutter
button .
d. The area selecting tool will appear on the screen. Drag the box in the
middle to select the desired area. Drag the dots around it to change the
size of the area.
e. After selecting the area, tap “Complete” to end shooting or tap “Take
next photo”.
f. After importing your photos, tap a photo to see its corresponding
information. Tap the photo under “Photo Info” to show detected
droplets. If the information is inaccurate, tap the delete icon or
“Replace Photo” to import the photo again.
Always use the lens of the analyzer when taking photos. Make
sure that there is no space between the analyzer and test paper
to avoid extra sources of light, which may compromise droplet
information accuracy.
Use the Gradienter in the upper right corner of Shooting View
to check whether the mobile device is horizontal when taking
photos. The mobile device is adjusted to level when the dot of the
Gradienter is coincident with the central cross, turning green.
6. Tap “More Info” to congure Spray Info, Environment Info, Flight Info, and
Crop Info, then tap “Save”.
7. After conguring all the settings, tap “Save”.

EN
Data Analysis
In the task list in Data Collection View, swipe one task to the left to edit or
delete the task. Tap the desired task and the app will show you the results of
the analysis.
1. Coefficient of Variation: Indicates the distribution of the droplets. The
smaller the value, the more uniform the distribution.
2. Coverage Rate and Drop: Select/clear to show/hide the corresponding item.
3. Display Value: Select/clear to show/hide the value of each sample location.
4. Landscape: Select/clear to show the results in landscape/portrait.
5. Photo Info: Tap to view the results of the analysis for each photo at its
corresponding sample location, such as drop number, diameter, coverage,
and distribution. You can enter Photo Info by tapping the sampling point
on the polyline. Tap the photo under Photo Info to show the detected
droplets. Tap “<”/“>” to show the previous or next photo.
6. Swipe to the left to view task information. Tap “<”/“>” to show the previous
or next task. Tap “Edit” for conguration.
More
Tap the icon on the upper right corner of Data Collection View for more
functions i.e. Bound Device, Feedback, APP Version, and Clear all tasks.
Specications
Model DA4231
Dimensions 96 mm × 46 mm × 45 mm
Weight (Battery Excluded) 134 g
Power 1.5 W
Battery 9 V alkaline or 9 V NiMH rechargeable
batteries recommended.
DJI is a trademark of DJI.
Copyright © 2017 DJI All Rights Reserved.
This content is subject to change.
Download the latest version from
http://www.dji.com/mg-1s

CH
8
免责声明
感谢您购买雾滴分析仪。在使用之前,请仔细阅读本声明,一旦使用,
即被视为对本声明全部内容的认可和接受。请严格遵守本文安装和使用
该产品,并务必重视注意事项。因用户不当使用、安装、改装(包含但
不限于使用非 DJITM 指定的零配件,如:电池、试纸、App 等)造成的
任何损失,深圳市大疆 TM 创新科技有限公司及其关联公司将不承担任
何责任。
DJI 是深圳市大疆创新科技有限公司及其关联公司的商标。本文出现的
产品名称、品牌等,均为其所属公司的商标或注册商标。本产品及文
档为深圳市大疆创新科技有限公司版权所有。未经许可,不得以任何
形式复制翻印。
关于不同语言版本的免责声明可能存在的语义差异,中国以中文版为准,
其他地区以英文版为准。
注意事项
1. 雾滴分析仪不包含电池,用户需自行购买 9V 电池。切勿使用存在破
损、漏液等情况的电池。
2. 雾滴分析仪通过获取试纸上的雾滴样本进行雾滴分析,使用不同试
纸所得的分析结果会有所不同。请选用正规厂商的水敏纸,否则可
能导致分析结果与实际情况偏差较大。
3. 务必保持镜头清洁,若有异物请使用包装内的镜头清洁布擦拭。
4. 若长期不使用分析仪,需取出电池并将分析仪放置在工具箱中。

CH
9
简介
雾滴分析仪专为农业领域设计,配备高精度镜头模组,在可拍照的智能
移动设备上配合定制的 DJI 雾滴分析仪 App 使用,能够准确地获取并
分析试纸上的雾滴信息,为精准农业提供可靠的数据支持。分析仪体积
小巧,简单易用,单人即可实现田间雾滴分析工作。
物品清单
雾滴分析仪 ×1
工具箱 ×1
吸盘 ×1组
镜头清洁布 ×1

CH
10
使用
下载 DJI 雾滴分析仪 App
在软件商店搜索“雾滴分析仪”,下载并安装至移动设备。
目前仅可于 Google Play、华为应用市场及腾讯应用宝平台进
行下载,可下载平台将持续更新,请访问 DJI MG-1S 产品页
面查看详细列表。
App 要求使用 Android 5.0 及以上系统。
绑定设备
App 需要绑定分析仪方可使用。绑定时确保移动设备已接入互联网。
1. 使用 App 扫描分析仪上的二维码,或在 App 中输入序列号即可。每
个二维码(序列号)最多可与 5部移动设备上的 App 绑定。
2. 如需解除绑定,点击 App 右上角的 图标 > 设备绑定 > 解除绑定。
部件名称
照明系统
电源开关
电源指示灯
镜头
吸盘
电池仓盖

CH
11
安装电池
请自备 9V 电池。
1. 推开电池仓盖。
2. 将9V 电池装入电池仓,注意正负极对应。稍加用力确保电池安装
稳固。
3. 装回电池仓盖。
开启 / 关闭分析仪
开启:长按分析仪的电源开关 2秒以开启分析仪。照明系统点亮且电源
指示灯显示绿灯常亮表示正常启动;电源指示灯显示红灯常亮表示电池
电量低,请尽快更换电池,以免影响正常使用。
关闭:在分析仪开启的状态下,长按电源开关 2秒以关闭分析仪,电源
指示灯和照明系统将熄灭。分析仪开启后闲置超过 8分钟也会自动关闭。
固定分析仪
1. 将分析仪带吸盘的一面贴近移动设备,使分析仪的镜头对准移动设
备的摄像头。按压分析仪,通过吸盘将其固定至移动设备。
2. 适当调整分析仪角度,使尽可能多的吸盘吸附至移动设备,以确保
稳固。
雾滴分析
雾滴分析仪
APP
将试纸放置于需要分析雾滴的位置(植物的顶部、中部或根部),并进
行喷洒。运行 App,然后按照以下方法进行雾滴分析。

CH
12
数据采集
1. 点击“新建任务”。
2. 输入“任务名称”、“作业者”、“时间”。
3. 选择“试纸放置区域”。
4. 输入“场地长度”和“采样间距”,App 将显示“预计需要采样张数”。
5. 点击“导入照片”下方的“+”,进入拍照界面。
a. 将试纸放置于平整的平面上,使分析仪镜头对准需要拍照的位置,
并贴紧试纸。
b. 滑动右下角菜单可更改采样位置。
c. 点击屏幕选择对焦点,然后点击拍照按钮 。
d. 屏幕显示照片区域选择工具。拖动中间的方框选择所需区域,拖
动四周的圆点改变区域大小。
e. 区域选择完成后,可选择“完成”结束拍照,或选择“继续拍下
一张”。
f. 导入照片后,可点击照片查看照片信息。点击照片信息中的照片,
可显示检测到的雾滴。若照片信息不准确,可选择删除 或替换
照片以重新导入。
务必配合分析仪镜头拍摄照片,并确保分析仪贴紧试纸以避
免外界光线进入镜头,否则将无法获取准确的雾滴信息。
拍照时,如有需要,可使用拍照界面右上方的水平仪观察移
动设备是否水平。水平仪的圆点与中心十字重合且变为绿色
时表示移动设备已调至水平。
6. 点击“更多信息”,设置喷洒信息、环境信息、飞行信息和作业信
息并保存。
7. 所有设置完成后,点击“保存”。

CH
数据分析
在数据采集界面的任务列表中,向左滑动任务可编辑或删除相应任务;
点击需要查看的任务,App 将显示分析结果。
1. 变异系数:表示雾滴的分布情况,变异系数越小分布越均匀。
2. 覆盖率、雾滴:勾选 /取消将显示 /隐藏此项分析结果。
3. 显示值:勾选 /取消将显示 /隐藏各个采样位置对应的数值。
4. 横屏:勾选 /取消将横屏 /竖屏显示分析结果。
5. 照片信息:点击可查看每个采样位置对应照片的雾滴个数、直径、
覆盖率、分布情况等分析结果。点击折线上的采样点 亦可进入照
片信息。点击照片可显示检测到的雾滴,点击“<”/“>”切换至上
一张 /下一张照片。
6. 向左滑动可查看任务信息,点击右上角的“<”/“>”切换至上一
个/下一个任务,点击“编辑”可修改信息。
更多
点击数据采集界面右上角的 图标,可进行以下操作:设备绑定、用
户反馈、查看 App 版本、清空所有任务。
规格参数
型号 DA4231
尺寸 96 mm×46 mm×45 mm
重量(不含电池) 134 g
功率 1.5 W
电池 推荐使用 9V 碱性电池或 9V 镍氢充电电池
DJI 是大疆创新的商标。
Copyright © 2017 大疆创新 版权所有
内容如有更新,恕不另行通知。
您可以在 DJI 官方网站查询最新版本
http://www.dji.com/mg-1s

JP
14
免責事項
散布分析計(以下[本製品]と記載します)をご購入いただきありがとうございます。
本製品の使用前に、この免責事項をよくお読みください。本製品を使用すると、この
免責事項をすべて読み、これに同意したとみなされます。本製品をご使用の際は、
マニュアルの記載事項を厳守し、警告に注意してください。SZ DJI TECHNOLOGY
CO., LTD. とその関連会社は、本製品が不適切な使用、取り付けまたは改変(指定
外のバッテリー、試験紙、アプリなどアクセサリーの使用などが含まれます)により、
直接または間接的な原因で生じた物的損害または人的被害についていかなる責
任も負いません。
DJITM はSZ DJI TECHNOLOGY CO., LTD.( 略 し て[ DJI])およびその関連会社の
商標です。本書に記載されている製品、ブランドなどの名称は、その所有者である
各社の商標または登録商標です。本製品および本マニュアルは、不許複製・禁無断
転載を原則とする DJI の著作物のため、DJI から書面による事前承認または許諾
を得ることなく何らかの形で本製品またはマニュアルのいかなる部分も複製するこ
とは固く禁じられています。
この免責事項は複数の言語で提供されています。各言語版の内容に相違がある場
合、中国で購入された製品については中国語版の内容が優先され、他の地域で購
入された製品については英語版の内容が優先されるものとします。
警告
1. 散布分析計にバッテリーは付属していません。指定の 9V バッテリーをお買い
求めください。液漏れや損傷のあるバッテリーは使用しないてください。
2. 試験紙上ににサンプルを滴下し、散布分析計で液滴情報分析を行います。分析
結果は試験紙のタイプによって変化することがあります。測定バイアスを低減す
るため、実績のあるメーカーの感水試験紙を使用してください。
3. レンズをきれいな状態に保ってください。汚れている場合は、同梱しているレン
ズクリーニングクロスでレンズを拭いてください。
4. 長時間使用しない場合は、分析計からバッテリーを取り外し、ツールボックスに
入れてください。

JP
15
はじめに
散布分析計には、農業用途に設計された高性能レンズモジュールが搭載されており、
スマートフォンと連携させて写真を撮ることができます。液滴の分布情報を取得し、
DJI Droplet Analyzer アプリで容易に分析できます。このため信頼性の高いデータ
を得ることができ、精密農業をサポートします。本装置のコンパクトな構造と使いや
すい機能は、一人で散布分析を行うのに理想的です。
同梱物
散布分析計 ×1
ツ ー ル ボ ックス ×1
吸 盤 セ ット ×1
レンズクリーニングクロス ×1

JP
16
概観
照明システム
電源ボタン
電源インジケ
ータ
レンズ
吸盤
バッテリー部
カバー
使用方法
DJI Droplet Analyzer のダウンロード
Google Play でDroplet Analyzer を検索して、お使いのモバイルデバイスにアプリ
をダウンロードします。
このアプリは Android 5.0 以降に対応しています。
モバイルデバイスとの紐づけ
このアプリを使用するには、インターネット経由でアプリを分析計に紐づけする必
要 が あります。
1. 分析計本体の QR コードをスキャンするか、シリアル番号を入力します。QR
コードまたはシリアル番号によって最大 5つのモバイルデバイスにアプリを
紐づけできます。
2. バインドを解除するには、アプリの右上の アイコンをタップして、[デバイスを
紐づけする]>[解除する]を選択します。

JP
17
バッテリーの 取り付 け
9V バッテリーが必 要で す。
1. バッテリー部カバーを押して、取り外します。
2. 9V バッテリーをバッテリー部に挿入します。正負端子が合っていることを確 認し
ます。再度押して、バッテリーをしっかり取り付けます。
3. カバーを取り付けます。
散布分析計の電源オン/オフ
電源をオンにする:電源ボタンを 2秒間長押しして分析計をオンにします。照明シ
ステムがオンになり、電源インジケータが緑色点灯している場合は、正常に起動し
ています。赤色点灯している場合は、バッテリー残量が残り少ない状態です。速やか
にバッテリーを交換してください。
電 源 を オ フ に す る:電源ボタンを 2秒間長押しして分析計をオフにします。電源イ
ンジケータおよび照明システムがオフになります。電源オンになってから分析計が
8分間使用されないと、自動的に電源オフになります。
分析計の固定
1. 吸盤をモバイルデバイスの方に向け、分析計のレンズをお手持ちのモバイルデ
バイスのカメラに合わせます。分析計をモバイルデバイスに押し当てて吸盤で
固定します。
2. 分析計に取り付けたモバイルデバイスにすべての吸盤が吸着するように、分析
計の位置を調整します。
散布分析
Droplet
Analyzer
アプリ
分析を行いたい植物の上に試験紙を置きます。液体を散布して、アプリを実行します。
以下の手順に従って、散布分析を行ってください。

JP
18
データ収集
1.[新規タスク]をタップします。
2.[タスク名]、[オペレーター]、[時間]を入力します。
3.[ 試 験 紙 位 置 ]を 選 択 し ま す 。
4.
[土地の全長]と[サンプルスペース]を入力します。アプリに[推定サンプル数]
の値が表示されます。
5.[写真をインポートする]の下の[+]をタップして、撮影 ビューにします。
a. 試験紙を平らな面上に置きます。分析計のレンズを撮影領域に合わせ、分析
計を試験紙に密着させます。
b. 画面右下のメニューをスクロールしてサンプルの位置を変えます。
c. 画面をタップして、フォーカスする領域を選択します。次にシャッターボタン
をタップしま す。
d. 領域選択ツールが画面に表示されます。中央のボックスをドラッグして、目的
の領域を選択します。ボックス周囲のドットをドラッグして、領域のサイズを
変更します。
e. 領域を選択したら、[完了]をタップして撮影を終了するか、[次の写真を撮
影 ]を タ ッ プ し ま す 。
f. 写真をインポートした後、画像をタップして、対応する情報を確認します。[画
像情報]の下の画像をタップして、検出された液滴を表示します。情報が正確
でない場合は、削除アイコン または[写真を交換]をタップして、再度画像
をインポートします。
写真を撮るときは必ず分析計のレンズを使用してください。余分な光
が入るのを防ぐため、分析計と試験紙との間にすき間がないことを確
認してください。すき間によって液滴の情報の精度が損なわれることが
ありま す。
写真撮影時は、撮影ビューの右上にある測斜計で、モバイルデバイス
が水平であることを確認してください。測斜計のドットが中央の十字と
一致して緑色になっていれば、モバイルデバイスは水平になっています。
6.
[詳細情報]をタップして散布情報、環境情報、飛行情報および作物情報の設定を行い、
[保存]をタップします。
7. すべての設定が完了したら、[保存]をタップします。

JP
データ分析
データ収集ビューのタスク一覧で、タスクを左側にスワイプすると、タスクを編集ま
たは削除できます。目的のタスクをタップすると、分析結果が表示されます。
1. 変動係数:液滴の分布を表します。値が小さいほど、分布が均一であることを示
します。
2. 被覆率および滴下:選択/消去で、対応する項目を表示/非表示にします。
3. 表示値:選択/消去で、各サンプル位置の値を表示/非表示にします。
4. ランドスケープ:選択/消去で、結果を横/縦で表示します。
5. 画像情報:タップすると、対応するサンプル位置における各画像の滴下数、直
径、被覆率、分布などの分析結果を表示します。多角形のサンプリングポイント
をタップすると、[画像情報]に入ることができます。[画像情報]で画像をタップ
すると、検出された液滴が表示されます。[<”/“>]をタップすると、前の画像また
は次の画像が表示されます。
6. 左側にスワイプしてタスク情報を表 示します。[<”/“>]をタップすると、前のタス
クまたは次のタスクが表示されます。設定を行うには、[編集]をタップします。
追加機能
データ収集ビューの右上にある アイコンをタップすると、デバイスの紐づけ、フィ
ードバック、アプリのバージョン、すべてのタスクの消去などの追加機能にアクセス
できます。
仕様
型式 DA4231
寸法 96mm ×46mm ×45mm
重量(バッテリーを除く) 134g
電源 1.5W
バッテリー 9V アル カリま た は 9V NiMH 充電式バッテリー推奨
DJI はDJI の商標です。
Copyright © 2017 DJI All Rights Reserved.
本内容は変更されることがあります。
最新版は下記よりダウンロードしてください。
http://www.dji.com/mg-1s
Table of contents
Languages:
Other dji Measuring Instrument manuals
Popular Measuring Instrument manuals by other brands

YOKOGAWA
YOKOGAWA AQ6380 user manual

National Instruments
National Instruments NI PXI-562 Series user manual

ABLE
ABLE BEKA associates BA648CF-P Installation & maintenance instructions

AEMC
AEMC JM875 user manual

Lasermark
Lasermark LMH instruction manual

ARJAY ENGINEERING
ARJAY ENGINEERING HYDROSENSE 4420-OCM user manual