DLI APEX Series User manual
WWW.DUTCHLIGHTINGINNOVATIONS.COM EN – Original manual
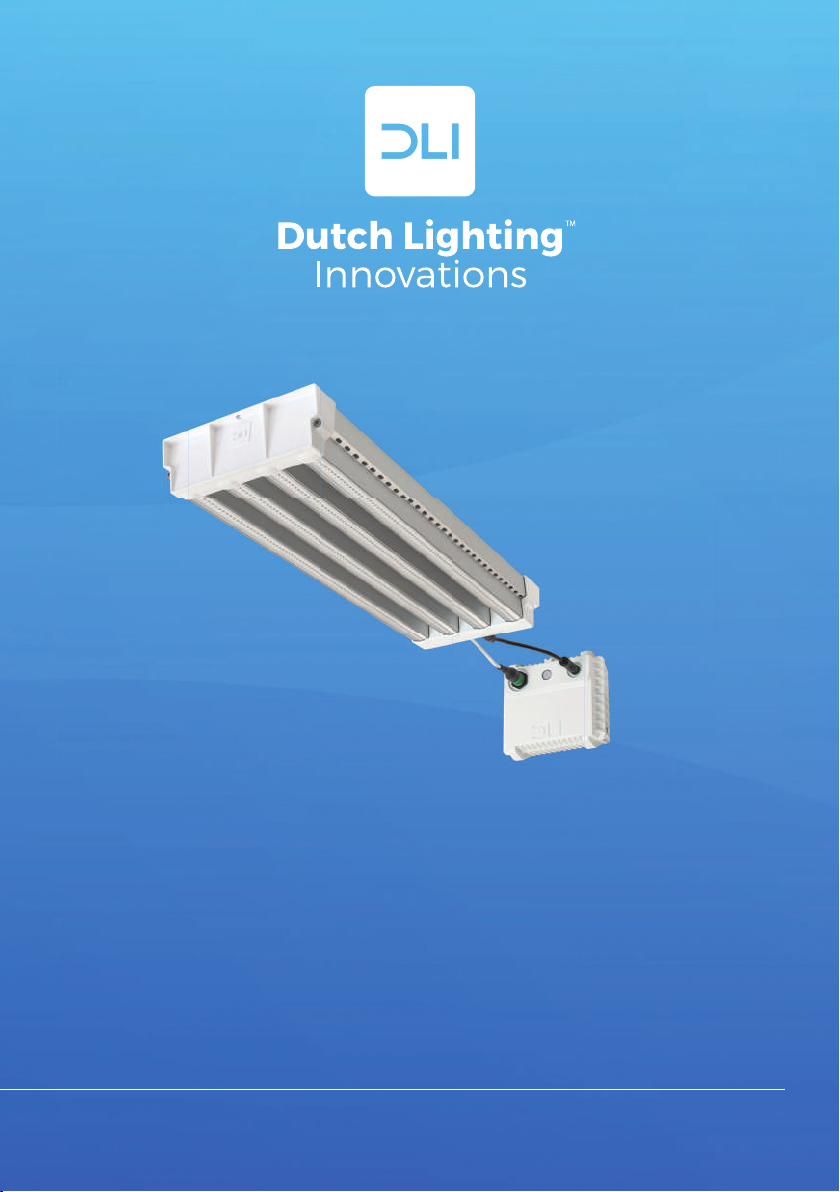
DLI APEX-Series
LED Toplighting
Installation manual

2
1 1
7
8
9
10
2 3 4 5 6
EN Installation manual 5
NL Installatiehandleiding 12
1
23

3
6
45
4
Click!
7
9
8
10

5
EN
Preface
Thank you for buying the DLI APEX-Series LED Toplighting Fixture. The efficient and
compact DLI APEX-Series LED Toplighting Fixture is made with high quality components
only to assure a high reliability, a long service life and safe operation.
In this manual, the DLI APEX-Series LED Toplighting Fixture will be referred to as “the
fixture”.
Contents
Introduction 6
Intended use
Symbols used in this manual
Conformity
Warranty
Product description 7
Description
Main parts
Specifications
Safety 8
Installation 9
Preparations before installing
Installing the driver box with electronic ballast
Installing the fixture
Connecting the Wieland power cable and Wieland connection cable
Use 10
Inspection, maintenance and repair 10
Cleaning the fixture
Disconnecting the Wieland power cable
Disconnecting the Wieland connection cable
Storage and disposal 11
6
Introduction
Intended use
The DLI APEX-Series is intended to be used as grow lighting for horticultural purposes in
greenhouses and indoor facilities.
This installation manual explains how to install and use the fixture. Read and understand
this manual completely before installing and using the fixture.
Using the fixture otherwise than specified in this manual, is considered as unintended use
and will void all warranty.
Symbols used in this manual
Warning! This symbol indicates a potentially hazardous situation which, if not avoided,
could result in death or serious injury.
Caution! This symbol indicates a potentially hazardous situation which, if not avoided,
could result in minor or moderate injury.
Note: This symbol indicates additional information.
This symbol indicates a hot surface. The fixture can reach high temperatures. Contact
may cause burns. Do not touch.
DLI declares with this symbol that the products comply with the European requirements.
270212
This symbol indicates that the product was tested and has met the certification
requirements for electrical and/or mechanical products. Applies to USA and CA only.
This symbol indicates that the electromagnetic radiation from the device is below the
limits specified by the Federal Communications Commission and the manufacturer
has followed the requirements of the Supplier’s Declaration of Conformity authorization
procedures. Applies to USA and CA only.
This symbol indicates the photobiological safety of lamps and lamp systems
Risk group 2: Do not stare at the operating light source. The philosophical basis for this
classification is that the lamp does not pose a hazard due to the aversion response to
very bright light sources or due to the thermal discomfort.
This symbol indicates that this product should not be thrown away with other household
waste. To prevent possible harm to the environment or human health by uncontrolled
waste disposal, you are responsible for recycling it so that it can promote the sustainable
reuse of raw materials. To return your used product, you can use the regular return and
collection systems applicable in your country.

7
EN
Conformity
The DLI APEX-Series fixture confirms to the following directives and standards:
CSA / UL* CSA C22.2 No. 250.0-18
UL Std. No. 1598 Ed.4 (2018-08-28)
FCC* FCC Part 18
CE / CB* IEC 60598-1:2014/AMD1:2017
IEC 60598-2-1(ed.1);am1
Photobiological hazard IEC 62471
IEC TR 62778
*Pending
Warranty
Refer to the general terms and conditions of Dutch Lighting Innovations Europe B.V. for
information about the warranty conditions.
Product description
Description
The DLI APEX-Series is intended to be used as grow lighting for horticultural purposes in
greenhouses and indoor facilities.
Main parts
See image 1for an overview of the main parts of the DLI APEX-Series LED Toplighting
Fixture.
1. Mounting points on the LED Module
2. Driver box with Electronic ballast
3. Wieland connector for mains power
4. Mounting points on the driver box
5. Ventilation plug
6. Wieland connector for connecting LED Module
7. Suspension bracket for driver box1
8. Suspension bracket for fixture1
9. Wieland power cable1
10. Wieland connection cable
1Optional delivery. Appearance may vary.
8
Specifications
Type DLI APEX-Series Led Toplighting
Market introduction 2021
Input voltage See product label
Rated power See product label
Input voltage range ±10%
Ambient temperature 0 – 25 °C / 32 – 77 °F
Relative humidity <70% (not condensating)
Dimensions (1000W) 840 x 240 x 80 mm
Weight (1000W) 8.0 kg
Dimensions (650W / 765W) 700 x 240 x 80 mm
Weight (650W / 765W) 6.5 kg
Dimensions (driver box) 220 x 125 x 200 mm
Weight (driver box) 3.0 kg
Safety
-
Warning!
– Read and understand this manual completely before installing and using the fixture.
– Always observe the local rules for installing and using the fixture.
– Always switch off the mains before installing or maintaining the fixture. Danger of
short-circuiting which may pose a fire hazard.
– Never touch the fixture when in operation or within 10 minutes after switch off as this
will cause major burn injuries.
– Always keep away from children and pets.
– Never open the driver box with electronic ballast. Danger of short-circuiting which
pose a fire hazard.
– Never rewire, repair or reconfigure any component of the fixture. Danger of short-
circuiting which may pose a fire hazard.
– Never use the fixture in a wet environment or outdoors. Danger of short-circuiting
which may pose a fire hazard.
– Never use the fixture in the proximity of dangerous or combustible materials. Danger
of combustion which may pose a fire hazard.
– Never let the Wieland power cable touch any hot parts of the fixture. Danger of
exposed electrical wiring which may pose short-circuit and a fire hazard.
– Never plug the power cable into a power supply with a different supply voltage than
instructed on the product label on the driver box with electronic ballast. Danger of
electric shock which may lead to injuries.

9
EN
– Never stare or look directly into the LED fixture when in use. This may be harmful to
the eyes.
– Always connect the power cable according to local rules, safety regulations and
electrical code.
6
Caution!
– Always keep a minimum of 30 centimeter between the fixture and the plants. Danger
of burned plants which may pose a fire hazard.
– Always connect the Wieland power cable properly.
– Never use a damaged fixture, Wieland power cable or Wieland connection cable. If the
Wieland power cable or Wieland connection cable is damaged, contact the supplier of
the fixture to receive a new cable.
– Never plug or unplug the Wieland power cable or Wieland connection cable while the
fixture is in use.
– Always use DLI approved parts as replacement parts. The use of other parts may
damage the fixture and will void the warranty.
Installation
-
Warning!
– Always switch off the mains before installing or maintaining the fixture. Danger of
short-circuiting which may pose a fire hazard.
– Always install the driver box according to the instructions. The bracket does not
connect properly and a hazardous situation can occur when the driver box is not
installed correctly.
Preparations before installing
1. Switch off the mains.
2. Check the provided lighting plan.
Installing the driver box with electronic ballast
1. Install the suspension bracket on the truss or C-profile. See image 2.
2. Slide the suspension bracket into the mounting slot on the driver box. See image 3.
Installing the fixture
6
Caution!
– Always keep a minimum of 30 centimeter between the fixture and the plants. Danger
of burned plants which may pose a fire hazard.
1. Install the suspension brackets on the truss or C-profile. See image 4.
2. Hook the suspension brackets into the mounting points on the fixture. See image 5.
3. Make sure the distance between the fixture and the top of the crop is at least 30
centimeter. See image 6.

10
Connecting the Wieland power cable and Wieland connection cable
-
Warning!
– Never let the Wieland power cable touch any hot parts of the fixture. Danger of
exposed electrical wiring which may pose short-circuit and a fire hazard.
– Never let the Wieland connection cable touch any hot parts of the fixture. Danger of
exposed electrical wiring which may pose short-circuit and a fire hazard.
– Never plug the power cable into a power supply with a different supply voltage than
instructed on the driver box. Danger of electric shock which may lead to injuries.
– Always connect the power cable according to local rules, safety regulations and
electrical code.
6
Caution!
– Always connect the Wieland power cable and Wieland connection cable properly.
– Never use a damaged fixture, Wieland power cable or Wieland connection cable. If the
Wieland power cable or Wieland connection cable is damaged, contact the supplier of
the fixture to receive a new cable.
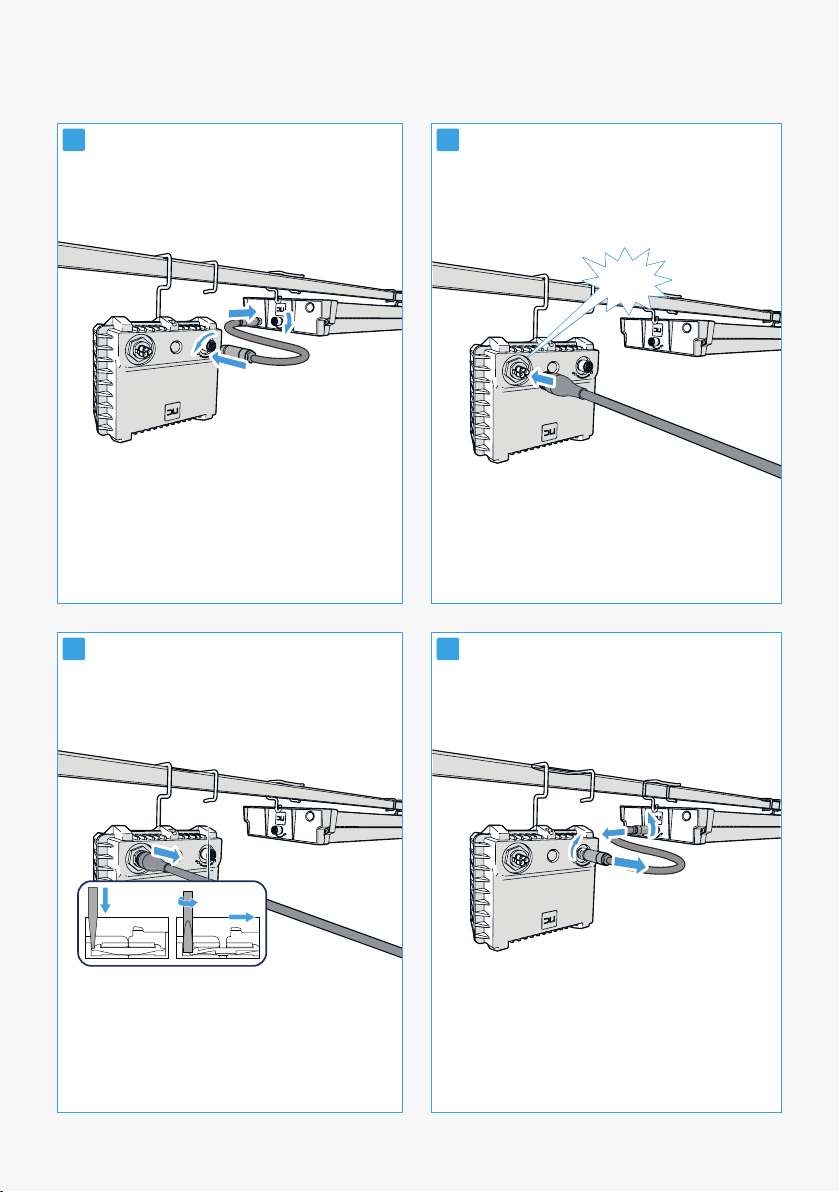
1. Connect the open end of the Wieland power cable to the main distribution cable of
the electrical installation.
2. Connect the Wieland connection cable to the driver box and the fixture. Turn the ring
of the connector on the Driver box counter clockwise to secure the connector. Turn the
ring of the connector on the LED Module clockwise. See image 7.
3. Plug the female connector of the Wieland power cable onto the male Wieland
connector on the driver box. See image 8.
4. Switch on the mains.
Use
-
Warning!
– Never touch the fixture when in operation or within 10 minutes after switch off as this
will cause major burn injuries.
Inspection, maintenance and repair
-
Warning!
– Always switch off the mains before installing or maintaining the fixture. Danger of
short-circuiting which may pose a fire hazard.
– Never touch the fixture when in operation or within 10 minutes after switch off as this
will cause major burn injuries.

11
EN
– Never open the driver box with electronic ballast. Danger of short-circuiting which
pose a fire hazard.
– Never rewire, repair or reconfigure any component of the fixture. Danger of short-
circuiting which may pose a fire hazard.
Cleaning the fixture
6
Caution!
– Check the fixture regularly for dust or dirt build up.
– Only use a damp microfibre cloth and demineralized water to clean. Using an
aggressive detergent to clean the fixture, may lead to product damage.
Check the fixture regularly for dust or dirt. Clean the fixture if necessary.
Disconnecting the Wieland power cable
1. Switch off the mains.
2. Unplug the female end of the Wieland power cable from the male Wieland connector
on the fixture. See image 9.
Disconnecting the Wieland connection cable
1. Switch off the mains.
2. Unplug the female end of the Wieland power cable from the male Wieland connector
on the fixture. See image 10.
3. Turn the ring of the Wieland connector on the Driver box clockwise to unplug the
Wieland connection cable. Turn the ring of the connector on the LED Module counter
clockwise.
Storage and disposal
Store the fixture in a dry, dust-free and clean environment.
Store in a room with an ambient temperature between 0 – 35 °C and a relative humidity
between 5% and 85%, non condensating.
This product should not be thrown away with other household waste. To prevent possible
harm to the environment or human health by uncontrolled waste disposal, you are
responsible for recycling it so that it can promote the sustainable reuse of raw materials. To
return your used product, you can use the regular return and collection systems applicable
in your country.
12
Inleiding
Bedankt voor uw aankoop van het DLI APEX-Serie LED TopLighting armatuur. Het DLI
APEX-Serie LED TopLighting armatuur is geproduceerd met componenten van de
hoogste kwaliteit, waardoor de betrouwbaarheid, een lange levensduur en een veilig
gebruik gewaarborgd worden.
In deze handleiding wordt er aan het DLI APEX-Serie LED TopLighting armatuur
gerefereerd als 'het armatuur’.
Inhoud
Inleiding 12
Beoogd gebruik
Symbolen die in deze handleiding gebruikt worden
Certificering
Garantie
Productbeschrijving 14
Beschrijving
Belangrijkste onderdelen
Specifications
Veiligheid 15
Installatie 16
Voorbereidingen vóór installatie
Installatie van de Driver box met elektronische ballast
Het armatuur installeren
De Wieland stroomkabel en Wieland verbindingskabel aansluiten
Gebruik 18
Inspectie, onderhoud en reparatie 18
Het armatuur schoonmaken
Loskoppelen van de WIeland aansluitkabel
Loskoppelen van de Wieland verbindingskabel
Opslag en verwijdering 19
13
EN
Introductie
Beoogd gebruik
Het DLI APEX-Serie LED TopLighting armatuur is bedoeld voor gebruik als groeiverlichting
in kassen en kweekruimtes in de tuinbouw.
In deze installatiehandleiding staat beschreven hoe u het armatuur moet installeren en
gebruiken. Zorg dat u deze handleiding volledig heeft gelezen en begrepen voordat u het
armatuur installeert en gebruikt.
Ander gebruik van het armatuur dan als beschreven in deze handleiding wordt
beschouwd als onbedoeld gebruik waardoor de garantie komt te vervallen.
Symbolen die in deze handleiding gebruikt worden
Waarschuwing! Dit symbool geeft aan dat er zich een mogelijk gevaarlijke situatie kan
voordoen. Wanneer deze niet vermeden wordt, kan dit leiden tot ernstige verwondingen
of de dood.
Pas op! Dit symbool geeft aan dat er zich een mogelijk gevaarlijke situatie kan voordoen.
Wanneer deze niet vermeden wordt, kan dit leiden tot lichte en matige verwondingen.
Opmerking: Dit symbool geeft extra informatie aan.
Dit symbool geeft aan dat het oppervlak heet is. De oppervlaktes van de lamp en reflector
kunnen hoge temperaturen bereiken. Bij contact bestaat het risico op brandwonden.
Raak ze niet aan.
DLI verklaart met dit symbool dat het product voldoet aan de Europese richtlijnen.
270212
Dit symbool geeft aan dat het product is getest en voldoet aan de eisen voor certificering
van elektrische en/of mechanische producten. (geldt alleen voor USA en CA)
Dit symbool geeft aan dat de elektromagnetische straling die het apparaat uitzendt,
onder de door de FCC gestelde limieten ligt en dat de fabrikant de procedures heeft
gevolgd voor de autorisatie van de conformiteitsverklaring van de leverancier (SDoC)
(Geldt alleen voor USA en CA)
Dit symbool geeft de fotobiologische veiligheid van lampen en lampsystemen aan
Risicogroep 2: Kijk niet in de werkende lichtbron. De filosofische basis voor deze
classificatie is dat de lamp geen gevaar vormt vanwege de afkeerreactie op zeer felle
lichtbronnen of vanwege het thermische ongemak.

14
Dit symbool geeft aan dat dit product niet bij het restafval of ander huishoudelijk
afval mag. Door afval goed te scheiden, voorkomt u schade aan het milieu en
gezondheidsrisico’s. U bent verantwoordelijk voor het recyclen, zodat materialen op
duurzame wijze kunnen worden hergebruikt. U kunt voor het inleveren van gebruikte
producten gebruik maken van het toepasselijke inzamelsysteem in uw land.
Certificering
De DLI APEX-Serie Toplighting armaturen voldoen aan de volgende richtlijnen en
standaarden:
CSA / UL* CSA C22.2 No. 250.0-18
UL Std. No. 1598 Ed.4 (2018-08-28)
FCC* FCC Part 18
CE / CB* IEC 60598-1:2014/AMD1:2017
IEC 60598-2-1(ed.1);am1
Photobiological hazard IEC 62471
IEC TR 62778
*In behandeling
Garantie
Raadpleeg de algemene voorwaarden van Dutch Lighting Innovations Holding B.V. voor
informatie over de garantievoorwaarden.
Productbeschrijving
Beschrijving
Het DLI APEX-Serie LED TopLighting armatuur is bedoeld voor gebruik als groeiverlichting
in kassen en kweekruimtes in de tuinbouw.
Belangrijkste onderdelen
Zie afbeelding 1voor een overzicht van de belangrijkste onderdelen van het
DLI APEX-Serie LED TopLighting armatuur.
1. Bevestigingspunten LED Module
2. Driver box met electronische ballast
3. Wieland aansluiting - Stroomtoevoer
4. Bevestigingsputn Driver box
5. Ventilatieplug
6. Wieland aansluiting - verbinding LED module / Driver box
7. Ophangbeugel voor de driver box1
8. Ophangbeugel voor de LED module1
15
EN
9. Wieland aansluitkabel stroomtoevoer1
10. Wieland verbindingskabel LED Module / Driver box
1Optioneel bijgeleverd. Er kunnen verschillen in het uiterlijk zijn.
Specifications
Type DLI APEX-Series Led Toplighting
Markt introductie 2021
Voltage Zie productlabel
Nominaal vermogen Zie productlabel
Voltagebereik ±10%
Omgevingstemperatuur 0 – 25 °C / 32 – 77 °F
Relatieve vochtigheid <70% (niet condenserend)
Afmetingen (1000W) 840 x 240 x 80 mm
Gewicht (1000W) 8.0 kg
Afmetingen (650W / 765W) 700 x 240 x 80 mm
Gewicht (650W / 765W) 6.5 kg
Afmetingen (driver box) 220 x 125 x 200 mm
Gewicht (driver box) 3.0 kg
Veiligheid
-
Waarschuwing!
– Zorg dat u deze handleiding volledig heeft gelezen en begrepen voordat u het
armatuur installeert en gebruikt.
– Neem altijd de plaatselijke regelgeving in acht bij het installeren en gebruiken van het
armatuur.
– Schakel altijd de stroom uit voor u begint met het installeren of onderhouden van het
armatuur. Risico op kortsluiting wat tot brandgevaar kan leiden.
– Raak het armatuur nooit aan wanneer deze in gebruik is of binnen 10minuten na
gebruik. Dit kan ernstige brandwonden veroorzaken.
– Uit de buurt van kinderen en huisdieren houden.
– Nooit de driver box met het elektronisch voorschakelapparaat openmaken. Risico op
kortsluiting wat tot brandgevaar kan leiden.
– Componenten van het armatuur mogen nooit opnieuw bedraad, gerepareerd of
aangepast worden. Risico op kortsluiting wat tot brandgevaar kan leiden.
– Het armatuur nooit in een vochtige omgeving of buiten gebruiken. Risico op
kortsluiting wat tot brandgevaar kan leiden.

16
– Het armatuur nooit gebruiken in de buurt van gevaarlijke of ontvlambare materialen.
Risico op ontbranding wat tot brandgevaar kan leiden.
– Zorg ervoor dat de Wieland aansluitkabel nooit in contact komt met hete onderdelen
van het armatuur. Risico op blootliggende elektrische bedrading die kortsluiting
kunnen veroorzaken wat tot brandgevaar kan leiden.
– Sluit de Wieland aansluitkabel nooit aan op een voeding met een andere
voedingsspanning dan aangegeven op de driver box met elektronisch
voorschakelapparaat. Risico op elektrische schokken die verwondingen kunnen
veroorzaken.
– Sluit alle stroomkabels altijd aan volgens plaatselijke regelgeving,
veiligheidsvoorschriften en elektrotechnische normen.
6
Pas op!
– Zorg ervoor dat er altijd minstens 30 cm afstand zit tussen het armatuur en de planten.
Risico op verbrande planten die tot brandgevaar kunnen leiden.
– Sluit de Wieland aansluitkabel altijd aan volgens de instructies.
– Gebruik nooit een beschadigd armatuur, Wieland aansluitkabel of Wieland
verbindingskabel. Als de aansluitkabel of verbindingskabel is beschadigd, neem dan
contact op met de fabrikant voor een vervanging.
– Sluit de Wieland aansluitkabel nooit aan of koppel deze los als het armatuur in gebruik
is of de installatie onder spanning staat.
– Sluit de Wieland verbindingskabel nooit aan en koppel deze niet los wanneer het
armatuur in gebruik is of de installatie onder spanning staat.
– Gebruik altijd door DLI goedkeurde onderdelen voor vervanging. Bij het gebruik van
niet goedkeurde onderdelen kan het armatuur beschadigen en vervalt de garantie.
Installatie
-
Waarschuwing!
– Schakel altijd de stroom uit voor u begint met het installeren of onderhouden van de
armatuur. Risico op kortsluiting wat tot brandgevaar kan leiden.
– Monteer de Driver box alleen op de aangegeven manier. Wanneer de Driver box niet
op de juiste manier gemonteerd wordt, zal de beugel niet vastklikken in de Driver box
en kan er een onveilige situatie ontstaan.
Voorbereidingen vóór installatie
1. Schakel de stroom uit.
2. Controleer het lichtplan.

17
EN
Installatie van de Driver box met elektronische ballast
1. Installeer de ophangbeugel aan de tralie of het C-profiel. Zie afbeelding 2.
2. Schuif de ophangbeugel vanaf de achterzijde in het montage gat van de Driver box.
Schuif de box zover door dat de beugel vastklikt. Zie afbeelding 3.
Het armatuur installeren
6
Pas op!
– Zorg ervoor dat er altijd minstens 30 cm afstand zit tussen het armatuur en de planten.
Risico op verbrande planten wat tot brandgevaar kan leiden.
1. Monteer de ophangbeugel aan de tralie of aan het C-profiel. Zie afbeelding 4.
2. Haak de ophangbeugel in de bevestigingspunten van het armatuur. Zie afbeelding 5.
3. Zorg ervoor dat er minimaal 30 cm afstand zit tussen het armatuur en de toppen van
de gewassen. Zie afbeelding 6.
De Wieland stroomkabel en Wieland verbindingskabel aansluiten
-
Waarschuwing!
– Zorg ervoor dat de Wieland aansluitkabel en de Wieland verbindingskabel nooit
in contact komen met hete onderdelen van het armatuur. Risico op blootliggende
elektrische bedrading die kortsluiting kunnen veroorzaken wat tot brandgevaar kan
leiden.
– Sluit de stroomkabel nooit aan op voeding met een andere voedingsspanning dan
aangegeven op de behuizing met elektronisch voorschakelapparaat. Risico op
elektrische schokken die verwondingen kunnen veroorzaken.
– Sluit de stroomkabel altijd aan volgens plaatselijke regelgeving,
veiligheidsvoorschriften en de geldende elektrotechnische normen.
6
Pas op!
– Sluit de Wieland aansluitkabel en Wieland verbindingskabel altijd op de juiste manier
aan.
– Gebruik nooit een beschadigd armatuur, Wieland aansluitkabel of Wieland
verbindingskabel. Als de aansluitkabel of verbindingskabel is beschadigd, neem dan
contact op met de fabrikant voor vervanging van de kabel.
1. Sluit het open eind van de Wieland aansluitkabel aan op de hoofdkabel van de
elektriciteitsvoorziening.
2. Sluit de Wieland verbindingskabel aan op het armatuur en de Driver box. De ring
van de connector moet op de Driver box tegen de klok in gedraaid te worden om de
connector te vergrendelen. Op het armatuur moet de ring met de klok mee gedraaid
te worden om de connector te vergrendelen. Zie afbeelding 7.
3. Klik de Wieland stekker van de stroomkabel op het Wieland chassisdeel op het
armatuur. Zie afbeelding 8.
4. Schakel de stroom in.

18
Gebruik
-
Waarschuwing!
– Raak het armatuur nooit aan wanneer deze in gebruik is of binnen 10minuten na
gebruik. Dit kan ernstige brandwonden veroorzaken.
Inspectie, onderhoud en reparatie
-
Waarschuwing!
– Schakel altijd de stroom uit voor u begint met het installeren of onderhouden van het
armatuur. Risico op kortsluiting wat tot brandgevaar kan leiden.
– Raak het armatuur nooit aan wanneer deze in gebruik is of binnen 10minuten na
gebruik. Dit kan ernstige brandwonden veroorzaken.
– Nooit de Driver box met elektronisch voorschakelapparaat openmaken. Risico op
kortsluiting wat tot brandgevaar kan leiden.
– Componenten van het armatuur mogen nooit opnieuw bedraad, gerepareerd of
aangepast worden. Risico op kortsluiting wat tot brandgevaar kan leiden.
Het armatuur schoonmaken
6
Pas op!
– Controleer regelmatig of het armatuur schoon en stofvrij is.
– Gebruik voor het schoonmaken uitsluitend een vochtige microvezeldoek en
gedemineraliseerd water. Bij het gebruik van agressieve schoonmaakmiddelen tijdens
het schoonmaken, kan het armatuur beschadigen.
Controleer regelmatig of het armatuur schoon en stofvrij is. Maak het armatuur zo nodig
schoon.
Loskoppelen van de WIeland aansluitkabel
1. Schakel de stroom uit.
2. Koppel de Wieland aansluitkabel los van het Wieland chassisdeel op het armatuur. Zie
afbeelding 9.
Loskoppelen van de Wieland verbindingskabel
1. Schakel de stroom uit.
2. Koppel de Wieland aansluitkabel los van het Wieland chassisdeel op het armatuur. Zie
afbeelding 10.
3. Koppel de Wieland verbindingskabel los van de Driver box door de ring van de
connector met de klok mee los te draaien en de connector los te trekken van de Driver
box. Koppel de Wieland verbindingskabel los van het armatuur door de ring van
de connector tegen de klok in los te draaien en de connector los te trekken van het
armatuur.

19
EN
Opslag en verwijdering
Bewaar het armatuur op een droge, stofvrije en schone plek.
Bewaar bij een omgevingstemperatuur tussen de 0°C en de 35°C met een relatieve
vochtigheid tussen 5% en 85%, niet condenserend.
Dit product mag niet bij het restafval of ander huishoudelijk afval. Door afval goed
te scheiden, voorkomt u schade aan het milieu en gezondheidsrisico’s. U bent
verantwoordelijk voor het recyclen, zodat materialen op duurzame wijze kunnen worden
hergebruikt. U kunt voor het inleveren van gebruikte producten gebruik maken van het
toepasselijke inzamelsysteem in uw land.

WWW.DUTCHLIGHTINGINNOVATIONS.COM
Dutch Lighting Innovations Europe B.V.
Lakenblekerstraat 41, 1431 GE Aalsmeer, The Netherlands
www.dutchlightinginnovations.com
info@dutchlightinginnovations.com
T +31 (0)297 760500
V1.0_10/2021
Table of contents
Languages:
Other DLI Lighting Equipment manuals

Popular Lighting Equipment manuals by other brands

Playa
Playa ZOE Operating, care and maintenance instructions

Safegate Group
Safegate Group Airfield Lighting 8-135 Series manual

Evenlite
Evenlite XCH Installation, operation and maintenance instructions

STERNO HOME
STERNO HOME GL29806 quick start guide
Ledj
Ledj Pixel Storm 6 Tri Batten user manual

ADJ
ADJ PAR Z4 User instruction


UME
UME 6940101125 owner's manual

ETI
ETI MWPK-1-LB3-CP3-MV-LVD Use and care guide

Honeywell
Honeywell OvaLED R manual

Elation
Elation ELAR EXTQW FLOOD HP user manual

LIVARNO home
LIVARNO home 392355 2201 Installation, operating and safety information

RASHA PROFESSIONAL
RASHA PROFESSIONAL Chaos Quick user manual