DLI 9000 User manual

Rev. 3

DLI 9000 Product Manual Rev. 3
2
Disclaimer
Data Ltd., Inc. (DLI) reserves the right to make changes in specifications and other information
contained in this document without prior notice, and the reader should in all cases consult DLI
to determine whether any such changes have been made. The information in this publication
does not represent a commitment on the part of DLI.
DLI shall not be liable for technical or editorial errors or omissions contained herein: nor for
incidental or consequential damages resulting from the furnishing performance, or use of
this material.
This document contains proprietary information that is protected by copyright. All rights are
reserved. No part of this document may be photocopied, reproduced, or translated into another
language without the prior written consent of DLI.
© 2012 Data Ltd., Inc. All rights reserved.
Web Address: www.dataltd.com
Trademarks
DLI 9000 is a trademark or registered trademark of Data Ltd., Inc.
Windows Embedded Standard, Windows 7, Windows 8 and the
Windows logos are trademarks or registered trademarks of Microsoft Corporation.
Android OS and the Android Logo are trademarks or registered trademarks of Open Handset
Alliance and Google.
The Bluetooth trademarks are owned by Bluetooth SIG, Inc., USA and licensed to DLI.
RAM Mount is a trademark of National Products Inc. in the United States and or other countries
Other product names mentioned in this manual may be trademarks or registered trademarks
of their respective companies and are hereby acknowledged.

DLI 9000 Product Manual Rev. 3
1
Table of Contents
Thank You!………………………………………………………….………………………………….....................4
DLI 9000 Peripherals and Accessories…………………………………………………………………………....4
Hardware Overview………………………………………………………………………………………………….5
Setting Up the DLI 9000 Terminal………………………………………………………………………………….9
Unpack the Carton and Verify its Contents………………………………………………………………………..9
Battery Status LED…………………………………………………………………………………………………10
Power Management Utility………………………………………………………………………………………...10
Optional Auto Power On & Off Setup…………………………………………………………………………….11
Adjusting the Backlight……………………………………………………………………………………………..11
Using the Stylus…………………………………………………………………………………………………….12
Using the Programmable Keys……………………………………………………………………………………15
Using the Wi-Fi Radio……………………………………………………………………………………………...18
Using the Bluetooth Radio…………………………………………………………………………………………21
Using the Barcode Scanner……………………………………………………………………………………….26
5-in-1 Demo…………………………………………………………………………………………………………32
SIM Card Insertion………………………………………………………………………………………………….32
SAM Card Insertion………………………………………………………………………………………………...33
Using the GPS………………………………………………………………………………………………………34
DLI 9000 Desktop Cradle………………………………………………………………………………………….36
Installing the Vehicle Mount Cradle………………………………………………………………………………39
Installation Clearance & Airflow…………………………………………………………………………………...40
Vehicle Installation………………………………………………………………………………………………….40
Integrated Power Filtering DC Converter………………………………………………………………………...40
Technical Assistance……………………………………………………………………………………………….41
Product Service and Repair……………………………………………………………………………………….41
Shipping Your DLI Device…………………………………………………………………………………………42
Limited Warranty……………………………………………………………………………………………………44
Regulatory and Safety Approvals…………………………………………………………………………………45
FCC Compliance……………………………………………………………………………………………………47

DLI 9000 Product Manual Rev. 3
4
Thank You!
Data Ltd Inc. would like to thank you for selecting the DLI 9000. The DLI 9000 was designed as
a forward thinking product that is modular in design and upgradeable. Wethank you, the
customer, for giving us the inspiration for the following features:
•
Impact Resistant Case
•
Optional Integrated 5-in-1 Module (1D/2D Imager, Magstripe Reader, RFID,
Smartcard Reader and Debit Pin Pad)
•
Integrated four radio technology (WiFi, Bluetooth, GPS, and Cellular)
•
Industrial-rated touchscreen
•
Front Facing & Back Cameras
•
Boot media via SSD (Solid State Drive)
DLI 9000 Peripherals and Accessories
3800141 Replacement Stylus
4100022 Replacement Hand strap (set of 2)
4100023 Screen Protector
5400011 Desktop AC Wall Adapter with (US) Power Cord
For country specific power cords please contact your sales representative.
6700040 Cigarette Lighter Adapter (12-24V DC Input)
3431182037500P Power cable, 3 prong locking connector with 5 AMP (bare leads)
5400020 DLI Surge Suppressor

DLI 9000 Product Manual Rev. 3
5
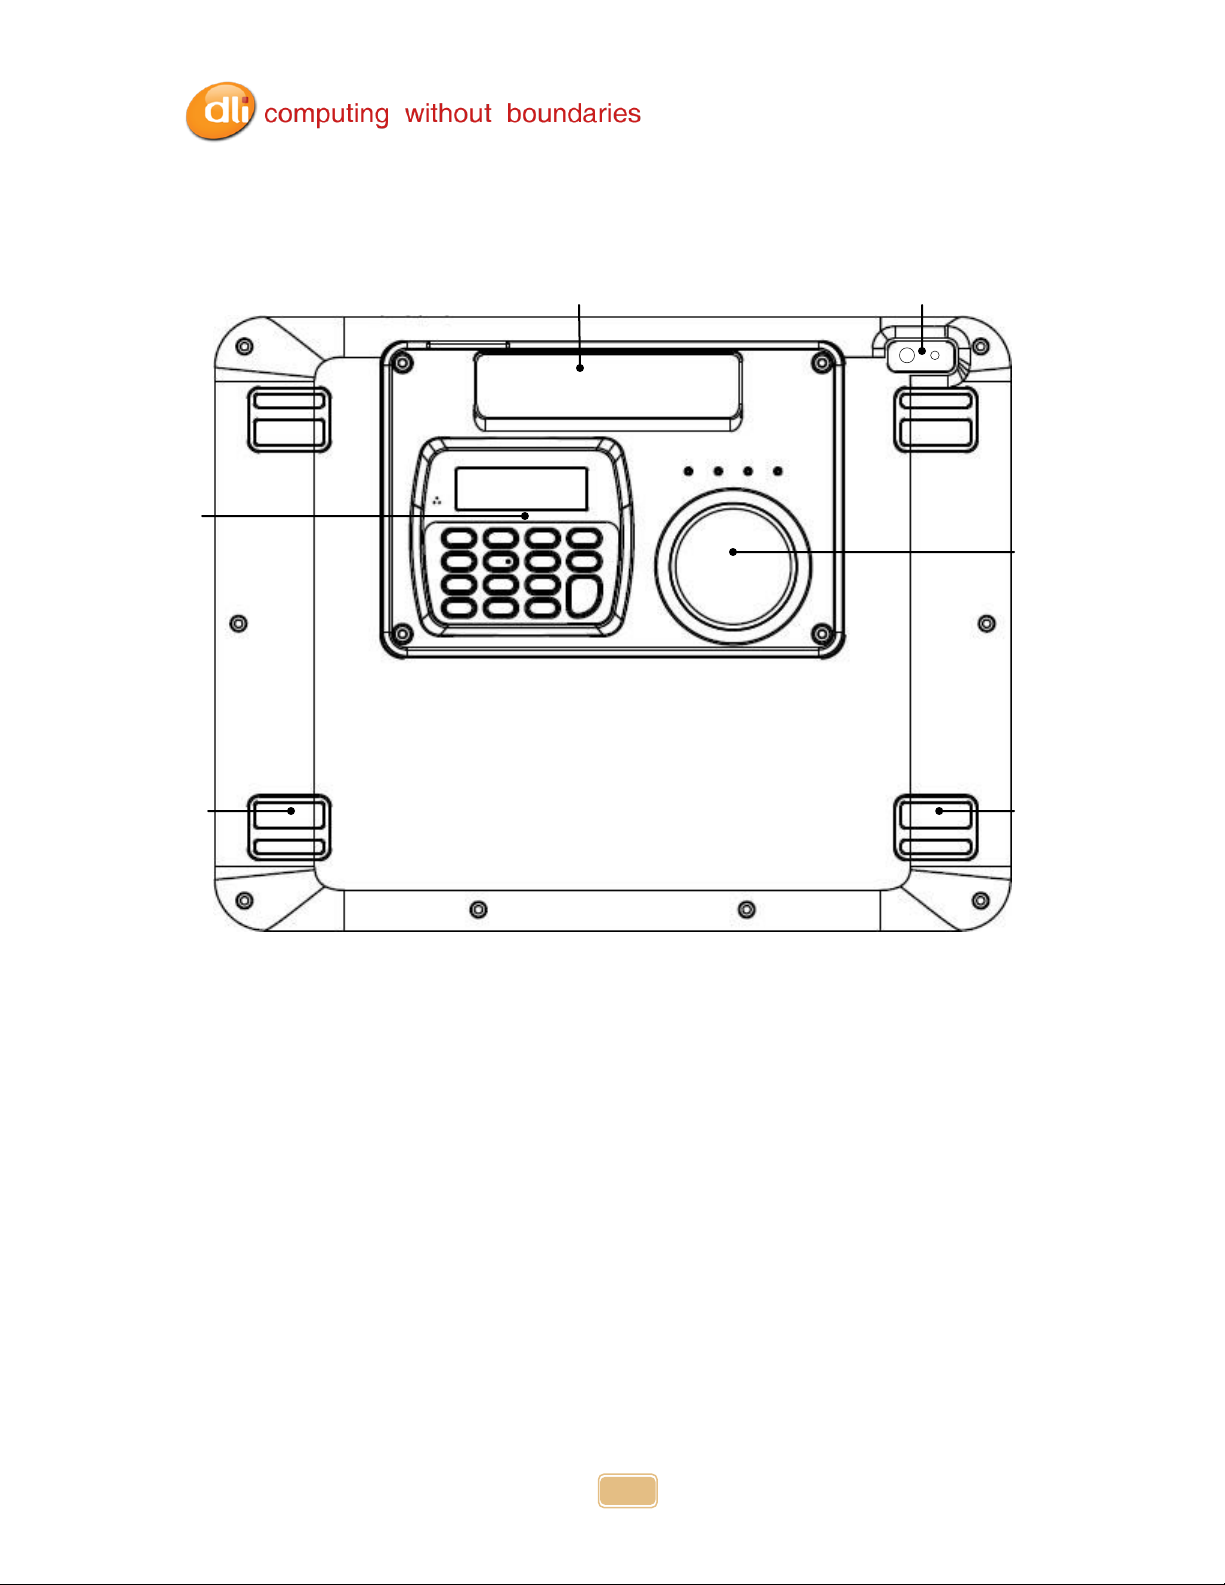
Hardware Overview
Front Panel
Impact Resistant Case
Programmable Keyboard
LCD with Touch Screen
Programmable
Button
Programmable
Button
1.3MP Camera
Ambient Light Sensor

DLI 9000 Product Manual Rev. 3
6
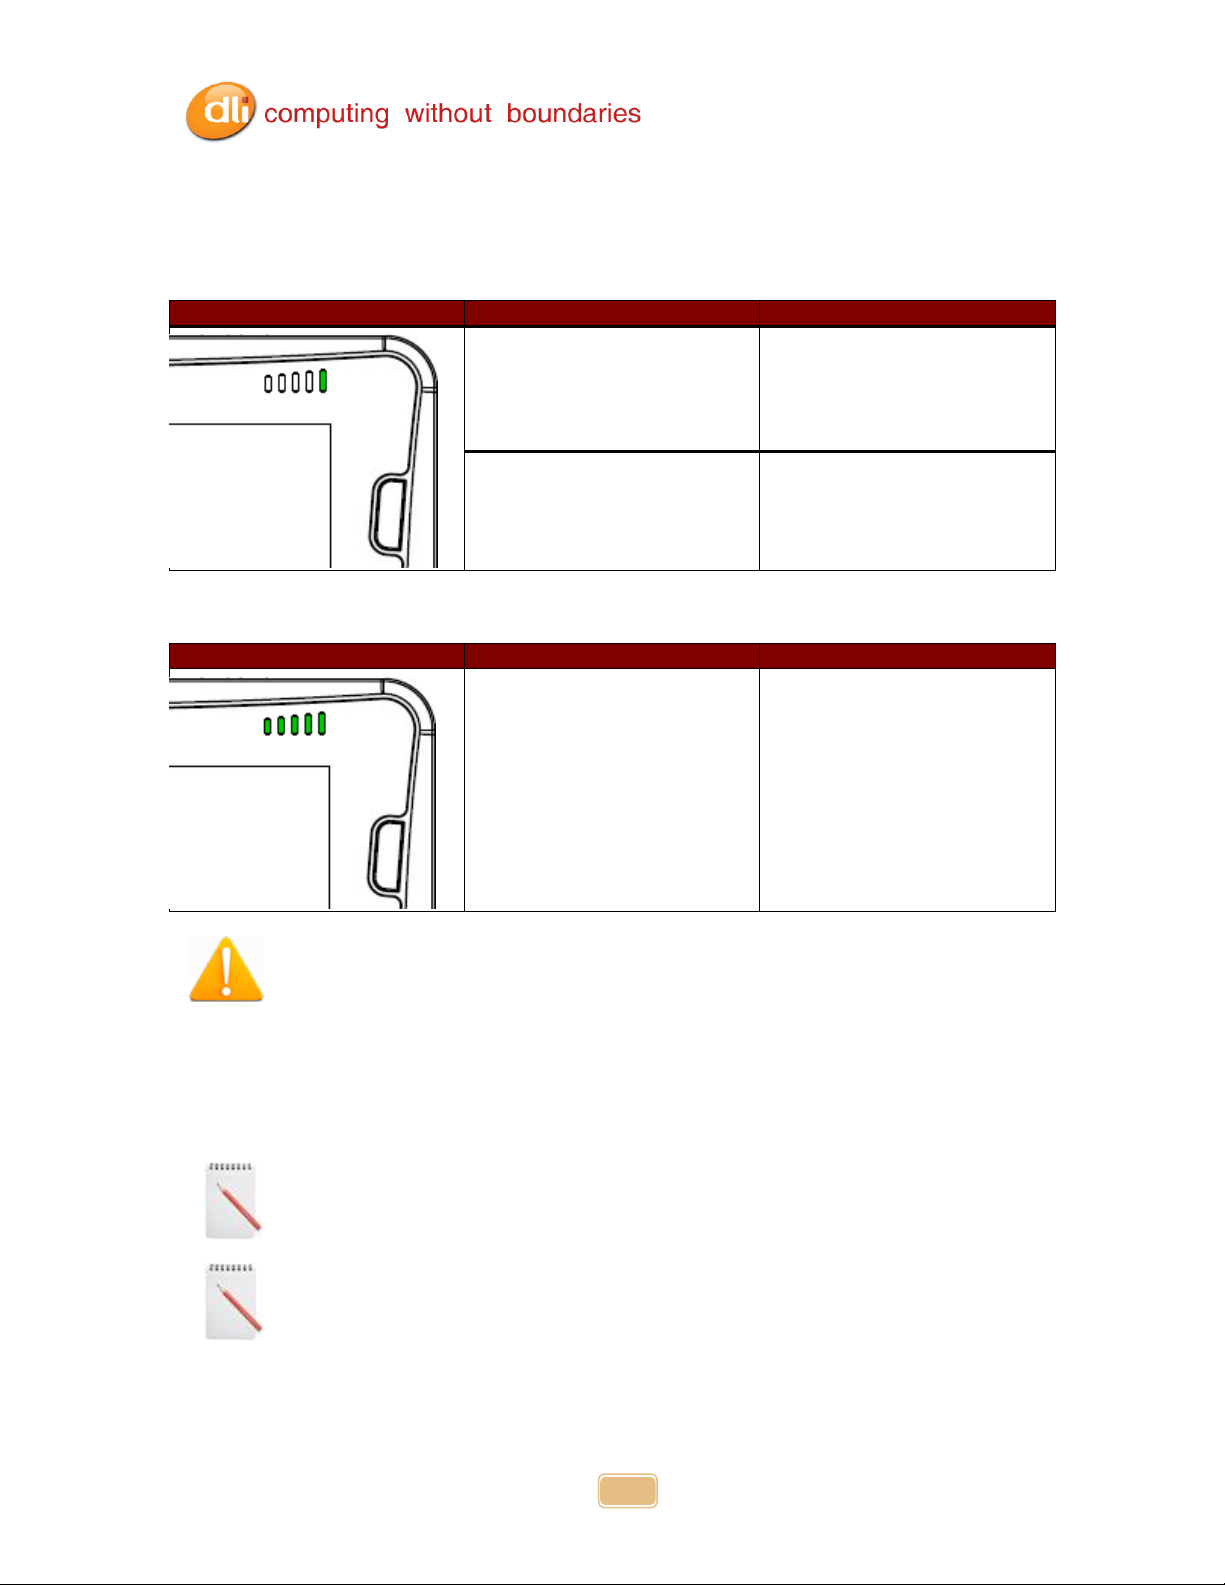
Front Panel Battery Status Indicator Lights
The front panel includes a battery status indicator light. When you push the battery status button,
found on the top panel of the tablet, the indicator lights will give you a percentage of battery life.
Each LED is 20% of battery life. The far right LED will indicate charging status when external power
is applied.
Indicator Light
Status
Description
Battery Status
Indicator lights
Solid Green
(5 LEDs)
Each green LED represents
20% of battery life
Top Panel
Bottom Panel
RF Cradle
Pass-Thru
Power Button
Smart Card
Reader
Cradle Interface
Top View
Front View
Battery Status Button
Battery Status Button
Magstripe Reader
1D/2D Imager
5-in-1 Module
5-in-1 Module
RF Cradle
Pass-Thru
Master Reset
Button
Microphone

DLI 9000 Product Manual Rev. 3
7
Side Panels w/ Optional 5-in-1 Module
AC Power
Left Side
Right Side
K-Lock
SIM Card Slot
Mini HDMI
USB
Headphone Jack
Speakers
DLI 9000 Product Manual Rev. 3
8
Back Panel w/ Optional 5-in-1 Module
RFID
SAM Support
NFC
Contactless Payment
Magstripe
2MP Camera w/ flash
Debit
Pin Pad
Handstrap
Hooks
Handstrap
Hooks

DLI 9000 Product Manual Rev. 3
9
Setting Up the DLI 9000 Terminal
1. Unpack the carton and verify its contents. –See Below
3. Charge the main battery for two hours.
4. Power on the terminal via the power button on the top of the terminal.
5. Let the device load and end on the Desktop screen.
Default BIOS password is qwerty
Unpack the Carton and Verify its Contents
Verify that the carton contains the following items:
•
DLI 9000 Rugged Mobile Tablet
•
Quick Reference Start Guide
If you ordered peripherals and/or accessories, verify that they are also included
with the order.
Be sure to keep the original packaging in case the DLI 9000 needs to be returned for
service–See page 41.
DLI 9000 Product Manual Rev. 3
10
Battery Status LED
On Power Source (Charger)
Battery Indicator Light (far right)
Status
Description
Solid Green
Capacity level = 100%
Blinking Green
Capacity level < 100%
and charging
Off Power Source (No Charger)
Battery Indicator Light
Status
Description
Solid Green
(5 LEDs)
Each green LED represents ~20%
of battery life
(from left to right)
For charging, use only DLI 9000 peripherals and the power cables. Use of
peripherals or cables not sold/manufactured by Data Ltd will void the warranty
and may damage the terminal.
Charging the Battery in the DLI 9000
1. Connect the DLI 9000 to the power supply provided by Data Ltd.
2. The battery will begin charging immediately.
3. Charge the battery for two hours, then power on the terminal.
Due to the nature of Lithium Ion, be sure to periodically charge your
batteries, as months of inactivity can have a long-term negative effect on
the life of the battery.
The battery will charge even if the terminal is in use as long as AC is applied to
the terminal.

DLI 9000 Product Manual Rev. 3
11
Power Management Utility
The DLI 9000 includes a comprehensive suite of power management functions. The power
management is based upon the ACPI Standard (Advanced Configuration and Power
Interface Specification) and is operated within the Embedded Controller (EC) at low level
management. The Power Management Utility is accessible in the Control Panel.
Optional Auto Power On & Off Setup
Your device can be set to power on when external power is detected via the BIOS, and powered
off at a certain battery percentage via the Operating System.
To enable the Auto Power On feature please contact DLI Technical Support, 800.526.1299 x774.
To enable the Auto Power Off feature based on battery percentage:
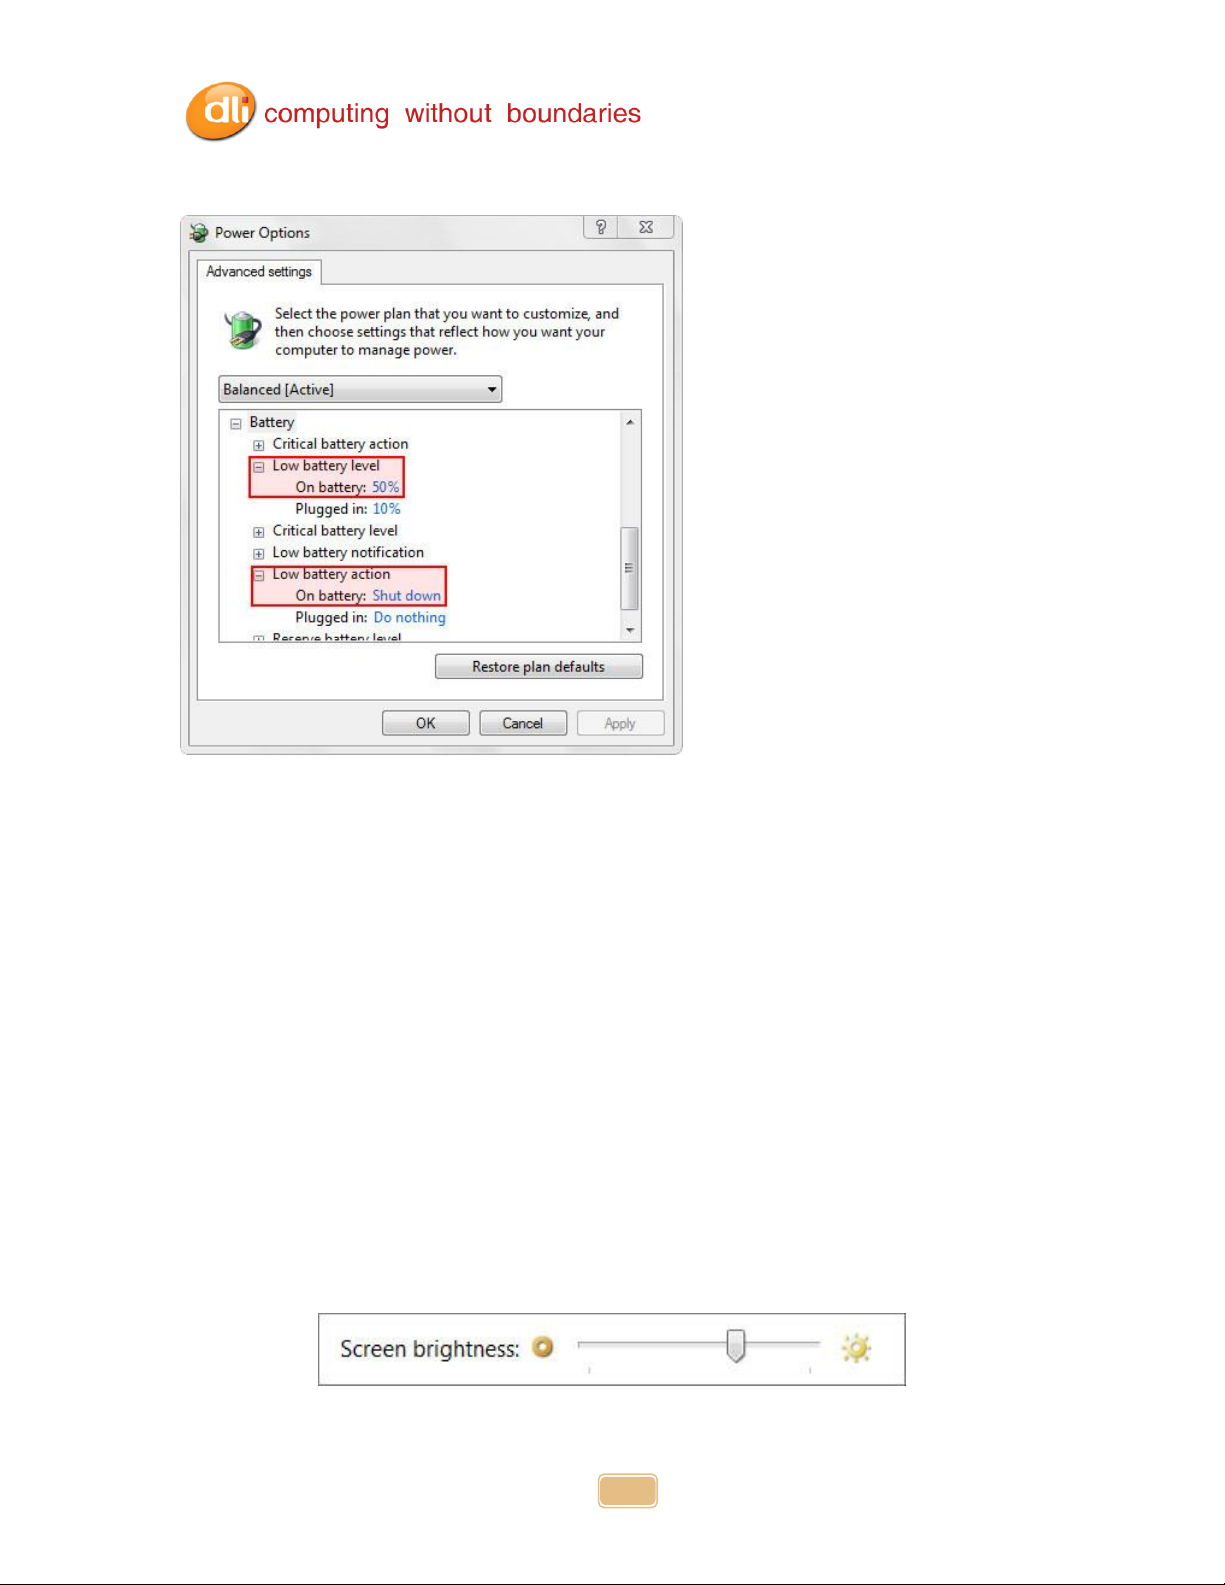
Tap Start>Control Panel>Power Options.
Select Change Plan Settings under the current Power Plan. This will bring up the Sleep and
Display settings (shown above on the left). Now select Change Advanced Power Settings
(shown above on the right).
(Continued on next page)
DLI 9000 Product Manual Rev. 3
12
Select Battery to expand the options (shown below).
Select Low battery level and give the On battery a percentage. 50% is what is shown; this
number can be changed to better fit the needed requirements.
After selecting a low battery level, now select a Low battery action. Select Shut downfor On
Battery. Select Apply and OK.
Once external power is removed (i.e. a forklift or a vehicle is turned off) the device will run off the
internal battery until it reaches the Low battery level set above and perform the set action.
Adjusting the Backlight
Brightness levels of the liquid crystal display (LCD) are adjustable based on the lighting conditions
by using the Windows Screen Brightness Bar. The DLI 9000 has a built-in Ambient Light Sensor
which will auto dim or increase brightness pending the ambient light. Example: if moving into a
dark area, the display will dim to help the eyes view the display. This feature can be
enabled/disabled via the BIOS. Please contact DLI Technical Support, 800.526.1299 x774
Adjusting the brightness with the Ambient Light Sensor disabled can be done via Windows in
Control Panel. Select Start > Control Panel > Power Options. At the bottom of this window is
your Screen Brightness Bar. Slide bar to the left to dim and slide to the right to increase
brightness.

DLI 9000 Product Manual Rev. 3
13
Using the Stylus
The stylus functions as a mouse; generally, a tap is the same as a mouse click.
Tap: Tap the touch screen once to open menu items and select options.
Double Tap: Double tap is used to perform a variety of actions, such as opening a
program, opening a folder, or selecting a word of text.
Drag: Hold the stylus on the screen and drag across the screen to select text
and images. Drag in a list to select multiple items.
Right Mouse Click: Holding down the stylus for 2 seconds followed by a circle animation will
activate the right mouse click.
Calibration ensures the accuracy of the stylus and adjusts the input angle for each person who
uses it. The terminal stores calibration data and settings on a per-user basis.
Calibration:
1. Open Control Panel and select Tablet PC Settings.
2. It is recommended to select Reset before calibrating the display. Once reset, select
Calibrate.
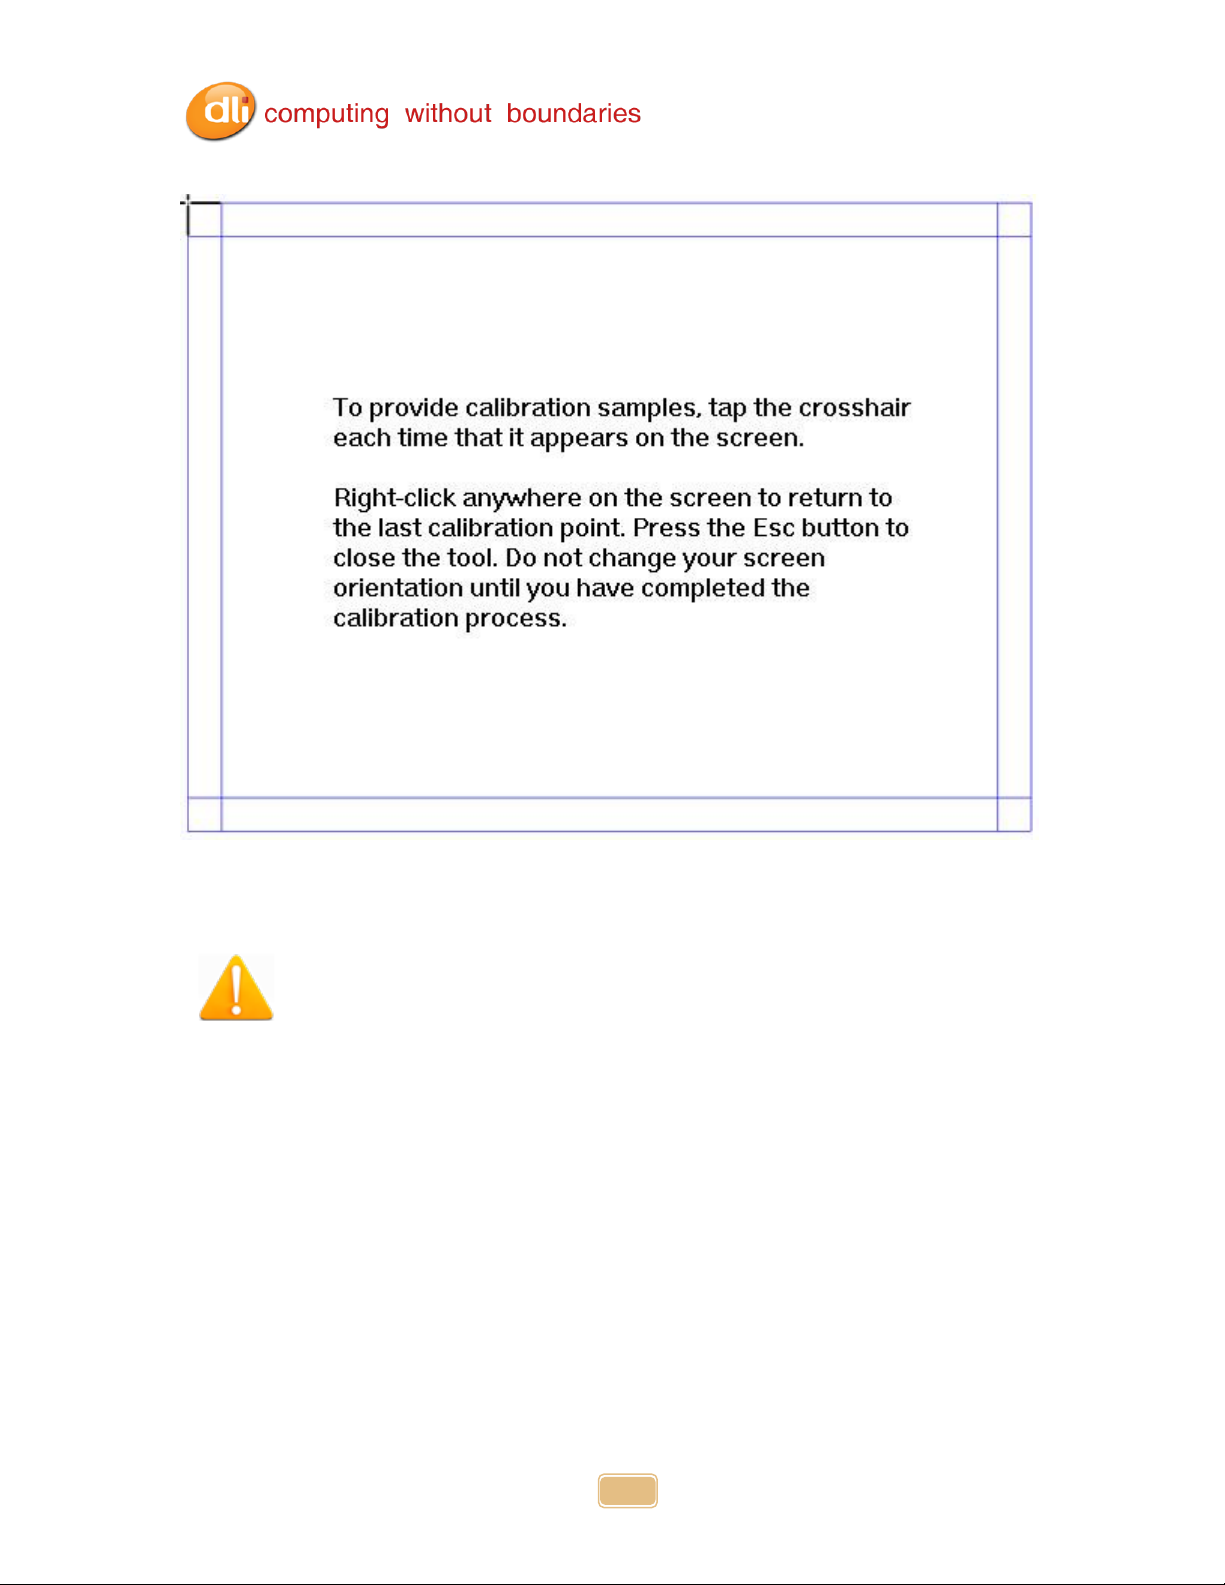
DLI 9000 Product Manual Rev. 3
14
3. Follow the instructions and the crosshairs to calibrate.
4. Finally select Apply and then OK. The calibration is complete.
Do not write on the terminal display with ink pens or use other sharp
objects that may damage the display.

DLI 9000 Product Manual Rev. 3
15
Using the Programmable Keys
The DLI 9000 has 6 integrated function keys. Each key is user configurable via the DLI KeyMon
Utility. The keys can be assigned to perform executable applications or Data Ltd. predefined
functions. The predefined functions are as follows:
Left Button –Barcode Scanner
F1 –DLI On-Screen Keyboard (OSK)
F4 –GPS Demo
Right Button –Camera Demo
The DLI KeyMon utility can be launched from the system tray or from the
Start>Programs>DLI>DLI KeyMon.The procedure below will assist you in defining the keys.
1. Double tap on the DLI KeyMon icon in the system tray
2. The DLI KeyMon screen is presented. Choose a key that requires a definition by
tapping on the orange keys or by highlighting the key in the button assignment area
and then double tapping.
3. There are 5 options for key assignment. Choose an assignment type that is required
for the key. Unassigned, Keyboard (OSK), Command, Scanner, External Program.

DLI 9000 Product Manual Rev. 3
16
4. To assign an application choose External program and tap on the browser icon.
Browser Icon
5. The user is returned to the assign menu once the selection has been chosen from
the browser icon. Selecting the apply button saves the change to the key. The path
to the application will appear in blue below the Current Assignment.

DLI 9000 Product Manual Rev. 3
17
6. To select a predefined action or keystroke choose Command and tap the down arrow to
display a drop-down menu. The drop-down menu has a list of various actions and
keystrokes to choose from. Once you have selected the command, tap the apply button
to save.
7. To Close the DLI KeyMon select File and then Exit or tap on the “X” on the top right of
the Main Window. This will close the KeyMon GUI but remain in the system tray.

DLI 9000 Product Manual Rev. 3
18
Using the WiFi Radio
The DLI 9000 has a PCIe 802.11a/b/g/n integrated radio. In Windows 7 the radio is configured
using the Windows Network and Sharing Center. With older versions of Windows the radio is
configured by Intel PROSet. Please contact Technical Support (See page 40) if you have any
questions configuring your radio. Windows provides the following features to Administrators and
end-users:
Connect or disconnect.
View Available Networks and network mapping.
Setup a new connection or network- Wireless,Wired, VPN connection or set up a
router or access point.
Connect and set up a domain or workgroup.
View Signal Quality and Speed.
Troubleshoot problems –Diagnose and repair network programs, or get
troubleshooting information.
Intel PCIe Integrated Radio
The Network icon can be found in the task tray. It provides a graphical representation of
your connection or signal quality.
Tap the network icon on the taskbar to see all your wireless and wired options—Wi‑Fi,
mobile broadband, dial-up, or corporate VPN. Tap your SSID and select Connect.

DLI 9000 Product Manual Rev. 3
19
Selecting Open Network and Sharing Center will bring you to the window below. Here
you can view your Network Map, your Active Networks, your Connection types and info.
You can also set up new connections or networks. Enter a domain or workgroup and
edit sharing options.
Selecting Set Up a Connection or Network brings up an easy to use wizard that helps
create a connection to your network and or the Internet. Choose the option that fits what
you need to do.

DLI 9000 Product Manual Rev. 3
20
If the SSID is not broadcasted you will need to select ‘Manually connect to a wireless
network’. This option will allow to you create a profile to add the SSID, Security type,
and Encryption type. Select Next to connect.
Table of contents
Other DLI Tablet manuals


