DLS MAGNIFICA EVO ECAM29034SB User manual

Doc. Nr.: DSDL_22014_A
[1]
Data Sheet and Service Manual
MAGNIFICA EVO
ECAM29034SB, ECAM29043SB USCA
ECAM29063SB, ECAM29084SB USCA
Date: 18.10.2022
TABLE OF CONTENTS:
1. TECHNICAL DATA ................................................................................................................................... 2
2. HYDRAULIC DIAGRAM........................................................................................................................... 3
3. WIRING-DIAGRAM ................................................................................................................................... 5
4. WORKING PRICIPLE ............................................................................................................................... 9
5. TEST MODE............................................................................................................................................. 16
6. STATISTICS READING.......................................................................................................................... 19
7. TROUBLESHOOTING............................................................................................................................ 21

Doc. Nr.: DSDL_22014_A
[2]
1. TECHNICAL DATA
Voltage 120V / 60 Hz
MAX. Input power 1250 W
Stand-by Button OFF 0,25 Wh (plug inserted but machine OFF)
COMPONENTS
Pump 120V AC - 52 W –Bar 15
Grinder motor 120V AC
Transmission motor 120V DC with position encoder
EV1 solenoid valve 120V AC
Thermoblock
- Temperature probe NTC sensor: operating set point
- Thermal fuse TCO 192 °C
- Heating element 120V AC –1200 W

Doc. Nr.: DSDL_22014_A
[3]
2. HYDRAULIC DIAGRAM
ECAM29034SB
ECAM29043SB

Doc. Nr.: DSDL_22014_A
[4]
ECAM29063SB
ECAM29084SB

Doc. Nr.: DSDL_22014_A
[5]
3. WIRING DIAGRAM
ECAM29034SB
ECAM29043SB

Doc. Nr.: DSDL_22014_A
[6]

Doc. Nr.: DSDL_22014_A
[7]
ECAM29063SB
ECAM29084SB

Doc. Nr.: DSDL_22014_A
[8]

Doc. Nr.: DSDL_22014_A
[9]
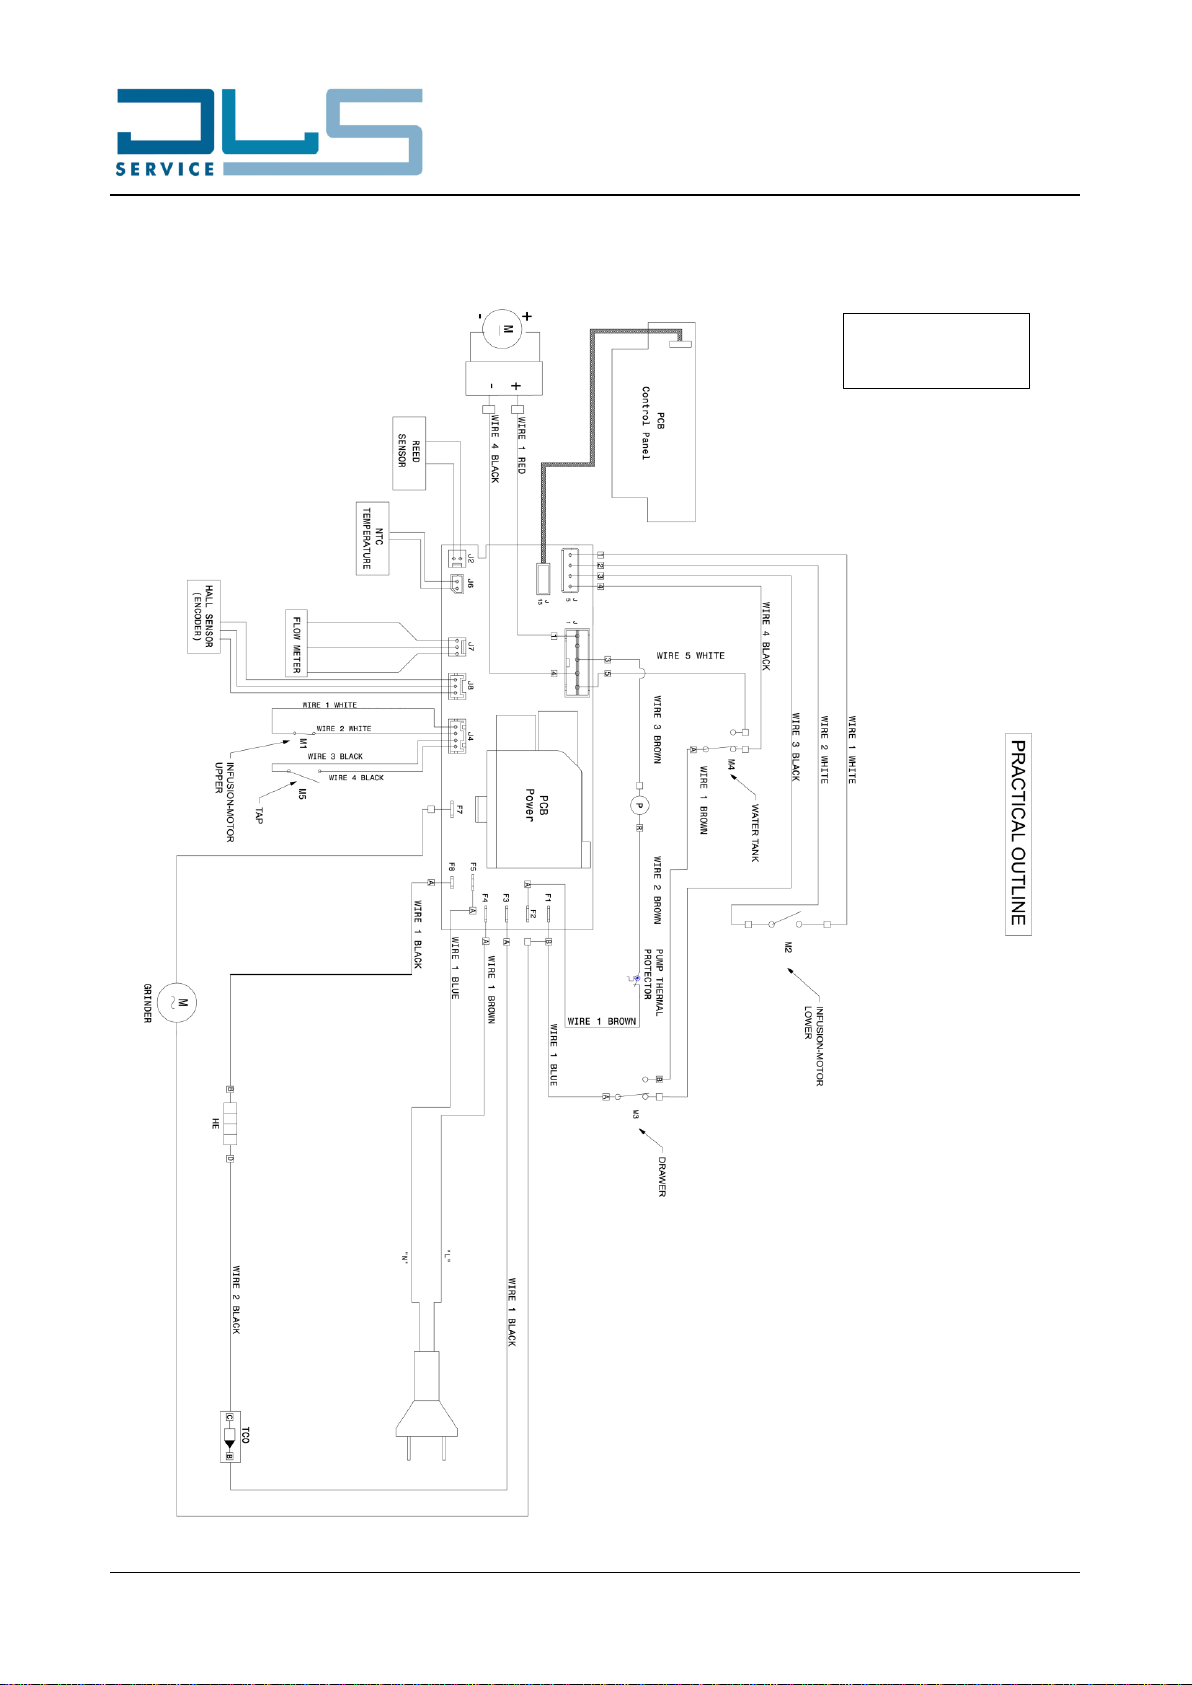
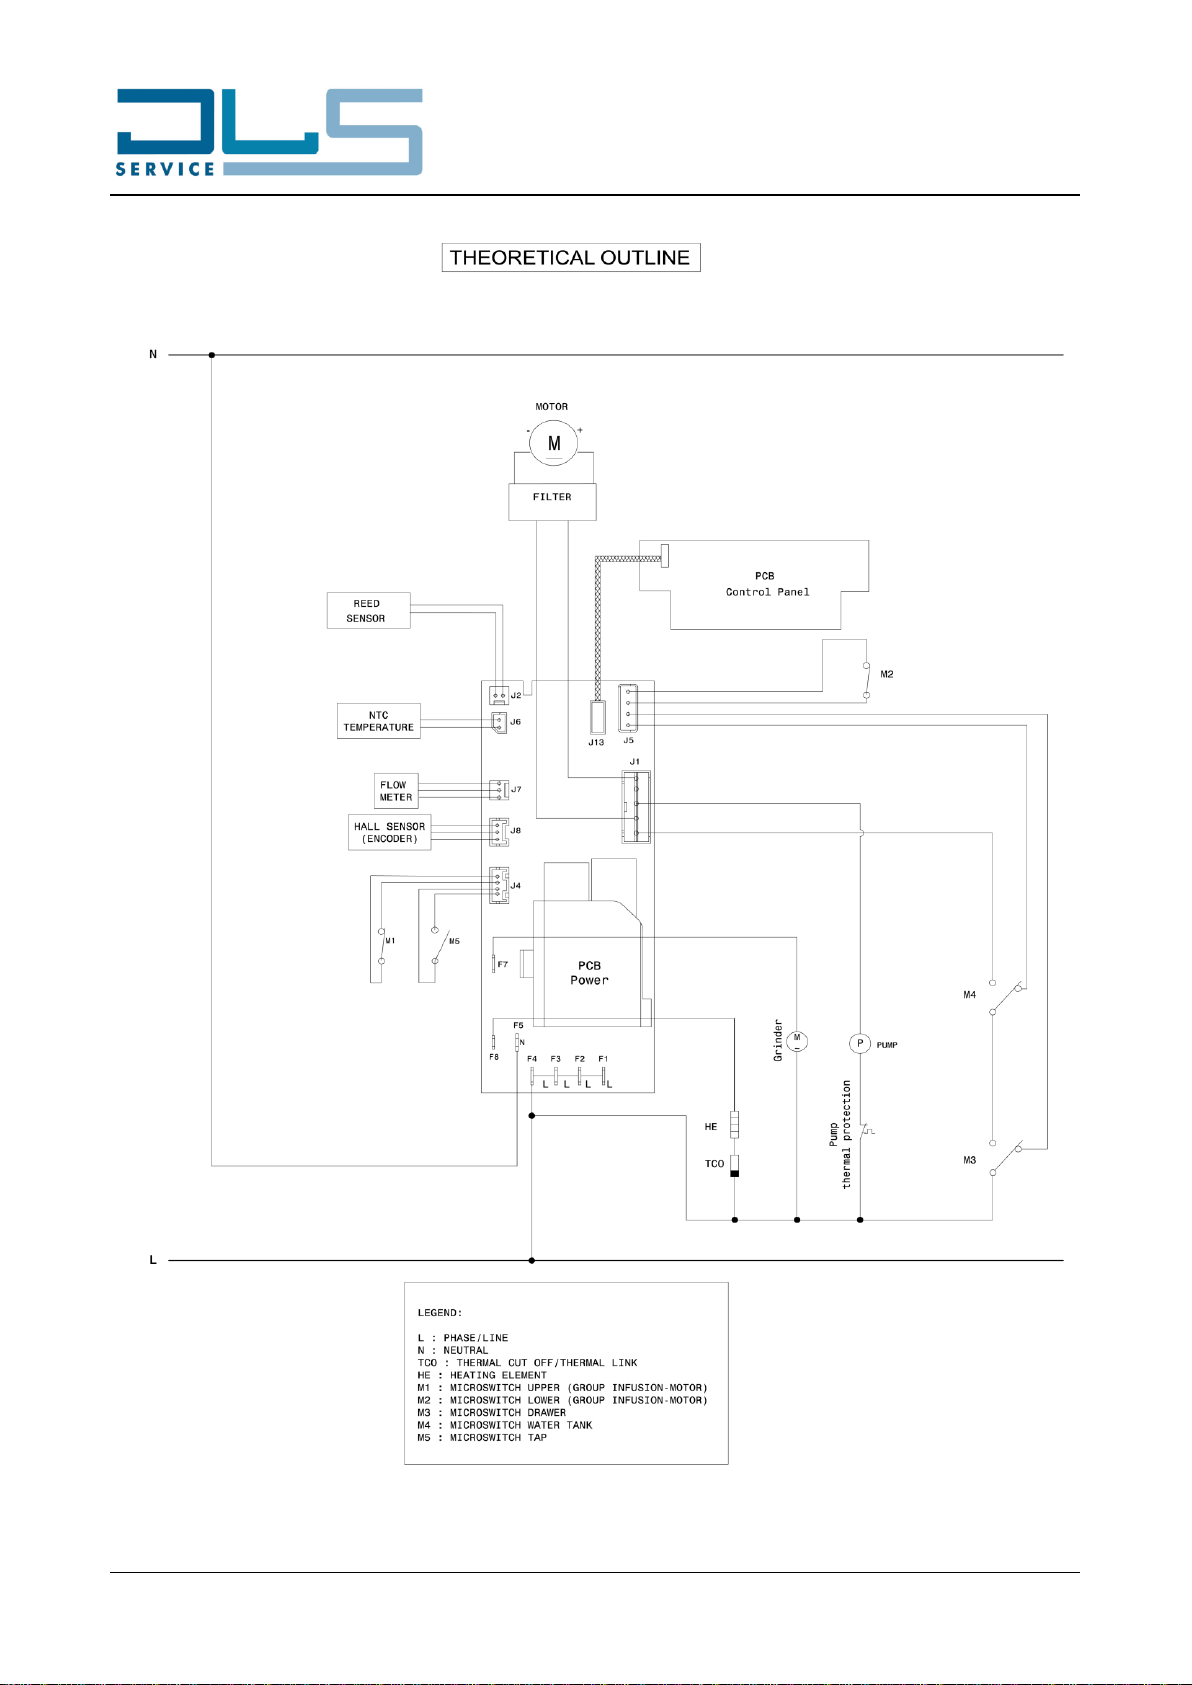
4. WORKING PRINCIPLE
4.1. MICROSWITCHES, SENSORS AND SOLENOID VALVES
MICROSWITCHES
Function
Logic
M1 = UPPER MICROSWITCH
Detects when the infuser is on top
position
“NC”, it opens when the infuser is in top
position
M2 = LOWER MICROSWITCH
Detects when the infuser is on down
position
“NO”, it closes when the infuser is in down
position
M3 = DRAWER MICROSWITCH
Detects when the drip tray is in
correct position
Changeover micro switch. When the drip
tray is inserted:
- the contact for the drip tray
detection is OPEN;
- the contact for the transmission
motor power supply is CLOSED.
M4 = WATER TANK
MICROSWITCH
Detects the presence of the water
tank
Changeover micro switch. When the water
tank is inserted:
- the contact for the water tank
detection is OPEN;
- the contact for the transmission
motor power supply is CLOSED.
M5 = IFD CONNECTOR
MICROSWITCH
Detects when the IFD connector is
attached to the machine
“NO”, it closes when the IFD connector is
attached.
M6 = MILK JUG LID
MICROSWITCH
Detects when the milk jug lid is
attached to the machine
“NO”, it closes when the milk jug lid is
attached.
M7 = HOT WATER SPOUT
MICROSWITCH
Detects when the hot water spout is
attached to the machine
“NO”, it closes when the hot water spout is
attached.
REED AND ENCODER
Function
Logic
REED SENSOR LOW WATER
TANK
Detects when the water level is at
minimum
HALL SENSOR ENCODER
Detects rotations of transmission
motor
MILK PRESENCE OPTICAL
SENSOR
Detects when the milk jug contains
milk and when it is empty
- When the jug is connected and
contains milk, the milk presence
blocks the
- infrared beam generated by the
sensor and the machine enables
the milk recipes preparation.
- When the jug is connected but it
is empty, the infrared beam
generated by the sensor is free to
pass and the machine disables
the milk recipes preparation. In
this case only the milk jug
cleaning function is active.
SOLENOID VALVE
Function
Logic
EV1 SOLENOID VALVE
3-Ways solenoid valve
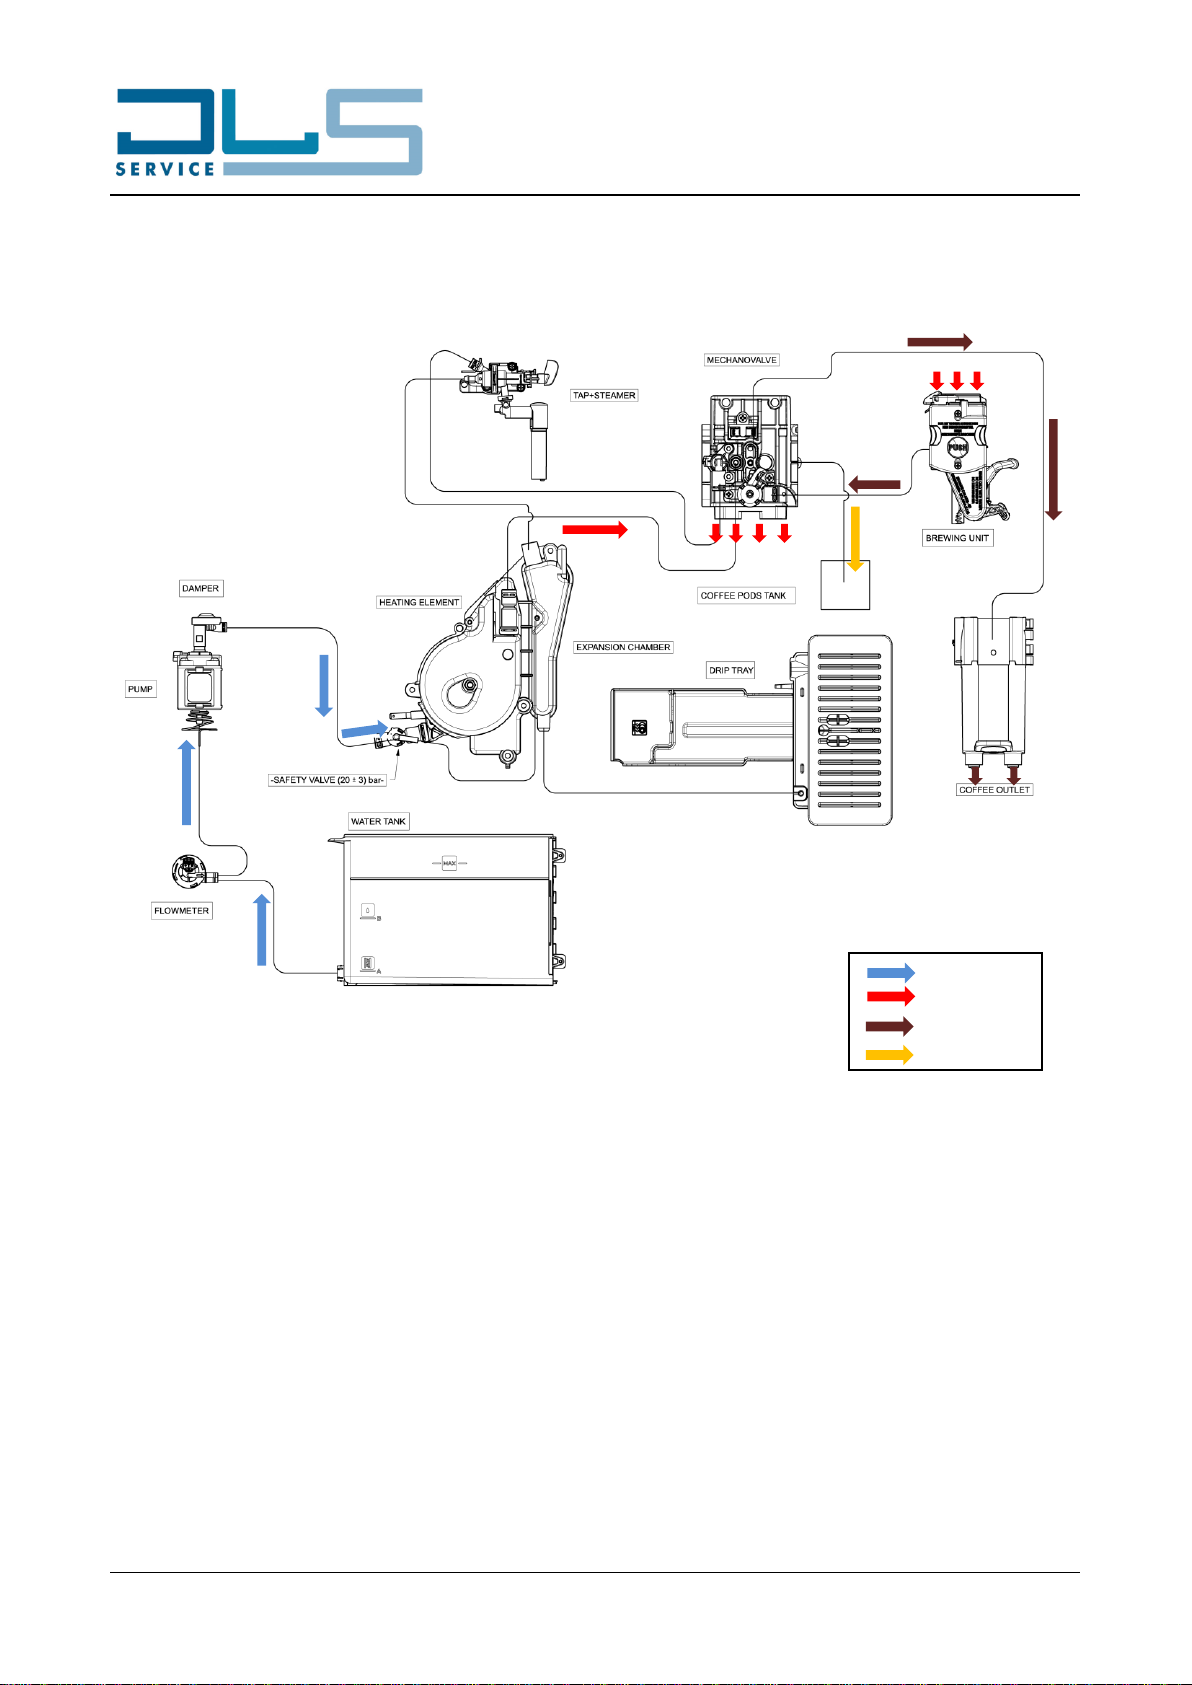
It opens to deliver hot water through the
hot water spout and steam to the milk jug
for milk frothing. When it closes, it allows
the discharge of the residual pressure to
the expansion chamber and drip tray.

Doc. Nr.: DSDL_22014_A
[10]
4.2. BEVERAGE DELIVERY CIRCUIT (ECAM29034SB, ECAM29043SB)
A. COFFEE DELIVERY
Espresso delivery steps:
- Thermoblock is activated
- Grinder is activated for a certain timing (based on the coffee taste selection)
- Infuser moves to the mechanical valve
- Pump is activated for a couple of seconds for pre-infusion
- Pump restarts for coffee delivering
- Pump and thermoblock stop
- Infuser moves away from the mechanical valve and releases the coffee pod
- Mechanical valve discharges excess water/coffee to the grounds container
- Infuser is moved back to the “Coffee Ready” position
Cold water
Hot water
Coffee
Discharge

Doc. Nr.: DSDL_22014_A
[11]
B. HOT WATER DELIVERY
Hot water delivery steps:
- Thermoblock is activated
- Pump is activated in fast pulsing mode for a certain timing
- Hot water is delivered through the tap-steamer output
- Pump stops, Thermoblock is deactivated.
Cold water
Hot water
Discharge

Doc. Nr.: DSDL_22014_A
[12]
C. STEAM DELIVERY
Steam delivery steps:
- Thermoblock is activated (setting temperature higher than 100°C)
- Pump is activated in slow pulsing mode for a certain timing
- The steam is delivered to the tap-steamer
- Pump stops, Thermoblock is deactivated.
Cold water
Steam
Discharge

Doc. Nr.: DSDL_22014_A
[13]
4.3. BEVERAGE DELIVERY CIRCUIT (ECAM29063SB, ECAM29084SB)
A. COFFEE DELIVERY
Espresso delivery steps:
- Thermoblock is activated
- Grinder is activated for a certain timing (based on the coffee taste selection)
- Infuser moves to the mechanical valve
- Pump is activated for a couple of seconds for pre-infusion
- Pump restarts for coffee delivering
- Pump and thermoblock stop
- Infuser moves away from the mechanical valve and releases the coffee pod
- Mechanical valve discharges excess water/coffee to the grounds container
- Infuser is moved back to the “Coffee Ready” position.
Cold water
Hot water
Coffee
Discharge

Doc. Nr.: DSDL_22014_A
[14]
B. HOT WATER DELIVERY
Hot water delivery steps:
- Thermoblock is activated
- EV1 solenoid valve is activated
- Pump is activated in fast pulsing mode for a certain timing
- Hot water is delivered through the hot water spout connected to the accessory nozzle
- Pump stops, EV1 and Thermoblock are deactivated.
Cold water
Hot water
Discharge

Doc. Nr.: DSDL_22014_A
[15]
C. MILK FROTHING PREPARATION
Milk frothing preparation steps:
- Thermoblock is activated (setting temperature higher than 100°C)
- EV1 solenoid valve is activated
- Pump is activated in slow pulsing mode for a certain timing
- The steam is delivered to the milk jug attached to the accessory nozzle. Here it mixes with milk and
air to produce hot frothed milk.
- Pump stops, EV1 and Thermoblock are deactivated.
Milk jug cleaning procedure:
- Thermoblock is activated
- EV1 solenoid valve is activated
- Pump is activated in very slow pulsing mode
- Hot water is delivered through the milk jug lid to clean its internal circuit
- Pump stops, EV1 and Thermoblock are deactivated.
Cold water
Steam
Discharge

Doc. Nr.: DSDL_22014_A
[16]
5. TEST MODE
5.1. PROCEDURE TO ACTIVATE TEST MODES
- The appliance must be plugged-in and in stand-by mode.
- Remove the drip tray. The GROUNDS CONTAINER icon will flash
- Hold the combination of the below three button pressed (depending on the model):
ECAM29X.6Y
ECAM29X.8Y
until the GROUNDS CONTAINER icon will turn OFF and the LEDs of the below buttons (depending
on the model) will start flashing:
ECAM29X.6Y
ECAM29X.8Y

Doc. Nr.: DSDL_22014_A
[17]
- Insert the grounds container and press one of the buttons indicated in the next paragraphs to start the
corresponding test function.
IMPORTANT NOTICE: The access to the desired test function must be done within 10 seconds,
otherwise the machine will automatically come back to stand-by mode.
5.2. LOAD TEST MODE
After having accessed the test mode as indicated on paragraph 5.1, press the first beverage icon from the left
(MY LATTE button) to access the LOAD TEST MODE:
The LED of each button linked to the activation of a component will illuminate steadily white. Hold the desired
button pressed to activate the corresponding load, the LED of the button will flash slowly to indicate the
activation of the load:
NOTICE: When the DOWN micro switch is reached by the infuser, the MILK JUG CLEAN LED will blink fast.
NOTICE: When the UP micro switch is reached by the infuser, the SETTINGS LED will blink fast.
NOTICE: Multiple components can be activated at the same time (e.g. the pump and EV1).

Doc. Nr.: DSDL_22014_A
[18]
5.3. DISPLAY TEST MODE
After having accessed the test mode as indicated on paragraph 5.1, press the second beverage icon from the
left (CAPPUCCINO or LATTE MACCHIATO button, depending on the model of coffee machine) to access the
DISPLAY TEST MODE:
During the display test mode all the LEDs are lit up. When a button is pressed, only the LED of that button
remains ON, while those of all the other buttons will be turned OFF:
In particular, by pressing each of the AROMA buttons, in addition to the button LED, also the two neighbor
warning LEDs will illuminate steadily:
NOTICE: The DISPLAY TEST MODE will reset the following settings in the appliance:
First run: the machine will ask again for hydraulic circuit filling.
Filter installation: if the filter installation function was enabled, it will be disabled.

Doc. Nr.: DSDL_22014_A
[19]
5.4 ENCODER RESET
After having accessed the test mode as indicated on paragraph 5.1, press the PRE-GROUND button to
perform the ENCODER RESET, i.e. the reset of the value of the maximum height of the infuser:
The PRE-GROUND LED will remain steady ON while the reset is in progress, then it will go OFF when the
reset is completed.
IMPORTANT: To complete the encoder reset procedure, start the appliance normally and perform a manual
rinse with the dedicated button.
The infuser must be clean and smooth in its movements to allow the encoder reset to be validated correctly.
6. STATISTICS READING
The appliance allows the reading of the statistics data to understand exactly how the machine operated along
the time.
To access the STATISTICS function:
- make sure the appliance is ready to use (i.e. in ready-for-coffee mode);
- hold the SETTINGS and PRE-GROUND buttons pressed for at least 5 seconds:
The LEDs of the buttons dedicated to read the statistics values will illuminate steadily.

Doc. Nr.: DSDL_22014_A
[20]
Press the desired button to display the corresponding statistics data:
BUTTON
STATISTIC DATA
ESPRESSO
Number of Coffee Beverages
MY LATTE
Number of Milk Beverages
CAPPUCCINO
Number of Milk Jug Cleanings
MILK JUG CLEAN/DESCALE
Number of Descaling Processes
X2/RINSE
Litres of Water
MID AROMA COFFEE BEAN
Number of Filters Installed
After having pressed the desired button, the appliance will display the corresponding statistic value
with the sequential flashing of the below lights:
Example: To display a total amount of 24 coffee beverages, the appliance will display:
- 4 flashings of the DESCALE light;
- followed by 2 flashings of the GROUNDS CONTAINER light.
NOTICE: To exit the statistics mode, press the SETTINGS button again or wait for 120 seconds without
operating on the machine. The appliance will come back to the ready to use mode.
This manual suits for next models
3
Table of contents
Other DLS Coffee Maker manuals