DMC HX33 User manual
Pneumatic Crimp Machine
Version HX33 –02/16 –Rev. A
HX33
Operating Instructions

HX33-DS Rev. A Page 2 / 23
Producer
WEZAG GmbH
Werkzeugfabrik
Wittigstr. 8
35260 Stadtallendorf
Germany
Sale
DMC
Daniels Manufacturing Corporation
526 Thorpe Road
Orlando, FL 32824-8133
USA
Telephone: 001 407 855 6161
www.dmctools.com
Date Version
02.24.2016 REV. A
© by WEZAG
Reproduction of these instructions or parts of them in whatever form is not permitted without
express written permission from the publisher.
We reserve the right to make technical changes necessary to improve the machine that could
diverge from figures and information in these instructions.

HX33-DS Rev. A Page 3 / 23
Table of Contents
1Introduction...............................................................................................................................................4
1.1 Product Specification.........................................................................................................................4
1.2 Conformity .........................................................................................................................................4
1.3 Dealing with the Operating Instruction...............................................................................................4
2Safety .......................................................................................................................................................5
2.1 Warning & Safety Precautions in this Operating Instruction .............................................................5
2.2 Safety Precautions ............................................................................................................................5
2.3 Responsibilities..................................................................................................................................7
2.4 Designed Use....................................................................................................................................7
2.5 Predictable Misuse ............................................................................................................................7
2.6 Hazardous Areas...............................................................................................................................8
3Shipment ..................................................................................................................................................8
3.1 Packing..............................................................................................................................................8
3.2 Packing Contents...............................................................................................................................8
4Technical Description...............................................................................................................................9
4.1 Operators Guide................................................................................................................................9
4.2 Machine Identification..................................................................................................................... 10
4.3 Technical Data................................................................................................................................ 10
4.4 Safety Guard................................................................................................................................... 10
4.5 Release Button............................................................................................................................... 11
5Transport and Installation.......................................................................................................................11
5.1 Transport ........................................................................................................................................ 11
5.2 Installation....................................................................................................................................... 11
6Commissioning / Connecting to Compressed Air Supply ......................................................................12
7Tooling....................................................................................................................................................14
8Normal Operation / Production Cycle.....................................................................................................15
9Maintenance...........................................................................................................................................16
9.1 Maintenance Plan........................................................................................................................... 16
9.1.1 Daily..................................................................................................................................... 16
10 Problem Handling and Fault Diagnostics...............................................................................................17
11 Removal from Service, Demounting, Disassembly,...............................................................................18
12 Storage...................................................................................................................................................18
13 Disposal..................................................................................................................................................18
14 Exploded View Drawing, Spare Part List ...............................................................................................19
14.1 Exploded View Drawing.............................................................................................................. 19
14.2 Parts List Exploded View Drawing.............................................................................................. 20
14.3 Pneumatic Diagram .................................................................................................................... 22
14.4 Parts List Pneumatic................................................................................................................... 22
14.5 Accessories overview for re-orders ............................................................................................ 23
14.6Additional Information / Limitation of Liability / Limited Warranty............................................... 23
HX33-DS Rev. A Page 4 / 23
1 Introduction
1.1 Product Specification
The DMC HX33 is a bench top pneumatic crimp machine that is compatible with M22520/5
military and many DMC "Y-die" series crimp dies. The die sets are interchangeable and can
be easily installed and removed from the HX33 pneumatic crimp tool.
Utilizing the enclosed foot pedal, the crimping cycle of the HX33 is activated and allows the
operator to have both hands free to insert the crimped item and wire. All HX33 crimp tools are
equipped with a positive closing mechanism to ensure consistent crimp quality.
The HX33 has an emergency release button that will open the crimping jaws in the event of
blocked jaws caused by operation or handling errors or wrongly placed terminals.
All other applications of the HX33 are only permitted with a written permission of the
manufacturer. For all unauthorised applications of the HX33 the manufacturer cannot be held
liable for any resultant damage or injury.
1.2 Conformity
The machine may only be used for the purpose specified in the operating instruction. The
manufacturer and supplier will not be liable for any damages which may result due to the
machine being used for a purpose other than that for which it was intended. This is done
entirely at the user’s own risk.
RoHS Information
The pneumatic crimp machine HX33 complies with the EU-Guideline 2011/65/EU(RoHS2).
CE
The pneumatic crimp machine HX33 is CE compliant.
The original declaration of conformity was supplied together with the invoice of the
machine.
1.3 Dealing with the Operating Instruction
The operating instruction manual contains all information concerning operating elements,
operation, commissioning, and maintenance work as well as technical data.
The operating instruction must be constantly within reach of the HX33 pneumatic crimp
machine. Every machine operator must read and understand the operating instruction in order
to ensure safe and efficient production with this piece of equipment.
DMC declines to accept any liability for damages that are incurred due to the fact that the
instructions on the machine or in the operation instruction have been disregarded.
The user is responsible for supplementing the operation instruction with any instructions
resulting from current national regulations for accident prevention and protection of the
environment.
This operating instruction has to be guarded for later use.
The German original version of the operating instruction is legally binding.
HX33-DS Rev. A Page 5 / 23
2 Safety
2.1 Warning & Safety Precautions in this Operating Instruction
The following warnings and safety related cautionary notices in the individual chapters alert
you to various levels of danger:
DANGER
+Identifies an imminent, serious danger, which, if it is not avoided, will lead to serious
injuries or even to death.
CAUTION
+Identifies a possible danger, which, if it is not avoided, will lead to serious injuries or even
to death.
ATTENTION
+Identifies a potential dangerous situation, which, if it is not avoided, can lead to medium
or minor injuries or material damages.
INFORMATION
+If this information is not followed, it can lead to a deterioration of the operating procedure.
2.2 Safety Precautions
The HX33 pneumatic crimp machine has been constructed according to state-of-the-art
technology and the acknowledged technical safety regulations.
When carrying out jobs such as installation, putting the machine into operation or setting it up,
operation, changing the conditions of use and the mode of operation or carrying out
maintenance and service jobs, it is important to observe the procedures for switching off the
machine described in the operation instruction.
Please observe the national regulations according to the minimum age of the personnel
operating the HX33 pneumatic crimp machine. Allowing younger persons access to the
machine is strictly prohibited.
+Do not operate the HX33 pneumatic crimp machine until you have studied and fully
understood all the instructions described in this operating instruction.
+Operate the HX33 pneumatic crimp machine in a dry and dust free environment only. The
crimp machine is only allowed to be used when it is in complete functional condition.
+Do not modify the HX33 pneumatic crimp machine nor use it for any purpose for which it
was not intended.
+The use a chain hoist or lifting device is recommended for transporting the crimping
machine.
+Wear suitable safety shoes when transporting the machine.
+Prior to starting up the HX33 pneumatic crimp machine, make sure it is firmly positioned on
a sturdy stand or bench to prevent it from tipping over. Ensure that the table or bench is
stable enough to support the machine in normal use.
+Assure an appropriate table height. The table height is dependent on the position of the
operator, (work in sitting or standing position) according to prEN 894-4:2004, Table A.1
+Assure appropriate illumination of the working place. (EN 1837:1999 –chapter 4.2: “The
general value of illumination has to be 500 lx […]”).
+Connect compressed air supply only with the supplied compressed air hose.

HX33-DS Rev. A Page 6 / 23
+Place the pneumatic tubes on the floor or out of the way so that they do not cause a trip
hazard.
+Pneumatic tubes must not be damaged.
+Place the foot pedal on the floor. No other place is allowed. The foot pedal must be
movable, so that the operator has the possibility to change his position for ergonomic and
production needs.
+Do not lay the foot pedal in aisles or walkways.
+Assure free access to the operating elements of the machine, especially the foot pedal.
+Before starting maintenance, disassembly or repair work, the crimp machine must be
disconnected from air supply.
+Maintenance work may be performed only by authorized and properly trained personnel.
+Due to the risk of hand or finger injury, never try to reach into the machine before having
assured that the machine is disconnected from the air supply. Disconnect the air supply
before changing the safety guard and the dies.
+Before commissioning the machine, it is always important to check whether all safety
devices, especially the safety guard and the die set, are installed and are functioning
correctly.
+Check the release button before starting the work on the crimp machine. In the case of
imminent danger immediately press the release button. The release button must be within
the direct reach of the operator. It must not be covered.
+Exercise caution at all times when the HX33 pneumatic crimp machine is switched on.
+The HX33 pneumatic crimp machine is not allowed to be used without a installed die set
and safety guard.
+The HX33 pneumatic crimp machine may only be set up and operated in perfect technical
condition, observing all the safety regulations and considering any possible dangers.
+The crimp machine is only allowed to be used when it is in a completely functional
condition.
+If you suspect that the machine cannot be operated safely, it must be switched off and
secured against anyone accidentally switching it on.
+In cases of a machine malfunction, production must be stopped and the malfunction must
be fixed before continuing work with the machine.
+Work with caution.
+Only one person is allowed to work on or with the machine at a time.
+Only trained personal are allowed to work on or with the machine.
+It is only allowed to work with the specified air pressure.
+When working with the HX33 pneumatic crimp machine, do not wear loose clothing,
jewellery or long, loose hair that can get caught in the HX33 pneumatic crimp machine.
+Disconnect the HX33 pneumatic crimp machine from the air supply before attempting any
maintenance work. Due to the risk of hand or finger injury, never try to reach into the
machine before having assured that the machine is disconnected from the air supply.
+The machine can only be depressurized by disconnecting the machine from the main air
supply.

HX33-DS Rev. A Page 7 / 23
2.3 Responsibilities
The HX33 pneumatic crimp machine may only be operated by suitably trained and authorized
personnel. The user must clearly define and observe the responsibilities of the personnel for
operation, set-up, maintenance, and service. It is particularly important to define who is
responsible for work on the pneumatic equipment. Such work should only be carried out by
specially trained staff.
Should the user make any changes to the machine without consulting the manufacturers or
the suppliers, the latter will not be liable for any damage that may result.
The user of the HX33 pneumatic crimp machine is responsible for making sure that all persons
involved in any way, either in the installation or in maintenance of the machine, have been
thoroughly trained on the system using this operating instruction.
The user is also responsible for the training of operators and the instruction must include the
following aspects:
+Purpose of the machine
+Hazard zones
+Safety rules and regulations
+Functionality of the various components of the machine
+Proper operation of the machine
To assure full familiarization with the system, the training must be conducted in the native
language of the operators involved.
Staff qualifications required in conjunction with the use of the pneumatic crimp
machine HX33:
Installation
Set-up
Instruction
Technical personnel with language proficiency in either English or
German, in addition to the native language of the operator.
Operation
Through qualified personnel trained as indicated above.
Maintenance
Service
Technical personnel with proficiency in English or German.
The safety instructions, warnings, and precautions contained in the individual chapters must
be strictly observed by all users and operators.
2.4 Designed Use
+Realization of crimp connections up to a wire size of 10AWG (5.3mm2) depending on the
terminal design.
The HX33 pneumatic crimp machine is designed for the use of the DMC “Y-die” series dies.
The HX33 pneumatic crimp machine should only be used with the dies specified by DMC. It is
only allowed to use the pneumatic crimp machine HX33 together with the DMC die sets for the
preparation of crimp connections!
2.5 Predictable Misuse
+Every application which is not mentioned in chapter 2.4 “Designed Use“.
HX33-DS Rev. A Page 8 / 23
2.6 Hazardous Areas
1. Hazardous Area: Area of interchangeable crimping dies
Person at risk: Operator
Type of Hazard: Hand Injuries
2. Hazardous Area: Opened machine
Person at risk: Installation Engineer
Type of Hazard: Direct or indirect contact with movable parts of the machine,
Hand injuries (cuts from sharp edges)
Hand injuries (risk of crushing)
3 Shipment
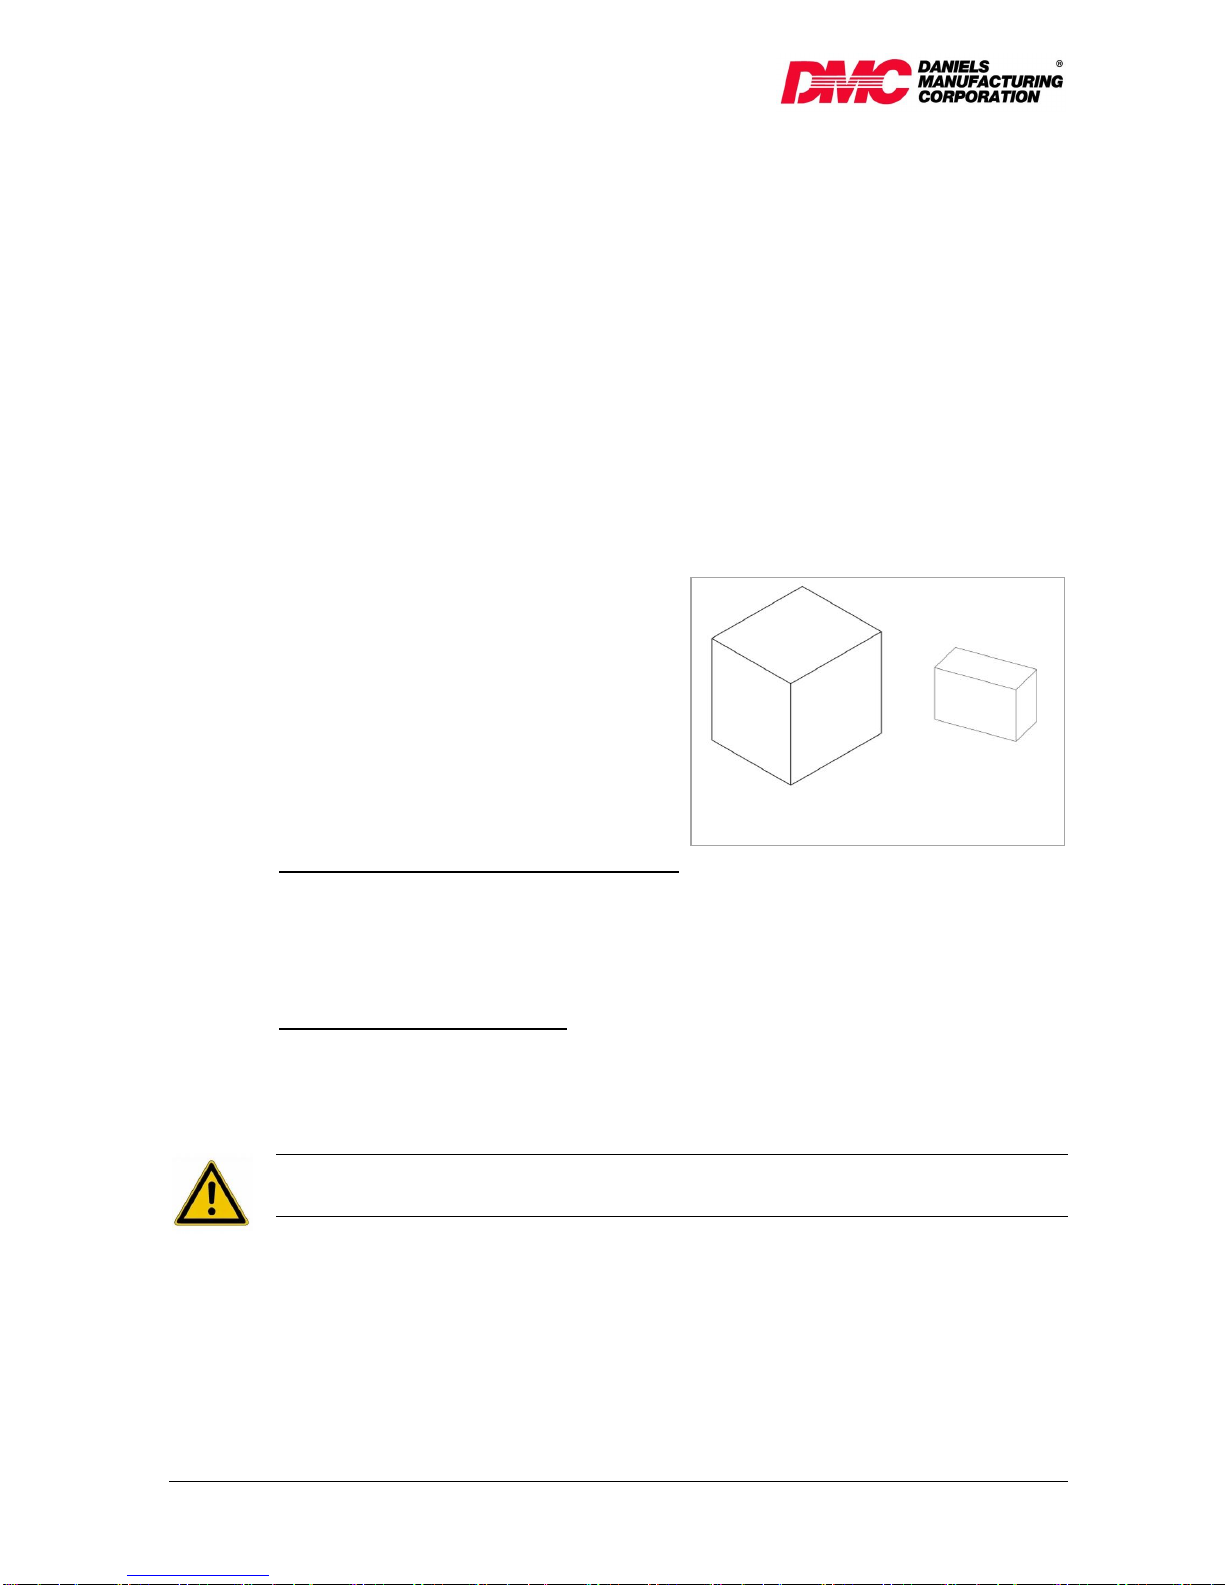
3.1 Packing
Upon receipt, unpack the HX33 pneumatic
crimp machine carefully and check that you
have received all components against the
packing slip, declaration of conformity, and
operating instructions. We recommend that
you retain the packing for further dispatch
and for storage.
Dimension (Carton 1/machine and black box):
Length: 15” (380 mm)
Width: 13.4” (340 mm)
Height: 15.4” (390 mm)
Gross-Weight: 34.61 lbs (15,7 kg)
Dimension (Carton 2/Foot pedal):
Length: 11.4” (290 mm)
Width: 7.5” (190 mm)
Height: 5.5” (140 mm)
Gross-Weight: 2.64 lbs (1,2 kg)
DANGER
+Use a chain hoist or lifting device to transport the crimping machine.
3.2 Packing Contents
1 pc
Pneumatic crimp machine HX33
with operating instruction (German original version and English translation)
(without die set)
1 pc
Safety guard
1 pc
Pneumatic foot pedal with cover
1 pc
Hexagon wrench key SW 2,0
1 pc
Air hose set
Carton 1: Machine
and black box
Carton 2: Foot pedal
Fig. 3.1

HX33-DS Rev. A Page 9 / 23
4 Technical Description
4.1 Operators Guide
Item
Description
01
Pneumatic crimp machine HX33
02
Release Button
03
Safety guard
04
Die Set
05
A =control pressure (foot pedal)
06
P1 = compressed air (foot pedal)
07
P = compressed air
08
Label with serial number
09
Pneumatic foot pedal
10
Safety cover for foot pedal
10
10
11
01
02
03
04
05
06
07
08
Fig. 4.1
HX33-DS Rev. A Page 10 / 23
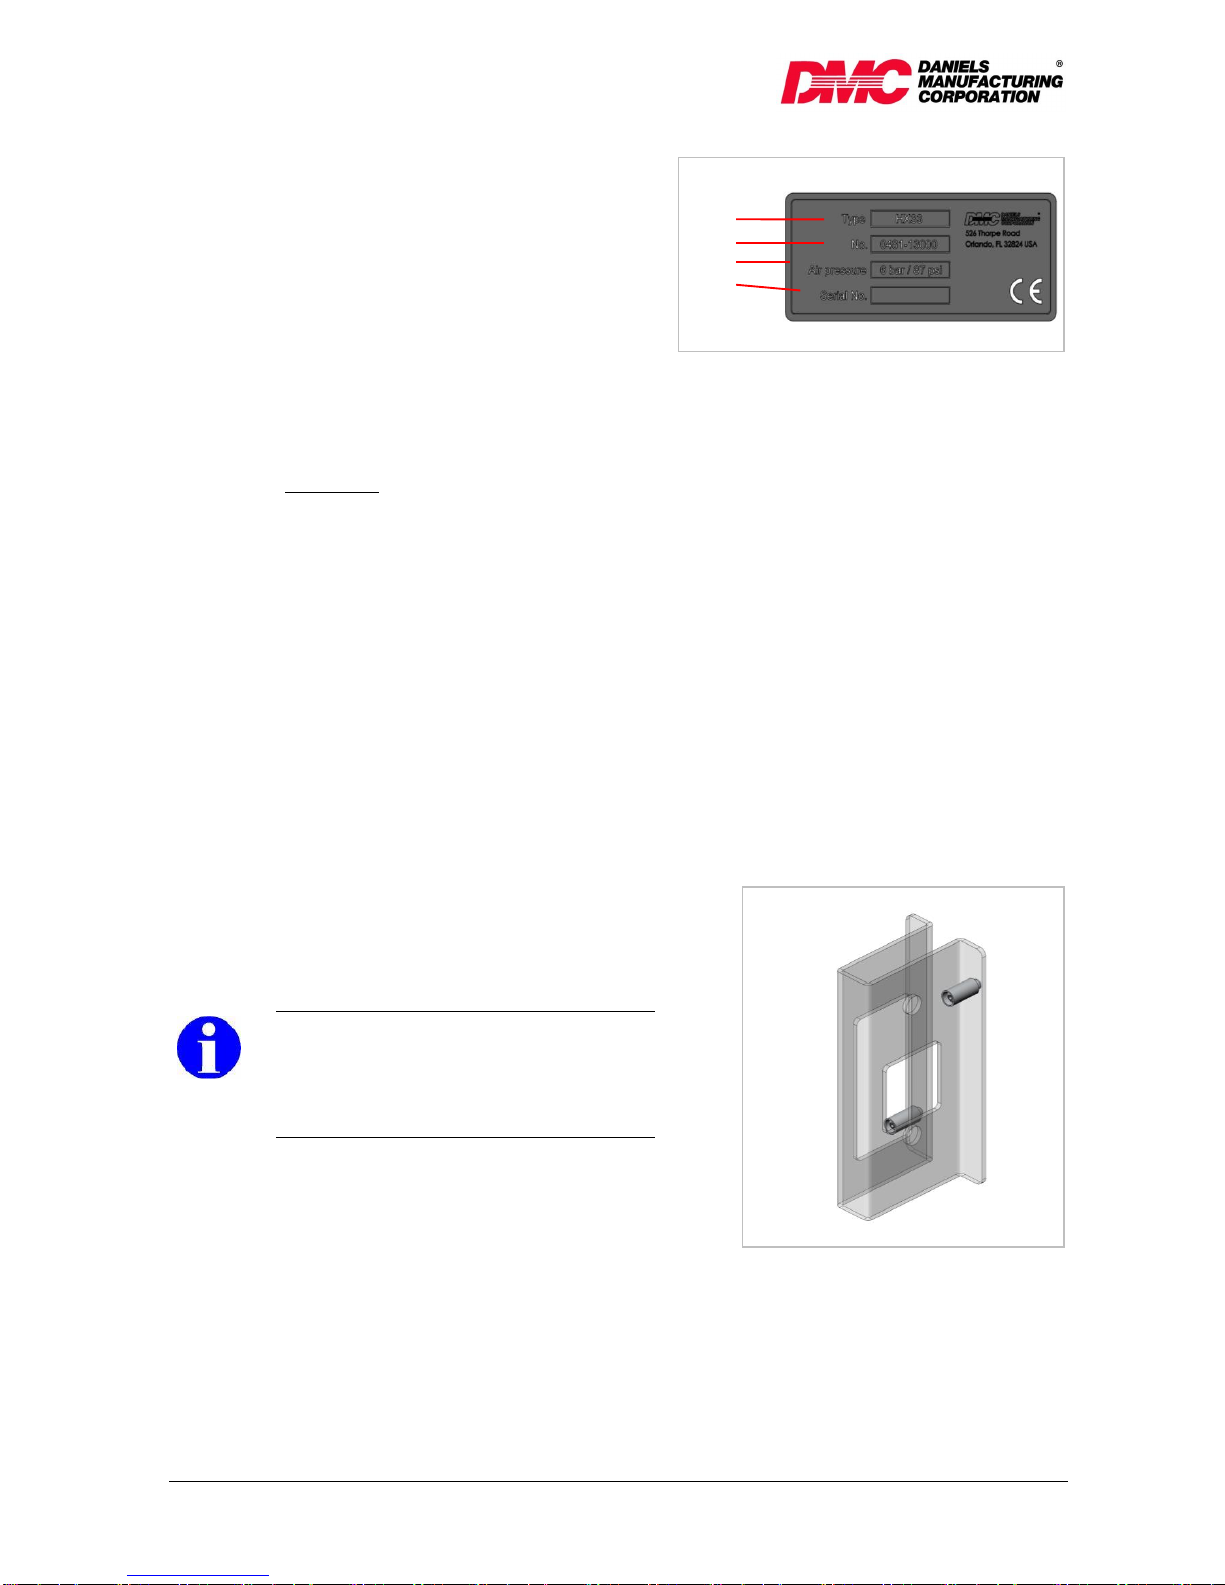
4.2 Machine Identification
Item
Description
1
Machine Type
3
Article Number
4
Air Pressure
2
Serial Number
4.3 Technical Data
Dimension:
Length overall:
11.8” (300 mm)
Width:
4.9” (125 mm)
Height:
10.2” (260 mm)
Weight with foot pedal:
32 lbs (14,5 kg)
Air pressure:
max. 87-116 psi / 6-8 bar
Air consumption per stroke:
5.2 l
crimp force at 87psi/6 bar:
3147lbf /14 kN
crimp force at 116psi/8 bar
3597 lbf / 16 KN
Noise level:
73 dB (A)
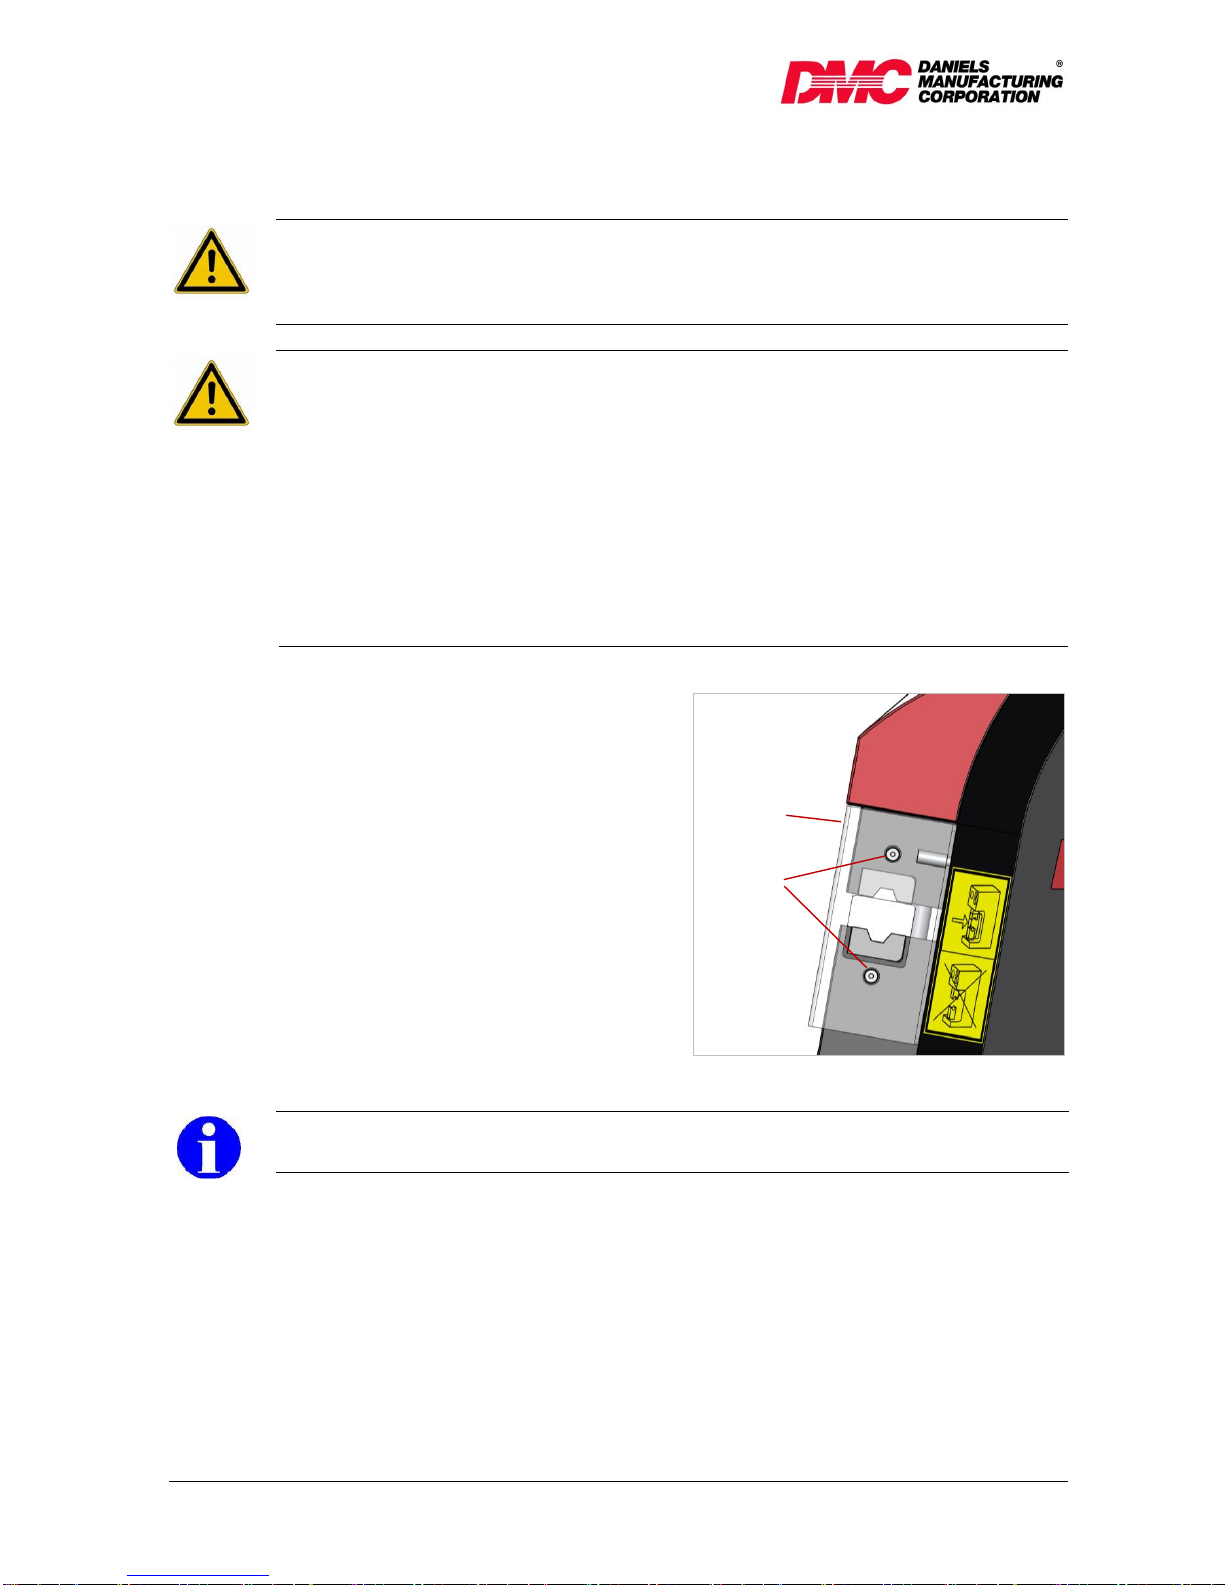
4.4 Safety Guard
The HX33 pneumatic crimp machine has a
special safety guard (in the scope of the
delivery).
INFORMATION
+In case of an accident, because of
mishandling or manipulation of the safety
guard, the manufacturer cannot be held
liable for any resultant damage or injury.
Fig. 4.2
Fig. 4.3
1
2
3
4
HX33-DS Rev. A Page 11 / 23
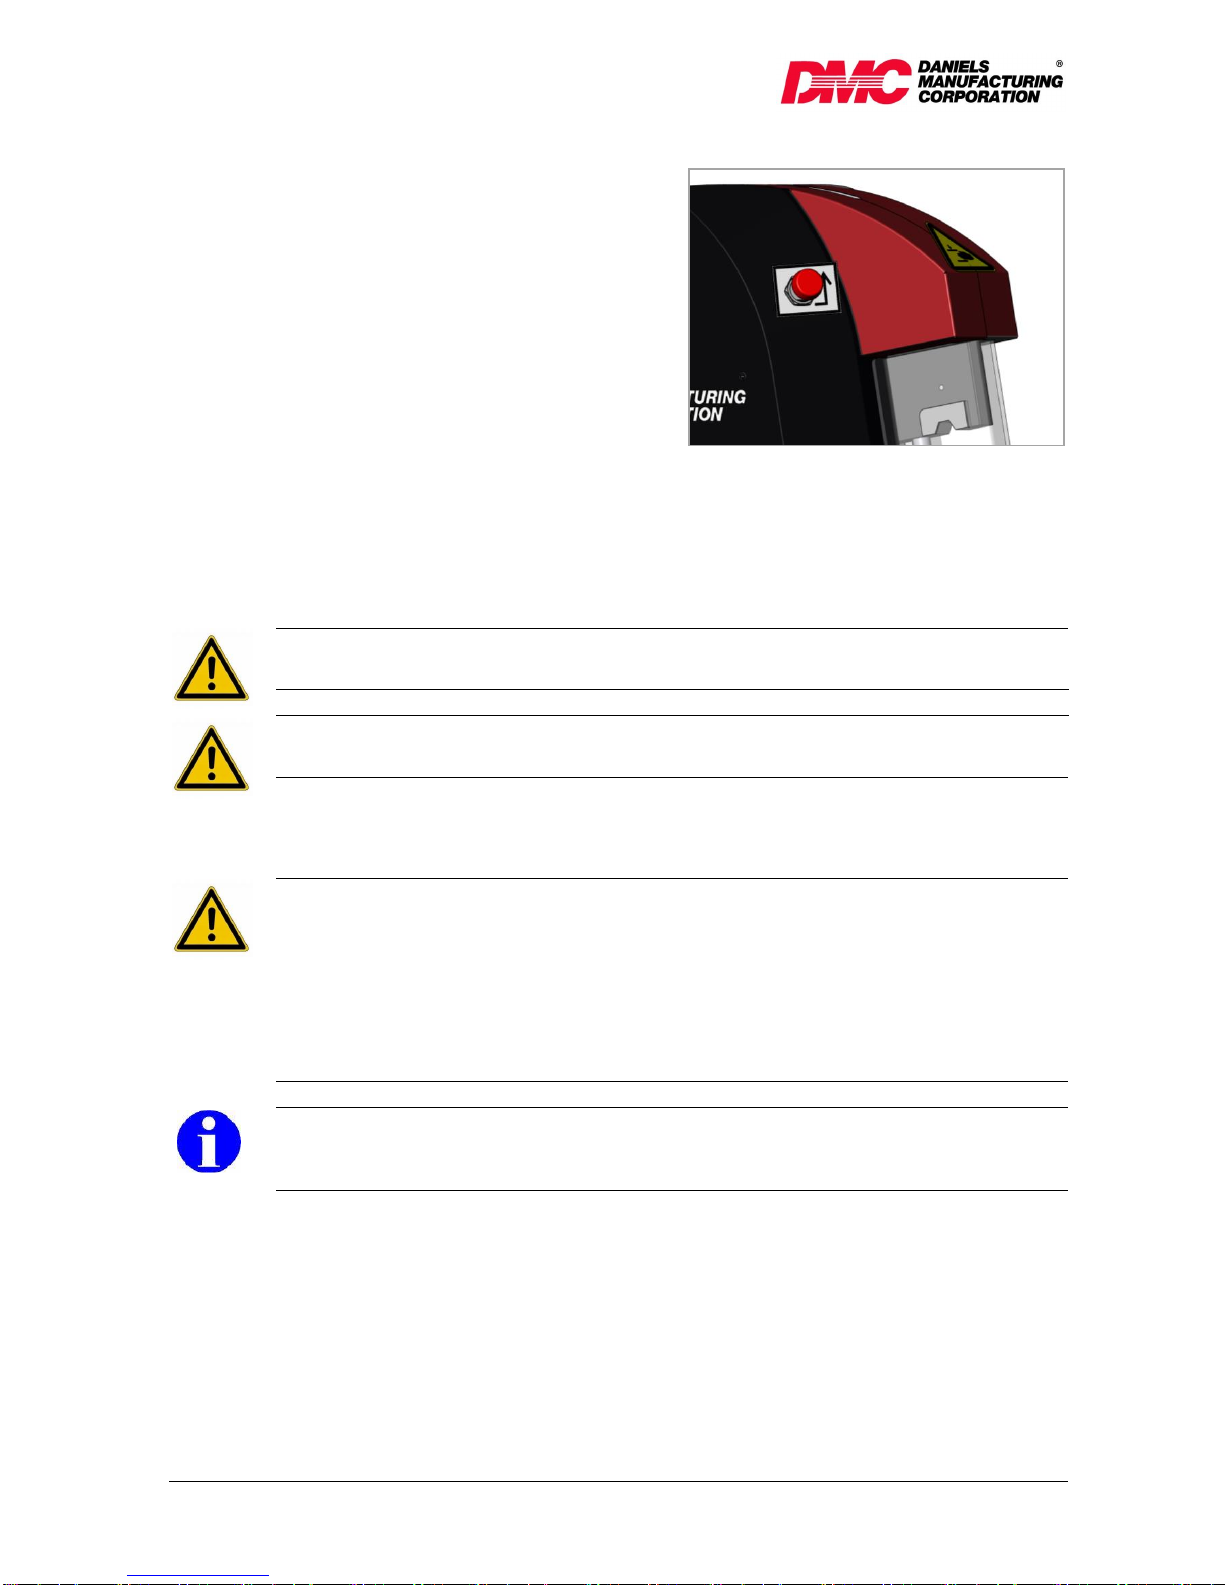
4.5 Release Button
In case of jammed jaws caused by operation
or handling errors or wrongly placed
terminals the jaws can be opened as follows:
+Press release button.
5 Transport and Installation
5.1 Transport
The weight of the pneumatic crimp machine HX33 is approx. 32 lbs / 14 kg.
CAUTION
+During transport and installation of the machine, wear suitable safety shoes.
ATTENTION
+Pneumatic tubes must not be damaged.
5.2 Installation
ATTENTION
+Position the HX33 pneumatic crimp machine on a flat surface and assure the stability of the
machine. Ensure that the table or bench is stable enough to support the machine in normal
use.
+Assure an appropriate table height. The table height is dependent on the position of the
operator, (work in sitting or standing position) according to prEN 894-4:2004, Table A.1.
+Assure appropriate illumination of the working place. (EN 1837:1999 –chapter 4.2: “The
general value of illumination has to be 500 lx [...]").
INFORMATION
+To reduce production noise or vibration, the machine can be placed on an insulating rubber
mat.
Place the foot pedal on the floor. No other place is allowed!
Fig. 4.4
Fig. 4.5
HX33-DS Rev. A Page 12 / 23
ATTENTION
+Place the pneumatic tubes on the floor so that they do not cause a trip hazard.
+Do not lay the foot pedal in aisles or walkways.
+Assure free access to the operating elements of the machine, especially the foot pedal.
+During transport and installation of the machine, wear suitable safety shoes.
INFORMATION
+To ensure fatigue-proof use, the user has to take a working position where the machine is
in a right height position and an acceptable usage of the foot pedal is possible. The foot
pedal has to be installed in a stable position. The position of the foot pedal should be
chosen in that way, that free access will be possible.
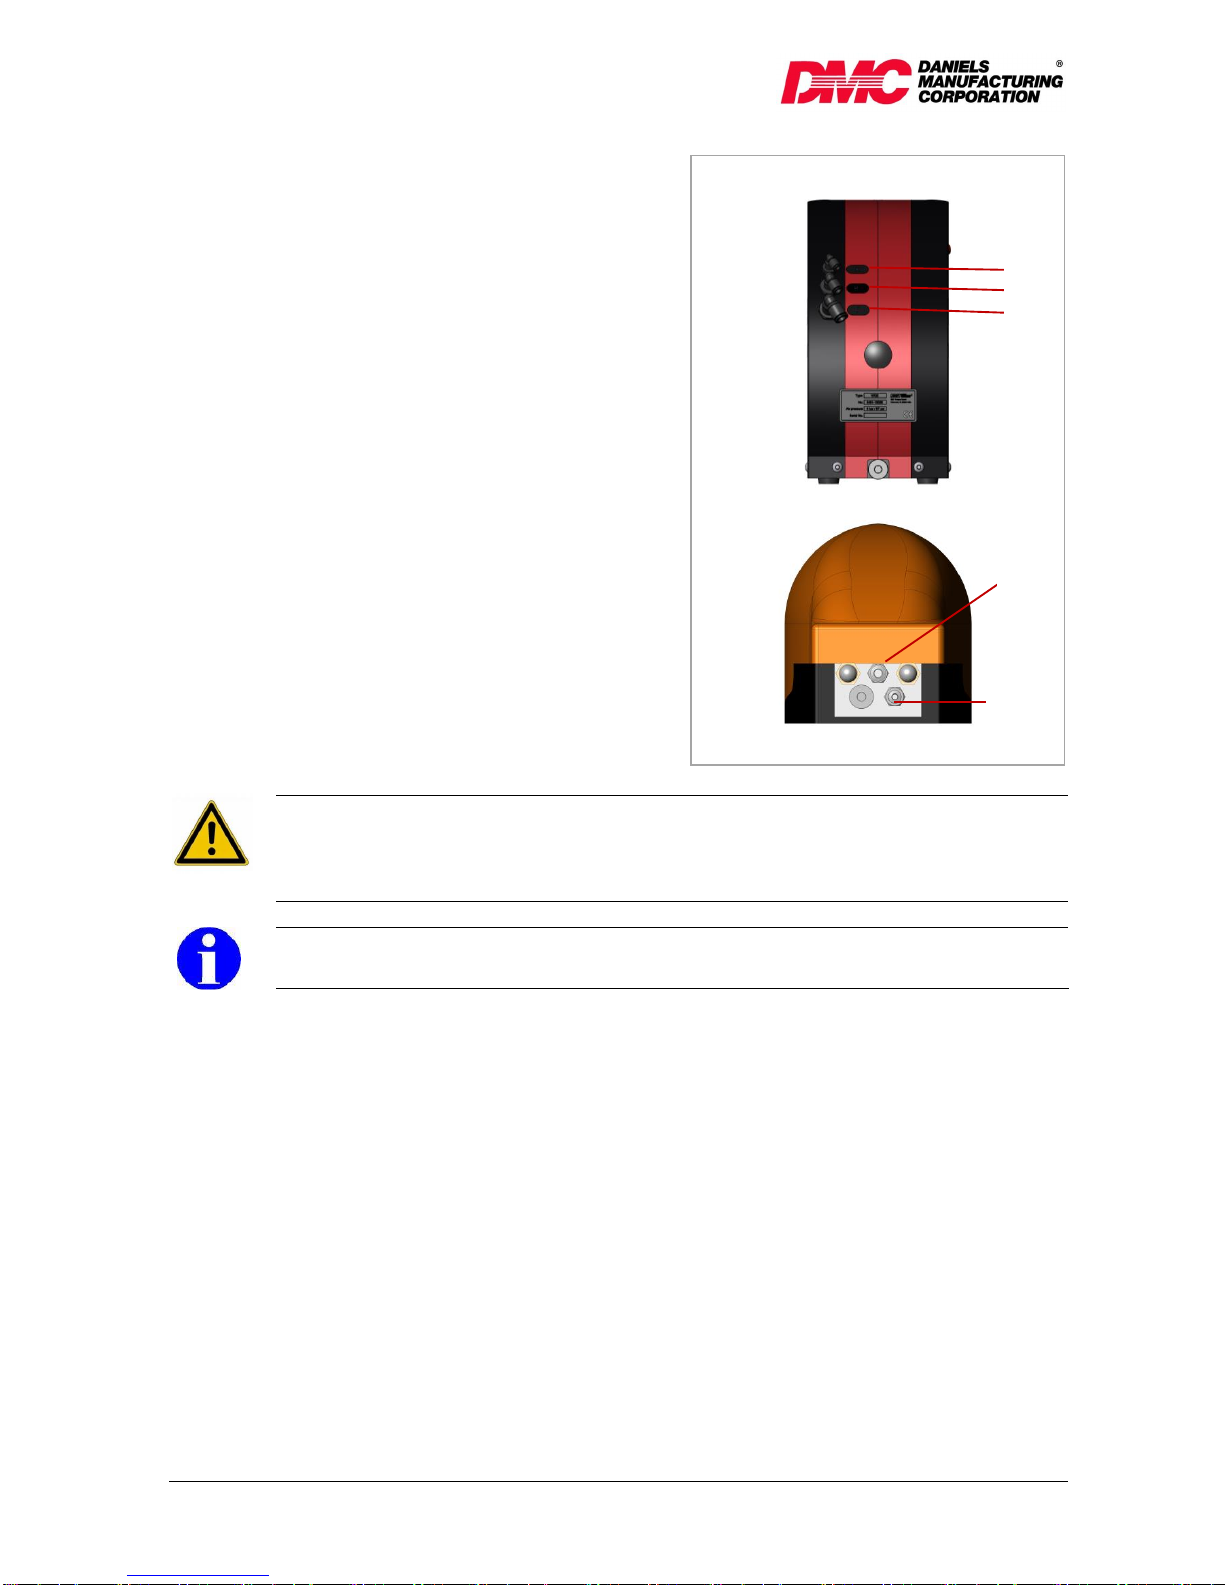
6 Commissioning / Connecting to Compressed Air Supply
DANGER
+Due to the risk of hand or finger injury, never try to reach into the machine before having
assured that the machine is disconnected from the air supply. Disconnect the air supply
before changing the safety guard and the dies.
CAUTION
+The HX33 pneumatic crimp machine may only be set up and operated in perfect technical
condition, observing all the safety regulations and considering any possible dangers.
+The crimp machine is only allowed to be used with mounted dies and safety guard.
+The crimp machine is only allowed to be used when it is in complete functional condition.
+When working with the HX33 pneumatic crimp machine, do not wear loose clothing,
jewellery or long, loose hair that can get caught in the HX33 pneumatic crimp machine.
+Work with caution.
+In cases of a machine malfunction, production must be stopped and the malfunction must
be fixed before continuing work with the machine.
+Only one person is allowed to work on or with the machine at a time.
+Only trained personal are allowed to work on or with the machine.
+Assure free access to the operating elements of the machine, especially the foot pedal.
+It is only allowed to work with the specified air pressure.
HX33-DS Rev. A Page 13 / 23
Connect the pneumatic foot pedal
connection 1with connection P1 on the
machine (PU air hose Ø 6 / 4 mm).
Install control cable of the pneumatic foot
pedal 4on connection Aof the machine (PU
air hose Ø 4 / 2,5 mm).
Use the HX33 pneumatic crimp machine
only with conditioned air (lubricated and
filtered). Standard Filter: 30 µm.
Connect connection Pof the machine with
air hose Ø 8 / 6 mm to the compressed air
supply.
Air pressure: 87-116psi / 6 - 8 bar
CAUTION
+Connect compressed air supply only with the supplied compressed air hose.
+The machine can only be depressurized by disconnecting the machine from the main air
supply.
INFORMATION
+Use only lubricated and filtered compressed air.
1
A
P1
P
4
Fig. 6.1
HX33-DS Rev. A Page 14 / 23
7 Tooling
DANGER
+Due to the risk of hand or finger injury, never try to reach into the machine before having
assured that the machine is disconnected from the air supply. Disconnect the air supply
before changing the safety guard and the dies.
CAUTION
+The pneumatic crimp machine HX33 may only be set up and operated in perfect technical
condition, observing all the safety regulations and considering any possible dangers.
+The crimp machine is only allowed to be used with mounted dies and safety guard.
+When working with the HX33 pneumatic crimp machine, do not wear loose clothing,
jewellery or long, loose hair that can get caught in the HX33 pneumatic crimp machine.
+Work with caution.
+Only one person is allowed to work on or with the machine at a time.
+Only trained personal are allowed to work on or with the machine.
+Assure free access to the operating elements of the machine, especially the foot pedal.
+It is only allowed to work with the specified air pressure.
1. Disconnect pneumatic supply.
2. Remove the safety guard 1.
3. Remove special screws of die set 2.
4. Slide the upper and lower die in the
adapter and tighten the screws.
5. Install the safety guard 1and tighten the
screws.
INFORMATION
+Control the right position of the die halves! The size of the profile should be in line!
2
1
Fig. 7.1
HX33-DS Rev. A Page 15 / 23
8 Normal Operation / Production Cycle
DANGER
+Due to the risk of hand or finger injury, never try to reach into the machine before having
assured that the machine is disconnected from the air supply. Disconnect the air supply
before changing the safety guard and the dies.
CAUTION
+The HX33 pneumatic crimp machine may only be set up and operated in perfect technical
condition, observing all the safety regulations and considering any possible dangers.
+The crimp machine is only allowed to be used with mounted dies and safety guard.
+When working with the HX33 pneumatic crimp machine, do not wear loose clothing,
jewellery or long, loose hair that can get caught in the HX33 pneumatic crimp machine.
+Work with caution.
+In cases of a machine malfunction, production must be stopped and the malfunction must
be fixed before continuing work with the machine.
+Only one person is allowed to work on or with the machine at a time.
+Only trained personal are allowed to work on or with the machine.
+Assure free access to the operating elements of the machine, especially the foot pedal.
+It is only allowed to work with the specified air pressure.
ATTENTION
+Position the HX33 pneumatic crimp machine on a flat surface and assure the stability of the
machine. Ensure that the table or bench is stable enough to support the machine in normal
use. During the utilization, the machine has to be placed on a table or a similar flat surface.
+Place the foot pedal on the floor. No other place is allowed. The foot pedal must be
movable, so that the operator has the possibility to change his position for ergonomic and
production needs. Do not lay the foot pedal in aisles or walkways.
+Place the pneumatic tubes on the floor so that they do not cause a trip hazard.
Crimp process:
1. Insert the crimp contact in the die profile. Please pay attention to the correct profile
assignment and to the correct positioning within the crimp profile!
2. Insert the wire/cable which is stripped acc. to the specification and position it for crimping.
3. Press the foot pedal to start the crimp process.
4. Keep the foot pedal pressed until the crimp cycle is finished.
5. Remove crimped contact.

HX33-DS Rev. A Page 16 / 23
9 Maintenance
DANGER
+Due to the risk of hand or finger injury, never try to reach into the machine before having
assured that the machine is disconnected from the air supply. Disconnect the air supply
before changing the safety guard and the dies.
CAUTION
+Connect compressed air supply only with the supplied compressed air hose.
+Before starting maintenance, disassembly or repair work, the crimp machine must be
disconnected from air supply.
+Maintenance work may be performed only by authorized and properly trained staff. The
housing and the covers in particular may only be removed by specially trained staff.
+When working with the HX33 pneumatic crimp machine, do not wear loose clothing,
jewellery or long, loose hair that can get caught in the HX33 pneumatic crimp machine.
+The crimp machine is only allowed to be used when it is in complete functional condition.
+The crimp machine is only allowed to be used with mounted dies and safety guard.
+Work with caution.
+Only one person is allowed to work on or with the machine at a time.
+Assure free access to the operating elements of the machine, especially the foot pedal.
+It is only allowed to work with the specified air pressure.
9.1 Maintenance Plan
DANGER
+Due to the risk of hand or finger injury, never try to reach into the machine before having
assured that the machine is disconnected from the air supply. Disconnect the air supply
before changing the safety guard and the dies.
CAUTION
+Before starting maintenance, disassembly or repair work, the crimp machine must be
disconnected from air supply.
+Maintenance work may be performed only by authorized and properly trained staff. The
housing and the covers in particular may only be removed by specially trained staff.
+When working with the HX33 pneumatic crimp machine, do not wear loose clothing,
jewellery or long, loose hair that can get caught in the HX33 pneumatic crimp machine.
+Work with caution.
Regular maintenance and cleaning of the parts which can be reached without opening the
machine will prolong the life of the machine. Do not use rough materials to clean the machine
such as steel wool. The machine and or machine part should not be cleaned with compressed
air. The crimping machine as well as the machine parts must not be cleaned with hard objects
like scrapers, steel wool or similar. Vacuum heavily soiled parts and wear.
9.1.1 Daily
+Visual inspection of the HX33 pneumatic crimp machine.
+Check air pressure (87-116psi / 6-8 bar) of the house installation (manometer not in the
scope of the delivery).
+Check oil-level of service unit of the house air supply (not in the scope of the delivery).
HX33-DS Rev. A Page 17 / 23
10 Problem Handling and Fault Diagnostics
DANGER
+Due to the risk of hand or finger injury, never try to reach into the machine before having
assured that the machine is disconnected from the air supply. Disconnect the air supply
before changing the safety guard and the dies.
CAUTION
+Before starting maintenance, disassembly or repair work, the crimping machine must be
disconnected from air supply.
+Maintenance work may be performed only by authorized and properly trained staff. The
housing and the covers in particular may only be removed by specially trained staff.
+When working with the HX33 pneumatic crimp machine, do not wear loose clothing,
jewellery or long, loose hair that can get caught in the HX33 pneumatic crimp machine.
+Work with caution.
+Before commissioning the machine, it is always important to check whether all safety
devices, especially the safety guard and the die set, are installed and are functioning
correctly.
In the event of a problem, our customer service personnel will be able to help you.
Service address:
DMC
Daniels Manufacturing Corporation
526 Thorpe Road
Orlando, FL 32824-8133
USA
Telephone: 001 407 855 6161
www.dmctools.com
Please have the following information ready when you contact service:
+Machine Type/Part Number
+Machine Serial Number

HX33-DS Rev. A Page 18 / 23
11 Removal from Service, Demounting, Disassembly,
DANGER
+Due to the risk of hand or finger injury, never try to reach into the machine before having
assured that the machine is disconnected from the air supply. Disconnect the air supply
before changing the safety guard and the dies.
CAUTION
+Before starting maintenance, disassembly or repair work, the crimping machine must be
disconnected from air supply.
+Maintenance work may be performed only by authorized and properly trained staff. The
housing and the covers in particular may only be removed by specially trained staff.
+When working with the HX33 pneumatic crimp machine, do not wear loose clothing,
jewellery or long, loose hair that can get caught in the HX33 pneumatic crimp machine.
+Only one person is allowed to work on or with the machine at a time!
+Work with caution.
+The machine can only be depressurized by disconnecting the machine from the main air
supply.
12 Storage
Store the machine in the original carton at room temperature.
13 Disposal
For the disposal of the pneumatic crimp machine HX33, send it back to DMC.

HX33-DS Rev. A Page 19 / 23
14 Exploded View Drawing, Spare Part List
14.1 Exploded View Drawing
Fig. 14.1
HX33-DS Rev. A Page 20 / 23
14.2 Parts List Exploded View Drawing
Item
No.
Pcs
P/N
Spare
Part
Description
1
1
2481-01001
Bottom plate
2
2
8480-84001
O-Ring Ø100x2 DIN 3771
3
1
2480-82016
Cylinder Housing
4
1
2480-84012
Piston
5
1
2480-84015
Piston guide band
6
1
8480-84007
O-Ring Ø92x4 DIN 3771
7
1
8480-84002
O-Ring Ø22x2 DIN 3771
8
1
2481-01019
Distance plate
9
1
2481-01020
Damping disc Ø30/12x2,5
10
1
2481-01007
Piston rod
11
1
8480-88011
Hex. socket screw M8x40 DIN912
12
1
8480-84003
O-Ring Ø25x3 DIN 3771
13
1
2481-01008
Cylinder Liner
14
1
2481-13012
Cover Plate
15
4
8480-99129
Hex. socket screw M6x110 DIN912
16
2
8480-88008
Hex. socket screw M8x60 DIN912
17
1
2481-13001
Plate, right
18
1
2481-13002
Plate, left
19
4
8480-99137
Hex. socket screw M8x25 DIN912
20
2
8481-01001
Hex. socket screw M8x45 DIN912
21
2
8480-99109
Cylinder bolt 6h6x50 DIN6325
22
2
8481-01509
Cylinder liner Ø16/12 x20
23
1
2481-13005
Lever
24
1
8480-89037
Cylinder liner Ø16/12 x12
25
1
2480-89024
Drive shaft-1296-18
26
2
8480-99161
Locking ring DIN 471-12x1
27
2
2481-13011
Bolt
28
2
8481-13002
Plain bearing XSM-1214-12 (Igus)
29
2
2481-13007
Roll
30
1
8481-13013
Cylinder bolt 8m6x100 DIN6325
31
1
8481-13003
Pressure Spring D-180D L0 41, Ln 21,82, Lndyn
23,11
32
2
8183-79006
Hexagon socket set screw M3x8 DIN913
33
1
8332-12003
Hexagon socket set screw M3x10 DIN913
34
2
8480-99055
Adjusting washer Ø6/12 x 0,2 DIN 988
35
1
2481-13003
Lower die plate
36
1
2481-13004
Upper die plate
Table of contents
Other DMC Power Tools manuals


Popular Power Tools manuals by other brands


Makita
Makita JS1600 instruction manual

Parkside
Parkside PKGA 20-Li C2 Translation of the original instructions

Bosch
Bosch 1500C Operating/safety instructions

Black & Decker
Black & Decker KS501 manual

Makita
Makita 4351T instruction manual

RAMSET
RAMSET MD380 Operator's safety & operating instruction manual