DMioTECH UA9205N User manual

UA9205N Digital Multimeter
Manual
1. INTRODUCTION
The UA9205N Digital Multimeter is a precision, battery powered, 3-1/2 digit LCD Digital Instrument.
Digit height 33mm
Single 32 position rotary switch for FUNCTION and RANGE selection, allows fast and convenient operation.
Curvilinear soft case.
Auto-Power Off
2. GENERAL SPECIFICATION
Display: 3-1/2 digits LCD with a maximum reading of 1999.
Measurement rate: updates 2-3 sec.
Over range indication: "1" figure only in the display
Automatic negative polarity indication.
The symbol is displayed when the battery voltage drops below the operating voltage.
Full range over load protection.
Capacitance measurement Auto-zeroing.
Auto Power Off. Automatic cut off approx. 15 minutes after the power on. It needs to be switched off and
on again to continue operation.
Operating temperature: 0°C~40°C, 0~75% R.H. Storage temperature: -10°C~50°C, 0~75% R.H.
Power: Single standard 9V battery.
Dimensions: 191mm L x 95mm W x 35mm H.
Weight: approx 410g (including battery and other parts)
Accessories: test leads, batery,package box.
3. ELECTRICAL SPECIFICATIONS
Accuracy is given as ± (% of reading + number of least significant digits) for one year, at 23°C±5°C RH<75%
3.1 DCV
Range
Accuracy
200mV
2V
0.5% ± 1
20V
200V
1000V
0.8% ± 2
Input impedance: 10MΩ on all ranges.

3.2 ACV
Range
Accuracy
200mV
1.2%
±3
2V
20V
0.8%
± 2
200V
750V
1.2%
±3
Input impedance: 10MΩ Frequency range: 40 ~ 400Hz
3.3 DCA
Range
Accuracy
2mA
1%
±
3
20mA
200mA
1.8%
±3
20A
2%
±5
Measuring voltage drop: 200mV
3.4 ACA
Range
Accuracy
2mA
0.8%
± 1
20mA
200mA
1.2%
±1
20A
2%
±5
Measuring voltage drop: 200mV Frequency range 40 ~ 400Hz
3.5 CAPACITANCE
Range
Accuracy
2nF
20nF
200nF
2.5% ±3
2uF
20uF
3.6 OHM
Range
200Ω
2K Ω
20K Ω
200K Ω
2M Ω
20M Ω
200M Ω
Accuracy
0.8% ± 3
0.8% ± 1
1% ±2
5% ±1

4. PRECAUTIONS AND PREPARATIONS FOR MEASUREMENT
1. Ensure the battery is correctly placed in the battery compartment.
2. Do not exceed the input limits shown below:
Function Range
Input Terminals
Maximum Input
DCV 200mV
250VDC
ACV 200mV
V/OHM COM
250VAC
DCV 2~1000V
1000 VDC
ACV 2~750V
750VAC
OHM
V/OHM COM
250V DC/AC
Diode
V/OHM COM
DCA 200mA
200mA DC/AC
ACA 200mA
A COM
DCA2A
2A DC/AC
ACA2A
DCA 20A
20A COM
20A DC/AC
3. Inspect the test leads for damaged insulation or exposed metal. Check Test lead continuity. Damaged
leads should be replaced.
4. Select the proper function and range for your measurement
5. Check the input terminal position for red test lead depending on measurement ranges.
6. Either one of the test leads should be removed from the circuit under test when changing the test ranges.
7. To avoid electrical shock or damage to the meter Do not apply more then 500V between any terminal and
earth ground.
8. To avoid electrical shock, use caution when working above 60VDC or 25VAC rms. Such voltage poses a
shock hazard.
9. When measurement is completed switch off the power. Remove the battery when not used for
extended periods to avoid leakage problems.
10. Do not tamper with the circuitry to avoid damage.
11. Do not use or store the instrument in conditions of high temperature and high humidity.
5. METHOD OF MEASUREMENT
5.1 DCV & ACV MEASUREMENT
1. Set the Function range switch at the required position.
2. Connect black test lead to "COM" terminal and red test lead to the "V/OHM" input terminal.
3. Connect test leads to measuring point and read the display value. The polarity of the red lead connection
will be indicated at the same time as the voltage.
Note:
a. If the voltage to be tested is unknown beforehand, set the Function range switch to the highest range
and work down.
b. When only the figure "1" is displayed over range is being indicated and the function range switch has to
be set to a higher range.
c. Never try to measure voltage above 1000V! Although indication is possible, there is danger of damaging
the internal circuitry.
5.2 DCA & ACA MEASUREMENT
1. Connect the black test lead to the "COM" terminal and the red test lead to "A" terminal for a maximum of 0.5A
2. Set the function range switch at the required position.
3. Connect test leads to measuring points and read the display value. The polarity at the red test lead
connection will be indicated at the same time as the current.
Note:
a. If the current range is unknown beforehand, set the function range switch to the highest range and
work down.
b. When only the figure "1" is displayed, over range is being indicated and the function range switch has
be set to a higher range.

c. When the input is from the "A" terminal, excessive current will blow the fuse which must then be replaced.
Fuse value is 0.5A.
d. The 20A range is not protected by a fuse and has a maximum 10A continuous current rating. The
20A range measurement time should not exceed 15 seconds.
5.3 RESISTANCE MEASUREMENT
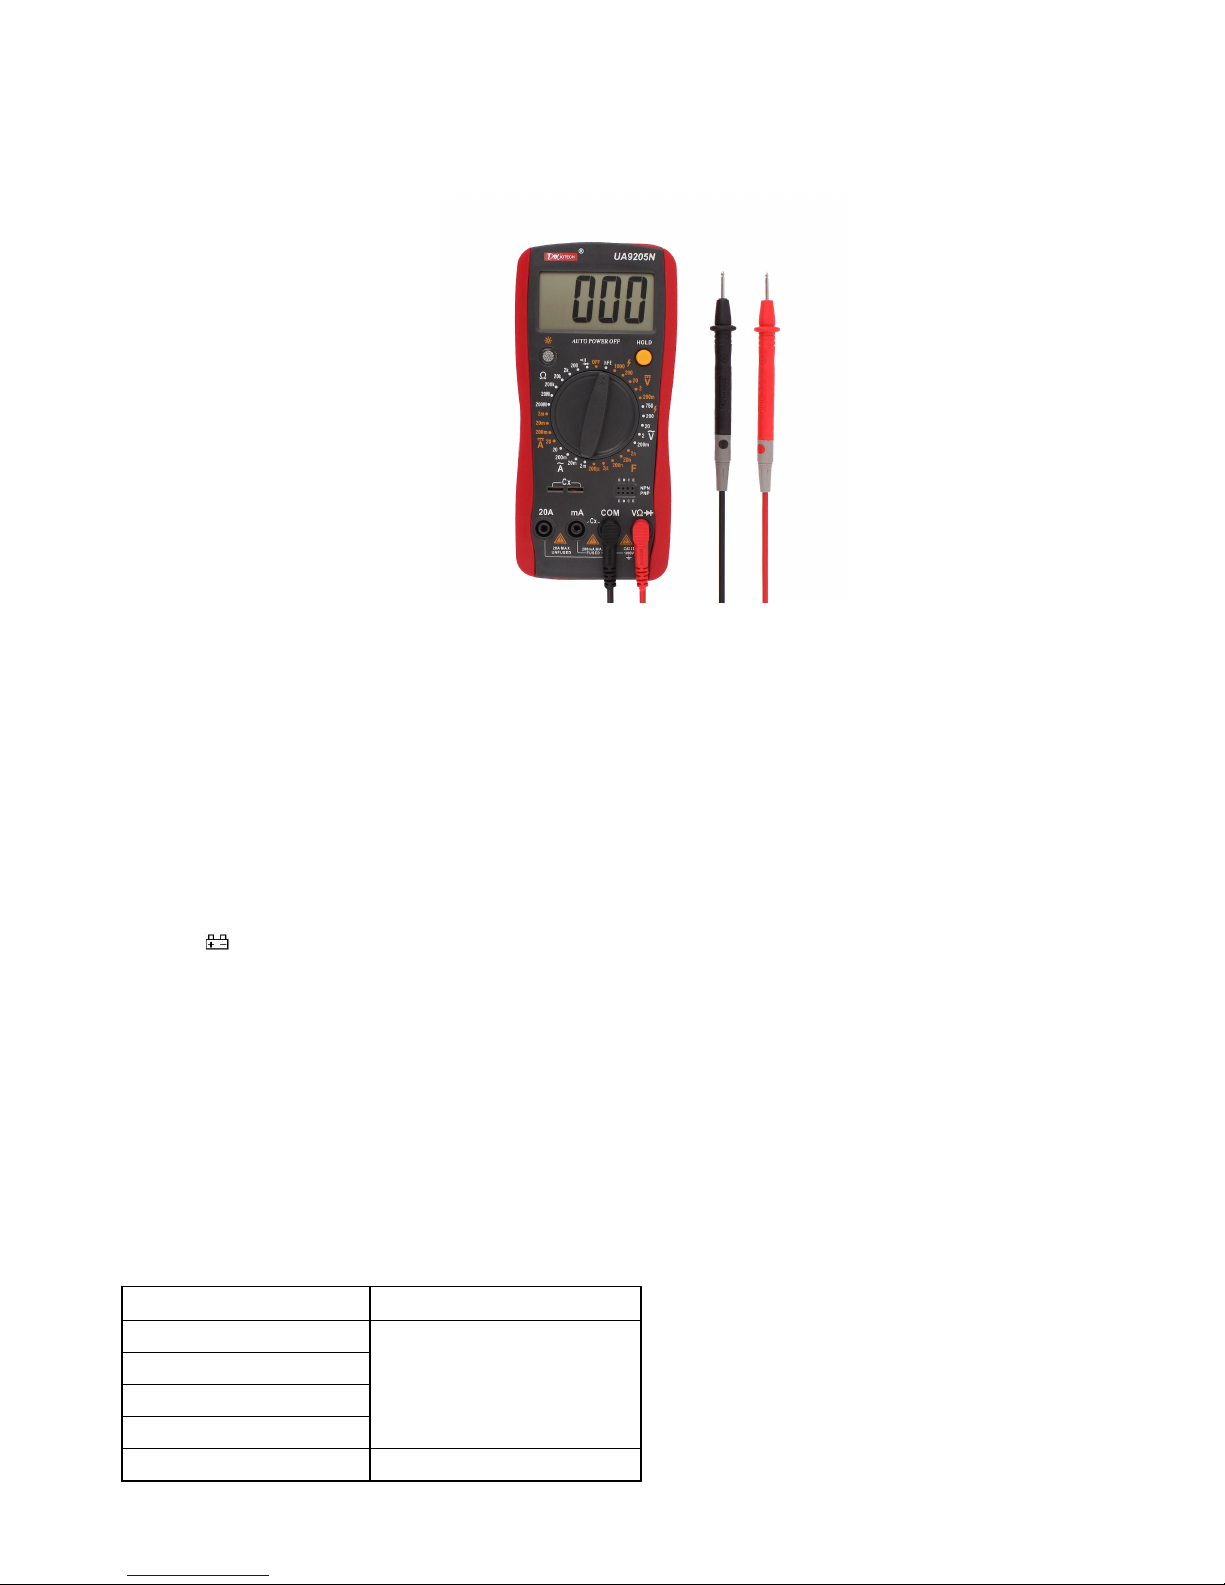
1. Connect black test lead to "COM" terminal and red test lead to the "V/OHM" input terminal.
2. Set the function range switch to the OHM range.
3. Connect the test leads across the resistance under measurement and read the display value.
Note:
a. The polarity of the red test lead is "+".
b. When the input is not connected, i.e at open circuit, the figure "1" will be displayed for the over
range condition.
c. If the resistance value being measured exceeds the maximum value of the range selected an over
range indication "1" will be displayed and function range switch must be set to a higher range.
d. 200MΩ range has a 10 digits (1MΩ) constant. This figure will appear in short circuit status and it should be
subtracted from any measurement result on this range. For instance: when measuring a100MΩ resistor a figure
of 101.0 will be shown in the display. A value of 1MΩ should be subtracted from the indicated value.
5.4 CAPACITANCE MEASUREMENT
1. Set the function range switch to the "Cx" position. Before connecting the capacitor, wait until the display
automatically zeros.
2. Connect the test capacitor to the "Cx" input socket (not test leads) and read the display value.
3. When using the probes for testing capacitors , insert the probes into the “CX” hole(Marked
with “mA & COM“) and connect test lead tips to the capacitor, then read the display value.
Note:
The tested capacitor should be discharged before the testing procedure. Never apply voltage to the "Cx"
input socket, or serious damage may result.
5.5 DIODE & CONTINUITY TEST
1. Set the function range switch to the position.
2. Connect the black test lead to "COM" terminal and red test lead to V/OHM input terminal; (Note: the polarity
of the red test lead is "+").
3. This range has an "AUDIBLE CONTINUITY TEST" function. Built-in buzzer sounds if the resistance
between the two probes is less than 30±10Ω.
4. Connect the test leads across the diode and read the display value.
Note:
a. When the input is not connected, i.e. at open circuit, the figure "1" will be displayed
b. Test condition: Forward DC current approx 1mA. Reversed DC voltage approx. 2.8V
c. The meter displays the forward voltage drop and displays figure "1" for overload when the diode
is reversed.
5.6 TRANSISTOR hFE TEST
1. Set the function range switch to the "hFE" position.
2. Determine whether the transistor is "NPN" or "PNP" type.
3. Correctly insert transistor into E.B.C connector.
4. Displayed reading is approx. transistor hFE value.
Note:
Test condition: Base current approx 10uA. Vce approx.2.8V
6. BATTERY AND FUSE REPLACEMENT
1. Battery and fuse replacement should only be performed after the test leads have been disconnected and power
turned off.
2. Loosen screws with suitable screwdriver and remove case bottom
3. The meter is power by a single 9V battery. Snap the battery connector leads to the terminals of a new
battery and reinsert the battery into the case top. Arrange the battery leads so that they will not be pinched
between the case bottom and case top.
4. The meter is protected by a fast fuse 0.5A/250V. Fuse dimensions are 5mmФ x 20mm.it is soldered on the
PCB on some versions.
5. Replace the case bottom and reinstall the three screws. Never operate the meter unless the case bottom is
in place.
Table of contents