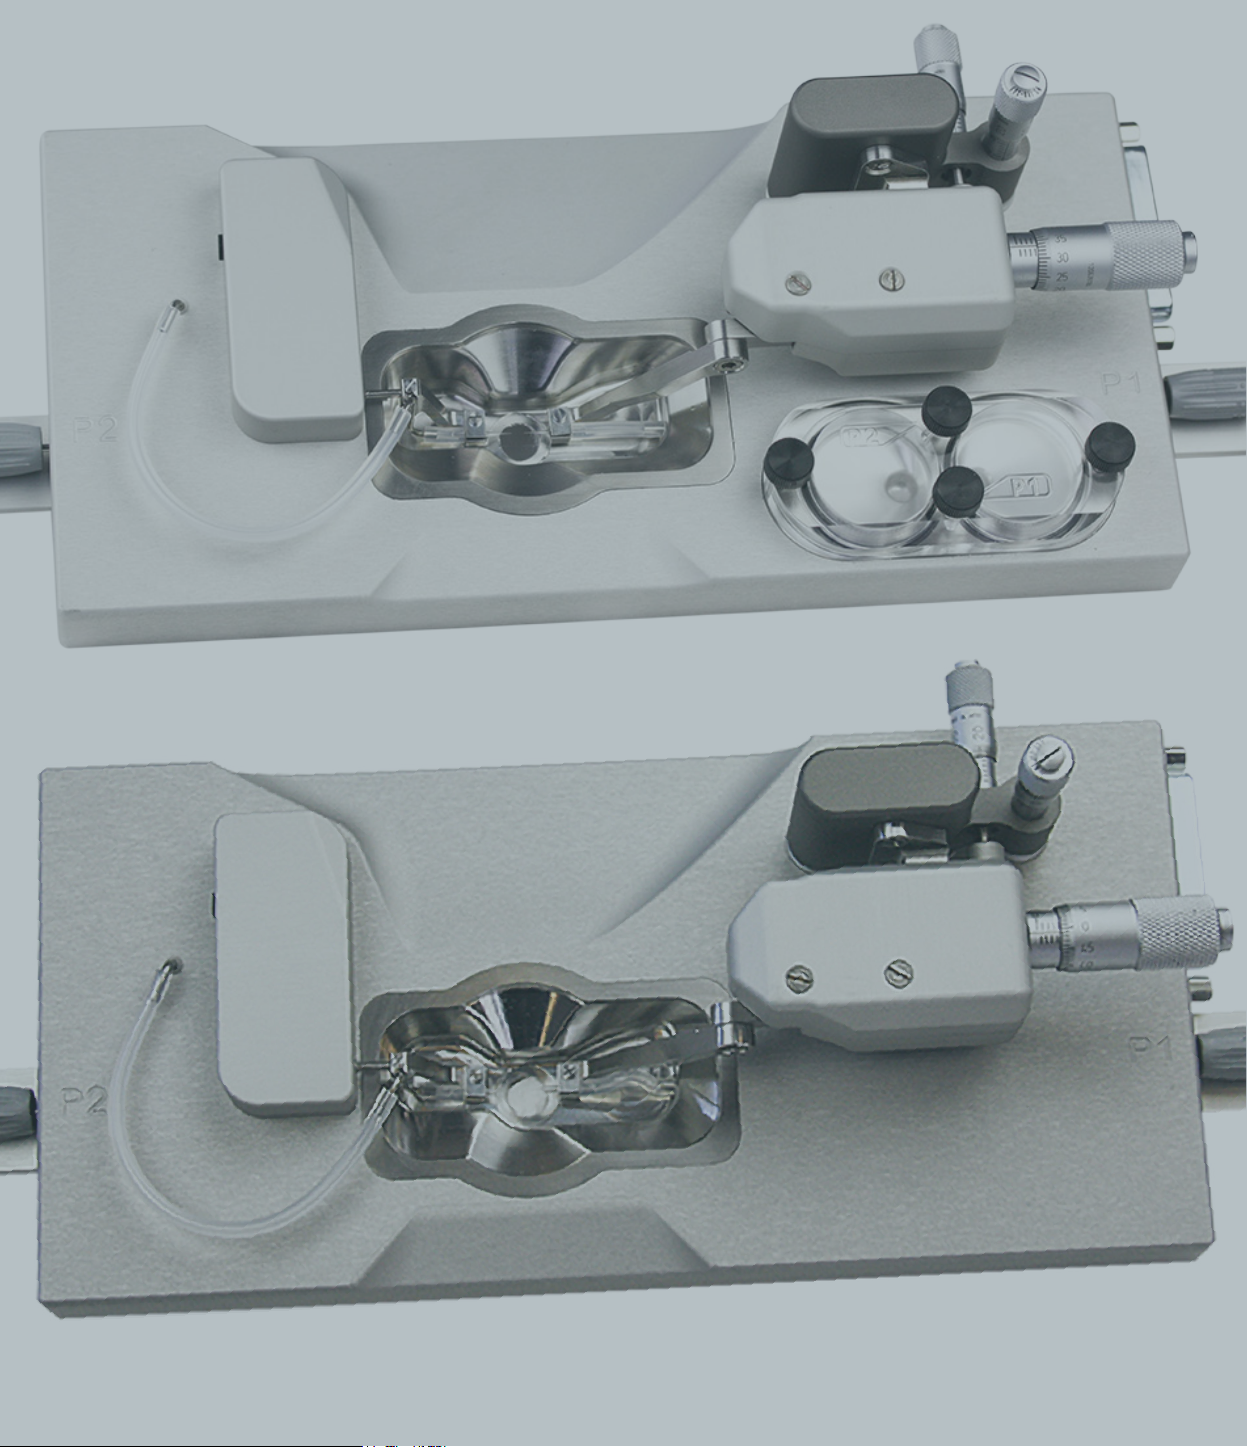
DMT MYOGRAPH SYSTEM 112PP User manual

USER MANUAL, VOL.2.0
MYOGRAPH SYSTEM - 112PP/114P


Pentium is a registered trademark of the Intel Corporation. Windows 7 are a registered trademarks of
Microsoft Corporation. All other trademarks are the properties of their respective owners.
DMT reserves the right to alter specications as required.
This document was, as far as possible, accurate at the time of printing.
Changes may have been made to the software and hardware it describes since then.
New information may be supplied separately.
This documentation is provided with the DMT Automated Multi Wire Myograph System – Model 630MA
All rights reserved. No part of this manual may be reproduced or transmitted in any form or by any
means without the written permission of Danish Myo Technology A/S.
Every attempt is made to ensure accurate information, misprints, construction- and specication changes,
can occur.
Danish Myo Technology A/S reserves the right to alter/change content as required and without any notice.
Copyright © Danish Myo Technology A/S
TRADEMARKS

CONTENTS
TRADEMARKS 3
SAFETY 5
UNPACKING THE PRESSURE MYOGRAPH SYSTEM 7
CHAPTER 1 - SYSTEM OVERVIEW 9
1.1 Interface Front Panel 9
1.2 Pressure Myographs 11
2.1 Setting up the complete Pressure Myograph System 13
2.2 Setting up step-by-step 15
2.3 The rst force and pressure calibrations 17
2.4 External Pressure Myograph connections 18
CHAPTER 3 - PRESSURE INTERFACE MENUS 30
3.1 General description of how to navigate the touch screen 30
3.2 Power-up screen 31
3.3 MAIN MENU 32
3.4 Pressure Menu 34
3.5 Heat Menu 36
3.6 Timer and Buzzer Menu 37
3.7 Setting Menu 38

5
The Pressure Myograph System has been designed for use only in teaching and research applications. It
is not intended for clinical or critical life-care use and should never be used for these purposes. Nor for
the prevention, diagnosis, curing, treatment, or alleviation of disease, injury, or handicap.
CAUTION:
• Do not open the apparatus: the internal electronics pose a risk of electric shock.
• Do not use this apparatus near water.
• To reduce the risk of re or electric shock, do not expose this apparatus to rain or
moisture.Objectslledwithliquidsshouldnotbeplacedontheapparatus.
• Do not block any ventilation openings. Install in accordance with the manufacturer’s
instructions.
• Onlyusesecureindustrystandardconnectorsandtubingforpressureconnections.Faults,
defects and mistakes due to wrong connections void warranty. We are not accountable
for results and mistakes due to inappropriate pressure hookup.
• Donotinstallnearanyheatsourcessuchasradiators,heatregisters,stoves,orother
apparatus that produce heat.
• Onlyuseattachmentsandaccessoriesspeciedbythemanufacturer.
• Unplug this apparatus during lightning storms or when unused for long periods.
SAFETY
The Pressure Myograph System is delivered with an external 100-240VAC to 24VDC adapter.
Protect the power adapter and cord from being walked on or pinched. Particularly at power plugs and the
point where they connect to the apparatus.
Refer all servicing to qualied service personnel. Servicing is required when the apparatus has been
damaged in any way; such as, the power-supply cord or plug is damaged, liquid has spilled onto or
objects have fallen into the apparatus, the apparatus has been exposed to rain or moisture, does not
operate normally, or has been dropped.

6
EC DECLARATION OF CONFORMITY
DMT A/S
Certify and declare that the following apparatus:
Pressure Myograph System - DMT114P, DMT112PP
Restrictive use: Only for laboratory use.
Manufactured by:
DMT A/S
Skejbyparken 152
8200 Aarhus N.
Denmark
Conforms with the essential requirements of the EMC Directive 2004/108/EC.
Based on the following specications applied by:
EN 61326-1:2006
EN 61326-2-6:2006
EN 61326-2-6/Corr.:2007
And with the LVD Directive 2006/95/EC. .
Based on the following specications applied by:
EN 61010-1:2010
EN 61010-2-030:2010
General warnings regarding EMC:
Do not use this device in close proximity to sources of strong electromagnetic radiation
(e.g. unshielded intentional RF sources), as these may interfere with the proper operation.

7
Please take a few minutes to carefully inspect your new Pressure Myograph System for damage, which
may have occurred during handling and shipping. If you suspect any kind of damage, please contact
us immediately and the matter will be pursued as soon as possible. If the packing material appears
damaged, please retain it until a possible claim has been settled.
We recommend that you store the packing material for any possible future transport of the Pressure
Myograph System. In case of transport, and the original packing material is unavailable, please contact
the DMT Sales Department for advice and packing instructions. After unpacking your new Pressure
Myograph System, please use the following list to check that the system is complete:
Pressure Interface
• Pressure Interface-to-chamber cable with a temperature probe
• Power adapter (the shape of the AC plug varies by country; be sure that the plug has the right shape
for your location)
• USB cables for PC connection.
• Atlas Copco Cablair hose for main pressure supply
• Two 500ml Schott Duran Bottles with specially designed screw caps
Pressure Myograph (114P or 112PP)
• Force calibration kit (including “bridge”, “balance” and 2-gram weight)
• Resistance tube shunt (calibration tube)
• Two glass cannulas
• Chamber cover
Riester “Big Ben” Pressure Manometer Peristaltic pump for superfusion ow (optional):
Watson Marlow peristaltic pump
FlowMeter – 162FM (optional)
• MyoFlow™ FlowMeter software including drivers (CD-ROM)
• User manual “FlowMeter – 162FM”
Microscope (optional)
• DMT inverted Microscope, Inverted Zeiss, Olympus, Nikon or Motic etc.
UNPACKING THE PRESSURE MYOGRAPH SYSTEM

8
Accessories:
• Allen key
• Spare screws
• Small screwdriver
• Suture wire
• Tube of high-vacuum grease
• Tube of grease for linear slides
• Silicone tubing: internal diameter 1mm
Computer, hardware, software & manuals:
• USB digital camera (optional)
• Computer (optional)
• CD with MyoVIEW software program (optional)
• CD with User Manual for Pressure Myograph Systems and User Guide for 114P or 112PP

9
CHAPTER 1 - SYSTEM OVERVIEW
1.1 INTERFACE FRONT PANEL
Figure 1.1 Pressure Interface - front
2x500mlSchottDuran
bottles
Power indicator
Touch display

10
Figure 1.2 Pressure Interface - rear
Connection port for Myograph chamber
2x500mlSchottDuranbottles
ON/OFF switch
24V DC port for power
Analoguerecorderoutput–connectiontoexternaldataacquisition
software (optional)
USBconnectionportfor
computer
Connection port for pH electrode
(optional)
Ground connection
Inletforoxygen/carbogen
topressurebottles(max
1 bar)

11
Micropositioner for vertical
adjustment of Glass Cannulas
Force Transducer housing
1.2 PRESSURE MYOGRAPHS
Micropositioner for
horizontal adjustment of
Glass Cannulas
25pinserialportfor
communication with
Pressure Interface
3-way Inlet valve
Inlet pressure
transducer
Force transducer pin
Outlet pressure
transducer
3-way Outlet valve
Left Glass Cannula Chamber Window Right Glass Cannula
Siliconetubeconnecting
perfusion inlet pipe and
right Glass Cannula
Perfusion inlet pipe
Fixationplateforright
Glass Cannula
Fixationplateforleft
Glass Cannula
Screwforadjustingthe
P2 arm in the vertical
direction
Outlet connecting pipe
Siliconetubeconnecting
perfusion outlet pipe and
right Glass Cannula
Outlet pressure transducer
connection pipe
Figure 1.1 Pressure Myograph - 114P with close-up detail of the chamber
1.2.1 PRESSUREMYOGRAPH-114P

12
Outlet pressure transducer
connection pipe
Micropositioner for vertical
adjustment of Glass Cannulas
Force Transducer housing
Micropositioner for
horizontal adjustment of
Glass Cannulas
25pinserialportfor
communication with
Pressure Interface
3-way Inlet valve
Pulsation
Chamber 2
Force transducer pin
Outlet pressure
transducer
3-way Outlet valve
Left Glass Cannula Chamber Window Right Glass Cannula
Siliconetubeconnecting
perfusion inlet pipe and
right Glass Cannula
Perfusion inlet pipe
Fixationplateforright
Glass Cannula
Fixationplateforleft
Glass Cannula
Screwforadjustingthe
P2 arm in the vertical
direction
Outlet connecting pipe
Siliconetubeconnecting
perfusion outlet pipe and
right Glass Cannula
Pressure Release screw
for Pulsation Chamber1
Pressure Release screw
for Pulsation Chamber2
Pulsation
Chamber 1
Figure 1.2 Pressure Myograph - 112PP with close-up detail of the chamber
1.2.2 PULSATILEPRESSUREMYOGRAPH-112PP

13
2.1 SETTING UP THE COMPLETE PRESSURE MYOGRAPH SYSTEM
Figure 2.1 is an example of a complete set-up for the Pressure Myograph System. The overview includes
optional equipment such as a peristaltic pump to enable superfusion ow and pH probes for measuring
pH in the superfusion buer. In addition, the overview also includes the DMT Flowmeter - 162FM. The
Flowmeter enables ow measurements in the range of 15-4000μl/min. A detailed step-by-step description
is provided in the remaining sections of chapter 2.
The Pressure Myograph System will work with a range of dierent microscopes: the DMT Microscope,
Figure 2.1 Example of a complete set-up of Pressure Myograph System with DMT inverted Microscope
Gas supply
Oxygen/
Carbogen/
Compressed
air
WasteBottle
pH electrode
FlowMeter
162FM
P1 P2
PRESSURE INTERFACE
(REAR PANEL)
Electronic
vacuum valve
Pressure Myograph Oxygen/
Carbogen/
Compressed air
Power
supply 4 Recorder
outputs
(Analogue)
USBoutput
(Digital)
Myoview
WasteBottle
Peristaltic
pump
Oxygen/Carbogen/
Compressed air
Vacuum
Pump

14
NOTE: The microscope is essential for the dimensional analysis of the mounted vessels
The DMT Microscope is a standard inverted microscope with a built-in digital CCD USB camera. The DMT
Microscope is very eective and recommended in setups requiring standard image analysis.
The Zeiss Axio vert A1 is an inverted microscope that provides the highest degree of exibility in image
analysis. The Zeiss Axio vert A1, a Nikon TS-100F and Motic AE 2000 enable the use of a wide range of
objectives and facilitate sophisticated uorescence techniques.
Contact the DMT Sales Department for further product information and price on any optional equipment,
including microscopes.

15
2.2 SETTING UP STEP-BY-STEP
This section describes how to connect the cables in the Pressure Myograph System as illustrated in gure
2.1.
NOTE:Beforeproceedingsettingupstep-bystepmakesurethatthepressureinterface,
themicroscopeandthecomputerareswitchedo
1. Pressure Myograph to Pressure Interface connection: Connect the Pressure Myograph to the Pressure
Interface by using the grey 25/44-pin connection cable. Then connect the cable with the temperature
probe to the Pressure Myograph.
2. Pressure Interface to computer connection: Connect the Pressure Interface to the computer with the
USB cable, from the back panel of the Pressure Interface to the USB port on the computer.
3. Pressure Interface and oxygen supply connection: Connect the “Oxygen” inlet on the back of the
Pressure Interface to an adjustable oxygen supply using the “Atlas Copco Cablair hose” delivered with
the Pressure Myograph System.
4. Microscope/camera to computer connection:
A. DMT Inverted Microscope: Inside the DMT Microscope there is a USB camera wired to a USB cable
and one USB cable to power the microscope light. Connect the two USB cables from the DMT
Microscope to the computer USB ports.
B. Other microscope: Zeiss Axio vert A1, Nikon TS-100F, Motic AE 2000 etc. Connect the USB cable
from the USB camera mounted on the microscope to the computer USB port.
IMPORTANT: MAKESURETHATTHEHOSEISSECURELYFASTENEDTOTHE“OXYGEN”INLET
USINGTHEHOSECLIP.THEPRESSUREFROMTHEOXYGENSUPPLYMUSTNOTEXCEED1.0
BAR

16
NOTE: If you have purchased a computer from dmt with your pressure myograph system
thenmyoviewdata,acquisitionsoftwarehasalreadybeeninstalledwithdriversforthe
digitalusbcamera.Followthenextproceduretosetupthepressuremyographsystem
NOTE: If you have not purchased a computer from dmt follow the myoview quick
installation guide to install myoview on your own computer
5. Pressure Interface to external Data Acquisition System connection (optional): If you have not obtained
the MyoVIEW software the four BNC ports on the rear of the Pressure Interface enables connection of
an external data acquisition system for recording inlet pressure P1, outlet pressure P2, longitudinal
force, probe temperature, chamber temperature, ow ON/OFF, pressure ON/OFF, pH1 value and
(Optional Dig out1, Dig out2, Dig in1 dig in2).
6. Turn on the power: Turn the main power to the Pressure Interface on at the power switch. Then turn
on the computer and the Pressure Myograph System is now ready to for use with MyoVIEW Data
Acquisition Software.

17
2.3 THE FIRST FORCE AND PRESSURE CALIBRATIONS
Prior to shipping the Pressure Myograph System has gone through two days of continuous testing,
including nal force and pressure calibrations. However in order to ensure that the Pressure Myograph
System is working at highest performance, DMT recommends that new force and pressure calibrations
are performed before the rst use. The force and pressure calibration procedures are described in detail
in chapter 3.7.1.

18
2.4 EXTERNAL PRESSURE MYOGRAPH CONNECTIONS
This section illustrates how to connect the perfusion circuit, the superfusion circuit, oxygen supply,
pressure supply and suction device on to the Pressure Myograph.
2.4.1 CONNECTINGPERFUSIONFLOWANDPURGINGTHESYSTEMWITHBUFFER
The Pressure Interface controls the perfusion ow. Instructions on how to control the perfusion ow are
provided in chapter 3.4. To connect the Pressure Interface to the Pressure Myograph, use the silicone
tube (internal diameter 1mm) delivered with the Pressure Myograph System.
• Connect the “perfusion inlet” at P1 on the Pressure Myograph (see gure 2.2 and 2.3 for Pressure
Myograph - 114P and Pulsatile Pressure Myograph – 112PP, respectively) to the P1 outlet on the cap
of the Pressure Interface bottle (see gure 2.4).
• Connect the “perfusion outlet” at P2 on the Pressure Myograph (see gure 2.2 and 2.3 for Pressure
Myograph - 114P and Pulsatile Pressure Myograph – 112PP, respectively) to the P2 inlet on the
Pressure Interface (see gure 2.4).
Perfusion outlet P2 Superfusionoutlet
InletpipeforOxygen/
carbogen supply
Access hole for
temperature or pH
probe
Superfusion
inlet pipe
Access hole for
addingbuerand
drugs
ExtraPerfusion
outlet
ExtraPerfusioninlet
ExtraPerfusion
inlet P1
Suctionpipetovacuum
Figure 2.1 Example of a complete set-up of Pressure Myograph System with DMT inverted Microscope

19
Figure 2.3 External Pressure Myograph connections for 112PP
Figure 2.4 Pressure Interface tube connections with Pressure Myograph Example with Pressure Myograph - 114P
Perfusion outlet P2
Suctionpipeforvacuum
Superfusionoutlet
InletpipeforOxygen/
carbogen supply
Perfusion inlet P1
ExtraPerfusioninlet
Access hole for
temperature or pH
probe
Superfusioninletpipe
Access hole for adding
bueranddrugs
ExtraPerfusionoutlet

20
NOTE:Tollthetubingandavoidairbubbles,mountthecalibrationshunt(resistance
tube) as shown below and described in chapter 3.7.2.1.
InletpipeforOxygen/
carbogen supply
Figure 2.5 Mounting of the Calibration Shunt tube in the 114P and 112PP chamber
CalibrationShunttube
(deliveredinasmallbox
with the system)
This manual suits for next models
1
Table of contents
Popular Industrial Equipment manuals by other brands

ABB
ABB GE ReliaGear Pro-Stock A2 quick start guide

CHIEF
CHIEF MI300i Complete manual

KTR-Group
KTR-Group BoWex FLE-PA Operating & assembly instructions

THORLABS
THORLABS LNR50 Series user guide

YOKOGAWA
YOKOGAWA Centum V Upgrade guide

Promation Engineering
Promation Engineering P9-120N4-HR Installation & operation manual