dobar CALIDO 35442E User manual

1 of 11
GAS FIRE PIT - dobar 35442E “CALIDO”
OWNER’S MANUAL
This appliance is intended for decorative purposes.
For Outdoor use only!
Keep the instruction for future reference!
Read the instructions before installation and use!
Warning: Accessible parts may be very hot, keep young children away.
This appliance must be installed in accordance with the rules in force,
and used only in a sufficiently ventilated space.
Consult instructions before installation and use of this appliance.
Read the instructions before using the appliance.
Importer: dobar e-Commerce GmbH
Fabrikstraße 3
48599 Gronau, Germany
Phone: 0049-2562-8146-26
Email: info@dobar-e.com

2 of 11
INDEX
Specification
Page 2
Gas Firepit Safety Warnings
Page 3
Expanded View
Page 5
Installation
Page 6
Operating Instructions
Page 7
Leakage Testing
Page 8
Gas Requirements
Page 8
LPG Cylinder
Page 9
Important Safety Rules
Page 9
Maintenance and Cleaning
Page 9
Storage (after use)
Page 10
Troubleshooting
Page 11
SPECIFICATION
Product Name
Gas Firepit “CALIDO”
Model
dobar 35442E
Pin code
2531CS-0150
Nominal heat input
9.3 kW (Hi)
Gas consumption
733 g/h (Hi)
Gas category
I3B/P(50)
Gas Type
Propane, butane and their mixtures
Gas pressure
50 mbar
Injector diameter
Ø 1.33 mm x 1 pcs
Destination countries
AT, DE, SK, CH, LU
Gas regulator
Certified regulator according to EN 16129 (flow rate: max. 1.5kg/h)
Gas hose
Certified gas hose according to applicable EN-standard (max1.5m)
Gas cylinder
Standard gas cylinder (recommend to use 4.5kg ~ 15kg)
Appliance dimension
600*600*300 mm
Mass appliance
14 kg
This appliance was designed and made in accordance with EN509 and EN437 plus subsequent
amendments (gas standards).
This appliance complies with the prescriptions of Gas Appliance Directive 2009/ 142/EC and Gas
Appliance Regulation 2016/426/EU.
The EC Declaration of Conformity from the importeur can be requested. State of information: 2018
This symbol is stick on in the higher part of the appliance (do not remove it).
Attention:
Surface very hot!
Do not touch!!!!

3 of 11
ATTENTION: This appliance is fitted with flexible gas rubber pipe and clamps that must be used; never use
different kind and always according to the National Rules in force of the country of destination.
These components should be periodically substituted, according to the date reported on the body of each
of them, or according to the National Rules in force of the country of destination.
Gas regulator and LPG cylinder are not included and have to be bought from local gas suppliers.
Before installation, ensure that the local distribution conditions (identification of the
type of gas and pressure) and the adjustment of the appliance are compatible.
GAS FIREPIT SAFETY WARNINGS
“The appliance must be installed according to the instructions and National Rules in force of the country
of destination”
Read the instructions carefully before using this appliance - Never use this appliance indoors, on vehicles or
boat.
If the instruction of this manual are not exactly followed, dangerous situation may come up; make sure all
parts are in proper place.
Any modification of the appliance may be dangerous; improper installation, adjustment, alteration, service or
maintenance may cause personal injury or property damage.
Installation and repair must be performed by a Qualified Service, Agency or Gas Supplier; never do it by
your-self!
Never use this appliance until all connections have been leakage tested. Never put it into operation if any
leakage is detected; check leakage all the time by soapy foam (never using a flame). In case of gas leakage,
appliance shall not be used; shut-off gas supply and the appliance must be investigated and rectified by
Qualified Service, Agency or Gas Supplier before it is used again.
Appliance must be attended all the time while in operation and never attempt to disconnect gas regulator or
gas fittings.
This is a decorative appliance only and any kind of cooking is strictly forbidden. Never use charcoal or any
other solid fuel but lava rocks supplied with the appliance.
Do not burns rubbish and any other materials throw on this appliance; do not pour water into the appliance.
Do not store or use gasoline or other flammable vapours and liquids in the vicinity of this or any other
appliance.
Use only gas type (see adjustment in “Specification” section and also Appliance Marking on the appliance)
specified by the manufacturer.
Use only LPG cylinder specified by the manufacturer (see in “LPG cylinder”).
Shut-off the valve of the LPG cylinder or the gas regulator before moving the appliance.
Do not move the appliance during use; once it has been turned in “OFF” position (full disk), wait temperature
has cooled down (at least 30 minutes).
Gloves are strictly recommended to be used while moving this appliance, to protect your hands.
Always use the appliance on a horizontal not combustible surface to keep it stable.

4 of 11
Check that the gas regulator seal is correctly fitted and able to fulfil its function.
Turn off the gas supply at the LPG cylinder after use.
Flexible metal or rubber pipe, used to connect the appliance with the LPG cylinder must be changed within
the prescribed intervals and according to the National Rules in force (see expiry date on the flexible metal or
rubber pipe).
Check flexible metal or rubber pipe used at least once per month and while LPG cylinder is changed; if it
shows sign of cracking, splitting or deterioration, it shall be exchanged for a new one of the same length and
of equivalent quality.
The appliance should be inspected before using and at least one time a year (see “Maintenance”).
A temperature less than 5 ˚C will cause restricted gas flow and the appliance will not work properly.
Battery ignition may contain mercury; do not put in fire or trash. After use, handle as recycle hazardous.
Take battery out when appliance is not supposed to be used for a long period of time.
Warning: accessible parts may be very hot. Keep young children away.
People should be warned of the hazards of high surface temperatures and should stay away to avoid burns or
clothing ignition.
If fire should go out, turn gas supply in “OFF” position (full disk) and wait for 2 minutes before attempting to
relight.
Children should be carefully supervised when they are in the area of the appliance; never let them to use this
appliance.
Clothing or other flammable materials should not be hung from the appliance, or placed near the appliance.
Always maintain at least 1m clearance from combustible materials (left or right side and back wall); any ceiling
is forbidden.
“This appliance must be kept away from flammable materials”.
Do not put any other fireplace cover or anything flammable on, beneath or beside the appliance.
Do not rest feet on appliance while in operation.
Keep any electrical supply cord and rubber pipe away from any heated surface.
Any sealed parts by Manufacture or his agent can not be altered by the user.
These instructions are only valid if the country symbol appears on the instruction manual and on the
appliance. If this code is not present on the appliance it is necessary to refer to the technical instructions
which will provide the necessary information concerning the modification of the appliance to the condition of
use for the country.
"WARNING: THIS APPLIANCE HAS A NAKED FLAME; A SUITABLE GUARD SHOULD BE USED FOR THE
PROTECTION OF YOUNG CHILDREN, THE ELDERLY AND THE INFIRM."

5 of 11
EXPANDED VIEW

6 of 11
INSTALLATION
Packed components list
Set up
This Gas Fire Pit must be installed on flat, stable surface, away from any combustible materials or construction.
Remove fire pit from a carton and remove cylinder cargo from another carton, place them on any level,
non-combustible surface.
Place lava rocks into the fire pit around the burner evenly.
Unscrew the button cap of igniter, put a piece of AAA battery into igniter compartment with anode outward,
then screw the button cap.
Take down the lid of cylinder cargo carefully and put it in the safety place.
Locate the hose out of the pathways where people may trip over it or in areas where the hose may be
subjected to accidental damage.
CAUTION: Do not kink flexible gas hose. If it is kinked, a gas leak could occur.
Instruction for connecting gas circuit to LPG cylinder
Keep at hand suitable crossed screwdriver, adjustable spanners, pliers and wrenches. Before assembly, make
sure all protection packing material has been removed. Flexible gas rubber pipe and clamps (if necessary) are
supplied with this appliance and must be used, according to National Rules in force. You need to purchase one
gas regulator and one gas cylinder. The gas regulator has to be set according to specific gas category (see on
page 2) and proper gas consumption (g/h) specification. The LPG cylinder should be standard one. Recommend
to use 4.5kg to 15 kg one. Replacement must be that specified in “Gas Requirements” section of this Instruction
Manual. Be careful: do not kink flexible gas rubber pipe of gas circuit. If pipe holder should not be provided, thread
of the gas inlet connection will be in line with Standards ISO 7-1 or ISO 228-1, according to National Rules in force
of the country of destination.
Make sure appliance gas knob is turned "OFF" (full disk) before assembling (see below Figure).
Position the LPG cylinder at the side of your appliance, not underneath, keeping in mind that the LPG cylinder
must be kept away from heat and in a safe position.
Connect the regulator to LPG cylinder by hand
Connect the hose to the appliance and the regulator. Tighten the screw of the hose clamp with a screwdriver.
Item
Description
Quantity
A
Fire Pit
1pc
B
Fabric dust cover
1pc
C
Lava Rock
2kg
D
Adjusting pin
4pcs
E
Metal cylinder holder
1pc

7 of 11
OPERATING INSTRUCTIONS
Lighting
Before ignite the appliance, perform “Leakage Testing” in a well ventilated area (outdoor). At first use and after
every LPG cylinder substitution, appliance gas circuit must be purged of the inside air before igniting! To do this,
turn the control knob counter-clockwise to the ignition position and push it holding for 1 minute before attempting
ignition.
1 - Make sure that LPG cylinder, full 4/5 its capacity, contains proper LPG Gas (refer to Technical Data on page 2).
Turn LPG cylinder valve in full “ON” position and close LPG compartment panel.
2 - Make sure that burner control knob is in “OFF” position (full disk).
3 - Push the control knob and keep pressing while turning counter-clockwise to the corresponding Maximum
position (big flame). At the same time push the ignition button (star). Igniter will sparks automatically (it is possible
to ignite the appliance even with proper lit long match, approaching carefully the burner managing in the same
way).
4 - When the burner is lit in Maximum position (big flame), stop pushing ignition button (star) and keep the control
knob pressed but not over 20 seconds to heat the thermocouple (FSD); then release it (first ignition take generally
more time, because gas circuit is full of air).
5 - If the burner does not keep lit, wait 5 minutes and then repeat steps 3 and 4.
6 - Burner now is lit in Maximum position (big flame).
7 - Adjust the heat input by turning the knob from the Maximum position (big flame), to the Minimum position, as
properly.
8 - After lighting, turn knob from Minimum to Maximum (big flame) position and back, to check flame stability.
9 - In case of accidental break down of the flame (for wind or other reasons), FSD will shout-off gas supply
automatically (FSD = Flame Safety Device) not over 60 seconds.
Note: The burner may be noisy when initially turned on.
To eliminate excessive noise from the burner, turn the control knob to the Minimum position and back.
If you experience any ignition problem consult the following “Troubleshooting”.
To turn “OFF” (full disk) the appliance
1. Turn appliance control knob clockwise up to “OFF” position (full disk).
2. Turn the LPG cylinder valve to the “OFF” position.
3. Allow the appliance to cool before moving it (at least 30 minutes).

8 of 11
Leakage Test Point ①②③④
Re-Lighting
1. Turn control knob to “OFF” position.
2. Wait at least 5 minutes, to let gas dissipate, before attempting burner re-light.
3. Repeat the “Lighting” steps.
LEAKAGE TESTING
Never check for gas leakages with a flame or while smoking.
This appliance needs to be periodically checked for leakages and an immediate check is required if the smell of
gas is detected.
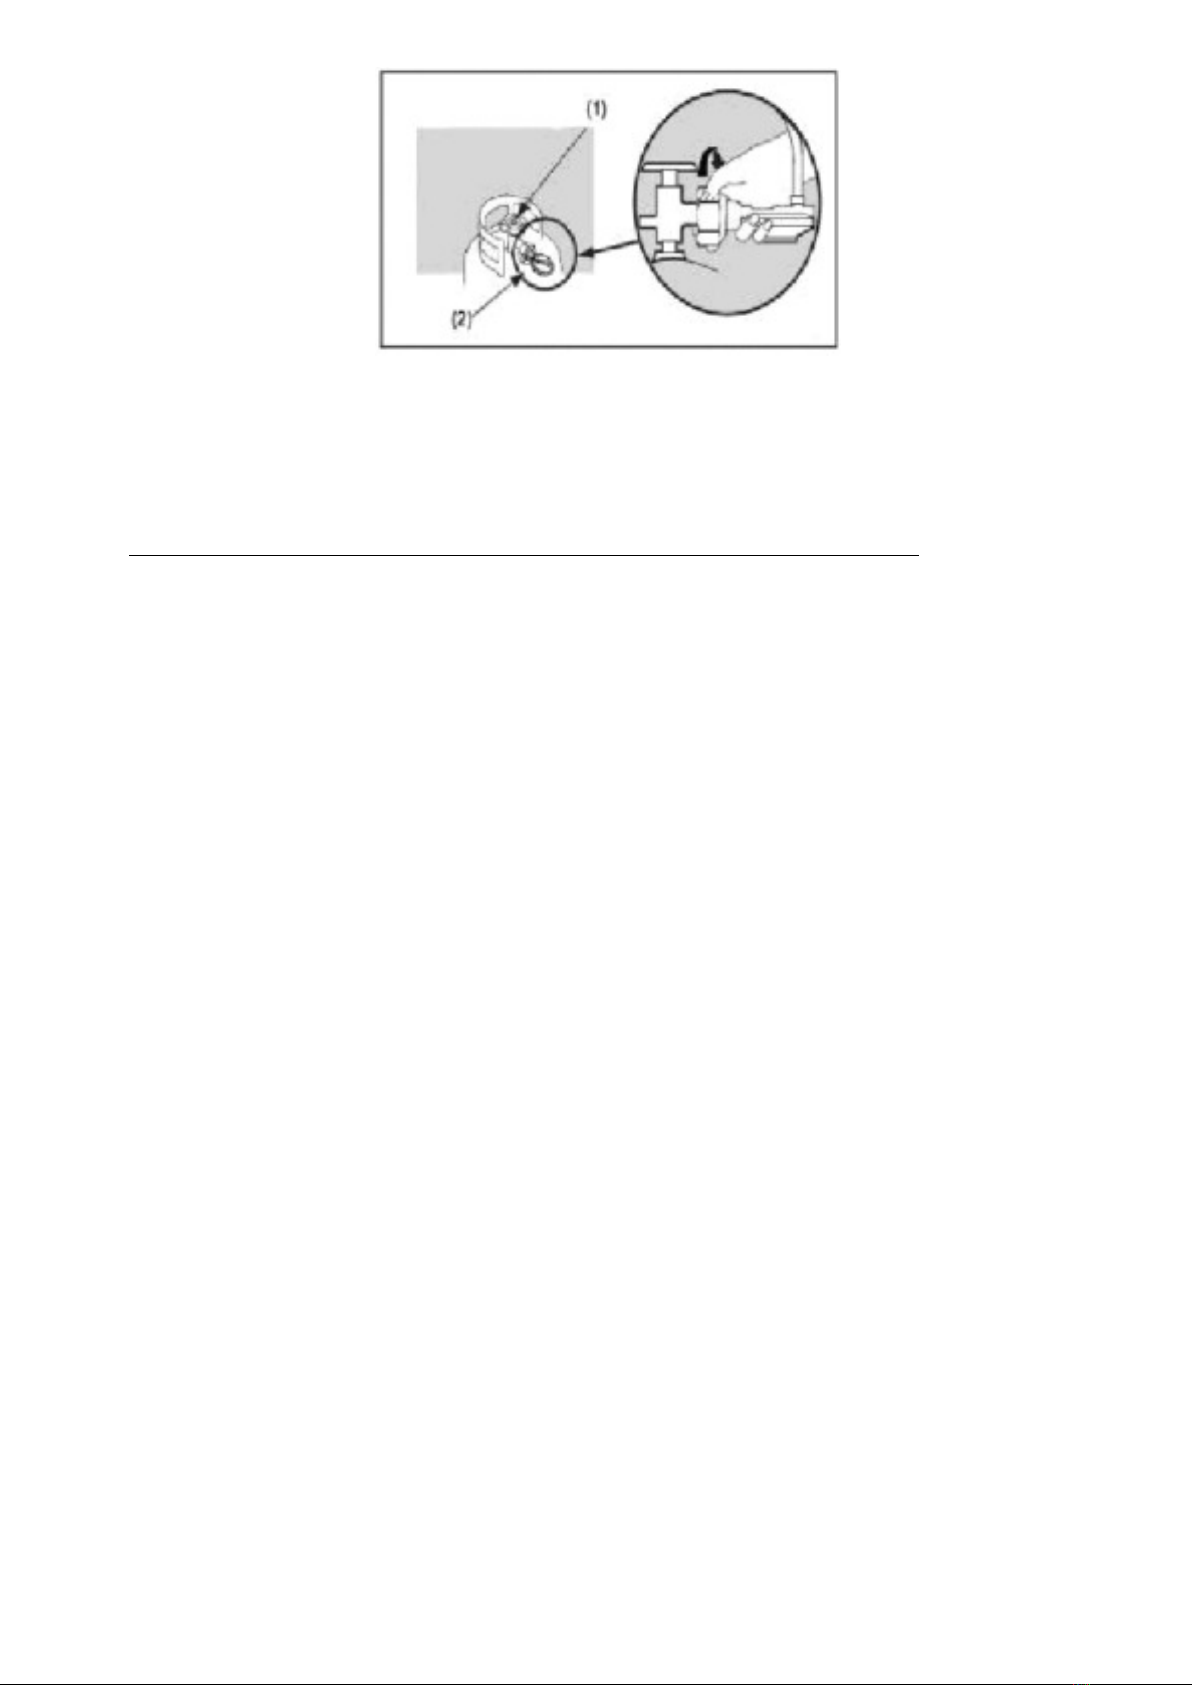
Make a soap solution using 1 part of liquid dish-washing
soap to 3 parts water. The soap solution can be applied
with a soap bottle, brush, or rag to the leakage tested
points shown in the figure beside.
The valve of the LPG cylinder should be in the “OFF”
position at this point of the leakage test. Once the soapy
solution is applied to the gas connections, the valve of the
LPG cylinder needs to be turned to the “ON”position.
Soap bubbles will begin to form in the soapy solution if
any leakage is present.
In the event of gas leakage, the appliance shall not be
used or if alight, the gas supply shall be shut-off and the
appliance shall be investigated and rectified before it is
used again. Tighten any leaking fittings, then turn on gas
supply and recheck.
If necessary, substitute gasket (according to EN 549
Class B2) or material used to guarantee tightness
(according to EN 751-1 Class I).
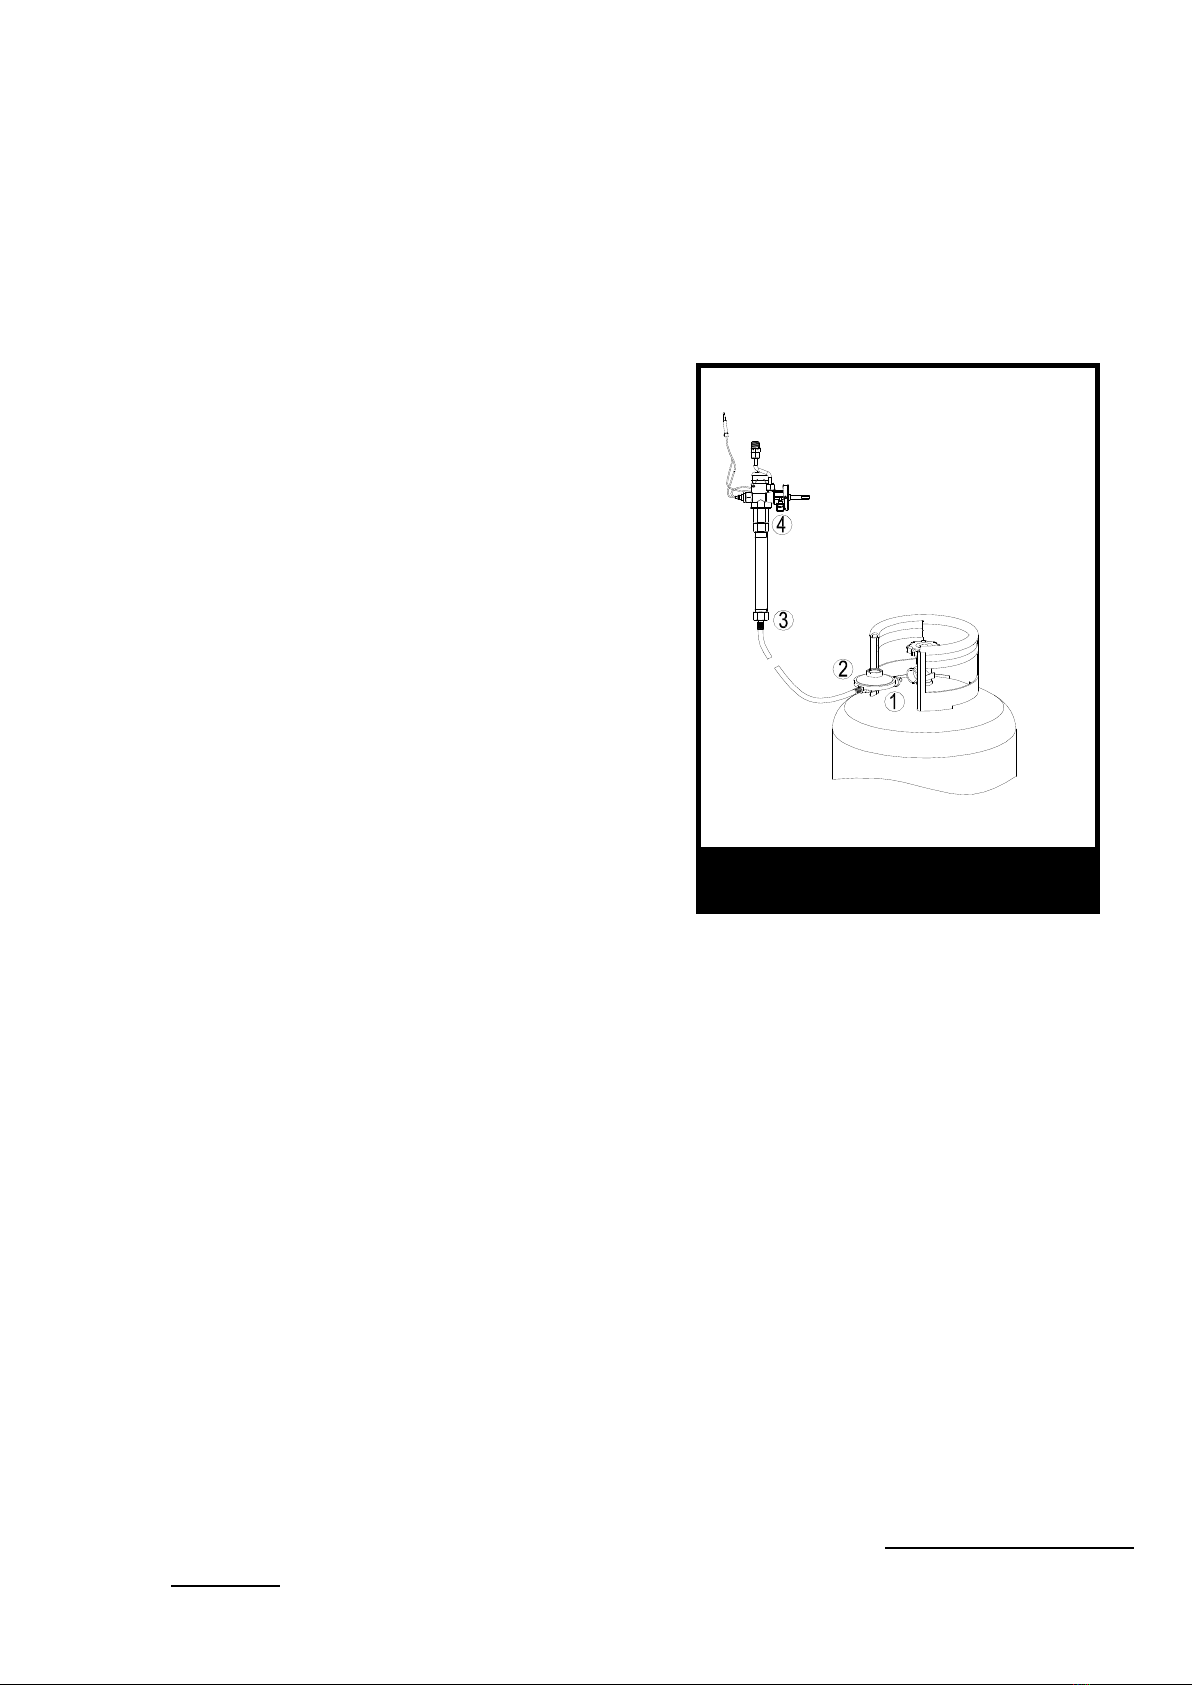
GAS REQUIREMENTS
Use only the type of gas and the type of LPG cylinder specified by the manufacturer.
Appliance must use an approved gas regulator (approved for a working temperature not lower than 50 ˚C)
according to the EN Standard EN16129 ( gas regulator inlet and outlet connection according to the National
Rules in force) and flexible gas rubber pipe according to applicable EN-standard (with proper inner diameter
according to gas inlet connection and National Rules in force) with a length not over 1.5 m and approved for a
working temperature not lower than 60 ˚C. When substitution will be necessary, you have to purchase suitable
gas regulator, flexible gas rubber pipe and clamps from your local gas dealer; gas regulator should be
substituted not over 10 years.
Flexible gas rubber pipe must be located in the LPG compartment carefully, avoiding any twisting.
Never use a damaged gas regulator.
Never connect this appliance to an unregulated LPG source (gas regulator is mandatory to be used).
When the appliance is not in use, turn the LPG cylinder in “OFF” position.
Always perform a leakage test on gas connections whenever a LPG cylinder is connected. If bubbles form in
the leakage test solution, do not use it. Never use a flame to test for leakages. It is strictly forbidden and
dangerous!

9 of 11
LPG CYLINDER
LPG cylinder used must be in accordance with the National Rules in force.
LPG cylinder should have collar to protect cylinder valve and never filled over 80% its capacity.
Refer to your gas supplier for instructions how to use and handle LPG cylinder.
Never use a LPG cylinder with a damaged body, valve, collar or foot ring.
Change LPG cylinders in an amply ventilated area, away from any ignition source (candle, cigarettes and so
on).
If appliance is stored indoors, detach and leave LPG cylinder outdoors in a ventilated and protected area.
LPG cylinder must always be used in an upright position.
Do not store a spare or disconnected LPG cylinder near this appliance.
IMPORTANT SAFETY RULES
This appliance is not fitted with “Atmosphere sensing device”.
To be used outdoors use only and in good weather condition (no rain, or windy condition).
The use of this appliance in enclosed areas can be dangerous and is PROHIBITED.
Children and adults should be aware of the high operating temperatures of areas above the post when operating
this appliance. Children should be carefully supervised when in the vicinity of the appliance.
NEVER hang anything, including clothes or any other flammable items, on this appliance.
DO NOT operates this appliance unless it is fully assembled with all its parts.
Minimum clearance is 1 m from combustible materials and or any wall side (left, right or back); any ceiling is
forbidden.
Appliance is not fitted with any guard; it is recommended to use one for the protection of young children, the elderly
or infirm. The approach to the appliance is limited such that accessibility to the flame is minimized.
Do not stay too closed to the appliance while in operation.
MAINTENANCE AND CLEANING
To enjoy years of outstanding performance from your appliance, regular services of the appliance is mandatory as
followings:
The appliance should be inspected before at least one time a year by a Qualified Service only. More frequent
cleaning may be required according to the use of the appliance.
Keep exterior surfaces clean, free and clear from combustible materials.
Use warm soapy water for cleaning. Never use flammable or corrosive cleaning agents.
While washing your unit makes sure to keep the area around the burner assembly dry at all times. If the gas
control is exposed to water in any way, DO NOT tries to use it. It must be replaced.
Burner and LPG compartment circulating air passageways of the appliance must be kept clean.
Airflow must be unobstructed. Keep controls, burner and circulation air passageways clean. Signs of possible
blockage include:
Gas odor with extreme yellow tipping of flame / Appliance glow is excessively uneven / Appliance makes popping
noises.
Spiders and insects can nest in burner or orifices. This dangerous condition can damage the appliance and render

10 of 11
it unsafe for use. Clean burner holes by using a heavy duty pipe cleaner. Compressed air may help clear away
smaller particles.
Carbon deposits may create a fire hazard. If any carbon deposits develop, clean dome and engine with warm
soapy water.
After the burner and lava rocks are completely cooled down, remove it from the bowl and use a soft brush to get rid
of the mild stains, loose dirt and soil. Wipe with a soft cloth.
Clean the bowl and afterward put lava rocks again in proper position.
For proper cleaning, a vacuum cleaner can be used.
Note: In a salt-air environment (such as near the sea), corrosion occurs more quickly than normal.
Frequently check the corroded areas and repair them promptly. Stubborn stains, discoloration and
possibly rust pitting can occur from exposure to harsh outdoor conditions. Be careful not let any powder
or solvent come in contact with painted or plastic components as damage may occur.
After long use, some discoloration can come up and it screen is normal.
Make sure both gas supplies is in OFF position before changing battery. Please refer to the process of assembling
battery.
Please contact the Manufacturer or dealer for information regarding replacement hoses, thermocouples, igniters,
lava rocks, etc.
Attention: Never use unauthorized parts or component for this appliance.
Use only original equipment replacement spare parts and components.
Otherwise may void the warranty of this product and result in a hazardous condition.
STORAGE (after use)
Turn control knob in “OFF” position (full disk).
Turn LPG cylinder in “OFF” position.
Store the appliance in a cool dry place away from direct sunlight; store it upright in an area sheltered from direct
contact with inclement weather (such as rain, sleet, hail, snow, dust and debris).
If desired, cover to protect exterior surfaces and to prevent build up in air passages.
Note: Wait until appliance is cool before covering.
During periods of extended inactivity or when transporting:
Turn control knob in “OFF” position (full disk).
Disconnect LPG cylinder and move to a secure, well ventilated location outdoors. DO NOT store in a location that
will exceed 50 °C.
Store appliance upright in an area sheltered from direct contact with inclement weather (such as rain, sleet, hail,
snow, dust and debris).
If desired, cover appliance to protect exterior surfaces and to prevent build up in air passages.
Note: Wait until appliance is cool before covering.

11 of 11
TROUBLESHOOTING
Problem:
Condition:
Solution suggested:
Burner won’t
light
Control knob is not in Maximum position (big
flame).
Turn control knob in Maximum position (big flame).
LPG cylinder valve is closed / Empty.
Open the valve / Replace LPG cylinder with a new one.
Blockage in the injector.
Clean or replace injector.
Air in the gas circuit.
Open gas line and bleed it (pressing
control knob in) for not over 1 minute or until you smell gas.
Low gas pressure.
Replace LPG cylinder with a new one.
Igniter fails.
Use match to light burner; change battery or obtain new
igniter and replace it.
Burner won’t stay
lit
Dirty build up around burner.
Clean dirty around the burner.
Low flames or not full running around the
burner.
Flame spreader holes partially closed; clean the burner.
Thermocouple is not operating correctly.
Replace thermocouple (FSD).
Low Gas pressure.
Replace LPG cylinder with a new one.
Burner flame is
low
Note: Do not
operate appliance
below 5 ˚C
Outdoor temperature is greater than 5 ˚C
and LPG cylinder is less than 25 % full.
Replace LPG cylinder with a new one.
Gas pipe is bent or kinked.
Straighten hose and perform leakage test on gas pipe.
Control knob is fully Maximum position (big
flame).
Turn control knob to”OFF" position (full disk), let cool to
room temperature and check burner and
orifices for blockage.
Carbon build-up
Dirty or film on burner.
Clean burner.
Flash back (flame
inside burner)
Burner ports are blocked.
Switch OFF the appliance. Close LPG cylinder valve. Wait
2 minutes, following the ignition procedure. Ignite burner. If
problem continuous, switch-off. Contact your dealer.
Thick black
smoke
Blockage in the burner.
Turn control knob to "OFF" position, let the appliance to
cool at room temperature and remove
blockage and clean burner inside and outside.
If you can not solve trouble according to one of the mentioned solution, please contact your dealer
or distributor responsible.
Table of contents
Other dobar Outdoor Fireplace manuals
Popular Outdoor Fireplace manuals by other brands

KSP
KSP Jensen La Valle RF-1590LP owner's manual

Kingsman Fireplaces
Kingsman Fireplaces FP2085NT manual

HPC
HPC Evolution 360 user manual

Superior Fireplaces
Superior Fireplaces VRE6036 Assembly, installation and operation instructions

BREEO
BREEO LUXEVE FIRE PIT WHITE RIVER user guide

Kenwood
Kenwood KXT754GL instructions

Gilbert & Bennett
Gilbert & Bennett FBCIWOVEN-BZ user manual

Bond
Bond CATALINA COVE HYFPY50025-6 owner's manual

Firegear
Firegear FPB-26DBS22TPSI-N Installation and operating instructions

Williams-Sonoma
Williams-Sonoma OFG155LP owner's manual

Coleman
Coleman 5055-707 Assembly and instruction sheet

Garden Treasures
Garden Treasures OFG133T1 manual