HPC Evolution 360 User manual

7/20/2015 980
1
Service We suggest that our fire
products be serviced by a
professional certified in the
US by the National Fireplace
Institute (NFI) as NFI Gas
Specialists.
Water Basin Insert, With Fire Feature Option
For Outdoor Use Only
If your system includes an HPC fire feature you must comply with the instructions
included for the fire feature.
Any system utilizing any fire affect is for outdoor use only and must comply with HPC
clearance and installation instructions for a fire feature. If you are unsure of what these
clearances and instructions are they are outlined in our fire pit instructions which are
available on our website or you can contact your dealer.
This product is not for use inside another body of water.
WARNING: FOR OUTDOOR USE ONLY
WARNING
•Improper installation, adjustment, alteration, service, or maintenance can cause injury or property
damage. Read the installation, operating, and maintenance instructions thoroughly before installing
or servicing this equipment.
Installation
We suggest that our fire products be
installed by professionals that are
locally licensed by the authority
having jurisdiction in gas piping.
INSTALLER: Leave this manual with the appliance.
CONSUMER: Retain this manual for future reference.
Instructions are also available at
www.HPCfire.com
Select Models
Certified to
ANSI Z21.97-2014
CSA 2.41-2014
CSA C22.2 No. 108-01-2010

7/20/2015 980
2
Index:
1) General Information
Please carefully follow the instructions in this manual to prevent personal injury or property loss. Instructions are updated
as needed. It is the installer’s responsibility to periodically review instructions for applicable updates.
The steps listed as:
WARNINGS: Contains information critical to the safe installation and operation of the Fire and Water.
WARRANTY REQUIREMENT: Must be strictly followed to qualify for product warranty.
Warranty will be void if not followed.
IMPORTANT: Are notes and insights to help ensure product satisfaction and serviceability.
-------------------------------------------------------------------------------------------------------------------------------------------------
WARNING: It is the installer’s responsibility to ensure a safe installation and to educate the end user as to proper
operation. Leave this manual with the end user.
WARNING: Never alter product or configuration in any way.
WARNING: FOR REMOTE CONTROL /SHUTDOWN TIMER USE: Including but not limited to wall switches, hand
held devices such As (cel phones, key fobs, remote controllers, timer controller, ect), business and whole house automated
control systems. It is the user’s responsibility to comply with the following guidelines:
1) Visual inspection
a. Visually ensure all covers are removed,
b. Visually ensure that the product is clear of people and any foreign debris prior to start-up
c. Visually ensure that the product is safe to start
2) Ensure product is monitored by a responsible adult during use.
3) When not in use, ensure power is off to the product to avoid accidental start-up of the product
WARNING: Not for use with any kind of automatic start-up timer.
WARNING:Product is not for use with small LP Tanks and must utilize permanent fixed piping for fuel supply.
WARNING: It is the responsibility of the installer to follow:
oThe National Fuel Gas Code, ANSI Z223.1/NFPA 54 or International Fuel Gas Code.
oThe National Electrical Code, ANSI/NFPA 70.
oLocal Codes
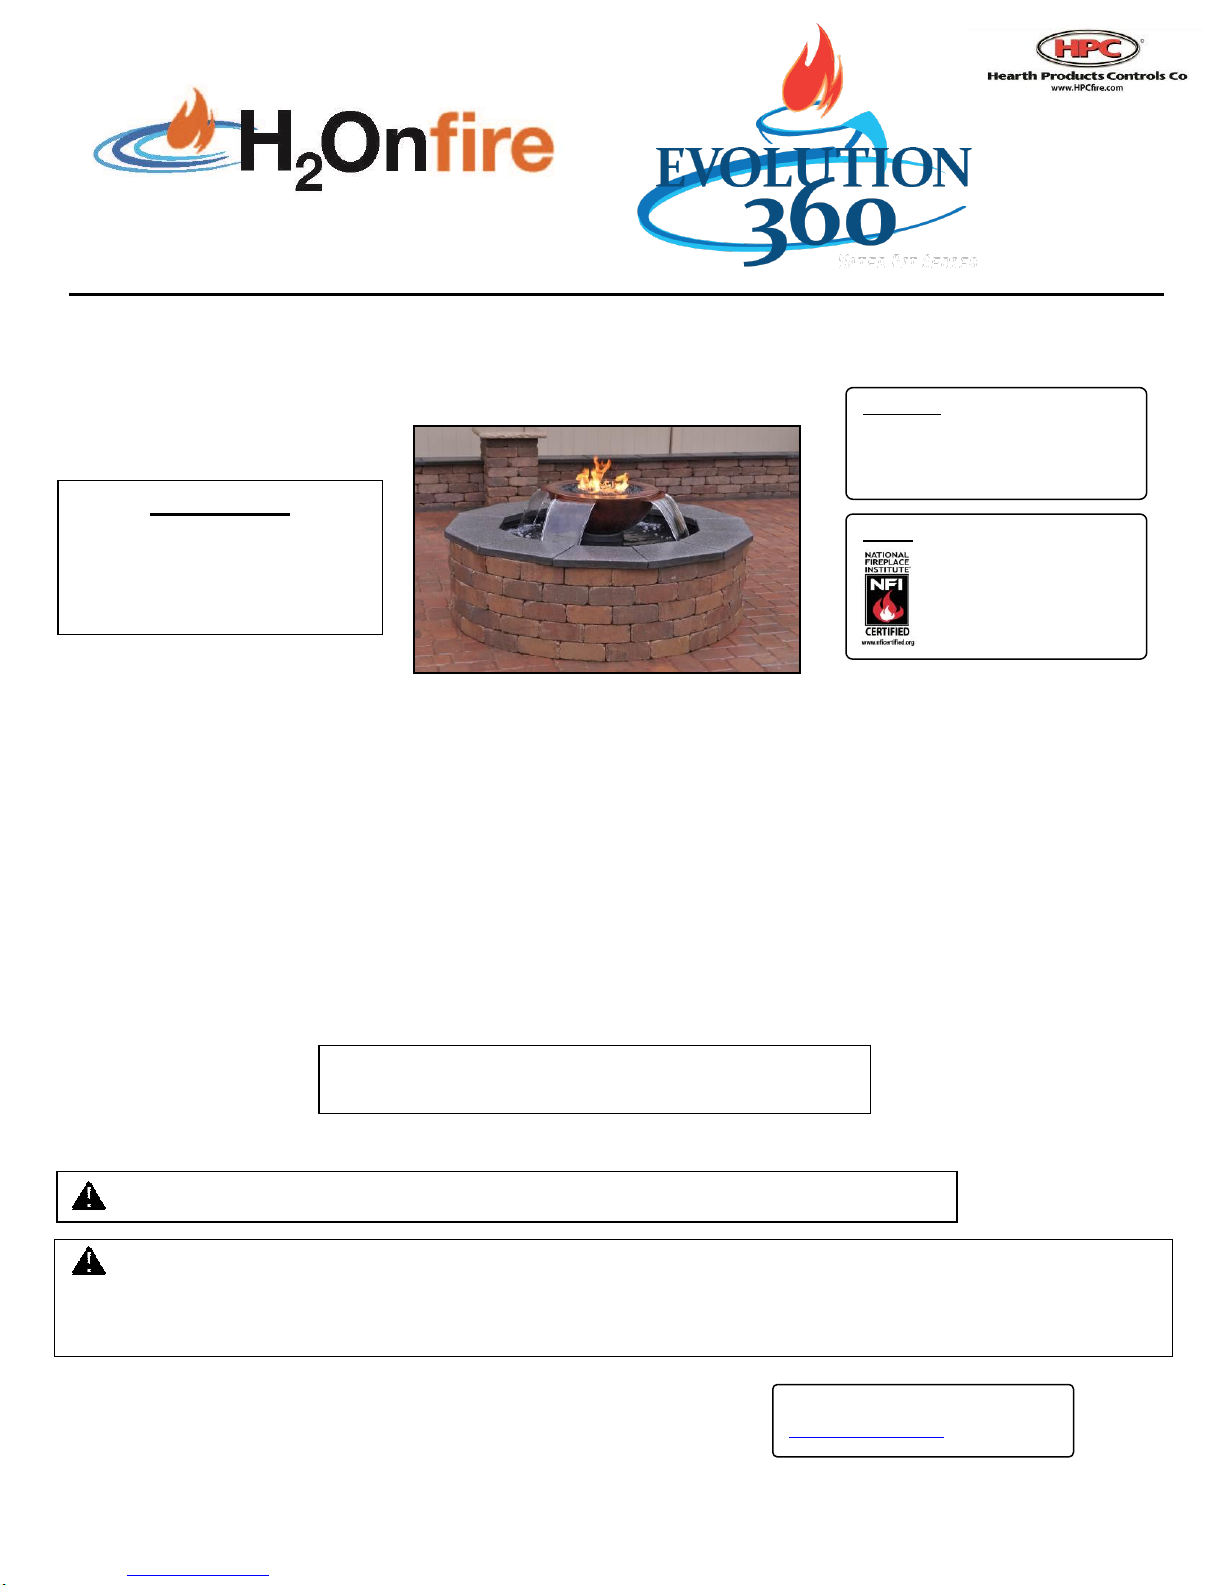
WARNING: For units with the fire feature option only use gas/fuel type specified for this fire pit see label on the fire pit
control Box. Verify correct gas/fuel type and pressure. Never use an alternative fuel to include bio-fuel, ethanol, lighter
fluid or any other fuel. Gas pressure and type should be checked prior to use and installation.
Gas pressure and type should be checked prior to use and installation.
● Natural Gas Fire Pit:
Supply Pressure: Minimum: 3.5” W.C.; Maximum: 7.0” W.C.
Outlet Pressure: 3.5” W.C.
● LP Gas Fire Pit:
Supply Pressure: Minimum: 8.0” W.C.; Maximum: 11.0” W.C.
Outlet Pressure: 10.0” W.C
1) General Information
2) Selecting the Location
3) Construction Of The Enclosure
4) Installation Of the Water Feature
5) Media
Product Specific Information
6) Parts List
7) Water Basin Operation
8) Maintenance
9) Troubleshooting
10) Replacement Parts
11) Warranty
12) Clearances, section 12, figure 1&2
13) Electronic ignition fire pit information

7/20/2015 980
3
WARRANTY REQUIREMENT: Water Basin Tower total weight limit, which includes bowl, fire pit, media, and water
is 150 lbs. maximum.
WARRANTY REQUIREMENT: Water Basin media total weight limitation is 250 lbs. maximum evenly distributed.
2) Selecting The Location & Site Preparation
WARNING: For outdoor use only and must comply with instructions and clearances.
WARNING: The water basin must be supplied power via GFCI protected circuits.
WARNING: FIRE OPTION - For a water basin with the fire option refer to the correct fire pit installation instructions
contained in this document (section 13).
WARNING: This product is not for use inside another body of water.
WARRANTY REQUIREMENT: The water basin must be properly drained and winterized in areas that drop below
freezing temperatures. (Section 8)
WARRANTY REQUIREMENT: Your location must have sufficient drainage to prevent damage to surrounding
surfaces. HPC does not warranty against drips or leaks and is not responsible for any damage. It is the installer’s
responsibility to ensure there is enough drainage to allow for maintenance, repair, winterization or leak of the water basin.
IMPORTANT: Choose a location that allows easy access for installation and maintenance of the water basin.
For Outdoor Use Only
Water Feature Only
With Optional Fire Feature
Control box must be above grade with adequate drainage
Refer to Section 12, Figure 2
Valve box must be above grade with adequate drainage
Refer to Section 12, Figure 1 and Section 15

7/20/2015 980
4
3) Construction Of The Enclosure
WARNING: FIRE OPTION - For a water basin with the fire option follow the correct fire pit instructions contained
in this document (section 13).
WARNING: The water basin must be supplied power via GFCI protected circuits
WARRANTY REQUIREMENT: The enclosure must be constructed on a stable surface.
WARRANTY REQUIREMENT: The weight of the water basin must be supported by the adjustable legs and not by
any other portion of the basin.
WARRANTY REQUIREMENT: Make sure that the water basin is high enough that the electrical control box and
optional fire pit valve box is above grade to prevent water damage to the controls inside the box.
WARRANTY REQUIREMENT: Your location must have sufficient drainage to prevent damage to surrounding
surfaces. HPC does not warranty against drips or leaks and is not responsible for any damage. It is the installer’s
responsibility to ensure there is enough drainage to allow for maintenance, repair winterization or leak of the water
basin.
WARRANTY REQUIREMENT: Do not rest or hang the enclosure on the water basin. The enclosure should be free
standing.
IMPORTANT: Make sure that the enclosure structure is level.
Below are examples of access panel doors for the Evolution 360, which are necessary for service and maintenance.
Refer to the site preparation recommendation diagram on pg.3 for access door opening information.
Stone enclosure on site
HPC®aluminum enclosure –sold separately
4) Installation Of The Water Feature
WARNING: Do not adjust legs out past 6.25 inches or the water basin may collapse. (Figure 7)
WARRANTY REQUIREMENT: The water feature should be supported by adjustable legs when placed into
enclosure.
WARRANTY REQUIREMENT: Soft water is recommended. Hard water may cause premature failure of
components and the pump.
WARRANTY REQUIREMENT: Never lift the unit by the top water or fire bowl, tower, or ring. This will damage
these parts.
WARRANTY REQUIREMENT: Ensure the water basin is able to be removed for regular service and maintenance.
Never permanently mount in a way that it cannot be removed.
WARRANTY REQUIREMENT: Water basin tower total weight limit which includes bowl, fire pit, media, and
water is 150lbs maximum.
WARRANTY REQUIREMENT: Water basin media total weight limitation is 250 lbs. maximum evenly distributed.
WARRANTY REQUIREMENT: Do not exceed 70 psi for water supply. This may damage the auto fill mechanism.
Installation
We suggest that our fire products be installed by professionals that are
locally licensed by the authority having jurisdiction in gas piping.

7/20/2015 980
5
1. Position the control panel and pump so they can be accessed in the future.
2. Prepare the site.
a. Make sure the area is stable and level.
b. Ensure adequate drainage to allow for periodic maintenance and winterization that will not result in
damage to the surrounding area.
c. Ensure electric is run to site on GFCI circuit and complies with all codes by the authority having
jurisdiction.
d. For fire option ensure there is correct gas type, plumbed to site, of sufficient BTU, install by a certified
installer and inspected by the authority having jurisdiction. Refer to the fire pit instructions included in
section 13 of this document.
3. Uncrate your water basin being careful not to damage the unit.
a. Clean the basin of all debris left from the shipping crate.
4. Inspect your water basin for any visual damage or defect.
5. Set water basin in place. This will require at least 2 people.
6. When applicable mount your water feature to the basin tower using ¼-20 stainless steel
mounting bolts. The length of bolt will be determined by your water feature.
a. Do not exceed weight limitations outlined in section 4.
b. Do not torque over 5 ft./lbs.
7. Level your water feature using the adjustable legs.
a. The adjustable legs may also be used for minor height adjustments. Do not adjust
out more than 6.25” from the bottom of the flange to the bottom of the foot or the
feature may collapse.(Figure 7)
b. Make major height adjustments with block that is larger than the feet and
sufficiently sturdy that there is not risk the unit will fall.
c. Adjust the basin to level condition first.
d. After the basin is level check the water feature for level.
i. If your water feature is made of copper it may be possible to make some
leveling adjustment by carefully adjusting the bowl itself.
ii. If it is not possible to adjust the water feature then make the water feature
level adjustments using the adjustable legs.
8. Hook up the basin drain and the overflow drain to the onsite drainage system. (Figure 8)
a. Your system will require regular service and or winterization.
b. Include a shutoff valve for the basin drain that is convenient to access.
7
7
drain
8
overflow
8
6.25”
7
Tower

7/20/2015 980
6
Fuse / Breaker size and type may vary. Refer to product label or consult with HPC customer service.
Control Box Wiring Schematic With Fire Feature Option

7/20/2015 980
7
Control Box with optional Fire Feature
Bonding lug on valve box with Fire Feature option
Bonding lug location for
water only applications

7/20/2015 980
8
Onsite Electrical Wiring Options

7/20/2015 980
9
9. Hook up electrical cord to GFCI electrical supply following the wire diagram.
a. Your system can be wired so that one switch controls multiple functions or each function is controlled
independently.
b. Refer to the wire labels on the 20 ft. 5 conductor power cord.
i. #1 = Pump (Water) - minimum 2.0 amp 120 VAC
ii. #4 = Lights –minimum 0.5 amp 120 VAC
iii. #3 = Valve Box (Optional Fire Feature) - minimum 1.0 amp 120
VAC
10. Turn on lights to ensure they work properly.
11. Hook up water to auto refill. (Figure 11) *DO NOT TURN WATER ON YET
a. Take care not to twist the refill float or damage the unit by over
torqueing.
b. Use plumber tape or appropriate sealer for PVC.
12. Hook up gas supply for water basins with the fire option.
a. Follow all fire pit instructions provided in the fire pit instruction.
b. Use appropriate gas rated sealer.
c. Do not use any sealers on flare fittings.
d. Ensure all fittings are leak tested with leak reactor or gas detector.
13. Fill your water basin with water ½ full.
a. Recommended to fill with external water source watching for leaks as
the basin fills.
b. Turn pump on then off several times for a few seconds to prime the
pump.
c. Turn pump on and confirm proper water flow.
i. Use level legs for fine tuning water flow.
d. HPC does not warranty against minor leaks. Your water feature has
been assembled and thoroughly inspected prior to shipping. There are many
connections and in some cases handmade water features.
e. Repair leaks as necessary then follow step 14.
14. Once step 14 is complete, fill water basin full (to bottom of overflow fitting)
a. Turn pump on and adjust the flow of your feature if needed using the ball
valve provided (blue handle). Not all units have ball valves.
i. It is recommended to not close off the ball valve more than ¼turn
(photos). This may reduce the life of the water pump.
15. Turn on the water supply to the water basin.
a. Allow the auto fill to finish filling the water basin.
b. Check the refill system for leaks and repair as needed.
c. Ensure the refill system turns off the water about 1 to 1.5” below the top of
the basin, to the bottom of the overflow fitting.
16. Turn on the optional fire feature if applicable.
17. Finish your project as desired keeping in mind accessibility for maintenance and
winterization.
11
auto refill
closed
14
open
14

7/20/2015 980
10
5) Media
WARNING: FIRE OPTION - For optional fire feature follow the fire pit instructions contained in this document
(section 13).
WARNING: Media for the water feature is NOT suitable to use as media for the optional fire feature. Use only
approved media intended for use with fire appliances. Failure to follow may result in your media exploding.
WARNING: For water basin do not exceed a total weight of 250 lbs. maximum of media in your water basin evenly
distributed.
WARRANTY REQUIREMENT: It is recommended to rinse your media thoroughly before putting it in your water
basin. Your basin is equipped with a course filter for large debris only. Thoroughly cleaning your media will help
keep your water clean and reduce silt build up in your system.
WARRANTY REQUIREMENT: Do not use media in the water feature less than 1 inch in size. Less than this may
damage the water pump.
Your water basin is designed to have media installed on top of the basin liner. One layer of rock or stone is
recommended and to not be less than 1” in diameter.
When placing media into your water feature the filter screen and liner must be installed to avoid damage to the low
level sensor float and to keep media from entering the pump intake opening.
6) Parts
a. Water Basin
b. Optional Water Bowl
c. Optional Fire Feature
d. Instructions
7) Operation
WARNING: FIRE OPTION - If your feature includes a fire feature follow all procedures included with your fire pit
contained in this document (section 13).
WARNING: For fire on water (FOW) features - Ensure the upper most bowl is full of water and that
water is on and functioning normally before fire is turned on.
WARNING: When not in use turn off power supply, water supply and fuel supply when applicable to the unit.
WARNING: Water temperature may be elevated in some configurations.
WARNING: Leaves, sticks, wood, paper, clothing, food etc. should always be kept away from the water feature.
Apply Start-Up / Shut Down Label near the controls for your feature.
EVOLUTION 360 START UP
1. STOP! Read the safety information on “What to Do If Smell Gas” (Pg. 1 section 13 of Fire Pit
Instructions When Applicable).
2. Ensure product is clear of people, debris, that all covers are removed, and the feature is safe to start.
3. Turn “ON” main electrical power, water and optional gas to the water basin.
4. Ensure system is full of water.
5. Turn on water, lights or fire as desired.
6. Never alter the design of the fire pit.
7. Ensure fire pit, children and patrons are supervised by a responsible adult that is familiar with
emergency shut-down.
8. Flammable materials should not be placed on or near the fire pit.
Note: Some configurations may require water to be on before the optional fire feature will light.
EVOLUTION 360 SHUT DOWN
1. Turn off Water, Lights or applicable Fire Feature.
IMPORTANT: FOR REMOTE CONTROL USE: YOU MUST ALSO TURN OFF POWER TO ELECTRICAL OUTLET OR GAS TO FIRE PIT TO
PREVENT ACCIDENTAL START.
2. After cooling cover fire pit.

7/20/2015 980
11
Service We suggest that our fire
products be serviced by a
professional certified in the
US by the National Fireplace
Institute (NFI) as NFI Gas
Specialists.
8) Maintenance & Winterization
WARNING: Turn off Power, Gas, and Water for all maintenance activities.
WARRANTY REQUIREMENT: Do not use unapproved chemical additives to the
water. Chemicals such as chlorine will reduce the pump life and void the warranty.
WARRANTY REQUIREMENT: The water feature must be winterized in areas that
drop below freezing.
Water Conditioning:
1) The only chemical HPC has testing or recommends is Spa Foundations from Natural Chemistry. Apply 2 level
teaspoons every 6 weeks to help maintain water clarity. Your application may vary. Too much may cause foaming.
Maintenance:
1) For optional fire feature refer to fire pit instructions.
2) The water basin must me winterized in areas that drop below freezing temperature.
3) Keep any debris out of water basin, water feature or optional fire pit- clean as needed.
4) Clean filter as needed. Remove filter, rinse out with water and replace.
a. 1 x week filter cleaning is recommended. Your application may vary.
Winterization/Drain and Cleaning:
1) Turn off Water, Electric and Gas for units with optional fire feature.
2) Open the drain and allow all water to drain into your local drain.
3) Separate the union on the inlet/outlet side of the pump for drainage.
a. This will result in several gallons of water on the ground.
4) Remove the liner and filter and towel dry the tank and gussets.
5) Ensure all water is removed from basin, bowl, pump, & water lines.
6) Cover Unit.
9) Troubleshooting
Below are some potential causes and countermeasures to the symptoms indicated in bold. If still unable to resolve issue,
please contact your retailer or certified technician.
WARNING: If your unit is equipped with an optional fire feature refer to HPC fire pit instructions included in section 13.
Water will not turn on
1. Not Enough Water. Your unit has a low level sensor and will not run
with low water level.
2. Breaker Tripped Reset breaker on electrical control box.
3. No power. Ensure there is power to the unit.
4. Defective Pump. Replace Pump.
Lights will not turn on
1. No Power. Ensure there is power to the unit.
2. Breaker Tripped Reset Breaker on electrical control box.
3. LED Driver defective Replace LED Driver.
4. Defective Light Strip Replace Light Strip
Weak Water Flow
1. Dirty Filter Clean Filter with water
2. Ball Valve Closed Open ball valve on outlet side of pump.
3. Defective Pump Replace Pump
inlet union
outlet union

7/20/2015 980
12
Water Level Low or High
1. Clogged Over Flow Clean Over Flow.
2. Autofill float defective Verify float valve is working properly replace as needed.
10) Replacement Parts
Please call HPC customer services for replacement parts.
FIRE OPTION –See common replacement parts list contained in this document (section 13).
11) Warranty
Limited Warranty
Hearth Products Controls Company (HPC) warranties its water products against manufacturing defects
that prevent safe and correct function for:
Polyethylene Basin/Liner- 3 years, 3 years comm.
Water Pump- 2yrs, 1yr comm.
Electronics/LED’s- 2yrs, 1yr comm.
Float / Sensors- 2yrs, 1yr comm.
Hose / Fittings- 2yrs, 2yr comm.
This commences from the date of original sale / shipment from HPC FOB Kettering, Ohio.
This warranty is for parts and in-house (HPC) labor. The defective product must be sent back to HPC
with a Return Merchandise Authorization (RMA) issued by HPC for that specific product
and any other additional information for the nature of the defect or warranty claim.
The warranty does not cover items that have been damaged by overheating, modification, abuse, or
improper storage. Labor involving installation or maintenance with the unit is not covered.
This warranty excludes claims for consequential, indirect-collateral expenses arising from product defects
or warranty recovery.
Small leaks in connections, fittings or water effects are not covered under warranty.
Minor flaws, variations and normal aging in hand crafted bowls are not covered under warranty.

7/20/2015 980
13
12) Clearances
Figure 1

7/20/2015 980
14
Figure 2

7/20/2015 980
15
13) Electronic Fire Pit Option
Electronic Ignition Fire Pit Insert
Installation & Operation Instructions
WARNING: FOR OUTDOOR USE ONLY
WARNING
•Improper installation, adjustment, alteration, service, or maintenance can cause injury or property
damage. Read the installation, operating, and maintenance instructions thoroughly before installing or
servicing this equipment.
WARNING
•Do not store or use gasoline or other flammable vapors and liquids in vicinity of this or any other
appliance.
•An LP-cylinder not connected for use shall not be stored in the vicinity of this or any other appliance.
DANGER
If you smell gas:
1) Shut off gas to appliance.
2) Extinguish any open flame.
3) If odor continues, keep away from appliance and immediately call gas supplier or fire department.
Select Models
Certified to
ANSI Z21.97-2014
CSA 2.41-2014
Installation
We suggest that our products be
installed by professionals that are
locally licensed by the authority
having jurisdiction in gas piping.
Service We suggest that our products
be serviced by a professional
certified in the US by the
National Fireplace Institute
(NFI) as NFI Gas Specialists.
INSTALLER: Leave this
manual with the appliance.
CONSUMER: Retain this
manual for future reference.

7/20/2015 980
16
Index:
14) General Information
15) Selecting the Location
16) Construction of Enclosure
17) Installation of Fire Pit
18) Media
Product Specific Information
19) Parts List
20) Fire Pit Operation
21) Maintenance
22) Troubleshooting
23) Replacement Parts
24) Warranty
14) General Information
Instructions are also available at HPCfire.com
Please carefully follow the instructions in this manual to prevent personal injury or property loss. Instructions are updated
as needed. It is the installer’s responsibility to periodically review instructions for applicable updates.
The steps listed as:
WARNINGS: Contains information critical to the safe installation and operation of the fire pit.
WARRANTY REQUIREMENT: Must be strictly followed to qualify for product warranty.
Warranty will be void if not followed.
IMPORTANT: Are notes and insights to help ensure product satisfaction and serviceability.
-------------------------------------------------------------------------------------------------------------------------------------------------
WARNING: It is the installer’s responsibility to ensure a safe installation and to educate the end user as to proper
operation. Leave this manual with the end user.
WARNING: Never alter product or configuration in any way.
WARNING: FOR REMOTE CONTROL / TIMER USE: Including but not limited to wall switches, hand held devices
such as (cellphones, key fobs, remote controllers, ect), business and whole house automated control systems. It is the
responsibility of the user to comply with the following guidelines:
1) Visual inspection
a. Visually ensure all covers are removed,
b. Visually ensure that the product is clear of people and any foreign debris prior to start-up
c. Visually ensure that the product is safe to start
2) When not in use
a. Ensure power is off to the product to avoid accidental start-up
WARNING: Not for use with any kind of automatic start-up timer.
WARNING: We suggest that our products be installed by professionals that are locally licensed by the authority having
jurisdiction in gas piping. We suggest that our products be serviced annually by a professional certified in the US by the
National Fireplace Institute (NFI) as NFI Gas Specialists or in Canada by WETT (Wood Energy Technical Training).
Installer must follow all instructions carefully to ensure proper performance and safety. Hearth Products Controls
Company is not responsible for your actions.
WARNING:Product is not intended to be a starter for wood or any other combustibles and not intended for cooking use.
WARNING: It is the responsibility of the installer to follow:
oThe National Fuel Gas Code, ANSI Z223.1/NFPA 54 or International Fuel Gas Code.
oThe National Electrical Code, ANSI/NFPA 70.
oLocal Codes
WARNING: Only use gas/fuel type specified for this fire pit see label on the fire pit control Box. Verify correct gas/fuel
type and pressure. Never use an alternative fuel to include bio-fuel, ethanol, lighter fluid or any other fuel.

7/20/2015 980
17
Gas pressure and type should be checked prior to use and installation.
● Natural Gas Fire Pit:
Supply Pressure: Minimum: 3.5” W.C.; Maximum: 7.0” W.C.
Outlet Pressure: 3.5” W.C.
● LP Gas:
Supply Pressure: Minimum: 8.0” W.C.; Maximum: 11.0” W.C.
Outlet Pressure: 10.0” W.C
15) Selecting the Location
WARNING: All fire pits, match lit kits, spark ignition, safety pilot and electronic ignition systems are designed and intended for
outdoor use only.
WARNING: For electronic ignition models there must be an electrical shut off ( wall switch or breaker ) on the exterior of the fire pit
or on adjacent wall to allow for emergency shutdown and maintenance.
WARNING:All fire pits must have a gas shutoff on the outside of the exterior of the fire pit to allow for emergency shut off and
maintenance. The gas shutoff should not be used to adjust flame height.
WARNING: Select a location where the fire pit can be attended during operation. Never leave an operating fire pit unattended or by
someone not familiar with its operation or emergency shut off locations.
WARNING: Both children and adults should be alerted to the hazards of high surface temperatures and should stay away to avoid
burns and clothing ignition.
WARNING: Young children should be carefully supervised when they are in the area of fire pit.
WARNING: Clothing or other flammable materials should not be placed on or near fire pit.
WARNING: Fire pits create very high temperatures - Combustibles must be located far enough away that there is no risk of ignition.
IMPORTANT:It is recommended that material such as granite, marble or other dense stone be kept away from heat and especially
flame due to risk of cracking. Manufacturer is not responsible for damage.
For Outdoor Use Only
Water Feature Only
With Optional Fire Feature
Control box must be above grade with adequate drainage
Refer to Section 12, Figure 2
Valve box must be above grade with adequate drainage
Refer to Section 12, Figure 1 and Section 15
16) Construction of the Enclosure
WARNING: For electronic ignition models there must be an electrical shut off ( wall switch or breaker ) on the exterior of the fire pit
or on adjacent wall to allow for emergency shutdown and maintenance.
WARNING:All fire pits must have a gas shutoff on the outside of the exterior of the fire pit to allow for emergency shut off and
maintenance. The gas shutoff should not be used to adjust flame height.
WARNING: Use non-combustible materials and construction for gas supply, power and enclosure. A metal outlet box should be used
inside the enclosure for electronic ignition models.
WARNING: The enclosure must incorporate 1 vent on at least two opposing sides (2 vents total) at a minimum size of 18 sq. inches of
total free area each (Example: 3”x 6” or larger). Installation of the vents in the mid to lower area of the enclosure is recommended.
Ventilation allows for heat and or residual fuel to escape. Failure to properly vent enclosure may result in the fire-pit overheating or
explosion. Overheating could lead to heat damage to internal components. Some enclosures may require more ventilation based on
material, size, and extended use. The vent may work as a drain as well when installed at bottom sidewall to prevent water build up.
WARNING: The interior void space of the enclosure surrounding the valve box cannot be filled with any material (gravel, crushed
rock, concrete, etc.)- It is a requirement to have a minimum of 2” under the valve box for proper ventilation and drainage.
WARNING: If the enclosure is to be used as a seating area/surface, it MUST be sufficiently large enough to prevent personal injury
from your fire feature in windy conditions. Wind is very unpredictable and can move the flame a significant amount horizontally.
WARRANTY REQUIREMENT: Do not daisy chain wiring for multiple Fire Pit installations. Each Fire Pit must have dedicated
wiring.
WARRANTY REQUIREMENT: The enclosure must be constructed on a stable surface. The weight of the fire pit must be supported
by the pan and not by any control/valve box. For electronic ignition models the control/valve box must be above grade with adequate
drainage to prevent water damage to the controls inside the box. *Make sure that the structure is level.

7/20/2015 980
18
17) Installation of a Fire Pit
WARNING:We suggest that our products be installed by professionals that are locally licensed by the authority having jurisdiction in
gas piping.
WARNING: Confirm this appliance is built for gas used –natural gas or LP. Do not use natural gas appliance with LP or LP
appliance with natural gas. Refer to the label on the appliance.
WARNING: To prevent damage, unhook fire pit from gas supply for pressure leak tests.
WARNING: Fuel line sizing is the responsibility of the installer and must be able to supply the stated maximum BTU for the product.
WARNING: Burn Testing- It is the responsibility of the qualified installer to test for gas leaks at all connections.
WARNING: When filling the pan with lava rock and/or decorative glass, the instructions in Section 5 must be followed.
WARNING: Gas Plumbing Connections: Use only joint compound or tape that is resistant to all gases. Apply joint compound to all
male pipe fittings only- DO NOT use on FLARED fittings. Be sure to tighten every joint securely.
WARRANTY REQUIREMENT: For Electronic Ignition Models the Warranty is void if valve box is opened.
Refer to cut sheets on our Web-Site for important dimensional information for your optional fire pit.
Plan your project well in advance to comply with all instruction and codes and allow for access and serviceability
of the product.
Purge gas lines of air.
Perform all leak tests with leak detector or leak reactant.
Verify correct gas type and pressure.
Perform leak test on main gas supply. Repair leaks as necessary.
Shut Off Gas Supply and Power to fire-pit.
Connect fire-pit to main gas supply. If using flex line avoid sharp bends with flex line to prevent whistling.
Turn on gas supply and perform leak test on all inlet connections. Repair as needed.
For electronic ignition models hook up proper 110VAC electrical power following all local codes.
Position fire pit safely with access to all gas connections for testing.
Light fire pit. It may take several cycles to purge air from the lines.
For electronic ignition models apply proper 110VAC.
Once fire pit is lit perform leak test on all gas connections. Repair as needed.
Turn off fire pit and allow it to cool.
Apply media as described in (Section 5).
Turn on fire pit again and perform leak test with media correctly installed. If gas leak is
detected verify correct media application and repair as needed.
Verify correct operation and lighting.
Review safety manual with end user and instruct not to change/ modify fire pit or media.
Leave manual with end user.
IMPORTANT: On electronic ignition models please apply the Start Up and Shutdown decal next to control switch in an obvious
position.
18) Media
WARNING: FOR GLASS MEDIA USAGE WITH LP GAS- WHEN USING APPROVED DECORATIVE GLASS TO COVER
BURNER APPLY ONLY ENOUGH TO HIDE BURNER. APPLYING OVER 1/2” MAY CREATE BACK PRESSURE AND GAS
LEAKAGE FROM AIR MIXER RESULTING IN LP POOLING UNDER FIRE PIT.
WARNING: FOR GLASS MEDIA USAGE WITH LP GAS- THE UNIT MUST BE TESTED WITH MEDIA OVER BURNER FOR
CONFIRMATION OF NO BACK PRESSURE CREATING GAS TO LEAK OUT OF AIR MIXER VENTURI HOLES. THIS MAY
HAVE TO BE DONE PRIOR TO PLACING IN ENCLOSURE IF NO ACCESS DOOR.
WARNING: The fire pit is designed to use approved media correctly installed over the burner to achieve proper combustion.
WARRANTY REQUIREMENT: Never install a mesh or screen under the media.
IMPORTANT: Media affects flame pattern greatly. It is possible to create an unusual flame pattern that could damage your
enclosure. Enclosure damage from an open flame fire feature is not covered under any warranty.
IMPORTANT:The use of concrete logs is not recommended.
Installation
We suggest that our products be installed by professionals that are
locally licensed by the authority having jurisdiction in gas piping.

7/20/2015 980
19
Lava Rock & Glass Application
Please follow the instructions below to add the finishing touch to your fire pit. Particular attention needs to be on the pilot
assembly area. Incorrect media installation will cause the pilot flame to suffocate and turn off pit or delay main burner
ignition.
Lava Rock Only Application
1) Install your fire pit per instructions.
2) Apply lava rock ONLY deep enough to cover ring and pan-
less than 2” above fire ring.
For Electronic Ignition
3) Blow Out Box: Do not cover vents with lava rock- leave
open. Do not allow any rock to block flame opening.
4)
Blowout Box: Do not cover blowout box vents or
opening with lava rock or glass. Incorrect media
installation will cause the pilot flame to suffocate and
turn off pit or delay main burner ignition.
Decorative Glass Application
1) Install your fire pit per instructions.
2) Fill Pan with glass. Cover Burner with 1/8 to ¼” of
glass. Do not over fill with glass. All LP installations
must be checked for back pressure with media installed.
Failure to do so may result in personal injury or
property damage.
For Electronic Ignition
3) Blowout Box: Do not cover blowout box vents or
opening with lava rock or glass. Incorrect media
installation will cause the pilot flame to suffocate
and turn off pit or delay main burner ignition.
DO NOT COVER VENTS! DO NOT COVER PILOT
OPENING!

7/20/2015 980
20
19) Parts Lists
1) Electronic Ignition Fire Pit 3) Cover
2) Lava Rock 4) Instructions
20) Fire Pit Operation
WARNING: Before use, be sure to test all gas connections for leaks. Do not use fire pit if there is any evidence of leaking gas. If
leaking gas suspected, turn off the main gas supply and repair immediately.
WARNING: Do not use the enclosure as a seating area. Wind and gusty conditions will affect the flame in an unpredictable manner.
If conditions exist that are not safe for patrons turn the fire pit off.
WARNING: Do not use fire pit if any part has been submerged under water. Immediately call a qualified service technician to inspect
the fire pit.
WARNING: For electronic ignition models power to fire pit must be turned off via wall switch or breaker when not in operation.
WARNING: Never use any material that is non-porous and holds moisture such as gravel, pebbles, river rock, etc. This material,
when heated will cause the trapped moisture to boil and fracture unexpectedly. This material is not sufficiently porous to allow heated
steam to readily escape which can break and cause personal injury or damage.
WARNING: Solid fuels shall not be burned in the fire pit. Leaves, sticks, wood, paper, clothing, food material, should be kept away
from the fire pit. Fire Pit is not for cooking. Make sure that there is no vegetation or other objects over the top or sides of the fire pit
that could interfere with safe operation. See clearances in section 2 Selecting the Location.
WARNING: If lava rock is wet, allow fire pit to burn for 45 minutes prior to coming within 15 feet of the fire pit.
WARRANTY REQUIREMENT: When not in use the fire pit must be covered at all times.
Electronic Ignition Fire Pit Start Up:
Initial Start-up: Several “on/off” cycles may be necessary to purge air in gas lines after system installation. Fire pit will
lockout after 15 attempts to light pilot: Please power OFF then ON to restart.
Sequence of Operation:
1. The hot wire igniter will be powered (glow red) for 5 seconds before pilot valve opens.
2. The hot wire igniter will only be powered the initial 15 seconds of the 60 second pilot cycle. This sequence will repeat up to
15 times (~15 minutes) before going into lockout. To reset, turn “OFF” power then back “ON” again.
3. Pilot flame will ignite and warm thermocouple- it may take 30 seconds at times for thermocouple to get hot. If
thermocouple is not hot in 60 seconds, system will shut down then go back to Step 1.
4. Once thermocouple is hot, main valve will open allowing main burner to ignite.
5. If pilot flame is blown out at any time, system will shut down, then automatically restart (Step 1).
IMPORTANT: If power to the fire pit is turned “Off” then immediately turned back “On” the system will go into lockout mode. To
reset, turn off, wait 5 minutes, then turn on.
WARNING: - OVERHEATING: The fire pit will automatically close gas valve if temperature exceeds 175º F inside valve box to
prevent component damage. When unit cools below 175º F, the unit will automatically restart. To correct overheating, ensure enclosure
has adequate ventilation- see “Construction of Enclosure”.
Table of contents
Other HPC Outdoor Fireplace manuals
Popular Outdoor Fireplace manuals by other brands

AZ Patio Heaters
AZ Patio Heaters F-1108-FPT owner's guide

Sunnydaze Decor
Sunnydaze Decor NB-CF24 Owner's manual and instructions

Fiap
Fiap premiumdesign FireTower manual

Heininger
Heininger FMPPC2 owner's manual

Regency
Regency PTO28CIT - NG Owners & installation manual

Firegear
Firegear FPB-29DBS22MT-N Installation and operating instructions