Dolmar GB GASOLINE ENGINE PUMP MP-352.4 User manual

GB Gasoline Engine Pump Instruction manual
F Motopompe Manuel d’instructions
E Moto bomba Manual de instrucciones
MP-352.4

2
! WARNING
PLEASE READ AND UNDERSTAND
THIS MANUAL COMPLETELY BEFORE OPERATING THE MACHINE.
Particularly important information is distinguished in this manual by the following notations.
! ATTENTION
IL EST CONSEILLÉ DE LIRE CE MANUEL ATTENTIVEMENT ET INTÉGRALEMENT AVANT D’UTILISER LA MACHINE.
Dans ce manuel, les informations particulièrement importantes sont indiquées de la manière suivante.
! ADVERTENCIA
POR FAVOR LEA Y COMPRENDA ESTE MANUAL CON CUIDADO ANTES DE USAR LA MÁQUINA.
En este manual las informaciones muy importantes están remarcadas de la siguiente manera.
! WARNING
Failure to follow WARNING instructions could result in severe injury or death to the machine operator, a bystander, or a
person inspecting or repairing the machine.
! ATTENTION
Le non-respect des instructions ATTENTION peut entraîner des blessures sérieuses voire même mortelles pour la
personne utilisant la machine, un passant ou la personne vérifiant ou réparant la machine.
! ADVERTENCIA
La inobservancia de las instrucciones ADVERTENCIA puede ocasionar heridas graves o la muerte del operador o de la
persona de inspección o reparación de la máquina.
CAUTION:
A CAUTION indicates special precautions that must be taken to avoid damage to the machine.
PRÉCAUTION:
PRÉCAUTION indique les précautions à prendre pour éviter d’endommager la machine
PRECAUCIÓN:
PRECUCIÓN muestra la indicación de las precauciones que se deben tener para evitar daños a la máquina.
NOTE:
A NOTE provides key information to make procedures easier or clearer.
NOTA BENE:
NOTA BENE donne des informations nécessaires à une manipulation plus simple et plus claire de la machine.
NOTA:
Una NOTA provee la informatión necesaria para hacer el procedimiento fácil y claro.

3
Never use the engine indoors.
Ne jamais utiliser le moteur àl’intérieur.
No usar nunca el motor en el interior de un ambiente.
Don’t touch the engine when it is hot.
Ne pas toucher les pières chaudes du moteur.
No tocar, son las partes calientes del motor.
Before refueling, be sure to stop the engine.
S’assurer que le moteur est arrêtéavant de faire le plein.
Antes de repostar combustible, asegurarse de apagar el motor.
Check the oil level before starting.
Vérifier le niveau d’huile avant le démarrage.
Revisar el nivel de aceite antes de arrancar.
CONTENTS
TABLE DES MATIÈRES
ÍNDICE
NOMENCLATURE
TERMINOLOGIE
NOMENCLATURA ...................................................................................................................................................... 7
PRE-OPERATION CHECKS
VÉRIFICATION AVANT UTILISATION
INSPECCIONES ANTES DEL USO ............................................................................................................................. 6
OPERATION
MARCHE
FUNCIONAMIENTO .................................................................................................................................................... 9
TROUBLE AND REMEDY
PROBLÈMES ET REMÈDES POUR LA PARTIE POMPE
AVERÍA Y REPARACIÓN ...........................................................................................................................................11
TROUBLESHOOTING PROCEDURES
PROBLÈMES ET REMÈDES POUR LA PARTIE MOTEUR
PROCEDIMIENTO PARA LOCALIZACIÓN DE AVERÍAS ............................................................................................ 13
SPECIFICATIONS
SPÉCIFICATIONS
ESPECIFICACIONES ................................................................................................................................................. 15
SAFETY PRECAUTIONS
SÉCURITÉ
MEDIAS DE SEGURIPAD ........................................................................................................................................... 16
Explanation of warning signs
Signification des étiquettes
Explicación de la etiqueta de ADVERTENCIA

4
NOMENCLATURE
TERMINOLOGIE
NOMENCLATURA
Drain Cap
Bouchon d’amorçage
Tapa de inundación
Spark Plug
Bougie d’allumage
Bujía de encendido
Delivery
Refoulement
Descarga
A
ir cleaner
Filtre à air
Filtro de aire
Drain plug
Boulon de vidange
Tapón de drenaje
Suction
A
spiration
Succión

5
Standard accessories
Tool kit Engine)
Instruction manual
Strainer (1 PC)
Pipe joint ass’y (2 PCS)
Hose band (3 PCS)
Accessoires standard
Jeux d’outils (Moteur)
Manuel d’instructions
Crépine (1 pc)
Raccord pour tuyau (2 jeux)
Collier pour tuyau (3 pcs)
Accesorios normales
Juego de herramientas (Motor)
Manual de instrucciones
Colador (1 pieza)
Ensamblaje de unión de tubo (2 piezas)
Abrazadera para manguera (3 piezas)
Recoil starter handle
Poignée du lanceur
Manija del arrancador de retroceso
Muffler
Pot d’échappement
Silenciador
Choke lever
Starter
Palanca de estrangulación
Fuel tank cap
Bouchon réservoir àessence
Tapón del tanque de combustible
Fuel tank
Réservoir du carburant
Depósito de gasolina
Oil filter (with oil gauge)
Bouchon de remplissage d’huile ( avec jauge àhuile)
Orificio de lubricación (con indicador del nivel de aceite)

6
! WARNING Avoid touching the engine and muffler with any part of your body or clothing during inspection or repair, while
they are still hot.
! ATTENTION Lors de la vérification ou réparation, faire attention qu’une partie du corps ou un vêtement ne vienne
toucher le moteur ou le pot d’échappement si ces derniers sont encore chauds.
! ADVERTENCIA Evitar tocar el motor y silenciador mientras estén calientes con cualquier parte del cuerpo o ropa
durante la inspección o reparación.
Engine oil Recommended oil: 4-stroke engine oil
Huile moteur Huile recommandée : huile pour moteur à4 temps
Aceite para motor Aceite recomendado: Aceite para motor de 4-tiempos
NOTE: API service Classification SE or SF, if not available, SD.
NOTA BENE: Classification du service API SE ou SF, si non disponible SD.
NOTA: Clasificación de servicio API SE o SF, si no se encuentra a disposición, utilice SD.
Engine oil quantity: 0.1 L
Quantitéd’huile moteur: 0,1 L
Capacidad de aceite para motor: 0.1L
A NOTE FOR SAFE OPERATION
Take special care of ventilation. Beware of CO poisoning.
A NOTA POUR LA SÉCURITÉ
Veiller àune bonne aération. Attention aux gaz d’échappement.
A NOTA PARA UN FUNCIONAMIENTO SEGURO
Tenga cuidado especial con la ventilación. Cuidado de no tener intoxicación por monóxido de carbono (CO).
PRE-OPERATION CHECKS
VÉRIFICATION AVANT UTILISATION
INSPECCIONES ANTES DEL USO

7
B Keep inflammables away from the exhaust outlet. Ԙ1 m (3.94 in)
B Eloigner tout produit inflammable de la sortie d’échappement. Ԙ1m (3,94 in)
B B Mantenga los productos inflamables a distancia de la válvula del escape. Ԙ1m (3,94 in)
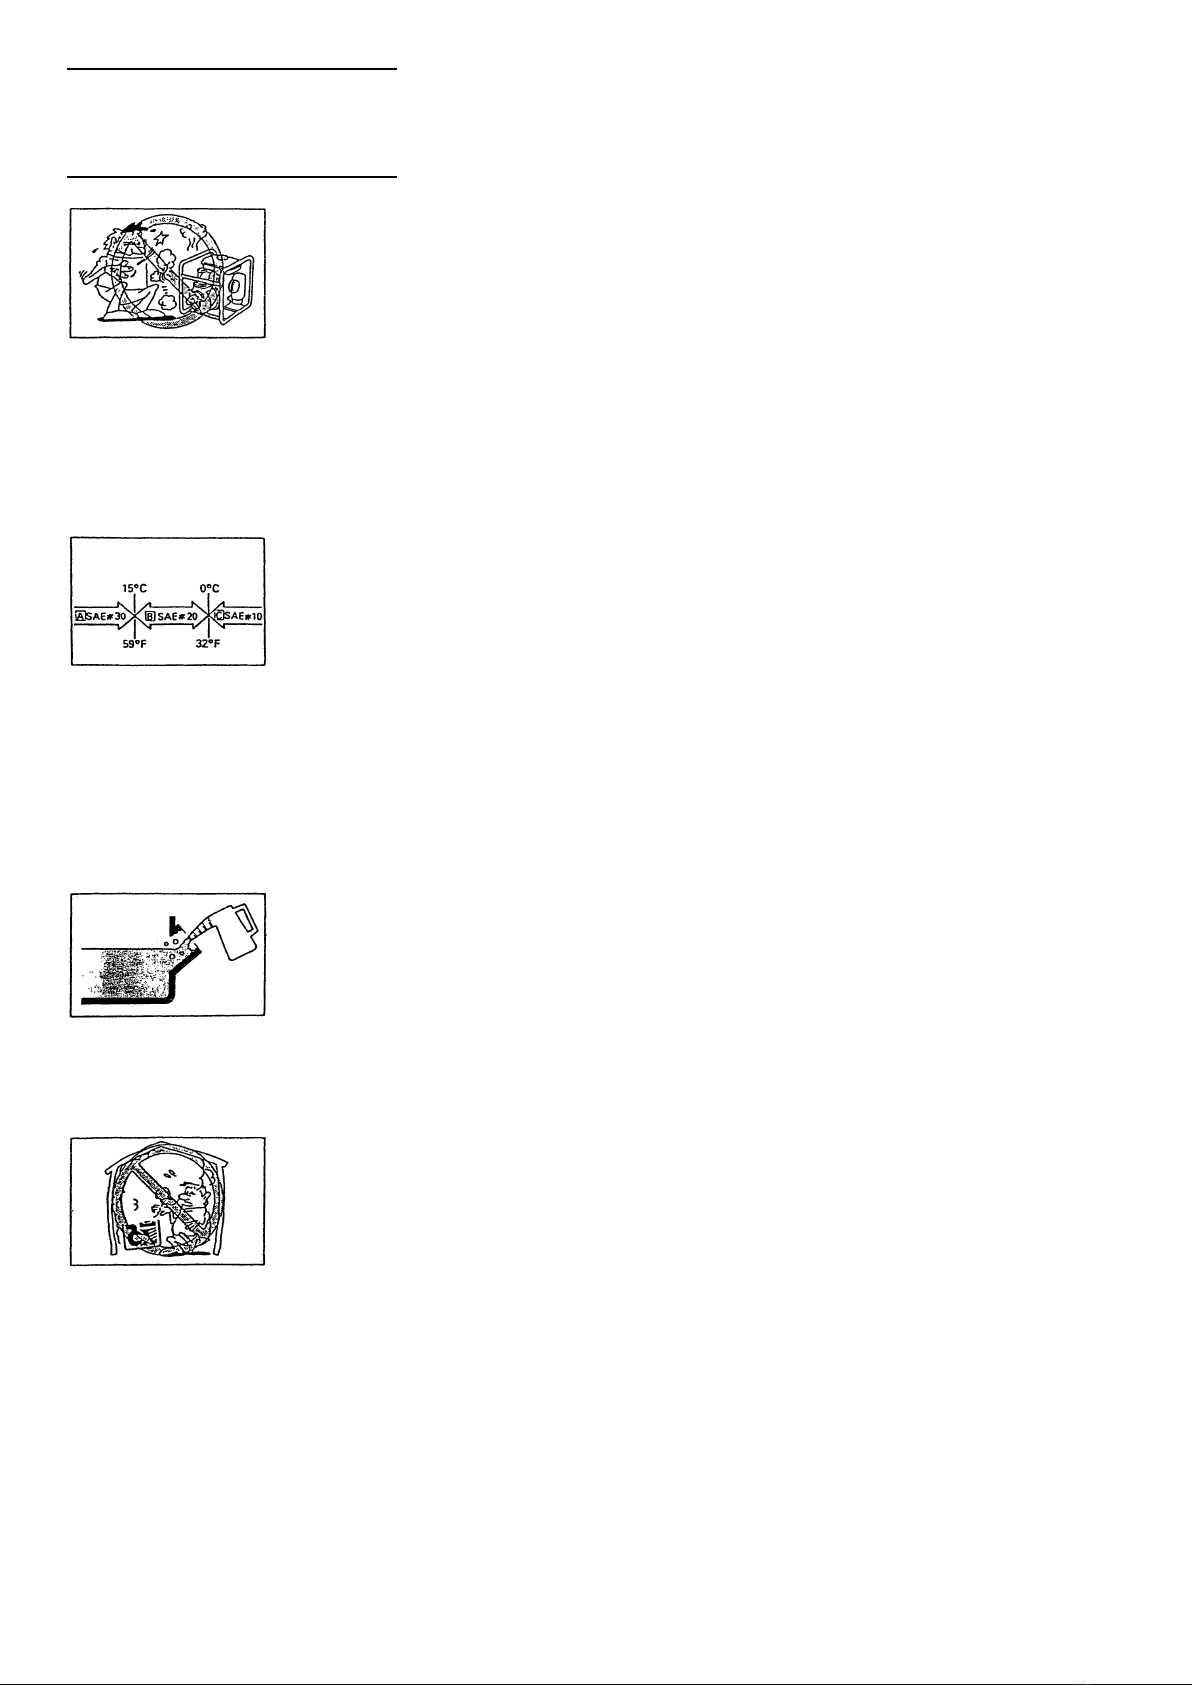
C Before refueling, be sure to stop the engine.
Never refuel while smoking or in the vicinity of an open flame.
After refueling, make sure the tank cap is tightened securely.
C Vérifier que le moteur soit bien arrêtéavant de refaire le plein d’essence.
Ne jamais faire le plein d’essence en fumant ou àproximitéd’une flamme.
Une fois le plein terminé, vérifier que le bouchon du réservoir àessence est bien resserré.
CAntes de repostar combustible, no olvidar de parar el motor.
No repostar nunca combustible cuando estéfumando o cerca de una flama.
Después de repostar combustible, asegurarse de que el tapón del tanque estébien cerrado.
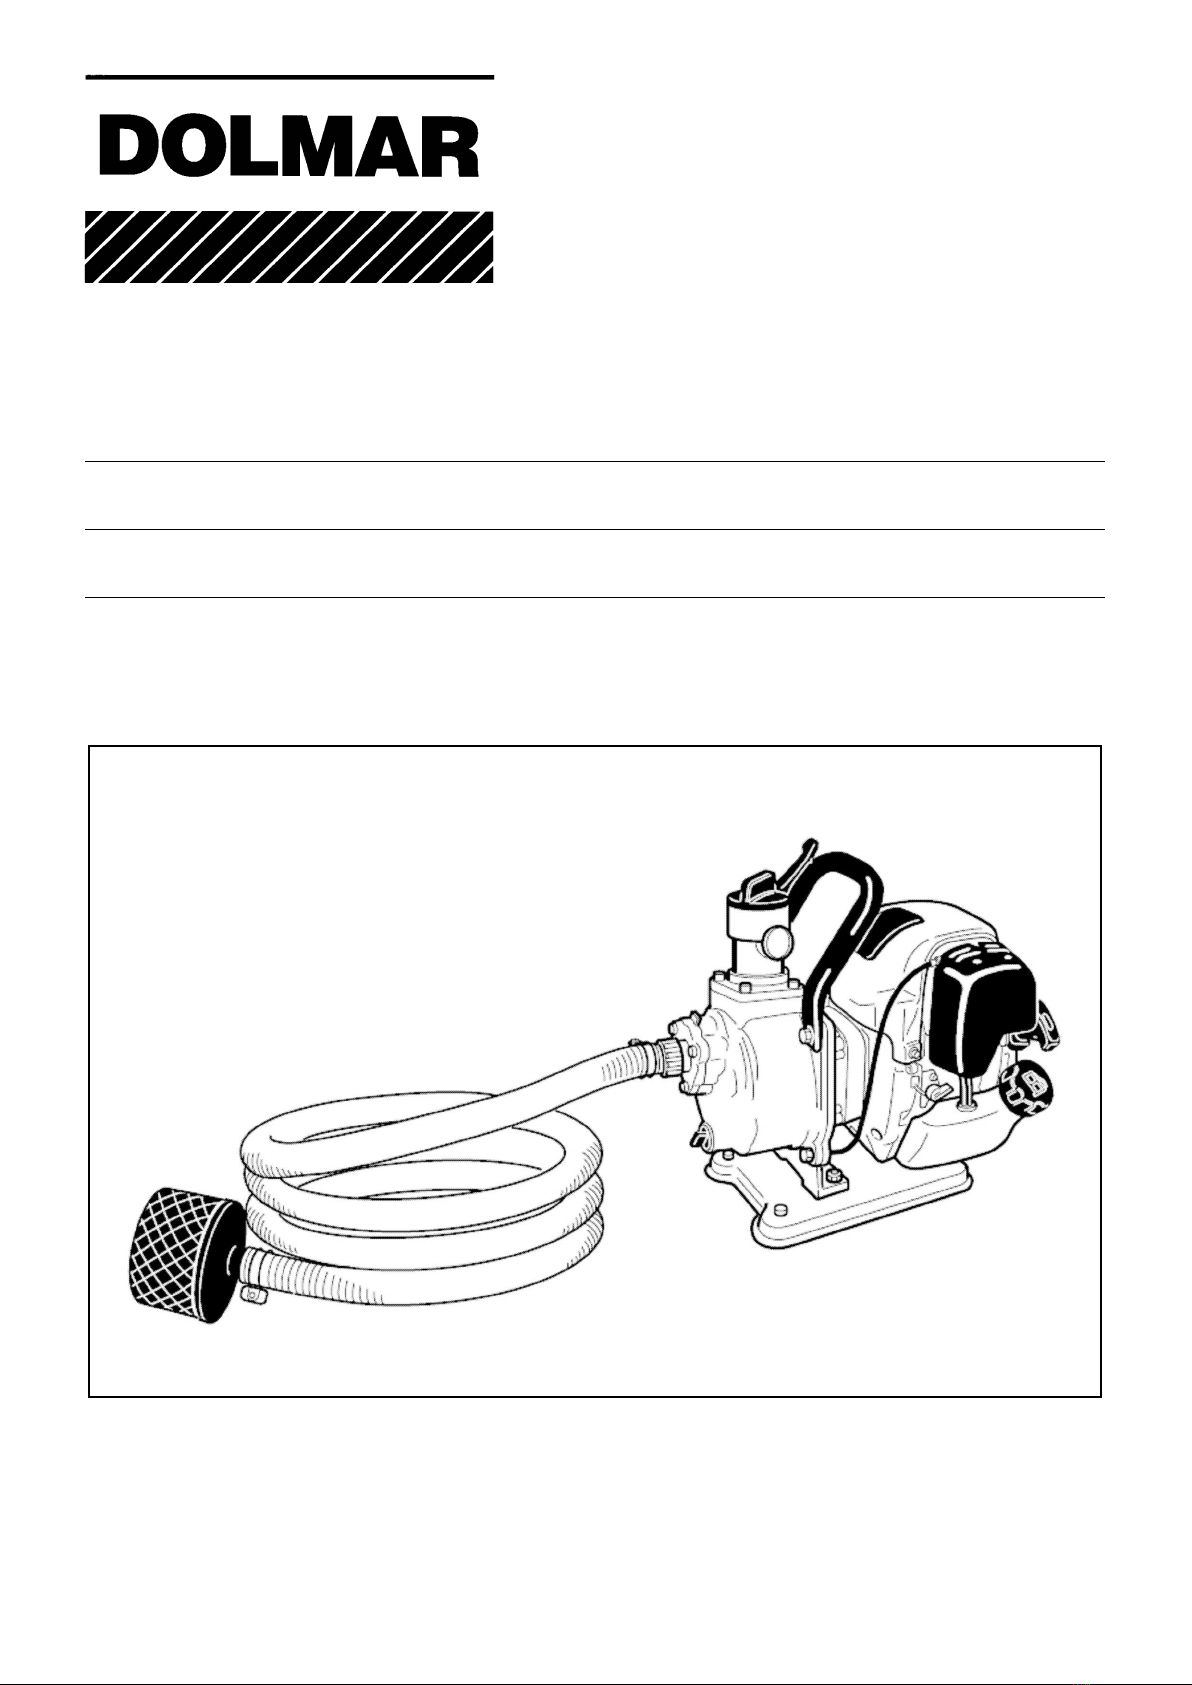
A HOSE INSTALLATION
1. Install the hose joints on the pump.
CAUTION: When installing the joint to the pump, be sure the gasket is in place.
A INSTALLATION DES FLEXIBLES
1. Monter les raccords de flexible sur la pompe
PRÉCAUTION: Lors du montage de raccord àla pompe, vérifier que le joint d’étanchéitésoit bien en place.
A INSTALACIÓN DE LA MANGA
1. Instalar la unión de manga en la bomba.
PRECAUCIÓN: Al instalar la unión en la bomba, asegurarse de que la junta estéen su lugar.
B 2. Connect the hoses on the joints with band.
3. Connect the strainer on the inlet hose end.
NOTE: Should air leak, water could not be drawn up.
B 2. Fixer les flexibles sur les raccords avec un collier.
3. Fixer, de même, la crépine àl’autre extrémitédu flexible d’aspiration.
NOTA BENE: Si les fixations ne sont pas correctes, l’air entrera dans les flexibles et l’eau ne pourra pas être aspirée.
B 2. Juntar la manguera en la unión con un fleje.
3. Juntar el tensor a la toma de la manguera.
NOTA: En caso de fuga de aire, el agua no se puede succionar.

8
CCAUTION: Do not remove strainer or pump damage may occur by foreign material.
CPRECAUTION: Ne pas retirer la crépine car la pompe risquerait d’être endommagépar les corps étrangers alors
aspirés.
CPRECAUCIÓN: No quitar el tensor, dado que materiales extraños pueden dañar la bomba.
Fuel
Recommended fuel: Regular Gasoline
Fuel tank capacity: 0.65L
! WARNING Fuel is highly flammable and poisonous. Check “NOTE FOR SAFE OPERATION”carefully before refueling.
Carburant
Carburant recommandé: essence normale
Capacitédu réservoir: 0,65L
! ATTENTION: L’essence est un produit hautement inflammable et toxique. Toujours se conformer au “NOTA POUR LA
SÉCURITÉ” avant de faire le plein du réservoir.
Combustible
Combustible recomendado: Gasolina Regular.
Capacidad del tanque de combustible 0.65L.
! ADVERTENCIA: La gasolina es una sustancia muy inflamable y tóxica. Revisar “NOTA PARA UN FUNCIONAMIENTO
SEGURO”antes de repostar el combustible.
Water
1. Remove priming plug and add water until pump casing is filled up with water
CAUTION: Should the pump be started without water in the casing, mechanical seal could be damaged.
Eau
1. Retirer le bouchon d’amorçage remplir d’eau le corps de la pompe.
PRÉCAUTION: Ne jamais faire fonctionner la pompe si elle n’est pas pleine. Le joint mécanique risquerait d’être
endommagé.
Agua
1. Quitar el tapón de cebador y añadir agua hasta que caja de la bomba estécompletamente llena.
PRECAUCIÓN: Si la bomba se pone en marcha sin agua en la caja, puede dañarse el sello mecánico.

9
NOTE:
Be sure the pump is placed on the firm place and as near to available water source as possible.
The higher the suction head is the more time will be required for priming with a less discharge.
NOTA BENE:
S’assurer que la pompe est installée sur un sol ferme et aussi près que possible d’une source d’eau.
Plus la tête d’aspiration est élevée et plus le temps d’amorçage sera long et le débit sera faible.
NOTA:
Asegurarse de que la bomba estépuesta en un lugar firme y lo más cerca posible de una fuente de agua.
Cuanto más alta estéla carga de aspiración, más tiempo necesitarápara la succión con una descarga menor.
OPERATION
CAUTION: This water pump has been shipped without engine oil. Unless you fill with oil, water pump damage will occur.
UTILISATION
PRÉCAUTION: Cette pompe àl’eau est expédiée sans huile moteur. Donc ne pas oublier de mettre de l’huile dans le
moteur, faute de quoi la pompe serait endommagée.
FUNCIONAMIENTO
PRECAUCIÓN: Esta bomba de agua se enviósin incluir aceite para motor. A menos que Ud. La llene de aceite, puede
causar daños en la bomba de agua.
Beware of water-hammering
Do not allow the wheel of a vehicle to run over the delivery hose. Do not close the delivery valve abruptly, because a
water-hammer will occur which may result in heavy damage to the pump.
Attention au coup de bélier
Ne pas laisser le véhicule stationner sur le tuyau de refoulement ou ne pas fermer brusquement la vanne de refoulement,
ce qui engendrerait un coup de bélier pouvant endommager grandement la pompe.
Tener cuidado con el ariete hidráulico
No deje que las ruedas de un vehículo pisen la manguera de descarga, o no cierre la válvula de descarga de una manera
brusca. Si no, ocurriráun ariete hidráulico que puede ocasionar daños graves a la bomba.
Do not put your hands or foreign objects in the release or valves when the pump is in use.
Ne pas laisser de corps étrangers du côtéaspiration et refoulement pendant le fonctionnement de la pompe
No meter la mano o cuerpos extraños en la salida de descarga o la toma de aspiración durante el funcionamiento.

10
CAUTION: Running over the delivery hose.
PRÉCAUTION: Écrasement du tuyau de refoulement
PRECAUCIÓN: Cuidado con pisar la manguera de descarga.
CAUTION: Abrupt closing of delivery valve.
PRÉCAUTION: Fermeture brusque de la vanne de refoulement
PRECAUCIÓN: Cuidado con cerrar la válvula de descarga en forma brusca.
Drain of water after use.
Water inside casing freezes at below 0°C (32°F) in winter and there by pump may possibly break. After use, drain water
from drain port at bottom to store.
Vidange de l’eau après utilisation
En hiver, l’eau restant dans la pompe gèle à0°C (32 °F) et peut provoquer une cassure du corps de la pompe. Il est donc
nécessaire de purger la pompe après son utilisation et avant son stockage.
Drenaje de agua después del uso
El agua dentro de la caja se congela a 0 °C (32°F) en invierno y como consecuencia de ello la bomba puede estropearse.
Después de usarla, drene el agua por el orificia de drenaje antes de almacenarla.

11
Pump does not revolve. Engine does not start. (Refer to instruction manual of engine)
Sticking of impeller (Disassemble & clean)
Pumping volume is small. Entrance of air at suction side (Check piping at suction side)
Drop of engine output (Repair)
Breakage of mechanical seal (Replace mechanical seal)
High suction lift (Lower)
Thin or long or kink of hose (Thicken or shorten or straighten)
Leak of water from water passage (Stop leak)
Clogging of foreign substance in impeller (Disassemble & clean)
Wear of impeller (Replace impeller)
Pump does not self-prime. Suction of air at suction side (Check piping at suction side)
Insufficient priming water inside pump casing (Prime fully)
Imperfect tightening of drain cock (Tighten the 2 plugs completely)
Imperfect revolution of engine (Repair engine)
Entrance of air from mechanical seal (Replace mechanical seal)
PROBLEMES ET REMÈDES POUR LA PARTIE POMPE
La pompe ne tourne pas Le moteur ne démarre pas ( Se référer au Manuel d’instructions du moteur)
Encrassage du rotor (Démonter et nettoyer)
Le volume pompe est faible Entrée d’air du côtéaspiration (Vérifier la conduite du côtéaspiration)
Baisse de puissance du moteur (Réparer)
Rupturédu joint mécanique (Remplacer ledit joint)
Côtéaspiration surélévé( Le baisser)
Tuyau fin ou long ou faux-pli ( Épaissir, raccourcir ou retendre)
Fuite d’eau dans les conduites (Arrêter la fuite)
Encrassage du rotor ( Démonter et nettoyer)
Usure du rotor ( Remplacer le rotor)
Défaut de l’auto-amorçage Entrée d’air du côtéaspiration (Vérifier la conduite du côtéaspiration)
Eau d’amorçage insuffisante dans le corps de la pompe
(Remplir correctement)
Mauvais serrage du boulon de vidange ( Bien resserrer les 2 boulons)
Mauvaise rotation du moteur (Réparer le moteur)
Entrée d’air àpartir du joint mécanique (Remplacer ledit joint)
TROUBLE AND REMEDY

12
AVERÍA Y REPARACIÓN
La bomba no gira. El motor no funciona. (Referirse al manual de instrucciones del motor)
Se pega el impulsor. (Desmontar y limpiar)
Capacidad de bombeo es Entrada del aire en el lado de succión (Comprobar la tubería de la succión)
pequeña Caída del rendimiento de motor (Reparar)
Rotura del sello mecánico (Reemplazar el sello mecánico)
Levantamiento prolongado de la altura de aspiración (Bajar)
La manguera es delgada, larga o retorcida (Engrosar, cortar o enderezar)
Fuga de agua desde el paso de agua (Eliminar la fuga)
Atasco de sustancias extrañas en el impulsor (Desmontar y limpiar)
Desgaste del impulsor (Reemplazar el impulsor)
La bomba no se autoceba. Succión de aire en el lado de succión. (Comprobar la tubería en la succión)
Insuficiente agua de cebadura dentro de la caja de bomba (Cebar por completo)
Cierre insuficiente del tapón de drenaje (Cerrar bien los dos tapones)
Revolución de motor imperfecta (Reparar el motor)
Entrada del aire desde el sello mecánico (Reemplazar el sello mecánico)

13
1. Remove spark plu
g
, and with its metal part touchin
g
the c
y
linderhead, tr
y
to
build sparks in the spark plug.
2. If nospark flies between the electrodes of the sparkplug, replace it.
Do sparks fly in
spark plug?
3. If still no spark flies, have a qualified service shop check the engine.
1. Check the compression by pulling starter handle slowly.
If compression is low, check the ti
g
htness of the spark plu
g
s and other
members, and tighten all loose members.
Is compression
sufficient?
2. If compression is still low, have a qualified service shop check the en
g
ine.
1. Set combination control lever to “CHOKE”, pull the starter handle several
times and remove spark plu
g
. If the end of the spark plu
g
is wet with fuel,
fuel suction is in order.
2. If fuel is not sucked properl
y
, check the carburetor entr
y
and fuel strainer
entry for possible blockage.
Starting failure
Is fuel sucked into
the cylinder?
3. When fuel is properl
y
sucked and still the en
g
ine can not be started, tr
y
with
new fuel.
PROBLEMES ET REMEDES POUR LA PARTIE MOTEUR
1. Retirer la bougie et vérifier si une étincelle se produit au niveau des
électrodes.
2. S’il n’y a pas d’étincelle, remplacer ladite bougie.
3. S’il y a une étincelle, faire vérifier le moteur par le service après-vente du
Étincelles àla
bougie d’allumage?
revendeur.
1. Vérifier la compression en tirant doucement la poignée du lanceur. Si la
compression est faible, vérifier le serrage de la bougie d’alluma
g
e et autres
Défaut de
démarrage
éléments connexes. Resserrer toutes les pièces qui seraient desserrées.
2. Si la compression reste faible, faire vérifier le moteur par le service après-
Compression suffi-
sante?
vente du revendeur.
1. Mettre le levier d’accélérateur sur la position starter "CHOKE", tirer plusieurs
fois la poignée du lanceur. Puis retirer la bougie d’alluma
g
e. Si son
extrémitéest mouillée, cela signifie que l’arrivée d’essence est correcte.
2. Si l’arrivée d’essence est incorrecte, vérifier l’entrée du carburateur et
l’entrée du filtre a essence oùil peut y avoir blocage.
3. Si l’arrivée d’essence est correcte mais que le moteur ne démarre tou
j
ours
Alimentation du
carburant au
cylindre?
pas, essayer un nouveau carburant.
TROUBLESHOOTING PROCEDURES

14
PROCEDIMIENTO PARA LOCALIZACIÓN DE AVERÍAS
1. Quite la bu
j
ía,
y
con su parte, metálica que toca la culata del cilindro, trate
de hacer chispas en la bujía de encendido.
2. Si no saltan chispas entre los electrodos de la bujía de encendido, reemplácela.
3. Si aún no saltan chispas, llame a la tienda de servicio especializada para
Saltan chispas en
la bujíad?
que revise el motor.
1. Comprobar la compresión
j
alando de la mani
j
a del arrancador lentamente.
Si la compresión estába
j
a, comprobar la tensión de la bu
j
ía
y
otras partes,
y ajustar todos las partes flojas.
2. Si la compresión todavía estábaja, llame a la tienda de servicio especializada
Hay suficiente
compresión?
para que revise el motor.
1. Poner la palanca del control de combinación a “ESTRANGULACI
Ó
N
(CHOQUE), tirar de la mani
j
a del arrancador varias veces
y
retirar la bu
j
ía
de encendido.
Si la punta de la bu
j
ía de encendido estámo
j
ada con combustible, la
succión de combustible estáen orden.
2. Si no estásuccionando bien el combustible, compruebe las entradas del
carburador y del colador de combustible para verificar si existe un posible
bloqueo.
3. Cuando el combustible estásiendo correctamente succionado pero el
Fallas en el
arranque
Es succionado el
combustible dentro
de cilindro?
motor no se puede poner en funcionamiento, pruebe con combustible
nuevo.

15
Model MP-352.4
Wei
g
ht 7.5㫂㪾
T
yp
e Sel
f
-
p
rimin
g
CENTRIFUGAL PUMP
Diameters
(
suction-dischar
g
e
)
11in
Total head 45m 148Ft
Maximum deliver
y
volume 130Ͱ/min
Maximum suction lift 26Ft
(
8m
)
Pump
A
xle seal Mechanical seal
T
yp
e 4-stroke, sin
g
le c
y
linder
Model EH035P
Dis
p
lacement c
y
linder 33.5cm
3
Fuel combustible
A
utomobile
g
asoline
Fuel tank ca
p
acit
y
0.65Ͱ
Engine
Startin
g
s
y
stem Recoil starter
The specifications are subject to change without notice for the purpose of product improvement.
SPECIFICATIONS
Modèle MP-352.4
Poids 7.5㫂㪾
Type Pompe centrifuge àauto-amorçage
Diamètres (aspiration-refoulement) 11in
Chute totale 45m 148Ft
Débit maximum 130Ͱ/min
Hauteur maximum d’aspiration 26Ft(8m)
POMPE
Joint d’axe Joint Mécanique
Type Monocylindre à4 temps
Modèle EH035P
Cylindrée 33.5cm
3
Carburant Essence ordinaire
Capacitèdu réservoir a essence 0.65Ͱ
MOTEUR
Système de démarrage Lanceur àretour
En vue d’amélioration du produit, ces spécifications peuvent être modifiées sans préavis.
SPECIFICATIONS
Modelo MP-352.4
Peso 7.5㫂㪾
Tipo BOMBA CENTRIFUGA autocebable
Diámetros (succión-descarga) 11in
Altura de elevación total 45m 148Ft
Volumen máximo de descarga 130Ͱ/min
Altura máxima de aspiración 26Ft(8m)
BOMBA
Sello del eje Sello mecánico
Tipo 4-tiempos, mono cilíndrico
Modelo EH035P
Desplazamiento del cilindro 33.5cm
3
Combustible Gasolina para automóvil
Capacidad del depósito de combustible 0.65Ͱ
MOTOR
Sistema de arranque Arrancador de retroceso
Con el objeto una mejora del producto, las especificaciones están sujetas a cambios sin previo aviso.
The specifications are subject to change without notice for the purpose of product improvement.
En vue d’amélioration du produit, ces spécifications peuvent être modifiées sans préavis.
Con el objeto de una mejora del producto, las especificaciones están sujetas a cambios sin previo aviso.
SPECIFICATIONS

16
SAFETY PRECAUTIONS
Please make sure you review each precaution carefully.
EXHAUST PRECAUTIONS
عNever inhale exhaust gasses.
They contain carbon monoxide, a colorless, odorless and extremely dangerous gas which can cause unconsciousness
or death.
عNever operate the engine indoors or in a poorly venblated area, such as tunnel, cave, etc.
عExercise extreme care when operating the engine near people or animals.
عKeep the exhaust pipe free of foreign objects.
REFUELING PRECAUTIONS
عBe sure to stop the engine prior to refueling.
عDo not overfill the fuel tank.
عIf fuel is spilt, wipe it away carefully and wait until the fuel has dried before starting the engine.
عAfter refueling, make sure that the fuel cap is secured to prevent spillage.
FIRE PREVENTION
عDo not operate while smoking or near an open flame.
عDo not use around dry brush, twigs, cloth rags, or other flammable materials.
عKeep the engine at least 3 feet (1 meter) away from buildings or other structures.
عKeep the engine away from flammables and other hazardous materials (trash, rags, lubricants, explosiver).
SECURITE
Veuillez suivre ces conseils pour une utilisation correcte et sure de votre moteur.
ÉCHAPPEMENT
عNe jamais respirer les gaz d’échappement. Ils contiennent du monoxyde de carbone, un gaz inodore, incolore et très
dangereux, qui peut causer de graves accidents pour l'homme.
عNe jamais utiliser le moteur dans un endroit comine ni un endroit insuffisament ventile tel que cave, tunnel etc.
عÊtre très prudent lors de l’utilisation du moteur près des enfants ou des animaux ou de quelques êtres vivants.
عEviter le pot d’échappement.
PLEIN DE CARBURANT
عArreter le moteur avant de faire le plein.
عNe pas faire déborder le carburant lors du plein.
عEssayer soigneusement toute trace de carburant sur le moteuret et attendre que tout soit evaporation avant le
demarrage
عAprès avoir fait le plein, vérifier que le bouchon du réservoir est bien en place pour éviter toute fuite.
PRÉVENTION DES INCENDIES
عNe pas appracher du moteur avec une cigarette ou toute autre flamme.
عNe pas utiliser le moteur près d’un stockage de materieres inflammables.
عUtiliser le moteur a un mètre de tout obstacle, mur meuble, porle,.....

17
MEDIDAS DE SEGURIDAD
Por favor, asegúrese de reviser detenidamente cada uno de estos apartados.
PRECAUCIONS CON LOS GASES DEL ESCAPE
عNo inhale gases del escape.
عContienen monóxido de carbono, un gas incolaro e incdora. Sumamente peligroso que puede causar pérdida del
conocimiento e incluso la muerte.
عNo haga funcionar nunca el motor en recintos cerrados o en sitios con venilbodegas, etc.
عTenga sumo cuidado cuando trabaje con el motor cerca de personas o animales.
عMantenga el tubo de escape libre de cuerpos.
PRECAUCIONES DE LLENADO
عAsegúrese de parar el motor antas del Nenado.
عNo llene a rebosar el depósito de combustible.
عSi el combustible se derrama, límpialo con cuidado y espere hasta secado completamente antes de encender el
motor.
عCuando cambie el aceite, asegúrese de que el tapón del combustible estábien cerado para prevenir cualquier derrame.
PREVENCION DE INCENDIO
عNo tenga el motor en funcionamiento mientras fuma, o cerca de una llama.
عNo opere el motor cerca de arbustos secos, palos, hilachas u otros materiales inflamables.
عMantenga el motor a una distancia mínima de un metro de edificios u otras instalaciones.
عMantenga el motor lejos de materiales inflamables y de alto riesgo (basura, hilachas, lubricantes, explosivos).

EMISSION COMPLIANCE PERIOD
For handheld engine : The Emissions
Compliance Period referred to on the Emissions
Compliance label indicates the number of operating hours for which the engine
has been shown to meet Federal emission requirements.
Category C=50 hours, B=125 hours, and A=300 hours.
AIR INDEX
An Air Index Information hang tag was supplied to this engine in accordance with the
emission regulations of the California Air Resources Board.
The bar graph on the hang tag shows the emissions performance of this engine.
The bar graph can be used to compare the emissions performance with other available
engine. The lower the Air Index, the less pollution.
The following durability description is to provide you with information relating to the
emission durability period of the engine.
Descriptive Term Applicable to Emissions Durability Period
Moderate −50hours (0-65 cc)
Intermediate −125hours (0-65cc)
Extended −300hours (0-65cc)
Notice : The Air Index Information hang tag must remain on the engine or on the
equipment until it is sold to the ultimate purchaser. Remove the hang tag
before operating the engine.
18

CALIFORNIA EMISSIONS CONTROL WARRANTY STATEMENT
YOUR WARRANTY RIGHTS AND OBLIGATIONS
The California Air Resources Board and DOLMAR GmbH North American Division. (Dolmar) are pleased to
explain the emissions control system’s warranty on your 2007 and later small off-road engine. In California, new
equipment that use small off-engines must be designed, built, and equipped to meet the State’s stringent anti-smog
standards. Dolmar must warrant the emissions control system on your small off-road engine for the period listed
below provided there has been no abuse, neglect or improper maintenance of your equipment.
Your emissions control system may include parts such as: carburetors or fuel injection system, ignition system,
catalytic converters, fuel tanks, valves, lters, clamps, connectors, and other associated components. Also,
included may be hoses, belts, connectors, sensors, and other emission-related assemblies.
Where a warrantable condition exists, Dolmar will repair your small off-road engine at no cost to you including
diagnosis, parts and labor.
MANUFACTURER’S WARRANTY COVERAGE:
This emissions control system is warranted for two years. If any emissions-related part on your equipment is
defective, the part will be repaired or replaced by Dolmar.
OWNER’S WARRANTY RESPONSIBILITIES:
• As the small off-road engine owner, you are responsible for performance of the required maintenance listed
in your owner’s manual. Dolmar recommends that you retain all receipts covering maintenance on your small
off-road engine, but Dolmar cannot deny warranty solely for the lack of receipts or your failure to ensure the
performance of all scheduled maintenance.
• As the small off-road engine owner, you should however be aware that Dolmar may deny you warranty coverage
if your small off-road engine or a part has failed due to abuse, neglect, or improper maintenance or unapproved
modications.
• You are responsible for presenting your small off-road engine to a Dolmar Service Center as soon as the
problem exists. The warranty repairs should be completed in a reasonable amount of time, not to exceed
30 days. If you have a question regarding your warranty coverage, you should contact Dolmar Warranty Service
Department at 1-888-OPE-PART for the information.
DEFECTS WARRANTY REQUIREMENTS:
(a) The warranty period begins on the date the engine or equipment is delivered to an ultimate purchaser.
(b) General Emissions Warranty Coverage. Dolmar must warrant to the ultimate purchaser and each subsequent
owner that the engine or equipment is:
(1) Designed, built, and equipped so as to conform with all applicable regulations adopted by the Air
Resources Board; and
(2) Free from defects in materials and workmanship that causes the failure of a warranted part for a period of
two years.
(c) The warranty on emissions-related parts will be interpreted as follows:
(1) Any warranted part that is not scheduled for replacement as required maintenance in the written
instructions required by subsection (d) must be warranted for the warranty period dened in Subsection
(b) (2). If any such part fails during the period of warranty coverage, it must be repaired or replaced by the
manufacturer according to Subsection (4) below. Any such part repaired or replaced under the warranty
must be warranted for the remaining warranty period.
19

(2) Any warranted part that is scheduled only for regular inspection in the written instructions required by
subsection (d) must be warranted for the warranty period dened in Subsection (b) (2). A statement
in such written instructions to the effect of “repair or replace as necessary” will not reduce the period
of warranty coverage. Any such part repaired or replaced under warranty must be warranted for the
remaining warranty period.
(3) Any warranted part that is scheduled for replacement as required maintenance in the written instructions
required by subsection (d) must be warranted for the period of time prior to the rst scheduled
replacement point for that part. If the part fails prior to the rst scheduled replacement, the part must
be repaired or replaced by the engine manufacturer according to Subsection (4) below. Any such part
repaired or replaced under warranty must be warranted for the remainder of the period prior to the rst
scheduled replacement point for the part.
(4) Repair or replacement of any warranted part under the warranty must be performed at no charge to the
owner at a warranty station.
(5) Notwithstanding the provisions of Subsection (4) above, warranty services or repairs must be provided at
all manufacturer distribution centers that are franchised to service the subject engines.
(6) The owner must not be charged for diagnostic labor that leads to the determination that a warranted part
is in fact defective, provided that such diagnostic work is performed at a warranty station.
(7) The manufacturer is liable for damages to other engine components proximately caused by a failure under
warranty of any warranted part.
(8) Throughout the emissions warranty period dened in Subsection (b) (2), the manufacturer must maintain a
supply of warranted parts sufcient to meet the expected demand for such parts.
(9) Any replacement part may be used in the performance of any warranty maintenance or repairs and
must be provided without charge to the owner. Such use will not reduce the warranty obligations of the
manufacturer.
(10) Add-on or modied parts that are not exempted by the Air Resources Board may not be used. The use
of any non-exempted add-on or modied parts will be grounds for disallowing a warranty claim. The
manufacturer will not be liable to warrant failures of warranted parts caused by the use of a non-exempted
add-on or modied part.
(11) The manufacturer issuing the warranty shall provide any documents that describe that manufacturer’s
warranty procedures or policies within ve working days of request by the Air Resources Board.
(d) Emission Warranty Parts List.
(1) Fuel Metering System
(i) Carburetor and internal parts
(ii) Fuel Filter
(iii) Fuel Tank.
(2) Air Induction System
(i) Air cleaner plate (including choke system)
(ii) Air cleaner cover
(iii) Air cleaner element
(3) Ignition System
(i) Spark Plugs.
(ii) Magneto or electronic ignition system.
(iii) Spark advance/retard system.
(4) Miscellaneous Items Used in Above Systems
(i) Hoses, Sealing gaskets, belts, connectors, and assemblies.
Dolmar will furnish with each new engine written instructions for the maintenance and use of the engine by the
owner.
20
Table of contents
Popular Water Pump manuals by other brands

Grundfos
Grundfos UPS 200 Series Installation and operating instructions

Gardens Best
Gardens Best GB 600 GP operating instructions

Briggs & Stratton
Briggs & Stratton 73021 Operator's manual

IWAKI PUMPS
IWAKI PUMPS PDA-W Series instruction manual

Levitronix
Levitronix PuraLev 600SU user manual

Emerson
Emerson YARWAY CONDENSAVER Series Installation, operation and maintenance instructions

Johnson Pump
Johnson Pump Viking Power 32 instruction manual

Becker
Becker SVw 380 Series operating instructions

Dolomite
Dolomite Mitos Programming instructions

BUSCH
BUSCH COBRA NC 1000 B instruction manual

Zehnder Rittling
Zehnder Rittling SWH100 operating instructions

Xylem
Xylem Goulds GB Series Installation, operation and maintenance instructions