Domi Jump TRAMPOLINE BASKETBALL HOOP Operator's manual

1
DOMIJUMP TRAMPOLINE
BASKETBALL HOOP
Installation Manual & Safety Instructions
Domi Jump. Inc, Shaoxing,Zhejiang, China

2
WARNING: Read these installation instructions carefully before
attempting to assemble or use this product. Keep this guide in a safe
place for future reference.
Got a problem building your basketball hoop? Call us on 0044 1276 855600 and we can help.
Contents
Warning
Tools & Parts List
Fittings List
Assembly
Page 2
Page 3
Page 4
Page 5
Read and follow all rules specified on the warning labels that came with your trampoline and
safety enclosure. If labels or signs are lost or unreadable, please contact us immediately for a
replacement.
The Capital Trampoline Basketball Set should be used only as described in this manual. The
basketball set should only be mounted to a compatible safety enclosure system. It should not
be mounted on any other device, structure or in any manner not described in this manual.
Do not attach anything to the basketball set or safety enclosure that is not a manufacturer-
approved accessory or part of the enclosure system.
Do not hang, kick or climb on any part of the basketball set or safety enclosure.
Remove all jewellery, watches and hair clips before using the basketball set. Wear clothing
free of drawstrings, hooks, loops or anything that could get caught in the basketball set or
safety enclosure.
Do not use the trampoline or basketball set while under the influence of alcohol or drugs.
Do not install the basketball set on a pole that is near or over a missing or damaged frame
pad.
When not in use, store the basketball provided with your set in a dry location.
Use the trampoline and basketball set only with mature, knowledgeable supervision.

3
Do NOT hang on the hoop. Damage resulting from hanging on the hoop is NOT covered by
warranty.
Adequate overhead clearance is essential. A minimum of 24 feet from ground level is
recommended. Provide clearance for wires, tree branches and other possible hazards.
Lateral clearance is also essential. Place the basketball set away from walls, structures,
fences and other play areas. Maintain a clear space on all sides of the trampoline and
trampoline enclosure.
Tools and Parts List
Tools: Installation of the Capital Trampoline Basketball Hoop requires a 10mm spanner, a 13mm
spanner and a pair of scissors. These are not provided.
You will also need a second person to assist. This person will hold the backboard in place whilst the
first person attaches the backboard to the trampoline enclosure pole. You will also need a step-
ladder or similar for outside the trampoline.
Pack Contents
A –Backboard x 1
B –Ring x 1
C –Net x 1
D –Flat Plate x 1
E –Connection Plate
F –Short Spring G –Long Spring

4
FITTINGS LIST
Code
Description
Qty
Where Used
1
Bolt M8 12mm
2
To fix flat plate onto backboard
M-2
M8 Washer
3
For flat plate (2) & spring through
bolt (1)
3
Bolt M5 x 75mm
1
To attach hoop to connection plate
L-3
Nut M5
1
To attach hoop to connection plate
4
Spring Through
Bolt M8 x 100mm
1
To fix springs to connection plate
L-2
M8 Nut with Nylon
Insert
1
Connection plate spring through bolt
2
Bolt M6 30mm
3
To attach hoop onto backboard
L-1
M6 Nut with Nylon
Insert
3
To attach hoop onto backboard
M-1
M6 Washer
6
To attach hoop onto backboard
L-4
M8 Nut with
Flange
6
For threaded rods and clamp
5
Short Threaded
Rod M8 x 60mm
4
To attach backboard to enclosure
pole
6
Medium Threaded
Rod M8 x 150mm
4
To attach backboard to enclosure
pole
7
Long Threaded
Rod M8 x 200mm
2
To attach backboard to enclosure
pole
8
Threaded Rod Cap
4
For ends of threaded rod
9
Clamp
3
To clamp onto the enclosure pole

5
ASSEMBLY
Attach the Flat Plate Dto Backboard A
using 2 x M8 Bolts 1 and 2 x Washers M8
M-2.
Attach the Velcro Net C onto the Ring Bas
shown.
Connect the Ring B with Connection Plate Eusing the M5 Bolt 3through the joint and locked with
M5 Nut L-3
When you insert the M5 Bolt, it can be a difficult to tighten the M5 Nut onto the bolt. It is best to use
a cross-head screwdriver and hold the nut firmly into the right-angle of the plate & hoop and use the
screwdriver to tighten the bolt into the nut.
Note: ensure the Connection Plate is fitted the right way up (with larger section facing down).

6
ASSEMBLY
Then attach the Ring B onto the front of the
backboard by using three M6 Bolts 2 and
six M6 Washers M-1.
Then fit the two Springs F and G using M8
Bolt 4 with one M8 Nuts L2 and one M8
Washers M-2.
1) If you have a top rod. Use a pair of
scissors to cut small holes in the net
webbing at points A, B, C & D as shown
(this should not affect the integrity of your
net). Hole A and B should be approximately
5cm below the top of your net (or at a
desired height).
The distance between A & B and C & D
should be 9.5cms and between A & C and
B & D 7.5cms
2) If you have a standard net & no top
rod. The basketball hoop will fit at the top of
the net and the threaded rods will push the
net downwards –there is no need to make
any holes in the netting.
Note: we recommend the Basketball Hoop
is used on an enclosure pole opposite the
entrance or well away from the entrance.

7
ASSEMBLY
The Capital Basket Ball Hoop will work with most shaped enclosure poles and net systems. Select
Instructions A, B or C below depending on the type of enclosure pole you have and whether you
have a rod round around the top of your net.
Note: You will need two people for the following final assembly, one standing inside the trampoline
holding the backboard in place and the second person on the outside of the trampoline (using a
step-ladder or similar) fixing the brackets, nuts and bolts.
A –Curved Enclosure Pole with a Top Rod
Insert and tighten two Medium Threaded M8
Rods 6 into the top Flat Plate bolts and two Long
Threaded M8 Rods 7 into the bottom Flat Plate
bolts. Then from the inside of the trampoline
push through the holes you have cut into the net.
Firstly on the bottom long rods screw down two
M8 Nuts with Flange L-4 with the nut end facing
the backboard and then attach a Bracket 9
through the two rods.
Secondly, attach another Bracket 9 onto the
other side of the enclosure pole onto the same
longs rods and using two M8 Nuts with Flange L-
4 and tighten against the back bracket ensuring
the backboard is in a vertical position
Lastly, attach the final Bracket 9 and two M8
Nuts with Flange L-4 to the Medium M8 Rods 6
and then attach the four Rod Caps 8

8
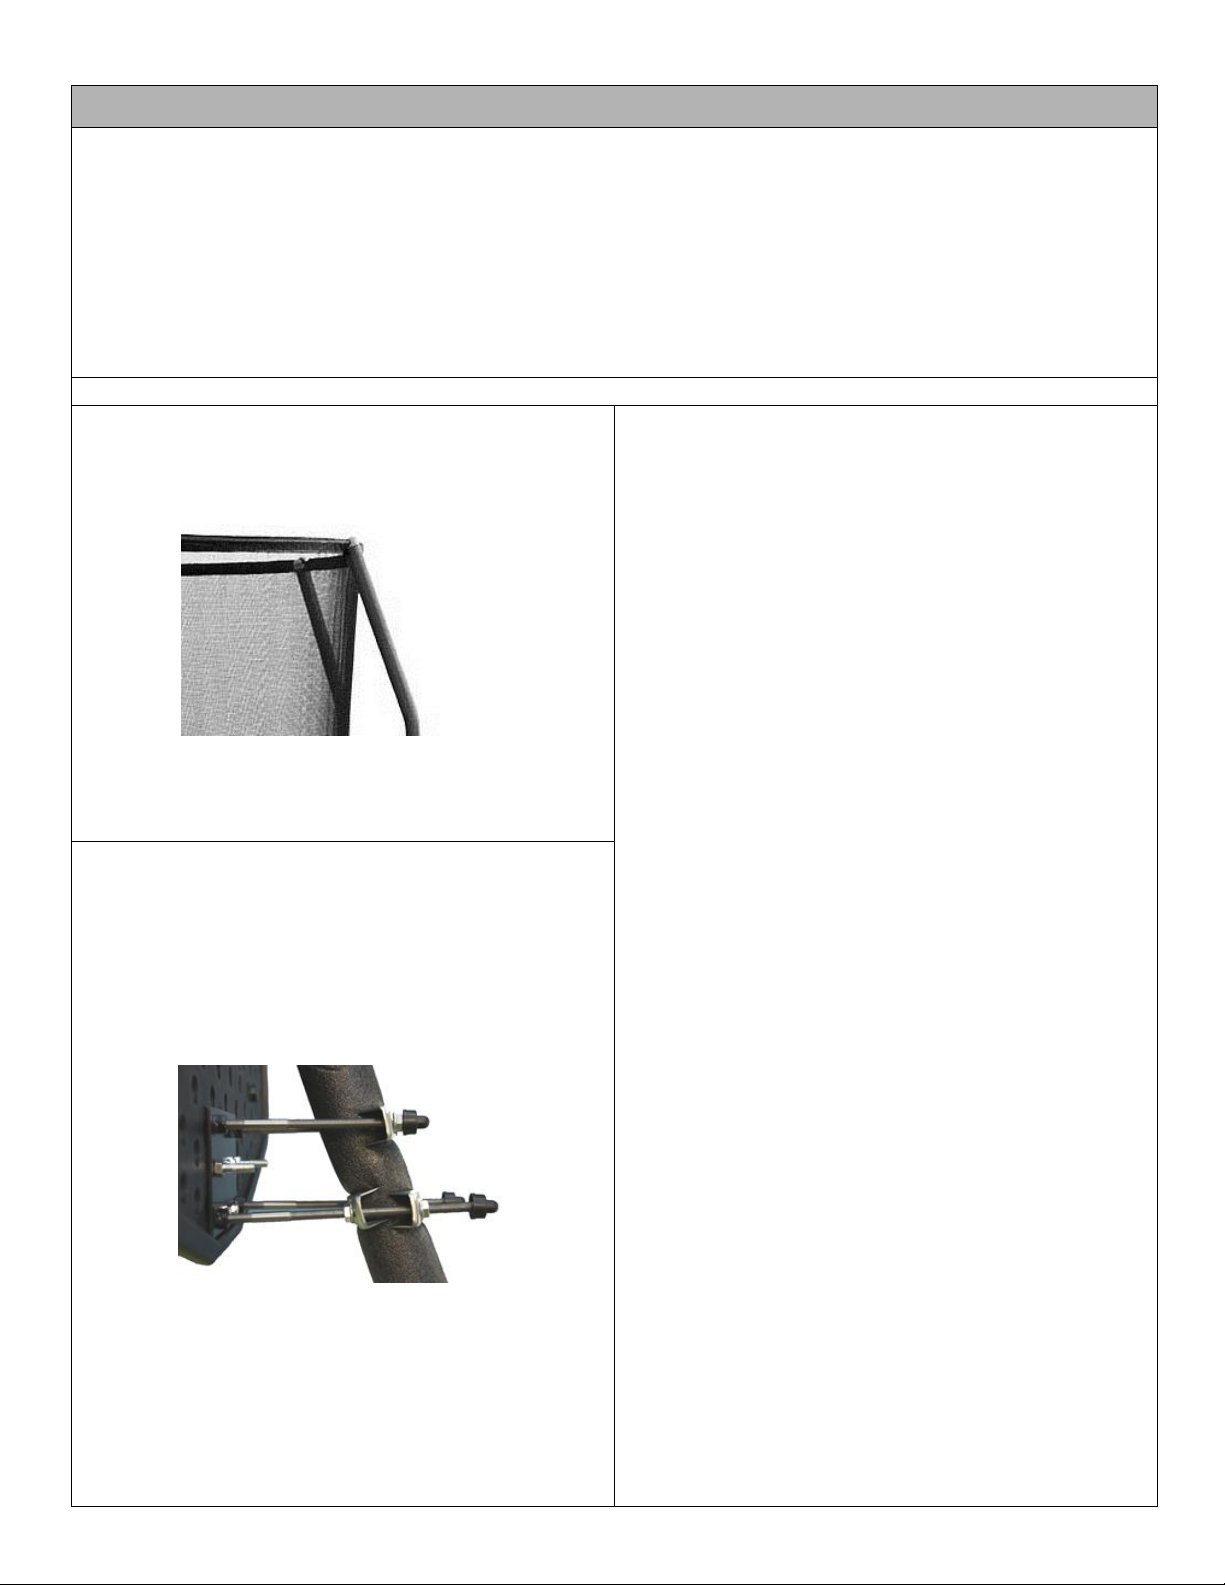
B –Straight Enclosure Pole with a Top Rod
Insert and tighten four Medium Threaded M8
Rods 6 into the top and bottom Flat Plate bolts.
Then from the inside of the trampoline push
through the holes you have cut into the net.
Firstly on the bottom rods screw down two M8
Nut with Flange L-4 with the nut end facing the
backboard and then attach a Bracket 9through
the two rods.
Secondly, attach another Bracket 9 onto the
other side of the enclosure pole onto the same
longs rods and using two M8 Nuts with FlangeL-
4 and tighten against the back bracket ensuring
the backboard is in a vertical position
Lastly, attach the final Bracket 9 and two M8
Nuts with Flange L-4 to the Medium M8 Rods 6
and then attach the four Rod Caps8
C –Straight Enclosure Pole with no Top Rod
Insert and tighten four Short Threaded M8 Rods
5 into the top and bottom Flat Plate bolts.
Then position the backboard over an enclosure
pole pushing the top of the net downwards.
Secondly, attach 2 x Brackets 9 using four M8
Nuts with Flange L-4 and tighten against the
back bracket ensuring the backboard is in a
vertical position
Lastly, attach the four Rod Caps8
You’re finished! Enjoy your Basketball Hoop.
Table of contents
Popular Accessories manuals by other brands

Nice
Nice Volo S Radio Instructions and warnings for the fitter

elsner elektronik
elsner elektronik KNX AQS TH-B-UP Installation and adjustment

MFJ
MFJ MFJ-495 instruction manual

Philips
Philips CRP329 brochure

Pepperl+Fuchs
Pepperl+Fuchs UC6000-30GM-2EP-IO-V15 quick start guide

Conrad
Conrad 62 04 20 operating instructions

American Standard
American Standard Acrylux 36" x 36" Shower Kit 3636Y1K.ST Specification sheet

FireClass
FireClass DPK4 quick start guide

AmazonBasics
AmazonBasics B00LRK8HJ8 instruction manual

Lacerta
Lacerta M-GEN quick start guide

Omron
Omron E3NT-L Operation manual

PCB Piezotronics
PCB Piezotronics ICP 101A Series Installation and operating manual