Domo Sapphire RXD3 User manual

Resource Identifier: 100123
Revision 1.0
Sapphire-RXD3 Setup Guide
Commercial in Confidence

Revision: 1.0
Sapphire-RXD3 Setup Guide
Copyright © 2022 Domo Tactical Communications (DTC) Limited. All rights reserved.
Commercial in Confidence
Page 0-1
0. Preface
0.1 About this Document
This document contains relevant information required to identify and install the equipment or system.
Basic configuration settings are provided for typical operation.
The actual presentation may differ from those in this document due to hardware or software changes.
0.2 Intended Audience
This document is for anyone interested in how the system can be used, but it is of most benefit to:
Operators who oversee the daily operation of the equipment
Installers who are responsible for the pre-installation, on-site installation and configuration of the
system in the end-user environment
Maintainers who are responsible for maintaining the equipment or system
0.3 Notice about this Publication
While every attempt is made to maintain the accuracy of the information in this product manual, it is
subject to change without notice.
Performance specifications are included for guidance. All particulars are given in good faith, actual
performance may vary.
0.4 Text Conventions
This document uses these conventions to identify text that has a special meaning:
Description Example
Text in capitals represents a key press on a keyboard.
The + sign means hold down the first key and press the second key.
ESC, F1, SHIFT
CTRL+C
<Text> Serves as a placeholder for variable text that is replaced as
appropriate, the text may be written in italics.
Use the filename
<system_name>.sys for…
Text in italics can represent a link to a place in the existing document
(often these are hyperlinks) or a reference to another document.
Refer to Section 0.4, Text
Conventions.
Text in bold emphasises a term of significance. We call this a protocol and
its function is…
Successive software menu selections are shown using arrows to
indicate sub-menus. This is often shown in bold.
Select Presets>Streamers
then edit…

Revision: 1.0
Sapphire-RXD3 Setup Guide
Copyright © 2022 Domo Tactical Communications (DTC) Limited. All rights reserved.
Commercial in Confidence
Page 0-2
0.5 Symbols
These symbols are used to highlight important information.
WARNING: A notice of when a situation may result in personal injury or loss of life, or destruction of
equipment.
CAUTION: A notice of when a situation may result in loss of data or damage to equipment or systems.
Note: A notice to draw attention to something or to supply additional information.
0.6 Copyright
This document contains information that is proprietary to Domo Tactical Communications (DTC)
Limited trading as Domo Broadcast Systems (DBS). Any copying or reproduction in any form
whatsoever is prohibited without the written permission of DTC.
© 2022 Copyright Domo Tactical Communications (DTC) Limited. All rights reserved.
0.7 Related Documents
All DTC documents can be downloaded from WatchDox. See Section 8.1.
Document Description
MASH Serial Guide Describes the serial control protocol
MASH REST API Guide Describes the REST API control over IP
MASH Schemas Guide Explains the contents of schemas from the unit.
Schemas are used to generate all the status/config/command web
pages, options, help text etc.
0.8 Document History
This is a controlled document, written and produced by the DTC Technical Publications team.
Changes are recorded in the table below.
Revision Date Author Summary of Changes
1.0 IR First release

Revision: 1.0
Sapphire-RXD3 Setup Guide
Copyright © 2022 Domo Tactical Communications (DTC) Limited. All rights reserved.
Commercial in Confidence
Page 0-3
CONTENTS
0. Preface ........................................................................................0-1
0.1 About this Document ............................................................................................................ 0-1
0.2 Intended Audience................................................................................................................ 0-1
0.3 Notice about this Publication ................................................................................................ 0-1
0.4 Text Conventions.................................................................................................................. 0-1
0.5 Symbols ................................................................................................................................ 0-2
0.6 Copyright .............................................................................................................................. 0-2
0.7 Related Documents .............................................................................................................. 0-2
0.8 Document History ................................................................................................................. 0-2
1. Product Overview ........................................................................1-1
1.1 Description............................................................................................................................ 1-1
1.2 Basic Specifications.............................................................................................................. 1-1
1.3 Approval Notices .................................................................................................................. 1-1
2. Product Package .........................................................................2-2
2.1 Overview............................................................................................................................... 2-2
2.2 Variants................................................................................................................................. 2-2
2.3 Parts List............................................................................................................................... 2-2
2.4 Licensing............................................................................................................................... 2-3
3. Connections, Controls and Indicators ..........................................3-4
3.1 Introduction ........................................................................................................................... 3-4
3.2 Front Panel ........................................................................................................................... 3-4
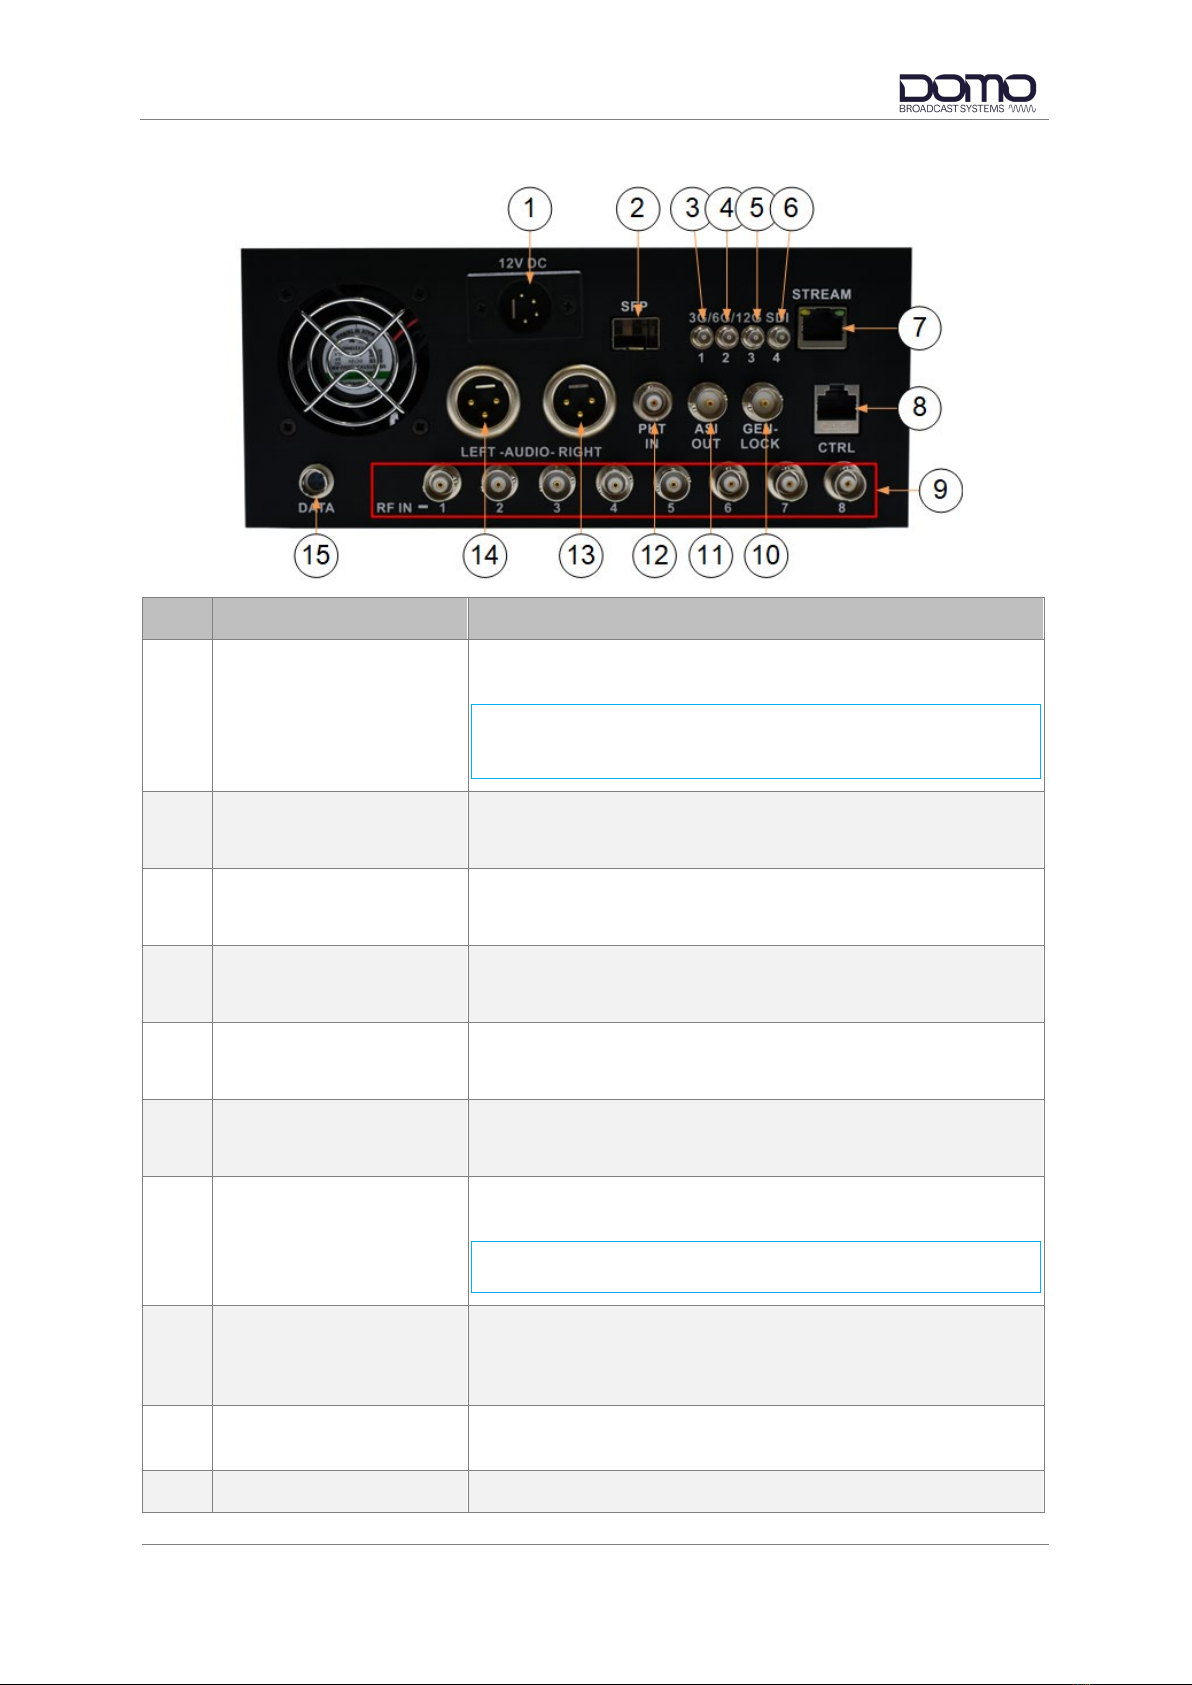
3.3 Rear Panel............................................................................................................................ 3-5
3.4 Pinout.................................................................................................................................... 3-6
4. Front Panel Touchscreen Control ................................................4-7
4.1 Power.................................................................................................................................... 4-7
4.2 Introduction ........................................................................................................................... 4-7
4.3 Touchscreen Left Zone......................................................................................................... 4-8
4.4 Touchscreen Right Zone ...................................................................................................... 4-9
5. Web Browser Control.................................................................5-10
5.1 Power.................................................................................................................................. 5-10
5.2 Introduction ......................................................................................................................... 5-10
5.3 IP Address Identification/Configuration .............................................................................. 5-11
5.4 Open Web Interface ........................................................................................................... 5-15
5.5 Web User Interface Overview............................................................................................. 5-17
6. Basic Setup Guide .....................................................................6-21
6.1 Introduction ......................................................................................................................... 6-21
6.2 Receiver Setup ................................................................................................................... 6-21
6.3 SDI Video............................................................................................................................ 6-24
6.4 IP Streaming ....................................................................................................................... 6-26
7. Appendix A – Reference Material ..............................................7-32
7.1 How to Configure a PC IP Address .................................................................................... 7-32
7.2 Subnet with CIDR Values ................................................................................................... 7-33

Revision: 1.0
Sapphire-RXD3 Setup Guide
Copyright © 2022 Domo Tactical Communications (DTC) Limited. All rights reserved.
Commercial in Confidence
Page 0-4
8. Appendix B – After Sales Support..............................................8-34
8.1 Documentation and Software ............................................................................................. 8-34
8.2 Contact Technical Support ................................................................................................. 8-34
8.3 Using the DTC RMA Service .............................................................................................. 8-34
9. Appendix C – Safety and Maintenance......................................9-36
9.1 Cautions and Warnings ...................................................................................................... 9-36
9.2 Repairs and Alterations ...................................................................................................... 9-36
9.3 Caring for your Equipment.................................................................................................. 9-37
9.4 Charging ............................................................................................................................. 9-37
9.5 Working with Lithium Batteries ........................................................................................... 9-37
9.6 Cleaning.............................................................................................................................. 9-38
9.7 Storage ............................................................................................................................... 9-38

Revision: 1.0
Sapphire-RXD3 Setup Guide
Copyright © 2022 Domo Tactical Communications (DTC) Limited. All rights reserved.
Commercial in Confidence
Page 1-1
1. Product Overview
1.1 Description
Sapphire-RXD3 is a Broadcast quality HEVC receiver decoding system, combining class-leading RF
technology with Ultra Low-Latency HEVC decoding, presented in a compact ½ 19’’ chassis.
The Sapphire-RXD3 cleverly combines an 8-way diversity COFDM receiver and DBS’ Sapphire Ultra-
Low Latency HEVC decoder in a single 2RU ½ 19’’ package, offering end-to-end latency of less than
40mS which makes it ideal for live action scenarios. Operators requiring legacy support for H.264
should choose the Sapphire-RXD3D which includes H.264 HD decoding.
8-way Maximum Ratio Combining diversity inputs ensure reception in the most difficult RF
environments whilst configurable LO frequencies and variable power ensures support for a variety of
external downconverters.
The Ultra-Low Latency H.265 decoder supports resolutions up to 4K in 10-bit 4:2:2 format and with full
support for HDR reinsertion, video interfaces are 12G capable. A monitoring port can be provided on
SFP which can be down-sampled to HD in the case of a 4K signal.
Sapphire-RXD3 will decode up to eight stereo audio pairs and output them embedded on SDI, one
pair of analogue audio outputs are also provided on XLR.
The Sapphire-RXD3 has a unified web-browser control interface for remote control.
Local control is achieved with a single touch screen interface offering immediate status on transmitter
performance and receiver status. The display can be set to operate in day or night modes, with
intuitive configuration entry.
The Sapphire-RXD3 enables onward streaming of video and audio and supports multiple streaming
formats including SRT. Timecode and HDR signalling are also fully supported. The Sapphire-RXD3
can support ST2110 interfaces for users requiring high rate video over IP solutions using the SFP
interface provided.
1.2 Basic Specifications
DC Input 12VDC nominal
Power consumption 50-80W depending on number of downconverters
Dimensions ½ 19” rack 2RU
Weight 4kg
Note: Detailed technical specifications are given in the product datasheet. Please see
https://www.domobroadcast.com.
1.3 Approval Notices
The equipment has been designed to meet and has been tested against harmonized EMC and safety
standards. The CE Declaration of Conformity as well as the technical file are available on request.

Revision: 1.0
Sapphire-RXD3 Setup Guide
Copyright © 2022 Domo Tactical Communications (DTC) Limited. All rights reserved.
Commercial in Confidence
Page 2-2
2. Product Package
2.1 Overview
Carefully open the packaging and verify that all the parts have been included, as ordered. Retain the
packing materials for storage.
Note: If you do not have all the parts or are not happy with the condition of your delivered product,
please contact DTC. See Section 8.2.
2.2 Variants
This part number will identify the product; it is also on the label.
Part Number Description
SAPPH-RXD3-2 Sapphire RX HEVC decoder 2-way diversity
SAPPH-RXD3-4 Sapphire RX HEVC decoder 4-way diversity
SAPPH-RXD3-6 Sapphire RX HEVC decoder 6-way diversity
SAPPH-RXD3-8 Sapphire RX HEVC decoder 8-way diversity
SAPPH-RXD3D-2 Sapphire RX HEVC/H.264 decoder 2-way diversity
SAPPH-RXD3D-4 Sapphire RX HEVC/H.264 decoder 4-way diversity
SAPPH-RXD3D-6 Sapphire RX HEVC/H.264 decoder 6-way diversity
SAPPH-RXD3D-8 Sapphire RX HEVC/H.264 decoder 8-way diversity
2.3 Parts List
These items will be in the package.
Part Number Description
Primary unit Sapphire-RXD3/D Receiver (see Variants above)
CA4065 120W 12VDC PSU to XLR

Revision: 1.0
Sapphire-RXD3 Setup Guide
Copyright © 2022 Domo Tactical Communications (DTC) Limited. All rights reserved.
Commercial in Confidence
Page 2-3
2.4 Licensing
Some product functions are enabled by licenses. The license for your product can be viewed in the
control software.
Description Included/Optional
M50 Decoder Included
RX Included
Pass-through Included – RXD3D only
IP Streaming Optional
IP Redundancy Optional
UHD 4K Optional

Revision: 1.0
Sapphire-RXD3 Setup Guide
Copyright © 2022 Domo Tactical Communications (DTC) Limited. All rights reserved.
Commercial in Confidence
Page 3-4
3. Connections, Controls and Indicators
3.1 Introduction
This chapter will help identify all the connections and interfaces of the product needed to install,
control and monitor the device.
3.2 Front Panel
No. Item Notes
1 Power LED The power LED will illuminate when power is on.
2 Power on/off switch It is recommended to use the power switch to power the device
On or Off.
3 Touchscreen display When fully booted (approx. 90s), the touchscreen display can be
used to monitor and configure some of the most used features.
See Section 4 for a description of operation.
Note: The web user interface can be used for more detailed
configuration of the Sapphire-RXD3.

Revision: 1.0
Sapphire-RXD3 Setup Guide
Copyright © 2022 Domo Tactical Communications (DTC) Limited. All rights reserved.
Commercial in Confidence
Page 3-5
3.3 Rear Panel
No. Item Notes
1 XLR 4-way jack Connect the supplied PSU (CA4069) for 12V power. See
Section 3.4.1 for pinout.
IMPORTANT: Please ensure the power switch on the front
panel is set to Off when connecting the power source. The
power switch should be used to control power to the device.
2 SFP+ cage SFP provides a video output for monitoring.
Supports 12G-SDI, 6G-SDI or 3G-SDI video formats.
3 HD-BNC socket SDI output 1.
Supports 12G-SDI, 6G-SDI or 3G-SDI video formats.
4 HD-BNC socket SDI output 2.
Supports 12G-SDI, 6G-SDI or 3G-SDI video formats.
5 HD-BNC socket SDI output 3.
Supports 3G-SDI video formats.
6 HD-BNC socket SDI output 4.
Supports 3G-SDI video formats.
7/8 RJ45 jack Gigabit Ethernet connection for web user interface control or
IP streaming.
Note: The CTRL and STREAM labels are notional and are
used to differentiate the connections.
9 BNC socket (50Ω) RF input from a downconverter/antenna assembly.
Up to eight antennas can be fitted for maximum receive
diversity depending on variant.
10 BNC socket (75Ω) Connect a Genlock device to this port to keep the receiver
synchronised with all the other equipment in your facility.
11 BNC socket (75Ω) ASI output.

Revision: 1.0
Sapphire-RXD3 Setup Guide
Copyright © 2022 Domo Tactical Communications (DTC) Limited. All rights reserved.
Commercial in Confidence
Page 3-6
No. Item Notes
12 BNC socket (75Ω)
Note: This is not valid for
the RXD3 variant and will
be plugged.
The packet diversity input (PKT IN) allows you to double the
diversity of the system by linking a remote receiver via ASI.
Each unit will provide coverage in a different area but will act
like a single receiver.
13 XLR 3-way jack (pins) Audio stereo line level audio output left. See Section 3.4.3 for
pinout.
14 XLR 3-way jack (pins) Audio stereo line level audio output right. See Section 3.4.3 for
pinout.
15 Hirose 4-way jack (pins) RS-232 data port. See Section 3.4.2 for pinout.
3.4 Pinout
3.4.1 Power
Mating part: Neutrik NC4FX
Pin Function
1 0V
2 N/C
3 N/C
4 VIN (12VDC nominal)
3.4.2 Data
Mating part: Hirose HR10-7P-4S(73)
Pin Function
1 GND
2 RX
3 TX
4 N/C
3.4.3 Audio
Mating part: Neutrik NC3FX
Pin Function
1 0V
2 AUD OUT+ (L/R)
3 AUD OUT- (L/R)

Revision: 1.0
Sapphire-RXD3 Setup Guide
Copyright © 2022 Domo Tactical Communications (DTC) Limited. All rights reserved.
Commercial in Confidence
Page 4-7
4. Front Panel Touchscreen Control
4.1 Power
The Sapphire-RXD3 requires 12VDC power which can be supplied via the supplied mains PSU. There
is a power switch on the front panel which can be used to power On/Off the unit.
When the unit has been switched on, it will take approximately 90s to boot-up.
4.2 Introduction
The Sapphire-RXD3 has a front panel touchscreen which can be used to monitor and control the
device without the need to connect to a PC device.
When the unit has fully booted, the front panel touchscreen will display the home screen and the
power LED will be illuminated.
Press the lock symbol, indicated below, for 5 seconds to lock the screen, if required.
The home screen will show colour-coded information and is divided into two zones, Left and Right.

Revision: 1.0
Sapphire-RXD3 Setup Guide
Copyright © 2022 Domo Tactical Communications (DTC) Limited. All rights reserved.
Commercial in Confidence
Page 4-8
4.3 Touchscreen Left Zone
The left zone holds key information about the RF and genlock settings and can be navigated by
swiping up/down.
Parameters which are detailed with the pencil icon can be edited, press the parameter to open the
settings.
To return to the home screen, select the right arrow icon.

Revision: 1.0
Sapphire-RXD3 Setup Guide
Copyright © 2022 Domo Tactical Communications (DTC) Limited. All rights reserved.
Commercial in Confidence
Page 4-9
4.4 Touchscreen Right Zone
The right zone displays the SNRs and levels for the received signals with a colour-coded bar graph.
Further information can be viewed by swiping up/down to view video/audio and network information.
The bottom page will allow you to restore defaults, this will return the Sapphire-RXD3 to factory
settings.
Parameters which are detailed with the pencil icon can be edited, press the parameter to open the
settings.

Revision: 1.0
Sapphire-RXD3 Setup Guide
Copyright © 2022 Domo Tactical Communications (DTC) Limited. All rights reserved.
Commercial in Confidence
Page 5-10
5. Web Browser Control
5.1 Power
The Sapphire-RXD3 requires 12VDC power which can be supplied via the supplied mains PSU. There
is a power switch on the front panel which can be used to power On/Off the unit.
When the unit has been switched on, it will take approximately 90s to boot-up.
5.2 Introduction
The Sapphire-RXD3 has a comprehensive web user interface (WUI) for detailed monitoring and
control. The WUI is accessed via a web browser using the IP address of the Sapphire, so an Ethernet
connection from the CTRL or STREAM port to a PC device is required.
Our devices are shipped to you with the IP DHCP setting enabled. This means that if the Sapphire-
RXD3 is connected to a network which is administered by a DHCP server, the IP address will be
automatically assigned. If the device is connected to a network which does not have a DHCP server,
contact your Network Administrator for an IP address you can use.
Re-configuration of the IP settings can be achieved via the web interface (see Section 5.3.4), or via
the touchscreen (see Section 5.3.2).
Note: If you are using a standalone PC or laptop, you will need to set the IP address of the PC to
match the IP address range of the device. Refer to Section 7.1 to find out how to do this.

Revision: 1.0
Sapphire-RXD3 Setup Guide
Copyright © 2022 Domo Tactical Communications (DTC) Limited. All rights reserved.
Commercial in Confidence
Page 5-11
5.3 IP Address Identification/Configuration
5.3.1 Device Finder
DBS’ Device Finder application can be used to identify DBS product IP addresses on a network.
Device Finder comes as a simple executable file which can be downloaded from DTC’s WatchDox
facility, see Section 8.1. This can be saved to the PC desktop.
Double-click the Device Finder executable to open the application. All DBS devices attached to the
network will be detected. Click Open to initialise communications with your PC’s default web browser.

Revision: 1.0
Sapphire-RXD3 Setup Guide
Copyright © 2022 Domo Tactical Communications (DTC) Limited. All rights reserved.
Commercial in Confidence
Page 5-12
5.3.2 Front Panel Touchscreen
The IP address of the Sapphire can be found and edited, if required from the front panel touchscreen.
This can be useful if the device is not connected via a DHCP server, or the IP address does not match
the subnet of the PC and the IP address settings need to be changed.
The IP address can be discovered by swiping up on the touchscreen right zone to find the Network
Information page. If the Ethernet cable is attached to the CTRL port, the IP address will appear
adjacent to the Control parameter (highlighted below). If the Ethernet cable is attached to the Stream
port, the IP address will appear adjacent to the Stream parameter.
The IP settings can be edited by pressing the Current Gateway parameter.
Note: Some IP parameters indicated with the pencil are not currently active and are for future
development.

Revision: 1.0
Sapphire-RXD3 Setup Guide
Copyright © 2022 Domo Tactical Communications (DTC) Limited. All rights reserved.
Commercial in Confidence
Page 5-13
5.3.3 IPv6 Address
DBS products support link-local IPv6 addressing. This will allow web browser control if the device is
not connected via a DHCP server, or the IP address does not match the subnet of the PC and the IP
address settings need to be changed.
The IPv6 address of the Sapphire-RXD can be discovered from the front panel touchscreen, see
Section 5.3.2 above.
Alternatively, the IPv6 address can be discovered from a Windows Powershell command prompt by
entering the command:
Get-NetNeighbor -IPAddress FE80*
The IP address for the Sapphire-RXD3 must have a Reachable state.
Once the IPv6 address has been discovered, enter the IP address into your web browser using
square-brackets around the address:
e.g., https://[ fe80::761a:e0ff:fe8f:f1cd]
Note: If this is the first time the web interface has been opened, follow the prompts explained in
Section 5.4.

Revision: 1.0
Sapphire-RXD3 Setup Guide
Copyright © 2022 Domo Tactical Communications (DTC) Limited. All rights reserved.
Commercial in Confidence
Page 5-14
5.3.4 IP Address Configuration via Web Interface
To re-configure the IP address via the web interface, go to the Config>Network page.
Note: It may be useful to open the Help (?) menu for descriptions of settings.
Change the DHCP setting to No if you do not want the unit to try and get an IP Address, Gateway or
DNS from a DHCP server.
The IP Address/Netmask parameter is written in CIDR notation. This is a compact representation
where the IP address is followed by a slash (/) and then a decimal number which indicates the count
of leading 1-bits in the network mask.
For example, an IP address 192.168.0.15 with a netmask of 255.255.255.0 would be written in CIDR
notation as 192.168.0.15/24, where the first 24-bits of the IP address are masked. See Section 7.2 for
a table of subnets mapped to CIDR values.
Click Apply to activate a running config and Save to retain.

Revision: 1.0
Sapphire-RXD3 Setup Guide
Copyright © 2022 Domo Tactical Communications (DTC) Limited. All rights reserved.
Commercial in Confidence
Page 5-15
5.4 Open Web Interface
Once the IP address has been confirmed, open a web browser on a PC device and enter the IP
address of the Sapphire-RXD3 in the address bar. Alternatively, if running Device Finder, click Open
on the line of the device address.
DBS devices have a pre-installed self-signed HTTPS certificate, the first time web communications are
established, it will be necessary to trust the address. The presentation of the web page will differ
depending on the browser application; the following example is Google Chrome. Click on Advanced
to proceed.
Click Proceed to <ip_address> (unsafe) to open the web user interface.
Table of contents
Other Domo Media Converter manuals