Door Controls DC10326 User manual

321 VZ County Road 4500
·
Ben Wheeler, TX 75754
·
800.437.3667
·
DoorControlsUSA.com
The DCU Indoor No-Touch Wave Sensor uses IR technology to activate a device with the simple wave of
a hand. Since it is No-Touch, this sensor is ideal for use in hospitals, clinics, labs, cleanrooms (to reduce
the risk of contamination), schools, factories, or oces.
DC10326
Indoor No-Touch Wave Sensor
Manual
Features:
►Dual voltage, 12~24 VAC/VDC
►Range adjustable from 23/8”-8” (6~20 cm)
►Stainless steel single-gang plate
►3A relay, adjustable from 0.5~30 sec, toggle, or as long as hand is near the sensor
►Quick connect screw-less terminal block
►LED illuminated sensor area for easy identication
►Selectable LED colors (turns from red to green or green to red) when activated
071020
321 VZ County Road 4500
·
Ben Wheeler, TX 75754
·
800.437.3667
·
DoorControlsUSA.com
Parts List:
1 - No-Touch Sensor 2 - Mounting Screws 1 - Manual
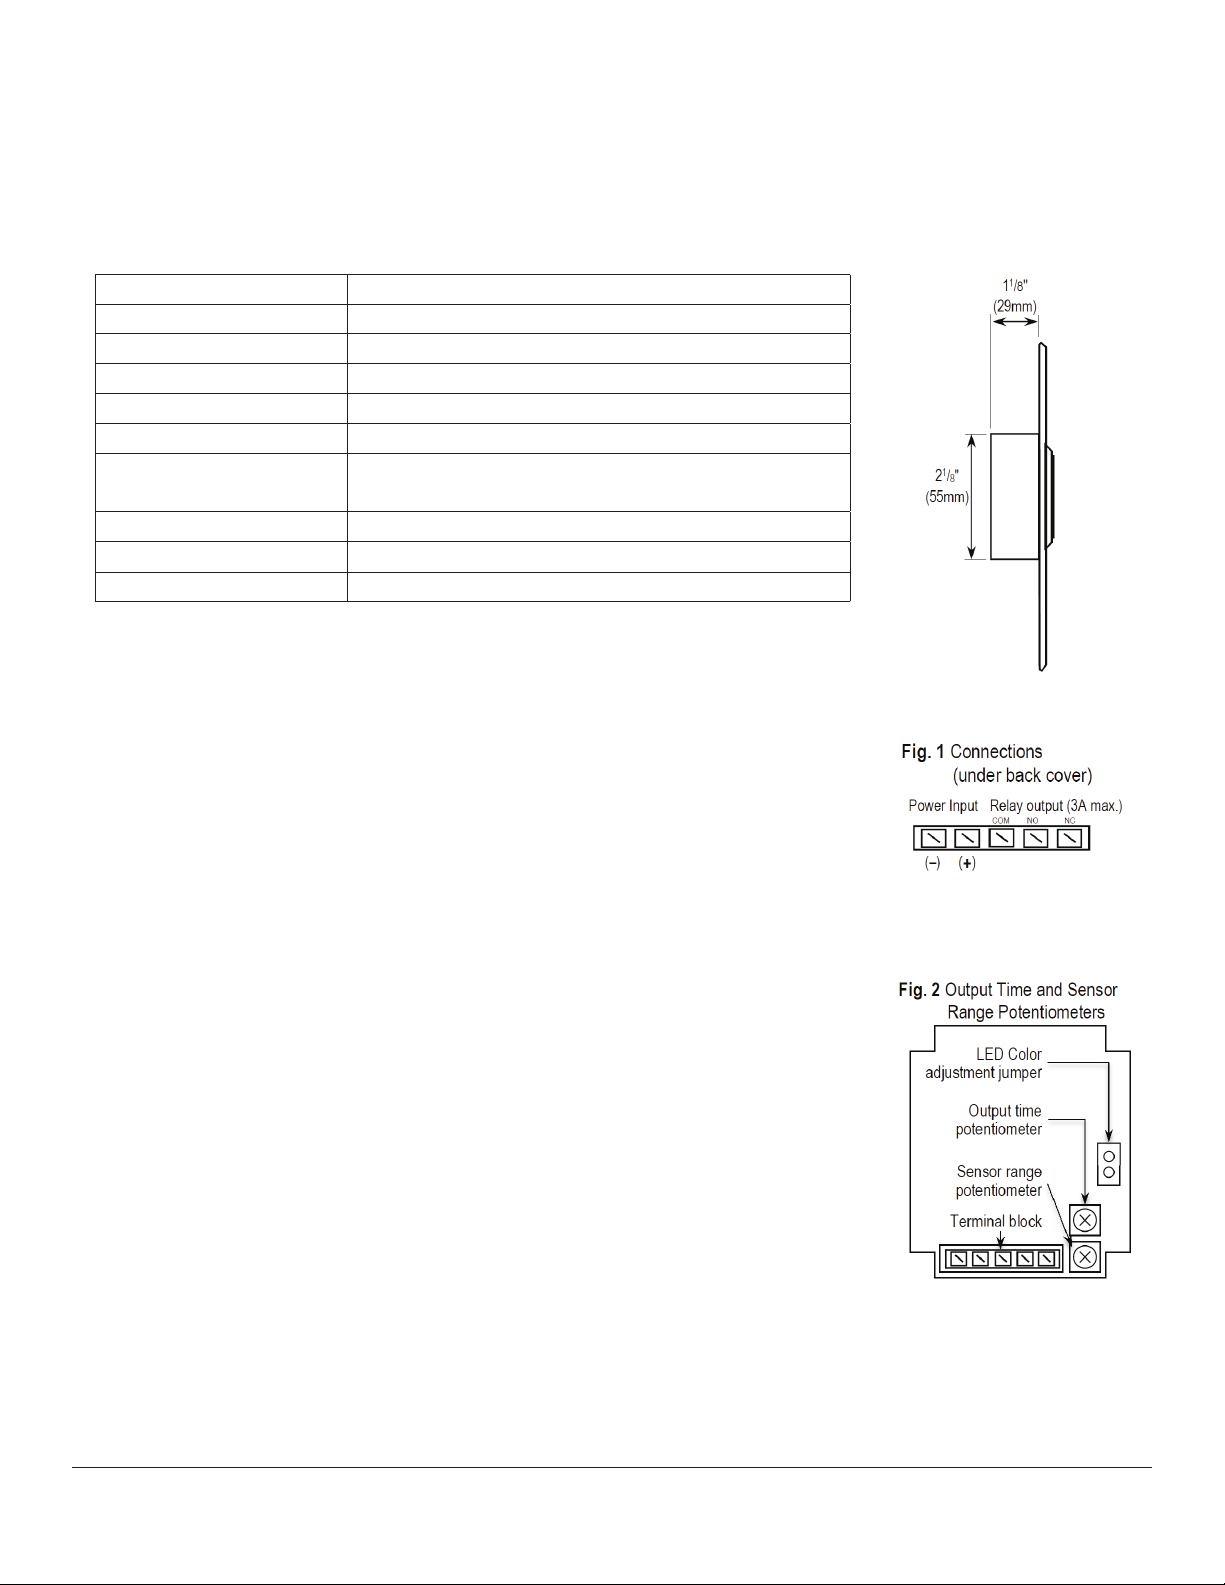
Specications:
Operating Voltage 12-24 VAC/VDC
Current draw (max.) 120mA@12VDC
Relay type Form C dry contact, 3A@24VDC
Response time 10ms
LEDS Standby Red*
LEDS Triggered Green*
Output time Adjustable, 0.5-30 sec., toggle, or as long as
sensor is triggered
Sensing range Adjustable, 2 3/8” - 8” (6-20 cm)
Operating temperature -4°~131° F (-20°~55° C)
Weight 3-oz (85g)
1. Run four wires through the wall to a single-gang back-box provided.
2. Connect the four wires from the back-box to the quick connect
screw-less terminal according to Fig. 1.
3. Screw the plate into the back-box, taking care not to crimp the wires.
4. Remove clear protective lm from the sensor before use.
Installation:
Adjusting the LED Color:
1. The LED color factory default setting is red (standby) and green
(triggered).
2. To reverse the LED color visual indicator to green (standby) and red
(triggered), remove the jumper located at the right side of the terminal
block as shown in Fig. 2.
Adjusting the Sensor Range and Output Timer
1. To adjust the sensor’s range, turn the trimpot counter-clockwise
(decrease) or clockwise (increase).
2. To adjust the output time, turn the trimpot counter-clockwise (de
crease) or clockwise (increase). To set to toggle, turn the trimpot all the
way counterclockwise.
*Default, reversible by jumper
1 - Single Gang Box

321 VZ County Road 4500
·
Ben Wheeler, TX 75754
·
800.437.3667
·
DoorControlsUSA.com
2. Installation with Electromagnetic Lock (Fail-Safe)
4. Installation with Electromagnetic Lock and Keypad
Sample Installations:
1. Installation with Automatic Door Controller
3. Installation with Electric Door Strike (Fail-Secure)
(Door Controls USA DC4000/DC7000 Control)

321 VZ County Road 4500
·
Ben Wheeler, TX 75754
·
800.437.3667
·
DoorControlsUSA.com
Care and Cleaning for the DC10326 No-Touch Wave Sensor:
The DC10326 is designed for indoor use to match most interiors. The sensor requires special care to
ensure reliability and a long operating life.
1. Use a soft, clean cloth for cleaning.
2.Be careful not to spray liquids directly on the unit.
3. When cleaning, spray the cleaning solution onto the cleaning cloth instead of the unit.
4.Be sure to wipe off any excess liquid from the sensor. Wet spots or areas may affect the sensor’s
performance.
WARNING: Incorrect mounting which leads to exposure to rain or moisture inside the enclosure could
cause a dangerous electric shock, damage the device, and void the warranty.
WARRANTY: This Door Controls USA product is warranted against defects in material and workmanship
while used in normal service for one (1) year from the date of sale to the original customer. Door Controls
USA obligation is limited to the repair or replacement of any defective part if the unit is returned,
transportation prepaid, to Door Controls USA. This Warranty is void if damage is caused by or attributed
to acts of God, physical or electrical misuse or abuse, neglect, repair or alteration, improper or abnormal
usage, or faulty installation, or if for any other reason Door Controls USA determines that such equipment
is not operating properly as a result of causes other than defects in material and workmanship.
6C62MXFS
6-32x5/8” Phil Pan M/S S/S
DC10324
Wave Plate Single Gang Indoor
DC10328
Single Gang Surface Box
Replacement Parts:
Table of contents


