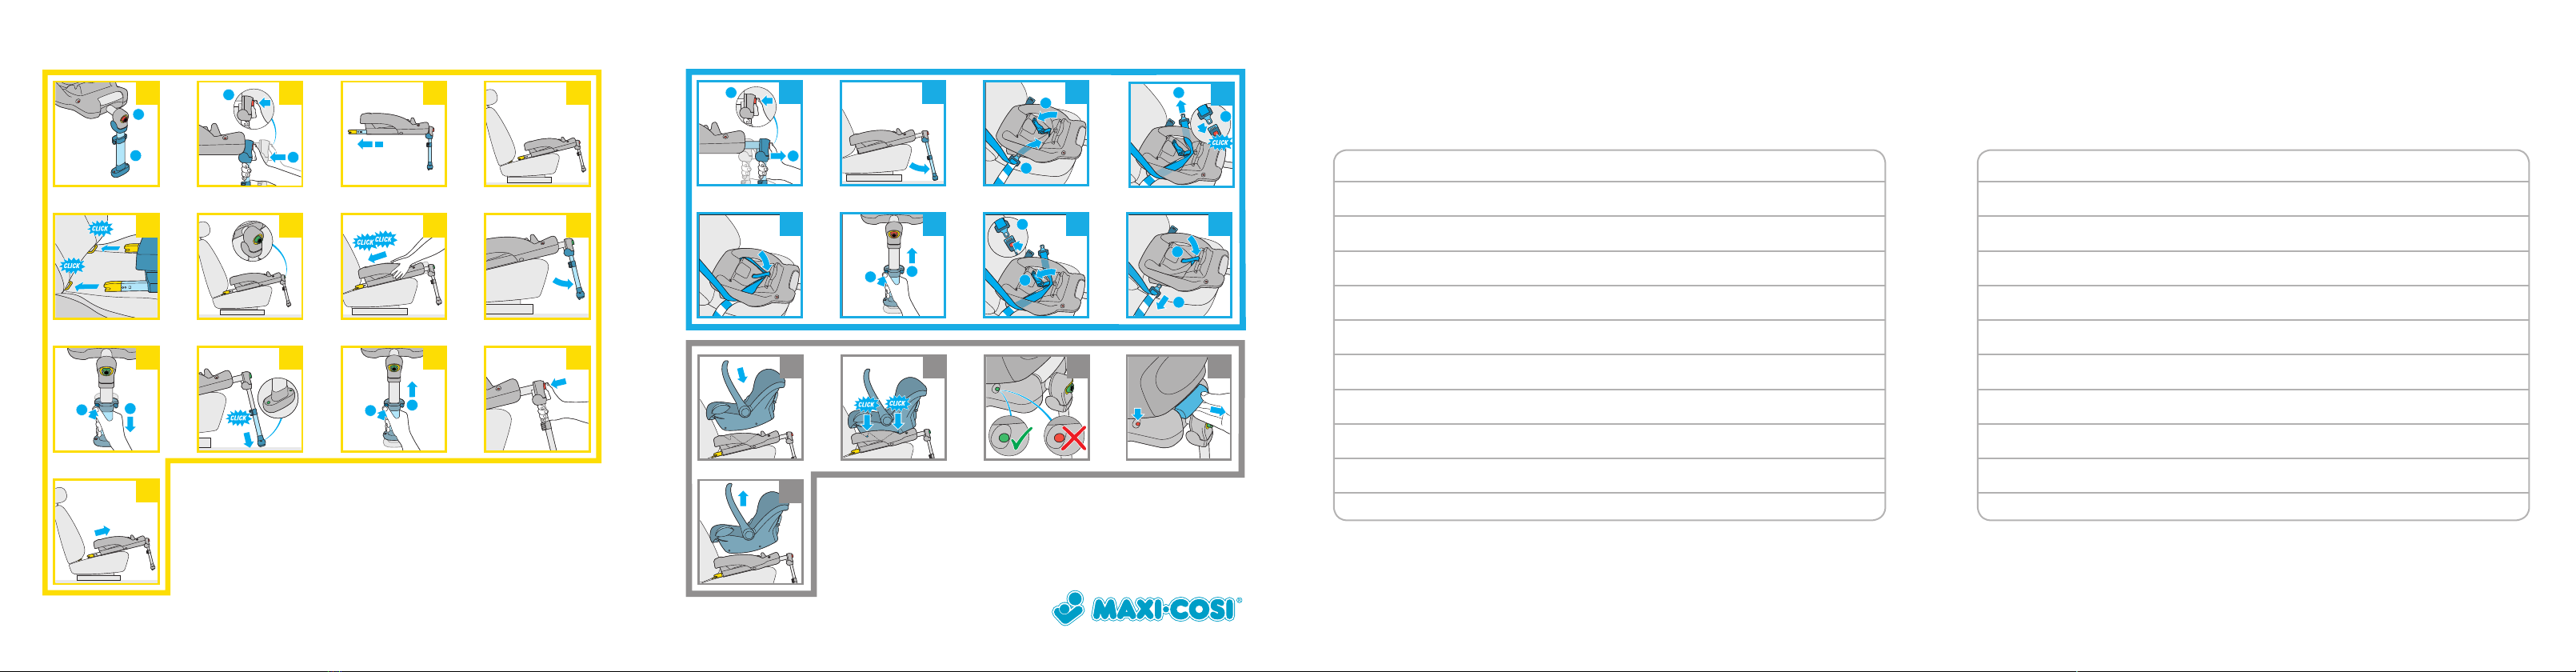
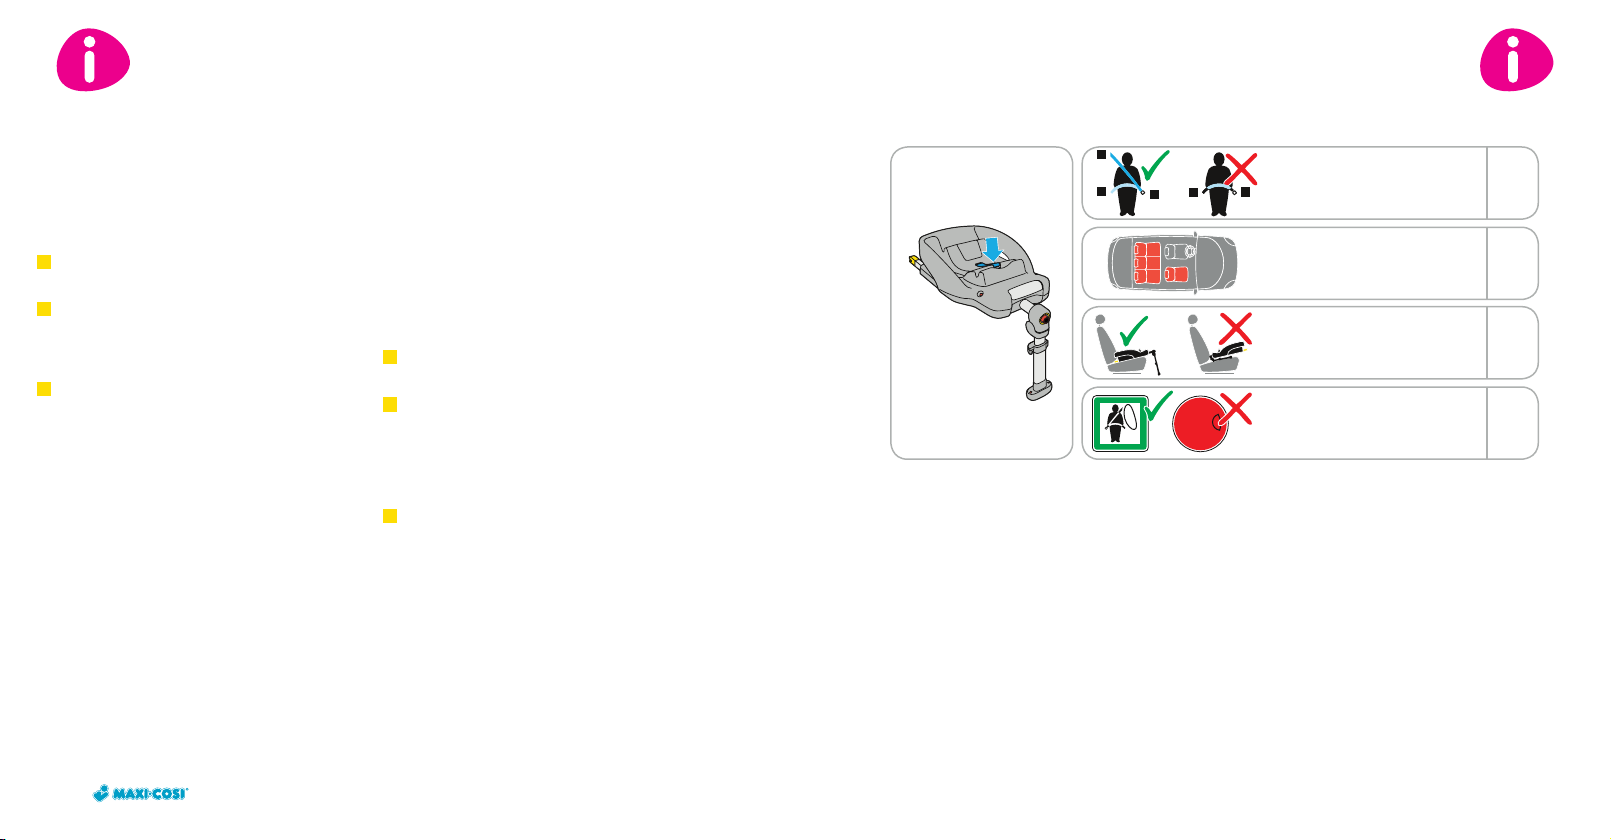
Dorel Maxi-Cosi EasyFix Troubleshooting guide

EasyFix EasyFix
EN Instructions for use / Warranty 7 - 20
FR Mode d’emploi / Garantie 21 - 34
DE Gebrauchsanweisung / Garantie 35 - 48
NL Gebruiksaanwijzing / Garantie 49 - 62
ES Modo de empleo / Garantía 63 - 76
IT Istruzioni per l’uso / Garanzia 77 - 90
PT Modo de emprego / Garantia 91 - 104
DRU0618A15
www.maxi-cosi.com
5
6
1
10
9
4
2
8
7
3
DOREL U.K.
Imperial Place 4
Maxwell Road
Borehamwood
Hertfordshire WD6 1JN
UNITED KINGDOM
DOREL FRANCE S.A.
Z.I. - 9 bd du Poitou
BP 905
49309 Cholet Cedex
FRANCE
DOREL GERMANY
Augustinusstraße 9 c
D-50226 Frechen-Königsdorf
DEUTSCHLAND
DOREL POLSKA
Ul. Legnicka 84/86
41-503 Chorzow
POLAND
DOREL BELGIUM
BITM Brussels
International Trade Mart
Atomiumsquare 1, BP 177
1020 Brussels
BELGIQUE / BELGIE
DOREL NETHERLANDS
Postbus 6071
5700 ET Helmond
NEDERLAND
DOREL HISPANIA S.A.
C/Pare Rodés n°26
Torre A 4°
Edificio Del Llac Center
08208 Sabadell (Barcelona)
ESPAÑA
DOREL ITALIA S.P.A.
a Socio Unico
Via Verdi, 14
24060 Telgate (Bergamo)
ITALIA
DOREL PORTUGAL
Rua Pedro Dias, 25
4480-614 Rio Mau (VDC)
PORTUGAL
DOREL SWITZERLAND S.A.
Chemin de la Colice 4
1023 Crissier
SWITZERLAND / SUISSE

1 2 3 4
5 6 7 8
12
9 10
12
11 12
13
2
1
1
22
114 15
1
2
16
1
2
21
12
2
1
1
2
17
20
19
18
22 23 24 25
26

7
Dear parents
Congratulations on your purchase of the EasyFix.
Safety, user-friendliness, comfort and design played
an important role in developing the EasyFix.
This product meets the most stringent safety
requirements.
Studies have shown that a large percentage of car
seats are not used correctly. Therefore, please take the
time to read through this manual carefully. Your child’s
safety can only be guaranteed if this product is used
according to these instructions.
Continuous research by our product development
department, supported by intensive contact and
consultation with test people and consumers ensure
that we kept fully up-to-date in the field of child
safety. If you have any questions or comments on the
use of the EasyFix, please do not hesitate to contact us.
Dorel (see the back of the instruction manual for
address and telephone number)
1 B a s e
2 Isofix connector
3 Anchor point
4 Colour indicator for the CabrioFix
5 Support leg control button
6 Support leg colour indicator
7 Support leg
8 Central button on the support leg
with colour indicator
9 Release lever for CabrioFix
10 Blue belt clamp
EN

89
EN
1. IMPORTANT: READ FIRST!
Read this instruction manual carefully and save it for
future reference. Failure to follow the instructions in
this manual could result in serious injury to your child.
Use original accessories and manufacturer-approved
parts only. Do not make any changes to the product.
If you have any problems or complaints, contact your
retailer or importer.
Always check car fitting list before installation.
IMPORTANT!
The EasyFix is a safety product and is only safe if
it is used in accordance with the instructions.
IMPORTANT!
The EasyFix may only be used in combination with
the CabrioFix. The CabrioFix can be recognised by
the type indication on the belt protector and the
two steel spindles underneath the CabrioFix.
If you are in any doubt, contact the manufacturer.
CONTENTS
1. Important: read first! 8
2. Approved car use 10
3. Installing and removing the EasyFix 10
3.1 Using Isofix (yellow marking on the product) and support leg 10
3.2 Using a 3-point safety belt (blue marking on product) and support leg 13
4. Installing and removing the CabrioFix 15
5. Maintenance 15
6. General instructions 16
7. Waste separation 17
8. Next stage car seat 18
9. Car fitting list 18
10. Warranty 19
11. Questions 20
Never leave a child unsupervised in the seat, either in
the car or outside of the car.
Do not use the EasyFix in a place where a frontal
airbag is installed as this can be dangerous.
This does not apply to side airbags.
The EasyFix may be used either on the passenger
seat or on the back seat, but it should always face
backwards. Lock the rear seats that fold down.
The EasyFix has been approved according to the most
recent guidelines of the ECE R 44/04, the European
standard for car safety seats, and can be used in
combination with the CabrioFix, suitable for children
from birth to approximately 12 months
(group 0+: 0 to 13 kg).
* The use of the support leg and / or Isofix, which
ensure optimum safety and easy installation, mean
that the EasyFix is not suitable for all types of cars.
The EasyFix is designated as “semi-universal”
and therefore suitable for installation in certain
types of cars. See the enclosed car fitting list
(see Section 9: Car fitting list).
EN
Suitability according to ECE R 44/04
Group
0+
EasyFix +
CabrioFix 0 – 13 kg 0 – 12 months Semi-universal*
Body weight of child Age
CabrioFix 0+ 0 – 13 kg 0 – 12 months Universal

10 11
EN
2. APPROVED CAR USE
The EasyFix is approved for 2 types of car use:
Installation with Isofix and support leg (see section
3.1); For use in cars with approved Isofix anchor points
(see Section 9: Car fitting list). Recognisable by the
yellow marking on the product and the yellow marking
in the instruction manual.
Installation using 3-point safety belt and support
leg (see section 3.2); For use in cars “fitted” with an
automatic 3-point safety belt approved in accordance
with ECE R16 or equivalent standard (see Section 9:
Car fitting list). Recognisable by the blue marking on
the product and the blue marking in the instruction
manual.
3. INSTALLING AND REMOVING
THE EASYFIX
3.1 Using Isofix (yellow marking on the product)
and support leg
If your car is equipped with Isofix anchor points, you
can install the EasyFix using the Isofix connectors
in combination with the support leg. To check whether
your car is suitable for Isofix attachment and
the support leg, see Section 9: Car fitting list.
* Check car fitting list
Yes*
Yellow
No
Yes
• Installed on seats fitted with
Isofix anchor points (located
between seat and seat back)
& with room for the support leg
• Isofix installation marking
• Frontal airbag
• Side airbag
Isofix class E
Only use the EasyFix on a forward-facing seat equipped
with Isofix anchor points. Read the car manufacturer’s
handbook before use.
Correct attachment to the Isofix anchor points is
essential for the safety of your child. Also see the
yellow outlined sticker on the side of the EasyFix.
Never use a different installation method than
the one described here!
A. Installing with Isofix
IMPORTANT!
Secure any fold-down seats.
IMPORTANT!
Make sure the support leg is fully folded out and
that the indicator on the central button is red.
• Press the central button on the support leg
and push the support leg backward as far as
possible.
• The Isofix connectors are now extended as far as
possible and the EasyFix is ready to be installed.
• Place the EasyFix on the seat of the car.
• Line up the Isofix connectors with the Isofix.
• Click both Isofix connectors into the Isofix anchor
points.
IMPORTANT!
Make sure that both Isofix connectors are securely
attached to Isofix anchor points:
there should be two audible clicks.
• Check to make sure the EasyFix is securely installed
by pulling on the EasyFix. The indicator on the
central button should now be green.
• Place both hands on the EasyFix and push it back as
far as possible until it is situated firmly
against the seat back (you’ll hear a ‘rattling’ sound).
• Check again to make sure the seat is secure by
pulling on the EasyFix.
EN
1
2
3
4
6
7
5

12 13
EN
B. Adjusting the length of the support leg
IMPORTANT!
Always use the support leg to ensure
the safe use of the EasyFix.
IMPORTANT!
Make sure the support leg is fully
folded out and locked at the hinge point.
• Keep the silver control button on the support leg
pressed and move the support leg downwards
until it reaches the floor of the car.
IMPORTANT!
Make sure the indicator at the base of
the support leg is green.
• In some cases the EasyFix may not be fully
supported by the car seat, but entirely by the
support leg.
• Release the control button and “click” the support
leg into the locked position.
• Check to make sure the support leg is securely
locked and stays in position by trying to move it up
or down without pressing the control button.
Checklist…
To ensure the optimum safety of your child, check
the following after installation:
• Both Isofix connectors are securely attached to the
Isofix anchor points: the indicator on the central
button on the support leg should be green.
• The support leg is fully folded out.
• The indicator on the base of the support leg
is green.
• The entire EasyFix is installed securely and firmly
in the car (check by pulling on the EasyFix).
C. Removing the EasyFix
• Restore the support leg to its start position by
pressing the control button and sliding the support
leg upwards.
• Disconnect the Isofix connectors by pressing the
central button on the support leg. The indicator on
the central button on the support leg should be
red. Considerable force may sometimes be needed
in orrder to release the buckle. If this is the case, try
pushing the EasyFix into the back of the vehicle seat
while pressing the release button.
• Remove the EasyFix from the Isofix anchor points.
• Remove the EasyFix from the car.
8
9
10
11
12
13
3.2 Using a 3-point safety belt (blue marking on
product) and support leg
If your car is not equipped with Isofix anchor points,
you can install the EasyFix using a 3-point safety belt
in combination with the support leg. To check whether
your car is suitable for installation using a 3-point
safety belt and support leg, see Section 9: Car fitting
list.
* Provided there is a 3-point safety belt in the middle
position of the back seat and there is enough room
for properly installing the support leg (see Section
9: Car fitting list).
Only install the EasyFix on a forward-facing seat fitted
with an automatic 3-point safety belt approved in
accordance with ECE R16 or equivalent standard.
The proper threading of the seat belt is essential to
your child’s safety. The seat belt must be threaded
along the blue markings on the EasyFix. See the sticker
outlined in blue on the topside of the EasyFix.
WARNING!
Never thread the belt in any other way!
EN
3
1212
Yes
No
Yes
Yes
Yes*
Blue
No
Yes
• Installation with 3-point safety belt
• Installation with 2-point safety belt
• On passenger seat
• On left/right side of back seat
• In middle position of back seat
• Belt routing marking
• Frontal airbag
• Side airbag

14 15
EN
A. Installing
IMPORTANT!
Make sure the Isofix connectors are retracted.
• Press the central button on the support leg and pull
the support leg forward as far as possible.
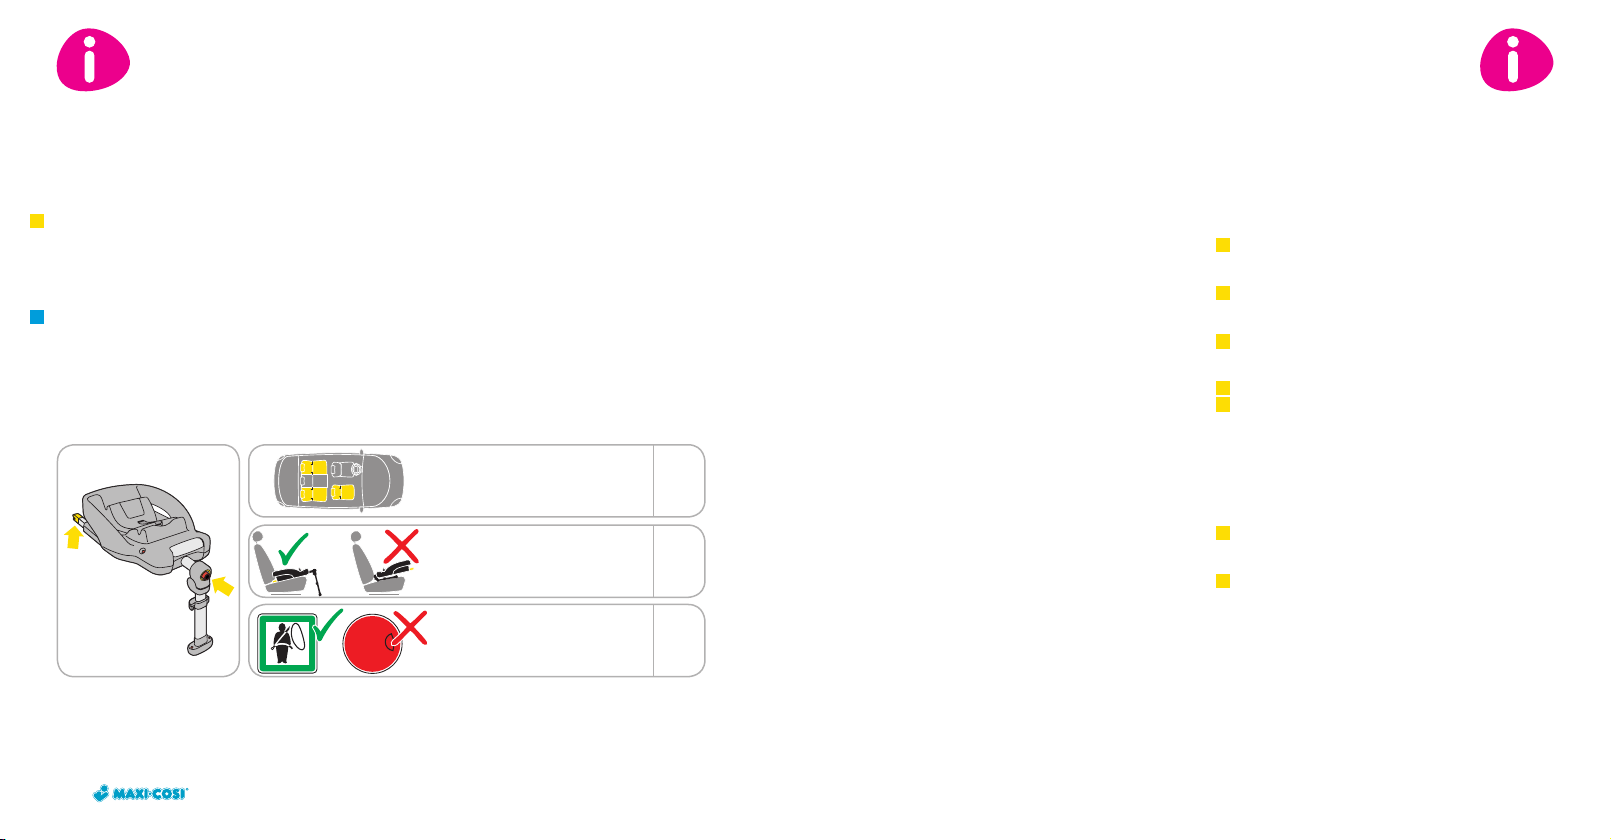
IMPORTANT!
Secure any fold-down seats.
IMPORTANT!
On some seats, the belts are fitted so far forward
that proper installation is not possible.
If this is the case, try another seat (see section 9:
Car fitting list).
• Place the EasyFix on the seat of the car with the
support leg folded out.
• Open the blue belt clamp by pulling the lever up.
Pass the shoulder and lap belt together through
the belt opening.
• Pass the seat belts between the base and the blue
belt clamp and then through the second belt
opening.
• Insert the seat belt into the belt buckle of the car.
NOTE!
Make sure that the seat belt is pulled tight
and is not twisted.
• Fasten the belt clamp by pushing the lever down.
• Check that it is fastened correctly by pulling on
the EasyFix.
B. Adjusting the length of the support leg
• See section 3.1, point B: “Adjusting the length
of the support leg”.
Checklist …
To ensure the optimum safety of your child, check
the following after installation:
• The seat belt is as tight as possible and not twisted.
• The two belt parts pass through the belt openings
in the base and under the blue belt clamp.
• The support leg is fully folded out.
• The indicator at the base of the support leg is
completely green.
• In some cases the EasyFix may not be fully
supported by the car seat, but entirely by the
support leg.
• The EasyFix as a whole has been installed in the
car in a secure and stable manner by pulling on the
EasyFix.
C. Removing the EasyFix
• Restore the support leg to its start position by
pressing the control button and sliding the support
leg upwards.
• Loosen the seat belt and open the blue belt clamp.
• Take the seat belt out from between the base and
the blue belt clamp and fasten the belt clamp.
• Remove the EasyFix from the car.
14
15
16
17
17
18
19
20
21
4. INSTALLING AND REMOVING
THE CABRIOFIX
A. Installing the CabrioFix
• Position the CabrioFix facing backwards (with the
back facing the direction of driving) on top
of the EasyFix. The carrying handle should be in the
upright position.
• Click the CabrioFix with its 2 spindles onto the
anchor points of the EasyFix.
NOTE!
A clear click should be audible and the indicators
should now be completely on green.
NOTE!
Under no circumstances should this product
be used if the indicator remains on red.
Carry out the above actions again. In case
of doubt or if you have any questions, contact
the manufacturer.
• Check that CabrioFix has been installed correctly
by pulling on it.
To install the child in the CabrioFix or to remove him/
her, see the CabrioFix user instructions. The optimum
safety of your child is only guaranteed if the CabrioFix
is used correctly. It is therefore important that you take
the time to read these instructions through carefully.
However, if you do not have these instructions, contact
our service point in your country or download
the necessary information from our internet site:
www.maxi-cosi.com.
B. Removing the CabrioFix
• Unlock the CabrioFix by pulling the release lever
upwards and at the same time forwards.
This releases the spindles from the anchor points
and take the CabrioFix out of the EasyFix.
5. MAINTENANCE
IMPORTANT!
Always remove the EasyFix from the car before
carrying out any of the following.
• Use lukewarm water, soap and a rag to clean the
plastic parts of the EasyFix. Do not use abrasive
cleaners.
IMPORTANT!
Never use lubricants, not even for the moving parts
on the EasyFix.
22
23
24
2625
EN

16 17
EN
6. GENERAL INSTRUCTIONS
Always pay close attention to the following…
• Prior to purchase check that the seat fits in your
car properly (see Section 9: Car fitting list).
• Always use the seat, even on short trips, as this
is when most accidents occur.
• Never use the EasyFix on seats equipped with
frontal airbags, as this can be extremely
dangerous. This does not apply to side airbags.
• The EasyFix must always be secured with the seat
belt / Isofix and support leg, even when not
in use. A loose EasyFix could injure other passengers
in a sudden stop or crash.
• Make sure the EasyFix does not become wedged by
adjustable seats or slamming the car door or
overloaded with heavy luggage.
• Always cover up the EasyFix when the car is parked
in the sun, as plastic and metal parts may
become extremely hot.
• Make sure that all luggage and objects likely to
cause injury in the event of an accident (on the rear
window shelf for instance) are properly secured.
• Take short breaks on longer trips to give your child
some freedom of movement.
• Never leave your child unattended in the car.
• Save the instruction manual for future reference in
the space provided on the back of the EasyFix.
• Never use a second-hand product, as you can
never be certain what has happened to it.
The safety of the car seat can only be guaranteed by
the manufacturer when used by the original owner.
• Replace the EasyFix after an accident, as the EasyFix
may become unsafe due to damage that is not
readily apparent.
• The manufacturer has taken into consideration the
fact that car seats may cause indentations in car
upholstery. This is unavoidable, however, due to
the prescribed safety standards and because the
car seat must be installed tightly in order to protect
your child. The manufacturer is not liable for any
damage that may occur to the car upholstery as a
result of this.
And it goes without saying…
• Set a good example and always wear your seat belt!
7. WASTE SEPARATION
For the effective and safe use of a car seat, it should
not be used for more than 5 years from the date of
purchase. Aging of the plastic (due to sunlight, for
instance) could result in deterioration of the product’s
quality. Once your child has outgrown the seat, we
recommend that you discontinue using it and discard it
as waste. For reasons of environmental protection, we
ask that you separate the waste generated by the
EasyFix from the purchase (packaging) to the moment
of discarding (product parts), and dispose of it
properly.
Keep all plastic packaging away from children to avoid
the risk of suffocation.
EN
Packaging Cardboard box Paper waste
Plastic bag Household waste
Plastic parts Appropriate recycling container
Metal parts Container for metal
Product parts

18 19
EN
8. NEXT STAGE CAR SEAT
9. CAR FITTING LIST
The use of Isofix anchor points and the support leg ór
3-point safety belt and the support leg, which ensure
optimum safety and easy installation, mean that the
EasyFix is not suitable for all types of cars. The EasyFix
is designated as “semi-universal” and therefore
suitable for installation on the seats of specific cars
only.
These cars have been compiled in a car fitting list.
However, this list is subject to change and additions.
For an up-to-date version of the car fitting list, visit the
website at www.maxi-cosi.com and / or retail outlet for
the EasyFix, where you can inquire about the suitability
of the EasyFix for your specific car. An up-to-date car
fitting list is included with the purchase of the EasyFix.
Type of car seat
Approved according to ECE R 44/04
Group
1
2 + 3
Body Weight
of child
9 to 18 kg
15 to 36 kg
Age
9 months
to 3,5 years
3,5 to 12 years
Tobi
Rodi AirProtect
10. WARRANTY
Our 24 months warranty reflects our confidence in the
high quality of our design, engineering, production
and product performance. We confirm that this
product was manufactured in accordance with the
current European safety requirements and quality
standards which are applicable to this product, and
that this product is free from defects on materials and
workmanship at the time of purchase.
Our 24 months warranty covers all manufacturing
defects in materials and workmanship when used in
normal conditions and in accordance with our user
manual. To request repairs or spare parts under
warranty for defects in materials and workmanship you
must present your proof of purchase, made within the
24 months preceding the service request.
Our 24 months warranty does not cover damage
caused by normal wear and tear, accidents, abusive
use, negligence or the consequence of failing to
comply with the user manual. Examples of normal
wear and tear include wheels and fabric worn down
by regular use and the natural breakdown of colors
and materials over extended period of time and use.
What to do in case of defects:
Should problems or defects arise, your first point of
contact is your Bébé Confort dealer or retailer. Our 24
months Warranty is recognized by them (1). You must
present your proof of purchase, made within the 24
months preceding the service request. It is easiest if
you get your service request pre-approved by Bébé
Confort Service. In principle, we pay for shipment and
for return freight connected to service requests under
the warranty. Damage not covered by our warranty or
on products outside of warranty can be handled at a
reasonable fee.
This Warranty is in compliance with to European
Directive 99/44/EG of 25 May 1999.
(1) Products purchased from retailers or dealers that
remove or change labels or identification numbers
are considered unauthorized. Products purchased
from unauthorized retailers are also considered
unauthorized. No warranty applies to these
products since the authenticity of these products
cannot be ascertained.
EN

20 21
11. QUESTIONS
If you have any questions, call your retailer or importer
(see back of instruction manual). Please have the
following information on hand when calling:
• Serial number at the bottom of the orange-white-
orange sticker (on the back of the EasyFix)
• Mark and type of car and seat on which the EasyFix
is installed
• Your child’s age (height) and weight
Chers parents
Toutes nos félicitations pour l’achat de ce EasyFix.
Lors de la conception du EasyFix, nous avons
constamment eu à l’esprit la sécurité, la facilité
d’utilisation, le confort et le design. Ce produit répond
aux normes de sécurité les plus sévères.
Des études démontrent que bon nombre de sièges
auto ne sont pas utilisés correctement. Nous vous
recommandons donc de lire attentivement ce mode
d’emploi. La sécurité maximum de votre enfant ne peut
être garantie que si ce produit est correctement utilisé.
Les études permanentes menées par notre service
de développement des produits, soutenues par des
contacts intensifs et une concertation avec des panels
d’essais et des clients, garantissent que nous restons à
la pointe du progrès en ce qui concerne la sécurité des
enfants. N’hésitez pas à nous contacter si vous avez
des questions ou des remarques concernant l’utilisation
du EasyFix.
Dorel (voir adresse et numéro de téléphone au dos du
mode d’emploi)
1 B a s e
2 Pinces Isofix
3 Point d’ancrage
4 Indicateur de couleur pour le CabrioFix
5 Bouton de réglage pour l’appui
6 Indicateur de couleur pour l’appui
7 Appui
8 Bouton de déverrouillage des pinces Isofix
9 Levier de déverrouillage pour le CabrioFix
10 Crochet de ceinture bleu
EN FR

22 23
FR
1. IMPORTANT: À LIRE
IMPÉRATIVEMENT!
Lisez attentivement le mode d’emploi et conservez-
le comme référence. L’utilisation de ce produit non
conformément aux instructions peut gravement
compromettre la sécurité de votre enfant.
Utilisez toujours des accessoires et des pièces
approuvées par le fabricant. Vous ne devez pas
apporter de modifications au produit. En cas de
réclamations ou de problèmes, adressez-vous à votre
revendeur ou à l’importateur.
Consultez toujours la liste des marques de voitures
avant installation.
ATTENTION!
Le EasyFix est un produit de sécurité et n’est sûr
que lorsqu’il est utilisé selon les prescriptions.
ATTENTION!
Le EasyFix ne peut être utilisé que combiné au
CabrioFix. Le CabrioFix se reconnaît à son indication de
type sur le protège-bretelles et à ses deux axes en acier
en dessous.
En cas de doute, prenez contact avec le fabricant.
SOMMAIRE
1. Important: à lire impérativement! 22
2. Possibilités d’utilisation dans la voiture 24
3. Montage et démontage du EasyFix 24
3.1 Utilisation avec Isofix (marque jaune sur le produit) et appui 24
3.2 Utilisation avec une ceinture à 3 points (marque bleu sur le produit) et un appui 27
4. Installer et enlever le CabrioFix 29
5. Entretien 29
6. Instructions générales 30
7. Tri des déchets 31
8. Sièges pour enfants plus âgés 32
9. Liste marques de voitures 32
10. Garantie 33
11. Questions 34
Ne laissez jamais votre enfant sans surveillance sur le
siège, ni dans la voiture ni en dehors.
N’utilisez pas le EasyFix dans un endroit où est
installé un coussin autogonflable frontal, ce peut
être dangereux. Ceci ne vaut pas pour les coussins
autogonflables latéraux.
Le EasyFix peut être utilisé tant sur le siège avant que
sur la banquette arrière. Mais cependant toujours
tourné vers l’arrière. Bloquez les banquettes arrières
rabattables.
Le EasyFix a été agréé selon les dernières directives
européennes de l’ ECE R 44/04, la norme européenne
pour les sièges de sécurité pour voiture, et peut être
utilisé combiné au CabrioFix, convenant pour les
enfants à partir de la naissance jusqu’à environ 12
mois. (Groupe 0+: 0 à 13 kg).
* A cause de l’utilisation d’un appui et / ou Isofix,
garants d’une sécurité et d’un conformité
d’installation optimaux, le EasyFix n’est
pas adapté à l’ensemble des marques de voitures.
Le EasyFix est homologué pour l’usage
“semi-universel” et peut être installé sur les sièges
de marques de voitures spécifiques qui sont
indiquées dans la liste jointe (voir chapitre 9:
Liste marques de voitures).
FR
Homologation ECE R 44/04
Groupe
0+
EasyFix +
CabrioFix 0 – 13 kg 0 – 12 mois Semi-universel*
Poids corporel de l’enfant Âge
CabrioFix 0+ 0 – 13 kg 0 – 12 mois Universel

24 25
2. POSSIBILITÉS D’UTILISATION DANS
LA VOITURE
Le EasyFix est homologué pour 2 types d’utilisation:
Utilisation avec Isofix et appui* (voir chapitre 3.1);
Utilisation dans les voitures avec points d’ancrage
Isofix homologués (voir chapitre 9: Liste marques de
voitures). Reconnaissable à la marque jaune sur le
produit et dans le mode d’emploi.
Utilisation avec une ceinture à 3 points et un appui*
(voir chapitre 3.2); Utilisation dans des voitures
équipées d’une ceinture à enrouleur à trois points de
fixation, à condition que celle-ci soit homologuée selon
la norme ECE R16 ou une norme équivalente (voir
chapitre 9: Liste marques de voitures). Reconnaissable
à la marque rouge sur le produit et dans le mode
d’emploi.
3. MONTAGE ET DÉMONTAGE DU
EASYFIX
3.1 Utilisation avec Isofix (marque jaune sur le
produit) et appui
Si votre voiture est pourvue de points d’ancrage Isofix,
vous pouvez fixer le EasyFix avec les connecteurs Isofix
en combinaison avec l’appui. Pour contrôler si votre
voiture convient pour l’utilisation du produit avec Isofix
et appui, voir chapitre 9: Liste marques de voitures
pour l’utilisation avec Isofix et appui.
* Contrôlez la liste des marques de voitures
Oui*
Jaune
Non
Oui
• Utilisation sur sièges avec points
d’ancrage Isofix (entre assise et
dossier) & place pour appui
• Marque installation Isofix
• Airbag frontal Non
• Airbag latéral Oui
Isofix class E
FR
Utilisez le EasyFix uniquement à une place dirigée
vers l’avant pourvue de points d’ancrage Isofix. Lisez
d’abord le manuel fourni par le fabricant automobile.
Une fixation correcte aux points d’ancrage Isofix est
essentielle pour la sécurité de votre enfant. Pour cela,
veuillez consulter l’autocollant entouré de jaune sur le
côté du PrioriFix.
N’utilisez jamais une fixation autre que celle
prescrite!
A. Installation avec Isofix
ATTENTION!
Verrouillez les banquettes arrière rabattables.
ATTENTION!
Vérifiez que l’appui est complètement déplié et
que l’indicateur sur le bouton central est rouge.
• Appuyez sur le bouton central sur l’appui et poussez
l’appui le plus possible vers l’arrière.
• Les connecteurs Isofix sont maintenant dans leur
position maximale et le EasyFix est prêt à
être installé.
• Placez le EasyFix sur la banquette.
• Tenez les connecteurs Isofix devant les guides Isofix
fixés.
• Cliquez les deux connecteurs Isofix sur les points
d’ancrage Isofix.
ATTENTION!
Vérifiez que les deux connecteurs Isofix sont
bien fixés sur les points d’ancrage Isofix: vous devez
clairement entendre à deux reprises un clic.
• Vérifiez que la fixation est correcte en tirant sur le
EasyFix, et l’indicateur sur le bouton central doit
maintenant être vert.
• Placez vos mains contre le EasyFix et poussez-le le
plus possible vers l’arrière, jusqu’à ce qu’il se trouve
bien contre le dossier (vous entendez une série
de bruits secs).
• Vérifiez encore une fois que la fixation est correcte
en tirant sur le EasyFix.
1
2
3
4
6
7
5
FR

26 27
B. Réglage de la longueur de l’appui
ATTENTION!
Utilisez toujours l’appui pour une utilisation sûre
du EasyFix.
ATTENTION!
Veillez à ce que l’appui soit complètement déplié
et que sa butée soit sur le centre de rotation.
• Prenez fermement l’appui sous le bouton de réglage
et enfoncez ce bouton d’un côté avec le pouce
et maintenez-le enfoncé et déplacez l’appui vers le
bas jusqu’à atteindre le sol de la voiture.
ATTENTION!
Veillez à ce que l’indicateur sur le pied de
l’appui soit vert.
• Dans certains cas, il se peut que le EasyFix ne soit
pas soutenu complètement par le siège auto
mais entièrement par l’appui.
• Relâchez le bouton de réglage et verrouillez l’appui
jusqu’à ce que vous entendiez clairement un « clic ».
• Contrôlez le verrouillage de l’appui et son maintien
dans la bonne position en voyant s’il est possible
d’élever ou d’abaisser l’appui sans appuyer sur le
bouton de réglage.
Liste de contrôle…
Après l’installation, vérifiez encore une fois, pour
une sécurité optimale de votre enfant, les éléments
suivants:
• Les deux connecteurs Isofix sont bien fixés sur
les points d’ancrage Isofix: l’indicateur sur le bouton
central est vert.
• L’appui est complètement déplié.
• L’indicateur sur le pied de l’appui est vert.
• Le EasyFix est installé de manière stable
et solide dans la voiture, ce que vous vérifiez en
tirant sur le EasyFix.
C. Démontage du EasyFix
• Placez l’appui dans sa position initiale en appuyant
sur le bouton de commande et en faisant
glisser l’appui.
• Déconnectez les connecteurs Isofix en appuyant
sur le bouton central sur l’appui. L’indicateur sur
le bouton central sur l’appui est de nouveau rouge.
Il arrive parfois qu’il faille exercer une force
considérable afin de détacher la boucle. Si tel est
le cas, essayez en poussant le EasyFix vers l’arrière
du siège du véhicule tout en poussant sur le bouton
de déverrouillage.
• Enlevez le EasyFix des points d’ancrage Isofix.
• Enlevez le EasyFix de la voiture.
8
9
10
11
12
13
FR
3.2 Utilisation avec une ceinture à 3 points
(marque bleu sur le produit) et un appui
Si votre voiture n’est pas équipée de points d’ancrage
Isofix, vous pouvez aussi fixer le EasyFix avec une
ceinture à 3 points de fixation en combinaison avec
l’appui. Pour vérifier si votre voiture convient pour
l’utilisation d’une ceinture à 3 points et d’un appui,
voir le chapitre 9: Liste marques de voitures pour
l’utilisation avec ceinture à 3 points et appui.
* À condition que la place du milieu sur la banquette
arrière soit pourvue d’une ceinture à 3 points et
qu’il y ait suffisamment de place pour effectuer une
installation correcte de l’appui, contrôlez la liste des
marques de voitures, chapitre 9.
Utilisez le EasyFix uniquement sur une place dirigée
vers l’avant et équipée d’une ceinture à enrouleur
à 3 points de fixation, à condition que celle-ci soit
homologuée selon la norme ECE R16 ou une norme
équivalente.
Il est essentiel pour la sécurité de votre enfant que la
ceinture passe de manière correcte le long des marques
bleues sur le EasyFix. Pour cela, reportez-vous à
l’autocollant entouré de bleu sur le côté du EasyFix.
WARNING!
N’utilisez jamais une autre configuration de
sangles que celle indiquée!
FR
3
1212
Oui
Non
Oui
Oui
Oui*
Bleu
Non
Oui
• Fixation avec ceinture à 3 points
• Fixation avec ceinture à 2 points
• Sur le siège passager
• Sur la banquette arrière gauche/droite
• Sur la banquette arrière au milieu
• Marque passage de la ceinture
• Airbag frontal
• Airbag latéral

28 29
A. Installation
ATTENTION!
Vérifiez que les connecteurs Isofix sont rentrés.
• Poussez sur le bouton de commande de l’appui
et tirez l’appui le plus possible vers l’avant.
ATTENTION!
Verrouillez les banquettes arrières rabattables.
ATTENTION!
Sur certains sièges, les ceintures sont fixées
tellement vers l’avant qu’il n’est pas possible
d’installer le siège. Dans ce cas, essayez un autre
siège. Contrôlez la liste des marques de voitures,
chapitre 9.
• Placez le EasyFix sur la banquette de voiture.
Assurez-vous que la patte d’appui soit totalement
dépliée.
• Ouvrez la pince de ceinture bleue en tirant le levier
vers le haut. Faites passer la ceinture d’épaule
et celle de hanche en même temps dans l’ouverture
prévue.
• Faites passer les ceintures de la voiture entre la base
et l’attache de ceinture bleue puis par la deuxième
ouverture de ceinture. La ceinture de voiture
est maintenant sur son côté (verticale).
• Bouclez la ceinture de sécurité de la voiture.
ATTENTION!
Assurez-vous que la sangle n’est pas torsadée.
• Fermez l’attache de ceinture en poussant le
levier vers le bas.
• Contrôlez si le EasyFix est bien fixé en tirant dessus.
B. Réglage de la longueur de l’appui
• Voir chapitre 3.1, point B: “Réglage de la longueur
de l’ap pui”.
Liste de contrôle …
Après l’installation, vérifiez encore une fois, pour
une sécurité optimale de votre enfant, les éléments
suivants:
• La ceinture auto est fermement tendue et n’est
pas torsadée,
• les deux parties de la ceinture passent par les
ouvertures de ceinture dans la base, et sous la pince
de ceinture bleue,
• L’appui est complètement déplié et sa butée est sur
le centre de rotation,
• L’indicateur sur le pied de l’appui est vert,
• Sur certains sièges, les ceintures sont fixées
tellement vers l’avant qu’il n’est pas possible
d’installer le siège.
• Le EasyFix dans son intégralité est installé
fixement et de manière stable dans la voiture, en
tirant sur le EasyFix.
C. Démontage du EasyFix
• Placez l’appui dans sa position initiale en appuyant
sur le bouton de commande et en faisant
glisser l’appui.
• Détachez la ceinture de voiture et ouvrez la
pince de ceinture bleue.
• Enlevez la ceinture de voiture entre la base et la
pince bleue et fermez la pince de ceinture.
• Enlevez le EasyFix de la voiture.
14
15
16
17
17
18
19
20
21
FR
4. INSTALLER ET ENLEVER LE
CABRIOFIX
A. Installation du CabrioFix
• Positionnez le CabrioFix tourné vers l’arrière
( votre enfant est en fait positionné en
sens contraire du roulage) au-dessus de le
EasyFix. Ce faisant, la poignée doit être droite.
• Cliquez le CabrioFix pour qu’il soit fixé par ses
2 axes sur les points d’ancrage de le EasyFix.
ATTENTION!
Vous devez entendre un clic clair et les indicateurs
doivent être verts.
ATTENTION!
N’utilisez ce produit en aucun cas lorsque
l’indicateur reste rouge.
Répétez les opérations ci-dessus. En cas de doute
ou de questions, prenez contact avec le fabricant.
• Contrôlez si le CabrioFix est bien fixé
en tirant dessus.
Pour l’installation et l’enlèvement de l’enfant dans le
CabrioFix, nous vous renvoyons au mode d’emploi
du CabrioFix. Ce n’est qu’en cas d’utilisation correcte
que la sécurité de votre enfant est assurée de manière
optimale. Prenez donc le temps de lire attentivement
et intégralement ce mode d’emploi. Si vous n’avez plus
ce mode d’emploi, prenez contact avec notre point
de service clientèle dans votre pays ou téléchargez les
informations nécessaires depuis notre site internet:
www.maxi-cosi.com.
B. Enlever le CabrioFix
• Déverrouillez le CabrioFix en tirant le levier de
déverrouillage vers le haut et en tirant en même
temps vers l’avant. Enlevez le CabrioFix de le
EasyFix.
5. ENTRETIEN
ATTENTION!
Ne faites ceci que lorsque le EasyFix se
trouve hors de la voiture.
• Nettoyez les parties en plastique de le EasyFix avec
un chiffon, à l’eau tiède savonneuse.
N’utilisez jamais de produits agressifs pour ce faire.
ATTENTION!
N’utilisez jamais de lubrifiants, même pas pour les
parties mobiles de le EasyFix.
22
23
24
2625
FR

30 31
6. INSTRUCTIONS GENERALES
Veillez toujours à ce qui suit…
• Avant l’achat, essayez si le siège auto pour bébé
s’adapte bien dans votre voiture (voir chapitre 9:
la liste de types de voitures).
• Utilisez toujours le siège-auto pour bébé, même
pour les petits trajets, car c’est justement alors que
se passent la plupart des accidents.
• N’utilisez pas le EasyFix dans un endroit
où est installé un coussin autogonflable frontal,
ce peut être dangereux. Ceci ne vaut pas pour
les coussins autogonflables latéraux.
• Le EasyFix doit toujours être fixé avec la ceinture
de voiture / Isofix et l’appui, même lorsqu’il n’est pas
utilisé. Un EasyFix non attaché peut
blesser les autres passagers en cas d’arrêt
d’urgence.
• Veillez à ce que le EasyFix ne soit pas coincé ou
surchargé par des bagages lourds, des sièges
réglables ou des portières qui se referment.
• Couvrez toujours le EasyFix lorsque la voiture est
garée en plein soleil, les parties en plastique et en
métal peuvent devenir très chaudes.
• Assurez-vous les bagages et autres objets (par
exemple sur la planche porte-chapeaux) qui peuvent
causer des blessures lors d’un accident, sont bien
attachés.
• En cas de longs déplacements, faites des pauses
régulières pour accorder à votre enfant un peu de
liberté de mouvement.
• Ne laissez jamais l’enfant seul dans la voiture.
• Conservez le mode d’emploi pour toute utilisation
future, dans l’espace prévu pour cela, derrière le
EasyFix.
• N’utilisez jamais de produits de deuxième
main, vous ne savez jamais ce qu’ils ont pu subir.
La sécurité du siège ne peut être garantie par
le fabricant que lorsqu’il est utilisé par son premier
propriétaire.
• En cas d’accident, remplacez toujours le
EasyFix. Il peut être devenu dangereux,
suite à un endommagement non directement
visible.
• Le fabricant tient compte du fait que les sièges
de voiture peuvent laisser des marques au
revêtement de la voiture ou aux ceintures de voiture.
Suite aux normes de sécurité stipulées et la force
avec laquelle ils doivent être tendus, ceci ne peut
être évité. Le fabricant n’est pas responsable pour
tout dommage éventuel y étant dû.
Et bien entendu…
• Donnez vous-même le bon exemple et portez
toujours votre ceinture de sécurité!
FR
7. SEPARATION DES DECHETS
Pour une utilisation optimale et sûre des sièges-auto,
il ne faut pas utiliser ceux-ci plus de 5 ans après la
date d’achat. Suite au vieillissement du plastique, en
autres sous l’effet des rayons solaires, les propriétés du
produit peuvent se dégrader insensiblement. De même,
si votre enfant est trop grand pour le siège, nous vous
conseillons de ne plus l’utiliser et de le mettre aux
détritus. Dans le souci de protéger l’environnement,
nous vous prions de séparer les déchets au début
(emballage) et à la fin (pièces du produit) de la durée
de vie de le EasyFix.
Gardez le plastique du matériel d’emballage hors
de la portée des enfants pour éviter les risques
d’étouffement.
FR
Emballage Boîte en carton Déchets en papier
Sac plastique Déchets ménagers
Parties en plastique Conformément aux caractéristiques/spécifications
du conteneur prévu pour cela
Parties en métal Conteneur pour métal
Pièces du produit

32 33
8. SÌEGES SUIVANTS
9. LISTE MARQUES DE VOITURES
Le EasyFix ne peut pas être utilisé sur toutes les
marques de voiture en raison de l’utilisation de points
d’ancrage Isofix et d’un appui ou de la ceinture à
3 points et d’un appui qui assurent une sécurité et
une facilité d’installation optimales. Le EasyFix est
homologué pour l’usage “semi-universel” et peut
être installé sur les sièges de marques de voitures
spécifiques dont une liste a été établie.
Cette liste est sujette à des modifications et s’allonge
au cours du temps. Pour une version actualisée de
la liste marques de voitures, nous vous renvoyons au
site Internet www.maxi-cosi.com et / ou au point de
vente en question du EasyFix. Vous pouvez également
demander ici si le EasyFix convient pour votre voiture.
La liste des marques de voitures valable actuellement
vous est remise séparément lors de l’acquisition du
EasyFix.
Type of car seat
Autorisation selon ECE R 44/04
Groupe
1
2 + 3
Poids du corps de
l’enfant
9 à 18 kg
15 à 36 kg
Age
9 mois - 3,5 ans
3,5 à 12 ans
Tobi
Rodi AirProtect
FR
10. GARANTIE
Notre garantie de 24 mois reflète notre confiance dans
la qualité supérieure de notre conception, ingénierie,
production et la performance du produit. Nous
garantissons que ce produit a été fabriqué
conformément aux exigences de sécurité et normes de
qualité actuelles européennes applicables à ce produit,
et que ce produit est, au moment de l’achat, exempt
de défaut de matériau et de fabrication.
Notre garantie de 24 mois couvre tous les défauts de
matériau et de fabrication pour une utilisation dans
des conditions normales et conformément à la notice.
Pour demander des réparations ou des pièces de
rechange sous garantie pour des défauts de matériau
et de fabrication, vous devez présenter la preuve d’un
achat effectué dans les 24 mois précédant la demande
de service.
Notre garantie de 24 mois ne couvre pas les
dommages causés par l’usure normale, les accidents,
l’utilisation abusive, la négligence ou les conséquences
d’un non-respect de la notice. Des exemples d’usure
normale comprennent des roues et des tissus usés par
l’utilisation régulière et la décomposition naturelle de
couleurs et des matériaux au fil du temps et par une
utilisation prolongée.
Que faire en cas de défauts:
Si des problèmes ou des défauts surviennent, le
meilleur choix pour un service rapide est de consulter
votre revendeur. Notre garantie de 24 mois est
reconnue par eux (1). Vous devez présenter la preuve
d’un achat effectué dans les 24 mois précédant la
demande de service. Cela est plus facile si vous
obtenez l’approbation au préalable de votre demande
de service par le Service. En principe, nous payons le
transport et le fret de retour pour des demandes de
service sous garantie. Les dommages qui ne sont pas
couverts par notre garantie peuvent être traités à un
tarif raisonnable.
Cette Garantie est conforme à la Directive européenne
99/44/EG du 25 mai 1999.
(1) Les produits achetés auprès de détaillants ou de
revendeurs qui ôtent ou changent les étiquettes ou
les numéros d’identifications sont considérés
comme non autorisés. Aucune garantie ne
s’applique à ces produits puisque l’authenticité de
ces produits ne peut pas être vérifiée.
FR

34 35
11. QUESTIONS
Si vous avez des questions, vous pouvez appeler votre
fournisseur ou l’importateur (voir au dos du mode
d’emploi). Pour cela, veillez à préparer les informations
suivantes:
• Le numéro de série qui figure au bas de l’autocollant
orange-blanc-orange (au dos du EasyFix).
• La marque et le modèle de votre voiture, ainsi que le
siège où est utilisé le EasyFix.
• L’âge (taille) et le poids de votre enfant.
Verehrte Eltern
Wir beglückwünschen Sie zum Kauf dieses EasyFix.
Bei der Entwicklung des EasyFix standen Sicherheit,
Bedienungsfreundlichkeit, Komfort und Design stets
im Vordergrund. Dieses Produkt erfüllt strengste
Sicherheitsanforderungen.
Eine Untersuchung ergab, dass viele Autositze nicht
richtig benutzt werden. Nehmen Sie sich daher
die Zeit, diese Gebrauchsanweisung sorgfältig
durchzulesen. Nur bei ordnungsgemäßer Benutzung ist
die Sicherheit Ihres Kindes gewährleistet.
Langzeituntersuchungen unserer Abteilung
Produktentwicklung sowie der intensive Kontakt und
die Beratung mit Testpersonen und Kunden stellen
sicher, dass wir auf dem Gebiet der Kindersicherheit
mit führend sind. Fragen oder Bemerkungen bezüglich
der Benutzung des EasyFix beantworten wir Ihnen
jederzeit gerne.
Dorel (Für Adressen- und Telefonangaben, siehe die
Rückseite der Gebrauchsanweisung)
1 B a s i s
2 Isofix-Stecker
3 Verankerung
4 Farbanzeige für den CabrioFix
5 Einstellknopf Stützfuß
6 Farbanzeige Stützfuß
7 Stützfuß
8 Zentralknopf auf dem Stützfuß mit Farbanzeige
9 Entriegelungshebel für den CabrioFix
10 Blaue Gurtarretierung
DEFR

36 37
DE
1. WICHTIG: BITTE ZUERST LESEN!
Lesen Sie diese Gebrauchsanweisung sorgfältig
durch, und bewahren Sie diese als Nachschlagwerk
auf. Nur bei Einhaltung der Vorschriften der
Gebrauchsanweisung ist die Sicherheit Ihres Kindes
gewährleistet.
Benutzen Sie ausschließlich vom Hersteller zugelassene
Originalzubehörteile und Teile. Nehmen Sie
keine Veränderungen am Produkt vor. Sollten Sie
Reklamationen oder Probleme haben, kontaktieren Sie
bitte Ihren Händler oder Importeur.
Bitte prüfen Sie immer die Fahrzeugliste vor der
Montage.
WARNUNG!
Der EasyFix ist ein Sicherheitsprodukt und
gewährleistet die Sicherheit nur dann, wenn er
entsprechend den Vorschriften benutzt wird.
WARNUNG!
Der EasyFix darf ausschließlich zusammen mit dem
CabrioFix benutzt werden. Der CabrioFix ist an der
Typenbezeichnung am Gurtpolster und den zwei
Stahlachsen an der Unterseite des CabrioFix zu
erkennen.
Im Zweifelsfall setzen Sie sich bitte mit dem Hersteller
in Verbindung.
INHALT
1. Wichtig: bitte zuerst lesen! 36
2. Anwendungsmöglichkeiten im auto 38
3. Montage und herausnehmen des EasyFix 38
3.1 Anwendung mit Isofix (gelbe markierung am produkt) und stützfuß 38
3.2 Anwendung mit dreipunkt-sicherheitsgurt (blaue markierung am produkt) und stützfuß 41
4. Montage und herausnehmen des CabrioFix 43
5. Pflege 44
6. Allgemeine anweisungen 44
7. Abfalltrennung 45
8. Folgesitze 46
9. Autotypenliste 46
10. Garantie 47
11. Fragen 48
Lassen Sie Ihr Kind nie unbeaufsichtigt im Sitz, im Auto
oder außerhalb des Autos zurück.
Benutzen Sie den EasyFix nicht auf einem Sitz, an der
ein “Frontairbag“ installiert ist, das kann gefährlich
sein. Dies gilt jedoch nicht für die sogenannten
“Seitenairbags”.
Der EasyFix darf sowohl auf dem Vordersitz als auf
dem Rücksitz benutzt werden, allerdings ausschließlich
rückwärts gerichtet. Zurückklappbare Rücksitze müssen
verriegelt werden.
Der EasyFix wurde gemäß den neuesten Richtlinien
der ECE R 44/04, der europäischen Norm für
Autosicherheitssitze, zugelassen und kann zusammen
mit dem CabrioFix für Kinder ab der Geburt bis zu ca.
12 Monaten (Gruppe 0+: 0 bis
13 kg) verwendet werden.
* Da Isofix-Verankerungen und / oder ein Stützfuß
verwendet werden, die eine optimale Sicherheit
und Montagekomfort garantieren, ist der
EasyFix nicht für alle Autotypen geeignet.
Der EasyFix wurde für die “semi-universelle”
Benutzung zugelassen, und eignet sich für die
Montage auf Sitzen einer speziellen Anzahl
von Autos, wie in der beiliegenden Autotypenliste
angegeben (siehe Kapitel 9: Autotypenliste).
Zulassung nach ECE R 44/04
Groupe
0+
EasyFix +
CabrioFix 0 – 13 kg 0 – 12 monate Semi-universell*
Poids corporel de l’enfant Âge
CabrioFix 0+ 0 – 13 kg 0 – 12 monate Universell
DE

38 39
2. ANWENDUNGSMÖGLICHKEITEN
IM AUTO
Der EasyFix wurde für 2 verschiedene
Anwendungsgebiete zugelassen:
Anwendung mit Isofix und Stützfuß (siehe Kapitel
3.1); Für die Benutzung in Autos mit zugelassenen
Isofix-Verankerungen (siehe Kapitel 9: Autotypenliste).
Erkennbar an der gelben Markierung am Produkt und
der gelben Markierung in der Gebrauchsanweisung.
Anwendung mit Dreipunkt-Sicherheitsgurt und
Stützfuß (siehe Kapitel 3.2); Für die Benutzung
in Autos mit einem automatischen Dreipunkt-
Sicherheitsgurt, vorausgesetzt, dieser ist nach der
ECE R16 oder einer gleichwertiger Norm zugelassen
(siehe Kapitel 9: Autotypenliste). Erkennbar an der
blauen Markierung am Produkt und der blauen
Markierung in der Gebrauchsanweisung.
3. MONTAGE UND HERAUSNEHMEN
DES EASYFIX
3.1 Anwendung mit Isofix (gelbe Markierung am
Produkt) und Stützfuß
Wenn Ihr Auto mit Isofix-Verankerungen ausgerüstet
ist, können Sie den EasyFix mit den Isofix-Steckern
zusammen mit dem Stützfuß befestigen. Kontrollieren
Sie, ob Ihr Auto für die Benutzung mit Isofix und
Stützfuß geeignet ist, siehe Kapitel 9: Autotypenliste.
* Kontrolieren Sie die Autotypenliste
Ja*
Gelb
Nein
Ja
• Benutzung auf Sitzen mit Isofix-
Verankerungen (zwischen
Sitzfläche und Rückenlehne) &
Platz für Stützfuß
• Isofix-Verankerungs-Markierung
• Frontairbag
• Seitenairbag
Isofix class E
DE
Benutzen Sie den EasyFix ausschließlich auf einem nach
vorne gerichteten Sitz, der mit Isofix-Verankerungen
ausgestattet ist. Lesen Sie vor der Benutzung zuerst
das vom Autohersteller gelieferte Handbuch.
Eine richtige Befestigung an den Isofix-Verankerungen
ist von größter Wichtigkeit für die Sicherheit Ihres
Kindes. Siehe diesbezüglich auch den gelb umrandeten
Sticker an der Seite des EasyFix.
Verwenden Sie niemals eine andere als die
vorgeschriebene Befestigung!
A. Montieren mit Isofix
WARNUNG!
Verriegeln Sie zurückklappbare Rückbänke.
WARNUNG!
Achten Sie darauf, dass der Stützfuß vollständig
ausgeklappt ist, und dass der Indikator auf
dem Zentralknopf auf rot steht.
• Drücken Sie der Zentralknopf auf dem Stützfuß
ein, und schieben Sie den Stützfuß so weit
wie möglich nach hinten.
• Die Isofix-Stecker befinden sich jetzt im äußersten
Stand, und der EasyFix kann nun montiert
werden.
• Stellen Sie den EasyFix auf den Rücksitz des Autos.
• Halten Sie die Isofix-Stecker gerade vor
die befestigten Isofix-Führungen.
• Klicken Sie beide Isofix-Stecker in die
Isofix-Verankerungen.
WARNUNG!
Achten Sie darauf, dass beide Isofix-Stecker richtig
in den Isofix-Verankerungen befestigt sind: Es muss
2 Mal ein deutliches Klicken zu hören sein.
• Kontrollieren Sie auf eine richtige Befestigung,
indem Sie am EasyFix ziehen.
Der Indikator an der Zentraltaste muss jetzt auf
grün stehen.
• Legen Sie die Hände gegen den EasyFix,
und schieben Sie den EasyFix so weit wie möglich
nach hinten, bis er straff gegen die
Rückenlehne sitzt (Sie hören ein ‘ratterndes’
Geräusch) .
• Kontrollieren Sie nochmals auf eine richtige
Befestigung, indem Sie am EasyFix ziehen.
1
2
3
4
6
7
5
DE

40 41
B. Längenverstellung des Stützfußes
WARNUNG!
Benutzen Sie immer den Stützfuß für eine
sichere Benutzung des EasyFix.
WARNUNG!
Achten Sie darauf, dass der Stützfuß vollständig
ausgeklappt ist und fest auf dem Drehpunkt sitzt.
• Halten Sie die silbere Bedientaste auf dem Stützfuß
eingedrückt und ziehen Sie den Stützfuß nach
unten, bis er den Fußboden des Autos berührt.
WARNUNG!
Achten Sie darauf, dass der Indikator am Fuß
des Stützfußes auf grün steht.
• In einigen Fällen kann es dazu kommen, dass
der EasyFix nicht vollständig durch die Sitzbank
abgestützt wird jedoch dann durch den Stützfuß.
• Lassen Sie den Einstellknopf los, und verriegeln
Sie den Stützfuß, bis ein deutliches ‘Klicken’
hörbar ist.
• Überprüfen Sie, ob der Stützfuß verriegelt ist, und
in seiner Position stehen bleibt, indem Sie
versuchen, ob sich der Stützfuß ohne Eindrücken
des Einstellknopfs nach oben oder nach unten
bewegen lässt.
Checkliste…
Überprüfen Sie nach der Montage zur Sicherheit
und für eine optimale Sicherheit Ihres Kindes
nochmals, ob:
• beide Isofix-Stecker gut an die Isofix-Verankerungen
befestigt sind: Der Indikator an der Zentraltaste des
stützfußes steht auf grün,
• der Stützfuß vollständig ausgeklappt ist,
• die Anzeige am Fuß des Stützfußes auf grün steht,
• der EasyFix vollkommen fest und stabil in das Auto
montiert wurde, indem Sie am EasyFix ziehen.
C. Herausnehmen des EasyFix
• Bringen Sie den Stützfuß in seine Beginnposition
zurück, indem Sie den Einstellknopf eindrücken
und den Stützfuß einschieben.
• Lösen Sie die Isofix-Stecker, indem Sie den
Zentralknopf auf dem Stützfuß eindrücken.
Der Indikator auf der Zentraltaste am Stützfuß
steht jetzt wieder auf rot. In einigen Fällen erfordert
das Loskoppeln viel kraft. Es hilft dann, den
EasyFix in die Sitzbank des Autos zu drücken und
gleichzeitig auf den entriegelungsknopf zu drücken.
• Entfernen Sie den EasyFix von den Isofix-
Verankerungen.
• Nehmen Sie den EasyFix aus dem Auto.
8
9
10
11
12
13
DE
3.2 Anwendung mit Dreipunkt-Sicherheitsgurt
(blaue Markierung am Produkt) und Stützfuß
Wenn Ihr Auto nicht mit Isofix-Verankerungen
ausgestattet ist, können Sie den EasyFix auch mit
einem Dreipunkt-Sicherheitsgurt zusammen mit dem
Stützfuß befestigen. Kontrollieren Sie, ob Ihr Auto für
die Benutzung mit einem Dreipunkt-Sicherheitsgurt
und Stützfuß geeignet ist, siehe
Kapitel 9: Autotypenliste.
* Vorausgesetzt, dass auf dem mittleren Sitz
des Rücksitzes ein Dreipunkt-Sicherheitsgurt
vorhanden ist und vorausgesetzt, dass genug Platz
für die richtige Montage des Stützfußes vorhanden
ist (siehe Kapitel 9: Autotypenliste).
Benutzen Sie den EasyFix ausschließlich auf einem
nach vorne gerichteten Sitz, mit einem automatischen
Dreipunkt-Sicherheitsgurt, vorausgesetzt, dieser ist
nach der ECE R16 oder einer gleichwertigen Norm
zugelassen.
Der richtige Verlauf des Sicherheitsgurts ist von größter
Wichtigkeit für die Sicherheit Ihres Kindes.
Der Sicherheitsgurt muss entlang der blauen
Markierungen an den EasyFix montiert werden. Siehe
diesbezüglich auch den blau umrandeten Sticker an der
Oberseite des EasyFix.
WARNUNG!
Verwenden Sie niemals einen anderen als den
vorgeschriebenen Gurtverlauf!
DE
3
1212
Ja
Nein
Ja
Ja
Ja*
Blau
Nein
Ja
• Befestigung mit Dreipunkt-
Sicherheitsgurt
• Befestigung mit Zweipunkt-
Sicherheitsgurt
• Auf den Beifahrersitz
• Auf den Rücksitz links/rechts
• Auf den Rücksitz in der Mitte
• Gurtverlauf Markierung
• Frontairbag
• Seitenairbag
Table of contents
Languages:
Other Dorel Car Seat manuals

Dorel
Dorel GMA 2010 User manual

Dorel
Dorel Rodi AirProtect Troubleshooting guide

Dorel
Dorel COMPLETE AIRCA 2010 User manual

Dorel
Dorel CabrioFix User manual

Dorel
Dorel TRIOFIT User manual

Dorel
Dorel V9 A 2010 User manual

Dorel
Dorel Solo Instruction Manual

Dorel
Dorel OS 2010 User manual

Dorel
Dorel Bebe Confort Pebble User manual