Dorel TRIOFIT User manual

Harness: Shoulder straps are attached to a splitter plate behind seat. Pull
strap end in front of seat to tighten harness. Push lever at lower front of seat
and pull on shoulder straps to loosen. Lap straps are threaded through slots
at hips and run straight across under seat shell.
Harness slots: There are two sets of slots. To adjust harness for smaller
infant, route straps through lowest set of slots, below metal bar (diagram 1).
To use the lower set of harness slots, you must adjust headrest to lowest
position, you must use upper set of loops on harness positioned as shown
in diagram 2, you must use body pillow (diagram 3), and you must adjust
crotch strap to innermost position with crotch strap anchor on top of shell’s
middle slot (diagram 4). Route harness straps and crotch strap through slots
in body pillow. When using upper set of harness slots, harness straps must
be routed over metal bar (diagram 5). Harness may be raised or lowered by
rotating the levers at the upper sides of the headrest and lifting or lowering
headrest (diagram 6). Make sure the headrest and metal bar at rear of
seat are locked into position.
Crotch strap: There are three positions. Middle or innermost slot must
be used if child is rear-facing. Any slot may be used for forward-facing.
To change position, turn metal anchor under seat sideways and feed it
through slot to top of seat. Re-thread through desired slot and tug to be
sure anchor is flat underneath seat. If using harness slots below metal
bar, crotch strap must be routed as described in “Harness slots” section above.
SEE PAGE 2
DOREL TRIOFIT
Type: Convertible/Combination
Last date made: Current
First made: 2018
Weight limits: 5 to 40 lbs. rear-facing, 22 to 50 lbs. & at least
2 years old forward-facing with harness, 40 to 100 lbs. and at
least 4 years old as belt-positioning booster with vehicle lap-
shoulder belt on child.
Harness: 5-point harness to 50 lbs. (removable)
P. 1 of 2
Important: This information sheet is not a substitute for complete manufacturer’s directions and current recall list.
SafetyBeltSafe U.S.A., P.O. Box 553, Altadena CA 91003 (310) 318-5111 (800) 745-SAFE ©SafetyBeltSafe U.S.A. #450 10/21
1
4
2
5 6
3

P. 2 of 2
Dorel TrioFit
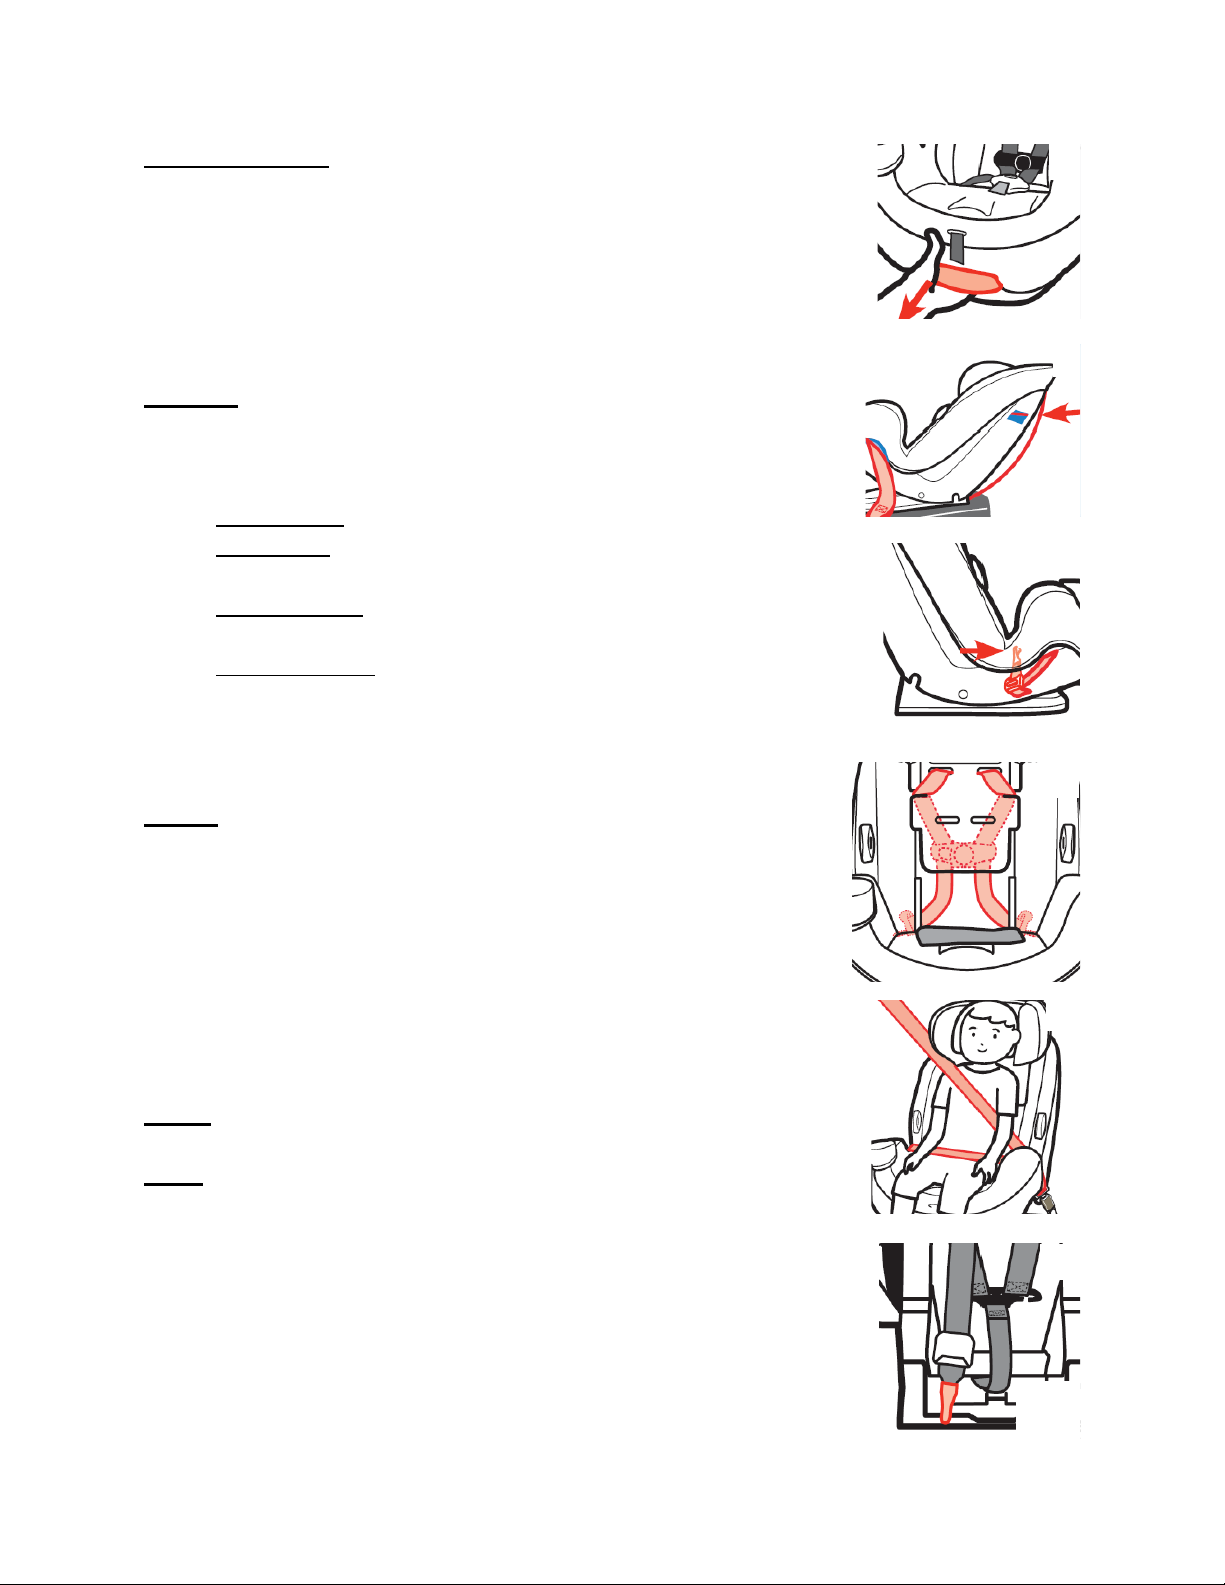
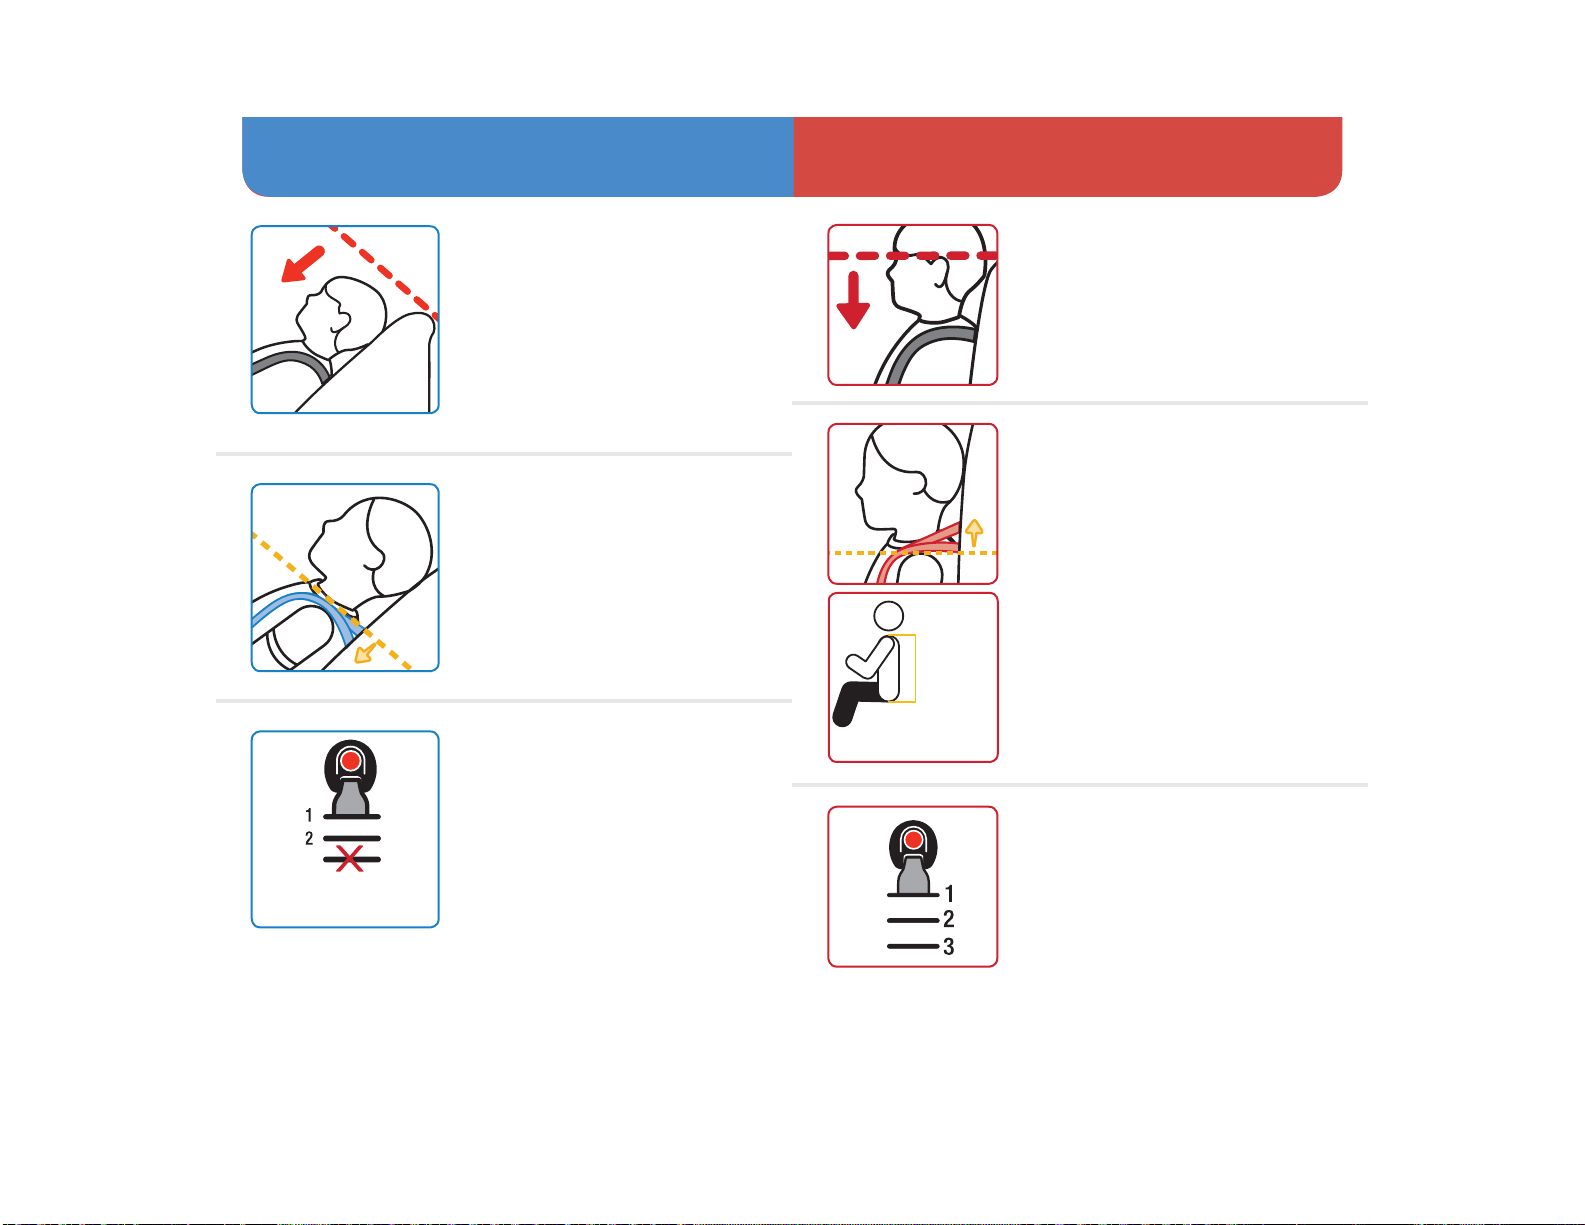
Angle adjustment: There are 3 positions. Grasp handle in center front of
seat (diagram 7), pull out to recline, pull up on center of seat to make
upright. Use fully reclined or semi-reclined for rear-facing and upright for
forward-facing. For children who cannot sit up unassisted, level line on
shell (diagram 8) must be parallel to ground. When forward-facing, use
fully upright position. If forward facing in harness or booster mode, use
semi-reclined position only if needed to make child restraint flush against
upright vehicle seatback.
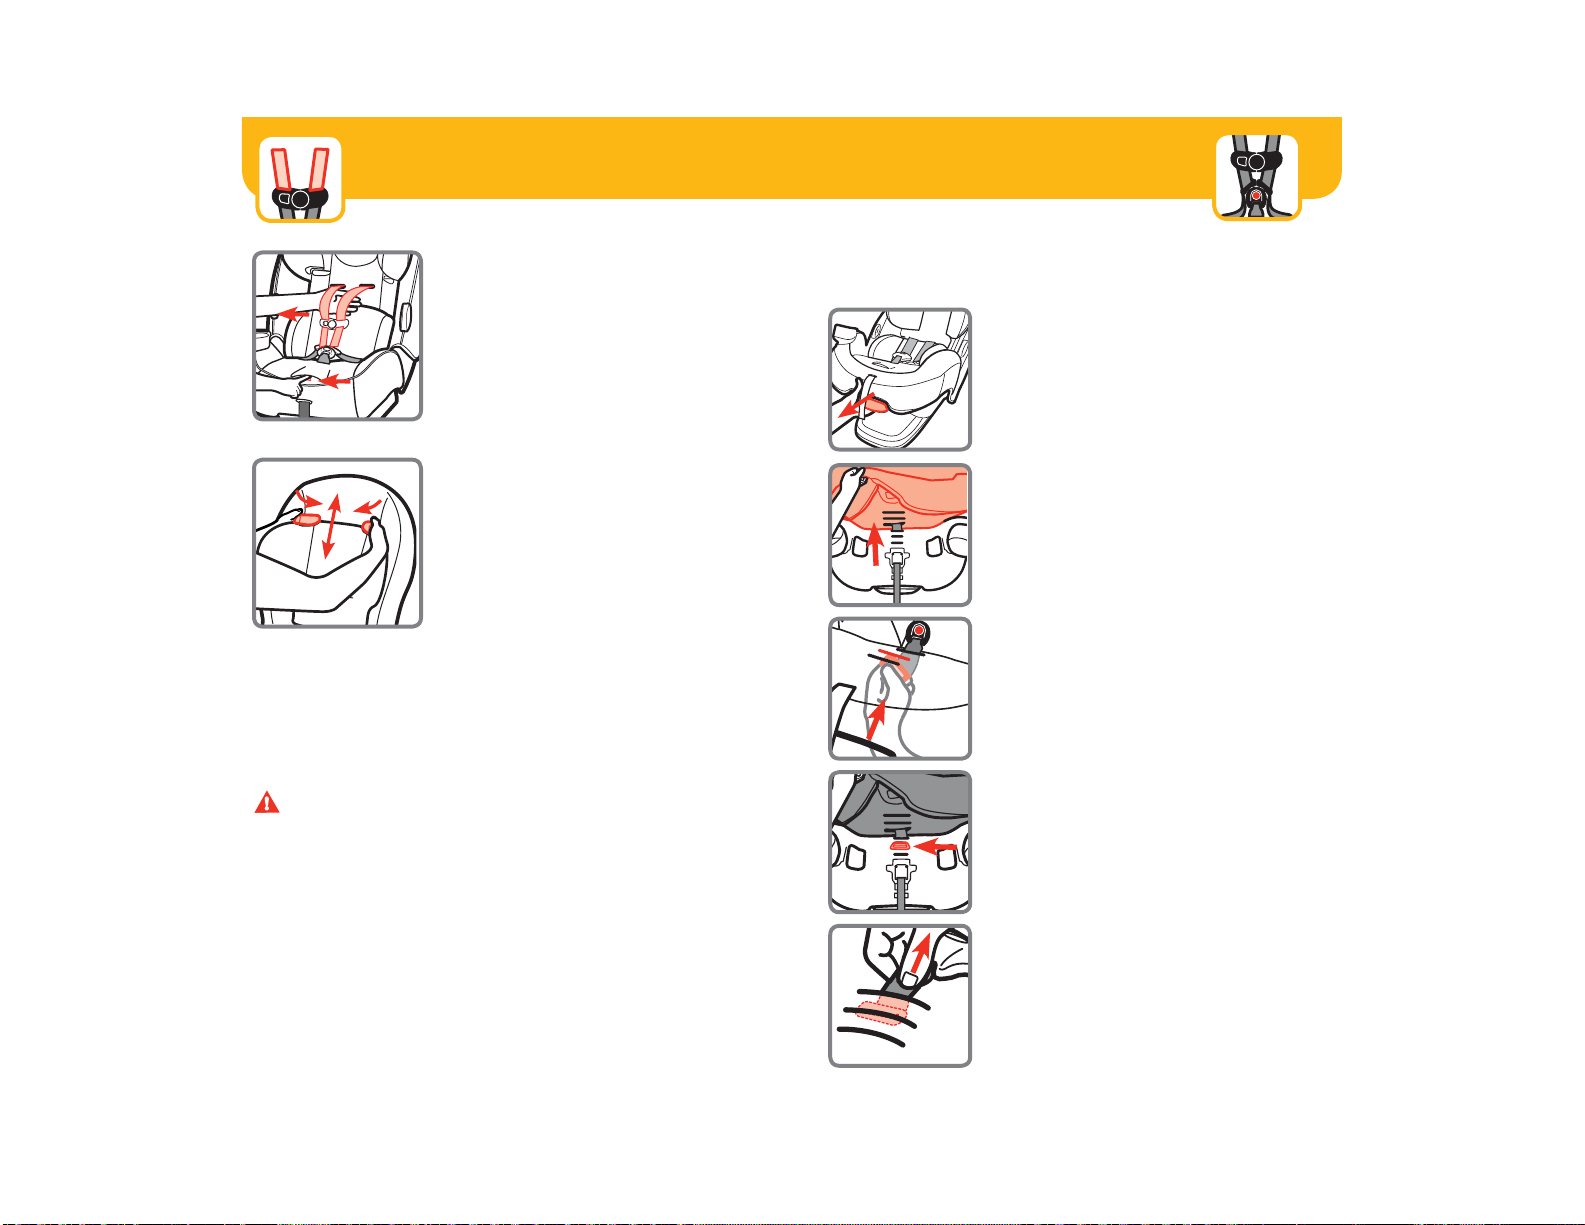
Belt path: If LATCH is not in use, thread connectors through rear-facing
belt path and attach connectors to storage locations on sides of restraint
(diagram 9). Do not install restraint in harness or booster mode
using inflatable safety belt.
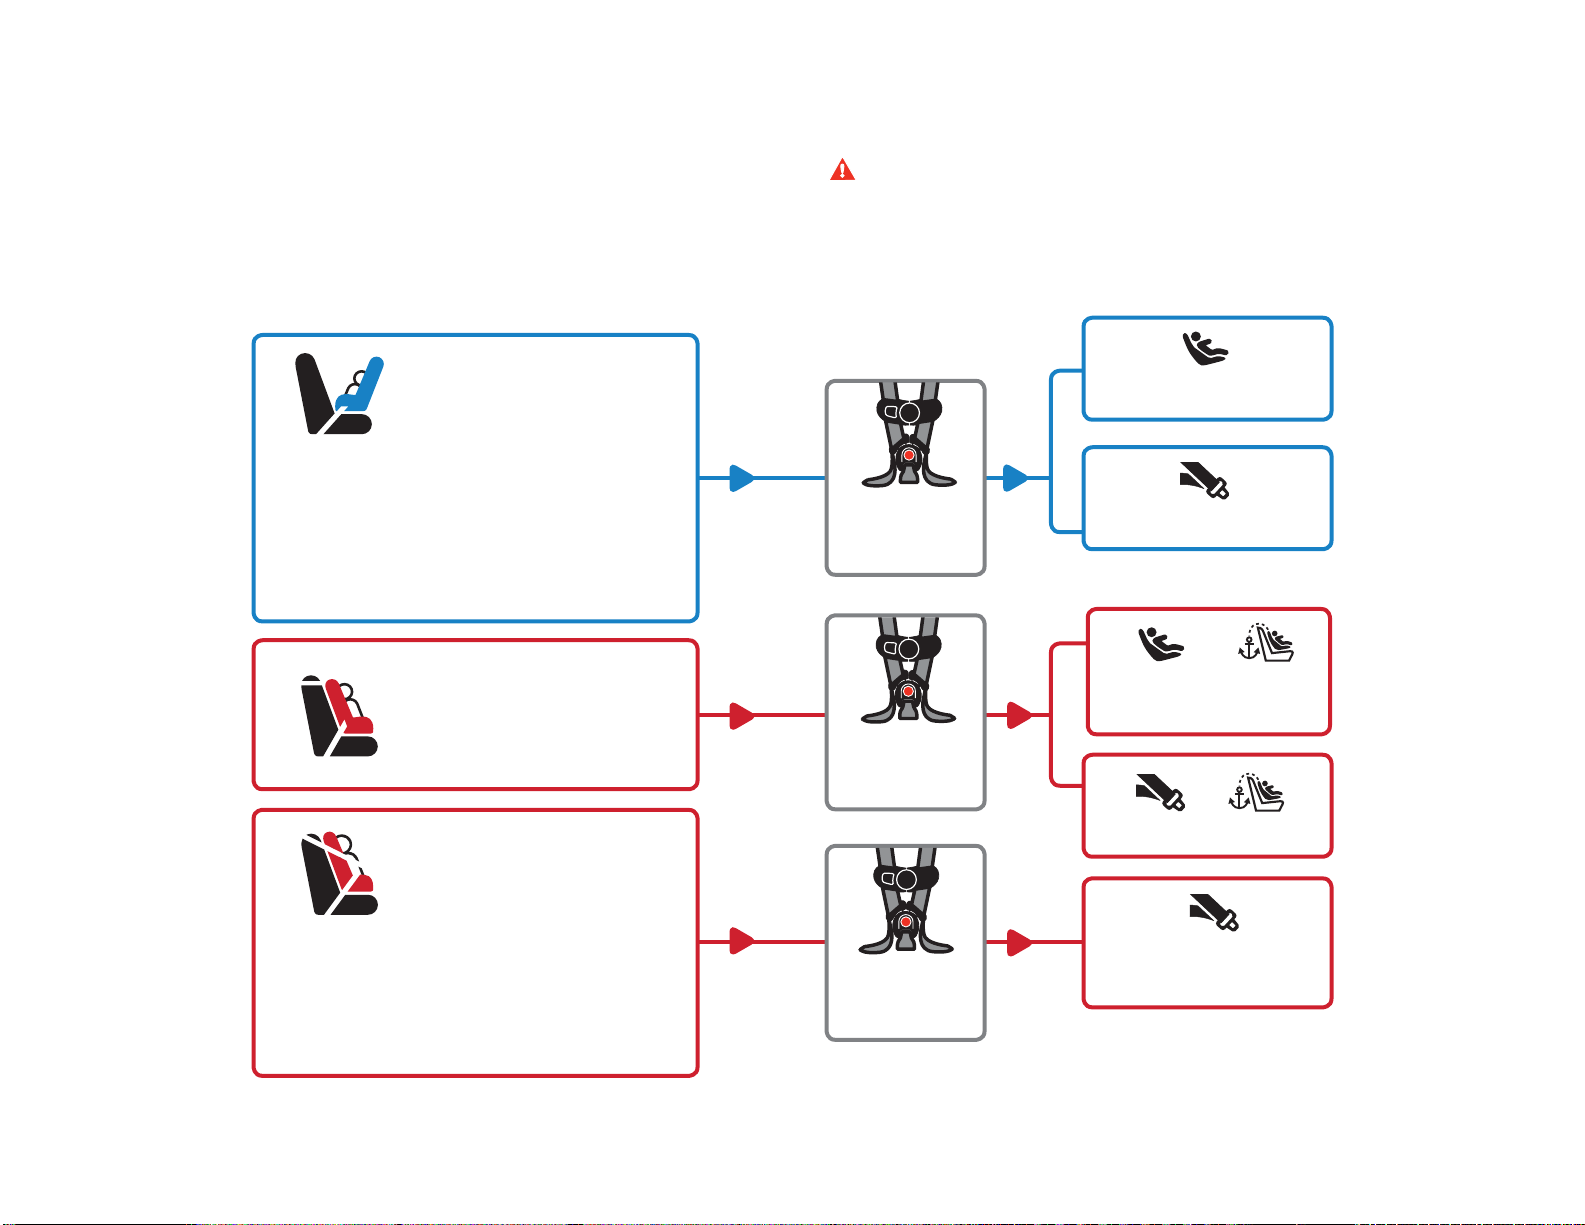
With harness:
Rear-facing: The vehicle belt is routed under child’s legs through
slots on each side of shell.
Forward-facing: The vehicle belt is routed through slots behind the
seat.
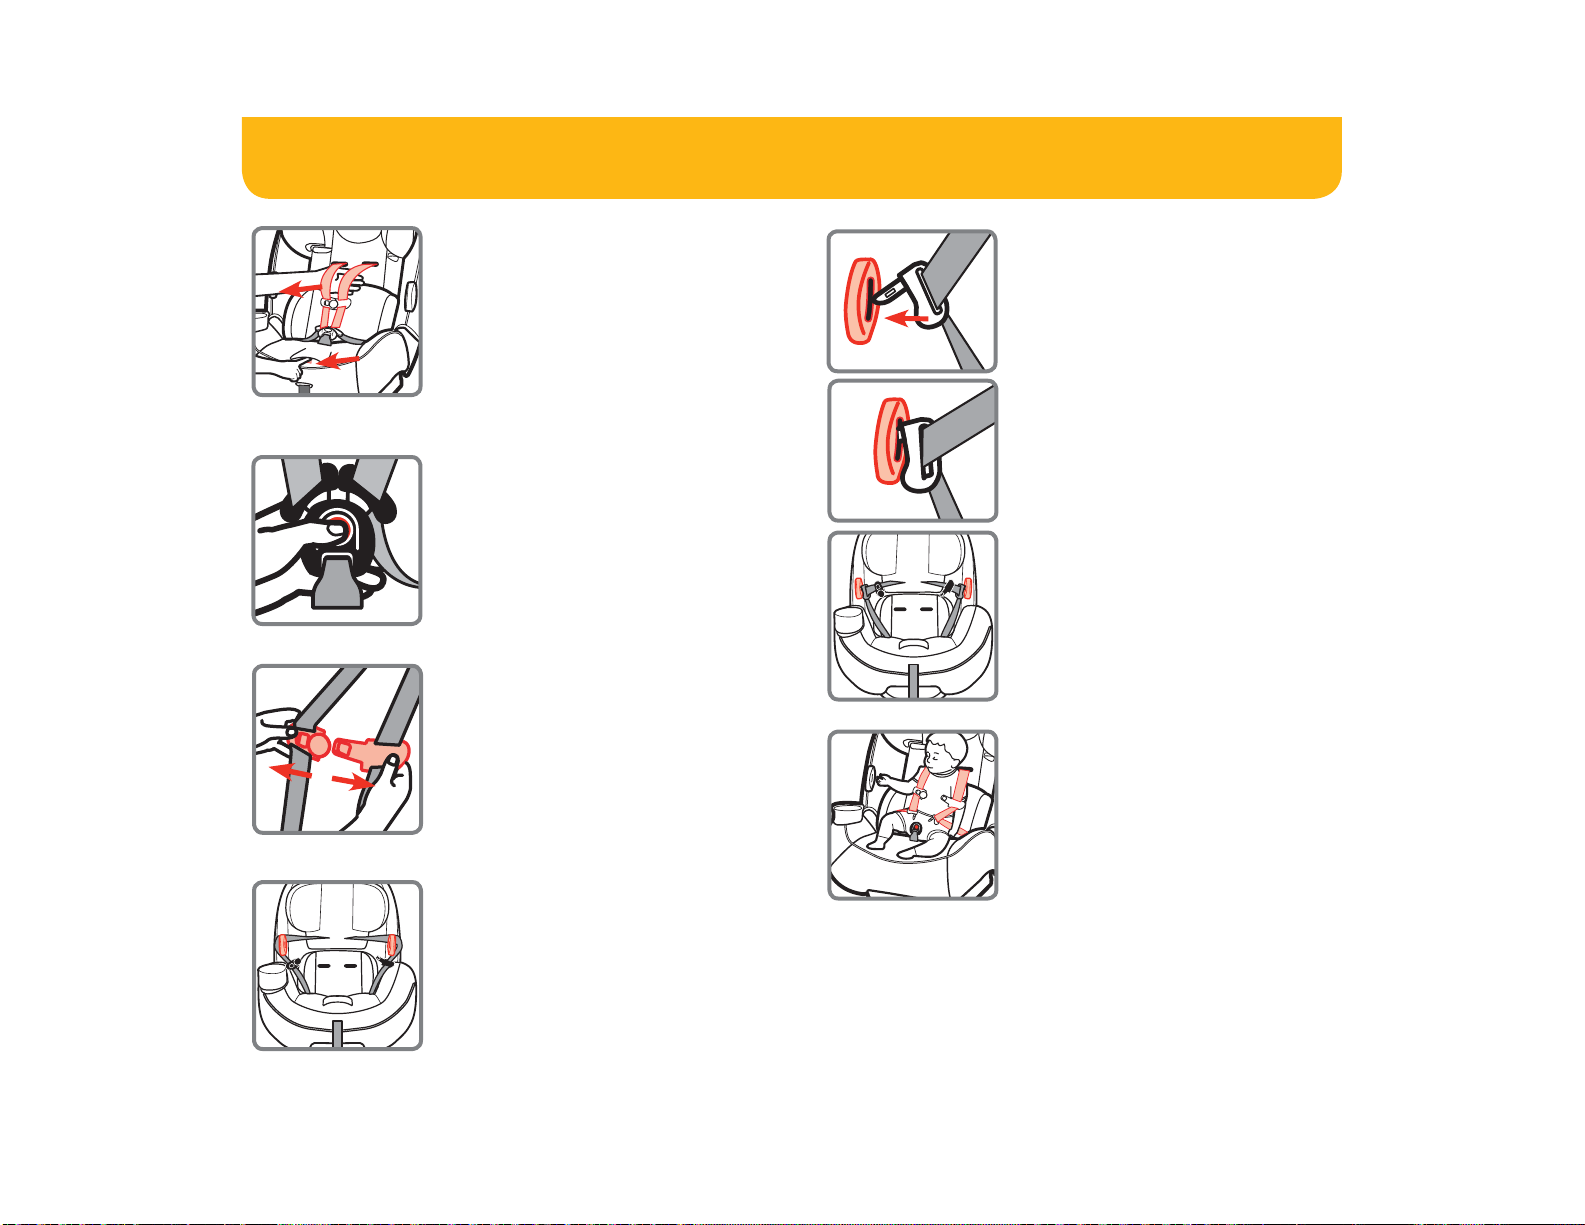
Without harness: Remove crotch strap and store harness behind
headrest and seat pad (diagram 10). Use vehicle lap-shoulder belt on child
as shown in diagram 11. Do not use guide under headrest to position
shoulder belt unless necessary for correct fit on child. LATCH straps
are not used in booster mode.
LATCH: Comes with a single attached lower connector strap. Lower
connector strap is not used in belt-positioning booster mode. For
rear-facing use, thread strap through hole in side of shell, under seat
pad and between buckle strap and harness adjuster lever, and through
rear-facing belt path. For forward-facing use, thread strap through
forward-facing belt path. Discontinue use of lower anchors when child is
40 lbs. Lower anchors may be used in center seating position only when
position is designated as a LATCH location in vehicle owner's manual and
space between bars is at least 11 inches (refer to Safe Ride News LATCH
manual).
Tether: Yes, for forward-facing use with harness only. If tether is not in
use, store as shown in diagram 12.
Other: Grow and Go and MultiFit have similar appearance, but different
weight limits.
Restraint expires ten years from date of manufacture.
Restraint may be used on aircraft in harness modes only.
DOREL brands include: COSCO, SAFETY 1st, and MAXI-COSI.
Model names may apply to any one or more of these brands.
Important: This information sheet is not a substitute for complete manufacturer’s directions and current recall list.
SafetyBeltSafe U.S.A., P.O. Box 553, Altadena CA 91003 (310) 318-5111 (800) 745-SAFE ©SafetyBeltSafe U.S.A. #450 10/21
7
8
9
11
10
12

TrioFit
Convertible Car Seat
4358-7313B
8.9.18
KEEP INSTRUCTIONS FOR FUTURE USE.
Read all instructions before using this car seat.
WARNING: Failure to follow the
warnings on the labels and in the
instruction manual can result in
serious injury or death
to your child.
©2018 Dorel Juvenile.

Choosing Rear Facing, Forward Facing, or
Booster Seat
Your child’s height, weight, and age determine how your child
restraint should be placed in the vehicle.
Please talk to your doctor about the best option for your child.
See page 3 to
adjust internal
harness system
See page 3 to
adjust internal
harness system
See page 16 to
store internal
harness system
WARNING: Verify your child’s weight and height
(do not guess) before choosing the child restraint’s
placement.
Children up to 1 year of age must ride rear facing.
The American Academy of Pediatrics recommends
that children remain rear facing until they are at least
2 years old.
In this child restraint, your child can remain rear facing
up to 40 lb (18 kg) and up to 40 in. (101.6 cm).
The American Academy of Pediatrics recommends
that children remain in a five-point harness until
they outgrow their forward-facing harnessed child
restraint.
This typically occurs around age 4, but some children
outgrow them sooner and others not until later.
Lower Anchor Belt Install
up to 40 lb (18 kg)
Page 46
+
FORWARD FACING
22-50 lb (10.1-22.6 kg)
29-45 in. (73.6-114.3 cm)
At least 1 year old
REAR FACING
5-40 lb (2.3-18 kg)
19-40 in. (48-101.6 cm)
BOOSTER SEAT
40-100 lb (18.1-45.4 kg)
43-52 in. (110.1-132.1 cm)
Lap and Shoulder Belt
Install Page 54
Lower Anchor Belt Install
Page 35
Vehicle Belt Install Page 40
Vehicle Belt Install Page 50
+

Table of Contents
Getting Started..................................... 1
Parts of the Child Restraint.......................................1
Prepare Child Restraint to Fit Your Child....................3
Rear-Facing Child Fit...............................................5
Forward-Facing Child Fit..........................................6
Changing Position of Buckle.....................................7
Adjusting Headrest/Harness Height............................9
Harness System Adjustments for Smaller Infants........10
Securing Child in Child Restraint...............................13
General Use ........................................... 15
Reclining Child Restraint..........................................15
Storing Harness System...........................................16
Removing Seat Pad for Cleaning...............................19
Installing Harness System........................................22
Accessories on Select Models..................................25
Safety Information............................... 26
Child Restraint Use..................................................26
Installation in Vehicle...............................................26
Vehicle Seating Position...........................................27
Vehicle Information ............................. 28
Choosing Lower Anchor or Vehicle Belts....................28
Knowing Your Vehicle Belts.......................................29
Aircraft Information .................................................33
Rear Facing ........................................... 34
Lower Anchor Belt Installation............................35
Vehicle Belt Installation .....................................40
Forward Facing .................................... 44
Tether Use........................................................45
Lower Anchor Belt Installation............................46
Vehicle Belt Installation .....................................50
Booster Seat ......................................... 52
Booster Seat Child Fit..............................................53
Lap and Shoulder Belt Installation......................54
Important Information........................ 56
Using a Locking Clip................................................56
Dorel Juvenile Group Information..............................58
Registration and Safety Notices................................59
Troubleshooting.......................................................60
Replacement Parts List............................................61
Warranty.................................................................62

Y
W
Parts of the Child Restraint
1 2
A. Headrest/Harness
Adjustment Levers
B. Adjustable Headrest
C. Shoulder Belt-Positioning
Guide (behind headrest pad)
D. Removable Cup Holder
(see page 25)
E. Body Pillow (see page 25)
F. Recline Handle
G. Easy Out Harness Holders
H. Harness Release Lever
(under flap)
I. LowerAnchor Belt
(see page 28)
J. HarnessAdjustment Strap
SideViewFrontView
BackViewHarness System Detail
L
M
N
O
P
X
N
K
V
N
K. Rear-Facing Belt Path
L. Rear-Facing Level Line
M. Forward-Facing Belt
Path
N. LowerAnchor Belt
Attachment for Storage
O. Shell (child restraint)
P. Base
Q. Upper Shoulder Harness
Slots
R. Chest Clip
S. Lower Shoulder Harness
Slots for Smaller Infants
T. Harness Straps
U. Buckle
V. Tether (see page 45)
W. Tether Attachment for
Storage
X. Splitter Plate
Y. Instruction Manual Storage
(in bottom of base)
Q
R
S
T
U
C
A
B
C
D
E
F
G
I
H
J

4
Prepare Child Restraint to Fit Your Child
3
1. Fully Loosen Harness
Straps
Push down on harness release
lever (under flap on front of seat
pad) while pulling out on harness
straps as shown.
3. Release Chest Clip
Press on chest clip release button
and pull apart.
2. Unbuckle Harness
Press in towards the top of the red
button.
Pull buckle tongues out.
2. Or the buckle tongues can be
placed into the slots in the harness
holders as shown.
5. Place Child in
Child Restraint to
Determine Proper
Harness Fit
The child’s bottom and back
should be flat against the child
restraint.
See pages 5-6 for fit
guidelines.
4. Place Harness Straps
Out of Way
The Easy Out Harness Holders can
be used two ways.
1.You can secure the harness
straps around them as shown.
1
2

65
How Does Your Child Fit? Forward-Facing Child Fit
Harness Strap Position
The harness strap must be at or
slightly above the shoulders;
never below.
Max Seated Shoulder Height
In this car seat, the maximum seated
shoulder height is 17 in. (43.2 cm).
To measure your child’s seated
shoulder height: have them sit on
the floor with their back flat against a
wall. Then measure from the floor up
to the top of their shoulder.
Buckle Position
Buckle can be used in any slot.
Choose the slot closest to your child.
The buckle should not be
underneath or behind your child.
Head Position
The tops of your child’s ears
must be below the top of the
car seat’s headrest.
Max Seated
Shoulder Height
17 in.
(43.2 cm)
Rear-Facing Child Fit
Need to make adjustments?
To change buckle position, see pages 7-8.
To adjust headrest/harness height, see page 9.
To make adjustments for smaller infants,see pages 10-12.
Harness Strap Position
The harness strap must be
at or slightly below the shoulders;
never above.
Buckle Position
Buckle must be used in either the
1st or 2nd slot. Choose the slot
closest to your child.
The buckle should not be
underneath or behind your child.
Head Position
The top of your child’s head
must be at least 1 in.
(2.5 cm) below the top of the
car seat’s headrest.
Do not use 3rd slot in
Rear-Facing mode.
Need to make adjustments?
To change buckle position, see pages 7-8.
To adjust headrest/harness height, see page 9.

7
6. Insert Buckle’s Metal
Retainer into Slot
Closest to Child
Buckle MUST face out.You MUST
use the 1st or 2nd buckle slots
when child restraint is used rear
facing.Any slot can be used when
forward facing.
1
2
3
7. Reach Under the Seat
Between Base and Shell
and Through Recline
Handle
Pull metal retainer completely
through pad and shell.
8. Check Buckle
Pull up on buckle to make sure it
is secured.The buckle MUST not
pull out.
WARNING: Failure to place buckle’s metal retainer
completely through pad and shell can result in serious
injury or death. 8
5. From Top of Seat,
Pull Buckle Out of Shell
and Pad
2. Fully Recline the Child
Restraint
Pull out on recline handle and push
top of child restraint back.
1. Unbuckle Harness
Press in towards the top of the red
button.
Pull buckle tongues out.
3. Locate Buckle’s Metal
Retainer
Reach under the seat between the
base and shell and through the
recline handle.
4. Rotate Metal Retainer
and Push It Up Through
Shell and Pad
Changing Position of Buckle

Harness System Adjustments for
Smaller Infants
10
continued on next page
9
1. With Buckle in the 1st Slot,
Fully Recline the Seat
If you need to move the buckle to the 1st
slot, see pages 7-8.
5. Replace Pad and Check
Buckle
Pull up on buckle to make sure it is
secured.The buckle MUST not pull out.
2. Lift Pad Off of Front of
Child Restraint
4. From Top of Seat, Lay the
Metal Retainer Flat Against
the Shell As Shown
3. From Bottom of Seat, Pull
Metal Retainer Down and
Push It Up into Middle Slot
As Shown
Adjusting Headrest/Harness Height
WARNINGS: Make sure that the harness height is
correct for your child’s size.
Failure to follow these steps can result in serious
injury or death.
1. Fully Loosen Harness
Straps
Push down on harness release
lever (under flap on front of seat
pad) while pulling out on harness
straps as shown.
2. To Adjust Headrest/
Harness Height
Rotate headrest/harness
adjustment levers inward.
Move the headrest up or down
to the proper height for your
child. See pages 5-6 for fit
guidelines.
Release it into slot to lock. Make
sure it is securely locked into
place.
If you cannot achieve a snug harness fit for your child,make
these adjustments.You MUST use the body pillow and the
headrest MUST be in the lowest position.

11
12. From the Back, Pull
Harness Straps Through
Shell
Harness straps MUST be in shoulder
harness slots BELOW the metal bar as
shown. DO NOT twist harness straps.
13. Attach 2nd Harness Strap
Loops to Splitter Plate As
Shown
Sewn ends of the harness strap loops
MUST face towards you.
DO NOT twist harness straps or harness
adjustment strap.
Make sure the same harness strap loops
are fitted COMPLETELY ON both sides
of the splitter plate.
Replace headrest pad around bottom
of headrest.
sewn
end
12
Correct
WARNINGS: Harness system must be installed correctly.
The harness strap must be returned to the upper shoulder
harness slots as your child grows.
Failure to follow these steps can result in serious injury or
death.
11. Pull Bottom of Headrest
Pad Off of Headrest
Thread harness straps through slots in
headrest pad.
Thread harness straps through lower
shoulder harness slots in headrest and
through the slots in seat back (shell).
7. Fully Loosen Harness
Straps
Push down on harness release lever
(under flap on front of seat pad) while
pulling out on harness straps as shown.
6. Adjust the Headrest to the
Lowest Position
The headrest MUST be in the lowest
position.
8. From Back, Remove Harness
Strap Loops From Splitter
Plate
9. Pull Harness Straps Out of
Upper Shoulder Harness
Slots
10. Pull Body Pillow Forward
Away from Seat
Thread harness straps through slots in
pillow.
You MUST use the body pillow.

1413
6. Check Harness Tightness
Try to pinch the harness at the
shoulders vertically between index
finger and thumb as shown.
If your fingers slip off, the
harness is tight enough.
If you can pinch the harness strap, tighten more.The harness
straps should be snug throughout their length.
A snug strap should not allow any slack. It lies in a relatively
straight line without sagging. It does not press on the child’s
flesh or push the child’s body into an unnatural position.
WARNINGS: Failure to fasten and tighten the harness
system correctly may allow the child to be ejected from
the child restraint in a crash or sudden stop causing
serious injury or death.Do not mistake comfort for safety.
Harness system must be snugly
adjusted.
DO NOT put snowsuits or bulky
garments on your child when
placing them in the child restraint.
Bulky clothing can prevent the
harness straps from being tight-
ened properly.
To Remove Child From Child Restraint:
1. Loosen Harness Strap
2. Unbuckle Harness
3. Release Chest Clip
4. Remove Child
Securing Child in Child Restraint
1. Place Child in Child
Restraint
The child’s bottom and back should
be flat against the child restraint.
Position harness strap over child’s
shoulders and upper thighs.
3. Close Chest Clip
Insert right half of chest clip into
left half and snap together.
2. Buckle Harness
Push buckle tongues into buckle
until you hear them “click.”
Pull up on harness strap to make
sure buckle is locked.
4. Tighten Harness
Pull on harness adjustment strap
to tighten harness snugly.
5. Position Chest Clip
The chest clip must be placed at
mid-chest (even with armpits) and
away from the child’s neck.

15
Storing Harness System
16
Only store the harness system when converting child
restraint into a booster seat.
To remove accessories,see page 25.
1. Fully Loosen Harness
Straps
Push down on harness release
lever (under flap on front of seat
pad) while pulling out on harness
straps as shown.
2. Unbuckle Harness
Press in towards the top of the
red button.
Pull buckle tongues out.
3. Locate Buckle’s Metal
Retainer
Fully recline the child restraint and
reach under the seat between the
base and shell and through the
recline handle. Rotate metal
retainer and push it up through
shell and pad.
4. From Top of Seat,
Pull Buckle Out of Shell
and Pad
Store the buckle in a safe place for
future use.
continued on next page
Reclining Child Restraint
How to Change Positions
To recline, pull out on recline handle
and push top of child restraint back.
For upright, pull out on recline
handle and pull top of child restraint
forward.
This child restraint has 3 positions:
Rear Facing - 3or 2
For children who cannot sit up
unassisted, the level line on shell
MUST be parallel with the ground
using either position 3 or 2.
For children who can sit up
unassisted, you may rotate the child
restraint to be more upright.
Forward Facing - 1Upright
Booster Seat - 1Upright
3
2
1
NOTE: When forward facing, the reclined positions are to be
used only to install the child restraint and booster seat flush
against the vehicle seat back. Vehicle seat back must be
upright.

18
9. Thread Harness Straps
into Slots on Sides of
Headrest As Shown
10. Place Chest Clip, Harness
Straps, and Buckle
Tongues Behind the
Headrest and Seat Pad
As Shown
Push chest clip up so it is behind
the headrest.
17
11. Tighten Harness
Pull on harness adjustment strap
to remove any slack from the
harness system.
12. Pull Headrest Pad Down
and Wrap Around
Bottom of Headrest
Attach fasteners on seat pad.
6. Undo Fasteners on
Headrest Pad As Shown
5. Adjust the Headrest
to the Highest Position
8. Undo Fasteners on Seat
Pad As Shown
7. Pull Headrest Pad Off
Bottom of Headrest
As Shown

2019
5. Pull Headrest Pad Off
Bottom of Headrest
As Shown
Remove headrest pad from shell.
6. Undo Fasteners on Seat
Pad As Shown
8. Pull Pad Off Sides and
Bottom of Shell
7. Remove Cupholder
See page 25.
Removing Seat Pad for Cleaning
You DO NOT need to remove the harness system to remove
the pad from the shell.
To remove accessories,see page 25.
3. Undo Fasteners on
Headrest Pad As Shown
4. Pull Elastic Straps
on Headrest Pad Over
Headrest/Harness
Adjustment Levers As
Shown
2. Adjust the Headrest
to the Highest Position
1. Unbuckle Harness
Press in towards the top of the red
button.
Pull buckle tongues out.
continued on next page

XXXXX
22
Installing Harness System
2. Insert Buckle’s Metal
Retainer into Slot
Closest to Child
Buckle MUST face out.You MUST
use the 1st or 2nd buckle slots
when child restraint is used rear
facing.Any slot can be used when
forward facing.
1. Fully Recline the Child
Restraint
Pull out on recline handle and push
top of child restraint back.
4. Check Buckle
Pull up on buckle to make sure it
is secured.The buckle MUST not
pull out.
3. Reach Under Seat
Between Base and Shell
and Through Recline
Handle
Pull metal retainer completely
through pad and shell.
1
2
3
21 continued on next page
WARNINGS: Do not use child restraint without the
seat pad. Failure to do this can result in serious injury or
death.
Cleaning Pad andAccessories
Machine wash separately with cold water on a gentle cycle.Do not
use bleach.Tumble dry separately for 10-12 minutes on low heat.
Remove immediately.
Cleaning Harness Strap
Spot clean using warm sudsy water and damp cloth.
Replacing Pad
Adjust the headrest to the highest position.Starting from the bottom,
gently pull headrest pad onto headrest.Place elastic straps on head-
rest pad around headrest/harness adjustment levers.Slide harness
straps into slots in pad.Attach fasteners.
Starting from bottom of child restraint,slip pad on shell. Pull harness
adjustment strap through pad.Wrap pad around bottom and sides
of shell.Push harness holders through slots in pad. Push pad behind
headrest.Wrap around the top of shell.Slide harness straps into slots
in pad.Attach fasteners.
9. Pull Pad Down and
Off of Bottom of
Harness Holders
Pull up to remove completely.
10. From the Top, Pull Pad
Off of Shell

XXXXX
2423
sewn
end
4. Attach 1st Harness Strap
Loops to Splitter Plate
As Shown
Sewn ends of the harness strap
loops MUST face towards you.
DO NOT twist harness strap or
harness adjustment strap.
Make sure the same harness strap
loops are fitted COMPLETELY ON
both sides of the splitter plate.
Correct
2. Thread Harness Straps
into Shoulder Harness
Slots
If you will be using the lower
shoulder harness slots for smaller
infants, see pages 10-12.
WARNINGS: Harness system must be installed
correctly. Failure to follow these steps can result in serious
injury or death.
3. From Back, Thread
Harness Straps OVER
Metal Bar
DO NOT twist harness straps.
If you have removed the harness straps from the
splitter plate, and the buckle tongues and chest
clip have been unthreaded from the harness
straps, follow the steps below to rethread them.
1. Thread Buckle and
Chest Clip
Harness strap ends go through
the back of buckle tongues and
through the chest clip front to
back as shown.
5. Adjust Headrest to
Highest Position
6. Undo Fasteners on Seat
Pad and Pull Headrest
Pad Off Bottom of
Headrest
Unthread harness straps from slots
on side of headrest.
Loosen harness straps.
Pull chest clip,harness straps,and
buckle tongues out from behind
the headrest and seat pad.
Slide harness straps into slots in
headrest pad.
Attach seat pad fasteners.

26
Child Restraint Use
Never take your child out of the child restraint while the
vehicle is moving.
Never leave child unattended.
Placing your child in a hot child restraint may result in
burns.
Do not use a child restraint with damaged or missing parts.
Do not use cut,frayed or damaged harnesses.
Do not substitute parts or try to modify the child restraint
in any way.
Do not lubricate buckles and fasteners.
Do not use any child restraint accessory except those
approved by Dorel Juvenile Group.
Never allow any child to play with this child restraint; it is
not a toy.
Do not remove or cover up any of the warning labels or
other labels on the child restraint.
Read all instructions for additional warnings.
On the side of the child restraint there is a date of
manufacture label. Do not use this child restraint more
than 10 years after the date of manufacture.
Installation in Vehicle
Check the vehicle belt or lower anchor belt before each
use. Use only if the belt is tightened properly and locked
securely in place.
This child restraint should be securely belted in the vehicle
even when not in use. In a crash or sudden stop,an unse-
cured child restraint could injure occupants.
Do not use a child restraint that has been in a crash.You
must get a new child restraint.
25
Accessories on Select Models
Body Pillow
When using the lower shoulder harness
slots for smaller infants, you MUST use
the body pillow.
To remove body pillow,slide pillow out
from behind the harness straps.
Or from the back of seat,remove harness
strap loops from splitter plate.From the
front,pull harness straps out of shell and
body pillow.
Rethread harness straps:For lower
shoulder harness slots for smaller
infants,see pages 10-12. For upper
shoulder harness slots, see page 24.
Removable Cupholder
To remove cupholder,twist the cupholder
counterclockwise.
Pull out of slot in shell.
The cupholder is dishwasher safe.
To install cupholder, align tabs on bottom
of cupholder with slots in shell.Twist clock-
wise to lock in place.

2827
The LATCH System
The lower anchors of LATCH (LowerAnchors andTethers for
CHildren) is a universal system for installing child restraints with-
out using vehicle seat belts.The lower anchor system can ONLY
be used in vehicles that have the lower anchor bars installed and
designated LATCH seating positions.Most vehicles manufactured
after September 2002 are equipped with lower anchor bars.
Check your vehicle owner’s manual to
see which seating positions may be
equipped with the LATCH system.
When installing this child restraint
with vehicle belts or when using
as a booster seat, the lower anchor
hooks and belt MUST be properly
stored.
To store the lower anchor belt on
this child restraint: Thread lower an-
chor belt through rear-facing belt path.
Then attach hooks to storage attach-
ments as shown.Gently pull free end of
belt to remove slack.
Lower Anchor Bars
Seat Bight
Your vehicle’s features may be considerably different than
those pictured here.
Lower Anchor Hooks
Adjuster
Lower Anchor Belt
Storage
Choosing Lower Anchor or
Vehicle Belts
Vehicle Seating Position
Never place a child rear facing in a seating
position with an active frontal air bag.
Check the vehicle owner’s manual for more infor-
mation about air bag/child restraint use.
Use the child restraint only on vehicle seats
that face forward.
Do not use on seats that face the sides or
rear of the vehicle.
Use the center seating position if possible.
For vehicles without a back seat,refer to
your vehicle owner’s manual.
If you are not sure where to place the child restraint in your vehicle,
consult your vehicle owner’s manual,contact Dorel Juvenile Group
Consumer Care Department,or visit your local Child Passenger
Inspection Station.Go to http://www.safercar.gov/cpsApp/cps/index.
htm to find your closest station.
Children are safer when properly
restrained in rear seating
positions than in the front
seating positions.
According to National HighwayTraffic SafetyAdministration
information, children in rear seating positions are statisti-
cally safer, whether you have air bags,advanced air bags,or
no air bags at all.
To avoid your child being seriously burned,take the follow-
ing precautions:
1. Park in the shade or where sun does not directly hit the child
restraint.
2. Cover the child restraint with a sheet or blanket when not in use.
3. Check for hot seat and buckles before placing child in child
restraint.
To help protect your vehicle seat’s upholstery from damage,use a
single layer towel underneath and behind child restraint.

3029 continued on next page
Knowing Your Vehicle Belts
1.You MUST Review Your
Vehicle Owner’s Manual
Your vehicle owner’s manual
will let you know what vehicle
belts and seating positions child
restraints can be installed in.
2. Determine How the Child
RestraintWill Be Locked Into
Place
The vehicle belt MUST NOT loosen
after tightening.
This means there needs to be a
way to lock the vehicle belt.
3. Check the Retractor
Retractors pull seat belts into
stored positions and lock the belt
to hold passengers in place.
A retractor is most likely how you
will be locking a child restraint into
place.
The ways this can be done are:
• By using the seat belt’s retractor; or
• By using the seat belt’s latch plate.
Not all vehicle belts and seating positions will work with
child restraints. Please follow the following steps to under-
stand how to lock a child restraint with a vehicle belt.
See the next page for some common types of vehicle belt retrac-
tors that will work with this child restraint.
Vehicle Belts
If lower anchors are not an option or if your child weighs more
than 40 lb (18 kg),you must use the vehicle seat belt system to
install the child restraint.
There are some vehicle belts that will not work with a child
restraint or will require special attention.
Check your vehicle owner’s manual for specific instructions.
WARNINGS: When used correctly the lower anchor belt
or vehicle belts are equally safe. Do not use both the lower
anchor belt and vehicle belt at the same time.
Your vehicle’s features may be considerably different than
those pictured here.
Table of contents
Other Dorel Car Seat manuals

Dorel
Dorel Maxi-Cosi EasyFix Troubleshooting guide

Dorel
Dorel OS 2010 User manual

Dorel
Dorel Bebe Confort Pebble User manual

Dorel
Dorel Rodi AirProtect Troubleshooting guide

Dorel
Dorel CabrioFix User manual

Dorel
Dorel Solo Instruction Manual

Dorel
Dorel V9 A 2010 User manual

Dorel
Dorel COMPLETE AIRCA 2010 User manual

Dorel
Dorel GMA 2010 User manual