Nachfolger HY5.1 TT User manual

HY5 .1TT
Designed according to
the highest german
safety standards
0/1, 0 – 18 kg
approx. 0 – 5 years
DE / EN / IT / FR / NL / PL / HU / CZ / SK / ES / PT

2 3
Vielen Dank,
dass Sie sich für den
nachfolger HY5.1 TT
entschieden haben.
Grazie per
aver acquistato
il nachfolger
HY5.1 TT.
Thank you
for purchasing
the nachfolger
HY5.1 TT.
Wir haben bei der Entwicklung des nachfolger HY5.1 TT
Kindersitzes größten Wert auf Sicherheit und Komfort
für Ihr Kind sowie bestmögliche Bedienfreundlichkeit
für Sie gelegt. Das Produkt wird unter höchsten Qua-
litätsstandards hergestellt und erfüllt die strengsten
Sicherheitsanforderungen.
Assicuriamo che nel processo di sviluppo del
nachfolger HY5.1 TT ci siamo concentrati sulla
sicurezza e il comfort per il suo bambino, nonché
sulla migliore facilità d‘utilizzo per lei. Il prodotto
è fabbricato con un‘alta sorveglianza della qualità
e conforme alle più severe norme di sicurezza.
We assure you that in the process of developing
the nachfolger HY5.1 TT we have focused on
safety and comfort for your child, as well as the
best user friendliness for you. The product is ma-
nufactured under highest quality surveillance and
complies with the strictest safety standards.
SEHR GEEHRTE KUNDIN,
SEHR GEEHRTER KUNDE!
CARO CLIENTE!DEAR CUSTOMER!

4 5
KURZANLEITUNG
ALLGEMEINE HINWEISE
VOR DER ERSTEN VERWENDUNG
VERWENDUNG IM FAHRZEUG
EINBAU DES KINDERSITZES
INSTALLATION DES TOP TETHER
ANPASSEN DER KOPFSTÜTZE
ANSCHNALLEN MITTELS GURTSYSTEM
VERWENDUNG DER NEUGEBORENENEINLAGE
IST IHR KIND RICHTIG GESICHERT?
AUSBAU AUS DEM FAHRZEUG
REINIGUNG DES BEZUGES
ENTFERNEN DES BEZUGES
BEDIENUNG DER MOBILEN PUMPE
PFLEGE
VERHALTEN NACH EINEM UNFALL
PRODUKTLEBENSDAUER
ENTSORGUNG
KONTAKT
GARANTIEBEDINGUNGEN
BREVI ISTRUZIONI
INFORMAZIONI GENERALI
PRIMA DI UTILIZZARE IL SEGGIOLINO
PER LA PRIMA VOLTA
USARE IL SEGGIOLINO IN AUTO
INSTALLAZIONE DEL SEGGIOLINO
INSTALLAZIONE DEL TOP TETHER
REGOLARE IL POGGIATESTA
SICUREZZA COL SISTEMA D‘IMBRACATURA
USO DELL‘INSERTO NEONATO
SUO FIGLIO È LEGATO CORRETTAMENTE?
DISINSTALLAZIONE DEL SEGGIOLINO
PULIRE IL RIVESTIMENTO
RIMUOVERE IL RIVESTIMENTO
GESTIONE DELLA POMPA
CURA DEL PRODOTTO
COSA FARE DOPO UN INCIDENTE
DURATA DEL PRODOTTO
SMALTIMENTO
CONTATTI
GARANZIA
BRIEF INSTRUCTION
GENERAL INFORMATION
BEFORE USING THE SEAT THE FIRST TIME
USE OF THE SEAT IN THE CAR
INSTALLATION OF THE CAR SEAT
INSTALLATION OF THE TOP TETHER
ADJUSTING THE HEADREST
SECURING BY MEANS OF HARNESS SYSTEM
USING THE NEWBORN INLAY
IS YOUR CHILD PROPERLY SECURED?
DE-INSTALLATION OF THE CAR SEAT
CLEANING THE COVER
REMOVAL OF THE COVER
OPERATING THE MOBILE PUMP
PRODUCT CARE
WHAT TO DO AFTER AN ACCIDENT
PRODUCT DURABILITY
DISPOSAL
CONTACT
WARRANTY
>
>
>
>
>
>
>
>
>
>
>
>
>
>
>
>
>
>
>
>
>
>
>
>
>
>
>
>
>
>
>
>
>
>
>
>
>
>
>
>
>
>
>
>
>
>
>
>
>
>
>
>
>
>
>
>
>
>
>
>
DE EN IT
6-7
8
10
12
14-20
22-24
26
28
30
30
32
34
36
38
40
42
42
44
44
46
6-7
9
11
13
15-21
23-25
27
29
31
31
33
35
37
39
41
43
43
45
45
47
6-7
9
11
13
15-21
23-25
27
29
31
31
33
35
37
39
41
43
43
45
45
47

4
1 2
5 6
3
1 2
4 5 6
3
CLICK
Watch installation video
Read user guide
6 7
rückwärtsgerichtet (0 - 5 Jahre)
3x
AAA Size
Battery
dos à la route (0 - 5 an)
menetiránynak háttal (0 - 5 év)
rearward-facing (0 - 5 years)
tegen de rijrichting in (0 - 5 jaar)
orientace proti směru jízdy (0–5 let) mirando hacia atrás (0 - 5 años)
rivolto all‘indietro (0 - 5 anni)
zwrócone do tyłu (0 - 5 lat)
orientácia proti smeru jazdy
(0 – 5 rokov)
Virado para trás (0 - 5 anos)
KURZANLEITUNG
GUIDE SOMMAIRE
GYORS ÚTMUTATÓ
BRIEF INSTRUCTIONS
KORTE HANDLEIDING
STRUČNÝ NÁVOD INSTRUCCIONES RESUMIDAS
BREVI ISTRUZIONI
KRÓTKA INSTRUKCJA
KRÁTKY NÁVOD INSTRUÇÃO CURTA

8 9
ALLGEMEINE HINWEISE GENERAL INFORMATION INFORMAZIONI GENERALI
Zulassung:
nachfolger HY5.1 TT „universelles“
Kinderrückhaltesystem nach UN R44/4
Gewicht:
0 bis 18 kg / Gruppe 0/1
Alter:
von der Geburt bis ca. 5 Jahre
Empfohlen:
Für Fahrzeuge mit Dreipunkt-Automatik-Gurt
nach UN R16 und Top Tether
WARNUNG! Damit Ihr Kind richtig geschützt
wird, ist es unbedingt notwendig den
nachfolger HY5.1 TT so zu verwenden, wie es in
dieser Anleitung beschrieben wird.
HINWEIS! Bewahren Sie diese Anleitung immer griffbe-
reit im dafür vorgesehenen Fach in der Tragetasche auf.
WARNUNG! Die Zulassung erlischt, sobald am Sitz
etwas verändert wird!
Approval:
nachfolger HY5.1 TT “universal“
child restraint according to UN R44/4
Weight:
0 to 18 kg / Group 0/1
Age:
from birth, up to approximately 5 years
Recommended for:
For vehicle seats with three-point
automatic retractor belt according to
UN R16 and Top Tether
WARNING! For proper protection of your child, it is
essential to use and install the nachfolger HY5.1 TT
according to the instructions given in this manual.
NOTE! Please always have the instruction manual at
hand and store it in the dedicated slot in the carrying bag.
WARNING! Approval of the seat expires immediately
in case of any modification!
Approvazione:
seggiolino „universale“ per bambini
nachfolger HY5.1 TT secondo la UN R44/4
Peso:
da 0 a 18 kg / Gruppo 0/1
Età:
dalla nascita fino a circa 5 anni
Consigliato per:
Sedili auto con cinture di sicurezza
a tre punti con riavvolgimento automatico
secondo la UN R16 e Top Tether
ATTENZIONE! Per la corretta protezione del bambino,
è essenziale usare e installare il nachfolger HY5.1 TT
secondo le istruzioni fornite in questo manuale.
NOTA! Conservate queste istruzioni sempre a portata
di mano nell’apposito scomparto nella custodia.
ATTENZIONE! L‘approvazione del seggiolino scade
immediatamente in caso di modifiche!
HY5.1 TT UN R44
UNIVERSAL SYSTEM -18kg Y
04 9568
nachfolger GmbH
Boecklinstrasse 59/2
1020 Vienna, Austria
C101_860_A
E 8

CLICK
10 11
Der nachfolger HY5.1 TT wird mit geöffnetem Ablassventil ausge-
liefert. Bitte beachten Sie, dass dieses vor der ersten Verwendung
geschlossen werden muss. Drücken Sie die Taste am Ablassventil
bis ein deutliches KLICK zu hören ist.
Des Weiteren müssen vor der ersten Verwendung Batterien in das
integrierte LED Warnsystem eingebaut werden.
Dazu entfernen Sie die Schraube mit einem handelsüblichen
Schraubenzieher und nehmen den Deckel des Batteriefachs ab.
Legen Sie drei AAA-Batterien ein und schließen Sie den Deckel
anschließend wieder.
HINWEIS! Wenn die Statusanzeige dauerhaft rot leuchtet, müssen
die Batterien ausgewechselt werden.
The nachfolger HY5.1 TT is delivered with the release valve in
open position. Please note that this must be closed prior to first
usage. Press the button on the release valve until you hear a clear
CLICK.
Furthermore, batteries must be installed in the integrated LED
warning system prior to first usage. Remove the screw with a
standard screw driver and remove the cover of the battery com-
partment. Insert three AAA batteries and close the cover again.
NOTE! If the status light remains solid red, the batteries must be
replaced.
Il nachfolger HY5.1 TT viene fornito con la valvola di rilascio in
posizione aperta. Si rammenta che questa dev‘essere chiusa
prima del primo utilizzo. Premere il pulsante sulla valvola di rilascio
finché non sente un chiaro CLICK.
Inoltre, prima del primo utilizzo devono essere installate le batterie
nel sistema di allarme LED integrato. Rimuovere le viti con un cac-
ciavite standard e rimuovere il coperchio del vano batterie. Inserire
tre batterie AAA e chiudere nuovamente il coperchio.
NOTA! Se la spia resta rossa, le batterie devono essere sostituite.
VOR DER ERSTEN VERWENDUNG BEFORE USING THE SEAT THE FIRST TIME PRIMA DI UTILIZZARE IL SEGGIOLINO
PER LA PRIMA VOLTA
3x AAA
Size Battery

12 13
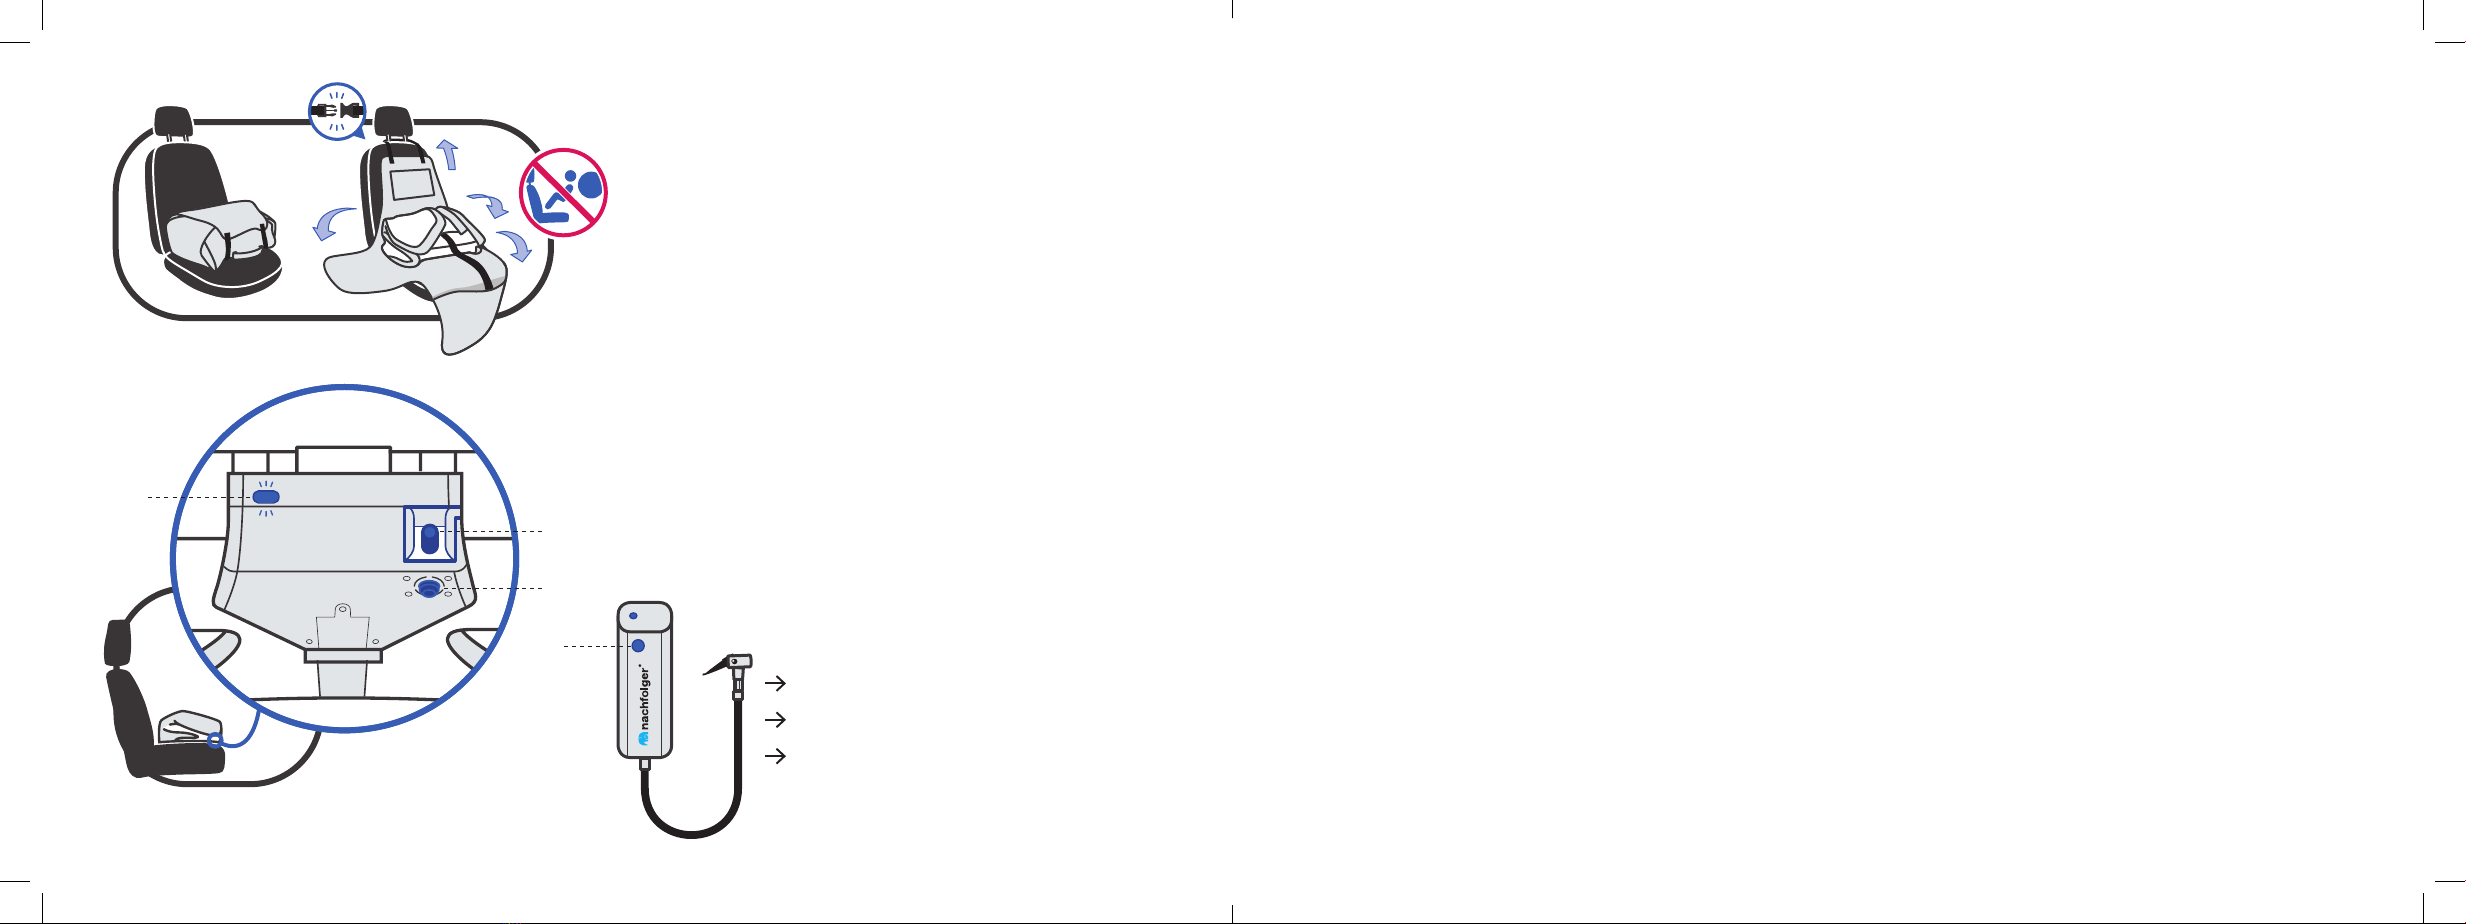
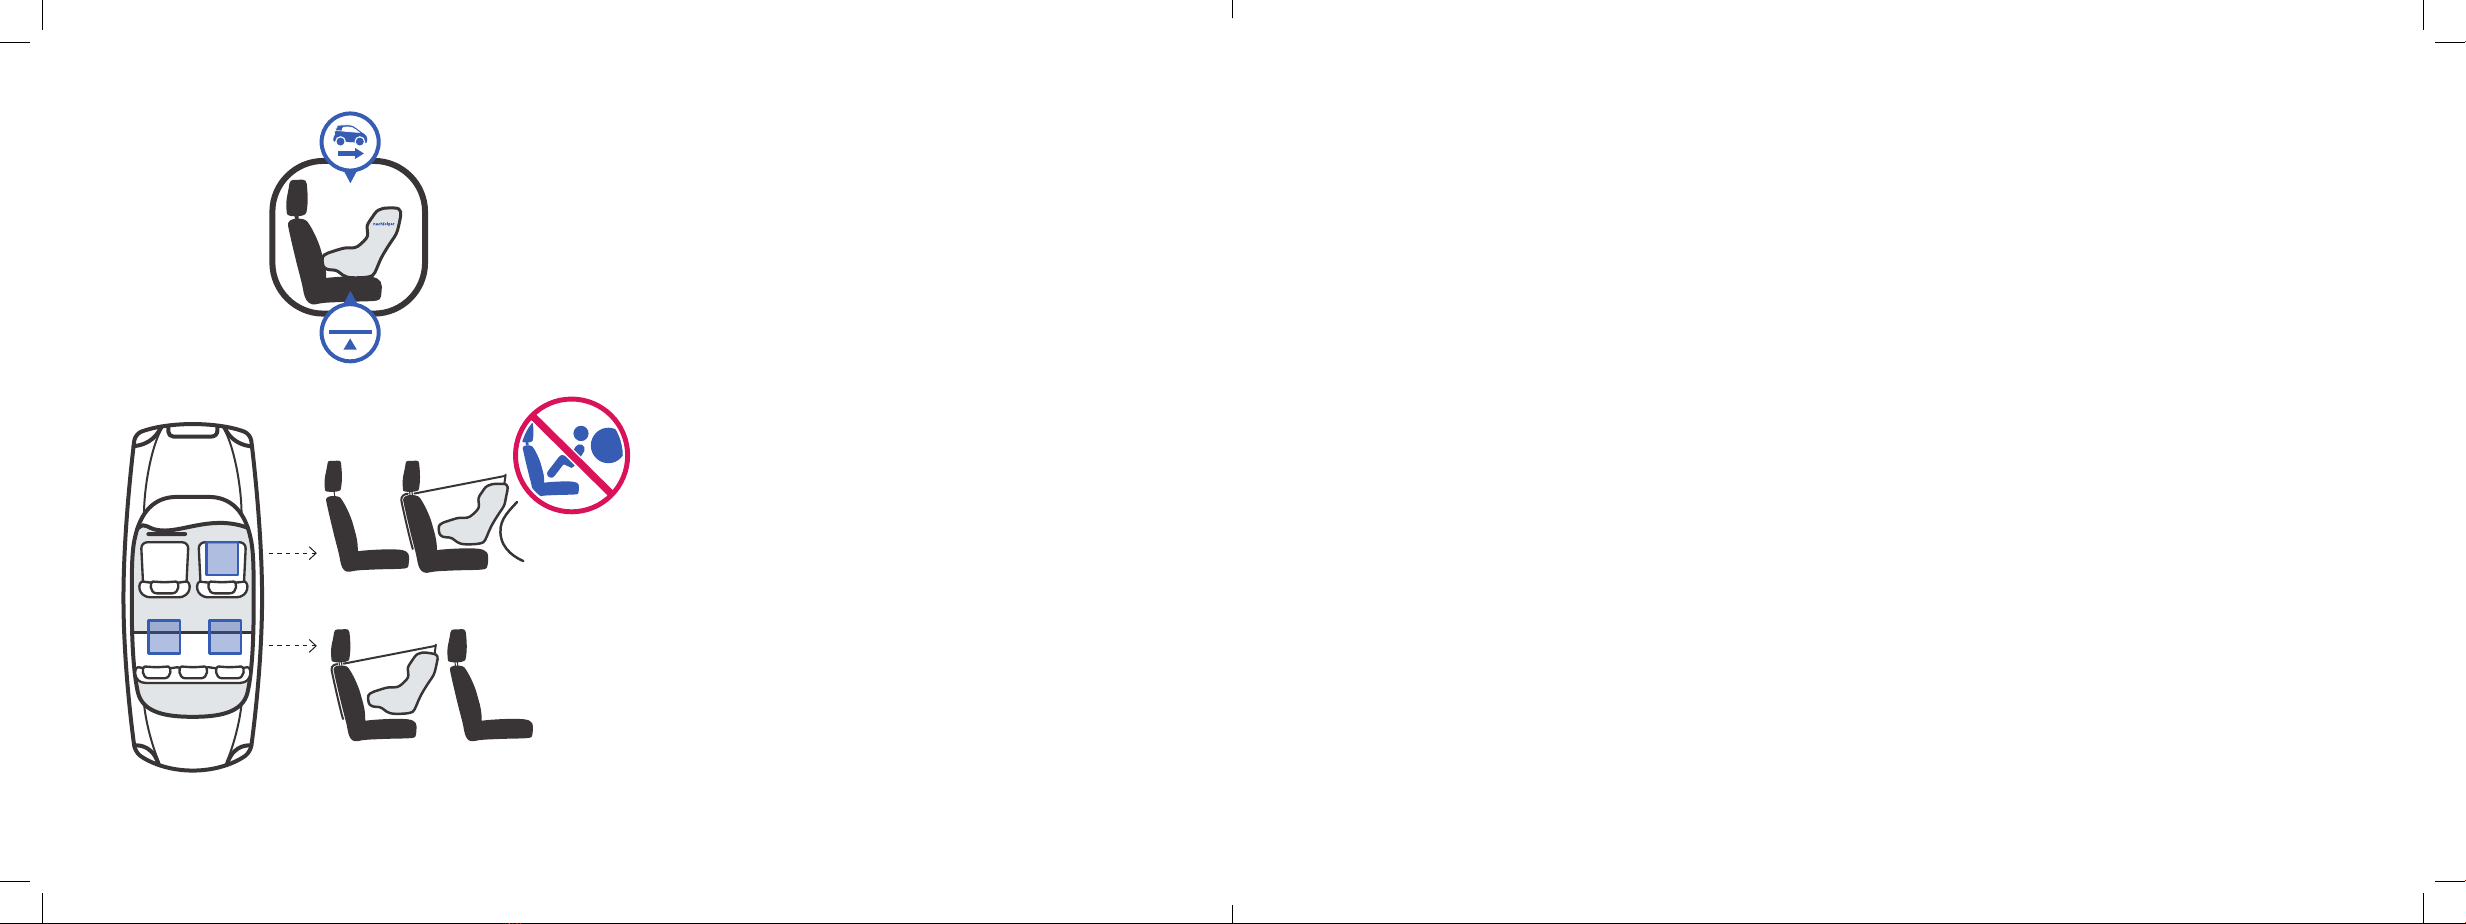
WARNUNG! Verwenden Sie den nachfolger HY5.1 TT nicht auf
einem Fahrzeugsitz, wenn der Front-Airbag aktiviert ist. Der groß-
volumige Front-Airbag entfaltet sich explosionsartig und kann Ihr
Kind schwer verletzen oder sogar töten. Dies gilt nicht für die so
genannten Seitenairbags.
An einigen Auto-Sitzbezügen aus empfindlichem Material (z.B.
Velours, Leder etc.) können durch die Benutzung von Auto-Kinder-
sitzen Gebrauchsspuren auftreten. Um das zu vermeiden, verwen-
den Sie die mitgelieferte Tasche als Unterlage für den Kindersitz.
Gepäckstücke oder andere Gegenstände im Fahrzeug, die bei
einem Unfall Verletzungen verursachen können, müssen immer
gut befestigt werden. Andernfalls können Sie sich zu
tödlichen Geschossen im Fahrzeug verwandeln.
WARNUNG! Bitte lassen Sie Ihr Kind nie unbeaufsichtigt im Fahr-
zeug zurück. Die Kunststoffteile (z.B. Gurtschloss) des Kindersitzes
heizen sich in der Sonne auf. Ihr Kind kann sich daran verbrennen.
Schützen Sie Ihr Kind und den Kindersitz vor intensiver Sonnenein-
strahlung (z.B. indem Sie ein helles Tuch über den Sitz legen).
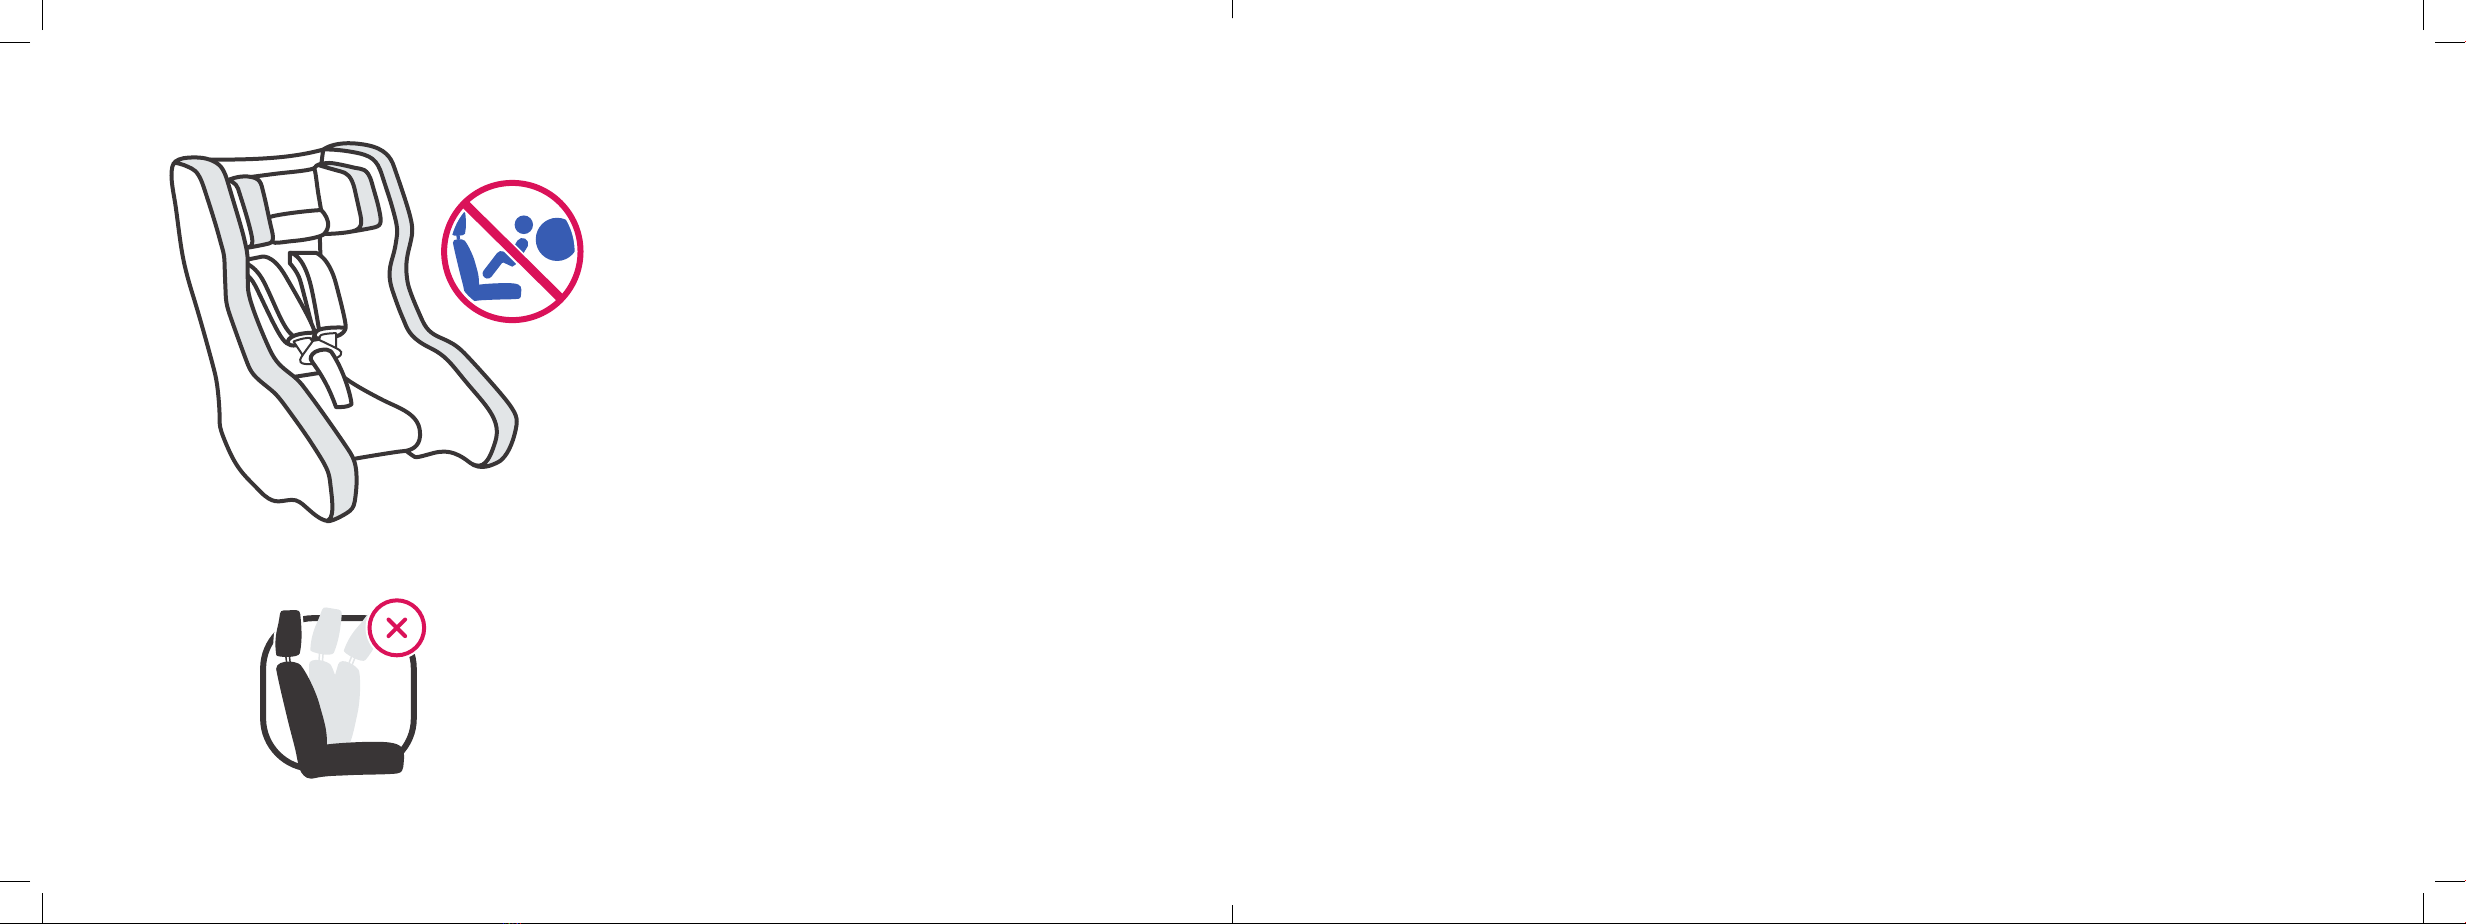
WARNUNG! Vergewissern Sie sich, dass die umklappbaren
Rückenlehnen der Fahrzeugsitze eingerastet sind und sich in einer
aufrechten Position befinden.
WARNING! Do not use the nachfolger HY5.1 TT in front seats
equipped with activated front-airbag. The high-volume front-air-
bags expand explosively. This can result in the death or injury of
the child. This does not apply to so-called side-airbags.
On some car seat covers which are made of a sensitive material
(e.g. velour, leather etc.) the use of child seats may lead to traces
of wear and tear. In order to avoid this, you should place the
delivered bag underneath the child seat.
Items of luggage and other loose objects in the car, which could
cause injury in an accident, must always be safely secured. They
can become deadly projectiles in the case of a car accident.
NOTE! Never leave your child in the car unattended. Plastic parts
of the seat heat up in the sun. Your baby may get burnt. Protect
your baby and the car seat from intense exposure to the sun
(e.g. putting a white blanket over the seat).
NOTE! Make sure that the folding backrests of the vehicle seats
are locked and are in an upright position.
ATTENZIONE! Non usare il nachfolger HY5.1 TT in sedili anteriori
dotati di airbag frontale attivo. Gli airbag frontali ad alto volume
si espandono esplosivamente. Ciò può causare morte o lesioni al
bambino. Ciò non si applica ai cosiddetti airbag laterali.
Su alcuni coprisedili fatti in materiale sensibile (per esempio vellu-
to, cuoio, ecc.) l‘uso del seggiolino può provocare tracce di usura.
Per evitarlo, collocare sotto il seggiolino la base fornita.
I bagagli e altri oggetti in macchina, che potrebbero causare lesi-
oni in un incidente, devono sempre essere fissati in modo sicuro.
Possono diventare proiettili mortali nel caso d‘incidente stradale.
NOTA! Non lasciare mai incustodito il bambino nell‘auto. Le parti
in plastica del seggiolino si scaldano al sole. Il bambino potrebbe
bruciarsi. Proteggere il bambino e il seggiolino da un‘intensa
esposizione al sole (per esempio ponendo un lenzuolo bianco sul
seggiolino).
NOTA! Assicurarsi che il ripiegamento degli schienali dei sedili sia
bloccato e in posizione verticale.
VERWENDUNG IM FAHRZEUG USE OF THE SEAT IN THE CAR USARE IL SEGGIOLINO IN AUTO

A
C
B
D
14 15
• Stellen Sie den HY5.1 TT samt Tasche auf den Fahrzeugsitz.
• Falten Sie die Tasche auseinander und lassen Sie sie gleich auf dem
Fahrzeugsitz liegen.
• Legen Sie die beiden oberen Verschlussriemen der Tasche um die
Fahrzeugkopfstütze und stecken Sie die beiden Gurtbandschließen
zusammen. Damit haben Sie den perfekten Sitzschoner bereits am
Sitz integriert. Die praktischen Aufbewahrungstaschen können Sie für
die Pumpe, Schuhe oder andere Spielsachen verwenden.
• In der transparenten Tasche finden Tablets, Fotos und andere
sehenswerte Dinge ihren Platz.
• Schließen Sie die automatische Pumpe an das Ventil im Sitz (A) an
und stellen Sie sicher, dass die Schnellablasstaste (B) geschlossen ist.
• Aktivieren Sie nun die Statusanzeige am Sitz, indem Sie die EIN-Taste
(C) drücken.
• Anschließend starten Sie den Aufpumpvorgang, indem Sie die Taste
an der Pumpe (D) drücken.
• Place the HY5.1 TT together with the bag on the vehicle seat.
• Fold the bag apart and leave it on the vehicle seat.
• Place the two upper buckle straps of the bag around the vehicle
headrest and fit the two buckle locks together. With this bag, you
have the perfect seat cover integrated in the seat. The practical
storage pockets can be used for the pump, shoes or other toys.
• In the transparent bag tablets, photos and other interesting things
find their place.
• Connect the automatic pump to the valve on the seat (A) and make
sure that the quick release button (B) is closed.
• Now activate the status indicator on the seat by pressing the ON
button (C).
• Then start the inflation process by pressing the button on
the pump (D).
• Posizionare il HY5.1 TT e la base sul sedile.
• Piegare a parte la base e lasciarla sul sedile.
• Posizionare le due cinture della base attorno al poggiatesta e
incastrare le due fibbie. Con questa base si ha la perfetta copertura
del sedile integrata nel seggiolino. Le pratiche tasche possono essere
usate per la pompa, le scarpe o altri giocattoli.
• Le fotografie e altri oggetti interessanti possono essere messi nelle
tasche trasparenti.
• Collegare la pompa automatica alla valvola sul seggiolino (A) e
assicurarsi che il pulsante di rilascio rapido (B) sia chiuso.
• Attivare ora l‘indicatore di stato del seggiolino premendo sul pulsante
ON (C).
• Avviare, quindi, il processo di gonfiaggio premendo sul pulsante della
pompa (D).
EINBAU DES KINDERSITZES INSTALLATION OF THE CAR SEAT INSTALLAZIONE DEL SEGGIOLINO
3x quickly BEDIENUNG DER MOBILEN PUMPE (38)
OPERATING THE MOBILE PUMP (39)
GESTIONE DELLA POMPA (39)

A
B
C
D
E
16 17
Statusanzeige am Sitz:
• ROT blinkend bedeutet, dass noch mehr Luft eingefüllt werden
muss (A).
• BLAU blinkend bedeutet, dass der Sitz bereits ausreichend
aufgeblasen wurde, damit man ihn aber länger nutzen kann,
wäre noch etwas mehr Luft besser (B).
• Leuchtet die LED Anzeige durchgängig BLAU,
ist der Sitz betriebsbereit (C).
• Ist zu viel Luft im System, blinkt die Lampe schnell ROT.
Häufiger bzw. langer Überdruck schädigt das Luftsystem (D).
• Leuchtet die LED Anzeige durchgehend ROT, ist die Batterie
am Ende ihrer Lebensdauer (E).
HINWEIS! Achten Sie beim Aufblasen des Sitzes, dass der Sitz nir-
gendwo eingeklemmt ist, damit er sich richtig entfalten kann.
HINWEIS! Sie können die Befüllung des nachfolger HY5.1 TT aber
auch an der Tankstelle per Fahrradpumpe oder mit der Pumpe, die im
Kfz Reifendichtmittelset enthalten ist, durchführen.
Status display on the seat:
• RED flashing light means that more air must be filled in the seat (A).
• BLUE flashing light means, that the seat has been inflated enough,
but to use it for a longer time, a bit more air would be better (B).
• If the LED indicator lights continuously BLUE, the seat is ready (C).
• When there is too much air in the system, the indicator flashes
quickly RED (D).
• If the LED indicator lights continuously RED, the battery is at the
end of its life (E).
NOTE! When unfolding the seat, make sure that the seat is not
clamped anywhere to allow it to unfold properly.
NOTE! You can also fill the nachfolger HY5.1 TT at the gas station,
by bicycle pump or with the pump which is included in the car tire
sealant set.
Visualizzazione di stato sul seggiolino:
• La luce ROSSA lampeggiante indica che bisogna inserire più aria
nel seggiolino (A).
• La luce BLU lampeggiante indica che il seggiolino è stato gonfiato
abbastanza, ma sarebbe meglio un po‘ più di aria per farlo durare
maggiormente (B).
• Se l‘indicatore LED ha una luce BLU fissa, il seggiolino è pronto (C).
• In caso di aria eccessiva nel sistema, l‘indicatore avrà una luce
ROSSA che lampeggia velocemente (D).
• Se l‘indicatore LED ha una luce ROSSA fissa, la batteria si sta
scaricando (E).
NOTA! Per sganciare il seggiolino, assicurarsi che non sia bloccato
da nessuna parte per consentirgli di sganciarsi correttamente.
NOTA! Il nachfolger HY5.1 TT può essere gonfiato anche dal benzinaio
con una pompa per biciclette o con la pompa inclusa nel set di ripara-
zione gomme dell‘auto.
EINBAU DES KINDERSITZES INSTALLATION OF THE CAR SEAT INSTALLAZIONE DEL SEGGIOLINO

OFF
18 19
Auswahl des Sitzplatzes:
Richten Sie den Sitz vor dem Angurten auf dem Fahrzeugsitz so aus,
dass er gegen die Fahrtrichtung steht und der Schriftzug an den
Seiten eine waagerechte Linie bildet.
Damit ist sichergestellt, dass der Sitz in jedem Fahrzeug – ob Klein-
wagen, Luxuslimousine oder Familienvan – immer gleich komfortabel
und richtig eingebaut wird.
Die Rückseite des Kindersitzes kann, muss jedoch nicht mit der
Rückenseite des Vordersitzes bzw. dem Armaturenbrett in Kontakt
kommen.
WARNUNG! Der nachfolger HY5.1 TT darf nur mit Top Tether verwen-
det werden. Dies gilt auf allen Sitzplätzen im Fahrzeug.
HINWEIS! Lesen Sie bitte in der Anleitung Ihres Fahrzeuges nach, auf
welchen Sitzplätzen sich der optimale Einbau bewerkstelligen lässt.
Zusätzlich
Selection of the seat:
Before you belt on the seat in the car, the seat must be positioned
against the driving direction and the lettering on the sides forms
a horizontal line. This ensures that the seat is always installed in
every vehicle - whether it is a small car, a luxury limousine or a
family van - in the same comfortable and correct way.
The back of the child restraint may, but does not need to be in
contact with the back of the front seat or the dashboard.
WARNING! The HY5.1 TT must be used only in conjunction with
the top tether belt! This applies to all seats in the vehicle.
NOTE! Please refer to the instructions manual of your vehicle,
to find the best suited seating positions for the installation.
Scelta della posizione:
Prima di mettere la cintura al seggiolino, esso dev‘essere posizi-
onato in senso contrario alla direzione di guida e la scritta sul lato
deve formare una linea orizzontale. Ciò assicura che il seggiolino è
installato in ogni vettura - sia che si tratti di una macchina piccola,
una lussuosa limousine o una monovolume - in modo confortevole
e corretto.
La parte posteriore del sistema di ritenuta per bambini può, ma
non deve essere nella parte posteriore del sedile anteriore o del
cruscotto.
ATTENZIONE! Questo seggiolino per auto può essere utilizzato
soltanto insieme alla cinghia Top Tether!Questo vale per tutti i posti
nel veicolo.
NOTA! Fare riferimento al manuale d‘istruzione del veicolo per
trovare le posizioni più adatte all‘installazione.
EINBAU DES KINDERSITZES INSTALLATION OF THE CAR SEAT INSTALLAZIONE DEL SEGGIOLINO

C
D E F
B
A
CLICK
20 21
• Lösen Sie den Bezug im Bereich der Oberschenkel und klappen Sie
diesen über das Gurtschloss zurück (A).
• Darunter befindet sich die Gurtführung mit der blauen Gurtklemme.
• Legen Sie sich ausreichend Gurtband vor und führen Sie die Schloss-
zunge des Fahrzeuggurtes von unten durch die türseitige Gurtführung.
• Öffnen Sie die Gurtklemme und legen Sie das Gurtband ein, ohne die
Gurtklemme zu schließen (B).
HINWEIS! Achten Sie darauf, dass der Gurt nicht verdreht ist.
• Stecken Sie nun die Schlosszunge durch die zweite Gurtführung von
oben kommend nach unten durch und anschließend in das fahrzeug-
eigene Gurtschloss, bis es mit einem deutlichen KLICK einrastet (C).
• Ziehen Sie nun das obenliegende Gurtband im Bereich der Gurtklem-
me kräftig nach oben, sodass der gesamt Gurt gespannt ist (D).
• Prüfen Sie den gesamten Gurtverlauf und wiederholen sie gegebe-
nenfalls den Vorgang bis der Gurt überall strammgezogen ist.
• Jetzt legen Sie das gespannte Gurtband in die Gurtklemme ein und
schließen diese (E).
• Klappen Sie den Bezug über die Gurtführung und befestigen Sie
ihn mit Hilfe der beiden Druckknöpfe wieder an der Unterseite der
Sitzfläche (F).
• Loosen the cover in the area of the legs and fold them back over the
belt buckle (A).
• Underneath is the belt guide with the blue belt clamp.
• Place the belt in a sufficient position and guide the buckle tongue of
the vehicle belt from below through the belt guide on the door side.
• Open the belt clamp and insert the webbing without closing the belt
clamp (B).
NOTE! Make sure the belt is not twisted.
• Now push the buckle tongue through the second belt guide
downwards from above and then into the vehicle-specific belt buckle
until you hear a clear CLICK (C).
• Now pull the upper belt in the area of the belt clamp upwards,
so that the entire belt is tensioned (D).
• Check the entire belt path and repeat the procedure until the belt is
tightly tightened.
• Now insert the tensioned webbing into the belt clamp and close it (E).
• Fold the cover over the belt guide and secure it with the two press
buttons on the bottom of the seat (F).
• Allentare il coperchio nell‘area delle gambe e ripiegarle attorno
alla fibbia (A).
• La guida della cintura è posta sotto con il morsetto blu.
• Posizionare la cintura in una posizione sufficiente e guidare la fibbia
della cintura dal basso attraverso la guida della cintura sul lato della
portiera.
• Aprire il morsetto e inserire la cinghia senza chiuderlo (B).
NOTA! Assicurarsi che la cintura non sia attorcigliata.
• Spingere ora la fibbia attraverso la seconda guida della cintura dal
basso verso l‘alto e nell‘apposita fibbia del veicolo fino a sentire un
chiaro CLICK (C).
• Tirare ora verso l‘alto la cintura superiore nell‘area del morsetto,
in modo che l‘intera cintura sia tesa.
• Controllare l‘intero percorso della cintura e ripetere la procedura fino
a che la cintura non sia ben serrata.
• Inserire ora la cinghia tesa nel morsetto e chiuderla (E).
• Piegare il coperchio sulla guida della cintura e assicurarla con i due
pulsanti a pressione sul fondo del seggiolino (F).
EINBAU DES KINDERSITZES INSTALLATION OF THE CAR SEAT INSTALLAZIONE DEL SEGGIOLINO

A B
C
D
1 2
4 5 6
3
CLICK
Watch installation video
Read user guide
22 23
WARNUNG! Dieser Autositz darf nur in Verbindung mit dem Top
Tether Gurt verwendet werden! Wenn Sie den Sitz vorne am Bei-
fahrersitz verwenden, stellen Sie sicher, dass der Beifahrer Airbag
deaktiviert ist!
HINWEIS! Der Top Tether muss auch am Beifahrersitz verwendet
werden.
• Nehmen Sie den Top Tether aus der Aufbewahrungstasche,
welche an der Rückseite des HY5.1 TT angebracht ist (A).
• Drücken Sie die blaue Taste an der Rückseite des HY5.1 TT und
ziehen Sie den Top Tether Bügel in die gewünschte Höhe, bis
Sie ein deutliches KLICK hören (B).
HINWEIS! Nur ein optimal eingestellter Top Tether gewährt Ihrem
Kind größtmöglichen Schutz und Komfort. Der Top Tether muss so
eingestellt werden, dass zirka zwei Finger breit zwischen Kopf des
Kindes und Top Tether Gurt frei bleiben (C).
• Drücken Sie die graue Taste am Top Tether Gurt und ziehen Sie
gleichzeitig am Top Tether Haken um den Gurt zu verlängern.
• Führen Sie den Top Tether Gurt auf kürzestem Weg durch oder
über die Kopfstütze.
• Details dazu finden Sie in Ihrer Fahrzeuganleitung.
• Hängen Sie den Schnapphaken in den empfohlenen Top Tether
Verankerungspunkt ein (D).
WARNING! This car seat must be used only in conjunction with the top
tether belt! If you want to use the car seat on the front passenger seat,
make sure the front passenger airbag is deactivated!
NOTE! The top tether must also be used on the front passenger seat.
• Take the top tether out of the storage bag, which is attached to the
back of the HY5.1 TT (A).
• Press the blue button on the back of the HY5.1 TT and pull the top
tether frame to the recommended height until you hear a clear
CLICK (B).
NOTE! Only when adjusted to the most suitable height does the top
tether offer your child the highest degree of protection and safety. The
top tether must be adjusted to leavethe space of two fingers between
the child’s head and the top tether belt (C).
• Press the gray button of the top tether strap while pulling the top
tether hook to extend the belt.
• Run the top tether strap the shortest way through or over the head
rest. Details can be found in your vehicle manual.
• Connect the snap hook into the recommended top tether anchorage
point (D).
ATTENZIONE! Questo seggiolino per auto può essere utilizzato
soltanto insieme alla cinghia Top Tether! Se utilizzate il sedile davanti
nel posto del passeggero, assicuratevi che l’airbag del passeggero
sia disattivato!
NOTA! Il Top Tether deve essere utilizzato anche sul sedile del pas-
seggero anteriore.
• Estraete il Top Tether dalla custodia montata sul retro del seggioli-
no HY5.1 TT (A).
• Premete il tasto blu sul retro dell’HY5.1 TT ed estraete la staffa
Top Tether all’altezza desiderata fino a udire un CLIC evidente (B).
NOTA! Soltanto un Top Tether regolato perfettamente offre al tuo
bambino la massima sicurezza e il migliore comfort. Il Top Tether
deve essere regolato in modo che resti uno spazio libero di circa due
dita fra la testa del bambino e la cinghia Top Tether (C).
• Premete il tasto grigio sulla cinghia Top Tether e allo stesso tempo
tirate il gancio Top Tether per allungare la cinghia.
• Fate compiere alla cinghia Top Tether il percorso più corto oppure
fatela passare sopra il poggiatesta. Potete trovare i dettagli in
merito nel manuale della vostra auto.
• Agganciare il gancio a scatto nel punto di ancoraggio Top Tether
consigliato (D).
INSTALLATION DES TOP TETHER INSTALLATION OF THE TOP TETHER INSTALLAZIONE DEL TOP TETHER

FE
24 25
HINWEIS! Achten Sie darauf, dass Sie anstatt des Top Tether Veranke-
rungspunkts nicht den Gepäckhaken benutzen. Lesen Sie bitte in
der Anleitung Ihres Fahrzeuges nach, wo sich der Top Tether Veran-
kerungspunkts befindet, oder suchen Sie an Ihrem Fahrzeug nach
diesem Symbol:
• Straffen Sie den Top Tether, indem Sie am freien Ende des
Gurts ziehen. Der Top Tether ist richtig gespannt, wenn die
grüne Spannungsanzeige sichtbar ist (E).
• Rollen Sie das freie Ende des Top Tether Gurtes auf und
fixieren es mit dem Klettband (F).
HINWEIS! Lesen Sie bitte in der Anleitung Ihres Fahrzeuges nach,
auf welchen Sitzplätzen sich der optimale Einbau bewerkstelligen lässt.
Ausbau:
• Zum Lösen der Top Tether Verankerung lockern Sie den
Gurt, indem Sie die graue Taste betätigen und den Versteller
vom Verankerungspunkt wegziehen.
• Hängen Sie dann den Schnapphaken aus dem Veranker-
rungspunkt aus.
• Packen Sie den Top Tether in den dafür vorgesehenen
Aufbewahrungsbeutel an der Rückseite des HY5.1 TT.
NOTE! Make sure that you are not using the luggage hooks, instead
of the top tether anchorage point. Please refer to the manual of your
vehicle for the locaton of the top tether anchorage point or watch out
in your vehicle for this symbol:
• Tighten the top tether by pulling on the loose end of the strap.
The top tether is tightened properly correctly if the green tension
indicator is visible (E).
• Roll up the loose end of the top tether strap and fix it with the
velcro tape (F).
NOTE! Please refer to the instructions manual of your vehicle, to find
the best seat positions for the installation.
De-installation:
• To release the top tether anchor, loosen the strap by pressing the
gray button and pulling the adjuster away from the anchorage point.
• Unhook the snap hook from the anchorage point.
• Put the top tether in the designated storage bag on the back of the
HY5.1 TT.
AVVERTENZA! Prestate attenzione di non adoperare il gancio ferma
bagagli al posto del punto di ancoraggio Top Tether. Controllate il ma-
nuale della vostra auto dove si trova il punto di ancoraggio Top Tether
oppure cercate questo simbolo nella vostra auto:
• Tendete il Top Tether tirando l’estremità libera della cinghia.
Il Top Tether è teso correttamente se è visibile l’indicazione di
tensione verde (E).
• Avvolgete l’estremità libera della cinghia Top Tether e fissatela
con il velcro (F).
AVVERTENZA! Controllate nel manuale della vostra auto su quali
sedili è consigliabile effettuare il montaggio.
Smontaggio:
• Per sbloccare l’ancoraggio Top Tether allentate la cinghia premendo
il tasto grigio e togliendo il regolatore dal punto di ancoraggio.
• Sganciate poi il gancio a scatto dal punto di ancoraggio.
Riponete il Top Tether nell’apposita custodia sul retro dell’HY5.1 TT.
INSTALLATION DES TOP TETHER INSTALLATION OF THE TOP TETHER INSTALLAZIONE DEL TOP TETHER

26 27
HINWEIS! Nur eine in optimaler Höhe eingestellte Kopfstütze gewährt
Ihrem Kind größtmöglichen Schutz und Komfort. Die Höhenverstellung
ist stufenlos und ermöglicht Ihrem Kind somit den bestmöglichen
Schutz.
• Die Kopfstütze muss so eingestellt werden, dass max. zwei Finger
breit zwischen Schulter des Kindes und Kopfstütze frei bleiben.
• Ziehen Sie die Kopfstütze an der Oberseite nach oben und führen
Sie diese in die gewünschte Position.
NOTE! Only when adjusted to the most suitable height does the head-
rest offer your child the highest degree of protection and safety. The
height of the headrest can be adjusted stepless and thus allows your
child the best possible protection.
• The headrest must be adjusted to leave free two fingers’ width
between the child’s shoulder and the headrest.
• Pull the headrest at the top upwards and bring the headrest into
the required position.
NOTA! Il poggiatesta offre al bambino il massimo grado di protezione
e sicurezza solo se regolato all‘altezza più confortevole. L‘altezza del
poggiatesta può essere regolata in modo graduale, consentendo al
bambino la migliore protezione possibile.
• Il poggiatesta deve essere regolato per lasciare due dita di larghezza
libere tra la spalla del bambino e il poggiatesta.
• Tirare il poggiatesta verso l‘alto e portarlo nella posizione desiderata.
ANPASSEN DER KOPSTÜTZE ADJUSTING THE HEADREST REGOLARE IL POGGIATESTA

A B C
D
CLICK
28 29
Um die Höhe der Schultergurte anzupassen, gehen Sie bitte folgender-
maßen vor:
• Öffnen Sie das Gurtschloss durch kräftiges Drücken auf den roten
Knopf (A).
• Ziehen Sie die Schultergurte inklusive der Gurtpolster durch die
Rückenlehne (B).
• Stecken Sie diese in der nächst passenden Höhe sofort wieder
hinein (C).
HINWEIS! Für den optimalen Schutz durch den nachfolger HY5.1 TT
sollten die Schultergurte so nahe wie möglich am Körper anliegen.
Stellen Sie die Höhe der Gurte so ein, dass diese von unten, über die
Schulter des Kindes verläuft.
HINWEIS! Lockern Sie die Schultergurte, indem Sie die Verstelltaste am
Zentralversteller betätigen und gleichzeitig beide Schultergurte nach oben
ziehen (D). Achten Sie darauf, dass die Schultergurte nicht verdreht sind.
• Führen Sie die beiden Schlosszungen zusammen. Rasten Sie sie
im Gurtschloss mit einem hörbaren KLICK ein.
• Ziehen Sie am Zentralverstellergurt und straffen Sie damit die
Schultergurte bis sie eng am Körper Ihres Kindes anliegen.
HINWEIS! Sorgen Sie dafür, dass der Kindersitz frei von Spielsachen und
harten Objekten ist.
To adjust the height of the shoulder belts, please follow the next steps:
• Press the red button to open the buckle (A).
• Pull the shoulder belts including the shoulder pads through the
backrest (B).
• Now insert it again through the next higher slot (C).
NOTE! For optimum protection by the nachfolger HY5.1 TT, the
shoulder straps should be as close as possible to the body. Adjust
the height of the straps so that it runs from below, over the child‘s
shoulder.
NOTE! Loosen the shoulder belts by activating the adjustment handle
on the central adjuster and simultaneously
pulling both shoulder belts upwards (D). Make sure that the shoulder
belts are not twisted or crossed over.
• Join the buckle tongue sections together and insert them into the
buckle with an audible CLICK.
• Pull the central adjuster belt below the shoulder belts to fit your
child’s body tightly.
NOTE! Make sure that the child seat is free of toys and hard objects.
Seguire le fasi seguenti per regolare l‘altezza delle cinture
• Premere il pulsante rosso per aprire la chiusura (A).
• Tirare le cinture, comprese di spalline, attraverso lo schienale (B).
• Inserirle nuovamente attraverso la successiva fessura superiore (C).
NOTA! Per una protezione ottimale con il nachfolger HY5.1 TT, le spal-
line devono essere il più vicino possibile al corpo. Regolare l‘altezza
delle cinghie in modo che scorra da sotto, oltre le spalle del bambino.
NOTA! Allentare le cinture premendo il pulsante centrale e poi tirare
contemporaneamente entrambe le cinture verso l’esterno (D). Assicur-
arsi che le cinture non siano arrotolate o intrecciate.
• Unire le fibbie e inserirle nella chiusura con un CLICK udibile.
• Posizionare la cintura regolabile centrale sotto le cinture per
aderire ermeticamente al corpo del bambino.
NOTA! Assicurarsi che il seggiolino del bambino sia libero da giocattoli
e oggetti duri.
ANSCHNALLEN MITTELS GURTSYSTEM SECURING BY MEANS OF HARNESS SYSTEM SICUREZZA COL SISTEMA D‘IMBRACATURA

30 31
Die optional erhältliche Neugeboreneneinlage gibt Ihrem noch kleinen
Baby die notwendige Unterstützung, mehr Liegekomfort und Halt.
• Vor der ersten Verwendung müssen Sie diese in dem Sitz montieren.
• Dazu öffnen Sie das Gurtschloss des Kindersitzes und legen beide
Schultergurte auf die Seite.
• Legen Sie die Neugeboreneneinlage in den Sitz.
Ab dem 6. Monat sollte die Neugeboreneneinlage entfernt werden, um
ausreichend Platz für Ihr Kind zu schaffen. Als Zwischenstufe kann der
Keil aus der Neugeboreneneinlage entfernt werden.
Zur Entfernung der Neugeboreneneinlage öffnen Sie das Gurtschloss,
legen die beiden Schultergurte auf die Seite und nehmen anschließend
die Neugeboreneneinlage aus dem Sitz.
HINWEIS! Für Frühchen, Babys unter 3 Kilogramm bzw. unter 45 cm
Körpergröße, empfehlen wir die Verwendung einer Babyschale.
The optional available newborn inlay helps to support lying comfort and
fit for the smallest babies.
• Before you use it for the first time, you must install it in the seat.
• Open the buckle of the child seat and put the two shoulder straps
on the side.
• Place the newborn inlay into the seat.
From the 6th month, the newborn inlay should be removed to create
sufficient space for the child. As an intermediate stage remove the
wedge from the newborn inlay. To remove the newborn inlay, open the
buckle, place the two shoulder straps on the side and then remove the
newborn inlay from the seat.
NOTE! For preemies, babies under 3 kilograms or under 45 cm height,
we recommend using an infant carrier.
L‘inserto neonato disponibile in opzione aiuta a supportare il comfort
da sdraiato ed è adatto per i bambini più piccoli.
• Installarlo sul sedile prima di utilizzarlo per la prima volta.
• Aprire la chiusura del seggiolino e posizionare di lato le due spalline.
• Posizionare l‘inserto neonato nel seggiolino.
L‘inserto neonato dovrà essere rimosso al sesto mese, in modo da cre-
are lo spazio sufficiente per il bambino. Come intermedio, il cuneo può
essere rimosso dall‘inserto neonatale. Per rimuovere l‘inserto neonato,
aprire la chiusura, posizionare di lato le spalline e rimuovere l‘inserto
dal seggiolino.
NOTA! Raccomandiamo l‘utilizzo di porte-enfant per bambini prematu-
ri, sotto i 3 chilogrammi o 45 cm di altezza.
Um die bestmögliche Sicherheit Ihres Kindes zu
gewährleisten, prüfen Sie bitte immer vor Beginn der Fahrt, ob…
• die Position der Kopfstütze ordnungsgemäß eingestellt wurde.
• das Gurtsystem an die Körpergröße Ihres Kindes angepasst
wurde, die Schultergurte nicht verdreht sind und das Gurtsystem
geschlossen ist.
• bei Babys bis 6 Monaten die Neugeboreneneinlage verwendet wird.
• der Top Tether straff über die Rückenlehne des Autositzes gespannt ist
und der Gurtspannungsanzeiger grün ist.
To guarantee the maximum safety for your child, please make sure that:
• The headrest is adjusted to the correct height.
• The belt system is correctly adjusted to the size of the child, the
shoulder belts are not twisted and the belt system is locked.
• The vehicle-specific belt is tensioned and the clamp is closed
and locked.
• The newborn inlay is used for babies up to 6 months.
• the top tether tightly stretched over the back of the car seat and the
belt tension indicator is green.
Per garantire la massima sicurezza al bambino, assicurarsi che:
• Il poggiatesta sia regolato all‘altezza corretta.
• Il sistema delle cinture sia regolato correttamente alla dimensione
del bambino, le cinture non siano arrotolate e che il sistema cinture
sia bloccato.
• l‘inserto neonato sia utilizzato per bambini fino a 6 mesi.
• il Top Tether è teso sopra lo schienale del sedile e l’indicatore della
tensione della cinghia è verde.
VERWENDUNG DER NEUGEBORENENEINLAGE USING THE NEWBORN INLAY
IST IHR KIND RICHTIG GESICHERT? IS YOUR CHILD PROPERLY SECURED? SUO FIGLIO È LEGATO CORRETTAMENTE?
USO DELL‘INSERTO NEONATO

180°
CLICK
180°
32 33
• Zum Ausbau des Sitzes öffnen Sie das Fahrzeuggurtschloss und die
Gurtklemme. Ziehen Sie anschließend die Schlosszunge am Gurt aus
der Gurtführung.
• Anschließend drücken Sie die Schnellablasstaste an der Unterseite
des Sitzes.
• Falls Sie die Neugeboreneneinlage verwenden, entfernen Sie diese nun.
• Falten Sie den Sitz zusammen, indem Sie die Rückenlehne fest gegen
die Sitzfläche drücken.
• Ist der Sitz flach gedrückt, schieben Sie die Kopfstütze nach oben und
klappen den oberen Teil der Rückenlehne zurück über den unteren Teil
der Rückenlehne.
• Wenn die Tasche bereits unter dem Sitz liegt, schließen Sie die
seitlichen Gurtschnallen über dem Sitz.
• Öffnen Sie die oberen Schnallen des Sitzschoners, die um die
Kopfstütze geschlungen waren und schlagen diese über den unteren
Teil des Schoners.
• Abschließend verbinden Sie beide Gurtschnallen miteinander.
• To remove the seat, open the vehicle seat belt buckle and the belt
clamp. Then pull the buckle through the belt guide.
• Then press the quick release button on the bottom of the seat.
• If you are using the newborn inlay, remove it now.
• Fold the seat together by pressing the backrest firmly against the seat.
• If the seat is flat, move the headrest upwards and fold the upper part
of the backrest back over the lower part of the backrest.
• If you have the bag already under the seat, close the side buckles
above the seat.
• Open the top buckles of the seat protector, which are wrapped around
the headrest and fold them over the lower part of the protector.
• Finally, connect the two buckles together.
• Per rimuovere il seggiolino, aprire l‘apposita chiusura del veicolo e il
morsetto. In seguito, tirare la chiusura attraverso la guida della cintura.
• Premere il pulsante di rilascio rapido sul fondo del seggiolino.
• Se si sta usando l‘inserto neonato, rimuoverlo adesso.
• Piegare il seggiolino premendo con fermezza lo schienale contro il
sedile.
• Se il seggiolino è sgonfio, muovere verso l‘alto il poggiatesta e
ripiegare la parte superiore del poggiatesta contro la parte inferiore.
• Se la base è ancora sotto il seggiolino, chiudere le chiusure laterali
sopra il seggiolino.
• Aprire le chiusure superiori della protezione sedile, che sono avvolte
al poggiatesta e ripiegarle sulla parte inferiore della protezione.
• In fine, collegare le due chiusure.
AUSBAU AUS DEM FAHRZEUG DE-INSTALLATION OF THE CAR SEAT DISINSTALLAZIONE DEL SEGGIOLINO

34 35
Es ist darauf zu achten, dass nur ein original nachfolger HY5.1 TT Sitz-
bezug und original nachfolger HY5.1 TT Polsterteile verwendet werden,
da diese für eine uneingeschränkte Funktionalität sorgen. Ersatzteile
sind im Fachhandel erhältlich.
Kunststoffteile und das Gurtsystem können mit einem feuchten Tuch
gereinigt werden. Bevor Sie die Neugeboreneneinlage waschen, muss
der Schaumteil entfernt werden. Genauere Informationen dazu, finden
Sie im Kapitel „Entfernen des Bezuges“.
WARNUNG! Vor Gebrauch waschen! Der Bezug darf nur bei 30°C im
Schonwaschgang gewaschen werden. Sollten Sie mit mehr als 30°C
oder mit der Hand waschen, kann es zu Ausfärbungen des Bezugstof-
fes kommen. Bitte den Bezug gesondert von anderer Wäsche waschen
und keinesfalls maschinell trocknen! Den Bezug keinesfalls in direkter
Sonne trocknen!
WARNUNG! Bitte auf keinen Fall chemische Reinigungs- oder Bleich-
mittel verwenden.
Make sure that only an original nachfolger HY5.1 TT seat cover is
used on the seat because the cover is also a fundamental component
of the good functioning of the child seat. Replacement covers may be
purchased at authorised dealers.
Plastic parts, the harness system as well as the antislidecoating of
the shoulder belts can be cleaned with a wet cloth. Before you wash
the newborn inlay, the foam part must be removed. For more detailed
information, see the section „Removing the cover“.
WARNING! Wash before use! The cover should be washed at 30°C in
a delicate wash cycle. Washing at higher temperatures than 30°C or
by hand may result in color bleeding. Wash separately from other items
and never tumble dry! Never dry in strong sunlight!
WARNING! Never use chemical cleaning or bleaching agents.
Assicurarsi di utilizzare solo coprisedili originali nachfolger HY5.1 TT
sul seggiolino, in quanto il rivestimento è anch‘esso una componente
fondamentale del buon funzionamento del seggiolino. Rivestimenti di
ricambio possono essere acquistati da rivenditori autorizzati.
Le parti in plastica, il sistema di cablaggio e il rivestimento anti scivolo
delle spalline possono essere puliti con un panno bagnato. Rimuovere
la gommapiuma prima di lavare l‘inserto neonato. Per informazioni più
dettagliate, consultare la sezione „Rimuovere il rivestimento“.
ATTENZIONE! Lavare prima dell‘uso! Il rivestimento deve essere lavato
a 30°C nel ciclo di lavaggio delicati. Il lavaggio a temperature superiori
a 30°C o a mano può causare perdita del colore. Non lavare con altri
oggetti e non fare la centrifuga! Non fare asciugare a luce solare forte!
ATTENZIONE! Non usare mai detergenti chimici o candeggianti.
REINIGUNG DES BEZUGES CLEANING THE COVER PULIZIA

180°
180°
36 37
Der Bezug besteht aus vier Teilen, die mittels Gummiband oder Druck-
knöpfen am Sitzgestell befestigt sind. Sobald Sie alle Befestigungen
lösen, können die Einzelteile abgenommen werden.
Gehen Sie wie folgt vor:
• Öffnen Sie das Gurtschloss des Gurtsystems.
• Öffnen Sie die Druckknöpfe aller Gurtpolster und Bezugsteile.
• Entfernen Sie alle Gurtpolster.
• Sie können nun den Bezug der Kopfstütze und den Sitzbezug nach
vorne hin abziehen.
• Um die Bezüge wieder zu befestigen, verfahren Sie in umgekehrter
Reihenfolge.
HINWEIS! Bevor Sie den Kopfstützenbezug waschen können, muss der
integrierte Styroporteil inklusive der Kunststoffplatte entfernt werden.
Bitte achten Sie darauf, dass der Styroporteil leicht brechen kann und
dieser vorsichtig entfernt werden muss.
HINWEIS! Achten Sie bei der Wiederanbringung der Schulterpolster
unbedingt darauf, dass...
• die geschlossene Seite nach innen zeigt.
• die Schultergurte im Schulterpolster geführt sind.
• die Druckknöpfe geschlossen sind.
• das Gurtband für die Kopfstütze richtig montiert ist.
The cover consists of four components fixed to the seat shell by elastic
piping and snap buttons. Once you have released all the fastenings, you
can remove the individual components for washing.
Proceed as follows:
• Open the belt buckle of the belt system.
• Open all snap buttons of the pads and cover parts.
• Remove all belt pads.
• Remove the cover of the headrest and the seat by pulling it forwards.
• To fix the cover again on the seat carry out the steps in reverse order.
NOTE! Before you can wash the headrest cover, the integrated styro-
foam part including the plastic plate must be removed. Please ensure
that the styrofoam part is easy to break and must be carefully removed.
NOTE! When remounting the shoulder pads, it is essential to ensure
that...
• the closed side faces towards the inside.
• the shoulder belts are guided inside the shoulder pads.
• the press buttons are closed.
Il rivestimento è composto da quattro componenti fissati al guscio del
seggiolino da tubi elastici e bottoni automatici. Dopo aver rilasciato tutti i
fissanti, è possibile rimuovere le componenti individuali per il lavaggio.
Procedere come segue:
• Aprire la chiusura del sistema cinture.
• Aprire tutti i bottoni automatici delle imbottiture e del rivestimento.
• Rimuovere le spalline.
• Rimuovere il rivestimento del poggiatesta e il seggiolino tirandoli via.
• Per risistemare il rivestimento sul seggiolino, seguire le indicazioni in
ordine inverso.
NOTA! Prima di poter lavare il rivestimento del poggiatesta, devono
essere rimosse la parte in polistirolo integrata e la piastra in plastica.
Assicurarsi che la parte in polistirolo sia facile da rompere e dev‘essere
rimossa con cautela.
NOTA! Nel rimontare le spalline, è essenziale assicurarsi che...
• il lato chiuso sia rivolto verso l‘interno.
• le cinture siano guidate dentro le spalline.
• I pulsanti automatici siano chiusi.
ENTFERNEN DES BEZUGES REMOVAL OFT THE COVER RIMUOVERE IL RIVESTIMENTO

C
B
A
38 39
Die mobile Pumpe, die optional erhältlich ist, ermöglicht Ihnen
maximale Flexibilität, wie auch Mobilität und verstärkt nochmals die
Einfachheit des Sitzes.
Funktion der Pumpe:
• Drücken Sie die Taste (A) 3-mal kurz um diese zu aktivieren.
• Die Taste blinkt blau, wenn die Aktivierung der Pumpe erfolgreich war.
• Anschließend kann die Pump-Funktion durch drücken derselben Taste
ein- und ausgeschaltet werden (A).
• Bei Erreichung des korrekten Drucks schaltet sich die Pumpe
automatisch ab.
• Wird die Pumpe 30 Sekunden nicht verwendet, muss sie erneut
aktiviert werden.
HINWEIS! Nach dem Befüllen des Sitzes muss der Schlauch der Pumpe
vom Ventil abgezogen werden (C), da sonst das Ventil permanent leicht
geöffnet bleibt.
Laden der Pumpe:
Die Pumpe kann bzw. soll mit dem USB- Ladegerät (B) während der Fahrt
bequem an der 12V-Steckdose im Fahrzeug aufgeladen werden, damit
Sie immer einsatzbereit ist, wenn Sie diese unterwegs benötigen.
HINWEIS! Speziell bei Flugreisen ist darauf zu achten, dass die Pumpe
nicht durch andere Gegenstände unbeabsichtigt aktiviert wird.
WARNUNG! Bitte beachten Sie, dass der Schlauch sehr heiß wird, nach-
dem die Pumpe für eine längere Zeit in Betrieb war.
The mobile pump, which is optionally available, ensures maximum
flexibility, mobility and enhances the simplicity of the seat.
Function of the pump:
• Briefly press the button (A) 3 times to activate it.
• The button flashes blue, when the activation of the pump was
successful.
• Afterwards the pump function can be switched on and off by
pressing the same button (A).
• When the correct pressure is reached, the pump switches off
automatically.
• If the pump is not used for 30 seconds, it must be activated again.
NOTE! After filling the seat, the hose of the pump (C) must be removed
from the valve, otherwise the valve remains slightly open.
Charging the pump:
The pump can or should be easily recharged (B) with the charger while
driving on the 12V socket in the car, so it is always ready when you
need it while traveling.
NOTE! Especially when traveling by airplane, ensure that the pump will
not be activated accidentally by other objects.
WARNING! Please note, that the tube will get hot after the inflator has
worked for a long time.
La pompa mobile disponibile come opzione Le permette il massimo
livello di flessibilità e di mobilità, rinforzando nuovamente la semplicità
del sedile.
Funzionamento della pompa:
• Prema il tasto (A) brevemente per 3 volte per attivarlo.
• Quando l‘attivazione della pompa sarà riuscita, il pulsante
lampeggerà di blu.
• Dopo, il funzionamento della pompa potrà essere acceso e spento
premendo lo stesso pulsante (A).
• Una volta raggiunta la pressione corretta, la pompa si spegnerà
automaticamente.
• Se la pompa non viene utilizzata per 30 secondi, si dovrà riattivarla.
NOTA! Dopo aver gonfiato il seggiolino, il tubo della pompa (C) dovrà
essere rimosso dalla valvola in modo che essa non resti leggermente
aperta.
Caricare la pompa:
La pompa può essere o deve essere facilmente ricaricata (B) con il
caricabatteria durante la guida mediante la presa 12V della macchina,
in modo da essere sempre pronta all‘uso durante il viaggio.
NOTA! Assicurarsi che la pompa non possa essere accidentalmente
attivata da altri oggetti, soprattutto durante i viaggi aerei.
ATTENZIONE! Si prega di notare che il tubo diventerà incandescente
dopo il gonfiaggio prolungato.
BEDIENUNG DER MOBILEN PUMPE OPERATION OF THE PUMP GESTIONE DELLA POMPA
3x
quickly
Other manuals for HY5.1 TT
1
Table of contents
Other Nachfolger Car Seat manuals