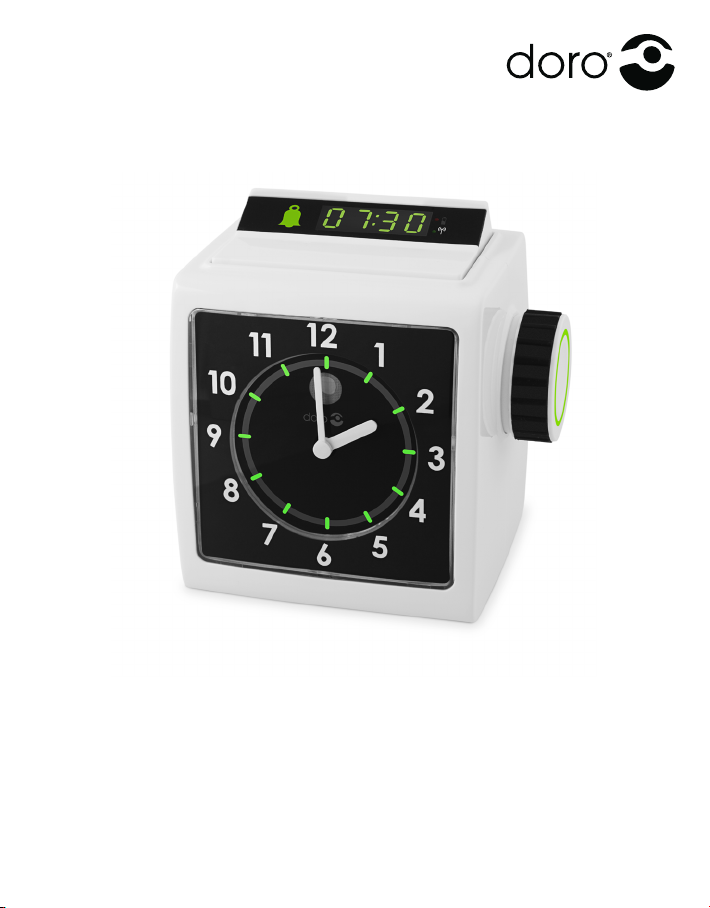
Doro HearPlus 333cl User manual

HearPlus
333cl


English
Alarm switch (display)
Alarm indicator
Alarm time
Battery indicator
Radio signal indicator
Jog wheel
Jog wheel button
Time set
Phone alarm on/off
Alarm type
Alarm volume
Alarm tone
1.
2.
3.
4.
5.
6.
7.
8.
9.
10.
11.
12.
Time zone
Brightness
Phone socket
Line socket
Shaker socket
Mains adapter socket
External alarm socket
Loudspeaker
13.
14.
15.
16.
17.
18.
19.
20.
Alarmomkopplare
(display)
Alarmstatus
Alarmtid
Batteristatus
Radiosignalsstatus
Inställningsratt
Knapp på
inställningsratt
Tidsinställning
Telefonalarm av/på
Alarmtyp
1.
2.
3.
4.
5.
6.
7.
8.
9.
10.
Alarmvolym
Alarmton
Tidszon
Ljusstyrka
Telefonuttag
Linjeuttag
Shakeruttag
Uttag för strömadapter
Externt alarmuttag
Högtalare
11.
12.
13.
14.
15.
16.
17.
18.
19.
20.
Svenska

Dansk
Alarmomskifter
(display)
Alarmindikator
Alarmklokkeslæt
Batteriindikator
Radiosignalindikator
Hjul
Hjulknap
Indstilling af klokkeslæt
Telefonalarm til/fra
Alarmtype
1.
2.
3.
4.
5.
6.
7.
8.
9.
10.
Alarmlydstyrke
Alarmtone
Tidszone
Lysstyrke
Udgang til telefon
Udgang til linje
Udgang til vibrator
Udgang til netadapter
Udgang
til ekstern alarm
Højttaler
11.
12.
13.
14.
15.
16.
17.
18.
19.
20.
Alarmbryter (display)
Alarmindikator
Alarmtidspunkt
Batteriindikator
Indikator for radiosignal
Innstillingshjul
Hjulknapp
Still klokkeslett
Telefonalarm på/av
Alarmtype
Alarmvolum
Alarmtone
1.
2.
3.
4.
5.
6.
7.
8.
9.
10.
11.
12.
Tidssone
Lysstyrke
Telefonkontakt
Linje
Risterkontakt
Strømadapterkontakt
Ekstern alarmkontakt
Høyttaler
13.
14.
15.
16.
17.
18.
19.
20.
Norsk

Hälytyskytkin (näyttö)
Hälytyksen kuvake
Hälytysaika
Paristokuvake
Radiosignaalin kuvake
Säätökiekko
Säätökiekkopainike
Aika-asetus
Puhelinhälytys
päällä/pois
Hälytystyyppi
Hälytyksen
äänenvoimakkuus
1.
2.
3.
4.
5.
6.
7.
8.
9.
10.
11.
Hälytysääni
Aikavyöhyke
Kirkkaus
Puhelinliitäntä
Linjaliitäntä
Väristinliitäntä
Verkkovirtasovittimen
liitäntä
Ulkoisen hälyttimen
liitäntä
Kaiutin
12.
13.
14.
15.
16.
17.
18.
19.
20.
Suomi
Bouton d’alarme
(afcheur)
Témoin d’alarme
Heure d’alarme
Témoin d’état des piles
Témoin de signal radio
Molette
Bouton de molette
Réglage de l’heure
Alarme téléphonique M/A
Type d’alarme
Volume d’alarme
1.
2.
3.
4.
5.
6.
7.
8.
9.
10.
11.
Tonalité d’alarme
Fuseau horaire
Luminosité
Prise du poste
téléphonique
Prise de ligne
téléphonique
Prise du vibreur
Prise du bloc
d’alimentation
Prise d’alarme externe
Haut-parleur
12.
13.
14.
15.
16.
17.
18.
19.
20.
Français

Weckertaste (Display)
Weckeranzeige
Weckzeit
Batterieanzeige
Funksignalanzeige
Drehrad
Drehradtaste
Uhrzeiteinstellung
Telefonwecker an/aus
Weckart
Weckerlautstärke
1.
2.
3.
4.
5.
6.
7.
8.
9.
10.
11.
Weckton
Zeitzone
Helligkeit
Telefonbuchse
Leitungsbuchse
Buchse für
Kissenschüttler
Buchse für Netzadapter
Anschluss für externen
Alarm
Lautsprecher
12.
13.
14.
15.
16.
17.
18.
19.
20.
Deutsch
Español
Interruptor de la alarma
(pantalla)
Indicador de la alarma
Hora de la alarma
Indicador de la pila
Indicador de la señal
de radio
Rueda de control
Botón de la rueda
de control
Ajuste de la hora
Alarma del teléfono
activada / desactivada
1.
2.
3.
4.
5.
6.
7.
8.
9.
Tipo de alarma
Volumen de la alarma
Tono de la alarma
Zona horaria
Brillo
Toma del teléfono
Toma de la línea
Toma del vibrador
Toma del adaptador de
red
Toma de la alarma
externa
Altavoz
10.
11.
12.
13.
14.
15.
16.
17.
18.
19.
20.

Interruttore sveglia
(display)
Indicatore della sveglia
Ora della sveglia
Indicatore batteria
Indicatore del segnale
radio
Rotella
Tasto della rotella
Regolazione dell’ora
Allarme telefonico on/off
Tipo di sveglia
1.
2.
3.
4.
5.
6.
7.
8.
9.
10.
Volume della sveglia
Tono della sveglia
Fuso orario
Luminosità
Presa telefonica
Presa di linea
Presa del dispositivo di
vibrazione
Presa adattatore
di rete
Presa allarme esterno
Altoparlante
11.
12.
13.
14.
15.
16.
17.
18.
19.
20.
Italiano
Alarmschakelaar
(display)
Alarmindicator
Alarmtijd
Batterij-indicator
Radiosignaalindicator
Insteldraaiknop
Instelknop
Tijd instellen
Telefoonalarm aan/uit
Alarmtype
Alarmvolume
1.
2.
3.
4.
5.
6.
7.
8.
9.
10.
11.
Alarmtoon
Tijdzone
Helderheid
Telefoonaansluiting
Lijnaansluiting
Aansluiting
kussenvibrator
Aansluiting netadapter
Aansluiting extern
alarm
Luidspreker
12.
13.
14.
15.
16.
17.
18.
19.
20.
Nederlands

Ελληνικά
Διακόπτης αφύπνισης
(οθόνη)
Φωτεινή ένδειξη
αφύπνισης
Ώρα αφύπνισης
Φωτεινή ένδειξη
μπαταρίας
Φωτεινή ένδειξη
ραδιοηλεκτρικού
σήματος
Περιστρεφόμενος
τροχός επιλογής
Περιστρεφόμενο
κουμπί επιλογής
Ρύθμιση ώρας
Ενεργοποίηση/
απενεργοποίηση
ειδοποίησης
τηλεφώνου
Τύπος ειδοποίησης
1.
2.
3.
4.
5.
6.
7.
8.
9.
10.
Ένταση ήχου
ειδοποίησης
Ήχος αφύπνισης
Ζώνη ώρας
Φωτεινότητα
Υποδοχή τηλεφώνου
Υποδοχή τηλεφωνικής
γραμμής
Υποδοχή συσκευής
δόνησης
Υποδοχή
προσαρμογέα
τροφοδοσίας
Υποδοχή εξωτερικής
συσκευής ειδοποίησης
Ηχείο
11.
12.
13.
14.
15.
16.
17.
18.
19.
20.

1
English
Installation
Connecting
Note!
Set the time zone according to Settings/Timezone
before connecting the power.
Connect the mains adapter and, if applicable, phone
line cords. A plug kit (not included) may be needed.
Batteries
Remove the cover on the underside and install 4 AA
1.5V Alkaline batteries (not included) in accordance
with the markings. The batteries are used for backup in
case of power failure.
The clock can continue to operate for approximately 1 year
on batteries. Backlight and display will automatically turn
off when the clock is running on batteries only.
Note!
The pillow shaker and ash will not work during power failure.

2
English
Operation
Setting the time
After connecting the power, the time is adjusted
automatically by an RCC signal. The indicator will
light up on the display. If no RCC signal has been
received within 20 minutes, the time should be set
manually. The clock will retry automatic time adjustmentThe clock will retry automatic time adjustment
at night when there is less radio interference.
The automatic time setting can be adjusted for the
different time zones in Europe, see Settings/Time zone.
Note!
Automatic time adjustment may not be available at all
locations due to obstructions of the radio signal. Place
the unit at least 2 meters away from a TV, computer, air
conditioner or other household electrical appliances.
The optimal location is near a window, preferably facing
Frankfurt/Germany.

3
English
Automatic time setting
Press and hold until is displayed to update
the automatic time adjusment.
Manual time setting
It is not possible to set the time manually while the
clock is searching for an RCC signal, please wait until
the indicator is off.
Press . The display will light up and the hours will
blink on the display.on the display..
Turn the jog wheel to set the hours and press the jog
wheel button to conrm. The minutes will blink on
the display.
Turn the jog wheel to set the minutes and press the
jog wheel button to conrm.
Note!
The adjustment of the analog clock can take up to
30 minutes to complete. During the adjustment, the
analog clock will not show the correct time. Do not
disconnect the power during adjustment since this
could damage the clock.
1.
1.
2.
3.

4
English
Setting the alarm time
Press the jog wheel button. The display will light up
and the hours and the symbol will blink.
Turn the jog wheel to set the hours and press the jog
wheel button to conrm. The minutes will blink.
Turn the jog wheel to set the minutes and press the
jog wheel button to conrm.
Turning on the alarm
Toggle the alarm switch forward to turn on the alarm.
The symbol and the display will light up.symbol and the display will light up.
Note!
The display will time out after 10 seconds after
disconnecting the mains adapter. Press the alarm mains adapter. Press the alarm
switch to turn the display on again. The alarm time will
not show while the clock is searching for an RCC signal.
1.
2.
3.

5
English
Turning off the alarm
To turn off the alarm, toggle the alarm switch backward.
Note!
The alarm turns off automatically after 9 minutes.
Snooze
When the alarm is heard, press the alarm switch. The
alarm will be repeated every 9 minutes until the alarm is
turned off.

6
English
Additional functions
External alarm
An external alarm device such as Doro CarePlus or Doro
SeePlus 314ci can be connected to the socket.
If the alarm is not turned off or snoozed within 9
minutes, the external alarm will be triggered.
Pillow shaker
A pillow shaker such as Doro HearPlus 55v can be
connected to the socket. See Settings/Alarm mode
on how to enable/disable the shaker.
Phone alarm
If the clock is connected to the phone line, incoming
calls will trigger the alarm. See Settings/Phone alarm
on how to enable/disable the phone alarm function. The
sound and ash signals are determined by the Alarm
mode setting when the phone alarm is ON.

7
English
Settings
Phone alarm
Phone alarm ON
Phone alarm OFF
Alarm mode
Shaker only (if connected)
Sound + Flash (+ Shaker if connected)
Flash (+ Shaker if connected)
Sound (+ Shaker if connected)
Alarm volume
Low
High
Very High
Gradually increasing alarm volume.

8
English
Alarm tone
Low frequency
High frequency
Time zone
The radio controlled time setting (RCC) can be adjusted
for time zone differences.
GMT GMT (London, Dublin...)
+1 GMT + 1 hour (Stockholm, Berlin, Paris...)
+2 GMT + 2 hours (Helsinki, Athens...)
XAutomatic time adjustment disabled. Time
must be set manually.
Note!
The automatic adjustment (RCC) can take up to 30
minutes to complete. During the adjustment, the
analog clock will not show the correct time.

9
English
Backlighting
The backlighting brightness setting also affects the LED
display.
No backlighting. Pressing the alarm switch
will turn on the backlighting for 10 seconds.
Dimmed backlighting.
Pressing the alarm switch will change to
bright backlighting for 10 seconds.
Bright backlighting.
If the mains adapter is disconnected, backlighting is
automatically turned off to save battery power. Press the
alarm switch to turn on the lights for 10 seconds.

10
English
Care and maintenance
Your unit is a technically advanced product and should be treated with
the greatest care. Negligence may void the warranty.
Protect the unit from moisture. Rain/snowfall, moisture and all types
of liquid can contain substances that corrode the electronic circuits. If
the unit gets wet, you should remove the mains power and the batteries
and allow the unit to dry completely before you replace it.
Do not use or keep the unit in dusty, dirty environments. The unit’s
moving parts and electronic components can be damaged.
Do not keep the unit in warm places. High temperatures can reduce
the lifespan for electronic equipment, damage batteries and distort or
melt certain plastics.
Do not keep the unit in cold places. When the unit warms up to normal
temperature, condensation can form on the inside which can damage
the electronic circuits.
Do not try to open the unit in any other way than that which is
indicated here.
Do not drop the unit. Do not knock or shake it either. If it is treated
roughly the circuits and precision mechanics can be broken.
Do not use strong chemicals to clean the unit.
The advice above applies to the unit, battery, mains adapter and other
accessories. If the unit is not working as it should, please contact the
place of purchase for service. Don’t forget the receipt or a copy of the
invoice.
•
•
•
•
•
•
•

11
English
Troubleshooting
If the digital and analog clock becomes un-synchronized
by accident, follow the steps below to restore the
syncronization:
Press and hold and the alarm switch (snooze) for
5 seconds. The display will light up and the hours
will blink on the display.
Turn the jog wheel to set the hours so that they
match the analog clock and press the jog wheel
button to conrm. The minutes will blink on the
display.
Turn the jog wheel to set the minutes so that they
match the analog clock and press the jog wheel
button to conrm.
The clock is now prepared for either automatic or
manual time setting.
1.
2.
3.
4.

12
English
Warranty and technical data
This product is guaranteed for a period of 24 months from the date of
purchase. In the unlikely event of a fault occurring during this period,
please contact the place of purchase. Proof of purchase is required for
any service or support needed during the guarantee period.
This guarantee will not apply to a fault caused by an accident or a similar
incident or damage, liquid ingress, negligence, abnormal usage, non-
maintenance or any other circumstances on the user’s part. Furthermore,
this guarantee will not apply to any fault caused by a thunderstorm or
any other voltage uctuations. As a matter of precaution, we recommend
disconnecting the device during a thunderstorm.
Batteries are consumables and are not included in any guarantee.
Use only AA Alkaline batteries of good quality.
Specications
Size: 114 mm x 127 mm x 94 mm
Weight: 567 g (including batteries)
Battery: 4 x 1.5 V AA Alkaline batteries
Declaration of Conformity
Doro hereby declares that Doro HearPlus 333cl conforms to the essential
requirements and other relevant regulations contained in the Directives
1999/5/EC (R&TTE) and 2002/95/EC (RoHS).
A copy of the Declaration of Conformity is available at
www.doro.com/dofc
Other manuals for HearPlus 333cl
1
Table of contents
Languages:
Other Doro Alarm Clock manuals