iHome iKT50 User manual

K4
instruction manual
Model: iKT50
CHARGE
K-CELL
BEFORE
USE
Questions?
Contact Customer Service at 1-800-288-2792
dual charging alarm clock with
speakerphone and removable battery

1
K4
Introduction
Thank you for purchasing the iHome K4. This product is designed to provide high quality wireless
sound for your iPad, iPhone, iPod, computer, tablet or other Bluetooth audio device and mobile
charging on the go with the included removable K-Cell rechargeable battery.
This instruction booklet explains the basic operation and care of the unit. Please read it carefully and keep for
future reference.
Maintenance
• Place the unit on a level surface away from sources of direct sunlight or excessive heat.
• Protect your furniture when placing your unit on a natural wood and lacquered finish. A cloth or other
protective material should be placed between it and the furniture.
• Clean your unit with a soft damp cloth. Strong cleaning agents, such as thinner or similar materials can
damage the surface of the unit.
Long-term Storage of Your Product
• Store in a cool, dry place.
• K-Cell should be charged before storing.
• If stored for a long period of time, K-Cell may be unresponsive until charged for a number of hours
(depending on discharge level)
• Do not store K-Cell for more than a year without charging as this can permanently harm the K-Cell’s
battery.

2
K4
Removable K-Cell Rechargeable Lithium-ion Battery
This device uses a removable rechargeable lithium-ion battery (K-Cell) that should last the lifetime of the device.
If you suspect your battery may be dead, try charging it for an extended period of time and try resetting the
unit. If this fails, contact Customer Service at 1-800-288-2792.
Warning/Disposal of unit
Do NOT attempt to change the battery. Doing so will void the warranty and could cause injury and damage
to your device. To dispose of the unit, follow the instructions below:
• Never dispose of used batteries/electronics with ordinary solid wastes, since they contain toxic
substances.
• Always dispose of used batteries/electronics in accordance with the prevailing community regulations.
• Many electronics retailers now recycle batteries and other electronic components at no charge.
General Battery Precautions
• Never use or charge a battery if it appears to be leaking, discolored, deformed, or in any way abnormal.
• Never disassemble the unit or attempt to remove battery as that could cause leakage of alkaline solution
or other electrolytic substances.
• Avoid charging a rechargeable battery when the temperature is not within 5°C - 35° C (41° - 95°
Fahrenheit).
• Never expose a battery to any liquid.
• Never expose a battery to excessive heat such as direct sunlight or fire. Never use a battery pack in an
unventilated vehicle where excessive internal temperatures may be encountered.
• Always keep batteries out of the reach of infants and small children

3
K4
Table of Contents
Included ..............................................................................................................................................4
Meet Your K4 .......................................................................................................................................5
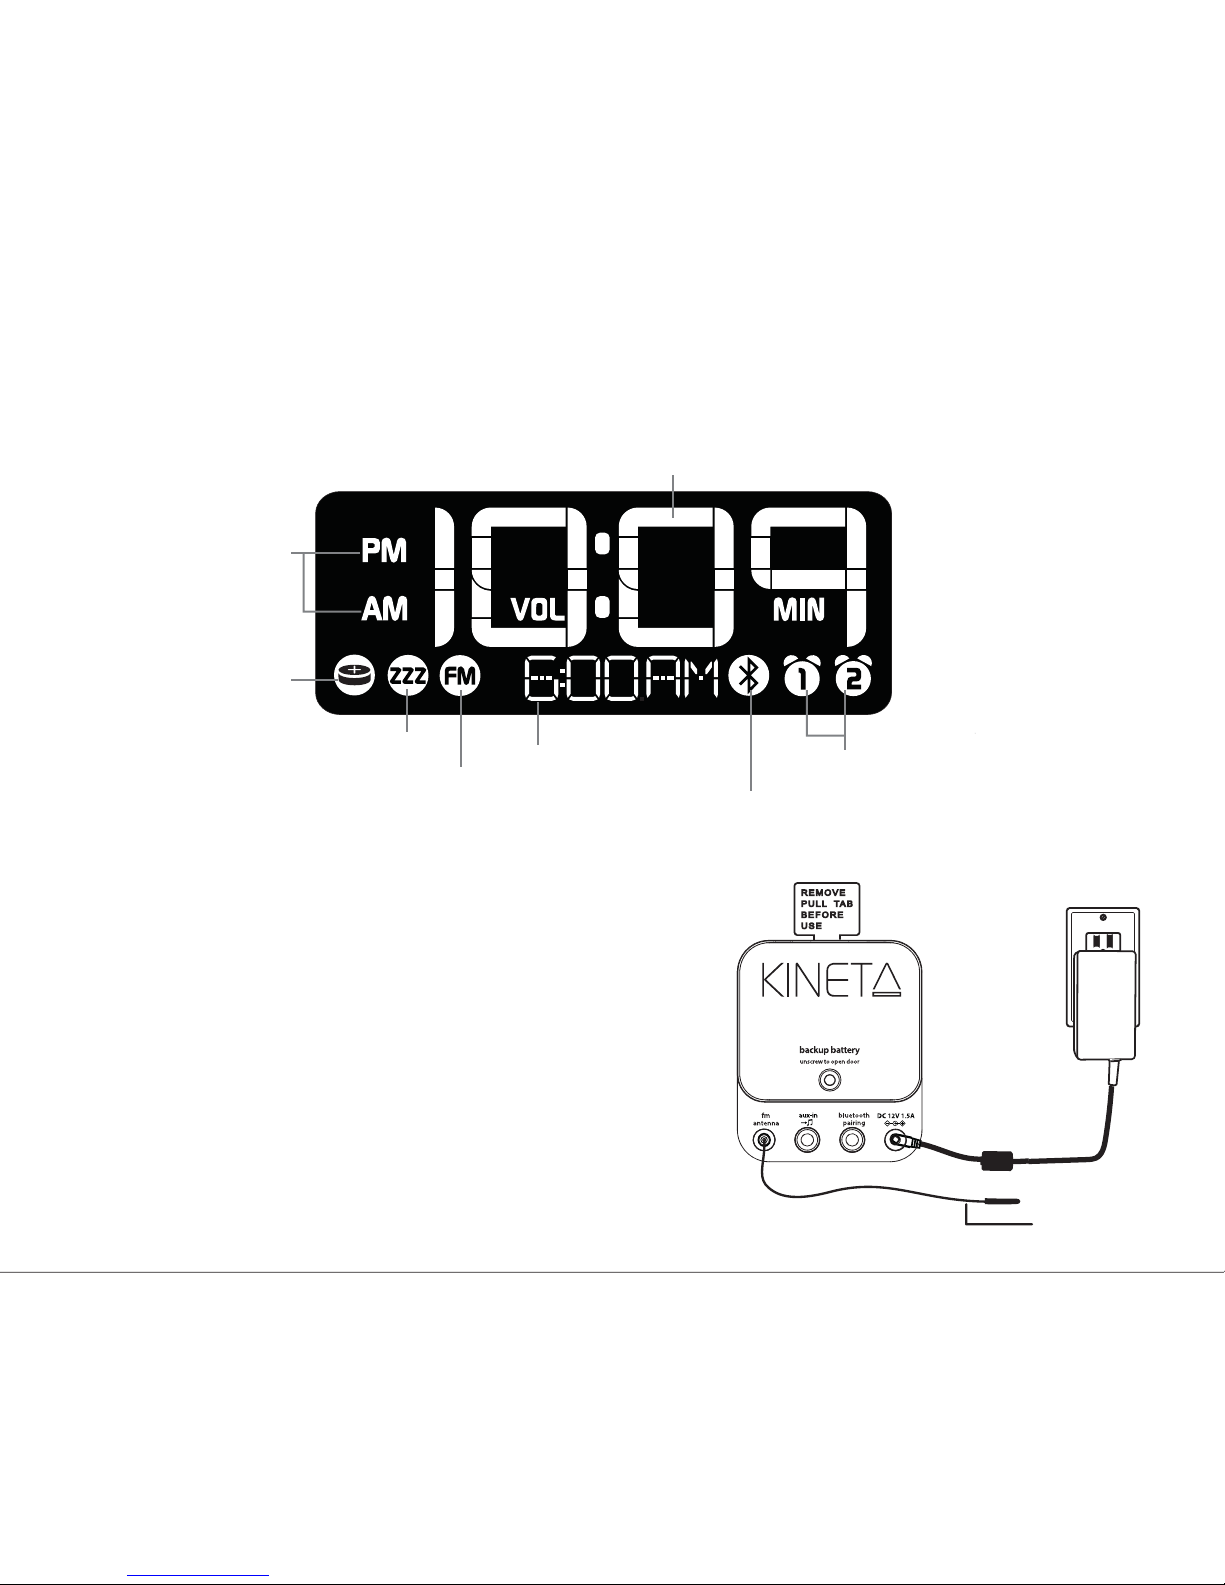
Display................................................................................................................................................6
Setting Up the Unit.................................................................................................................................6
Charging
Charging the K-Cell When Docked in Unit/Battery Level Meter.................................................................7
Charging the K-Cell via USB...............................................................................................................8
Charging Devices Using the K-Cell/Charging Devices Using the USB Charging Port.....................................9
Setting The Clock ................................................................................................................................10
Setting and Using the Alarms ............................................................................................................10-11
Previewing the Alarm and Turning the Alarm On/Off .................................................................................11
Using the FM Radio/Setting and Using FM Presets ....................................................................................12
Using FM Radio in Other Countries.........................................................................................................13
Snooze/Dimmer Button/Sleep Mode......................................................................................................13
Bluetooth
Using Bluetooth: Pairing Your Device ..................................................................................................14
Pairing with a Different Device
/
Playing Audio Via Bluetooth .................................................................15
Speakerphone Operation ................................................................................................................16
Playing Audio via Aux In ......................................................................................................................17
Replacing and Installing Clock Backup Battery..........................................................................................18
Consumer Product Safety Guide.............................................................................................................19
FCC Information..................................................................................................................................20
Troubleshooting...................................................................................................................................21
Warranty...........................................................................................................................................22

4
K4
Included
• K4 Unit
• K-Cell
• AC adaptor
• FM antenna
K-Cell
K4 Unit
AC adaptor FM antenna

5
Meet Your K4
Left Side
Top
Power
LED
Power/Alarm Reset Button
Microphone
Mode Button
K-Cell Eject
Button
K-Cell
Line up arrow on K-Cell
with arrow on cabinet to
insert K-Cell
Volume Down/
Volume Up Buttons
Alarm 1/Alarm 2 Buttons
Play/Pause and
Presets Button
Snooze/Dimmer Button
Sleep/Time Set Button
Plus/Minus Settings/
Talk/End Call Buttons
USB Charging Port
Back
Backup Battery
Compartment
Aux-in Jack
FM Antenna jack
Bluetooth Pairing Button
K4
snooze | dimmer
mode
presets
DC Jack
eject

6
The Display
Alarm Active Indicator
Sleep Mode Indicator
Radio Mode Indicator
Bluetooth Indicator
PM/AM Indicators
Mode/Wake to
Alarm Source Indicators:
Bluetooth device,
Radio frequency, Tone
Low Backup
Battery Indicator
Time Display
Setting Up the Unit
• Connect the included AC adaptor to the DC jack
located on the back of the unit and connect the other
end to a working wall outlet to power the unit and
charge K-Cell.
• Connect the included FM antenna to the FM Antenna
Jack located on the back of the unit and extend for best
FM radio reception.
• Remove the Battery Pull Tab before using the unit. 1
CR2450 battery is included for battery backup to
maintain clock settings in case of power failure. See
page 19 for more on installing and replacing backup
battery.
K4
RESET
RESET
TEST
TEST
FM Antenna

7
K4
Charging K-Cell When Docked in Unit
Charge inserted K-Cell fully before use. For first time use, charge for at least 3 hours.
Use iHome K-Cell battery ONLY. Do NOT attempt to use with/insert other USB battery cells.
To insert K-Cell: Line up arrow on top and bottom of K-Cell with arrow
on top of cabinet before inserrting K-Cell. Make sure the iHome name
on the K-Cell faces the same direction as the iHome name on the front
of the unit (with the channel on the K-cell facing the back) before
inserting.
Press down gently on K-Cell until it locks into place.
Connect the included AC adaptor to the DC jack on the back of the
unit and connect the other end to a working wall outlet to power the
unit. While connected to AC, the unit will charge the docked external
K-Cell removable cell.
Once charged, press the
K-Cell Eject Button to release
the K-Cell and remove for use
as a portable USB charger.
K-Cell charge status LED
While docked in unit:
• LED flashes while charging
• LED solid once charged

Using the K4
8
Charging the K-Cell via USB
Charge K-Cell fully before use. For first time charge, charge for at least 3 hours.
Connect a micro USB cable to the micro USB Charging Port on the top of the K-Cell and connect the other
standard USB plug to a computer, USB AC adaptor (not included) or other USB power source. The LED
on the K-Cell flashes while it is charging and becomes solid once fully charged.
Computer USB port
Top of K-Cell
USB AC adaptor
(not included) Charges K-Cell
Charge device from K-Cell
Charges K-Cell
USB AC adaptor
connected to
working outlet
Computer
connected to
working outlet

9
Charging Devices Using the K-Cell
Charge K-Cell fully before use. For first time charge, charge for at least 3 hours.
Connect the USB cable plug included with your device to the standard
Charging Port on the top of the K-Cell and connect the other end to the
device you wish to charge.
Charging Devices Using the USB Port
Connect the USB cable plug included with your device to
the standard USB Charging Port on the left of the unit and
connect the other end to the device you wish to charge.
NOTE: unit must be connected to AC adaptor to charge
devices via USB port.
Using the K4
RESET
RESET
TEST
TEST

10
Setting the Clock
1. Press and hold the Sleep/Time Set Button for 2 seconds until “DST ON” flashes on
the display and a beep sounds, indicating automatic daylight saving time feature is
active and the unit will add or subtract an hour automatically at the start or end of
daylight saving time. To disable DST feature, press the –or +Buttons to toggle to
“DST OFF”.
2. Press the Sleep/Time Set Button. The year will flash on the display.
3. Press the –or +Buttons to adjust the clock to the current year.
4. Press the Sleep/Time Set Button. The date will flash on the display.
5. Press the –or +Buttons to adjust the clock to the date.
6. Press the Sleep/Time Set Button. The time will flash.
7. Press the –or +Buttons to adjust the clock to the current time (hold for rapid setting).
Make sure you set the correct AM/PM time. The AM and PM indicators appear to the
left of the display.
8. Press the Sleep/Time Set Button to confirm and exit clock setting mode. 2 beeps will confirm clock
setting is complete.
TIP: To toggle the clock display between standard 12 hour time and 24 hour (“military”) time display,
press the Alarm or Alarm Button while the display is flashing during time setting.
Setting and Using the Alarms
This unit features dual alarms which can be set to different times and alarm sources. Each is set in the same
way. Instructions are given as “Alarm Button”; use Alarm 1 Button or Alarm 2 Button to set respective
alarms. Alarm will sound for 1 hour until reset.
Note: Each step must be completed while display is flashing or step will time-out in 10 seconds with any
changes saved.
1. Press and hold the Alarm Button for 2 seconds until the alarm time display and alarm icon flash. A
beep sounds.
Using the K4

11
Setting and Using the Alarm (Continued)
2. Press the –or +Buttons to adjust the alarm time to the desired time (hold for rapid setting).
Make sure you set the correct AM/PM alarm time.
3. Press the Alarm Button to confirm the alarm time setting. The alarm schedule will flash.
4. Press the –or + Buttons to set the alarm schedule (‘7 DAYS’ = the whole week,
‘5 DAYS’ = Monday through Friday, ‘2 DAYS’ = Saturday and Sunday only).
5. Press the Alarm Button to confirm the alarm schedule setting. The wake-to source
will flash.
6. Press the –or +Buttons to select the desired wake to alarm source: Bluetooth,
radio or tone. The selected wake-up source will flash in the lower part of the
display.
Wake to Bluetooth: You will wake to the currently linked Bluetooth device. If no
device is detected, the alarm will default to Tone.
Wake to Radio: Press the Alarm Button to confirm. Press the Presets Button to select an FM preset
to wake to, or press the –or +Buttons to tune in a desired wake to station.
If FM antenna is not connected, the alarm will default to Tone.
Wake to Tone: Press the Alarm Button to confirm. Press the –or +Buttons as needed to listen to
and to select one of the four built-in wake-to tones (1 - 4).
7. Press the Alarm Button to confirm the alarm source. The volume display will flash.
8. Press the –or + Buttons to adjust the alarm volume. Note that the alarm volume setting is stored
separately from other volume settings.
9. Press the Alarm Button to confirm the alarm settings and exit alarm setting mode. 2 beeps will confirm
alarm setting is complete. The alarm icon will remain on the display, indicating the alarm is armed.
10.When alarm is sounding, press the Power Button or Alarm 1 or Alarm 2 Button to silence alarm and
reset it come on the next day at the same time (unless settings are changed).
Previewing the Alarm and Turning the Alarm On/Off
1. Press and release the Alarm Button to view the current alarm time.
2. Press and release the Alarm Button as needed to toggle the alarm ON and OFF, indicated by the alarm
icon and a beep.
Using the K4

12
Using the FM Radio
1. Press and release the Mode Button as needed until the FM indicator icon and
current FM radio frequency appear on the display.
2. Press the –or +Buttons to tune the radio to the desired station (hold to scan for the next clear
station). Connect and extend the included FM antenna for best reception.
3. Press the or Buttons to adjust the volume on the unit.
4. When you are through listening, press the Button to turn the unit off.
Setting and Using FM Presets
The unit allows you to store up to 6 FM radio station presets
1. Press and release the Mode Button as needed until the FM indicator icon
appears on the display.
2. Press and release the Presets Button as needed until the preset number (P1-
P6) you wish to set is displayed, then press and hold the Presets Button to
enter setting mode. A confirmation beep will sound.
3. Press the –or +Buttons to tune the radio to the desired station (hold to
scan for the next clear station).
4. Press and release the Presets Button. 2 beeps will sound to confirm the preset has been
assigned. Repeat steps 2 - 4 until you have set up to 6 preset stations.
5. To listen to a preset FM station at any time, follow steps 1 - 2 to turn on FM radio mode and cycle to
the desired preset.
after 3 sec
Using the K4

13
Using FM Radio in Other Countries
Different areas of the world use different FM frequency steps and ranges. By default, this unit is set to
USA frequency steps. To use the radio outside the USA:
1. Make sure unit is OFF.
2. Press and hold the Mode Button for 5 seconds until “USA” appears in the display and a beep sounds.
3. Press and release –or +Buttons to cycle to your location: Europe, Japan, Australia, China or USA.
4. Press the Mode Button again to exit frequency setting mode. 2 beeps will confirm setting.
Snooze/Dimmer Button
1. To program Snooze, press and hold the Snooze/Dimmer Button during normal operation (when no
alarm is sounding). A beep will sound the current snooze duration will flash.
2. Press the –or +Buttons to select the desired snooze time (between 01 and 29 minutes).
3. Press and release the Snooze/Dimmer Button to confirm Snooze setting. 2 beeps will sound.
4. While the alarm is sounding, press and release the Snooze/Dimmer Button to temporarily silence the
alarm for the set duration (9 minutes is the default). Snooze can be used several times during alarm.
5. To adjust the brightness of the display, press and release the Snooze/Dimmer Button during normal
operation (when no alarm is sounding) to cycle through the brightness display settings.
Sleep Mode
This unit allows you to sleep to the current sound source for a set time before turning the unit off.
1. To set Sleep time, press and release the Sleep Button as needed to cycle to the desired sleep
duration:120, 90, 60, 30 or 15 minutes or OFF (turns the unit off). During sleep mode, press the Sleep
Button to view sleep time remaining.
2. Press the or Buttons to adjust the sleep volume on the unit. Note that the sleep volume setting is
stored separately from other volume settings.
TIP: To exit Sleep mode and turn the unit off before Sleep time expires, you can also press the Power Button.
Using the K4

5. If pairing is successful, a tone will sound and the Bluetooth icon will appear solid on the display, indicating
the K4 is ready to play music. There should also be an indication on your device. If no device is successfully
paired within 3 minutes the K4 will default to previous mode. To exit Bluetooth pairing mode, press the
Bluetooth Pairing Button or Power Button.
14
Pairing is the set-up process to introduce your Bluetooth-capable device to the K4. Once your
device is paired, the K4 can recognize it and you can play your audio through it.
1. Turn on your Bluetooth device and make it “discoverable” by turning on Bluetooth mode
(check in Options or Settings).
2. Press the Power Button to turn on the K4. The first time the unit is powered on, it will enter
auto-pairing mode and attempt to connect to a Bluetooth device. Otherwise, follow step 3
to begin pairing.
3.
Press and hold the Bluetooth Pairing Button located on back of the unit for 2 seconds. The
pairing sound will play, and “PAIR” and the Bluetooth icon will flash on the display indicating
the unit is in pairing mode.
Pairing Your Device
4. “iHome Kineta K4” should appear in your device’s Bluetooth menu. If “Not Paired”, “Not Connected” or
similar message appears, select “iHome Kineta K4” to connect it. If prompted for a passcode, enter
“1234” on your device’s keypad.
For iPhone
iHome Kineta K4 iHome Kineta K4
For other
Using the K4

Pairing with a Different Device
When you power ON the unit, it will automatically link with the most recently connected Bluetooth device
as long as that device is still within range (approx. 30 feet). If no device is found within 3 minutes, the unit
will begin a power down countdown and shut off after 12 minutes. To pair with a different device follow
steps 1 - 4 under ”Pairing Your Device” on previous page.
Playing Audio Via Bluetooth
1. Press
the Power Button
to turn on the unit. The Bluetooth icon will appear solid on the display and a
tone will sound when a linked device is in range and detected. You can then listen to audio streamed
wirelessly from your paired Bluetooth device.
2. Press the
Button to play audio from your device. Press again to pause play and once more to resume
play. When Bluetooth audio is active, the Bluetooth icon will appear on the display.
3. Press the
+
Button to advance to the next track; press –to go to the previous track. Use controls on your
Bluetooth device to search within tracks.
4. Press t
he
or
Button to adjust
the K4 volume. You can also adjust volume on your device.
5. When done listening,
press
the Power Button
to turn the unit OFF.
Remember to turn off your device
,
too.
6. Once powered off or switched to another mode (FM/Aux), Bluetooth will disconnect.
NOTE: Unit will power down if there is no linked Bluetooth device or aux-in audio detected within 15 minutes.
15
Pairing with a Different Device
Using the K4

Speakerphone Operation
NOTE: The unit must be powered on and linked to a Bluetooth phone to receive a call.
When a call is received, playing music is muted to hear the ring tone.
1. Press the Button to answer a call, or press the Button to ignore the call. For call waiting
function, press the Button to place a currently active call on hold and answer a new call; press
the Button to switch between the calls. Press and hold Button to end the current call.
2. When a call is completed, press the Button to end the call and resume previous function.
“END” will appear on the display to indicate the end of the call.
16
Using the K4

17
Playing Audio via Aux In
1. Connect one end of a standard 3.5mm stereo audio
cable (not included) to the Aux-in jack on the back of
the unit and connect the other end to the headphone
or line-out jack on your audio device.
2. Press
the Power Button
on the unit to turn it on.
3. Press and release the Mode Button as needed until
“AUX-IN” appears on the display.
4. Power on the audio device and use the controls on the
device to play or pause audio, and navigate tracks.
5. Press t
he
or
Button to adjust the system volume
.
You can also adjust volume on your device.
6. When done listening, press
the Power Button
to turn
the unit OFF. Remember to turn off your device, too.
TIP: To mute the audio, press the Button. Press again to
release.
Mobile Phone Game Devices iPod Laptop
PC/Tablet MP3/MP4
Using the K4

18
Replacing and Installing Clock Backup Battery
Note: 1 CR2450 battery is included with the unit.
Remove pull tab before using the unit.
This model is equipped with a battery backup circuit that will maintain the time and other settings in the event of a
temporary power interruption (the display is NOT maintained). When the backup battery is getting weak the Low
Backup Battery Indicator will appear at the lower left of the display. When you see this indicator you should replace
the backup battery as soon as possible.
To install/replace the backup battery:
IMPORTANT: When replacing the backup battery be sure to have the unit connected to the AC outlet to maintain all of your
settings, otherwise it will be necessary to reset them after the battery is replaced.
1. Use a Phillips scerewdriver to remove the battery door located on the bottom of
the unit. If replacing battery, remove the exhausted battery.
2. Insert 1 fresh CR2450 battery in the backup battery compartment. Make sure
the ”+” side of the battery is facing toward you.
3. Replace the battery compartment door and tighten screw. Do not overtighten.
Confirm that the backup battery indicator is not flashing in the display.
Note: Make sure you dispose of batteries properly (see your local regulations)
WARNING: Lithium batteries can explode or cause burns if disassembled, shorted,
recharged, exposed to water, fire, or high temperatures. Do not place loose
batteries in a pocket, purse, or other container containing metal objects, mix with
used or other battery types, or store with hazardous or combustible materials. Store
in cool, dry, ventilated area. Follow applicable laws and regulations for transport
and disposal.
Using the K4

19
When used in the directed manner, this unit has been designed and manufactured to ensure your personal safety. However, improper use can result
in potential electrical shock or fire hazards. Please read all safety and operating instructions carefully before installation and use, and keep these
instructions handy for future reference. Take special note of all warnings listed in these instructions and on the unit.
1. Water and Moisture – The unit should not be used near water. For example: near a bathtub, washbowl, kitchen sink, laundry tub, swimming
pool or in a wet basement.
2. Ventilation – The unit should be situated so that its location or position does not interfere with its proper ventilation. For example, it should not
be situated on a bed, sofa, rug or similar surface that may block ventilation openings. Also, it should not be placed in a built-in installation,
such as a bookcase or cabinet, which may impede the flow of air through the ventilation openings.
3. Heat – The unit should be situated away from heat sources such as radiators, heat registers, stoves or other appliances (including amplifiers) that
produce heat.
4. Power Sources – The unit should be connected to a power supply only of the type described in the operating instructions or as marked on the
appliance. Only use the AC adapter that came with the unit.
5. Power-Cable Protection – Power supply cables should be routed so that they are not likely to be walked on or pinched by items placed upon
or against them. It is always best to have a clear area from where the cable exits the unit to where it is plugged into an AC socket.
6. Cleaning – The unit should be cleaned only using a warm damp cloth. Do not use solvents, etc.
7. Objects and Liquid Entry – Care should be taken so that objects do not fall and liquids are not spilled into any openings or vents located on
the product.
8. Attachments – Do not use attachments not recommended by the product manufacturer.
9. Lightning and Power Surge Protection – Unplug the unit from the wall socket and disconnect the antenna or cable system during a lightning storm
or when it is left unattended and unused for long periods of time. This will prevent damage to the product due to lightning and power-line surges.
10. Overloading – Do not overload wall sockets, extension cords, or integral convenience receptacles as this can result in a risk of fire or electric shock.
11. Damage Requiring Service – The unit should be serviced by qualified service personnel when:
A. the power supply cable or plug has been damaged.
B. objects have fallen into or liquid has been spilled into the enclosure.
C.the unit has been exposed to rain.
D. the unit has been dropped or the enclosure damaged.
E. the unit exhibits a marked change in performance or does not operate normally.
12. Periods of Nonuse – If the unit is to be left unused for an extended period of time, such as a month or longer, the backup batteries should be
removed from the unit to prevent damage or corrosion.
13. Servicing – The user should not attempt to service the unit beyond those methods described in the user’s operating instructions. Service methods
not covered in the operating instructions should be referred to qualified service personnel.
Questions? Visit www.ihome.com or call 1-800-288-2792 Toll Free
Consumer Product Safety Guide
IMPORTANT SAFETY INSTRUCTIONS
Table of contents
Other iHome Alarm Clock manuals