Draper 88988 User manual

EN
Original Instructions
Version 2
2-IN-1
LASER STUD
FINDER AND
DISTANCE
MEASURER
88988

1.1 Product Reference
User Manual for: 2-in-1 Laser Stud Finder and
Distance Measurer
Stock No: 88988
Part No: DMSD
1.2 Revisions
Version 1: March 2010
First release
Version 2: January 2024
UKCA, remove laser reference
As our manuals are continually updated, always ensure
that the latest version is used.
Please visit drapertools.com/manuals for the latest
version of this manual and the associated parts list, if
applicable.
1.3 Understanding the Safety Content of
This Manual
WARNING!
– Situations or actions that may result
in personal injury or death.
CAUTION! – Situations or actions that may result
in damage to the product or surroundings.
Important: – Information or instructions of particular
importance.
1.4 Copyright © Notice
Copyright © Draper Tools Limited.
Permission is granted to reproduce this manual for
personal and educational use ONLY. Commercial
copying, redistribution, hiring or lending is strictly
prohibited.
No part of this manual may be stored in a retrieval system
or transmitted in any other form or means without written
permission from Draper Tools Limited.
In all cases, this copyright notice must remain intact.
1. Preface
– 2 –
These are the original product instructions. This
document is part of the product; retain it for the life
of the product, passing it on to subsequent holders.
Read this manual in full before attempting to
assemble, operate or maintain this product.
This Draper Tools manual describes the purpose
of the product and contains all the necessary
information to ensure its correct and safe use.
Following all the instructions and guidance in
this manual will ensure the safety of both the
product and the operator and increase the
lifespan of the product.
All photographs and drawings within this manual are
supplied by Draper Tools to help illustrate correct
operation of the product.
Every eort has been made to ensure the
information contained in this manual is accurate.
However, Draper Tools reserves the right to amend
this document without prior warning. Always use the
latest version of the product manual.

2. Contents
– 3 –
EN
1. Preface 2
1.1 Product Reference 2
1.2 Revisions 2
1.3 Understanding the Safety Content of This
Manual 2
1.4 Copyright © Notice 2
2. Contents 3
3. Product Introduction 4
3.1 Intended Use 4
3.2 Specication 4
4. Health and Safety Information 4
5. Assembly 5
6. Disposal 5
7. Warranty 5
8. Operation and Use 6-7
8.1 Stud Detector 6
8.2 Distance Detection 6-7

4. Health and Safety Information
3. Product Introduction
Stock No. 88988
Part No. DMSD
Wood Stud Detection: 19mm
Distance Measurement 0.60-15M
Accuracy ±0.5% ±1 Digit
Resolution 0.01M (1”)
Aperture Angle (approx.) 5°
Laser Diode Type 650nM Diode
Laser Class Class 2A
Power Source* 9V (PP3) (not supplied)
Weight 192g
Operating Temperature 32°F-104°F (0°C-40°C)
– 4 –
3.2 Specication
3.1 Intended Use
Scope text inserted in here. Sample text only. Any other
application beyond the conditions established for use
will be considered misuse. Draper Tools accepts no
responsibility for improper use of this product.
WARNING! This product is not a toy and must be
respected.
Read this manual in full before attempting to assemble,
operate or maintain the product and retain it for later use.
• DO NOT shine or aim the laser pointer at people or
animals, as it may cause damage to eyesight.
• The combined stud/distance detector is a precision
instrument which must be handled with care.
• Avoid shock, vibrations and extreme heat.
• Avoid dust and water, which may obstruct the lens. If
needed, use a soft cloth to clean the lens.
• Keep the laser tool dry and clean.
• Check battery regularly to avoid deterioration.
• Remove battery if the laser tool is to be stored for an
extended period of time.
• Ensure the battery is tted in the correct
+/- orientation.
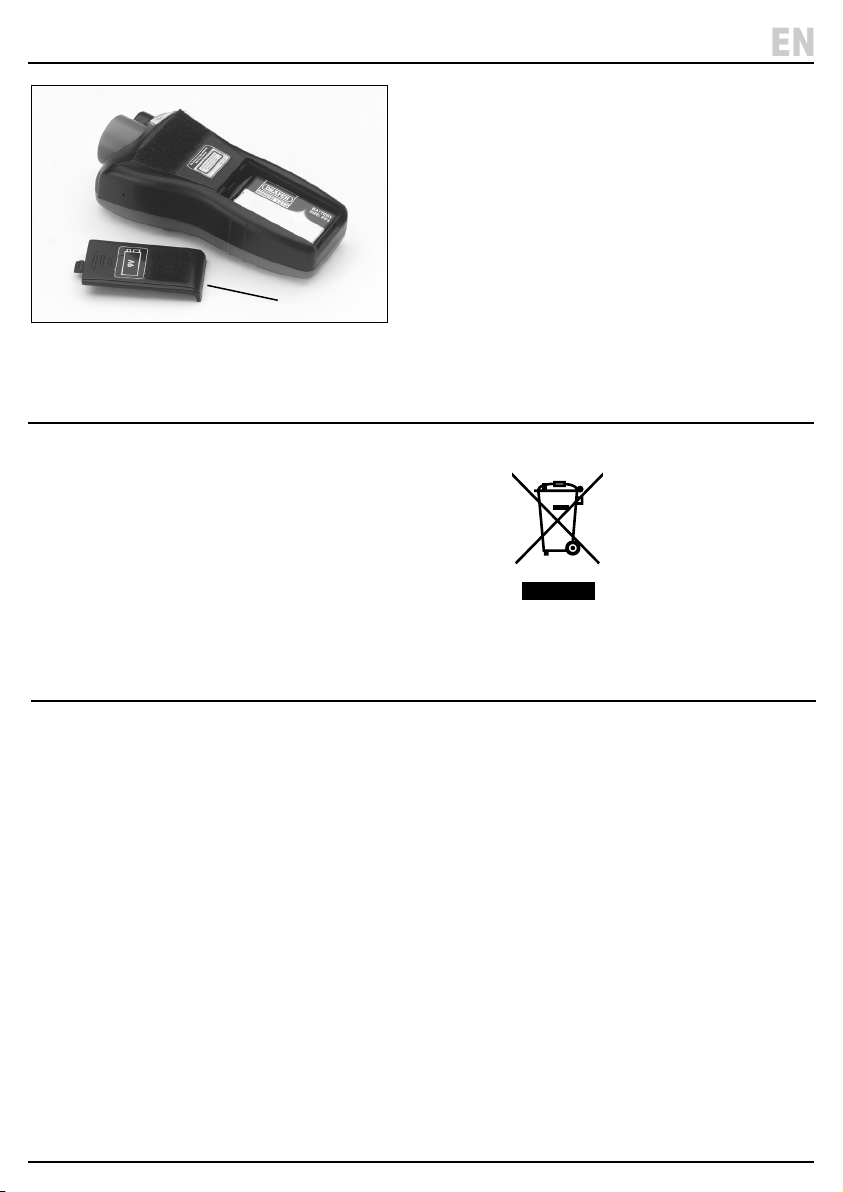
5. Assembly
6. Disposal
1 Fig.
(A)
• Slide out battery door (A) located at the rear of
the unit.
• Fit a new 9V PP3 battery* (not supplied) into the
battery compartment - ensure the battery is tted
in the correct +/- orientation.
• Replace cover (A) and securely clip in place.
– 5 –
EN
At the end of its working life, disposed of the product
responsibly and in line with local regulations. Recycle
where possible.
• DO NOT dispose of this product with domestic waste.
• DO NOT incinerate.
− DO NOT burn or mutilate batteries, this may
release toxic or corrosive substances.
• DO NOT abandon in the environment.
7. Warranty
Warranty is 12 months -
Visit drapertools.com/warranty/ for more information.
Proof of purchase must be provided.
Draper Tools Limited

8. Operation and Use
8.1 Stud Detector
2 Fig.
(B)
Place the detector at against the wall. Press and hold
button (B) to calibrate the unit. The buzzer will sound to
conrm and the display will read ‘Stud’.
Important: If by chance, the calibration is carried out
too close or over a stud the detector will not pick up a
reading and will give false information. For this reason it
is advisable to take a couple of readings and calibrate
the unit in dierent positions to ensure accuracy.
Upon detection of a stud or nogging the bars will begin
to increase on the LCD display and the buzzer will sound
when all twelve bars are lit.
The best method of accuracy is to mark the wall at the
point where the buzzer sounds. Then move the detector
approximately 30cm past this point. Trace back with the
detector again, until the buzzer sounds. Mark the wall,
and the midway point between the marks is the centre of
the stud/nogging.
Important: The wall must be a cavity design for the
detector to work correctly. If the cavity has been lled
with glass bre, even this may eect the readout.
8.2 Distance Detection
3 Fig.
Ensure the detector is positioned and pointing
perpendicular to the target area. The laser is a guide to
where the measurement is being taken.
The target area must be a rigid surface without any
irregularities. The target cannot be impaired by
obstacles.
For more accurate results and when measuring longer
distances ensure the target area is large (measurements
over 12M the target should be >3M2). For small and
irregular surfaces try axing a piece of board as the
target area.
The ultrasonic distance detection will not measure
through glass, but WILL measure to glass.
Measure from base (i.e. measurement includes length of
detector). Press button (C) to select metric or imperial
results.
TO TAKE STANDARD MEASUREMENTS:
• Press button (D) to take the measurement.
• The result will be displayed unless an error has
occurred in which case try again.
– 6 –
(C)
(G)
(F)
(D)
(I)
(H)
(E)

8. Operation and Use
– 7 –
EN
TO ADD RESULTS: (without using the memory)
• Press button (D) to take the measurement.
• Press button (E) to enter the addition mode.
• The ‘+’ is displayed on the LCD.
• Press button (D) again to take the next reading.
• Press button (E) to display the result.
TO ADD RESULTS: (using the memory)
• Press button (D) to take the measurement.
• Press button (F) to save the current measurement.
• Press button (D) to to take the next reading.
• Press button (E) to enter the addition mode.
• The ‘+’ is displayed on the LCD.
• Press button (G) to recall the previous measurement.
• Press button (E) to display the result.
TO TAKE AREA MEASUREMENTS:
• Press button (H) to enter area mode.
• The symbol will appear on the LCD with the ‘L’
ashing.
• Press button (D) to take the length measurement.
• If the measurement was successful the ‘W’ will begin
ashing.
• Press button (D) to take the width measurement.
• If successful the result in Ft2/M2 will be displayed
under the individual measurement button (D) to cycle
through the two individual measurements or press
button (H) to begin a new area measurement.
• Alternatively, press and hold button (D) for two
seconds to exit the area mode.
Important: It is possible to store an area result in the
memory, take a fresh area measurement and add them
together using button (E).
TO TAKE VOLUME MEASUREMENTS:
• Press button (I) to enter volume mode.
• The symbol will appear on the LCD with the ‘L’
ashing.
• Press button (D) to take the length measurement.
• If the measurement was successful the ‘W’ will begin
ashing. Press button (D) to take the width
measurement.
• If successful the ‘H’ will begin ashing.
• Press button (D) to take the height measurement.
• If successful the result in Ft3/M3 will be displayed
under the individual measurement.
• Press button (D) to cycle through the three individual
measurements or press button (I) to begin a new
volume measurement.
• Alternatively, press and hold button (D) for two
seconds to exit the area mode.
Important: All length, width and height measurements
must be complete to exit the volume mode.
Important: It is possible to store a volume result in the
memory, take a fresh volume measurement and add them
together using button (E).

© Published by Draper Tools Limited© Published by Draper Tools Limited
Delta International
Delta International BV
Oude Graaf 8
6002 NL
Weert
Netherlands
Contact Details
Draper Tools
Draper Tools Limited
Hursley Road
Chandler’s Ford
Eastleigh
Hampshire
SO53 1YF
UK
Website: drapertools.com
Email: [email protected]
Product Helpline: +44 (0) 23 8049 4344
Telephone Sales Desk: +44 (0) 23 8049 4333
General Enquiries: +44 (0) 23 8026 6355
General Fax: +44 (0) 23 8026 0784
Please contact the Draper Tools Product Helpline for repair and servicing enquiries.
Table of contents
Other Draper Measuring Instrument manuals

Draper
Draper 400 Series User manual

Draper
Draper PVC150D User manual

Draper
Draper 41911 User manual

Draper
Draper 43618 User manual

Draper
Draper D370 User manual

Draper
Draper 50024 User manual

Draper
Draper 80799 User manual

Draper
Draper 34280 Firmware update

Draper
Draper DLLM-1 User manual

Draper
Draper 400 Series User manual


