Dreamiracle KDF-591D User manual

USER’S MANUAL
AIR FRYER
KDF-591D
THIS INSTRUCTION CONTAINS IMPORTANT SAFETY INFORMATION.PLEASE READ
AND KEEP FOR FUTURE REFERENCE.
Please give us a chance to make it right and do better!
Contact our friendly customer service department for help first.
Replacements for missing or damaged parts will be shipped.
Follow Dreamiracle
Visit us:www.dreamiracle.com
°F


Introduction
Thank you for buying this top quality air fryer. You will now be able to
cook a wide assortment of food in a healthier manner – with little or no
oil!
The air fryer uses hot air, in combination with high-speed air circulation,
and a top grill to prepare your dishes quickly and easily. The ingredients
are heated from all sides, at once, and there is no need to add oil in most
cases.
A: Basket
B: Protective cap
C: Basket release button
D: Basket handle
E: The tray
F: Air inlet
G: Control panel
H: Vent windows
I: Power cord
A: Pre-heat
B: Temperature plus/minus
C: French fries
D: meat
E: Time/Temperature
F: Drumsticks
G: Steak
H: Time plus/minus
I: START/STOP
J: ON/OFF
K: Vegetables
L: Chicken
M: fish
N: Shrimp
O: Cake
01
General description
English
°F

Important
Danger
- Never immerse the housing, which contains electrical components and
the heating elements, in water nor rinse it under the tap.
- Do not let any water or other liquid enter the appliance – to prevent
electric shock.
- Always put the ingredients to be fried in the basket, to prevent them
from coming into contact with the heating elements.
- Do not cover the air inlet and the air exhaust openings while the
appliance is operating.
- Do not fill the frying tray with oil as this may cause a fire hazard.
- Never touch the inside of the appliance while it is operating.
- Check whether the voltage indicated on the appliance corresponds to
the local mains voltage in your country before you connect the
appliance.
- Do not use the appliance if the plug, the power cord or the appliance
itself is damaged.
- If the power cord is damaged, you must have it replaced at a service
center authorized by similarly qualified persons in order to avoid a
hazard.
- This appliance is not suitable for children or for people who are either
physically or mentally handicapped or who lack experience and
knowledge. Should you want anyone else to use the appliance, that
person should be properly guided on its use.
- Keep the appliance and its mains cord out of the reach of children
when the appliance is switched on or is cooling down.
- Keep the mains cord away from hot surfaces.
- Do not plug in the appliance or operate the control panel with wet
hands.
- Only connect the appliance to an earthed wall socket. Always make
sure that the plug is inserted into the wall socket properly.
- Never connect this appliance to an external timer switch.
- Do not place the appliance on or near combustible materials such as a
tablecloth or curtains.
Read this user manual carefully, before you use the appliance, and keep it
safe for future reference.
02

Before first use
Caution
- Do not place the appliance against a wall or other appliances. Leave at
least 10cm free space at the back and sides and 10cm free space above
the appliance. Do not place anything on top of the appliance.
- Do not use the appliance for any purpose other than described in this
manual.
- Do not let the appliance operate unattended.
- During hot air frying, hot steam is released through the air exhaust
openings. Keep your hands and face at a safe distance from the steam
and from the air exhaust openings. Also be careful of hot steam and hot
air when you remove the frying tray from the appliance.
- The surface below the appliance may become hot during use.
- Immediately unplug the appliance if you see dark smoke coming out of
the appliance. Wait for the smoke emission to stop before you remove
the frying tray from the appliance.
- Place the appliance on a horizontal, level and stable surface.
- This appliance is intended for normal household use only. It is not
intended for use in environments such as staff kitchens, offices, farms
or other work environments. Nor is it intended to be used by clients in
hotels or other similar environments.
- If the appliance is used improperly or if it is not used according to the
instructions in the user manual, the warranty becomes invalid and seller
refuses any liability for any damage that may be caused.
- Always unplug the appliance after use.
- Let the appliance cool down for approx. 30 minutes before you handle
or clean it.
- Remove burnt remnants.
1. Remove all packing material.
2. Remove any stickers or labels from the appliance – other than the
rating label.
3. Thoroughly clean the basket, and frying tray, with hot water and some
liquid washing soap using a non-abrasive sponge.
Note: You can also clean these parts in the dishwasher.
4. Wipe the inside and outside of the appliance with a moist cloth.
03

1. Power on
1. Place the appliance on a stable, horizontal and level surface that is also
heat resistant.
2. Place the basket in the frying tray properly.
Do not fill the frying tray with oil or any other liquid.
Do not put anything on top of the appliance. This disrupts the airflow and
affects the air-frying result.
Plugin, there are BEEPS sounds; Light up. 1 second will be back to standby
mode: all light will be off expected .
Plugin, it is in standby mode. press , default temperature and default
time of the Program are 360°F, 15 min respectively, at that time you can
adjust the time and temperature freely by using Time +/- and
Temperature +/- button.
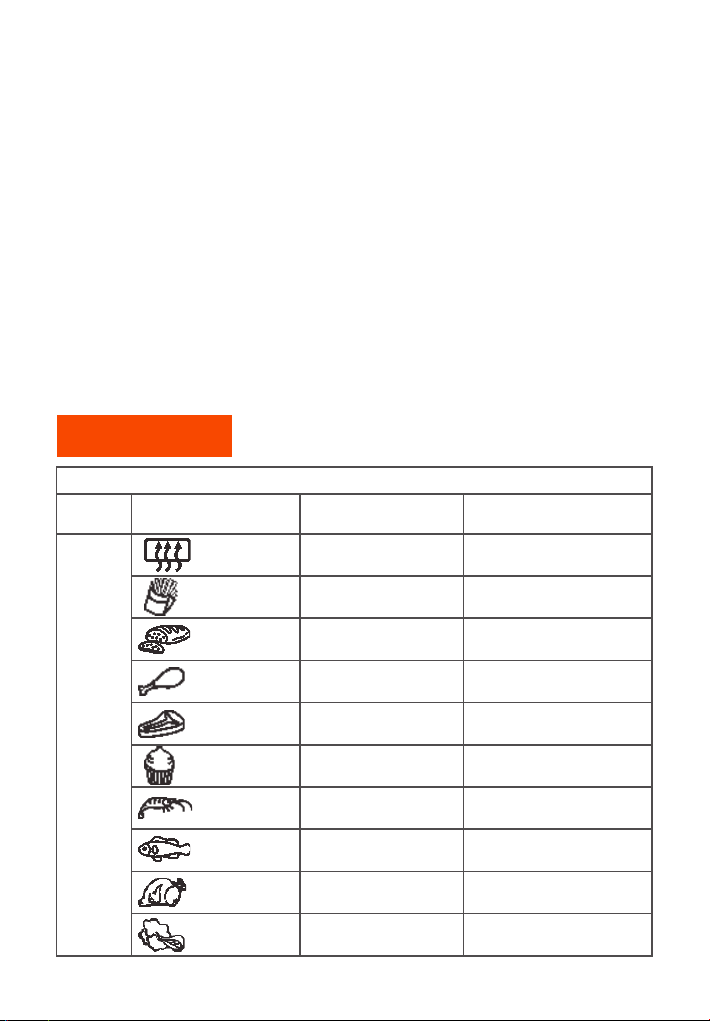
You can also press any function icon to cook different food. When
pressing the function icon, the lights flickered, then press unit start to
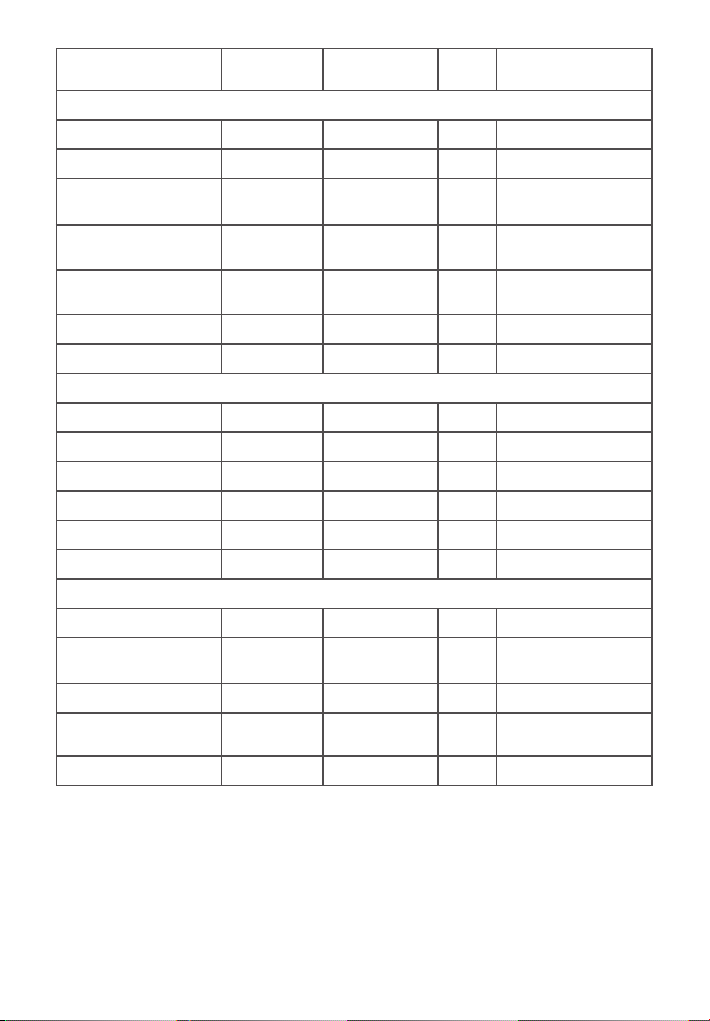
work. Every function has its own default time and temperature (As shown
in the table). Customers can adjust the time and temperature freely by
using Time +/- and Temperature +/- button.
(1). The temperature control range is 180-400°F, every click on the +/-
temperature will increase or reduce 10°F. At 400°F, press the "+", will loop
back to a temperature of 180°F, press the "-" at 180°F temperature will
cycle back to 400°F. In the process of temperature control, temperature
digital display will flicker on the screen (not flashing during working), after
flickering 3 times, the temperature has been done of setting;
(2). The adjusting time range is 1 to 60 mins. every click on the +/- time will
increase or reduce 1 min. At 60 min if you press "+", the time will cycle back
to 01 min. At 01 min, if you press "-", the temperature will cycle back to 60
min. In the process of time control, the time digital display will flicker on
the screen (not flashing during working), after flickering 3 times, the time
has been done of setting.
After selecting the function, set the right time and right temperature,
press , the start to flicker, after BEEPS sounds, machine start to work.
During the machine working, press , after BEEPS sounds, machine stop
working, stop flickering.during the machine working, press , after
BEEPS, machine stop working, and machine back to standby mode.
04
Preparing for use
Using the appliance
2. Menu selection/Temperature/Time
3. Start, pause/stop

Noted:
(1). During working, you can take frying tray out, stop working,and you
can check the cooking result or add more food, machine continues to
work on the program if pull in the frying tray.
(2). Power cut or unplug during working, machine stop working, all light
off, machine continue to work on the program when power on or plugin
again.
(3). During work, six red lights for the heating element. When red six red
lights flicker on by one, it means the heating element is working, when
the temperature reaches set temperature, the heating element stops
working, and six red lights don’t flicker.
The heating element stops working when working time is done, show 00
min, the motor continues to work, buzzer warning. The motor continues
to work for 1 min, cooling machine, then machine enters the standby
mode.
05
Menu table
4. End of program
Menu
pre-heat
french fries
Meat
drumsticks
steak
cake
shrimp
fish
chicken
vegetables
3
18
12
20
12
25
8
10
30
10
360
400
400
400
360
320
360
360
400
320
function
Default time(min)
Program logistics
Default temperature
(°F )

Caution: Do not touch the pan during and about 30mins after use, as it
gets very hot. Only hold the pan by the handle.
1. Put the mains plug in an earthed wall socket.
2. Put the ingredients into the basket and put the basket in the frying tray.
3. Put the frying tray in the right position. Choose a function from the
menu and press START/PAUSE to start cooking.
4. Screen display. It will show temperature and time. Temperature is the
setting temperature and time is remain working time. The function we
have selected is flickering.
5. Some ingredients require shaking halfway through the preparation time
(see section 'Settings' in this chapter). To shake the ingredients, pull the
frying tray out of the appliance by the handle and shake it. Then slide
the frying tray back into the air fryer.
Caution: Do not press the basket release button during shaking.
6. When you hear the timer bell, the set preparation time has elapsed. Pull
the pan out of the appliance and place it on a heat-resistant surface.
7. Check if the ingredients are ready. If the ingredients are not ready yet,
simply slide the frying tray back into the appliance and cook it extra
minutes.
Tip: To reduce the weight, you can remove the basket from the pan and
shake the basket only. To do so, pull the pan out of the appliance, place
it on a heat-resistant surface and press the basket release button.
8. To remove small ingredients, press the basket release button and lift the
basket out of the frying tray.
Do not turn the basket upside down with the frying tray still attached to
it, as any excess oil that has collected on the bottom of the frying tray
will spill out and leak onto the ingredients.
After hot air frying, the frying tray and the ingredients are hot.
Depending on the type of ingredients in the air fryer, steam may escape
from the frying tray.
9. Empty the basket into a bowl or onto a plate.
Tip: To remove large or fragile ingredients, use a pair of tongs to lift the
ingredients out of the basket.
10. When a batch of ingredients is ready, the air fryer is instantly ready for
preparing another batch.
Note: When using the Health Fryer for the first time, a slight smoke or
odour may be emitted. This is normal and will soon subside. Ensure that
there is sufficient ventilation around the Health Fryer.
06
Operation step

Except for the preset menu, you also can use this air fryer to make other
foods by setting the time and temperature. The table below helps you to
select the basic settings for the ingredients you want to prepare.
Note: Keep in mind that these settings are only for reference. As
ingredients differ in origin, size, shape as well as brand, we cannot
guarantee the best setting for your ingredients.
Because the Rapid Air Technology instantly reheats the air inside the
appliance, pulling the frying tray briefly out of the appliance during hot
air frying barely disturbs process.
- Smaller ingredients usually require a slightly shorter preparation time
than larger ingredients.
- A larger amount of ingredients only requires a slightly longer
preparation time, a smaller amount of ingredients only requires a
slightly shorter preparation time.
- Shaking smaller ingredients halfway through the preparation time
optimized the end result and can help prevent unevenly fried
ingredients.
- You can coat fresh potatoes with a little oil for a crispy result. Fry your
ingredients in the air fryer within a few minutes after you have added
the oil.
- Do not prepare extremely greasy ingredients such as sausages in the air
fryer.
- Snacks that can be prepared in an oven can also be prepared in the air
fryer.
- The optimal amount for preparing crispy fries is 500 grams.
- Use pre-made dough to prepare filled snacks quickly and easily.
Pre-made dough also requires a shorter preparation time than
home-made dough.
- You can also use the air fryer to reheat ingredients by setting the
temperature to 300°F and the timer to about 10 minutes.
07
Settings
Caution

Note: Add 3 minutes to the preparation time before you start frying if the
appliance is cold.
Time (min.) Temperature
(°F) Shake Extra information
Potatoes & fries
Meat & Poultry
Snacks
Thin frozen fries
Thick frozen fries
Home-made
fries (8x8mm)
Home-made
potato wedges
Home-made
potato cubes
Rösti
Potato gratin
Spring rolls
Frozen chicken
Nuggets
Frozen fish fingers
Frozen Breadcrum-
bed cheese snacks
Stuffed vegetables
Steak
Pork chops
Hamburger
Sausage roll
Drumsticks
Chicken breast
8-12
10-14
7-14
13-15
18-22
10-15
8-10
6-10
6-10
10
10
400
400
400
400
320
Use oven-ready
Use oven-ready
Use oven-ready
Use oven-ready
Use oven-ready
Shake
Shake
360
360
360
400
360
360
12-16
12-20
18-25
18-22
12-18
15-18
18-22
400
400
360
360
400
360
360
Shake
Shake
Shake
Shake
Shake
add1/2 tbsp of oil
add1/2 tbsp of oil
add1/2 tbsp of oil
08

For the best results, we advise to use pre-baked fries. If you want to
make home-made fries, follow the steps below:
1. Peel the potatoes and cut them into sticks.
2. Soak the potato sticks in a bowl of water for at least 30 minutes, take
them out and dry them with kitchen paper.
3. Pour 1/2 tablespoon of olive oil in a bowl, put the sticks on top and mix
until the sticks are coated with oil.
4. Remove the sticks from the bowl with your fingers or a kitchen utensil
so that excess oil stays behind in the bowl. Put the sticks in the basket.
Note: Do not tilt the bowl to put all the sticks in the basket in one go, to
prevent excess oil from collecting at the bottom of the frying tray.
5. Fry the potato sticks according to the instructions in this chapter.
Clean the appliance after every use.
The frying tray, basket and the inside of the appliance have a non-stick
coating. Do not use metal kitchen utensils or abrasive cleaning materials
to clean them, as this may damage the non-stick coating.
1. Remove the mains plug from the wall socket and let the appliance cool
down.
Note: Remove the frying tray to let the air fryer cool down more quickly.
2. Wipe the outside of the appliance with a moist cloth.
3. Clean the frying tray and basket with hot water, some washing liquid
soap and a non-abrasive sponge.You can use a washing liquid to
remove any remaining dirt.
Note: The frying tray and basket are dishwasher-proof.
Tip: If dirt is stuck to the basket, or at the bottom of the frying tray, fill
the frying tray with hot water and with some washing liquid soap. Put
the basket in the frying tray and let the frying tray and the basket soak
for approximately 10 minutes.
4. Clean the inside of the appliance with hot water and a non-abrasive
sponge.
5. Clean the heating element with a cleaning brush to remove any food
residues.
1. Unplug the appliance and let it cool down.
2. Make sure all parts are clean and dry.
09
Cleaning
Storage
Making home-made fries

The air fryer
does not work
The ingredients
fried with the air
fryer are not
done.
The ingredients
are fried
unevenly in the
air fryer.
Fried snacks are
not crispy when
they come out
of the air fryer
I cannot slide
the pan into the
appliance
properly.
White smoke
comes out of
the appliance
Fresh potato
fries are fried
unevenly in the
air fryer.
The appliance is not plugged
into the mains.
You have not set the timer.
The amount of the ingredients
in the basket is too much.
The set temperature is too low.
The preparation time is too
short.
Certain types of the ingredi-
ents need to be shaken
halfway through the prepara-
tion time.
You used a type of snack
meant to be prepared in a
traditional deep fryer.
There is too much food in the
basket.
The basket is not placed in the
pan correctly.
You are preparing greasy
ingredients.
The pan still contains greasy
residues from previous use.
You did not soak the potato
sticks properly before you fried
them.
Put the mains plug in an
earthed wall socket.
Turn the timer knob to the
required Preparation time to
switch on the appliance.
Put smaller batches of
ingredients in the basket.
Smaller batches are fried
more evenly.
Turn the temperature control
knob to the required
temperature setting (see
section 'Settings').
Turn the timer knob to the
required preparation time (see
section 'Settings').
Ingredients that lie on top of
or across each other (e.g. fries)
need to be shaken halfway
through the preparation time
(see section 'Settings').
Use oven snacks or lightly
brush some oil onto the
snacks for a crispier result.
Do not fill the basket beyond
the Max amount indicated in
the table on the earlier page.
Push the basket down into the
pan until you hear a click.
Pay attention that the
temperature is well-controlled
to be under 360°F, when you
fry greasy ingredients in the
air fryer.
White smoke is caused by
grease heating up in the pan.
Make sure you clean the pan
properly after each use.
Soak the potato sticks in a
bowl of water for at least 30
minutes; take them out and
dry them with kitchen paper.
Problem Possible Causes Solution
10
Troubleshooting

Fresh potato
fries are fried
unevenly in the
air fryer.
Fresh potato
fries are not
crispy when
they come out
of the air fryer.
You did not use the right
potato type.
Use fresh potatoes and make
sure they stay firm during
frying.
The crispiness of the fries
depends on the amount of oil
and water in the fries.
Make sure you dry the potato
sticks properly before you coat
them with oil.
Cut the potato into thinner
sticks for a crispier result.
Add slightly more oil for a
crispier result.
Problem Possible Causes Solution
11

WICHTIGE SICHERHEITSMASSNAHMEN
Vielen Dank für Ihren Kauf dieser hochwertigen Luftfritteuse. Sie können
jetzt eine große Auswahl an Speisen gesünder kochen - mit wenig oder
gar keinem Öl!
Die Luftfritteuse verwendet heiße Luft in Kombination mit einer schnel-
len Luftzirkulation und einem Top-Grill, um Ihr Geschirr schnell und
einfach zuzubereiten. Die Zutaten werden von allen Seiten gleichzeitig
erhitzt, und in den meisten Fällen muss kein Öl hinzugefügt werden.
A: Korb
B: Schutzkappe
C: Korbentriegelungsknopf
D: Korbgriff
E: Tablett
F: Lufteinlass
G: Bedienfeld
H: Lüftungsfenster
I: Netzkabel
A: Vorheizen
B: Temperatur plus / minus
C: Pommes Frites
D: Fleisch
E: Zeit / Temperatur
F: Keulen
G: Steak
H: Zeit plus / minus
I: START / STOP
J: EIN / AUS
K: Gemüse
L: Hähnchen
M: Fisch
N: Garnelen
O: Kuchen
12
Allgemeine Beschreibung
Deutsch
°F

wichtig
Gefahr
- Tauchen Sie das Gehäuse, das elektrische Komponenten und
Heizelemente hat, nie ins Wasser und spülen Sie es nicht unter dem
Wasserhahn aus.
- Lassen Sie kein Wasser oder andere Flüssigkeiten in das Gerät
eindringen, um einen elektrischen Schlag zu vermeiden.
- Legen Sie die zu frittierenden Zutaten immer in den Korb, damit sie
nicht mit den Heizelementen in Kontakt kommen.
- Decken Sie den Lufteinlass und die Luftauslassöffnungen nicht ab,
während das Gerät in Betrieb ist.
- Füllen Sie die Bratschale nicht mit Öl, da dies zu einer Brandgefahr
führen kann.
- Berühren Sie nie das Innere des Geräts, während es in Betrieb ist.
- Überprüfen Sie, ob die am Gerät angegebene Spannung der lokalen
Netzspannung in Ihrem Land entspricht, bevor Sie das Gerät
anschließen.
- Verwenden Sie das Gerät nicht, wenn Stecker, Netzkabel oder Gerät
selbst beschädigt sind.
- Wenn das Netzkabel beschädigt ist, müssen Sie es in einem
autorisierten Servicecenter von den qualifizierten Personen
austauschen lassen, um eine Gefahr zu vermeiden.
- Dieses Gerät ist nicht für Kinder oder Personen geeignet, die entweder
körperlich oder geistig behindert sind oder denen Erfahrung und
Wissen fehlen. Wenn Sie möchten, dass andere Personen das Gerät
verwenden, sollte diese Person bei der Verwendung des Geräts
ordnungsgemäß angeleitet werden.
- Bewahren Sie das Gerät und sein Netzkabel außerhalb der Reichweite
von Kindern auf, wenn das Gerät eingeschaltet ist oder abkühlt.
- Halten Sie das Netzkabel von heißen Oberflächen fern.
- Schließen Sie das Gerät nicht an und bedienen Sie das Bedienfeld nicht
mit nassen Händen.
- Schließen Sie das Gerät nur an eine geerdete Steckdose an. Stellen Sie
immer sicher, dass der Stecker richtig in die Steckdose eingesteckt ist.
- Schließen Sie dieses Gerät niemals an einen externen Zeitschalter an.
Lesen Sie dieses Benutzerhandbuch sorgfältig durch, bevor Sie das Gerät
verwenden, und bewahren Sie es zum späteren Nachschlagen auf.
13

Vor der ersten Verwendung
Warnung
- Stellen Sie das Gerät nicht auf bzw.neben die brennbaren Materialien
wie Tischdecken oder Vorhängen.
- Stellen Sie das Gerät nicht gegenüber eine Wand oder andere Geräte.
Lassen Sie auf der Rückseite und Flanken mindestens 10 cm Freiraum
und über dem Gerät 10 cm Freiraum. Stellen Sie nichts auf das Gerät.
- Verwenden Sie das Gerät nicht für andere als die in diesem Handbuch
beschriebenen Zwecke.
- Lassen Sie das Gerät nicht unbeaufsichtigt laufen.
- Beim Frittieren mit heißer Luft wird heißer Dampf durch die
Luftauslassöffnungen freigesetzt. Halten Sie Ihre Hände und Ihr Gesicht
in sicherem Abstand vom Dampf und von den Luftauslassöffnungen.
Achten Sie auch auf heißen Dampf und heiße Luft, wenn Sie die
Bratschale aus dem Gerät nehmen.
- Die Oberfläche unter dem Gerät kann während des Gebrauchs heiß
werden.
- Ziehen Sie sofort den Netzstecker aus der Steckdose, wenn dunkler
Rauch aus dem Gerät austritt. Warten Sie, bis die Rauchemission
aufhört, bevor Sie die Bratschale aus dem Gerät nehmen.
- Stellen Sie das Gerät auf eine horizontale, ebene und stabile Oberfläche.
- Dieses Gerät ist nur für den normalen Haushaltsgebrauch geplant. Es
ist nicht für den Einsatz in den Situationen wie Personalküchen, Büros,
Farmen oder anderen Arbeitsumgebungen vorgesehen. Es ist auch
nicht für Kunden in Hotels oder ähnliches vorgesehen.
- Wenn das Gerät nicht ordnungsgemäß verwendet wird oder wenn es
nicht gemäß den Anweisungen in der Bedienungsanleitung verwendet
wird, erlischt die Garantie und übernimmt Verkäufer dann keine
Haftung für eventuell verursachte Schäden.
- Ziehen Sie nach dem Gebrauch auf jeden Fall den Netzstecker aus der
Steckdose.
- Lassen Sie das Gerät ca. 30 Minuten abkühlen, bevor Sie es anfassen
oder reinigen.
- Entfernen Sie verbrannte Überreste.
1. Entfernen Sie das gesamte Verpackungsmaterial.
2. Entfernen Sie alle Aufkleber oder Etiketten vom Gerät - außer dem
Typenschild.
14

3. Reinigen Sie den Korb und die Bratschale gründlich mit heißem
Wasser und etwas flüssiger Waschseife mit einemnicht scheuernden
Schwamm.
Hinweis: Sie können diese Teile auch in der Spülmaschine reinigen.
4. Wischen Sie die Innen- und Außenseite des Geräts mit einem
feuchten Tuch ab.
15
1. Einschalten
1. Stellen Sie das Gerät auf eine stabile, horizontale und ebene
Oberfläche, die auch hitzebeständig ist.
2. Stellen Sie den Korb richtig in die Bratschale.
Füllen Sie die Bratschale nicht mit Öl oder eine anderen Flüssigkeit.
Stellen Sie nichts auf das Gerät, was den Luftstrom stört und den Effekt
der Luftfritteuse beeinflusst.
Beim Netzanschließen ertönt ein Piepton, das Licht leuchtet auf. 1
Sekunde später kehrt es in den Standy-Modus zurück: Alle Anzeigen
erlöschen .
Netzanschließen, es ist im Standby-Modus und dann drücken Sie , die
Standardtemperatur und die Standardzeit des Programms betragen
jeweils 360°F und 15 Min. Zu diesem Zeitpunkt können Sie Zeit und
Temperatur mit den Tasten Zeit „+/-“ und Temperatur „+/-“ frei einstellen.
Sie können auch ein beliebiges Funktionssymbol drücken, um verschie-
dene Speisen zuzubereiten. Wenn Sie das Funktionssymbol drücken,
flackern die Lichter und drücken Sie dann , um mit der Arbeit zu
beginnen. Jede Funktion hat ihre eigene Standardzeit und -temperatur
(wie in der Tabelle gezeigt). Kunden können Zeit und Temperatur mit
den Tasten Zeit „+/-“ und Temperatur „+/-“ frei einstellen.
(1). Der Temperaturregelbereich beträgt 180-400°F, jeder Klick auf die +/-
Temperatur erhöht oder verringert sich um 10°F. Drücken Sie bei 400°F
das „+“, um auf eine Temperatur von 180°F zurückzukehren, und drücken
Sie das „-“ bei 180°C, um auf 400°F zurückzukehren. Während der
Temperaturregelung flackert die Temperatur-Digitalanzeige auf dem
Bildschirm (während der Arbeit flackert nicht). Nach dreimaligem
Flackern wurde die Temperatur eingestellt.
Vorbereitung für den Gebrauch
Verwendung des Gerätes
2. Menüauswahl / Temperatur / Zeit

Hinweis:
(1). Während der Arbeit können Sie die Bratschale herausnehmen und
die Arbeit beenden und das Garergebnis überprüfen oder weitere
Lebensmittel hinzufügen. Das Gerät führt weiter sein Programm durch,
wenn Sie die Bratschale hineinziehen.
(2) .Schalten Sie die Stromversorgung oder ziehen Sie den Stecker aus
der Steckdose, das Gerät funktioniert nicht mehr und alle Lichter sind
aus. Wenn das Gerät wieder eingeschaltet wird, führt es weiter sein
Programm durch,
(3) Während der Arbeit hat das Heizelement sechs rote Lichter. Wenn
eines der sechs roten Lichter flackert, bedeutet dies, dass das Heizele-
ment funktioniert. Wenn die eingestellte Temperatur erreicht wird,
funktioniert das Heizelement nicht mehr und flackern die sechs rote
Lichter nicht.
Das Heizelement funktioniert nach Ablauf der Arbeitszeit nicht mehr
und zeigt 00 Min. an, der Motor arbeitet weiter und macht Summ-War-
nung. Der Motor arbeitet 1 Min. lang weiter, kühlt das Gerät und wechselt
dann in den Standby-Modus.
16
4.Ende des Programms
(2). Der Einstellzeitbereich beträgt 1 bis 60 Minuten. Jeder Klick auf die
Zeit „+/-“ erhöht oder verringert sich um 1 Min. Wenn Sie nach 60 Min. „+“
drücken, wird die Zeit auf 01 Min. zurückgesetzt. Wenn Sie nach 01 Min. „-
“ drücken, wird die Temperatur auf 60 Min. zurückgesetzt. Während der
Zeitsteuerung flackert die Zeitanzeige auf dem Bildschirm (während der
Arbeit flackert nicht). Nach dreimaligem Flackern ist die Zeit fertig
eingestellt.
Nachdem Sie die Funktion ausgewählt haben, stellen Sie die richtige Zeit
und Temperatur ein. Drücken Sie und beginnt zu flackern, nach-
dem ein Piepton ertönt, beginnt die Maschine zu arbeiten. Während der
Arbeit drücken Sie , nachdem Piepton ertönt, arbeitet das Gerät nicht
und hört auf zu flackern. Während der Arbeit drücken Sie , nachdem
ein Piepton ertönt, hört das Gerät mit dem Arbeiten auf. Dann kehrt es in
den Standby-Modus zurück.
3.Start, Pause/Stop

17
Warnung: Berühren Sie die Pfanne während des Gebrauchs und ca. 30
Min.nach dem Gebrauch nicht, da sie sehr heiß wird. Halten Sie die
Pfanne nur am Griff.
1. Stecken Sie den Netzstecker in eine geerdete Steckdose.
2. Legen Sie die Zutaten in den Korb und stellen Sie den Korb in das
Bratblech.
3. Stellen Sie die Bratschale in die richtige Position. Wählen Sie eine
Funktion aus dem Menü und drücken Sie START / PAUSE, um den
Garvorgang zu starten.
4. Bildschirmanzeige. Es wird Temperatur und Zeit anzeigen. Die
Temperatur ist die eingestellte Temperatur und die Zeit ist die
verbliebene Arbeitszeit. Die von uns ausgewählte Funktion flackert.
Betriebsschritt
Menütabelle
Menü
Vorwärmen
Pommes frittes
Fleisch
Keulen
Steak
Kuchen
Garnelen
Fisch
Hähnchen
Gemüse
3
18
12
20
12
25
8
10
30
10
Funktion
Standardzeit
(Min)
Programmlogistik
Standardtemperatur
(°F )
360
400
400
400
360
320
360
360
400
320

Neben dem voreingestellten Menü können Sie mit dieser Luftfritteuse
auch andere Lebensmittel zubereiten, indem Sie Zeit und Temperatur
einstellen. Die folgende Tabelle hilft Ihnen bei der Auswahl der Grundein-
stellungen für die Zutaten, die Sie zubereiten möchten.
18
5. Einige Zutaten müssen während der Zubereitungszeit geschüttelt
werden (siehe Abschnitt 'Einstellungen' in diesem Kapitel). Um die
Zutaten zu schütteln, ziehen Sie das Bratblech am Griff aus dem Gerät
und schütteln Sie es. Schieben Sie dann die Bratschale zurück in die
Luftfritteuse.
Warnung: Drücken Sie während des Schüttelns nicht den
Korbentriegelungsknopf.
6. Wenn Sie die Timer klingen hören, ist die eingestellte
Vorbereitungszeit abgelaufen. Ziehen Sie die Pfanne aus dem Gerät
und stellen Sie sie auf eine hitzebeständige Oberfläche.
7. Überprüfen Sie, ob die Zutaten fertig sind. Wenn die Zutaten noch
nicht fertig sind, schieben Sie die Bratschale einfach zurück in das
Gerät und kochen Sie es einige Minuten mehr.
Hinweis: Um das Gewicht zu reduzieren, können Sie den Korb aus der
Pfanne nehmen und nur den Korb schütteln. Ziehen Sie dazu die
Pfanne aus dem Gerät, stellen Sie sie auf eine hitzebeständige
Oberfläche und drücken Sie den Korbentriegelungsknopf.
8. Um kleine Zutaten zu entfernen, drücken Sie den Korbentriegelungsk
nopf und heben Sie den Korb aus der Bratschale.
Drehen Sie den Korb nicht mit der daran befestigten Bratschale auf den
Kopf, da überschüssiges Öl, das sich am Boden der Bratschale
angesammelt hat, herausläuft und auf die Zutaten gelangt.
Nach dem Heißluftbraten sind die Bratschale und die Zutaten heiß.
Abhängig von der Art der Zutaten in der Luftfritteuse kann Dampf aus
der Bratschale entweichen.
9. Leeren Sie den Korb in eine Schüssel oder auf einen Teller.
Hinweis: Um große oder zerbrechliche Zutaten zu entfernen, nehmen
Sie die Zutaten mit einer Zange aus dem Korb heraus.
10. Wenn ein Batch von Zutaten fertig ist, ist die Luftfritteuse sofort
bereit, einen weiteren Batch zuzubereiten.
Hinweis: Bei der ersten Verwendung der gesunden Luftfritteuse kann
ein leichter Rauch oder Geruch freigesetzt werden. Dies ist normal und
wird bald nachlassen. Stellen Sie sicher, dass die gesunde Luftfritteuse
ausreichend belüftet ist.
Einstellungen
Table of contents
Languages:
Popular Fryer manuals by other brands

Gaggenau
Gaggenau VF 411 Operation and assembly instructions

NOD
NOD NOD0011 instruction manual

Cuisinart
Cuisinart CDF 100 - Brushed Deep Fryer INSTRUCTION AND RECIPE BOOKLET

Klarstein
Klarstein CRISP-PRO manual

Falcon
Falcon E401F Installation, servecing and user instructions

Falcon
Falcon E350/37 Installation and servicing instruction