manuals.online logo
Brands
  1. Home
  2. •
  3. Brands
  4. •
  5. Dreamland
  6. •
  7. Game
  8. •
  9. Dreamland 92519 User manual

Dreamland 92519 User manual

Table Hockey
AIRHOCKEYTAFEL
HOCKEY SUR TABLE
Assembly instructions
MONTAGE-INSTRUCTIES
INSTRUCTIONS D’ASSEMBLAGE
PARTS LIST
ONDERDELENLIJST
LISTE DES PIÈCES
WARNING:Choking Hazard--Toy contains small balls and/or small parts.
Not for children under 3 years.
WAARSCHUWING: Verstikkingsgevaar - Dit speelgoed bevat bal-letjes en/
of kleine onderdelen. Niet geschikt voor kinderen beneden de 3 jaar.
ATTENTION : Risque de suffocation — Ce jeu comprend de petites balles
et/ou de petites pièces. Ne convient pas aux enfants de moins de 3 ans.
REFERENCE NUMBER: 92519 (82683)
IMPORTANT!/BELANGRIJK!/IMPORTANT !
Please Keep Your Instructions.Before attempting assembly,please read through this instruction book to
familiarize yourself with all the parts and assembly steps.We recommend that two adults assemble this
table.Please refer to the Parts List below and be sure that all parts have been included.
Houd deze instructies bij. Lees deze handleiding aandachtig door voor u het speelgoed probeert te monteren,
om uzelf vertrouwd te maken met de onderdelen en de montage-instructies. We raden aan dat dit speelgoed
door twee volwassenen wordt gemonteerd. Neem de onderstaande onderdelenlijst en controleer of alle
onderdelen wel degelijk in de verpakking zitten.
Veuillez conserver ces instructions. Avant d’entamer le montage, veuillez lire attentivement ce manuel
d’instructions afin de vous familiariser avec toutes les pièces et étapes d’assemblage. Nous recommandons
que cette table soit assemblée par deux adultes. Veuillez vous référer à la liste des pièces ci-dessous et vous
assurer que toutes les pièces sont incluses.
PARTS LIST/ONDERDELENLIJST/LISTE DES PIÈCES
HOCKEY TABLE ASSEMBLY
AIRHOCKEY-TAFELBLAD
TABLE DE HOCKEY PRÉ-
ASSEMBLÉE X 1
X 1
X 2 X 2 X 2 X 2
LEG
POOT
PIED
LEG
POOT
PIED
END LEG BRACE
DWARSLAT POOT
RENFORT DE PIEDS
SIDE PANEL OF BOX
PANNEAU LATÉRAL DE LA BOÎTE
ZIJPANEEL VAN DOOS
SUPPORT BOARD
STEUNPLAAT
SURFACE PLANE X 1
COVER BOARD
AFDEKPLAAT
PANNEAU X 4
LEG BOLT
BOUT VOOR POOT
BOULON DE PIED
LEG BOLT
BOUT VOOR POOT
BOULON DE PIED
X 8
WASHER
RING
RONDELLE
X 8
WASHER
RING
RONDELLE X 4
WING BOLT
VLEUGELMOER
VIS PAPILLON X 1
ROUND HEAD SCREW
SCHROEF MET RONDE KOP
VIS À TÊTE RONDE
X 14 X 4
WASHER HEAD SCREW
SCHROEF MET BORGRING
VIS À RONDELLE INTÉGRÉE
X 10
WASHER HEAD SCREW
SCHROEF MET BORGRING
VIS À RONDELLE INTÉGRÉE
X 1
ALLEN WRENCH
INBUSSLEUTEL
CLÉ ALLEN
X 2
PUSHER
PUSHER
LANCEUR
X 2
GOAL BOX
OPVANGBAK DOEL
CAGE DE BUT
X 1
KNOB
KNOP
BOUTON
X 1
WRENCH
MOERSLEUTEL
CLÉ
X 2
PUCK
PUCK
RONDELLE
X 1
SUPPORT BRACE
STEUNBEUGEL
RENFORT DU PLATEAU
NUT
MOER
ÉCROU
X 8
ASSEMBLY INSTRUCTIONS/MONTAGERICHTLIJNEN:/INSTRUCTIONS D’ASSEMBLAGE :
We recommend that two adults work together to assemble this game.
We raden aan dat dit spel door twee volwassenen wordt opgesteld.
Nous recommandons que ce jeu soit assemblé par deux adultes.
Step 1 - Open the carton of your new hockey game near where you will play.
Select a clear level floor.This game requires at least two adults to assemble the table.
Stap 1 - Open de doos van uw nieuw hockeyspel vlakbij de plaats waar u ermee zult spelen.
Kies een schoon, effen oppervlak. Om deze tafel op te zetten, zijn minstens twee
volwassenen nodig.
Étape 1 – Ouvrez la boîte de votre nouveau jeu de hockey à proximité de
l’endroit où vous souhaitez jouer. Choisissez un endroit propre et
plat. La table de ce jeu doit être montée par au moins
deux adultes.
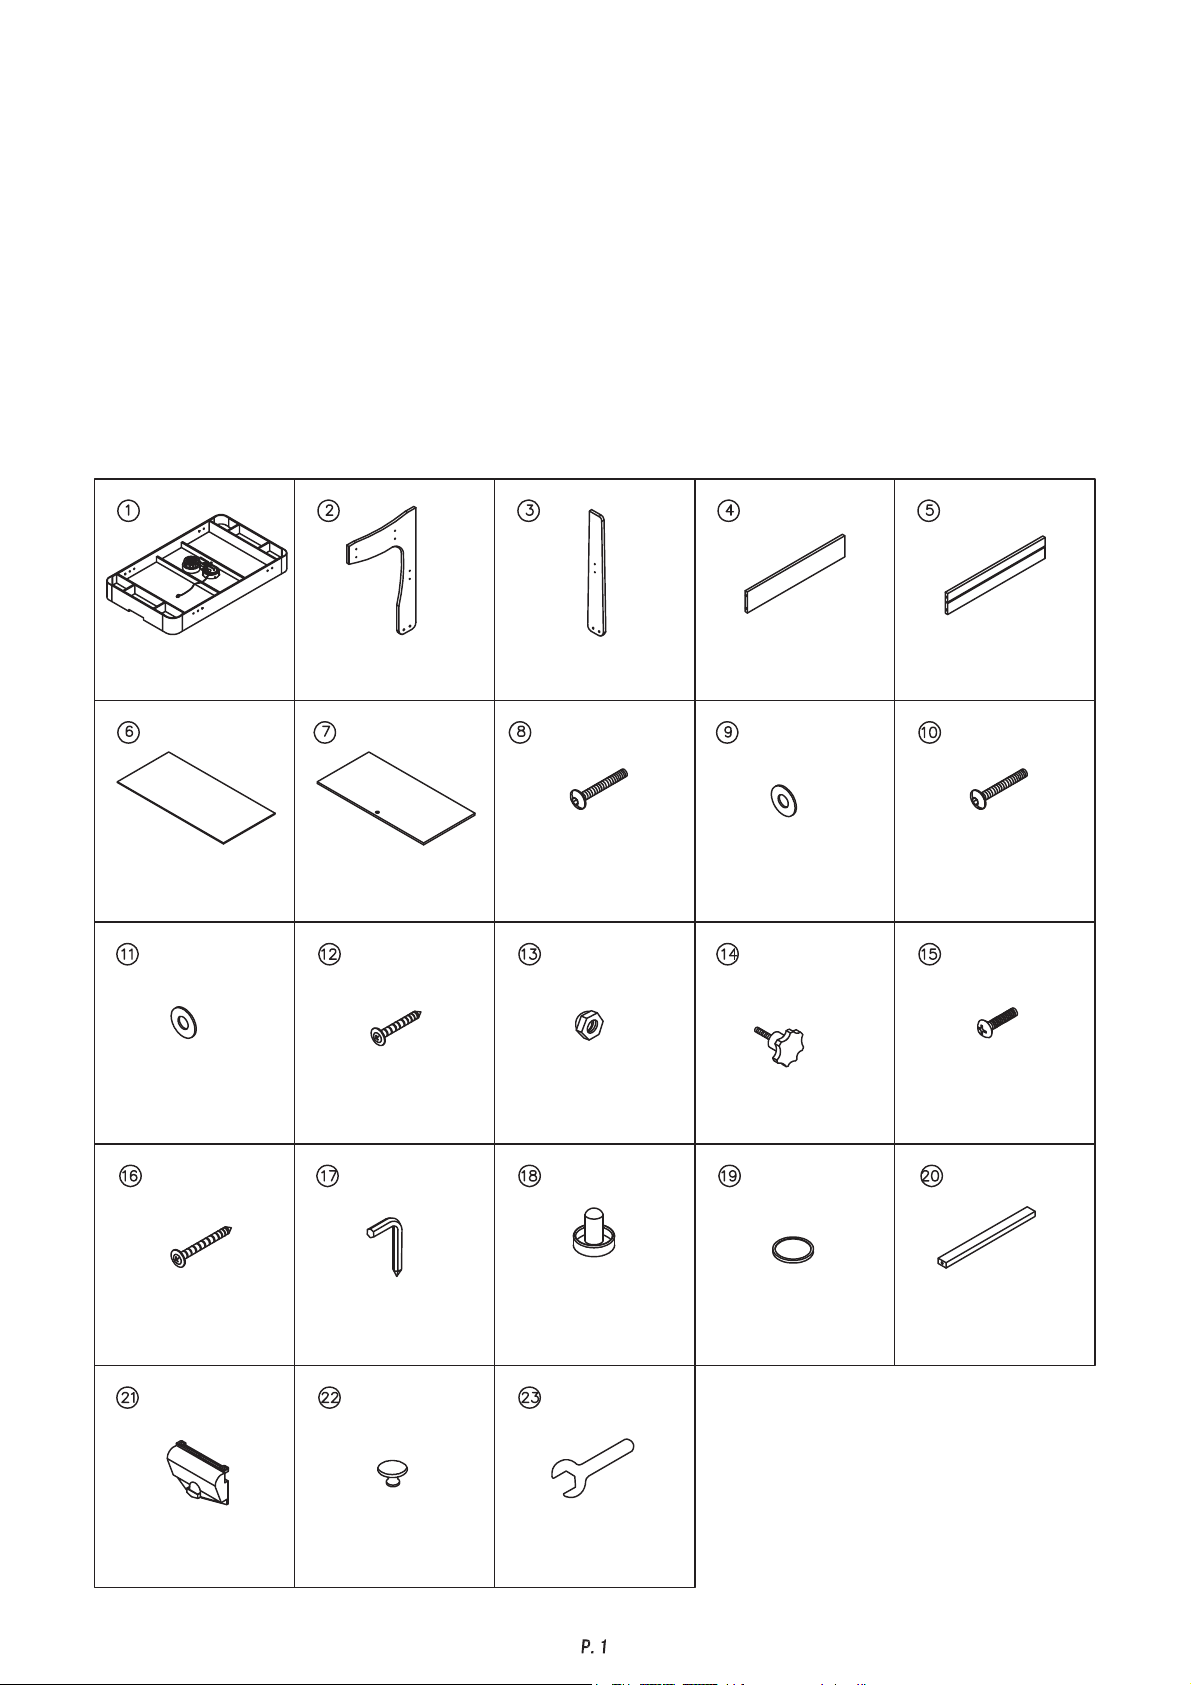
Step 2 - Remove all the contents from inside the carton and verify that you have all listed parts as shown on the Parts List.
NOTE:Some parts are pre-installed.We suggest that you use the bottom carton to assemble the game and protect the
game.Carefully cut or tear the four carton corners so that the bottom carton becomes a flat working surface area.
Stap 2 - Haal alle onderdelen uit de doos en controleer of u alle onderdelen hebt die op de onderdelenlijst staan. OPM.: Bepaalde
onderdelen zijn voorgemonteerd. We stellen voor dat u het onderste karton gebruikt om de tafel op te monteren en het spel te
beschermen. Snijd of scheur de vier hoekvlakken van de doos voorzichtig af, zodat de bodem als effen werkvlak kan dienen.
Étape 2 – Retirez tout le contenu de la boîte et vérifiez que vous disposez de toutes les pièces figurant sur la liste. REMARQUE : certaines
pièces sont préinstallées. Nous vous suggérons d’utiliser le fond de la boîte pour assembler le jeu tout en le protégeant. Coupez
ou déchirez soigneusement les quatre coins de la boîte afin que le fond de la boîte forme une surface de travail plane.
Step 3 - Place the pre-assembled Hockey Table Assembly (#1) face down in your work area.
Stap 3 - Zet het voorgemonteerde hockeytafelblad (#1) omgekeerd op uw werkvlak.
Étape 3 – Placez la table de hockey pré-assemblée (#1) à l’envers sur votre surface de travail.
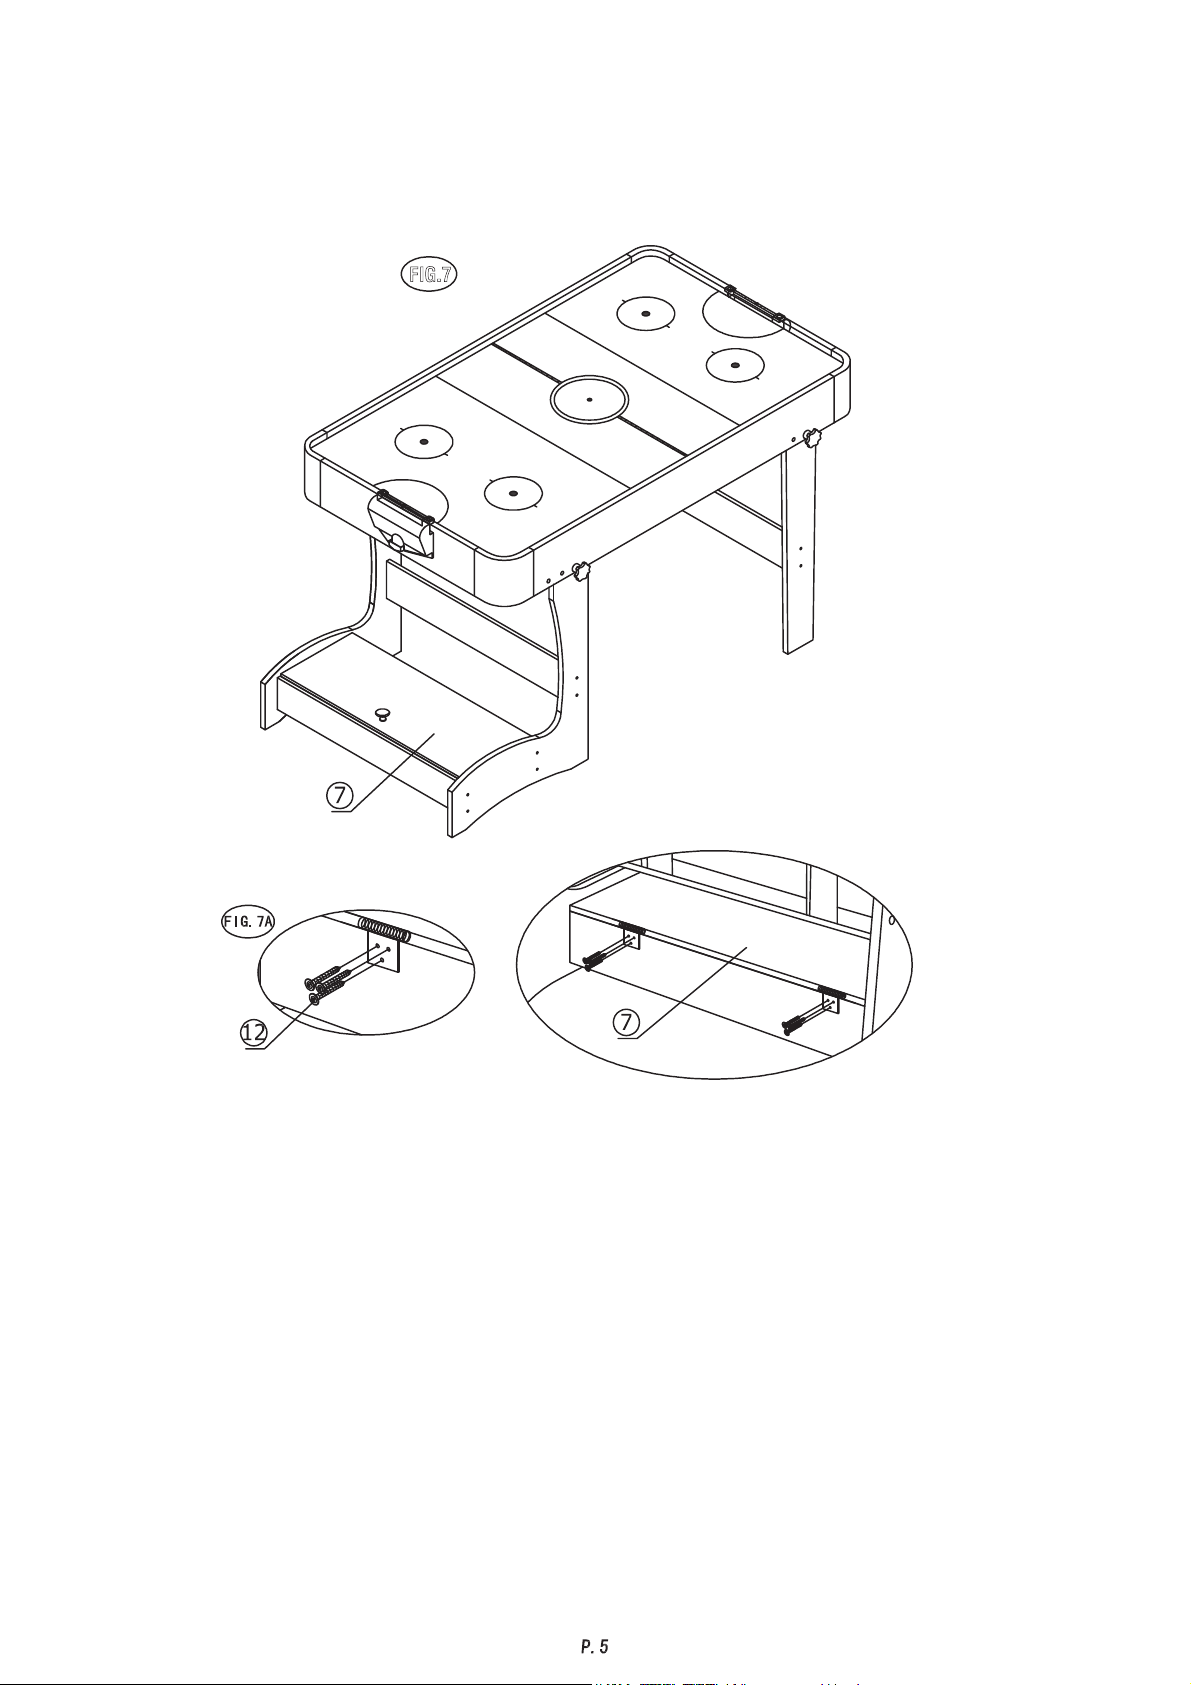
Step 4 - Attach the (#2) and (#3) Legs to the Cabinet using one of Leg Bolt (#8), two of Washers (#9),one of Rod Bolt (#13),One of Wing
Bolt (#14) per Leg.See FIG.2.
Stap 4 - Bevestig de poten (#2) en (#3) aan het tafelblad met behulp van één bout voor poot (#8), twee ringen (#9), één moer (#13), één
vleugelbout (#14) voor elke poot. Zie FIG. 2.
Étape 4 - Fixez les pieds (#2) et (#3) à la table en utilisant un boulon de pied (#8), deux rondelles (#9), un écrou (#13) et une vis papillon
(#14) par pied. Voir FIG. 2.
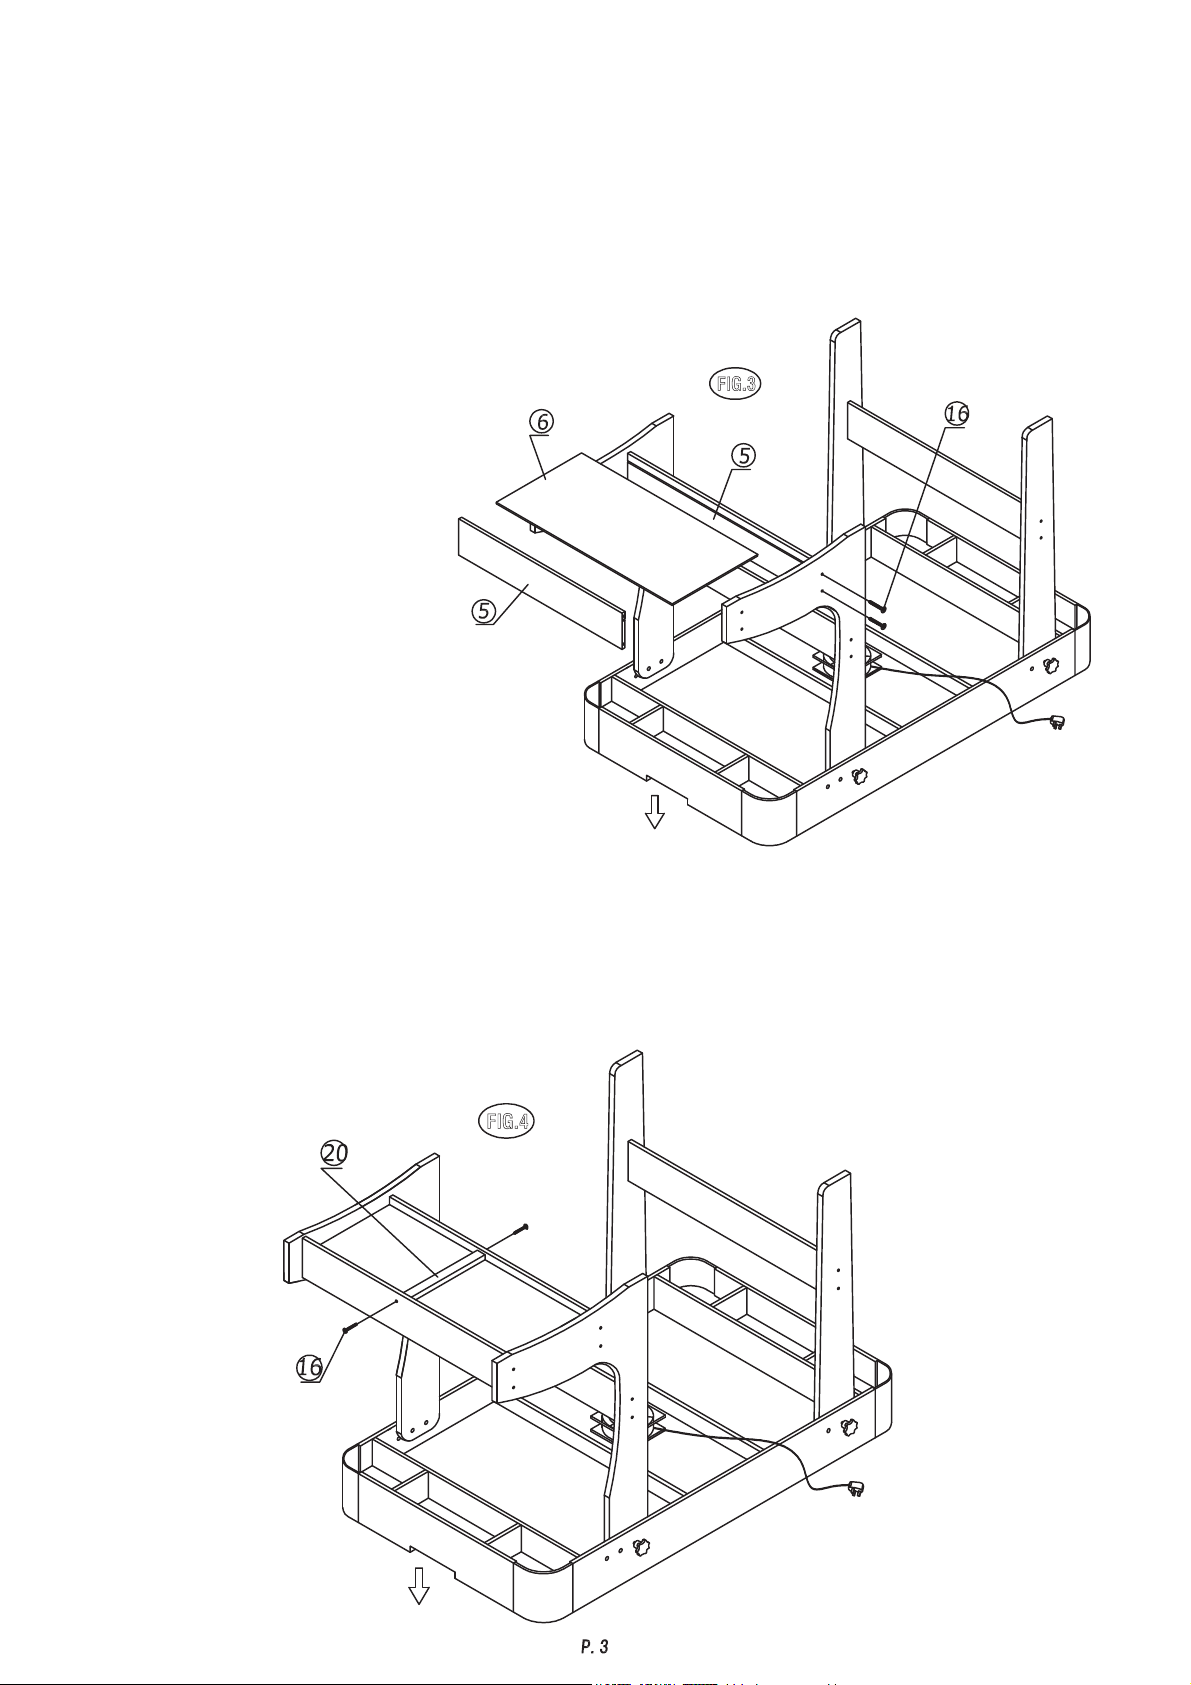
Step 5 - Attach the two End Leg Braces (#4) to the Legs (#2 & #3)
using two of Leg Bolts (#10) and two of Washers (#11) per
Leg.See FIG.2.
Stap 5 - Bevestig de twee dwarslatten (#4) dan aan de poten
(#2 en # 3) en gebruik daarbij voor elke poot twee
bouten (#10) en twee ringen (#11). Zie FIG. 2.
Étape 5 - Fixez les deux renforts (#4) aux pieds
(#2 & #3) en utilisant deux boulons (#10)
et deux rondelles (#11) par pied. Voir FIG. 2.
Step 6 - Attach the one side panel of box (#5) to the legs (#2) using four of Washer head screws (#16) per leg. See FIG.3
Stap 6 – Maak de beugel zijpaneel van doos (#5) vast aan de poten (#2) met vier schroeven met borgring (#16) per poot. Zie Fig. 3
Étape 6 - Attacher un panneau latreal de la boite (#5) aux pieds (#2) à l’aide de quatre vis à rondelle intégrée (#16) par pied. Voir fig. 3.
Step 7 - Slide the support board (#6) with graphics facing up as shown in FIG 3. Then attach the one End Leg Brace (#5) to the
legs (#2) using two of the washers (#11) and two of the Leg Bolts (#10) per Leg. If the field does not slide smoothly, check
to be sure you have not over tightened any screws or the Support Board is not caught by the slot.
Stap 7 – Schuif de steunplaat (#6) erin met de tekening naar boven zoals in Fig. 3. Maak vervolgens de eindpootbeugel (#5) vast aan
de poten (#2) met twee borgringen (#11) en twee pootbouten (#10) per poot. Als het speelveld er niet vlot inschuift, kijk dan
of u de schroeven niet te vast hebt aangedraaid en of de steunplaat niet blijft steken in de gleuf.
Étape 7 - Faire glisser le plateau (#6) de sorte que les dessins soient orientés
vers le haut comme indiqué sur la fig. 3. Attacher ensuite un renfort
latéral (#5) aux pieds (#2) à l’aide de deux rondelles (#11) et deux
boulons de pied (#10) par pied. Si le plateau
ne glisse pas facilement, s'assurer de ne pas
avoir trop serré une ou plusieurs vis ou vérifier
que le plateau ne soit pas bloqué au niveau de
la fente.
Step 8 - Place the Support Brace (#20) on the Support Board (#6) as shown in FIG.4. Attach it using one of Washer Head Screw
(#19) per Side. See FIG.4.
Stap 8 – Plaats de steunbeugel (#20) op de steunplaat (#6) zoals in Fig. 4. Maak hem vast met een schroef met borgring (#19) per
kant. Zie Fig. 4.
Étape 8 - Placer le renfort du plateau (#20) sur le plateau (#6) comme indiqué sur la fig. 4. Attacher le renfort à l’aide d’une vis à
rondelle intégrée (#19) par côté. Voir fig. 4.
Step 9 - Lift the table assembly from the floor with two strong adults, turn it over, and set table on its legs in the location where
you will play. Go back and make sure that all connections are tight.
Stap 9 – Til de gemonteerde tafel van de grond met twee sterke volwassenen, draai ze om en zet ze op de poten op de plek waar
u wilt spelen. Kijk na of alle aansluitingen vastzitten.
Étape 9 - Soulever la table du sol, la retourner et la poser sur ses pieds à l’endroit souhaité. Cette opération doit être exécutée par
deux adultes robustes. Vérifier que toutes les attaches soient bien fixées.
CAUTION:Two adults are recommended to flip the table as shown.
1.Grab the table on the ground.
2.Turn the table over.
3.Place it on all four feet at the same time on the ground.
OPGELET: om de tafel om te draaien zoals afgebeeld zijn twee
sterke volwassenen nodig.
1. Neem de tafel van de grond.
2. Draai de tafel om.
3. Plaats alle vier poten gelijktijdig op de grond.
ATTENTION : La table doit être retournée, comme illustré, par
deux adultes.
1. Soulevez la table du sol.
2. Retournez la table.
3. Posez ses quatre pieds sur le sol simultanément.
HOLD TABLE
NEEM DE TAFEL VAST
TENIR LA TABLE
DO NOT HOLD THE LEGS
NEEM DE TAFEL NIET VAST BIJ DE POTEN
NE PAS TENIR LA TABLE PAR SES PIEDS
DO NOT LEAN THE ON ITS LEGS
LAAT DE TAFEL NIET OP EEN OF TWEE POTEN RUSTEN!
NE PAS APPUYER LA TABLE SUR SES PIEDS INCLINÉS !
Step 10 - Attach goal boxes (#21) to hockey end aprons using four of Washer Head Screws (#12) per Goal Box. See FIG. 6.
Stap 10 – Maak de doelen (#21) vast aan de eindschorten van de hockeytafel met vier schroeven met borgring (#12) per doel. Zie Fig. 6.
Étape 10 - Attacher les buts (#21) aux extrémités de la table à l’aide de quatre vis à rondelle intégrée (#12) par but. Voir fig. 6.
Step 11 - Attach the one nut (#22) to the Cover Board (#7) using one of the Round Head Screw (#15). See FIG. 6 and 6A
Stap 11 – Maak de more (#22) vast aan de afdekplaat (#7)
met een schroef met ronde kop (#15). Zie Fig. 6 en 6A
Étape 11 - Attacher le écrou (#22) à la planche de recouvrement
(#7) à l’aide d’une vis à tête ronde (#15).
Voir fig. 6 et 6A
Step 12 - Attac the one Cover Board (#7) to the end leg braces using six of Flat head screw (#18). See FIG.7 and 7A.
Stap 12 – Maak de afdekplaat (#7) vast aan de eindpootbeugels met zes schroeven met platte kop (#18). Zie Fig. 7 en 7A.
Étape 12 - Attacher la planche de recouvrement (#7) aux renforts latéraux à l’aide de six vis à tête plate (#18). Voir fig. 7 et 7A.
THE HOCKEY GAME ASSEMBLY IS COMPLETE .
Plug in the power cord, turn on the motor
YOU ARE NOW READY TO PLAY TURBO HOCKEY
DE HOCKEYTAFEL IS NU VOLLEDIG GEMONTEERD.
Steek de stroomkabel in, zet de motor aan.
HET SPEL KAN BEGINNEN
L’ASSEMBLAGE DU JEU DE HOCKEY EST TERMINÉ.
Brancher le câble d’alimentation, allumer le moteur
VOUS ÊTES MAINTENANT PRÊT À JOUER AU TURBO HOCKEY.
Step 13 - Loosen the Wing Bolts (#14) on both sides,fold the table.See FIG.7A.Then locate the Legs to the Cabinet
using Wing Bolts (#14) as shown in FIG.7B.
Stap 13 - Draai de vleugelbouten (#14) aan beide kanten los en vouw de tafel op. Zie FIG. 7A. Bevestig de poten dan
aan het tafelblad met behulp van de vleugelbouten (#14) zoals afgebeeld op FIG. 7B.
Étape 13 - Desserrez les vis papillon (#14) des deux côtés et pliez la table. Voir FIG. 7A. Fixez ensuite les pieds au niveau de la
table en utilisant les vis papillon (#14) comme indiqué à la FIG. 7B.
Keep distance from the Hockey
Table Rod while fold up !
Houd voldoende afstand van
de hockeytafel als u de tafel
opvouwt!
Tenez-vous à distance de la
table de hockey pendant le
repliage !
WAARSCHUWING:
ATTENTION :
Hi Mark International Co., Ltd.
11F, No. 149 Roosevelt Rd., Sec. 3, Taipei, 10647 Taiwan

This manual suits for next models

1

Popular Game manuals by other brands

Learning Resources Quizzillion LER 6914 Use and care guide

Learning Resources

Learning Resources Quizzillion LER 6914 Use and care guide

Learning Resources Coggy Doggy LER 9210 instructions

Learning Resources

Learning Resources Coggy Doggy LER 9210 instructions

Techno Source Bicycle 30451 operating instructions

Techno Source

Techno Source Bicycle 30451 operating instructions

Radica Games Word Scramble 75013 instruction manual

Radica Games

Radica Games Word Scramble 75013 instruction manual

Hasbro The United States Air Mail Game instructions

Hasbro

Hasbro The United States Air Mail Game instructions

ThinkFun Yoga Dice instructions

ThinkFun

ThinkFun Yoga Dice instructions

Techno Source Clickables 21201 user manual

Techno Source

Techno Source Clickables 21201 user manual

Techno Source 4010 user manual

Techno Source

Techno Source 4010 user manual

Canon BJ/BJ148 brochure

Canon

Canon BJ/BJ148 brochure

Pragma Cougar TOPAZ user manual

Pragma

Pragma Cougar TOPAZ user manual

Hasbro Beyblade Master Driger 82705 owner's manual

Hasbro

Hasbro Beyblade Master Driger 82705 owner's manual

Playskool Alphabet Roadway instruction manual

Playskool

Playskool Alphabet Roadway instruction manual

Radica Games TOTAL MELTDOWN 74008 instruction manual

Radica Games

Radica Games TOTAL MELTDOWN 74008 instruction manual

Excalibur PL26 operating manual

Excalibur

Excalibur PL26 operating manual

Excalibur Ivan II user guide

Excalibur

Excalibur Ivan II user guide

Radica Games POKER/BLACKJACK SILVER EDITION 71054 instruction manual

Radica Games

Radica Games POKER/BLACKJACK SILVER EDITION 71054 instruction manual

Hoffmann 7147 Assembly manual

Hoffmann

Hoffmann 7147 Assembly manual

Radio Shack Sonar Sea Battle 1989 Tandy manual

Radio Shack

Radio Shack Sonar Sea Battle 1989 Tandy manual

manuals.online logo
manuals.online logoBrands
  • About & Mission
  • Contact us
  • Privacy Policy
  • Terms and Conditions

Copyright 2025 Manuals.Online. All Rights Reserved.