manuals.online logo
Brands
  1. Home
  2. •
  3. Brands
  4. •
  5. Costway
  6. •
  7. Game
  8. •
  9. Costway UY10001 User manual

Costway UY10001 User manual

10 IN 1 MULTI-GAME TABLE
UY10001
USER’S MANUAL
THIS INSTRUCTION BOOKLET CONTAINS IMPORTANT SAFETY INFORMATION. PLEASE READ AND KEEP FOR FUTURE REFERENCE.
Please give us a chance to make it right and do better !
Contact our friendly customer service department for help first.
Replacements for missing or damaged parts will be shipped ASAP !
Contact Us !
Do NOT return this item. US:cs.us@costway.com
UK:cs.uk@costway.com
US office: Fontana UK office: Ipswich
02 03
Before You Start
General Warnings:
The product must be installed and used under the supervision of an adult.
Read through each step carefully and follow the proper order.
Remove all packaging, separate and count all parts and hardware.
Please ensure that all parts are correctly installed, incorrect installation can lead to
a danger.
We recommend that, where possible, all items are assembled near the area in
which they will be placed in use, to avoid moving the product unnecessarily once
assembled.
Ensure a secure surface during installation, and place the product always on a flat,
steady and stable surface.
WARNING
Attention: The Product is not suitable for the children under 3 years
Danger: Keep all small parts and packaging materials for this product away from babies
and children, otherwise they may pose a choking hazard.
WARNING:
CHOKING HAZARD-Small parts.
Not for children under 3 years.
0-3
Please read all instructions carefully and keep it for future reference.
IMPORTANT!
PARTS LIST
Please Keep Your Instructions. Before attempting assembly, please read through this
instruction book to familiarize yourself with all the parts and assembly steps. We
recommend that two adults assemble this game. Please refer to the Parts List below and be
sure that all parts have been included.
WARNING: Choking Hazard--Toy contains small
balls and/or small parts. Not for children under
3 years.
SIDE APRON
2PCS
END APRON
2PCS
SOCCER
PLAYFIELD
1PC
SUPPORT BRACE
2PCS
SUPPORT BRACE
2PCS
TT/HOCKEY
PLAYFIELD
1PC
M6X28MM BOLT
16PCS
M6 WASHER
16PCS
3.5x12MM WASHER
HEAD SCREW
16PCS
3.5x35MM WASHER
HEAD SCREW
12PCS
4X20 TM
26PCS NUT
26PCS
1 2 3 4
5 6 7 8
910 11 12
04 05
2PCS
LEG LEVELER
4PCS
3 HOLES
PLAYER ROD
4PCS
2 HOLES
PLAYER ROD
5 HOLES
PLAYER ROD
2PCS
PLAYING
CARD
1DECK
PLAYER BLACK
13PCS
PLAYER IVORY
13PCS
TABLE TENNIS
PADDLE
2PCS
13 14 15 16
17 18 19 20
HAND GRIP
8PCS
END CAP
8PCS
RUBBER BUMPER
16PCS
CABINET FOR
BILLIARD
1PC
LEFT LEG
2PCS
RIGHT LEG
2PCS
GOAL BOX
2PCS
SOCCER BALL
2PCS
21 22 23 24
25 26 27 28
BILLIARD BALLS
1PC
CUE STICK
2PCS
CHALK
2PCS
TRIANGLE
1PC
29 30 31 32
HOCKEY
PUSHER
2PCS
HOCKEY
PUCK
2PCS
FELT PAD
2PCS
NET & POST SET
1 SET
CHESS
1SET
BACKGAMMON
1 SET
CHECKERS BOWLING
1 SET
33 34 35 36
37 38 39 40
2PCS 1PC
1 SET 1PC
SAFETY LOCK
MULTI-GAME
BOARD
SHUFFLE BALL BRUSH
ALLEN KEY
1PC
41 42 43 44
45
1 SET
06 07
ASSEMBLY INSTRUCTIONS:
We recommend that two adults work together to assemble this game.
1) Open the carton of your new table game near where you will play. Select a clear level
floor. This game requires at least two adults to assemble the table.
2) Remove all the contents from inside the carton and verify that you have all listed parts
as shown on the Parts List. We suggest that you use the bottom carton as a clean flat
working area to protect the game. Carefully cut or tear the four carton corners so that the
bottom is now your work area.
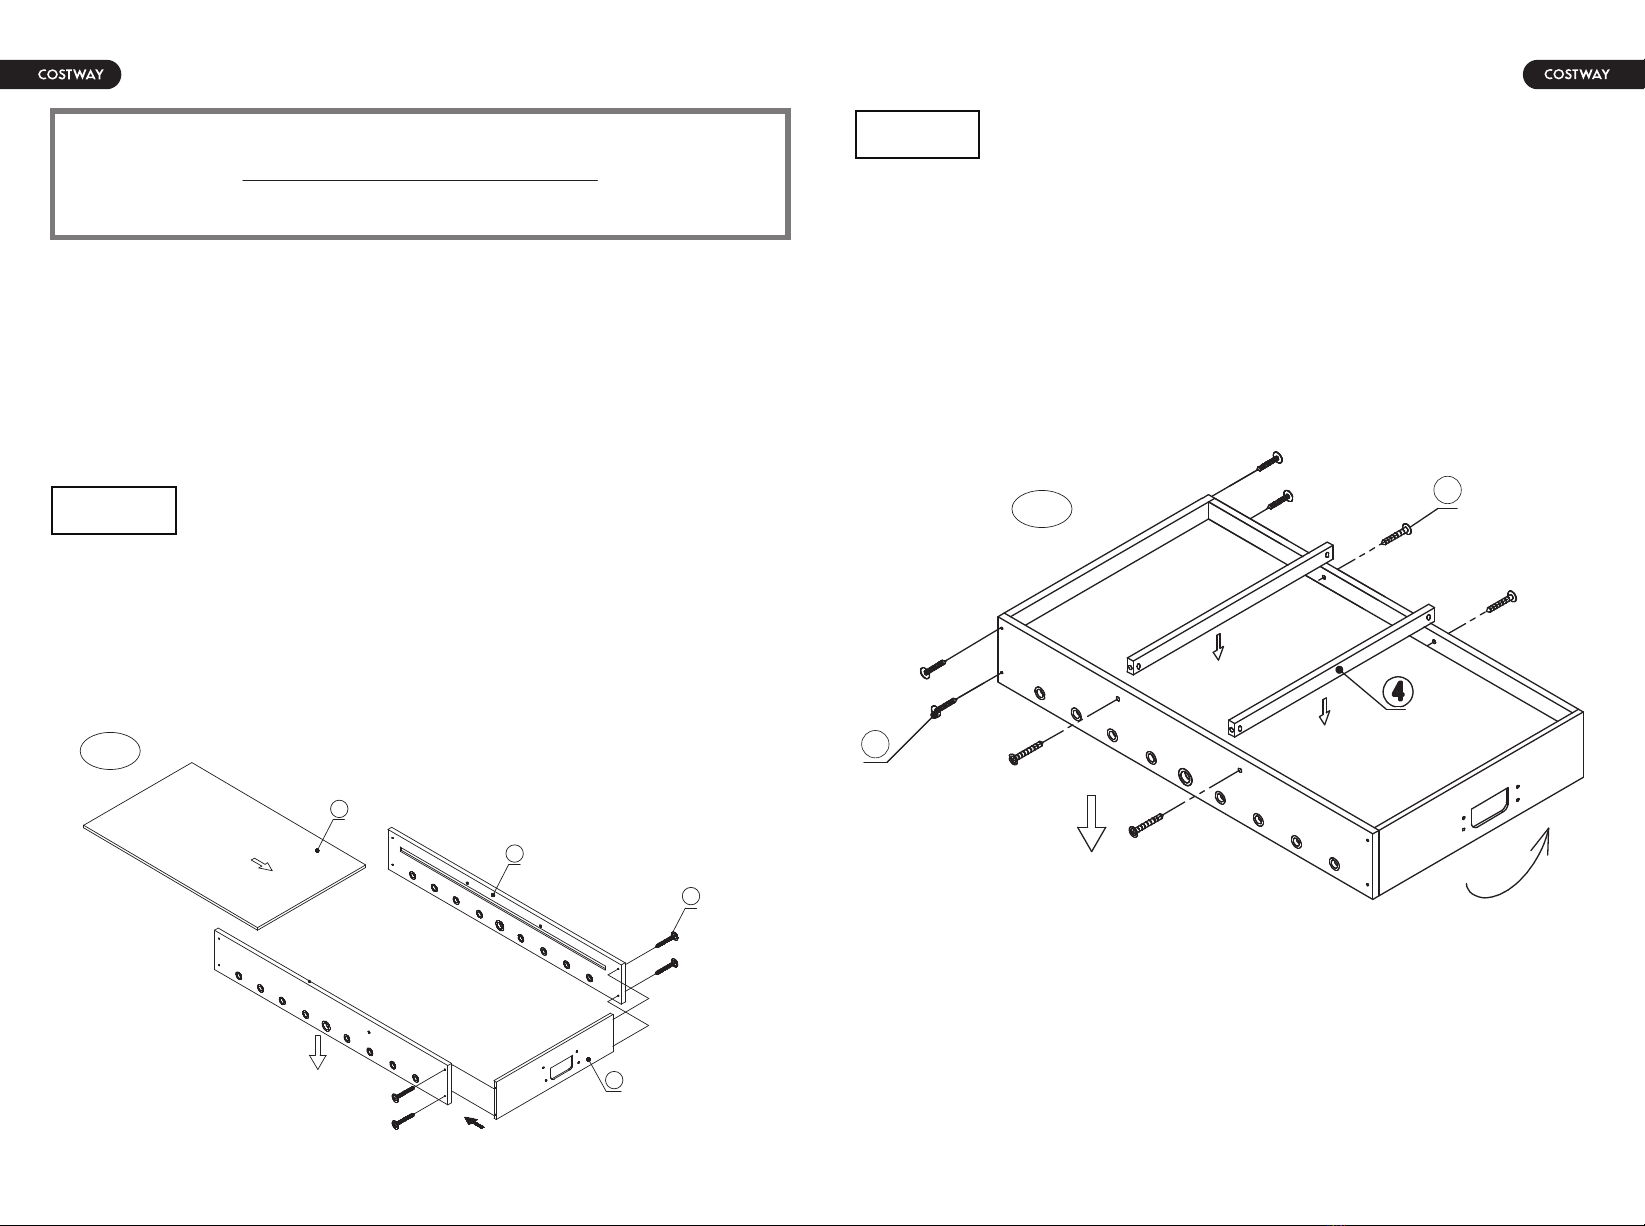
3) Attach one End Apron (#2) between the Side Aprons (#1) using two of Washer Head Screws (#10)
per Side. See FIG.1.
NOTE: Leave connections loose - Do not tighten screws securely at this time.
4) Slide the Playfield (#3) with graphics facing down as shown in FIG 1.If the field does not slide
smoothly, check to be sure you have not over tightened any screws or the Playfield is not caught by the
slot.
C:\Users\Administrator\Desktop\SUM -48 2 4 -1 0_ 9 2 .p n gC:\Users\Administrator\Desktop \SUM -48 2 4 -10 _ 9 1 .p n g
C:\Users\Administrator\Desktop\SUM -4 8 2 4 -10 _ 9 0.pngC:\Users\Administrator\Desktop\SUM-482 4 -1 0 _ 8 9 .p ng
C:\Users\Administrator\Desktop\SUM -48 2 4-10_88.pn gC:\Users\Adm inis trator\Desk top \SU M-4 8 2 4 -10 _ 8 7 .pn g
C:\Users\Administrator\Desktop\SUM -48 2 4 -1 0_ 8 6 .p ngC :\Use rs\Ad m inistrator\Desktop\SUM-482 4 -10 _ 8 5 .pn gC:\Users\Adminis trator\Desk top \SU M -48 2 4 -1 0 _ 8 4 .pn g
C:\Users\Administrator\Desktop\SUM -48 2 4 -1 0 _8 3 .p n gC:\Users\Administrator\Desk top \SU M -48 2 4 -1 0 _ 8 2 .pn gC:\Users\Adminis trator\Desk top \SUM -48 2 4 -1 0_ 8 1 .p ng
C:\Users\Administrator\Desktop\SUM -48 2 4 -1 0_ 8 0 .p n g
C:\Users\Administrator\Desktop\SUM -48 2 4-10_38.pn g
C:\Users\Administrator\Desktop\SUM -4 8 2 4 -10 _ 1 5 .png
C:\Users\Administrator\Desktop\SUM -4 8 2 4 -10 _ 1 4 .pngC:\Users\Administrator\Desktop\SUM-4 8 24 -10_13.pngC:\Users\Administrator\Desktop \SUM -48 2 4 -1 0 _ 1 2 .pn g
C:\Users\Administrator\Desktop\SUM -48 2 4 -1 0 _1 1 .pngC:\Users\Administrator\Desktop\SUM-4824 -10 _ 1 0 .p ngC:\Users\Adm inistrator\Desk top \SU M -48 2 4 -10 _ 9 .pn g
C:\Users\Administrator\Desktop\SUM -48 2 4 -1 0_ 8 .pngC:\Users\Administrator\Desktop\SUM-4 8 24 -1 0 _ 7 .pn gC:\Use rs\Ad min istrator\Desk top \SU M-4 8 24 -1 0 _ 6 .pn g
C:\Users\Administrator\Desktop\SUM -48 2 4 -1 0_ 5 .p n gC:\Use r s \Ad min istra tor \Desktop\SUM- 4824- 1 0 _ 4 .pn gC:\Users\Admin istr a tor \Des k top \SU M - 4 8 2 4 - 1 0 _ 3 .pn g
C:\Users\Administr a tor \De s k top \SU M- 4824- 1 0 _ 2 .pn g
3
1
10
2
FIG.1
FIG.1.
5) Repeat the step to attach the other End Apron to the Side Aprons (#1).
6) Place two Support Braces (#4) on Playfield (#3) as shown in FIG.2. Attach them using
two of Washer Head Screw (#10) per side. See FIG.2.
FIG.2
FIG.2.
10
10
08 09
7)Attach the player rods (#14 - #16) into the side aprons as shown in FIG.3A.Attach
rubber bumper (#23) to the player rod, followed by the players (#18 & #19) and another
rubber bumper (#23). See FIG 3-1
8) Attach Players (#18 & #19) to the player rods using one 4x20TM(#11) and one
Nut(12). See FIG 3-2
FIG.3.
05
FIG.3
FIG.3-1 FIG.3-2
14
15 14
16
16
14
15
14
12
11
18 19&
18 19&
ORDER OF PLAYERS
(Overhead View -
Table upside down)
IVORY
BLACK
14
15
14
16
16
14
15
14
9) Attach Goal Boxes (#27) to End Aprons using four of Washer Head Screws (#9) per
Goal Box . See FIG.4.
FIG.4
FIG.4.
9
27
10 11
10) Put Hand Grips (#21) and End Caps (#22) on the player rods in order. NOTE: To
make the Handles easier to attach, spray a little window cleaner on the rod ends prior to
installation and tap on gently with a hammer. See FIG.5.
FIG.5
FIG.5.
11) Attach Legs (#25 & #26) to the cabinet (#24) using four of Bolts (#7) and four of
Washers(#8) per Leg. See FIG.6.
12) Attach the two End Leg Braces (#6) to the legs using four of Washer Head Screws
(#9) per Leg. See FIG.6.
13) Locate Leg Leveler(#13) And Screw Into per Leg. See FIG.6.
FIG.6.
21
22
#35
felt pad
#33
HOCKEY PUSHER
26
69
87
25
24
13
36

Other Costway Game manuals

Costway TY580403 User manual

Costway

Costway TY580403 User manual

Costway SP0583 User manual

Costway

Costway SP0583 User manual

Costway TY557858 User manual

Costway

Costway TY557858 User manual

Costway TY580385 User manual

Costway

Costway TY580385 User manual

Costway UY10001 User manual

Costway

Costway UY10001 User manual

Costway TY327948 User manual

Costway

Costway TY327948 User manual

Costway TY343181 User manual

Costway

Costway TY343181 User manual

Costway TY557859 User manual

Costway

Costway TY557859 User manual

Costway TY590676 User manual

Costway

Costway TY590676 User manual

Costway NP10255WL-BL User manual

Costway

Costway NP10255WL-BL User manual

Costway SP36989GR User manual

Costway

Costway SP36989GR User manual

Costway TY571923 User manual

Costway

Costway TY571923 User manual

Costway TY246800 User manual

Costway

Costway TY246800 User manual

Costway TY557856 User manual

Costway

Costway TY557856 User manual

Popular Game manuals by other brands

GAELCO Ring Riders Operator's manual

GAELCO

GAELCO Ring Riders Operator's manual

Pentashot GLS 17 operating instructions

Pentashot

Pentashot GLS 17 operating instructions

Fundex Games 2428 User instructions

Fundex Games

Fundex Games 2428 User instructions

Hasbro Spiderman Monopoly brochure

Hasbro

Hasbro Spiderman Monopoly brochure

Hathaway NG2246BL Assembly instructions

Hathaway

Hathaway NG2246BL Assembly instructions

Tiger Electronics 66874 instructions

Tiger Electronics

Tiger Electronics 66874 instructions

Haba My Very First Games First Orchard manual

Haba

Haba My Very First Games First Orchard manual

Enabling Devices Batter Up 1433 user guide

Enabling Devices

Enabling Devices Batter Up 1433 user guide

Tiger Electronic Toys 760041WTIE-1 instructions

Tiger Electronic Toys

Tiger Electronic Toys 760041WTIE-1 instructions

Learning Resources Three Bear Family manual

Learning Resources

Learning Resources Three Bear Family manual

Rally and Roar SOC040 18P Assembly instructions

Rally and Roar

Rally and Roar SOC040 18P Assembly instructions

Hudora Hagar INSTRUCTIONS ON ASSEMBLY AND USE

Hudora

Hudora Hagar INSTRUCTIONS ON ASSEMBLY AND USE

Radica Games WOOGIES N1698 instruction manual

Radica Games

Radica Games WOOGIES N1698 instruction manual

Hasbro 60-043 owner's manual

Hasbro

Hasbro 60-043 owner's manual

Coastal Amusements Hi-Striker X-treme Assembly and installation

Coastal Amusements

Coastal Amusements Hi-Striker X-treme Assembly and installation

Radica Games TETRIS 76069 instruction manual

Radica Games

Radica Games TETRIS 76069 instruction manual

Hasbro Deer Pong instructions

Hasbro

Hasbro Deer Pong instructions

Ice Tons Of Tickets Updating Instructions

Ice

Ice Tons Of Tickets Updating Instructions

manuals.online logo
manuals.online logoBrands
  • About & Mission
  • Contact us
  • Privacy Policy
  • Terms and Conditions

Copyright 2025 Manuals.Online. All Rights Reserved.