Drieaz HVE3000 User manual

07-01782B Dri-Eaz Products, Inc.
Warranty 07-01804 1 Sapphire Scientific
Owner’s Manual
HVE3000 Flood Pumper and Inline Booster
The high-efficiency HVE3000 can be used both as a flood pumper to quickly remove excess
liquid water for flood remediation and as an inline truckmount booster to extend the
effective vacuum hose length for carpet extraction and cleaning.
Patents: http://www.LBpatents.com
READ AND SAVE THESE INSTRUCTIONS
SAFETY INSTRUCTIONS
WARNING! Do not alter or modify your HVE3000 in
any way. Use only replacement parts authorized by
Dri-Eaz Products, Inc. or Sapphire Scientific, Inc.
Modifications or use of unapproved parts could
create a hazard and will void your warranty. Contact
your authorized Dri-Eaz or Sapphire distributor for
assistance.
WARNING! Do not operate unit in standing water.
Electric shock hazard. Unit must be grounded.
GROUNDING INSTRUCTIONS
This appliance must be grounded. If it should
malfunction or breakdown, grounding provides a path of
least resistance for electric current to reduce the risk of
electric shock. This appliance is equipped with a cord
having an equipment-grounding conductor and
grounding plug. The plug must be inserted into an
appropriate outlet that is properly installed and grounded
in accordance with all local codes and ordinances.
WARNING – Improper connection of the equipment-
grounding conductor can result in a risk of electric
shock. Check with a qualified electrician or service
person if you are in doubt as to whether the outlet is
properly grounded. Do not modify the plug provided with
the appliance – if it will not fit the outlet, have a proper
outlet installed by a qualified electrician.
WARNING! Unplug unit before opening cover for
cleaning or servicing.
• Inspect the power cord before use. If cord is
damaged, do not use. Always grasp the plug (not
the cord) to unplug.
• To keep power cords from pulling out of the unit, be
sure to insert the plugs firmly into the sockets and
engage the cords in the cord clips provided on the
back of unit.
• When using both power cords, each cord must be
connected to separate 115V/60 Hz circuits protected
by Ground Fault Circuit Interrupter (GFCI) devices.
Do not use adapters. Never cut off third prong. Do
not use extension cords.
• Keep motor and wiring dry.
• Water may eject from the pumpout with
considerable force creating hazardous conditions.
Always keep outet capped or connected to hose
when unit is plugged in.
• Do not operate with water temperatures exceeding
140°F (60°C).
INTRODUCTION
The HVE3000 is a portable flood pumper intended
for commercial use. It can be teamed with an extraction
tool to remove water quickly and effectively from flooded
structures. It is ideal for use in large spaces or multi-level
units like hotels, schools, hospitals, factories, offices,
and homes.
The HVE3000 can also be used as an inline booster
and prefilter with a truckmount extractor to provide
additional vacuum pressure on long hose runs.
Read this Owner’s Manual carefully to learn how to
properly operate your HVE3000. Improper use of the
machine may create hazardous conditions and may void
the warranty.
DRI-EAZ PRODUCTS, INC.
SAPPHIRE SCIENTIFIC, INC.
F479
78-006
15180 Josh Wilson Road
2604 Liberator
Burlington, WA 98233
Prescott, AZ 86301
www.dri-eaz.com
www.sapphirescientific.com
Phone: 800-932-3030
Fax: 360-757-7950
WARNING

07-01782B Dri-Eaz Products, Inc.
Warranty 07-01804 2 Sapphire Scientific
BEFORE YOU BEGIN
Warranty registration
Visit warranty.drieaz.com or
warranty.sapphirescientific.com to register your
purchase. Registration allows us to better assist you with
using, maintaining or servicing your equipment, as well
as to contact you in case we have important safety
information concerning this product. If you determine
service is required, have your equipment model, serial
number and original proof of purchase available and call
your distributor for assistance with obtaining a return
material authorization (RMA).
CONTENTS GUIDE
Parts identification .......................................... 3
Extraction mode setup .................................... 4
Truckmount booster setup ............................. 4
Maintenance ..................................................... 5
Specifications .................................................. 9

07-01782B Dri-Eaz Products, Inc.
Warranty 07-01804 3 Sapphire Scientific
PARTS IDENTIFICATION
IMPORTANT! BEFORE FIRST USE:
The grab handle/vacuum hose guide (see Fig. A) is shipped inside the filter basket (Fig. D).
Remove the guide from the basket and install it as shown using the four screws provided. Do not
overtighten the screws. The unit is now ready to be set up as an extractor or booster.
Two Velcro straps are also enclosed in the filter basket (Fig. D). Use these straps to secure the
extractor hose when not in use.
FIG. A: FRONT
FIG. C: CONTROL PANEL DETAIL
Automatic pumpout drain
outlet. Fitted with a 1½ in.
outlet. To use a garden hose,
replace with the supplied ¾
in. fitting. Keep capped
when not in use.
Vacuum inlet (from
extraction tool).
Gravity drain hose.
Keep capped and clipped
into place when not in
use.
Grab handle/vacuum
hose guide. Direct hose
through guide before use
to avoid tipping.
Vacuum outlet. Connect
to truckmount for use as
booster. Keep capped
when not in use.
FIG. B: REAR
Handle
HEPA exhaust filter grill.
Thumbscrews allows easy
filter replacement.
Filter basket cover.
Remove by lifting
clamps.
Control panel and
power cord sockets.
Details in Fig. C,
below.
P: Automatic pumpout switch. Turn on to activate automatic pumpout
system. NOTICE! When automatic pumpout system is activated, sump pump
can turn on any time liquid is present in tank. Liquid may eject from Pump
Outlet with considerable force and cause injury. Always attach suitable drain
hose before activating automatic pumpout system.
A: Power cord socket.Provides power to sump pump and blower 1.
B: Power cord socket:Provides power to blower 2.
1, 2: Vacuum blower switches.
LOW: Blower 1 ON, Blower 2 OFF. Cord A required.
MEDIUM: Blower 1 OFF, Blower 2 ON. Cord B required.
HIGH: Blower 1 ON, Blower 2 ON. Cords A and B required.
Independent circuit indicator light: Glows bright green when the two cords
are properly connected to separate circuits. No light appears if a) the two cords
are connected to the same circuit or b) if only one cord is connected. When using
both power cords, do not operate the unit unless the green light is illuminated.
P
1
2
A
B
Power cord storage strap.
Power cord retention
clips. Secure cord(s) here
while using the unit.
Cover assembly
latches (×4)

07-01782B Dri-Eaz Products, Inc.
Warranty 07-01804 4 Sapphire Scientific
Cover assembly latches (×4)
Recovery tank interior.
NOTE: Pump, float and
float arm assembly are
located inside tank.
Filter lid seal
Airflow shutoff ball valve
assembly.
Filter lid.
Filter basket.
Filter lid clamps (×2)
Gravity drain hose.
EXTRACTION MODE SETUP
Remove water quickly and effectively from flooded
structures.
1) Connect vacuum hose to vacuum inlet.
2) Connect one or two power cords depending on
job requirements. The second cord must be
connected to a separate 15 amp circuit.
NOTICE: The power cords of the HVE3000 should be
plugged into separate GFCI-protected 115 volt outlets
rated for at least 15 amps. Always plug the cord firmly
into the base of the unit first and secure the cord into the
cord clip.
NOTICE: Connect to two separate 15A circuits ONLY. A
bright green light indicates correct connections. No light
will show when using only one cord.
3) For automatic pumpout, connect hose to pumpout
outlet to pump outlet and turn pump switch ON. Do not
use anything smaller than a ⅝ in. hose, and ensure
there are no kinks in the hose. For increased pumpout
performance, see “Enhancing Pumpout Performance,”
p. Error! Bookmark not defined..
NOTICE: Before turning the pump on, attach a drain
hose and place the end in a suitable drain. Operating the
pump without a drain hose in place may cause injury.
NOTICE: Avoid contact with water draining from the
pump outlet. Water is pressurized and may exit the unit
with force. Water may contain chemicals or
contaminants that can be a health hazard upon contact.
4) Turn on vacuum blower(s) to LOW, MED or HIGH.
The machine can operate with either one or both
blowers running. For maximum vacuum performance,
turn on both Blower 1 and Blower 2.
For use as truckmount extraction booster, see
“Booster Mode” below.
NOTICE: Keep truckmount outlet capped when not
in use.
EXTRACTION OPERATION TIP
• Place the HVE3000 as close as possible to the end of
the hose run nearest the wand or other extraction tool.
This position will maximize the vacuum provided by
the unit.
TRUCKMOUNT BOOSTER SETUP
Use in conjunction with a truckmount extractor to provide
additional extraction power. The HVE3000 has been
tested to boost vacuum on hose runs as long as 300
ft. (90 m). To maximize performance, we recommend
using the shortest runs as possible.
NOTICE: Do not attempt to operate the unit with a
truckmount producing vacuum pressures greater than 12
in. water (40.6 kPa). Doing so could damage the unit
and will void the warranty.
NOTICE: Do not operate with water temperatures
exceeding 140° F (60° C). Doing so could damage the
unit and will void the warranty.
1) Connect vacuum hose to vacuum inlet.
2) Connect one or two power cords depending on
job requirements. The second cord must be connected
to a separate 15 amp circuit. A green light indicates the
unit has been correctly connected to separate circuits.

07-01782B Dri-Eaz Products, Inc.
Warranty 07-01804 5 Sapphire Scientific
WARNING: The power cords of the HVE3000 should be
plugged into separate GFCI-protected 115 volt outlets
rated for at least 15 amps. Always plug the cord firmly
into the base of the unit first and secure the cord into the
cord clip.
NOTICE: Connect to two separate 15A circuits ONLY. A
bright green light indicates correct connections. No light
will show when using only one cord.
3) Connect pumpout hose to pump outlet and turn
pump switch ON. For maximum pumpout performance,
we recommend using the unit with a 1½ in outlet hose.
See “Maximizing pumpout performance” below.
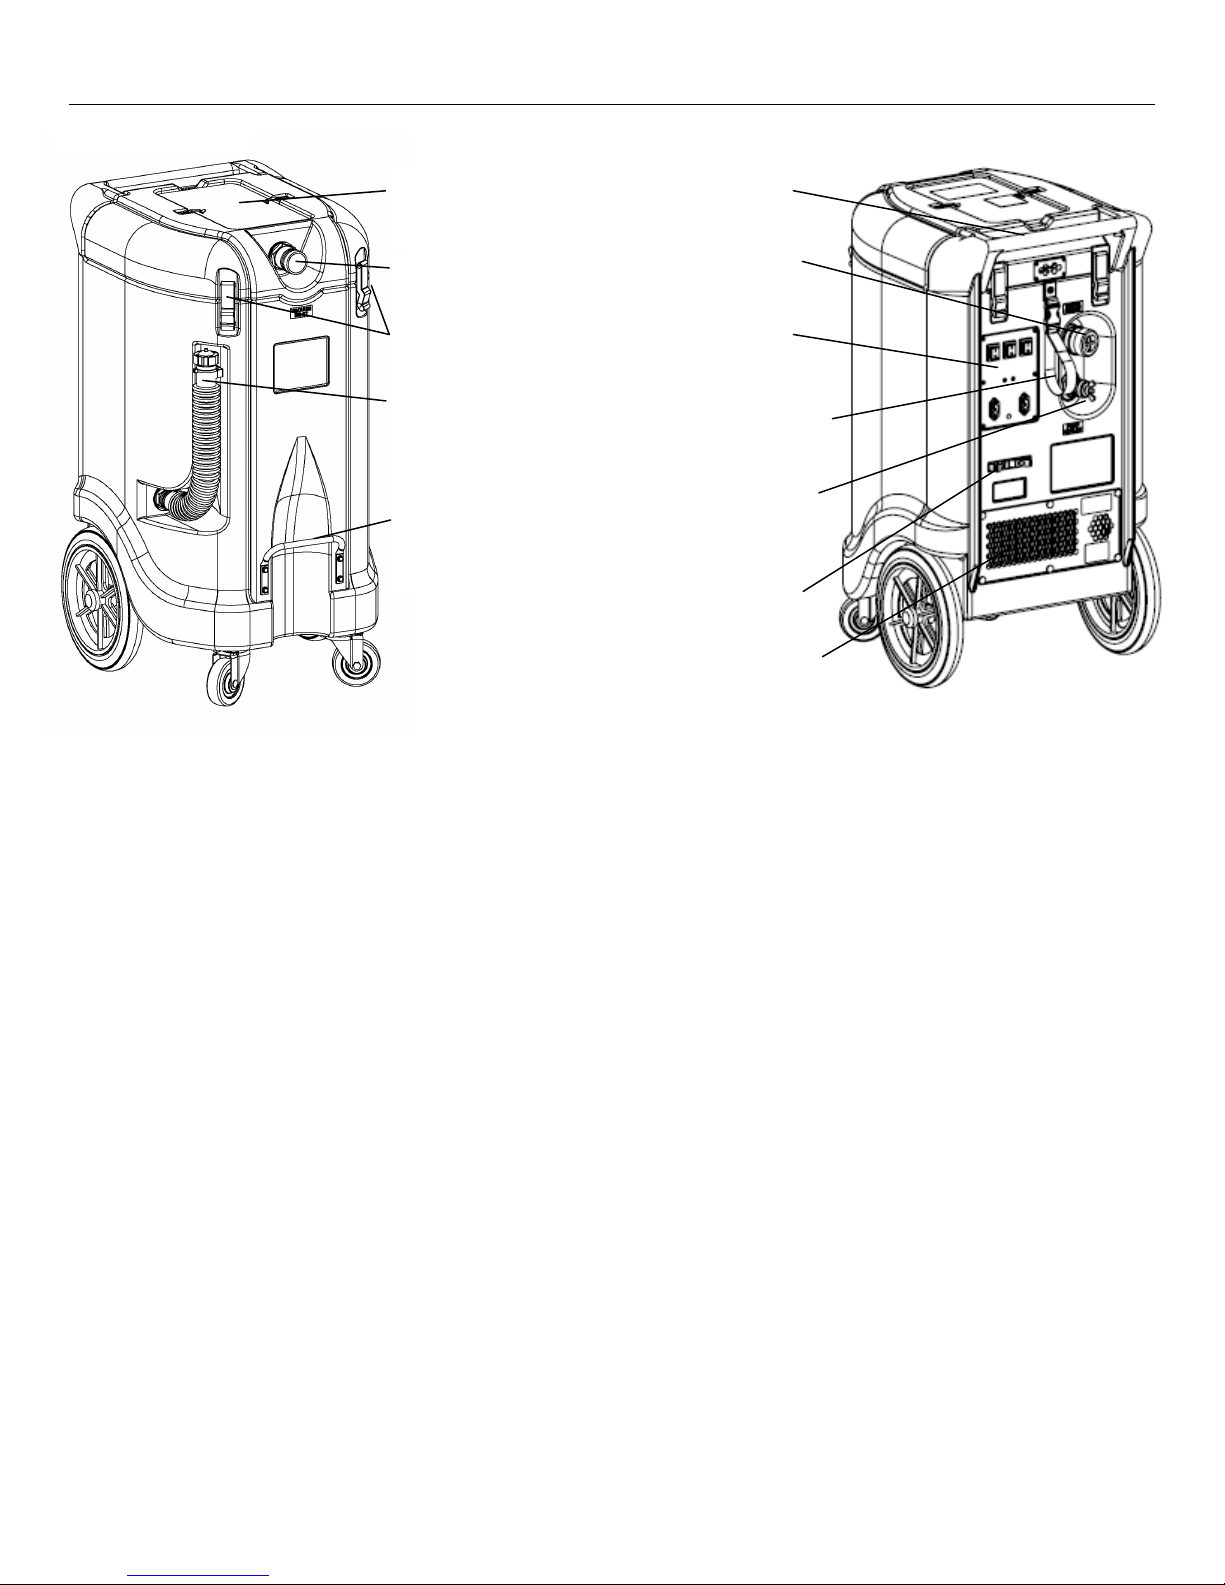
4) Attach vacuum hose to truckmount via vacuum
outlet.
5) Turn on vacuum blower(s) to LOW, MED or HIGH.
The machine can operate with either one or both
blowers running. For maximum vacuum pressure, turn
on both Blower 1 and Blower 2.
TRUCKMOUNT BOOSTER OPERATION TIP
• Place the HVE3000 as close as possible to the end of
the hose run nearest the wand or other extraction tool.
This position will maximize the vacuum boost provided
by the unit.
Maximizing pumpout performance
The sump pump outlet of HVE3000 is equipped with a
1½ in. barbed hose fitting for use with a 1½ in. drain
hose (hose purchased separately). Because the internal
pumpout system is plumbed with 1½ in. lines, use of a
large-diameter drain hose will help to ensure maximum
pumpout performance.
The HVE3000 may also be used with a standard garden
hose. Simply replace the 1½ in. fitting with the ¾ in.
reducer fitting supplied with your unit and attach the
garden hose.
NOTICE: Before turning the pump on, attach a drain
hose and place the end in a suitable drain. Operating the
pump without a drain hose in place may cause injury.
NOTICE: Avoid contact with water draining from the
pump outlet. Water is pressurized and may exit the unit
with force. Water may contain chemicals or
contaminants that can be a health hazard upon contact.
Airflow shut-off
The HVE3000 will automatically shut off airflow to the
blowers when the recovery tank is full. This prevents
water and debris from entering the motors. When the
recovery tank becomes excessively dirty, or if there is
too much foam in the tank, the float may not function
properly. When the blowers emit a high-pitched whine, it
is likely means that the ball float has engaged and that
the tank is full and needs to be emptied, or that
excessive foam is present. When this occurs, check the
tank and empty it if necessary, and use a defoamer any
time foam is present.
MAINTENANCE
WARNING! ELECTRIC SHOCK HAZARD. Unplug the
unit before performing any maintenance.
Before each use
Inspect the electrical cord for damage. Look for
fraying, cuts, etc. Do not use the unit if you find any
damage. Call 800-932-3030 to locate the nearest service
center.
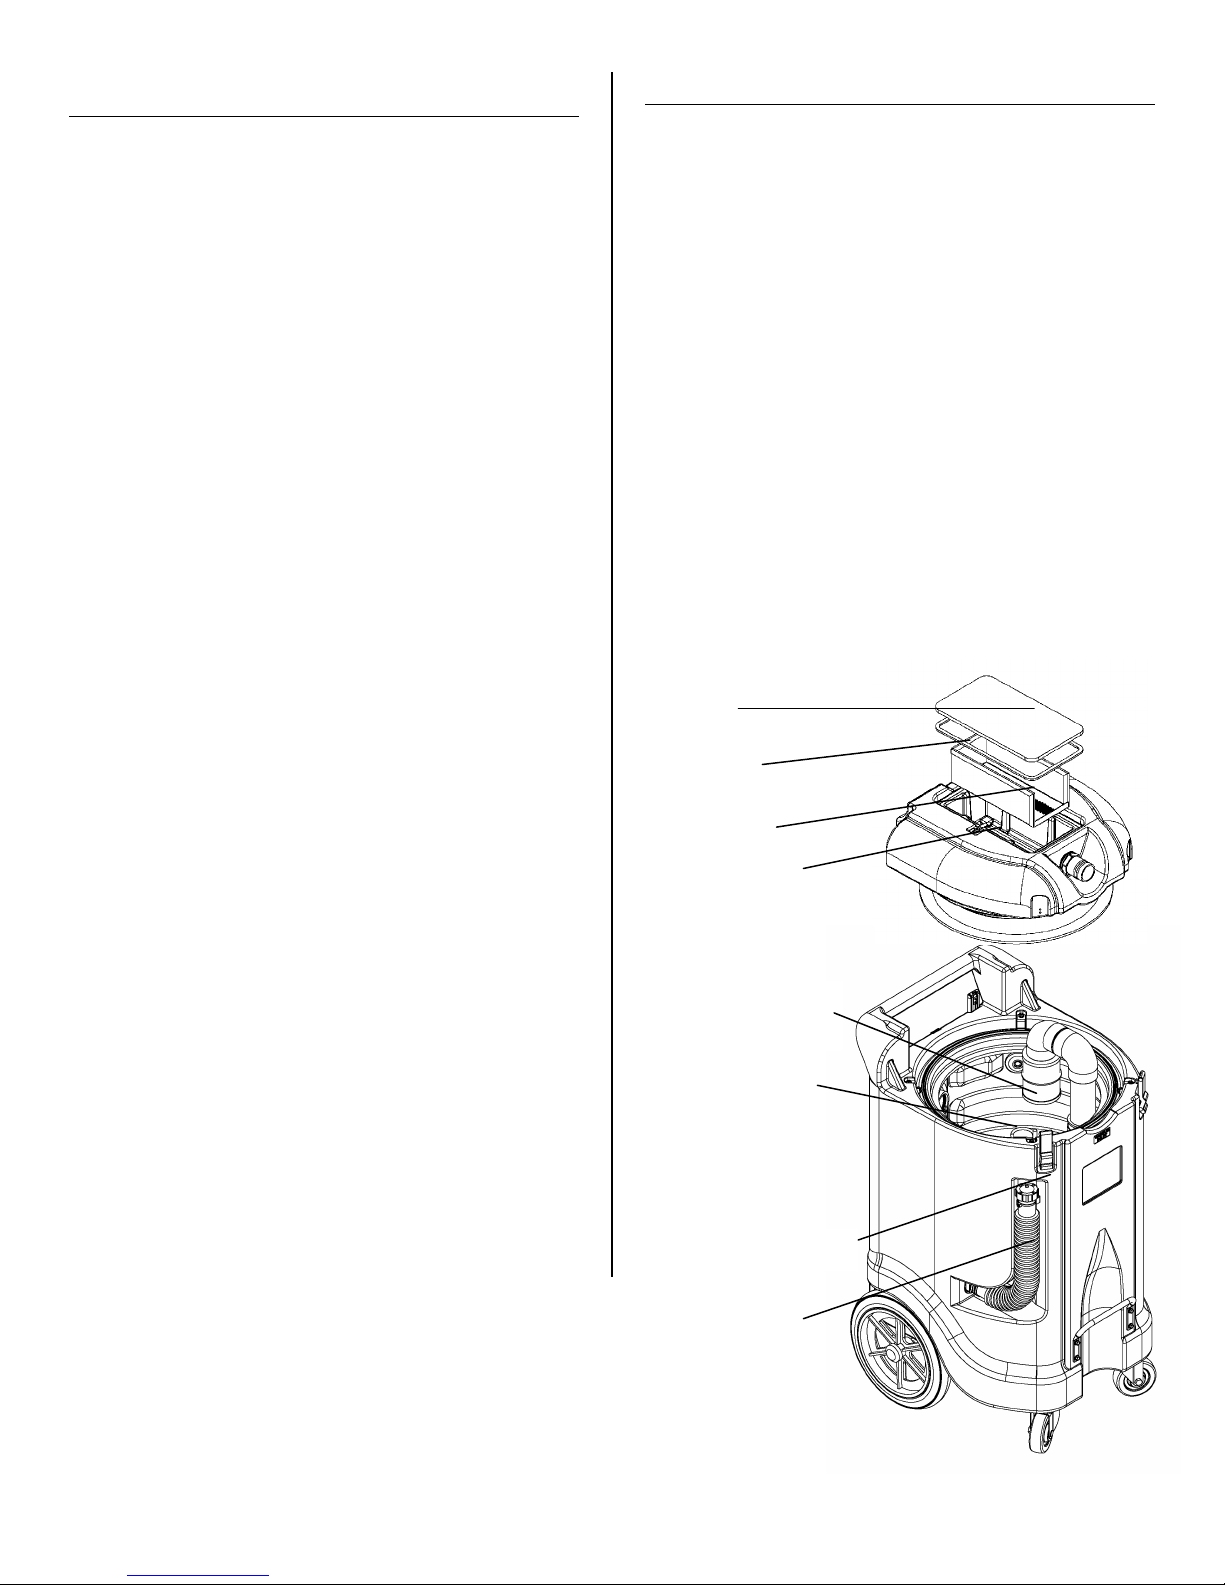
Check the filter basket and HEPA filter (Fig. D).
Performance is greatly reduced when either filter is
clogged.
Check the sump pump float valve (Fig. D). Remove
any clogs or obstructions to the float mechanism.
Check the manual drain hose for clogs or kinks.
Check all hose fittings. Look for cracks, debris, and
damaged threads or seals.
Check ball float valve. Ensure cover screen is clean.
After each use
Clean filter basket and top cover. Release cover
clamps, remove the cover, and lift out basket. Rinse
basket, basket basin, and cover with water to clean.
(Clean also as needed during use.)
Clean recovery tank, float valve, and airflow shutoff
valve.
1. Release four cover assembly latches and lift off cover
assembly (see Fig. D). With gravity drain hose directed
into a suitable drain, remove any accumulated debris
and wash recovery tank interior with an all-purpose
detergent. Rinse interior with fresh water. Allow the unit
to drain completely through the gravity drain hose.
2. Slide airflow shutoff ball valve assembly downward off
of the vacuum standpipe (Fig. D; see also “Remove float
ball assembly,” p. 7). Rinse valve assembly clean. Make
sure the float ball moves freely inside the cage and is
free of any debris. Replace ball valve assembly.
3. Wipe off pump, float, float arm assembly and tank
interior with a damp cloth. Allow tank interior and cover
assembly to dry completely before replacing the cover
assembly.
To maintain appearance, wipe interior and exterior
surfaces with a damp cloth. For deep cleaning and to
add a protective shine to the exterior, use Dri-Eaz
MicroGuard Cleaner and MicroGuard Protectant or a
similar automotive interior treatment.

07-01782B Dri-Eaz Products, Inc.
Warranty 07-01804 6 Sapphire Scientific
Monthly
Use an all-purpose silicone spray to lubricate wheels,
castors and latches. Take care to wipe up any excess
spray, as it may create slippery surfaces.
As needed
Replace HEPA filter. Replace when the filter is visibly
dirty. To access the filter, remove the filter cover plate
thumbscrews and lift off the plate. Replacement filters
are sold in packs of four. Ask for Dri-Eaz part no. F503
or Sapphire part no. 20-054.
Special Maintenance Tasks
To ensure proper operation, we recommend the
following maintenance based on hours of use. In
excessively dusty or dirty conditions, it may be
necessary to perform these tasks more frequently.
Blower motor replacement 1000 hrs
Order the motor brush replacement kit, Dri-Eaz and
Sapphire part no. S506. Complete instructions are
provided with the kit.
Pump Inspection and service 1000 Hrs
Tools required
• 3/8 in. nut driver or socket with a 6 in. extension and a ratchet.
• 3/32 in. socket
• 15/16 in. open end wrench
• Short handled screwdriver
Remove the cover assembly and inspect the recovery tank
for any remaining water. If necessary, wipe out the tank
with a towel.
Loosen hose clamp on float valve assembly and slip off
assembly.
Loosen cord clamp on inside wall of tank with the 15/16 in.
wrench, and pull in approximately two feet of cord or until
the cord shows resistance.

07-01782B Dri-Eaz Products, Inc.
Warranty 07-01804 7 Sapphire Scientific
Remove float ball assembly.
Note: It is not necessary to remove the float ball assembly
to access the pump. However, we recommend removing
the assembly and cleaning it every time you inspect and
clean the pump.
To remove the float ball assembly, loosen lower the hose
clamp on the float ball assembly and remove assembly.
If you are servicing the float ball assembly, use a Philips
screwdriver to remove the float ball housing retaining
screw and remove the float ball housing. Rinse all
components clean and ensure float ball moves freely
inside housing. Reinstall float ball housing.
Loosen upper pump outlet hose clamp and pull the hose
off the outlet.

07-01782B Dri-Eaz Products, Inc.
Warranty 07-01804 8 Sapphire Scientific
Using the 3/8 in. socket, Remove bolts on both ends of the
cross-brace. Lift off brace.
Inspect float assembly. Check float and float shaft and float
switch arm for smooth operation. Clean as necessary.
Fold up the pump handle and lift out the pump for
inspection. Rest the pump on a table or other stable
surface placed next to the unit. There is no need to
disconnect the wire harness.

07-01782B Dri-Eaz Products, Inc.
Warranty 07-01804 9 Sapphire Scientific
Using a Philips screwdriver, remove the pump intake cover
retention screw and the plate from the bottom of the pump.
Clean off any debris from intake area. Replace plate when
finished.
Wipe out tank with a clean rag.
Reassembly
Lower pump back into bottom of tank and fold handle down. Ensure that the pump feet are firmly seated.
Replace pump rentention bracket.
Push excess power cord back through cord grip and retighten grip. The cord should be slack, but should not dangle down
and interfere with the operation of the float or the float arm assembly.
Reinstall the float ball assembly.
Replace the cover assembly.
The unit is now ready to use.
SPECIFICATIONS

07-01782B Dri-Eaz Products, Inc.
Warranty 07-01804 10 Sapphire Scientific
Model HVE3000 High Volume Extractor
Weight 132 lbs. | 60 kg
Dimensions
(H × W × D)
40.2 × 22.5 × 24.8 in.
102.1 × 57.2 × 63.0 cm
Power (115V)
12A (Blower 1 + Pumpout);
13.5A (+ Blower 2)
Tank capacity 12 gal. | 45 l
Maximum performance ratings:
Blower 1 (low blower) 8 in. Hg (108 in. H2O)
Blower 2 (high blower) 10 in. Hg (136 in. H2O)
Both blowers 12 in. Hg (164 in. H2O)
Pumpout discharge
rate (1½ in. outlet)
50 gpm
Pumpout discharge
rate (¾ in. outlet)
12 gpm
Safety approvals
Specifications are subject to change without notice. Some values
may be approximate.
Warranty information is available at www.dri-eaz.com or
www.sapphirescientific.com.
Be sure to visit warranty.drieaz.com or
warranty.sapphirescientific.com and register your
purchase to ensure you receive any important product
releases.
.

07-01782B Dri-Eaz Products, Inc.
Warranty 07-01804 11 Sapphire Scientific
PURCHASE / COMPRA / ACHAT
Purchase date / Fecha de compra / Date d’achat : ________________________________________________________
Serial number / Número de serie / Numéro de série : ______________________________________________________
Distributor / Distribuidor / Distributeur : ____________________________ Tel. / Tel. / Tél. : ________________________
MAINTENANCE / MANTENIMIENTO / MAINTENANCE
DATE
FECHA
DATE
SERVICE PERFORMED
SERVICIO PROPORCIONADO
MAINTENANCE EFFECTUÉE
PERFORMED BY
PROPORCIONADO POR
EFFECTUÉE PAR
Other manuals for HVE3000
1
Table of contents
Popular Media Converter manuals by other brands

YASKAWA
YASKAWA CIMR-MX1S instructions

Renkforce
Renkforce 2290937 operating instructions

evertz
evertz 8010TM instruction manual

l-com
l-com LCMC Series quick start guide

Rohde & Schwarz
Rohde & Schwarz SGU100A user manual

Omnitron Systems Technology
Omnitron Systems Technology OmniConverter GHPoE/S user manual