DriveSmart Pro HD User manual

Introduction:
Thank you for purchasing the DriveSmart Pro HD dash camera and GPS speed camera
detector.
We hope it gives you a safer and well-informed driving experience. Whilst protecting you from
crash-for-cash fraudsters and other drivers silly maneuvers the DriveSmart Pro HD will also
alert of pending speed camera locations, red light cameras and mobile speed camera zones to
allow you to drive smart and safely within the speed limits. With the constant threat of Mobile
laser as well as fixed camera locations the DriveSmart Pro HD is a perfect choice. Powered by
the Laser Elite GPS database. The most comprehensive in the UK.
Laser Elite has the most up-to-date and sophisticated database of Mobile Laser / Safety Van /
Fixed camera locations available with over 10 years of developing laser detection, diffusing and
jamming devices. As one of the biggest threats to driving in the UK is mobile laser, Laser Elite
was the perfect choice for the database supplier, with the big advantage that database updates
are free for life.
What’s Included in the Box:
Additionally, a DriveSmart hardwire cable is available to purchase separately, as are spares of
the above parts if required.

Functions of the DriveSmart Pro HD Buttons
Quick Installation
To quickly get up-and-running with this product, please operate it as follows:
Plug the power lead into the cigarette lighter socket of the car, and insert the other end into the mini USB
socket on the unit. Press the button on the power lead so it lights up red and is on.
To record, insert a TF/SD memory card (not supplied) with the underside metal connectors facing into the car.
This should be a Class 10 card. Min 8GB, Max 32GB. If you just want to use the unit for speed camera alerts
this is not needed.
After powering up, the DriveSmart Pro HD will start up with a welcome message and will start searching for a
satellite connection. If you have a TF/SD card inserted the unit will start recording automatically and the LED
on the top left will start flashing to confirm this. After successfully connecting the satellite, the screen will show
the car’s driving speed and the unit will announce ‘GPS Lock’.
Take the suction cup mount and place it in a suitable location not to obstruct the drivers view. Push the lever
down to create the suction, now slide the camera into the underneath fitting. The bezel can be twisted to lock
the ball-and-socket fixing into place for your desired angle.
Lens
Menu
Up Button
Down Button
LCD Screen
OK Button Camera Mode
Power (Press & Hold)
Lens
AV
-
OUT
HDMI Port
USB Power
TF/SD Card
Reset
Microphone

Warning
It may take one to five minutes for the unit to get satellite lock for the first time, with regular use this should
speed-up, but it may take a little longer if you start driving. The screen will show Zero speed until a full satellite
signal is received – but the dash camera side will still record if a memory card is inserted.
For your safety and to comply with motoring laws in most countries, please do not operate this product while
driving. You should adjust the product to your satisfaction before you start driving.
If you want the display to show what it is recording instead of the current speed, select the menu button top
right, press OK to select ‘Speed Display’ and then use the arrow up/down buttons to select ‘Off’ and then
press OK to confirm.

Keys & Functions
Menus
There are 6 Menus, keep pressing the Menu key to tab through then. They are as follows:
1. Speed Camera Settings
2. Movie Mode
3. Still Capture
4. Playback
5. Media Tool
6. General Settings
Name Icon Function Introduction
Power Button
Press and hold the power button to turn on/off the unit. Quick press it to exit from
the menu or stop recording.
Page Down
Button
In recording mode: Quick press to reduce volume, press and hold to set to select
KPH speedo
In pictures mode quick press to shrink the focal length, in playback mode press to
decrease speed of playback video.
Page Up
Button
In recording mode: Quick press to increase volume, press and hold to select MPH
In picture mode: Quick press to extend the focal length, in playback mode press
to
increase speed of playback video.
OK Button
Quick press to start or stop recording. Press and hold OK button to turn off or turn
on the screen.
Menu Button
Quick press to enter menu settings,
Press and hold to see GPS satellite signal
reception.
Recording /
Camera /
Playback Mode
Press to switch between Photo mode / Playback of video / Playback for
picture mode settings.

Menu 1 - Speed Camera Settings
Name Description Submenu
Dark Mode Screen is off rather than showing your speed and
only comes on when you get a GPS or Laser speed
camera alert.
On / Off
Speed Camera
Detection
Allows you to turn the speed camera alerts on/off On / Off
Traffic Light Camera
Detection
Turns on/off alerts for red light cameras On / Off
SPECS Camera Turns alerts for SPECS average speed cameras
on/off
On / Off
Mobile Camera Area Turns alerts on for mobile camera zone hot spots
where mobile vans and hand-held laser guns have
been reported operating in the past
On / Off
Warning Distance Changes distance range of GPS points alert 200 / 400 / 600 / 800 yards / meters
Warning Distance
Increase
This increases the alert range when you are over
60 MPH, we would suggest having this on if you do
a lot of motorway driving
On / Off
Cruise Overspeed
Warning
Allows you to get an audible alert when travelling
over the set speed limit. You can set this between
20 and 90 MPH/KPH to warn you if your speed
drifts above your defined limit
On / Off
Current Speed Fine
Adjustment
Allow you to adjust your real time GPS to correctly
match your speedometer. Your cars speedometer
will read higher than your actual speed and at a
contact speed the GPS will be showing your correct
speed but if you want to adjust this to match your
cars speedo you can do this here
From -5 to +5 mph/kph
Continuous Alarm
For Overspeed
Warning
Sounds when driving over the speed limit inside an
alert area
On / Off
Laser Detector Allows you to turn on/off laser band detection (laser
band is the most commonly used in the UK).
On / Off
GPS Time
Adjustment
Allows you to adjust + or - GMT on the on-screen
display time to allow for British Summer Time and
use around the world
+/- 1-12 hours

Menu 2 - Movie Mode
Name Description Submenu
Movie Mode Select the recording resolution 1920*1080 30fps / 1280*720 30fps
/ 640*480 30fps
Movie Quality Choose REC Quality Super Fine / Fine
Movie Clip Time Film cutting time OFF / 1min / 3min / 5min / 10min
Movie Off Time Recording time for after without the power 0min / 5sec / 15sec / 30sec / 1min
Motion Detection Motion sensitivity Off / Low / Middle / High
Motion Event RCE Choose the recording time when turn off and
detecting moving event
Off / 5sec / 10sec / 30sec / 1min
Sound Record If turn off, will be mute in the recording On / Off
MIC Sensitivity Adjust the microphone’s volume Standard /low
Scene Choose different scene modes to recording Auto / sports / portrait / landscape /
Twilight / snow / beach / fireworks
Exposure Adjust brightness From -2 to +2
White Balance Adjust the color balance
Auto / daylight / cloudy / fluoresc./
fluoresc.1 / fluoresc.2/ incandesc.
ISO Sensitivity Choose the sensitivity of light Auto / ISO100 / ISO200 / ISO400
Colour Colour option Auto / Natural / Vivid
Menu 3 - Still Capture
Name Introduction Submenu
Still image size Choose the picture’s resolution 14M / 12M / 8M / 5M / 3M / 2M / 1.2M /
VGA
Still quality Choose the picture’s quality Super fine / fine
Scene Choose different scene mode to record Auto / sports / portrait / landscape /
Twilight / snow / beach / fireworks
Exposure Adjust brightness From -2 to +2
White balance Adjust the color balance Auto / daylight / cloudy / fluonesc./
fluonesc.1 / fluonesc.2 / incandesc.
ISO sensibility Choose the sensitivity of light Auto / ISO100 / ISO200 / ISO400
Colour Colour option Auto / Natural / Vivid
Effect The approach to choose the image effect Normal / Sepia / B&W / Emboss /
Negative / Sketch / Oil / Crayon

Menu 4 - Playback
Menu 5 - Media Tool
Name Description Submenu
Format the SD Card All the data will be deleted Yes / No
SD Card Info Surplus time of record, surplus pictures
Menu 6 - General Settings
Name Description Submenu
Clock setting Time setting
Date format Select the date format
Stamp Change screen overlays Date + Logo / date / Logo / off
Languages Choose the display language
English / Simplified Chinese
TV system Choose TV SYS NTSC / PAL
Flicker Flicker speed 50 Hz / 60 Hz
LCD Rotate Video rotation option On / Off
LCD Power Save Automatically screen off Off / 30sec / 1min / 3min
Protect Level G shock sensor, movement sensitivity level Off / low / middle / high
Motion Detection Select the motion detection sensitivity Off / low / middle / high
Reset Setup Yes / No
FW Version Show the software version Version, branch, testing
Name Description Submenu
Volume Select the volume of playback 1~10
Delete Delete the videos or pics Delete one / Delete all
Protect Protect the videos or pics without been
deleted
Protect One / Protect All / Unprotect One
/ Unprotect All.

Updating the Firmware and Database from Your PC
Your DriveSmart Pro HD has been shipped with a current database ready for you to use it out of the box. When
you wish to update this database you will need to follow the current steps
1. Visit www.drivesmartpro.com and select the page for your product.
2. Download the file labelled SD_Update.bin – this maybe in a zip file
3. Save this to an appropriate location on your PC
4. Turn off your DriveSmart Pro HD.
5. Remove your SD/TF memory card from the unit and insert it into your computer.
6. Then copy across the SD_Update.bin file you have just downloaded to the memory card.
7. Now remove it from your PC and reinsert it into the DriveSmart Pro HD.
8. Now turn the unit back on. It will Read the cards new software file and Write it to its memory, then turn off.
9. You can then turn it back on and use it with the latest data correctly installed.
Data Correction
If you think there is an error or missing data in the database, please fill in the form to report this at
www.drivesmartpro.com who can investigate and report back to you on their findings.
PC Playback
Recordings can be played back on the DriveSmart Pro HD screen but if you want to view this on your PC then visit
www.drivesmartpro.com where you can download the DriveSmart viewer software which will give you an overlay
with Google Maps and other metrics.

Product Technical Information
Display Screen Ultra HD 2.7 inch large LCD screen
Memory Card External SD/TF card, maximum support 32GB.
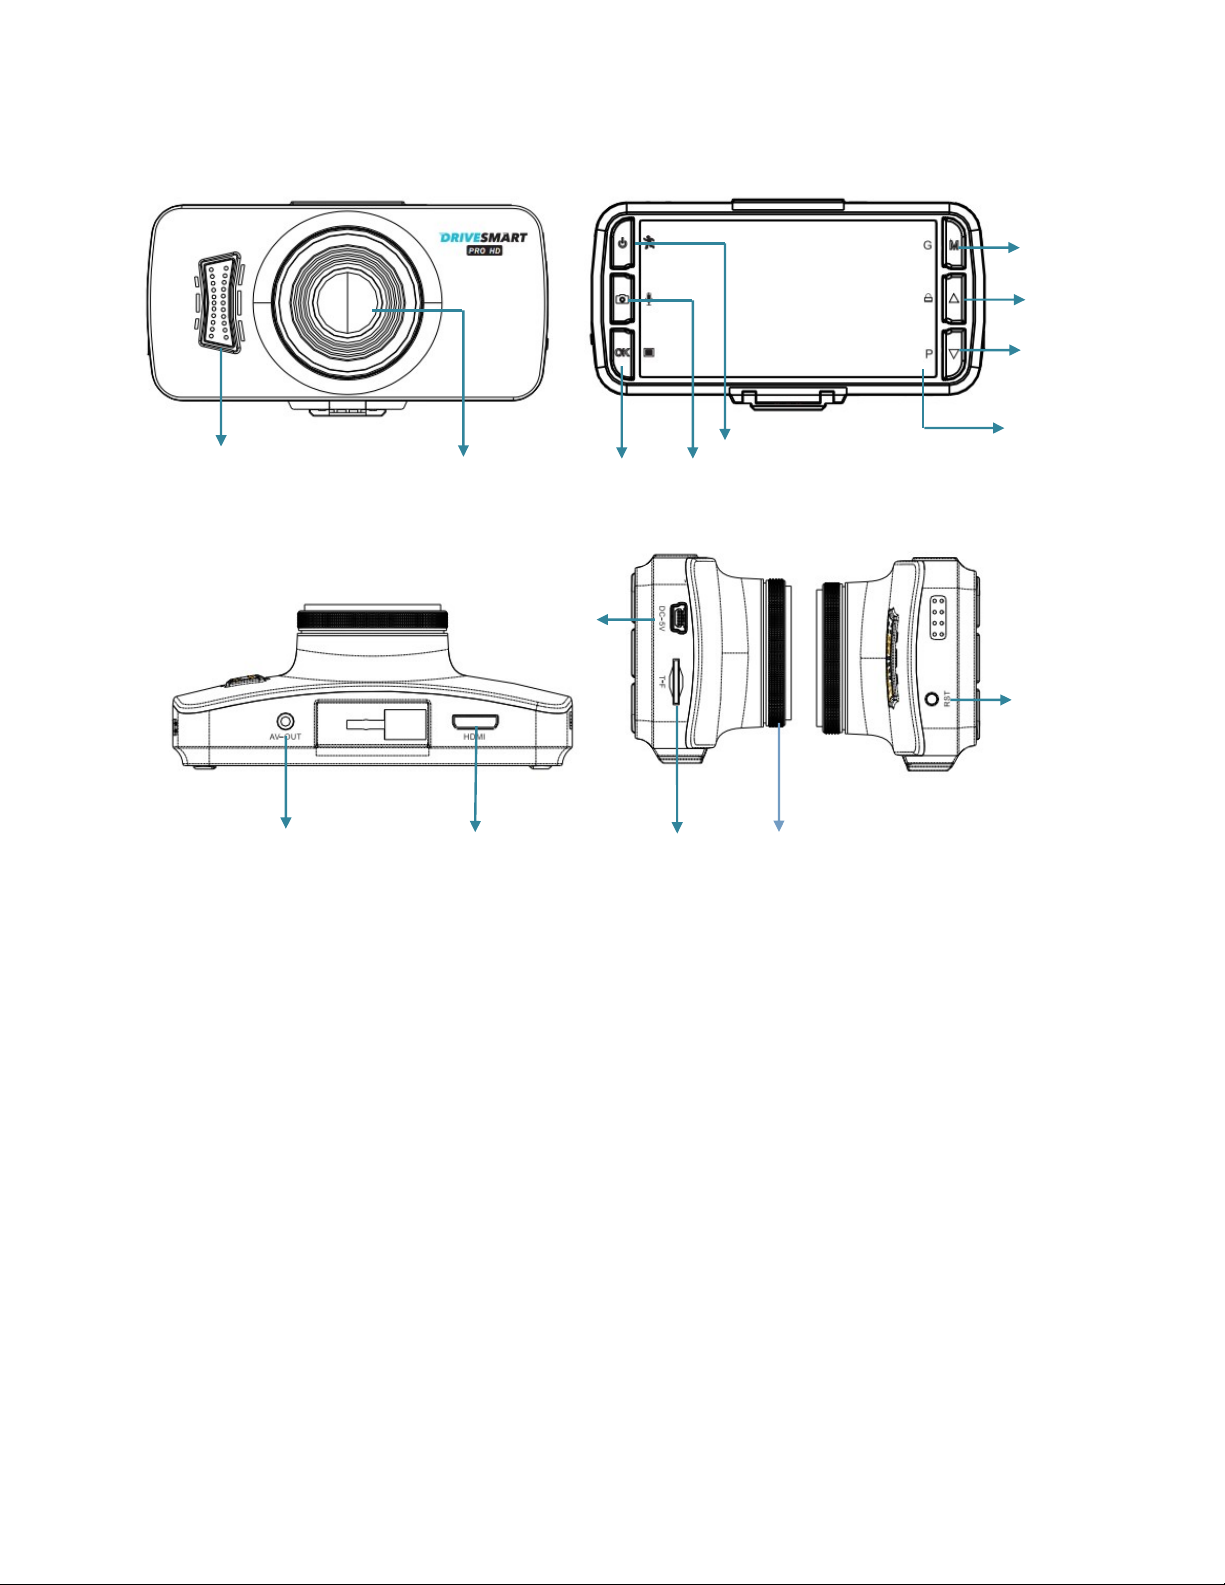
Lens Level 160 - degree wide Angle recording, 5M pixel
G-sensor Support (G-sensor) impact automatically save video to prevent erasure
Cycle Record Support without missing seconds seamless file stored in a row
Motion Detecting Supported
Video Resolutions Full high definition:1920*1080(30fps) High definition: 1920*720(30fps)
High definition: 1920*720(60fps) VGA:640*480(30fps)
Record Format AVI
Video Compression H.264
Playback Support Yes
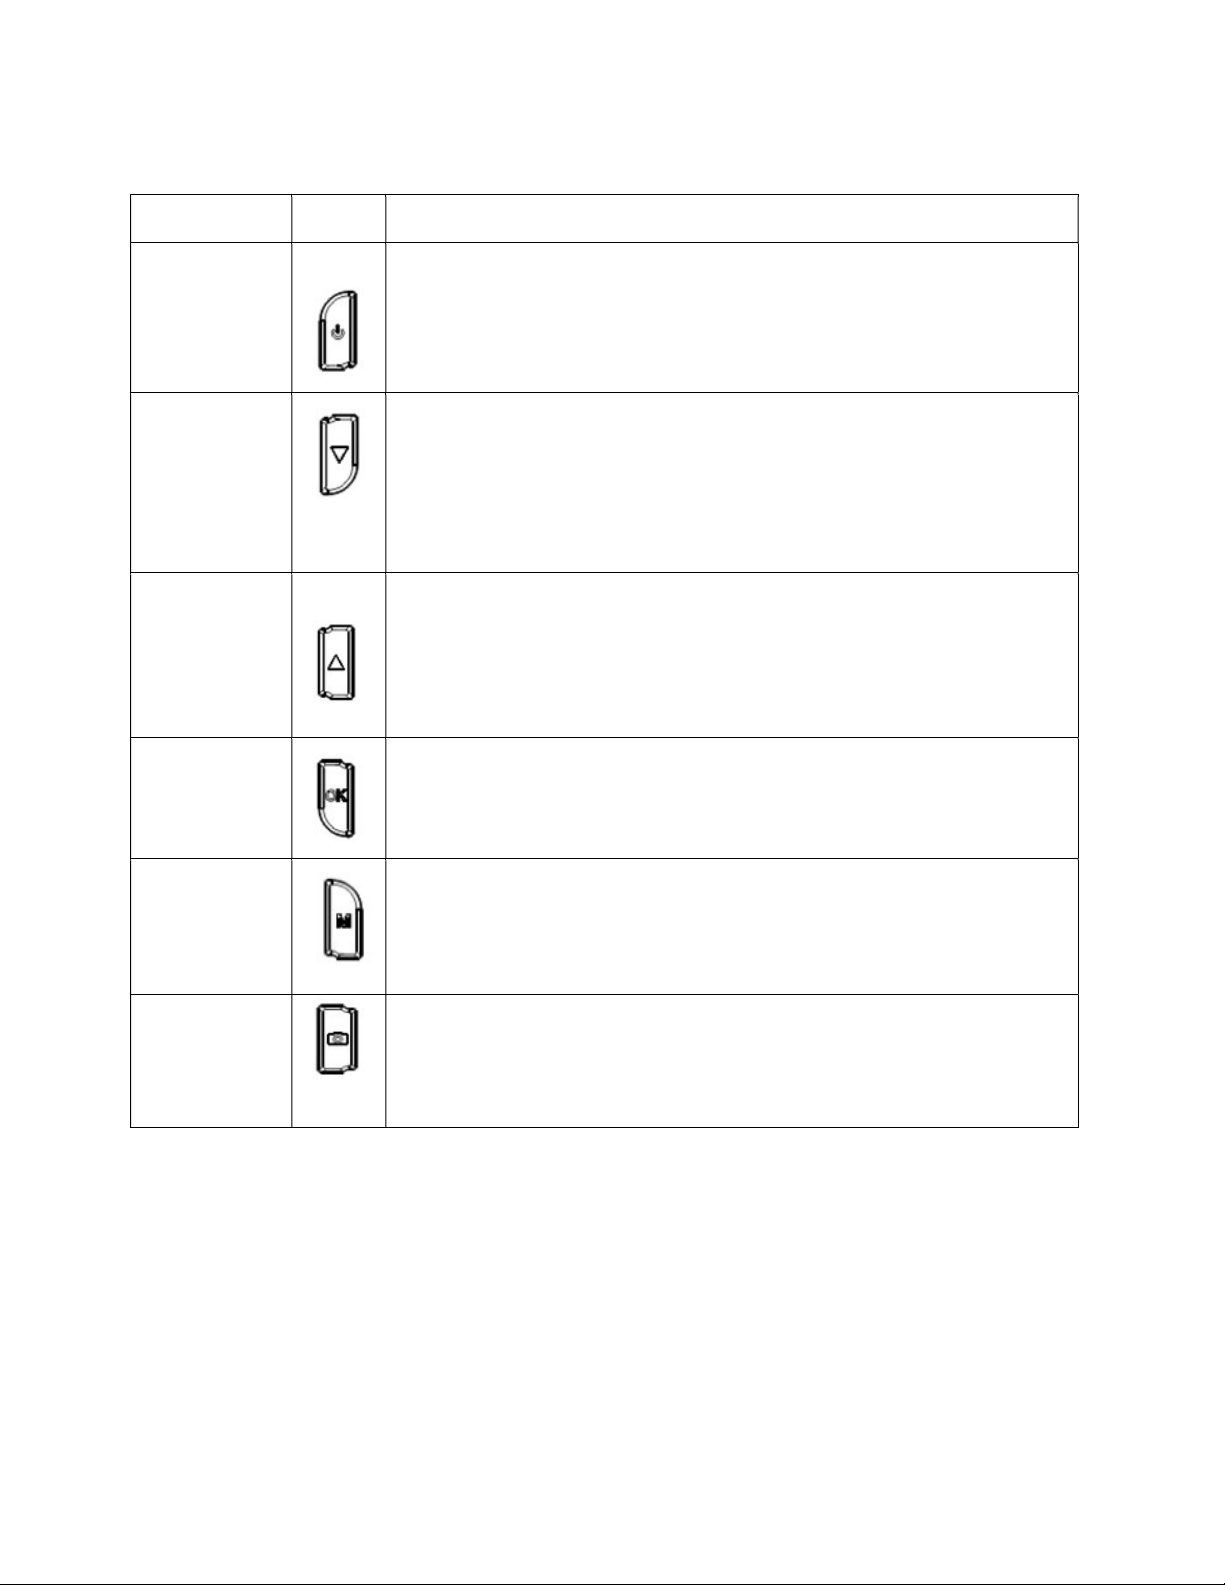
Power Protection When plugged into power the unit will automatically power on and start recording,
if power is lost while recording it will automatically save the video and power off 3
seconds later.
Display Content Road speed, camera alert, video record content.
Photograph Resolution
Ratio
4352×3264(14M) 4000×3000(12M) 3264×2448(8M) 2560×1920(5M)
2048×1536(3M) 1280×960(1.2M) 640×480(VGA)
Photo Format JPG
Video Output TV-OUT
Language English
Battery Lithium polymer soft package battery inside 180mA, just for saving function
Microphone Microphone inside, high-fidelity recording. Option to turn on/off
USB Cable For updating the software and database
Maps Tracking is supported via GPS, the DriveSmart Pro HD DVR will record and keep
the coordinates and the driving speed and time by using the GPS signal. This
information will be displayed when the footage is payed back on the PC with
compatible playback software and it will connect to Google Maps and display the
driving position using these maps.
CPU ARM9 CPU, Basic frequency 234MHz
International storage
FLASH
128M (database) + (voice)
Prestore data capacity 700,000
Positional accuracy Less than ten meters
Reception channel 16
Dynamic GPS--DGPS DGPS
Receiving sensitivity -159dBm
GPS antenna internally installed
USB MINI 5PIN USB, Can update database, software and voice
Loudspeaker 8Ω 1w

Help / Trouble Shooting
GPS Malfunction Exclusion
No Power Check power
Check fuse
Check car charger
Continuous Abnormal Alarm Restart
Check signal in car
Check device is functioning correctly
No Sound Check volume setting
Restart to check again
GPS Lock is Slow or Non-functioning Tall buildings and city driving can cause interference
It can be normal to take upto 5 minutes to get 1st GPS lock when unit is
new.
Drive out of tunnel or enclosed area
Check you do not have an athermic / heat reflective windscreen which
generally has a purple tint.
No Alert of New Data Points Download the newest database
Report the any new points to DriveSmart
GPS system failure Take note of location
Restart the GPS
Report to the place of purchase
Doesn’t Show the Standby Picture Inspect whether the fuse of plug and socket in the indoor space has
been burned out
Inspect whether the cigar lighter has been corroded.
Restart the machine for self-testifying
Potential Reasons for False Alerts:
1.A camera is located on an adjacent road in less than 50 meters.
2.The fixed camera has been removed but your still get alerts. Update database, if alert persists inform
DriveSmart through the website and we will investigate.
3.The distance of two continuous speed measuring stations is less than 100 meters.
4.There is fixed speed camera ahead of a bend or in a road that forks off.
5.The tunnel’s exit have fixed speed camera
6.Overlapping roads like bridges and flyovers (above or below)
The system may cause confusing alerts in the above six conditions, so the users should pay attention to
recognise them. Please contact us if you have queries on any false alerts.
Table of contents