DSE DK-V2-4K User manual

Document: DK-V2-4K 2A2
Page: 1
USER MANUAL DK-V2-4K Dash Cam Car Camera
DSE srl - Digital Surveillance Equipment - www.dse.eu
DK-V2-4K
Black box car camera and video
recorder
Composition of the product
1. Dashcam camera
2. Rear cameras
3. Connection cable for rear view camera
4. USB power cable from car lighter
5. Car panel removal tool
Product description
DK-V2-4K is a car video recorder equipped with an
integrated front camera and a second external rear
camera. It is ideal to be mounted on the windshield with
the bracket included and to monitor everything that
happens around the vehicle.
1 - MONITOR
2 - ADHESIVE BRACKET
3 - UP BUTTON
4 - ENTER BUTTON
5 - DOWN BUTTON
6 - POWER BUTTON
7 - MICROSD CARD SLOT (NOT INCLUDED)
8 - REAR CAMERA MINIJACK CONNECTOR
9 - MICROUSB CONNECTOR FOR POWER SUPPLY
10 - BLUE LED (POWER) RED LED (REGISTRATION)
11 - RESET BUTTON
12 - FRONT CAMERA
Insert the microSD card
The first thing to do, if you want to make recordings, is to
insert the micro SD card in the appropriate slot in the DVR
(7)
It is possible to use micro SD cards with capacities up to
256 GB in CLASS 10 or higher. The SD card is not
included in the package.
As an indication, consider that one hour of continuous
recording of the two cameras takes up about 14GB, so a
256GB SD card can contain over 16 hours of continuous
recording.
Format the microSD card
If you have inserted a new SD card, normally the device is
able to automatically format it and start using it without
the need for any manual formatting. If you wish to format
the memory in order to delete any content you can do so
in the configuration menu as explained below.
Note that formatting the memory regularly, about once a
month, is recommended for proper operation over time.
Installation of the dashcam with cigarette
lighter power supply
The dashcam is supplied with a cigarette lighter power
cable that takes the 12VDC from the lighter and supplies
5VDC to the camera, with MicroUSB connector.
It is the fastest way to install the dashcam.
The camera should be positioned near the rear view
mirror, in order to have a good front view. The best
position is towards the passenger side, as shown, so as
not to obstruct the driver's view.

Document: DK-V2-4K 2A2
Page: 2
USER MANUAL DK-V2-4K Dash Cam Car Camera
DSE srl - Digital Surveillance Equipment - www.dse.eu
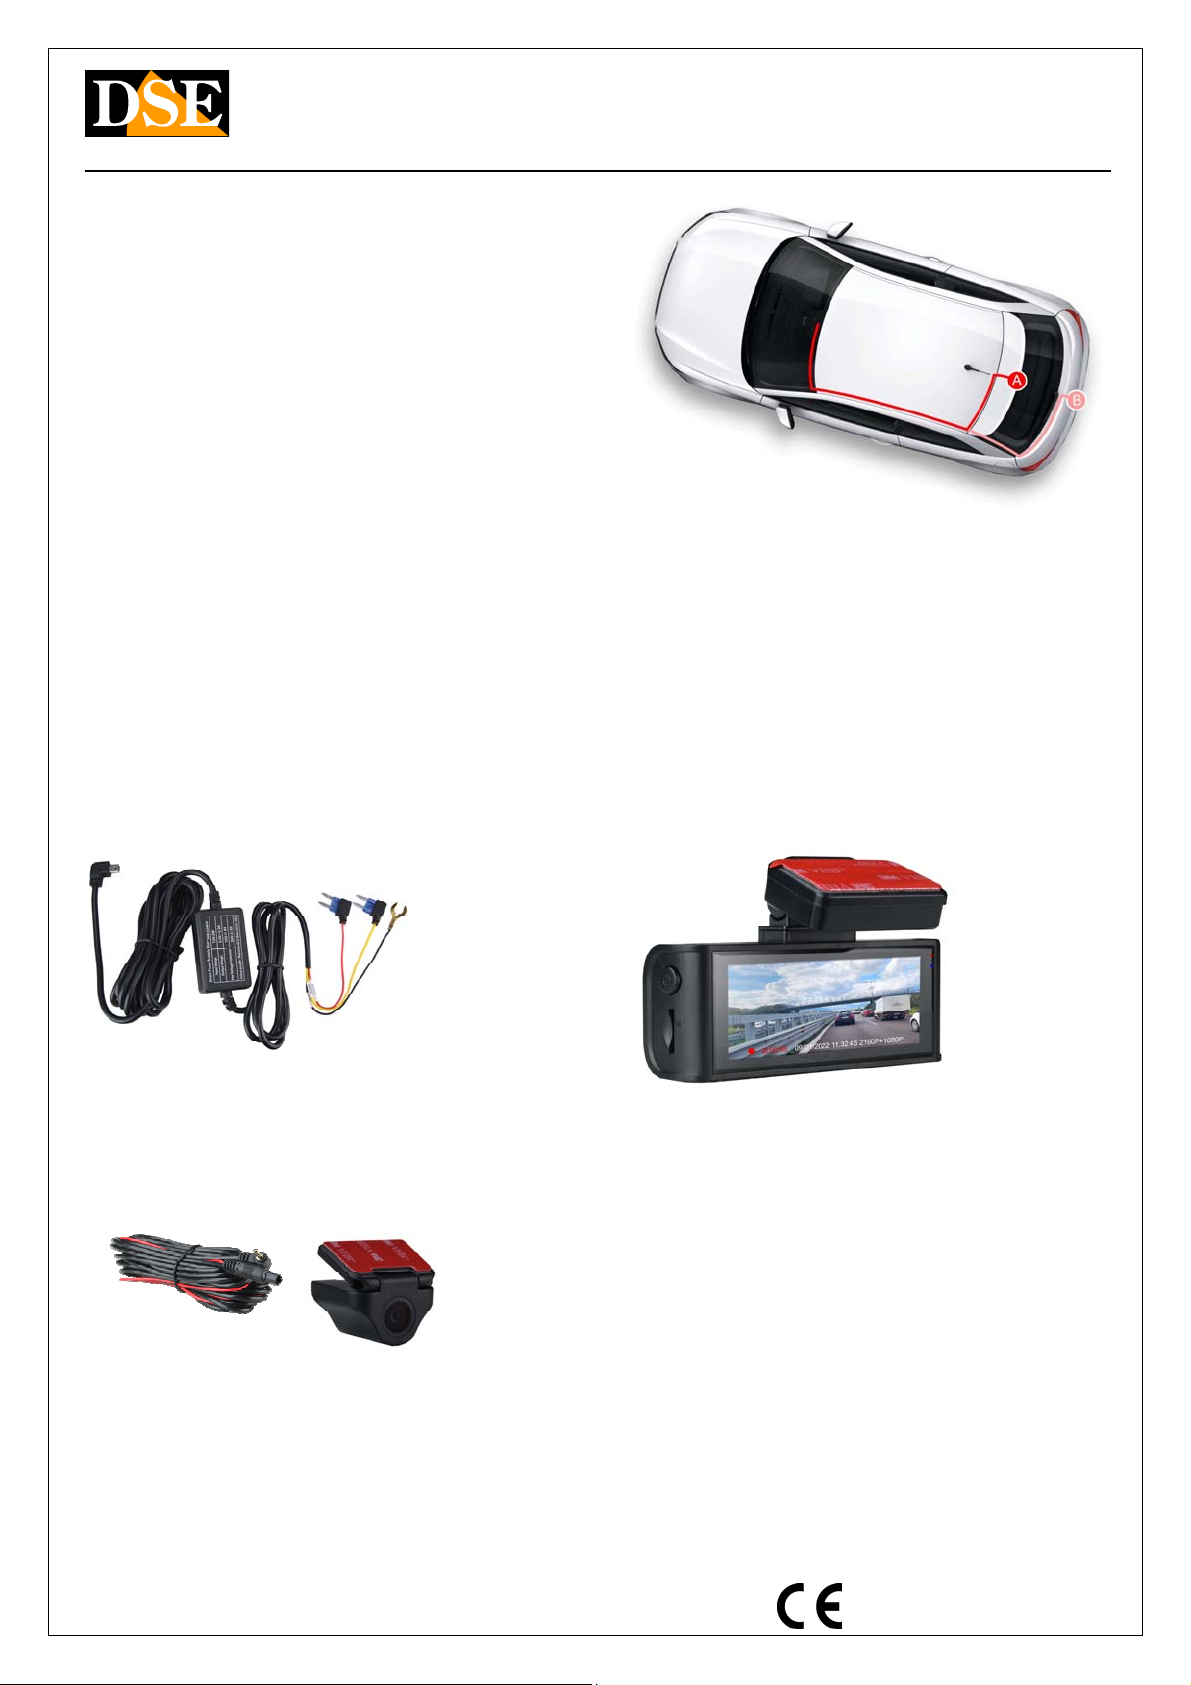
The bracket is equipped with a high-strength adhesive. It
is advisable to clean the glass well and check the framing
before gluing the bracket.
Most vehicles only supply power to the cigarette lighter
with the ignition on. In this case, the camera will turn on
and off automatically together with the vehicle panel.
Some vehicles supply power to the lighter constantly,
even when the vehicle is stationary. In this case you will
have to turn the dashcam on and off manually with the
front ON / OFF button.
The lighter cable supplied with the camera is long enough
so that it can easily be hidden along the edge of the rear
window, passing under the gaskets.
Installation of the dashcam with power supply
from the fuse control unit
If you want to install the dashcam so as not to have
visible cables inside the vehicle, you can separately
purchase our installation kit, in the version with microUSB
connector, suitable for this dashcam,
The kit includes the cables and connectors to connect to
the vehicle's fuse box. It also includes a 12V / 5VDC
transformer with battery saver that is able to disconnect
the dashcam when the vehicle's battery starts to run out,
a very useful function if you use the dashcam with the
vehicle stationary.
NOTE: This model supports the connection of the + BAT
cable (voltage always present) and also of the ACC cable
(voltage only when the ignition is on). If you connect both
cables, the camera will turn on and off automatically with
the vehicle, but you can also activate it at will when the
vehicle is stationary for surveillance while parked.
For the installation of the dashcam kit you can consult the
specific installation kit manual.
Installing the rear view camera
This dashcam is equipped with 2 cameras: one internal for
the front view and one external for the rear view which
must be connected to the AV IN connector (8) with the
cable supplied and positioned on the rear of the vehicle.
You can arrange the rear camera inside the vehicle, so
that it shoots through the rear glass (A), or mount the
camera outside, above the license plate (B), preferably
having it installed by a professional. The camera is
perfectly waterproof and small in size.
The connection cable is included. On the camera side
there is a red cable that you can connect to the positive
that turns on the rear lights to automatically bring the
rear camera to full screen when reverse gear is engaged.
If you don't want this feature you can leave the red cable
unused.
Turn on the camera and record
The camera turns on automatically when it receives power
through the USB port and turns off in seconds if it fails. If
you only supply power to the camera when the vehicle is
running, it will turn on and off together with the vehicle.
If you supply power to the camera continuously, you will
instead have to turn the camera on and off manually by
holding down the power button (6) for a few seconds.
When turned on, the blue LED on the camera lights up to
signal the camera on when the monitor is off.
The camera has an internal battery which is used to allow
the camera to stop safely when the power fails and also
for operation in parking mode. The battery does not have
sufficient capacity to allow normal use without power.
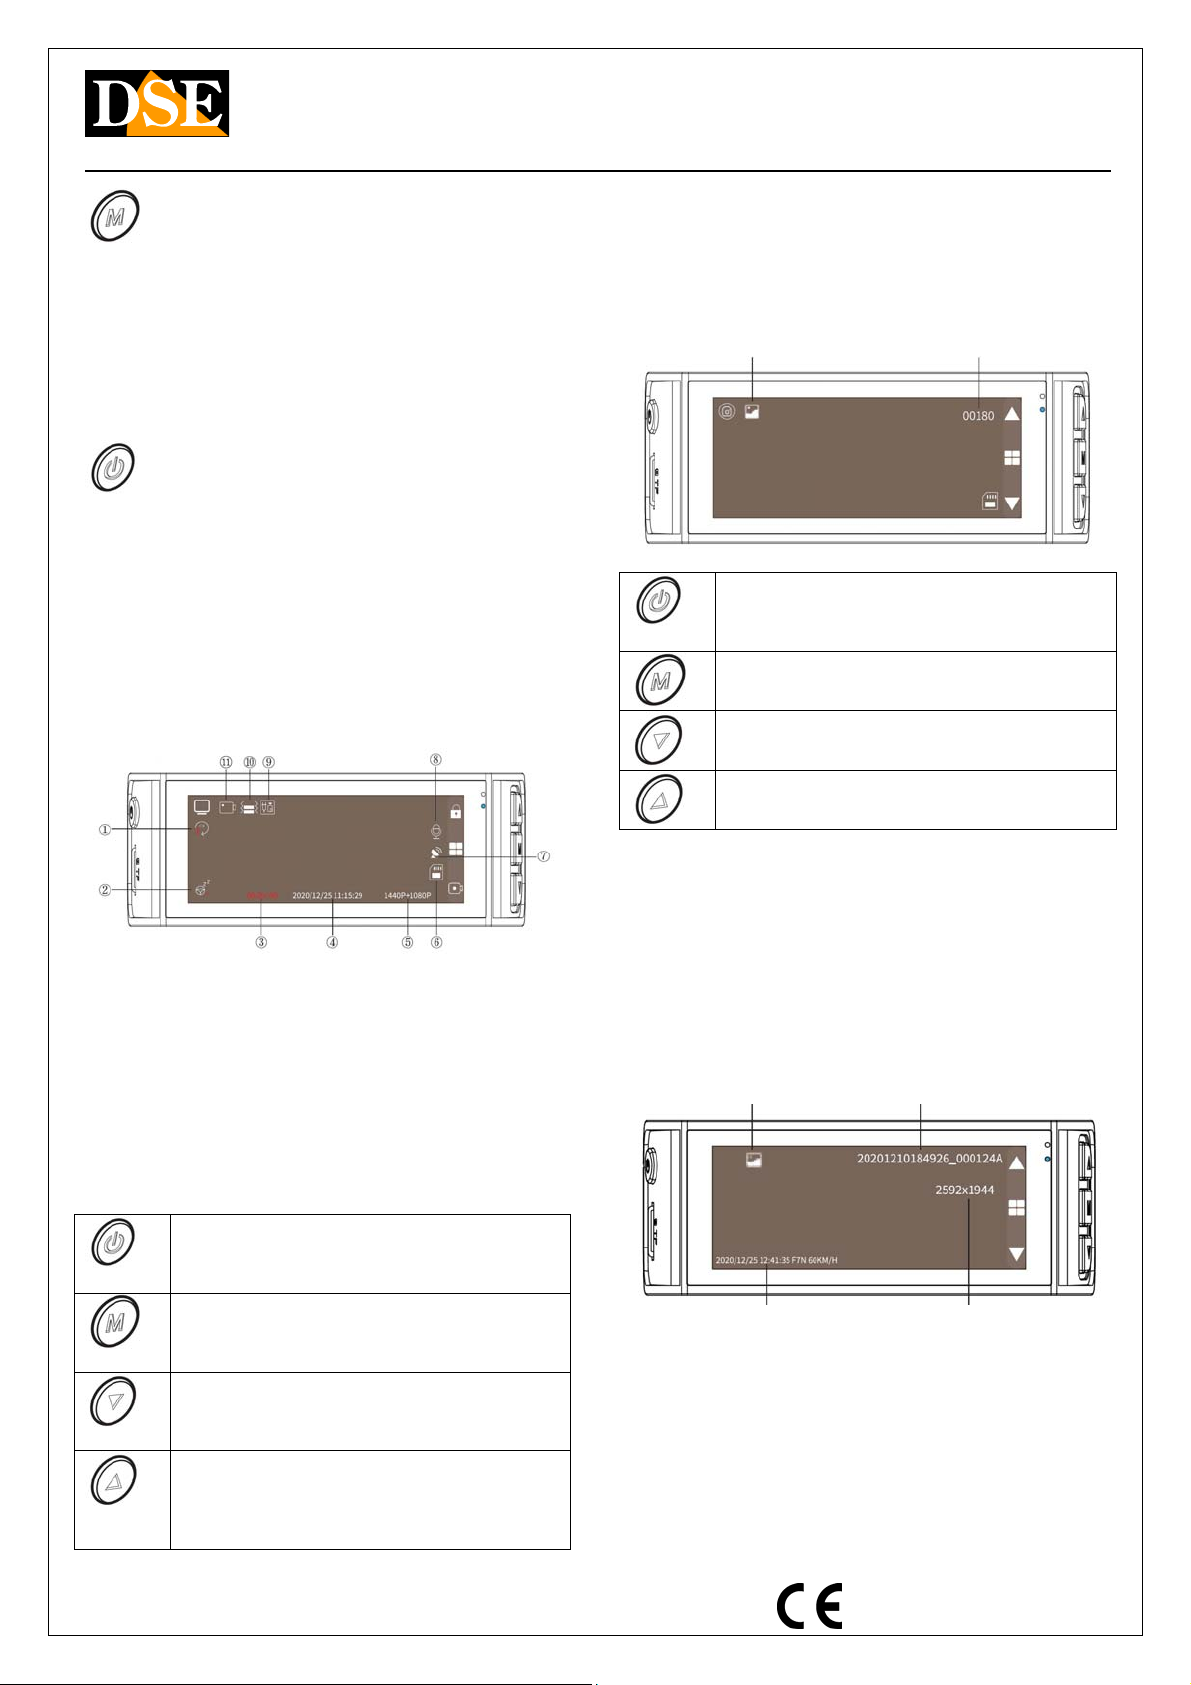
The camera automatically starts recording at startup. To
stop recording, press the DOWN button (5).
Turn off the dashcam and monitor
To turn off the camera completely, press and hold the ON
/ OFF button (6) for a few seconds.
ATTENTION. If the GUARD / PARKING function is active,
the camera restarts automatically when a shock is
detected.
Change the operating mode
The camera has 3 operating modes which are selected
with the M button (4).
REGISTRATION MODE to register
PHOTO MODE to take pictures
PLAYBACK MODE to see the recorded files
The camera automatically starts in RECORD mode. To
change the operating mode, use the M button by holding
it down for 3 seconds as follows:

Document: DK-V2-4K 2A2
Page: 3
USER MANUAL DK-V2-4K Dash Cam Car Camera
DSE srl - Digital Surveillance Equipment - www.dse.eu
REGISTRATION ---- Press M for 3 sec. ---- PHOTO ----
Press M for 3 sec. ---- PLAYBACK ---- Press M for 3 sec. --
-- REGISTRATION
Note that briefly pressing the M key (not for 3 seconds)
accesses the setup menu.
Monitor control
By briefly pressing the power button (6) you can select
this viewing mode in sequence
1 - Front + rear camera in PIP
2 - Front camera only
3 - Rear view camera only
4 - Monitor off
Operation with monitor off is recommended when using
the camera for stationary surveillance to reduce power
consumption.
REGISTRATION mode (auto start)
This is the normal operating mode that the dashcam
automatically activates at startup
1 - OVERWRITE RECORDING (1,3,5 min.)
2 - ACTIVE FATIGUE FUNCTION
3 - DURATION OF DIRECTING IN PROGRESS
4 - DATE AND TIME
5 - VIDEO RESOLUTION
6 - SD CARD STATUS
7 - GPS STATUS (GREEN ICON = CONNECTED)
8 - AUDIO ON / OFF
9 - REAR CAMERA CONNECTION
10 - SENSITIVITY OF THE COLLISION SENSOR
11 - VIDEO / PHOTO MODE
Long press
Turns the dashcam on and off
Short press
Change the on-screen camera
Long press
Change the operating mode
Short press
Change the on-screen camera
Long press
Enable / Disable audio
Short press
Start / Stop recording
Long press
Turns the wifi on and off
Short press
Protects the current file from being
overwritten
PHOTO SHOOT mode
This operating mode is for taking pictures in high
resolution. To enter this mode stop recording with the
down arrow key and long press the M key
PHOTO FILE TYPE RESIDUAL PHOTO
CAPACITY
Long press
Turns the dashcam on and off
Short press
Take the picture
Long or short press
Change mode to PLAYBACK
Long or short press
Zoom -
Long or short press
Zoom +
PLAYBACK mode
This mode is for reviewing recorded files. To enter this
mode: stop recording with the down arrow key, long press
the M key to switch to PHOTO mode and then press the M
key again.
In playback mode you can browse all photo and video files
stored in the memory by pressing the UP / DOWN
buttons. The main information is shown for each file
PHOTO INFO
PHOTO FILE TYPE FILE NAME
DATE AND TIME RESOLUTION
VIDEO INFO
VIDEO FILE DURATION FILE NAME

Document: DK-V2-4K 2A2
Page: 4
USER MANUAL DK-V2-4K Dash Cam Car Camera
DSE srl - Digital Surveillance Equipment - www.dse.eu
DATE AND TIME RESOLUTION
COMMANDS WHILE SEARCHING FOR FILES
Short press
Starts / Stops playing the video file
Long press
Change mode to REGISTRATION
Short press
Opens the file edit menu
Short press
Go to next file
Short press
Go back to previous file
COMMANDS DURING PLAYING VIDEO FILES
Short press
Starts / Stops playing the video file
Short press
Stop playing
Short press
2X 4X 8X fast playback
Short press
Slow playback -2X -4X -8X
EDIT FILES MENU
Select a file and press M to open the edit menu
DELETE - Delete the selected file
DELETE ALL - Delete all files
LOCK - Protects the file from being overwritten
UNLOCK - Removes overwrite protection
Computer connection via USB
You can connect your dashcam to computer with a USB
cable (not included). As soon as you connect the camera,
it turns on in MASS STORAGE mode.
Use this mode to explore memory with explorer and copy
files to PC. It is a great way to save video files to a
computer without having to take out the memory card.
Another way to copy files to PC is to extract the memory
card and insert it into an SD card reader
Playback of video and photo files
The camera saves video files in MP4 format that you can
play with common players such as VLC.
A specific player is also available: GPSPlayer. You can
download it at this address, in the version for Windows
and for Mac.http://www.gpsplayer.net/setup.html
This player allows you to play, in addition to video, all
related data that the camera has stored such as GPS
coordinates.
l Files ending with the letter A refer to the front camera,
those ending with the letter B refer to the rear camera.
The protection of movies
When the memory is full, the camera continues to record
overwriting the oldest files. Since the memory can hold a
few hours of recording it is essential to protect important
files from being overwritten so that they are not deleted.
To protect a file you can press the LOCK button with the
lock in playback mode. Protected video is identified by the
closed padlock icon.
As we have already seen, in recording mode you can also
press the UP arrow button to protect the current file, for
example when an accident or a significant episode occurs.
The collision sensor (G-Sensor / Gravity) also
automatically activates file protection in the event of an
accident. Videos recorded in GPARKING mode are also
automatically protected from overwriting.
WiFi and UCAM APP
This camera is equipped with wifi for smartphone control.
You can download the free UCAM app from Google Play or
Apple Store
1 - ACTIVATE WIFI
Press and hold the UP ARROW key to activate wifi
The name (F7Nxxxx) of the wifi network generated by the
dashcam and the factory password: 12345678 appear
superimposed. After a few seconds they disappear, but
you can view them again with the ON / OFF button The
wifi range of the camera is 3-5 meters

Document: DK-V2-4K 2A2
Page: 5
USER MANUAL DK-V2-4K Dash Cam Car Camera
DSE srl - Digital Surveillance Equipment - www.dse.eu
2 - CONNECT THE PHONE TO THE WIFI
Search with your mobile phone for the camera network
and connect to its wifi with the password 12345678. If
your mobile warns you that this connection does not have
access to the Internet, choose to keep it.
3 - USE THE APP WITH YOUR DASHCAM
Now launch the UCAM app. With the app you can control
the framing of the two cameras, and configure all the
operating options. You can also play the recorded videos
and download them to your phone.
GPS
This device includes a GPS to locate the position. GPS
coordinates can also be superimposed on the video if this
is selected in the configuration.
If you play the videos with the gpsplayer you will be able
to see the location map together with the video.
For the GPS to work, the dashcam must be placed in the
car and in free air. Furthermore, it is necessary to wait at
least 1 minute for the signal to be hooked up. The
function of the GPS cannot be tested indoors.
Settings
To set the dashcam options, enter the setup menu by
briefly pressing the M button
RESOLUTION - Set the video resolution of the recording.
There are 2 options: Front 2160P + Rear 1080P, Front
1440P + Rear 1080P
AUDIO - Enable audio recording
DATE STAMP - Enable the date and time stamp
LOOP RECORDING - Enables continuous recording so the
camera, once the memory has run out, continues to
record overwriting the oldest files. You can define the
duration of the individual video files (1,3,5 minutes).
G-SENSOR - Here you enable the collision sensor (G-
SENSOR) which detects impacts to the vehicle. This
sensor is used to detect when the vehicle has been hit and
automatically protect video files from overwriting. You can
set the sensitivity Low, Medium and High. Default: OFF
FATIGUE DRIVING - Here you enable a warning that the
camera emits after 1,2,3,4 hours of continuous operation.
It can be used to warn you that you have been driving for
too long and you need a stop.
SPEED STAMP - Enables the overlay of the speed detected
by the GPS
GPS STAMP - Enable the overlay of GPS coordinates
SPEED UNIT - Choose the speed unit of measurement
GPS INFO - Show gps information
REARCAMFLIP - Reverses the rear view camera image to
simulate the view in the rear view mirror.
APP - Show the QR code to download the UCAM app
WIFI - Turn wifi on and off (like button up)
LANGUAGE - Set the menu language (including Italian)
TIME FORMAT - Sets the 12 or 24H time format
DATE / TIME - Set date and time
TIME ZONE - Set the time zone: In Italy GMT + 1
FREQUENCY - Set the refresh rate to 50 or 60Hz
CLICKTONE - Enables sound when pressing keys
SCREENSAVER - Activates automatic screen shutdown
after 10, 30 or 120 seconds of inactivity. Note that this
feature only turns off the screen while the dashcam
continues to run. It is very important to enable this
function if you keep the camera running while parking to
reduce consumption.
PARKING MONITOR - This function can only be used if the
camera is used with the installation kit for the fuse box
and if both the BAT + and ACC connectors are connected
(see next chapter)
DEFAULT SETTING - Restore factory settings
VERSION - Shows the product version
Parking monitor
If you have connected the camera to the fuse box using
our installation kit and connecting both connectors (BAT +
/ ACC) you can use the camera for surveillance while
parking.
This function is enabled in the configuration menu, under
PARKING MONITORING.
There are two ways:

Document: DK-V2-4K 2A2
Page: 6
USER MANUAL DK-V2-4K Dash Cam Car Camera
DSE srl - Digital Surveillance Equipment - www.dse.eu
GSENSOR - This is a handy feature to monitor your car
while parking. If the vehicle is hit, the camera turns on,
starting recording and then returning to standby. Video
files recorded in this mode are automatically protected
from overwriting.
TIME LAPE RECORDING - This is also a function to protect
the parked car. In this mode, the camera remains in
operation even when the vehicle is off, recording 1 frame
per second. It is a recording that documents well what
happens while consuming very little memory space and
very little battery. The connection kit to the fuse box has
a protection that prevents the vehicle battery from being
discharged, even if you leave the vehicle stationary for a
long time. When playing a time-lapse video, reduce the
playback speed for better viewing.
Main technical characteristics
Sensor CMOS
Maximum resolution Tel. 1 3840x2160 / 2560/1440
Tel. 2 1920x1080
Frame rate 25 f / sec
Video format Tel 1-2 MP4 (H264)
PHOTO: JPG
Overlay Date time (excludable)
Functions Continuous recording
Regist. shock parking
Regist. parking time-lapse
Audio microphone Incorporated
IR illuminator No
Video storage MicroSDcard max 256GB
Approximately 16 hours of
recording
Operating
temperature -20 ° + 70 ° C
Memory MicroSD Class 10 or higher
Memory capacity Up to 256GB
Monitor 3.16 "
Diet 5VDC mini USB
Table of contents
Other DSE Dashcam manuals