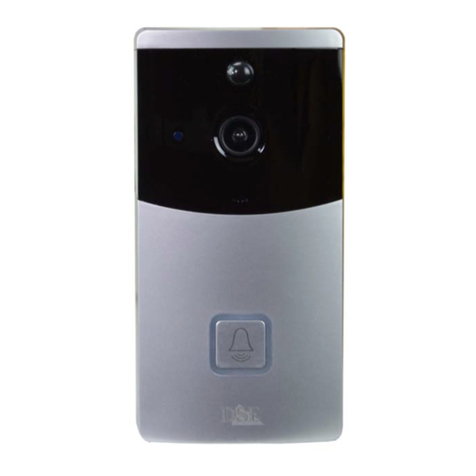
DSE DM-C2 User manual

INSTALLATION MANUAL
DM-C2 videophones
Page:2
What did you buy
These wifi video entryphones are called Smart-Home because they are intended for home automation. You
can connect these devices to your WiFi network and then control them as you wish with the Smart Life
home automation app, even over the Internet. With the Smart Life app you also control our remote controls
and cameras of this DM series which allows you to make your own smart home
This manual explains how to install and configure the intercoms.
LENS–Wide angle lens
IR LEDs–IR LEDs for night lighting
It turns on automatically when it gets dark
MICROPHONE–Microphone
INDICATOR–Status LEDs
Flashing blue = Device is awaiting configuration Steady red =
Connection to the wifi network failed
Solid Blue = Connection to wifi network established
Solid Blue and Red = No wifi network connected
DSE SRL – ITALY – WWW.DSE.EU

INSTALLATION MANUAL
DM-C2 videophones
Page:3
LEDs off = Device in stand-by, awaiting human detection PIR–Infrared human
presence detector
If it detects a person in front of the intercom, it starts recording and sends a notification
INFRARED LIGHT–Ambient light sensor
Decides the switching on of the infrared illuminator for night shots CALL
BUTTON–Intercom button SPEAKER-Speaker
RESET BUTTON–Reset button
Press for 5 seconds to restore the factory parameters USB–Micro
USB port for battery charging
Connect a USB power supply with the included cable to recharge the batteries
MICROSD–Compartment for micro SD card
Insert a microSD card, max 32GB to record (not included). The direction of insertion is indicated with a
small drawing.
BATTERIES–2 3.7V 1800mAh rechargeable batteries
SECURITY SCREW–Fixing screw
Insert the included locking screw here to lock the doorphone into its base
DSE SRL – ITALY – WWW.DSE.EU

INSTALLATION MANUAL
DM-C2 videophones
Page:4
Assembly and operation
These battery videophones can work without any electrical connection, thanks to their internal battery.
They work normally in stand-by condition consuming very little battery. If the call button is pressed, they
are activated to record video and send notifications. They are also activated when a human presence is
detected in front of the intercom or when a remote connection with the app is requested.
Thanks to this system, these videophones can work for several weeks before needing a battery charge.
When the battery runs out, it is possible to receive an alert notification to proceed with recharging the
battery. The battery is recharged by connecting a USB power supply or a computer to the internal microUSB
socket.
The video door phone is equipped with a fixing base which is screwed to the wall with plugs. The intercom
clips into the base and is secured with a small security screw. This way you can easily remove the intercom
to recharge it.
DSE SRL – ITALY – WWW.DSE.EU

INSTALLATION MANUAL
DM-C2 videophones
Page:5
Remove the battery protectors
To prevent the batteries from being excessively discharged during storage, they are delivered with an
adhesive insulating protection on the negative. When you are ready to use the product you must remove
these protections, by extracting the batteries and removing the green cover which is located on the
negative pole of each battery. Then reinsert the batteries into the housing respecting the positive pole
upwards.
Check WIFI coverage
Before placing the product in its final location, remember that this device must connect to your wifi
network in order to function. You should therefore check with your mobile phone that in the point where
you want to put it there is good coverage of your wifi network. If you see that the signal is poor, you
should intervene on your wifi network, perhaps boosting it with a repeater.
Do not install the product in an area with poor wifi signal because it would then be unreliable in its
operation.
SD card
The Smart-Home video door phones can record the video on a micro SD card (not included) which you
can insert inside. The SD card slot is located under the rear door, above the battery compartment. You
can insert any Class 10 SD card with capacities up to 32GB. The direction of card insertion is shown by
the icon shown near the slot.
Power on
These videophones do not have a power switch. To make them work you have to open the rear door and
remove the plastic protection which in some models serves to insulate the batteries.
Inside the door you will also find the slot for inserting the microSD card, the USB socket for recharging
and the RESET button.
DSE SRL – ITALY – WWW.DSE.EU

INSTALLATION MANUAL
DM-C2 videophones
Page:6
Reset
Smart-Home devices are always equipped with a reset button which you can find behind the protective
flap. Press and hold this button for a few seconds if you want to restore the factory conditions to pair the
video door phone to a new wifi network. A voice message informs you of the reset in progress.
You must perform this reset if you want to connect your camera to a new access point, even within your
own LAN network.
DSE SRL – ITALY – WWW.DSE.EU

INSTALLATION MANUAL
DM-C2 videophones
Page:7
Download the Smart Life app
In order to use the camera with your mobile phone, you must first connect the device to your wifi
network. To do this you need the APPsmartlifewhich you can download for free from Google Play or the
Apple Store. It is a very popular app in home automation, which uses the Tuya platform.
On first launch you need to create an account by entering a valid email address. Press CREATE A NEW
ACCOUNT and then wait for the code via email to confirm your subscription.
If you don't have an email address you can also use your phone number by pressing Use Phone Number
and get the verification code via sms
Once the account has been created, you have your own space in the cloud where you can upload all your
cameras and also many different devices, such as our WiFi remote controls or our WiFi cameras of this
DM Series.
DSE SRL – ITALY – WWW.DSE.EU

INSTALLATION MANUAL
DM-C2 videophones
Page:8
Configure the video intercom
In order to use the video door phone with your mobile phone, you must first connect the device to your
wifi network. It's a very easy operation to perform, thanks to the APP you just downloaded. Activate the
video intercom by standing near the WiFi hot spot you want to connect to in order to be sure that the
WiFi signal is excellent. Also connect the mobile phone to the 2.4GHz wifi network you want to connect
the device to. The device does not support 5GHz network
Check that the front LED of the device flashes. The device can also emit a configuration-waiting audible
message. If the front button does not flash, the device is not ready for configuration and it is advisable to
check the power supply or carry out a reset. Do not connect the USB power supply, which is only for
charging, otherwise the device will not work.
1 – Press the + button and then ADD DEVICE
2 – Choose the type of SECURITY CAMERA device that you find in the CAMERA or VIDEO SURVEILLANCE
section
DSE SRL – ITALY – WWW.DSE.EU

INSTALLATION MANUAL
DM-C2 videophones
Page:9
3 – Now check that the front blue LED flashes, insert the confirmation tick and press NEXT
DSE SRL – ITALY – WWW.DSE.EU

INSTALLATION MANUAL
DM-C2 videophones
Page:10
4 – Now you have to choose your wifi hot spot to connect to and enter the access password. If you have
networks with different frequencies, remember that the device only supports 2.4 GHz WiFi networks. Select
the network and enter the password to access your WiFi network. Warning: your mobile phone must be
connected to the wifi network you want to connect the device to.
DSE SRL – ITALY – WWW.DSE.EU

INSTALLATION MANUAL
DM-C2 videophones
Page:11
5 – Show the QR code that appears in the app to the video door phone camera by placing the phone at a
distance of 15-20 cm from the lens. Slowly move the phone back and forth so that the camera can scan the
QR Code. Keep going until the camera emits a short confirmation sound. When you hear the read
confirmation sound, press the BEEP button to continue.
The camera registration process takes about 30 seconds, during which the camera is connected to your WiFi
network and is added to your personal area on the Cloud server.
DSE SRL – ITALY – WWW.DSE.EU

INSTALLATION MANUAL
DM-C2 videophones
Page:12
FINISHED!
Now the video intercom is configured and ready to be used. If you mess something up and the procedure
doesn't go through, you can press the internal reset button and start over.
DSE SRL – ITALY – WWW.DSE.EU

INSTALLATION MANUAL
DM-C2 videophones
Page:13
Use the intercom
Now that you have configured your video door phone, you can control it with the app. Thanks to the P2P
cloud server you can control it not only within your network, but also through the Internet.
Like all our battery-powered Smart Home devices, this device also normally remains in stand-by,
consuming very little battery, to "wake up" when the front button is pressed or when you connect
remotely with the app.
First try to connect with the app as shown below.
– Enable listening to audio through the device's microphone
- Select between the main higher resolution (FHD) video stream and that
secondary (SD) lighter. It can be useful to receive the SD stream when connecting with
little bandwidth available and FHD images are not received smoothly.
- Enable digital zoom in the image. The magnified area can then be moved by dragging it.
It is also possible to activate the digital zoom with the two-finger zoom gesture.
DSE SRL – ITALY – WWW.DSE.EU

INSTALLATION MANUAL
DM-C2 videophones
Page:14
- Switch between normal and full screen viewing
– Take a photo of the live image which is saved in the album (see below)
– By pressing this button, you can talk to whoever is near the camera.
– Press to record the images you are viewing in a video which will be saved in the album
- Opens the advanced commands menu
PLAYBACK–It allows you to play the videos recorded in the SD memory inside the device by searching them
by date
GALLERY–Here you can browse the photos and videos recorded with the PHOTOGRAPH and
RECORD buttons seen above
COLOR THEME–You can use the app in normal mode: Light Mode or in Dark Mode with dark backgrounds.
NIGHT MODE–Set the night vision of the camera. Normally the AUTO function is maintained so that the
camera shoots in color if there is sufficient light and switches to monochromatic infrared illumination in
case of insufficient light. However, it is possible to force shooting always in Color by selecting OFF (shooting
with natural light) or always in B/W with IR by selecting ON
DEVICE VOLUME–It is possible to reduce the playback volume of the loudspeaker PIR–It is possible to
adjust the sensitivity of the front presence detector. Presence detector allows the camera to record
images and send a notification if a human presence is detected in front of the device.
DSE SRL – ITALY – WWW.DSE.EU

INSTALLATION MANUAL
DM-C2 videophones
Page:15
SIREN–You can manually trigger an audible alarm signal that plays through the device's speaker.
EDIT–You can bring some commands to the main screen of the app in order to have them available more
quickly.
PERSON AT THE DOOR
If the call button is pressed, the video door phone emits a local sound and sends a push notification to
your mobile phone. If the Smart Life app in your mobile is turned off you will get an alert notification like
this notifying you. Depending on your phone settings it will produce an alert sound or vibration.
However, if you use this video entryphone regularly, you should keep the app always active in the
background by closing it with the central button at the bottom, rather than exiting the app completely. If
the app is running on your phone, instead of receiving a simple notification you can answer it directly like a
phone call
DSE SRL – ITALY – WWW.DSE.EU

INSTALLATION MANUAL
DM-C2 videophones
Page:16
DSE SRL – ITALY – WWW.DSE.EU

INSTALLATION MANUAL
DM-C2 videophones
Page:17
Settings
From the device command page you can access some advanced options by pressing the edit icon (pencil)
in the upper right corner
DEVICE INFO –Show camera information
INSTANT SCENE–Indicate if you have entered the device in a smartlive scenario. The app allows you to
predict scenarios to perform automatic actions.
THIRD PARTY CONTROL -You can connect your Smart Home devices with voice command devices. The
cameras support the most common voice command devices such as Amazon Echo (ALEXA) and Google
Assistant. In this section you will find instructions on how to associate your camera. Further on in the
manual you will find indications for these integrations.
BASIC FEATURE SET –This section contains the basic settings of the
DSE SRL – ITALY – WWW.DSE.EU

INSTALLATION MANUAL
DM-C2 videophones
Page:18
camera which may vary by model. Normally, SCREEN ROTATION, TIME STAMP, UNI and BI DIRECTIONAL
AUDIO types are set here. NIGHT VISION FUNCTION-Set the night vision of the camera. Normally the
AUTO function is maintained so that the camera shoots in color if there is sufficient light and switches to
monochromatic infrared illumination in case of insufficient light. However, it is possible to force shooting
always in Color by selecting OFF (shooting with natural light) or always in B/W with IR by selecting ON
SOUNDS–Adjust the volume of the device
OPERATIVE MODE–This item allows you to decide whether the camera is activated only when the PIR
sensor detects a presence, as is normally done, or if it records continuously until the battery is consumed.
DETECTION ALERT SETTINGS–Enable push notification when a presence is detected in front of the device.
PIR SWITCH–The video intercom is equipped with a PIR sensor to detect the presence of people and send
notifications. Here you can set the detection sensitivity. Not all environments are suitable for this function
so if you receive too many notifications you can eventually disable the sensor by choosing OFF
ENERGY SAVING SETTINGS–This item shows the battery charge in real time and also allows you to set the
charge threshold at which to receive the low battery notification.
CLOUD STORAGE–These cameras can save recordings on Tuya cloud server. Here you can purchase the
cloud storage service of the recordings
MEMORY CARD–This item is only available if you have inserted an SD memory card into your device. Here
you check the status of the SD memory inserted in the camera with Total, Used and Remaining capacity. You
can schedule continuous or event-only recording and format the card. You also have a time programmer
available to record only in certain periods.
OFFLINE NOTIFICATION–Receive a notification if the camera is offline (not connected to the server) for 30
minutes. For battery cameras this limit is 8 hours.
DSE SRL – ITALY – WWW.DSE.EU

INSTALLATION MANUAL
DM-C2 videophones
Page:19
Device management
Smart Home means being able to manage the whole house with your mobile phone. Smart Life is the ideal
app. You can add all of our DM Series devices: our Smart Home cameras, our remote controls and our
intercoms and manage them all from the same app.
All your devices are in the app
DSE SRL – ITALY – WWW.DSE.EU

INSTALLATION MANUAL
DM-C2 videophones
Page:20
Amazon Echo integration
Smart Life integrates seamlessly with Amazon Alexa.
Just download theSMART LIFE skillsusing the Amazon Alexa app to link Alexa to your Smart Life account.
Through the Smart Life skill you can control all our DM Series devices with Alexa voice commands.
To manage cameras with Alexa, you need to purchase a device with a monitor, such as the Echo Show. You
can ask Alexa to show the cameras you want at any time.
DSE SRL – ITALY – WWW.DSE.EU
Table of contents
Other DSE Intercom System manuals