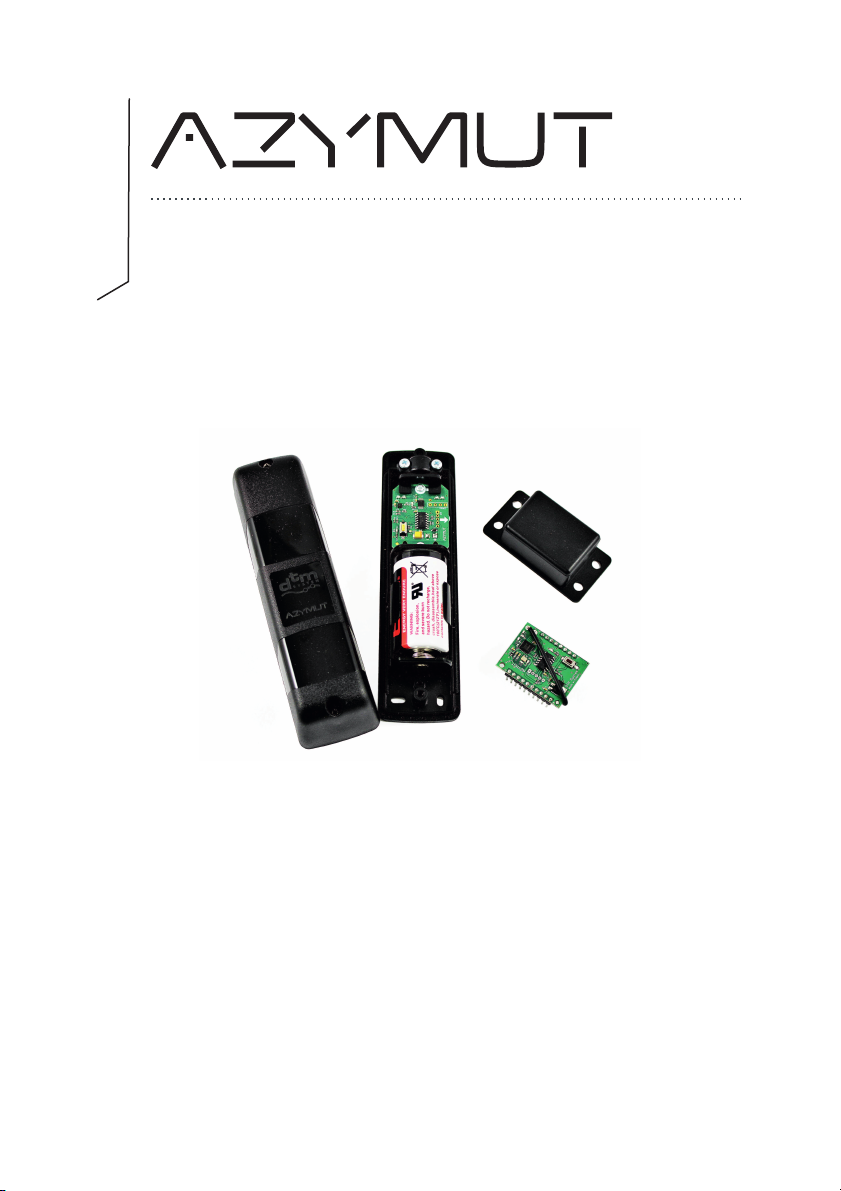
dtm Azymut User manual

WIRELESS GATE STATE SENSOR
Installation and operating manual
v.1.5
www.dtm.pl

WARNING ! ! !
The set includes a neodymium magnet that generates a very strong magnetic field.
Neodymium magnets, due to their strong magnetic field, should not be close to any kind of data
carriersandelectronicandelectricalequipmentaswellasRTVand household appliances.
Inparticular, devicessuchas:NEVERAPPROACH
(hard drives, payment cards, hotel cards, code cards, other, floppy disks and other storage media,
audio and video cassettes,CD / DVD players, modern displays,GSM phones and tablets, laptops and
computers, remote control and access control transmitters, monitors andTV sets, medical devices
for measuring and functional and life support functions - e.g. pacemakers, ventilators and other
electronicdevices.
The magnet should not be close to any kind of measuring devices, as it may disrupt the correct
operationofthemeasuringdeviceandcauseirreversibleundesirablefaultsinit.
If you are not sure whether a neodymium magnet can be attached to a particular device, please refer
totheinstructions supplied with the deviceorcontactthemanufacturerofthe equipment.

GENERAL INFORMATION
Azymutisawireless,magneticgatestate sensor designed to work with a FLEX receiver.
MODULES AND TECHNICAL DATA
Azymutconsistsof three modules:
AZ-TX transmitter
formountingon the gate
frequency: channel1-868.45MHz,channel2 - 868.31MHz,
channel3-868.18MHz
powersupply: battery3,6V/8,5Ah,typeC
assembly: surface-mounted,splash-proofhousing,Ip54
dimensions: 38x38x145mm
temperature(min./max.): -20°C / +55°C
AZ-FLEXRX receiving module
formountingin the FLEX receiver connector
dimensions: 36x27x18mm
frequency: channel1-868.45MHz,channel2 - 868.31MHz,
channel3-868.18MHz
powersupply: fromFLEXreceiverconnector
antenna: wire,868MHz
AZ-MG magnet
strongneodymiummagnetformountingon the gate
dimensions: 33x62x20mm
AZ-TX transmitter
AZ-MG magnet
AZ-FLEXRX receiving module
plate holder
programming
button
ST LED
LED signaling
radio communication
battery holder
arrows indicating
the direction of assembly
relative to the magnet
battery
programming
button
LED
pin plug for mounting
in the FLEX receiver connector
Fig. 1 View of the Azymut sensor modules with the description of the elements.
antenna
front
side

MONTAGE
The AZYMUT sensor is designed to work with the FLEX receiver. It can be mounted on gates of any
type.
The distance between the AZ-MG magnet and the AZ-TX transmitter with the gate
closed should be in the range of 1-30 cm
Pay attention to the arrows on theAZ-TX transmitter board!
The AZ-TX transmitter must be mounted perpendicular with the arrows pointing to
the front wall of theAZ-MG magnet when the gate is closed. If necessary, reverse the
fixing of the plate in the transmitter housing (Fig.2).
Installation of theAzymut sensor in various types of gates:
Garage door
1. Mount theAZ-FLEXRX receiving module in the FLEX receiver (Fig. 3). Set the input in the signaling
modeintheFLEX receivermenu-'Sr.St=on'option (see the FLEX receiver manual).
2. Mount theAZ-MG magnet on the gate and the AZ-TX transmitter on the wall (or vice versa) in such
awaythatthemagnetand the transmitter are on one level when the gate is closed (Fig. 4).
Fig.3 Installation of the AZ-FLEXRX receiving
module in the FLEX receiver.
Fig.4 Mounting the sensor on the garage door.
Fig.2 Mounting the AZ-TX transmitter relative to
AZ-MG magnet.
2x10-pin module
socket in the FLEX
receiver

One-leaf gate
1. Mount theAZ-FLEXRX receiving module in the FLEX receiver (Fig. 3). Set the input in the signaling
modeintheFLEX receivermenu-'Sr.St=on'option (see the FLEX receiver manual).
2. Mount theAZ-MG magnet on the post,AZ-TX transmitter on the gate wing (or vice versa), in such a
waythatthemagnetandthe transmitter are opposite each other when the gate is closed (Fig.5).
Double leaf gate
1. Mount theAZ-FLEXRX receiving module in the FLEX receiver (Fig. 3). Set the input in the signaling
modeintheFLEX receivermenu-'Sr.St=on'option (see the FLEX receiver manual).
2. Mount theAZ-MG magnet on the one leaf, theAZ-TX transmitter on the second gate leaf, in such a
waythatthemagnetandthe transmitter are facing each other when the gate is closed (Fig.6).
Sliding gate
1. Mount theAZ-FLEXRX receiving module in the FLEX receiver (Fig. 3). Set the input in the signaling
modeintheFLEX receivermenu-'Sr.St=on'option (see the FLEX receiver manual).
2. Mount theAZ-MG magnet on the post, AZ-TX transmitter on the gate (or vice versa), in such a way
thatthemagnetandthe transmitter are opposite each other when the gate is closed (Fig.7).
Do not mount the transmitter in places exposed to magnetic fields from a source other
than a dedicated magnet. If the LED in the AZ-FLEXRX module changes state several
times during gate movement, install the magnet and / or transmitter in a different place.
Probablythemetalelementsweakenthe magnetic field in the vicinity of the magnet.
Fig.5 Mounting the sensor on the one-leaf gate.
Fig.6 Mounting the sensor on the double leaf gate.
Fig.7 Mounting the sensor on the sliding gate.

SENSOR LAUNCH
After mounting the transmitter and magnet on the gate, it is necessary to calibrate the AZ-TX
transmitterandpairit with theAZ-FLEXRXreceivingmoduleinthe FLEX receiver.
1.Calibration of theAZ-TXtransmitter
-closethegate
-brieflypressthetransmitterbutton - the "ST" LED will flash
-openandclosethe gate once
- press the AZ-TX transmitter button again shortly - the "ST" LED will blink rapidly indicating the
successof the operation.
If the "ST" LED generates 2 pulses, the calibration procedure failed. The reason may be
too much distance between the AZ-MG magnet and the AZ-TX transmitter or too small
difference in the open and closed distance. Correct the assembly and repeat the
calibrationprocedure.
2.Pairingthetransmitter with the FLEX receiver
-pressthebutton on theAZ-FLEXRXmodulein the FLEX receiver - the diode will start to flash,
-open and close the gate - the diode will start to blink rapidly indicating the success of the operation.
Pairingcantakeplace a few seconds after the opening of thegate.
3.Control of the sensor's operation.
When the gate is closed, the LED in theAZ-FLEXRX module in the FLEX receiver should be on.When
thegateisnot closed, the LED should be off.
If the diode in the AZ-FLEXRX module blinks shortly every 5 seconds, it indicates a weak
batteryintheAZ-TXtransmitterpairedwithit.
If the diode in the AZ-TX transmitter generates 5 pulses, it may mean a low battery or
damage of the transmitter. Replace the battery. If the problem recurs despite the battery
replacement,pleasesendthedeviceforservice.
PRESENTATIONOFTHEGATE STATE
Appropriate mounting of the AZYMUT sensor allows you to check the gate state on a mobile device
orcomputer.
The status of the gate is visible after adding a FLEX receiver, equipped with an WL card, to the
CloudFlex account (www.cloudflex.dtm.pl), and in the V-PILOT mobile application available for
AndroidandiOSdevices.
There is a version of the Azymut sensor equipped with a Bluetooth module. The producer provides
the API for further implementation in order to connect to the device from the external application
level.

CHANGINGTHE RADIOCHANNELOFTRANSMITTER - RECEIVERCOMMUNICATION
The set communicates with each other on one of three frequencies. In the case of work in the vicinity
of several sets of transmitter - receiver, for operational reliability, it is recommended to set a different
radiochannelforcommunicationbetweenthetransmitter and the receiver in each set.
Tochangetheradiochannel:
- press and hold the button on the AZ-TX transmitter, release the button when the "ST" LED starts
blinking,
- the "ST" diode generates 1, 2 or 3 pulses, simultaneously indicating the number of the radio channel
thatiscurrentlyused,
-brieflypressthebuttonon theAZ-TXtransmitter to change the radio channel,
- press and hold the button on theAZ-TX transmitter to confirm the channel selection.The diode will
blink,signifyingthesuccessoftheoperation,
- in the same way, change the radio channel in the AZ-FLEXRX receiver module installed in the FLEX
receiver.
The channels set in the AZ-FLEXRX module and in the AZ-TX transmitter must be
identical.
FORMATOFTHE AZ-FLEXRX RECEIVING MODULE
To format the AZ-FLEXRX module, press and hold the button for 15 seconds. The diode will first
display the channel number currently set and then it will blink and go off. The button should be
releasedafterthediodegoesout.
Formattingthemodulecauses:
-removingthetransmitterfrom memory,
-restorationofradio channel No. 1.
PACKAGECONTENTS
-AZ-TXtransmitter
-AZ-FLEXRXreceivingmodule
-AZ-MGmagnet
-3.6V/8.5Ah battery, typeC
-setof4 mounting pins
-Installationandoperating instructions

DTM System
ul. Brzeska 7, 85-145 Bydgoszcz, Polska, tel. +48 52 340 15 83, www.dtm.pl
DISPOSAL
Electrical or electronic equipment can not
be disposed of with household waste. The
correct disposal of the device gives the
possibility to preserve the Earth's natural
resources for longer and prevents
degradationofthe natural environment.
WARRANTY
The manufacturer DTM System provides
the devices that are operational and ready
for use. The warranty is granted for a
period of 30 months from the date of sale
by the manufacturer. The warranty period
i s d e t e r m i n e d b a s e d o n t h e
manufacturer's warranty seals identifying
the production batch, placed on each
product. To recognize the warranty, it is
necessary to present a sales document.
The manufacturer undertakes to repair the
device free of charge if there are defects
due to the manufacturer's fault during the
warranty period. The defective device
must be delivered to the place of purchase,
including a copy of the proof of purchase
and a brief, unambiguous description of
the damage. The cost of disassembly and
assembly of the device is borne by the user.
The warranty does not cover batteries in
remote controls, any damage resulting
from im prope r use, un authori zed
adjustments, alterations and repairs, and
damage caused by lightning, overvoltage,
or short circuit of the power supply
net work. T he det ailed terms and
conditions of granting a guarantee are
regulated by relevant legal acts.
DTM System hereby
declares that the device
complies with Directive
2014/53 / EU. The full text of the EU
Declaration of Conformity is
availableat www.dtm.pl.
Table of contents
Popular Accessories manuals by other brands

Philips
Philips KAH3 installation instructions

PCB Piezotronics
PCB Piezotronics IMI SENSORS Swiveler 607A11/030BZ Installation and operating manual

Hytronik
Hytronik HMW20 Installation and instruction manual

LEGRAND
LEGRAND HPM 630R01WE instruction manual

Blyss
Blyss 21223KF-UK manual

Manitowoc
Manitowoc K00121 installation instructions

IFM Electronic
IFM Electronic ecomat100 CR2101 Device manual

CMP
CMP DEL AOP 50 INSTALLATION INSTRUCTIONS & PRODUCT MANUAL

Elsner
Elsner Vari KNX 3L Installation and adjustment

Lehmann electronic
Lehmann electronic AAL Profiline HC-503 instruction manual

Endress+Hauser
Endress+Hauser Oxymax COS22 Series operating instructions

Niko
Niko JT3000/BC2 user manual