Duinotech WXC4394 User manual

LoRa Gateway
The LoRa Gateway is an ideal solution for connecting sensors and sensor networks to the internet.
The XC4394 LoRa Gateway incorporates a OpenWRT based router SoC offering WiFi, LAN, WAN and
USB connectivity. Also connected to the SoC is an ATMega328 microcontroller offering functionality
similar to an Arduino Uno. Many of the ATMega328’s IO pins are broken out to a screw terminal
header. The ATMega328 is also connected internally to a LoRa compatible module.
The following ATMega328 pins are broken out, as well as A2 being connected to the ‘heartbeat’ LED
on top of the unit:

Setup:
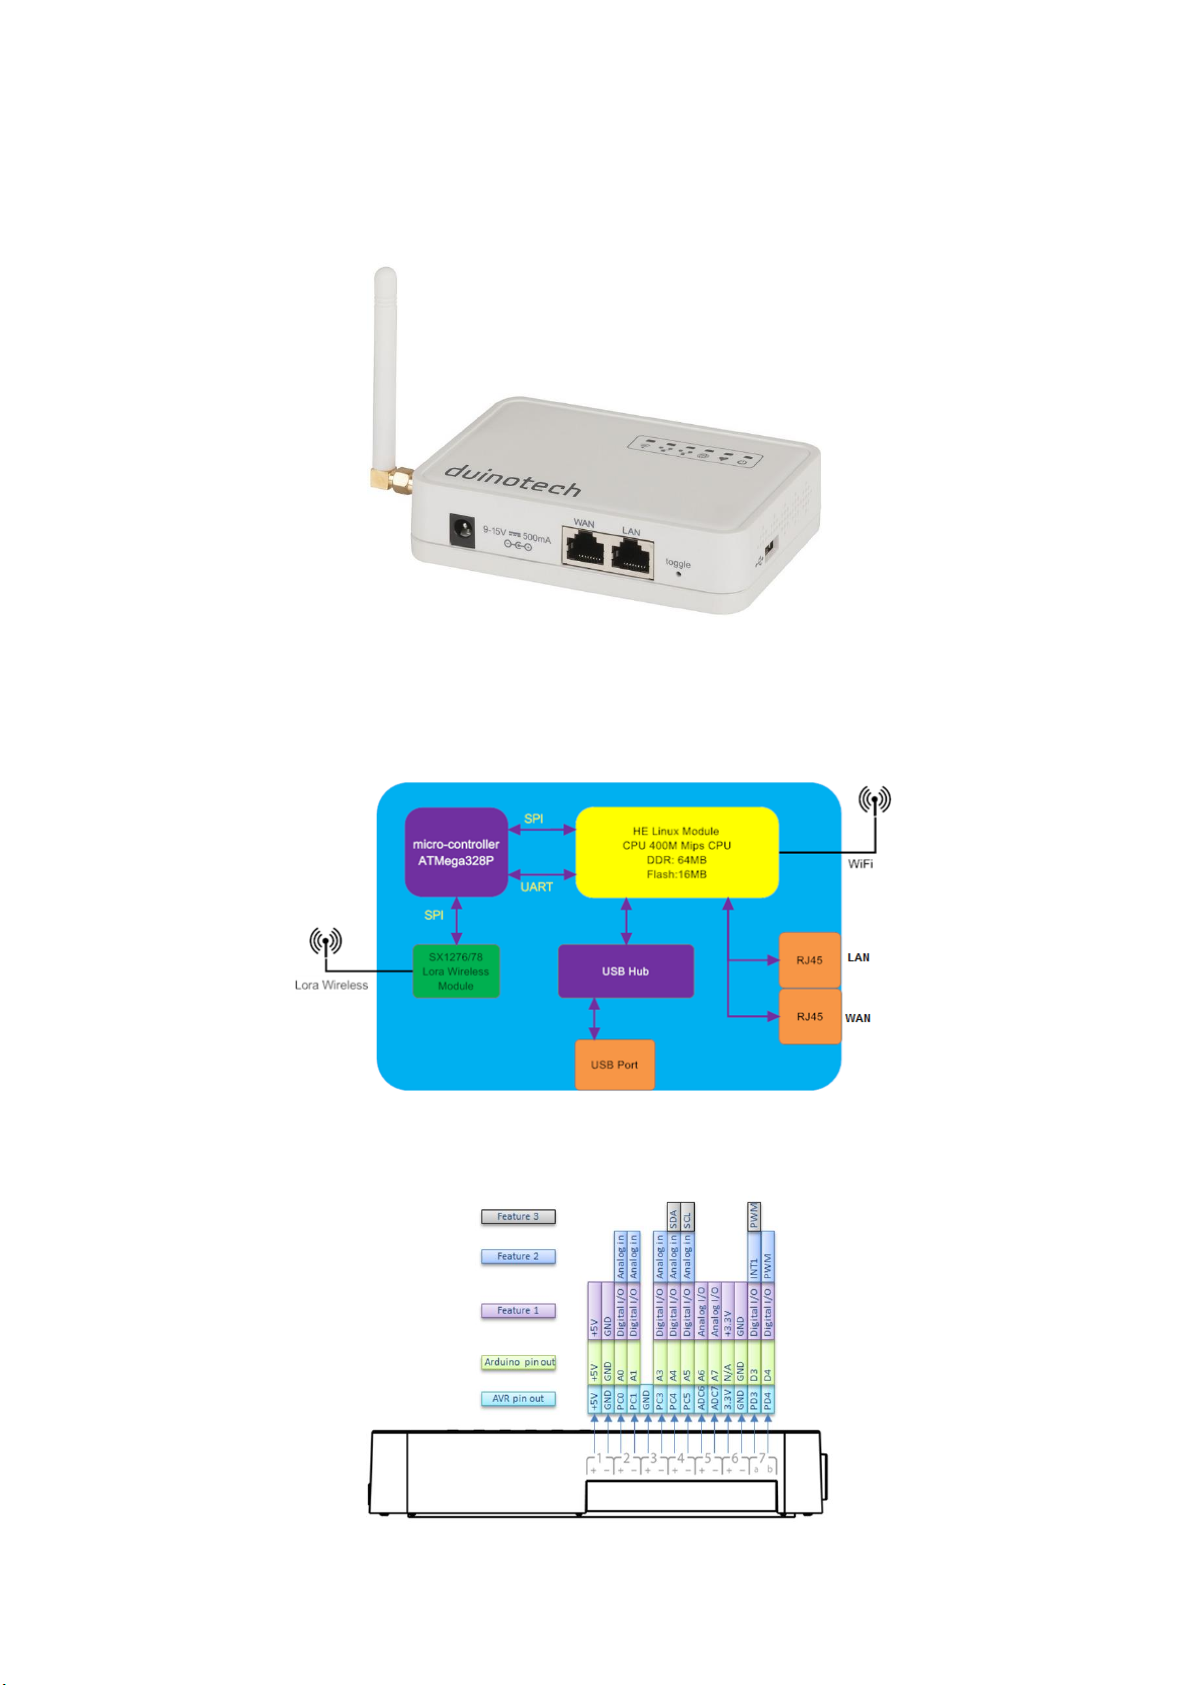
Initial setup is similar to other routers- attach the external antenna if necessary (this is the LoRa
antenna, the WiFi antenna is internal), and then connect the power supply to the Gateway and
mains power. If you have a LAN connection to the internet, connect it now- you will be able to skip
some of the wireless setup.
Once the Gateway has started, it will present an open WiFi network called ‘duinotech-xxxxxx’.
Connect to this WiFi network, and use a browser to go to http://10.130.1.1/. Use the username
‘root’ and the password ‘duinotech’ to log in. These credentials should be used for any activity that
requires authentication, such as SSH.
Once logged in, click on System>System and set the Timezone to the correct setting for your
location, then press ‘Save’ at the bottom of the page. Like other Linux-based devices, the Gateway
can automatically set the time via NTP if it has an internet connection.
Click on Network>Internet Access and set the Internet connection method. Most users will be able
to use ‘WiFi Client’ by setting the SSID, Encryption and Password to match their own WiFi network.
Click ‘Save and Apply’. After this, the Gateway will not be accessible via http://10.130.1.1/, so you
may have to find its new IP address via your WiFi router, and connect to this IP address. It may be a
good idea to give the Gateway a reserved DHCP address so that the address doesn’t keep changing.
The instructions for this will vary between routers.
As the Gateway is effectively a Linux computer, you can also run commands via a console over an
SSH connection. We have been using TeraTerm and PuTTY succesfully, but there are others out
there. To connect a SSH client to the Gateway, you will need to know the IP address, username and
password (the default username and password are as above). If you are having trouble with the SSH
connection, check that SSH is enabled on the Gateway under the System>Administration menu.
Arduino Setup:
To be able to use the Gateway with the Arduino IDE, the Yun board profile needs to be installed. This
also has a profile to allow programming over WiFi to occur. When programming the microcontroller,
you can continue to use the Uno profile, but the Port is now a virtual port, not a physical COM port.
It should appear as ‘duinotech-xxxxxx at xxx.xxx.xxx.xxx’ where the second set of x’s is the IP
address. If you are not seeing the virtual port, restart the Arduino IDE or the computer as necessary.
To test out the connection, open the ‘Blink’ sketch, and change it to use pin ‘A2’ instead of ‘13’- this
is the ‘heartbeat’ LED on the top of the case. If you can get the heartbeat LED blinking, then the
virtual COM port upload is working.
LoRa Module
To make use of the LoRa Module on the Gateway, an Arduino library is needed, and we’ve been
using one that can be installed via the Library Manager (Sketch>Include Library>Manage Libraries…).
Search for 'lora', and install the library simply called 'lora'. Alternatively, it can be downloaded from
https://github.com/sandeepmistry/arduino-LoRa, where there are guides describing the library
features. A simple way to test the library is to use the ‘LoRaReceiver’ and ‘LoRaSender’ example
sketches.

OpenWRT:
As mentioned above, OpenWRT is a version of Linux designed for small devices like routers. If you
are familiar with Linux commands and file systems, you should find the Gateway has few surprises.
One major difference worth remembering is that most of the file system is held on flash, which can
wear out if used excessively. Files which are not required to be kept can be worked on in the /tmp
folder, which exists as a ramdisk which is lost when power is lost. If you need large amounts of
writeable storage, a USB stick or similar is recommended.
All the commands shown below are entered into the console, which will have to be accessed via an
SSH client.
If you are unsure about how a command works, try the command name followed by ‘--help’, eg:
ls --help
Although the Gateway has only one USB socket, a hub can be used to add extra devices. The Yun
Shield has limited power ability, so a powered hub should be used if possible.
Connecting a 3G USB Wireless Broadband Stick
The Gateway version of the OpenWRT system should automatically detect a USB Modem if attached.
Select ‘USB Modem’ under Network>Internet Access, and then see if the Modem is detected.
Update the settings below to match your hardware and ISP’s setting, then click Save & Apply to
complete the setup.
If the Modem is not detected, you may need to find and install appropriate drivers.

Webcam:
The following commands will install packages to allow a webcam to be used to take (jpg) photos.
Run:
opkg update
opkg install kmod-video-uvc fswebcam
We tested this following on our QC3203 Webcam, and also some cheap generic webcams, but your
mileage may vary, and extra drivers may be needed.
Use the following command to capture an image to the /tmp folder:
fswebcam -S 10 /tmp/image.jpg
Image Manipulation:
Run the following:
opkg update
opkg install ffmpeg
After capturing a .jpg as above, run this command:
ffmpeg -i /tmp/image.jpg -vf scale=640:-1 /tmp/image.bmp
This will scale the file to 640 pixels wide and convert to bitmap format. This may be handy of you are
using the Arduino to display or manipulate the image, as it is difficult to read .jpg files due to the
compression, but .bmp files are uncompressed.
Audio:
Using our XC4953 USB Soundcard, we were able to play MP3’s and stream audio from the internet:
opkg update
opkg install kmod-usb-audio kmod-sound-core madplay
To play sounds:
madplay test.mp3
To stream from an internet MP3 stream:
wget -O - http://live-radio01.mediahubaustralia.com/PBW/mp3/ | madplay –
USB Storage:
By default, drivers should be installed for USB flash drives, and should work as long as they have a
FAT or FAT32 partition. Flash drives appear at:
/mnt/sda1
For example, enter the following to work in the root directory of the flash drive:
cd /mnt/sda1
Multiple drives may have names like /mnt/sdb1.
Table of contents