manuals.online logo
Brands
  1. Home
  2. •
  3. Brands
  4. •
  5. Edge-Core
  6. •
  7. Gateway
  8. •
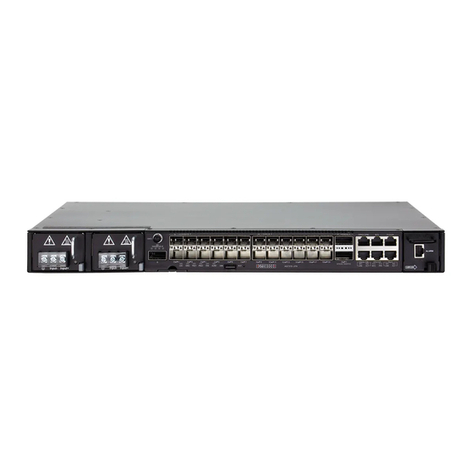
  9. Edge-Core CSR200 User manual

Edge-Core CSR200 User manual

This manual suits for next models

1

Other Edge-Core Gateway manuals

Edge-Core VG007 Programming manual

Edge-Core

Edge-Core VG007 Programming manual

Edge-Core AS5915-18X Owner's manual

Edge-Core

Edge-Core AS5915-18X Owner's manual

Edge-Core AS7315-27X User manual

Edge-Core

Edge-Core AS7315-27X User manual

Edge-Core SIP Gateway VG3300 Series User manual

Edge-Core

Edge-Core SIP Gateway VG3300 Series User manual

Edge-Core OD200 User manual

Edge-Core

Edge-Core OD200 User manual

Edge-Core ECH502 User manual

Edge-Core

Edge-Core ECH502 User manual

Edge-Core CSR300/AS7315-30X User manual

Edge-Core

Edge-Core CSR300/AS7315-30X User manual

Edge-Core AS5915-18X User manual

Edge-Core

Edge-Core AS5915-18X User manual

Edge-Core VG007 User manual

Edge-Core

Edge-Core VG007 User manual

Edge-Core AS7315-27X User manual

Edge-Core

Edge-Core AS7315-27X User manual

Edge-Core RG230 User manual

Edge-Core

Edge-Core RG230 User manual

Popular Gateway manuals by other brands

Telecom FM onestream gfx Programming guide

Telecom FM

Telecom FM onestream gfx Programming guide

UfiSpace LoRa GPE810U Quick setup guide

UfiSpace

UfiSpace LoRa GPE810U Quick setup guide

Merak MMk-736F Quick setup guide

Merak

Merak MMk-736F Quick setup guide

Robustel R3010 user guide

Robustel

Robustel R3010 user guide

turck BL20-PG-EN-V3 user manual

turck

turck BL20-PG-EN-V3 user manual

IBM Security Web Gateway Appliance quick start guide

IBM

IBM Security Web Gateway Appliance quick start guide

SSS Siedle Smart Gateway Commissioning instructions

SSS Siedle

SSS Siedle Smart Gateway Commissioning instructions

ADTRAN 424RG Installation

ADTRAN

ADTRAN 424RG Installation

Chorus Hyperfibre XGS-250WX-A user guide

Chorus

Chorus Hyperfibre XGS-250WX-A user guide

Dragino G308 user manual

Dragino

Dragino G308 user manual

Data Domain DD690g Installation and setup guide

Data Domain

Data Domain DD690g Installation and setup guide

Raritan Laptop Release notes

Raritan

Raritan Laptop Release notes

Haivision Torpedo quick start guide

Haivision

Haivision Torpedo quick start guide

ATCOM AG-268 user manual

ATCOM

ATCOM AG-268 user manual

LST M500RFE-AS Specification sheet

LST

LST M500RFE-AS Specification sheet

Vega VEGA BS-3 user manual

Vega

Vega VEGA BS-3 user manual

Kinnex Media Gateway quick start guide

Kinnex

Kinnex Media Gateway quick start guide

2N Telekomunikace 2N StarGate user manual

2N Telekomunikace

2N Telekomunikace 2N StarGate user manual

manuals.online logo
manuals.online logoBrands
  • About & Mission
  • Contact us
  • Privacy Policy
  • Terms and Conditions

Copyright 2025 Manuals.Online. All Rights Reserved.

– 1 –
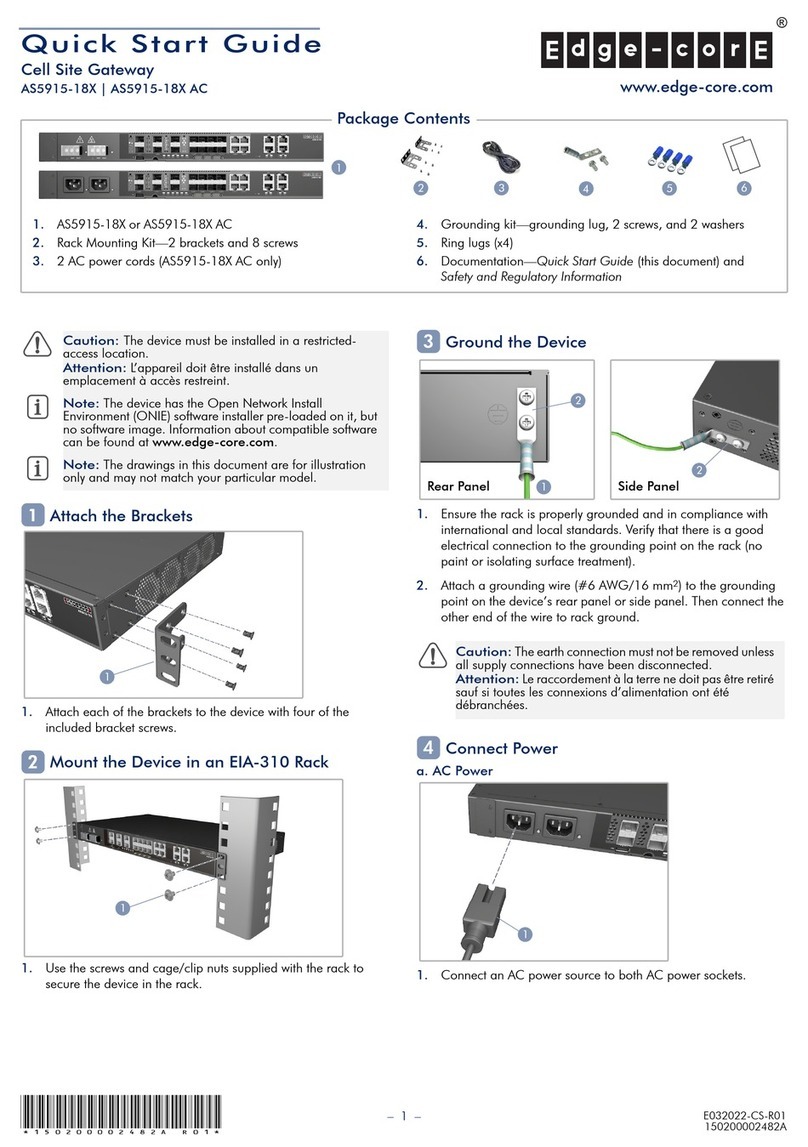
Quick Start Guide
Attach the Brackets
1. Attach each of the brackets to the router with four of the included
bracket screws.
Mount the Router in an EIA-310 Rack
1. Use the screws and cage/clip nuts supplied with the rack to
secure the router in the rack.
Ground the Router
1. Ensure the rack is properly grounded and in compliance with
international and local standards. Verify that there is a good
electrical connection to the grounding point on the rack (no
paint or isolating surface treatment).
2. Attach the grounding wire (#6 AWG/16 mm2) to the grounding
point on the router’s rear panel or side panel. Then connect the
other end of the wire to rack ground.
Connect Power
1. Connect an external DC power source to the PSUs. Or, connect
to a no-tolerance DC mains supply with a UL/CSA-approved
circuit breaker rated at 16 A.
Caution:
The device must be installed in a restricted-
access location.
Attention:
le périphérique doit être installé dans un
emplacement à accès restreint.
Note:
The router has the Open Network Install
Environment (ONIE) software installer pre-loaded on the
router, but no software image. Information about
compatible software can be found at
www.edge-core.com.
Note:
The drawings in this document are for illustration
only and may not match your particular model.
1
1
2
1
Caution:
The earth connection must not be removed unless
all supply connections have been disconnected.
Attention:
Le raccordement à la terre ne doit pas être retiré
sauf si toutes les connexions d’alimentation ont été
débranchées.
Caution:
Before connecting power supply cables to the
router, ensure that power to the feed lines is turned off at the
supply circuit breaker or disconnected from the power bus.
Attention:
Avant de connecter les câbles d’alimentation
au routeur, assurez-vous que l’alimentation des lignes
d’alimentation est coupée au niveau du disjoncteur
d’alimentation ou déconnectée du bus d’alimentation.
3
2
1
2
Rear Panel Side Panel
4
1
E012021-CS-R01
15020000xxxxH
Cell Site Gateway
AS5915-18X
1.
AS5915-18X
2. Rack Mounting Kit—2 brackets and 8 screws
3. Grounding kit—grounding lug, 2 screws, and 2 washers
4. Ring lugs (x4)
5. Category 6 stacking cable
6. Documentation—Quick Start Guide (this document) and
Safety and Regulatory Information
1
Package Contents
2346
www.edge-core.com
*150200002xxxH_R01*
5
Quick Start Guide
– 2 –
1. Connect the ground wire / earth.
2. Connect the -36 – -72 VDC wire.
3. Connect the DC return wire.
Verify Power Status
1. Verify the router is receiving power by checking the system LEDs.
After power on, the PSU1/PSU2 LEDs should be on green.
Connect Network Cables
1. For the RJ-45 Management port, connect 100-ohm Category 5,
5e or better twisted-pair cable.
2. Connect DAC cables to the SFP/SFP+ slots. Or first install SFP/
SFP+ transceivers in the slots and then connect fiber optic
cabling to the transceiver ports.
3. As connections are made, check the port status LEDs to be sure
the links are valid.
Connect Timing Ports
1. Use a shielded cable to connect the Building-Integrated Timing
Supply (BITS) port to other devices that use BITS synchronization
signals.
2. Use a shielded cable to connect the Pulse-Per-Second (PPS) /
Time-of-Day (ToD) port to other devices that use these
synchronization signals.
3. Use coax cables to connect the 1-pulse-per-second (1PPS) in/
out SMB ports to other synchronized devices.
4. Use coax cables to connect the 10 MHz in/out SMB ports to
other synchronized devices.
Perform Initial System Boot
1. If the network operating system (NOS) installer is located on a
network server, first connect the RJ-45 Management (Mgmt) port
to the network using 100-ohm Category 5, 5e or better twisted-
pair cable. (Not required if the NOS installer is located on
attached storage.)
2. Boot the router. Wait for the ONIE software to locate and
execute the NOS installer, and then wait for the installer to load
the NOS software image.
Subsequent router boots will bypass ONIE and directly run the
NOS software.
(Optional) Install the Air Filter
1. Unscrew and remove the air filter slot cover.
2. Slide the air filter assembly (ordered separately) into the slot and
secure it with its two captured screws.
Caution:
Use a UL/IEC/EN 60950-1 certified power
supply to connect to a DC converter, and a #14 AWG/
1.5 mm2(for 36 VDC to 72 VDC PSU) copper wire to
connect to a DC PSU.
Attention:
Attention: utilisez une alimentation certifiée UL/
IEC/EN 60950-1 pour vous connecter à un convertisseur
CC, et un fil de cuivre # 14 AWG / 1,5 mm2(pour
alimentation 36 V CC à 72 V CC) pour se connecter à une
alimentation CC.
3
21
5
1
6
2
3
1
Note:
Refer to the network operating system (NOS) installer
and NOS documentation for details on software options
and set up for ONIE.
7
2
1
3 4
8
9
2
1
Quick Start Guide
– 3 –
Hardware Specifications
Router Chassis
Size (WxDxH) 440 x 240 x 43.7 mm (17.32 x 9.45 x 1.72 in.)
Weight 3.8 kg (8.38 lb), with two installed PSUs
Temperature Operating: -40° C to 70° C (-40° F to 158° F)
Storage: -40° C to 85° C (-40° F to 185° F)
Humidity Operating: 5% to 95% (non-condensing)
Power
Consumption
180 Watts maximum
48 VDC PSU
Power Rating -48 VDC, 180 Watts
DC Input -36 V – -72 V, 6 A
Regulatory Compliances
Emissions EN 55032:2015+AC:2016, Class B
EN 300 386 V1.6.1
FCC Title 47, Part 15, Subpart B, Class B
VCCI CISPR 32:2016, Class B
BSMI Class B, CNS 13438
Immunity EN 55035:2017
EN 55024:2010+A1:2015
IEC 61000-4-2/3/4/5/6/8/11
Environmental Storage:
◆ETSI EN 300 019-1-1 Class 1.1
◆Temperature: -5°C to +45°C (+23°F to +113°C)
Transportation:
◆ETSI EN 300 019-1-2 Class 2.3
◆Temperature: -40°C to +70°C (-40°F to +158°C)
Operating Conditions:
◆ETSI EN 300 019-1-3 Class 3.2
◆Temperature: -40°C to +65°C (-40°F to +149°C)
◆Relative Humidity: 5% to 95%
Safety CB IEC/EN60950-1 & IEC/EN62368-1
UL/CSA No 62368-1
BSMI CNS14336-1