Fig. 1 A
A
C
D
Fig. 2
Fig. 3
Fig. 4
Antes del primer uso
Elija una ubicación adecuada
Seleccione una ubicación con luz solar directa y completa. No instale el disposivo en áreas con sombra, ya que la batería no se cargará correctamente
y se reducirá la candad de horas de funcionamiento durante la noche. No instale el disposivo junto a otras fuentes de iluminación nocturna, como
las luces de la calle o el porche, ya que estas luces pueden impedir el encendido automáco de la luz.
Carga de la batería
Rere la ra de aislamiento de la parte inferior de la cubierta superior para permir cargo. Para un rendimiento ópmo, lo mejor es instalar la luz bajo
luz solar completa y cargarla entre 10 y 12 horas. La luz debe completar al menos entre 8 y 12 ciclos completos de carga y descarga para alcanzar la
capacidad máxima de la batería.
Instrucciones de montaje
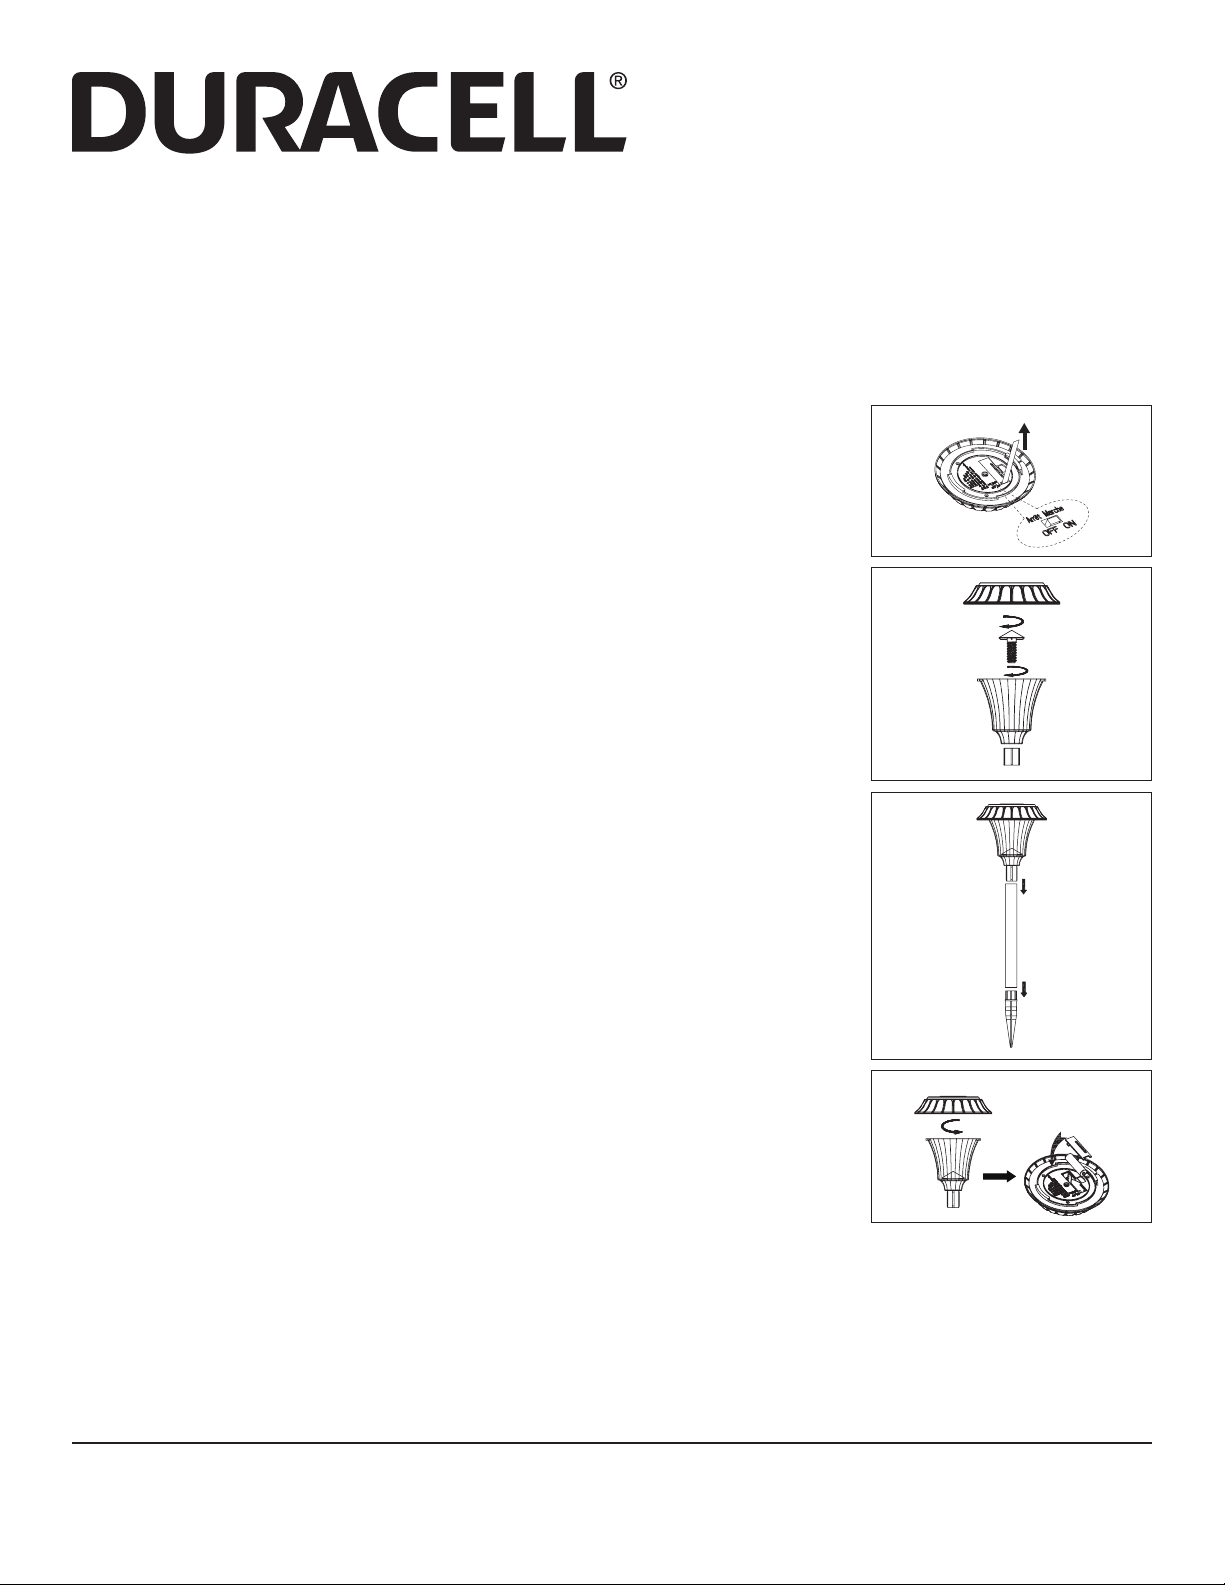
Paso 1 (Fig. 1)
Rere la ra de aislamiento de la parte inferior de la cubierta superior (A). Deslice el interruptor ubicado en la
parte inferior de la cubierta superior hacia la posición ON.
Paso 2 (Fig. 2)
Ulice la tuerca (D) para asegurar el perno (B) a la lente (C). Gire y asegurar la lente (C) a la carcasa superior (A).
Paso 3 (Fig. 3)
Conecte el poste de montaje (E) al clavo de erra (F). Fije el conjunto de la luz de poste de montaje (E). Empujar
el montaje en suelo. Precaución: NO ulice un marllo. En los casos donde el suelo es muy duro, ulice una
pala para primero ablandar el suelo y evitar así que se rompa el clavo de erra.
Reemplace la batería (Fig. 4)
Gire el lente (B) y rerelo de la cubierta superior (A). Rera la cubierta del comparmiento de la batería.
Reemplace la batería con nueva batería Ni-MH, AA, solar y recargable de 900 mAh. Nota: Se requiere una
capacidad mínima de 900 mAh. PRECAUCIÓN: CONTIENE UNA BATERÍA DE HIDRURO METÁLICO DE NÍQUEL. LA
BATERÍA DEBE RECICLARSE O DESECHARSE ADECUADAMENTE POR ESTADO Y LOCALES DIRECTRICES. NO INGERIR.
SI NO SE INSERTA LA BATERÍA CON LA POLARIDAD CORRECTA COMO SE INDICA EN EL COMPARTIMIENTO DE LA
BATERÍA PUEDE ACORTAR LA VIDA DE LA BATERÍA O CAUSAR BATERÍA A LA FUGA. NO ARROJE AL FUEGO.
Resolución de problemas
Si la luz solar no se enciende a la noche o su funcionamiento nocturno es muy breve, el movo puede ser una
de las condiciones que se presentan a connuación:
1. La batería no está cargada por completo. Asegúrese de que la luz solar esté ubicada en un área donde pueda
recibir la máxima candad de luz solar directa y completa todos los días. Si la luz solar no recibe la candad
suciente de luz solar durante un día (por ejemplo, debido a que hay muchas nubes), se recargará el próximo
día soleado y reanudará su funcionamiento normal. La limpieza del panel solar es igual de importante para
garanzar el máximo rendimiento de la carga.
2. La luz solar está instalada cerca de otras fuentes de luz, que pueden impedir que la luz solar se encienda
automácamente a la noche. Para solucionar este problema, busque una nueva ubicación para el disposivo
o elimine las demás fuentes de luz.
3. La batería está alcanzando el n de su vida úl y debe reemplazarse.
Consejos para el invierno
Quite los desechos y la nieve del panel solar para que la batería se recargue. Si las luces estuvieron cubiertas
por nieve durante mucho empo, cargue las baterías bajo luz solar directa y completa durante al menos entre
10 y 12 horas para que mantengan la capacidad máxima.
Garana
El fabricante garanza que este producto está libre de defectos en materiales y mano de obra durante dos (2)
años desde la fecha de compra original. El fabricante se compromete a reparar o sustuir el producto defectuoso,
a su libre elección. Esta garana no incluye los costos asociados con la instalación sica, eliminación o devolución del producto. Esta garana sólo se
exende al comprador original y no es transferible o asignable a los compradores posteriores. Sin el trabajo de garana será proporcionado por esta
garana sin una prueba de compra razonable. Por favor llámenos al 1-866-897-2098 para recibir el servicio de garana o devolver el producto con el recibo
de compra original al lugar de compra. Esta garana no se exende a lo siguiente: (1) las bombillas LED, (2) baterías, (3) los defectos causados por y como
resultado de un mal uso, negligencia, accidente o funcionamiento inadecuado, mantenimiento y almacenamiento, desmontaje de piezas, (4) arañazos en
la supercie o la intemperie ya que se considera un desgaste normal, (5) cualquier otra falla no relacionada con defectos en materiales y mano de obra.
No hay ninguna otra garana, excepto los mencionados anteriormente. Algunos estados no permiten la exclusión o limitación de daños emergentes
especiales o permiten limitaciones en la duración de una garana implícita, por lo que la limitación anterior puede no aplicarse en su caso. Esta garana le
otorga derechos legales especícos y usted puede tener otros derechos que varían de estado a estado.
©2016 Este producto se distribuye a través de: Jiawei Technology (USA) Ltd. • 2305 Lincoln Avenue • Hayward, CA 94545 • USA
En caso de preguntas/repuestos, póngase en contacto con nuestro servicio al cliente llamando al 1-855-826-7488, de lunes a viernes entre las 9
30 y las 18 30, hora del este.
E
F
B
Luces solares para senderos con
lente de vidrio acanalado,
conjunto de 10, bronce
Modelo: RS21Mh-K8-ORB-10


