Duramaxx King Rex User manual

King Rex
Fahrradanhänger
Bicycle Trailer
Remorque de vélo
Remolque de bicicletas
Rimorchio da bici
10027855 10027856


3
DE
Sehr geehrter Kunde,
wir gratulieren Ihnen zum Erwerb Ihres Gerätes.
Lesen Sie die folgenden Hinweise sorgfältig durch und
befolgen Sie diese, um möglichen Schäden vorzubeugen.
Für Schäden, die durch Missachtung der Hinweise und
unsachgemäßen Gebrauch entstehen, übernehmen wir
keine Haftung. Scannen Sie den folgenden QR-Code,
um Zugriff auf die aktuellste Bedienungsanleitung und
weitere Informationen rund um das Produkt zu erhalten:
INHALTSVERZEICHNIS
Sicherheitshinweise 4
Zusammenbau 4
Transport von Haustieren 7
Hersteller & Importeur (UK) 8
TECHNISCHE DATEN
Artikelnummer 10027855, 10027856
Gewicht 16 kg
Zulässige Beladung 40 kg
Empfohlene Höchstgeschwindigkeit 16 km/h
Räder und Maße 20“ / 86 x 56,5 x 65 cm
English 9
Español 15
Français 21
Italiano 27

4
DE
SICHERHEITSHINWEISE
• Der Anhänger darf nicht mit mehr als 40 kg beladen werden.
• Die empfohlene Höchstgeschwindigkeit beträgt 16 km/h.
• Der Anhänger darf nicht benutzt werden, um Personen damit zu
befördern.
• FührenSiekeinetechnischenModikationenamGerätdurch.Dieskann
zu Gefahren im Straßenverkehr führen und die Herstellergarantie erlischt.
• Tragen Sie immer einen Helm.
• Nutzen Sie den Anhänger nicht auf steinigem, unebenem Gelände und in
gefährlichen Verkehrssituationen.
• Das ziehende Fahrrad muss in einwandfreiem Zustand sein. Die Bremsen
sollten perfekt funktionieren. Mit Anhänger (und Beladung) verlängert
sich Ihr Bremsweg.
• Beladen Sie den Anhänger nur bis zur Oberkante, damit herausfallende
Dinge nicht den Straßenverkehr gefährden.
• Der Anhänger darf nicht mit einer mit einer Maschine verbunden werden,
die mit einem Antriebssystem ausgestattet ist. Der Anhänger darf nur
durch direkt angewandte, menschlichen Kraft bewegt werden.
• Der Anhänger darf nicht durch motorisierte Fahrzeuge bewegt werden.
Dies gilt auch für Fahrräder mit Elektroantrieb oder Fahrräder mit
elektromotorischem Hilfsantrieb.
ZUSAMMENBAU
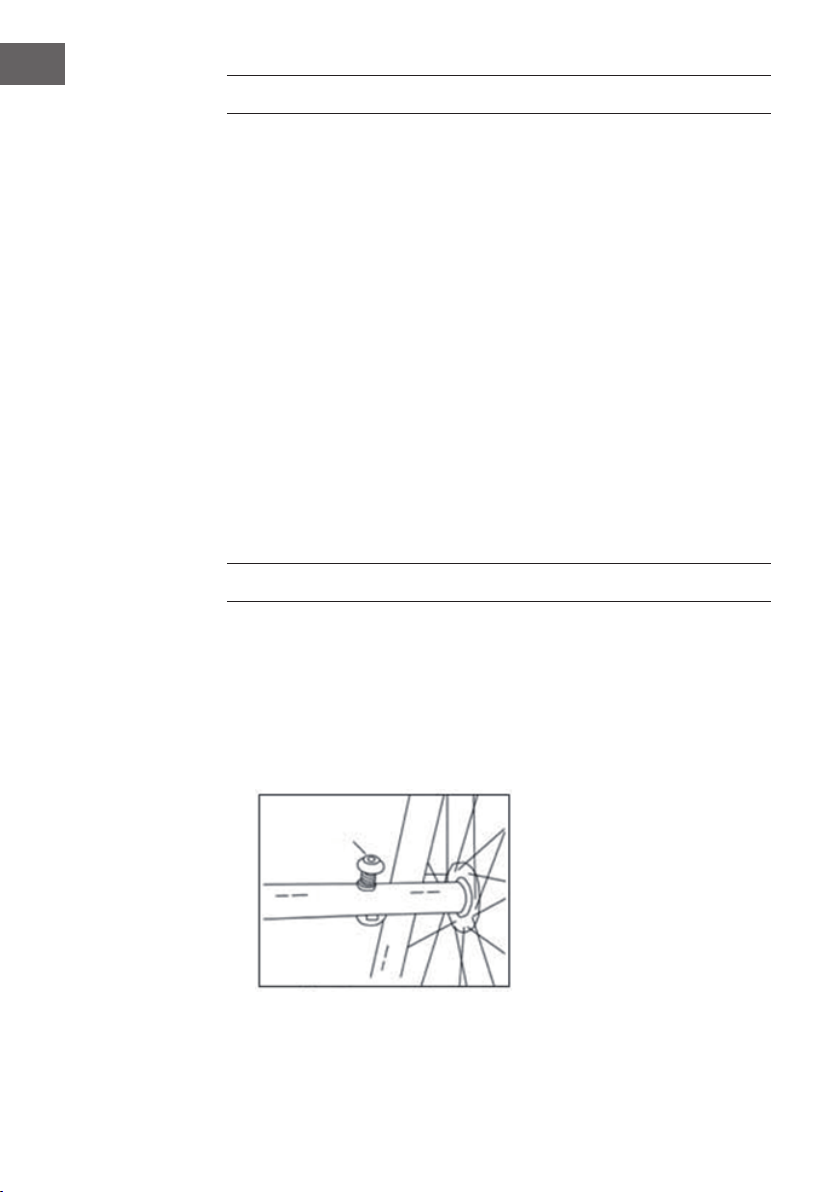
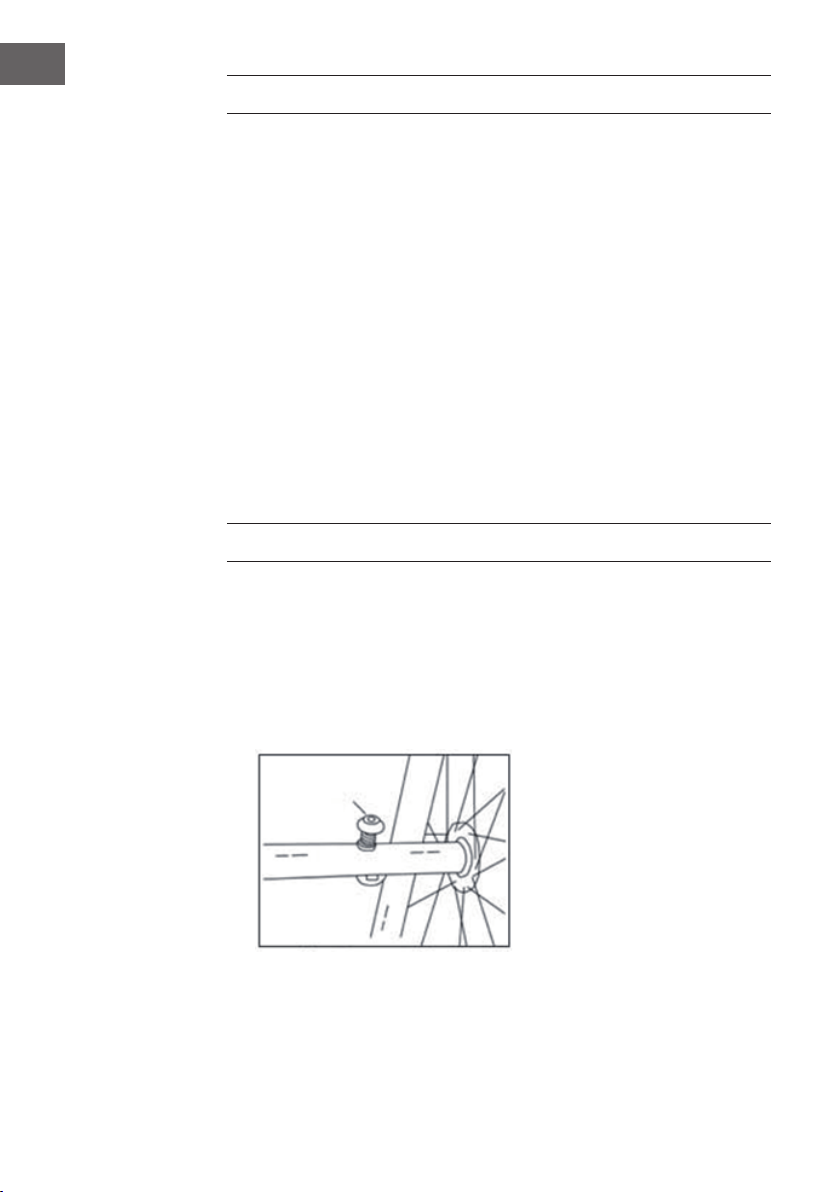
Schritt 1: Die Räder anbringen
• Schieben Sie das Ende der Achsen in die Aufnahmen am Rahmen. Sie
rasten hör- und fühlbar ein.
• Die Räder können wieder entfernt werden, indem Sie den Sicherungspin
auf der Unterseite in die Fassung hineindrücken und das Rad samt Nabe
wieder aus der Aufnahme ziehen.

5
DE
Schritt 2: Die Zugstange in Position bringen
• DerAnhängerwirdimTransport-Zustandgeliefert.Daherbendetsich
die Zugstange auf der Unterseite in der Verstau-Position.
• Ziehen Sie den Sicherungspin aus dem Klappgelenk heraus und klappen
Sie die Zugstange um 180° nach vorn, bis das Gelenk einrastet.
• Sichern Sie das Gelenk wieder mit dem Sicherungspin.
Schritt 3: Aufbau der Kabine
• Stellen Sie den Anhänger auf die Räder und klappen Sie die beiden Wagen-
Seiten nach oben.
• Legen Sie die mitgelieferte Metallstange so in die dafür vorgesehenen
Aufnahmen wie rechts zu sehen.
• Schrauben Sie die Enden mit den großen sternförmigen Muttern fest.

6
DE
Schritt 4: Ans Fahrrad koppeln
• Die Zugstange ist auf einfache und schnelle Weise mit dem Fahrrad zu
verbinden: Schrauben Sie die Mutter der Hinterradnabe ab und stecken
Sie den Haken zwischen Fahrradrahmen und Hinterradnabe (wie eine
zusätzliche Unterlegscheibe).
• Schrauben Sie das Hinterrad ihres Fahrrades wieder fest.
• Der Haken sollte, wie in der Abbildung zu sehen, mit dem ‚männlichen‘ Teil
nach hinten zeigend und vom Fahrrad weg zeigend angebaut werden.
• Stellen Sie den Hänger hinter das Fahrrad und integrieren Sie das
‚männliche‘ Stück in die dafür vorgesehene Öse (‚weibliches Teil‘, siehe
Abbildung).
• Sichern Sie die Verbindung mit dem Sicherheitsgurt, indem Sie diesen
einmal um den Fahrradrahmen wickeln (achten Sie da- rauf, dass er nicht in
die Speichen gerät) und am Hänger-Teil der Ziehstange befestigen.
Schritt 5: Ihr Haustier im Hänger sichern
• Laden Sie Ihr Haustier stets durch die hintere Tür in den Anhänger
während Sie die vordere Tür verschlossen halten.
• Bitten Sie eine zweite Person, das Fahrrad derweil festzuhalten.
• Die mitgelieferte Sicherheitsleine sollte mit einem Hundegeschirr und
nicht mit einem Halsband verbunden werden.
• Schließen Sie die hintere Tür bevor Sie losfahren.

7
DE
TRANSPORT VON HAUSTIEREN
Beladen und Entladen von Haustieren
• Beladen und Entladen Sie das Haustier nur durch die Hintertür, wenn die
Vordertür geschlossen ist und der Anhänger am Fahrrad befestigt ist.
• WennsichdasHaustierimAnhängerbendet,befestigenSieeinEndeder
Sicherheitsleine (im Lieferumfang enthalten) am Halsband des Haustieres
und das andere Ende am D-Ring im Anhänger. Stellen Sie die Länge
der Leine so ein, dass das Haustier bei geöffneter Leine nicht durch die
Frontscheibe austreten kann.
• Schließen Sie während der Fahrt immer die hintere Tür.
Den Anhänger kennen lernen
Machen Sie Ihr Haustier langsam mit dem Anhänger vertraut, öffnen und
schließen Sie die Türen und lassen Sie Ihr Haustier auf Kommando wieder
aussteigen.
In Bewegung
Gewöhnen Sie Ihr Haustier an die Bewegung des Anhängers, indem Sie das
Gespann langsam schieben. Sitzt das Haustier ruhig, fahren Sie ein kleines
Stück. Wird es unruhig, halten Sie das Gespann an, beruhigen Sie es und
belohnen Sie es, sobald es ruhig ist, mit Leckerlies.
In voller Fahrt
Versichern Sie sich, dass Ihr Haustier ruhig ist und den Anhänger gut annimmt,
verlängern Sie die Fahrtzeiten schrittweise.

8
DE
HERSTELLER & IMPORTEUR (UK)
Hersteller:
Chal-Tec GmbH, Wallstraße 16, 10179 Berlin, Deutschland.
Importeur für Großbritannien:
Berlin Brands Group UK Ltd
PO Box 1145
Oxford, OX1 9UW
United Kingdom

9
EN
Dear customer,
Congratulations on the purchase of your appliance.
Please read the following instructions carefully and
follow them to prevent potential damage. We accept
no liability for damage caused by disregarding the
instructions or improper use. Please scan the QR code to
access the latest operating instructions and for further
information about the product.
CONTENTS
Safety instructions 10
Assembly 10
Transport of pets 13
Manufacturer & Importer (UK) 14
TECHNICAL INFORMATION
Product code 10027855, 10027856
Product code weight 16 kg
Permissible load 40 kg
Recommended maximum speed 16 km/h
Wheels and dimensions 20" / 86 x 56.5 x 65 cm

10
EN
SAFETY INSTRUCTIONS
• The trailer must not be loaded with more than 40 kg.
• The recommended maximum speed is 16 km/h.
• The trailer must not be used to transport people.
• Donotmakeanytechnicalmodicationstotheunit.Thiscanleadto
dangersinroadtrafcandthemanufacturer'swarrantywillbevoided.
• Always wear a helmet.
• Donotusethetraileronstony,uneventerrainandindangeroustrafc
situations.
• The bicycle being towed must be in perfect condition. The brakes should
work perfectly. With a trailer (and load) your braking distance will
increase.
• Only load the trailer up to the top edge so that things falling out do not
endangerroadtrafc.
• The trailer must not be connected to a machine equipped with a
transmission mechanism. The trailer may only be moved by directly
applied human power.
• The trailer must not be moved by motorised vehicles. This also applies to
bicycles with electric drive or bicycles with auxiliary electric motor drive.
ASSEMBLY
Step 1: Attach the wheels
• Slide the end of the axles into the receptacles on the frame. You can hear
and feel them click into place.
• The wheels can be easily detached by pressing the locking pin on the
underside into the socket and pulling the wheel and hub out of the socket
again.

11
EN
Step 2: Put the drawbar in position
• The trailer is delivered in transport condition. Therefore, the drawbar is on
the underside in the stow position.
• Pull the safety pin out of the folding joint and fold the drawbar forward
180° until the joint engages.
• Secure the joint again with the locking pin.
Step 3: Assembling the cabin
• Put the trailer on its wheels and fold up the two sides of the trolley.
• Place the metal rod supplied in the slots provided as shown on the right.
• Screw the ends tight with the large star-shaped nuts.

12
EN
Step 4: Couple to the bike
• The drawbar can be connected to the bicycle in a simple and quick way:
Unscrew the nut of the rear wheel hub and insert the hook between the
bicycle frame and the rear wheel hub (like an additional washer).
• Screw the rear wheel of your bicycle back on.
• Thehookshouldbeattachedwiththe'male'partpointingbackwardsand
away from the bicycle, as shown in the illustration.
• Placethehangerbehindthebicycleandintegratethe'male'pieceintothe
eyeletprovided('femalepiece',seeillustration).
• Secure the connection with the safety belt by wrapping it once around
the bicycle frame (make sure it does not get caught in the spokes) and
attaching it to the hanger part of the drawbar.
Step 5: Secure your pet in the hanger
• Always load your pet into the trailer through the rear door while keeping
the front door closed.
• Ask a second person to hold the bicycle in the meantime.
• The safety leash provided should be connected to a dog harness and not
to a collar.
• Close the rear door before driving off.

13
EN
TRANSPORT OF PETS
Loading and unloading of pets
• Only load and unload the pet through the back door when the front door is
closed and the trailer is attached to the bicycle.
• Once the pet is in the trailer, attach one end of the safety leash (included)
tothepet'scollarandtheotherendtotheD-ringinthetrailer.Adjustthe
length of the leash so that the pet cannot escape through the windscreen
when the leash is open.
• Always close the rear door while driving.
Getting to know the trailer
Slowly familiarise your pet with the trailer, open and close the doors and let
your pet out on command.
On the move
Get your pet used to the movement of the trailer by pushing it slowly. If the pet
sits still, drive a short distance. Should it become restless, stop the team and
soothe it, then reward it with treats as soon as it is calm.
At full speed
Make sure your pet is calm and adopts to the trailer comfortably, gradually
increase the driving distances.

14
EN
MANUFACTURER & IMPORTER (UK)
Manufacturer:
Chal-Tec GmbH, Wallstrasse 16, 10179 Berlin, Germany.
Importer for Great Britain:
Berlin Brands Group UK Ltd
PO Box 1145
Oxford, OX1 9UW
United Kingdom

15
ES
Estimado cliente:
Le felicitamos por la adquisición de este producto. Lea
atentamente el siguiente manual y siga cuidadosamente
las instrucciones de uso con el n de evitar posibles
daños. La empresa no se responsabiliza de los daños
ocasionados por un uso indebido del producto o por
haber desatendido las indicaciones de seguridad.
Escanee el siguiente código QR para obtener acceso al
manual de usuario más reciente y otra información sobre
el producto.
ÍNDICE
Indicaciones de seguridad 16
Montaje 16
Transporte de mascotas 19
Fabricante e importador (Reino Unido) 20
DATOS TÉCNICOS
Número del artículo 10027855, 10027856
Peso 16 kg
Capacidad máxima recomendada 40 kg
Velocidad máxima recomendada 16 km/h
Ruedas y medidas 20" / 86 x 56,5 x 65 cm

16
ES
INDICACIONES DE SEGURIDAD
• La carga del remolque no debe superar los 40 kg de peso.
• La velocidad máxima recomendada es de 16 km/h.
• El remolque no debe utilizarse para transportar personas.
• Norealiceningunamodicacióntécnicaenlaunidad.Estopuedederivar
enunpeligroparaeltrácorodadoylagarantíadelfabricantequedará
anulada.
• Utilice siempre un casco.
• No utilice el remolque en terrenos pedregosos e irregulares ni en
situacionesdetrácopeligroso.
• La bicicleta que lleve el remolque debe encontrarse en perfecto estado.
Los frenos deberán funcionar a la perfección. Con el remolque (y la carga),
su distancia de frenado aumentará.
• Cargue el remolque sólo hasta el borde superior para que no se caigan
objetosqueponganenpeligroeltrácorodado.
• El remolque no debe conectarse a una máquina equipada con un sistema
de tracción. El remolque sólo debe moverse con fuerza humana directa.
• Elremolquenodebemoverseconvehículosmotorizados.Estotambiénse
aplicaalasbicicletasconaccionamientoeléctricooalasbicicletasconun
accionamientoauxiliardemotoreléctrico.
MONTAJE
Paso 1: Colocar las ruedas
• Deslice el extremo de los bujes en las horquillas del cuadro. Oirá y sentirá
cómo encajan en su sitio.
• Las ruedas pueden volver a desmontarse al presionar el pasador de
seguridad de la parte inferior y sacar de nuevo la rueda junto con el buje.

17
ES
Paso 2: Colocar el enganche en posición
• El remolque se entrega en condiciones de transporte. Por lo tanto, el
enganche está guardado en la parte inferior.
• Saque el pasador de seguridad de la articulación plegable y pliegue el
enganche 180° hacia delante hasta que la articulación quede encajada.
• Asegure de nuevo la articulación con el pasador de seguridad.
Paso 3: Montaje de la cabina
• Ponga el remolque sobre sus ruedas y coloque los dos lados del carro hacia
arriba.
• Coloque la varilla metálica suministrada en las ranuras previstas, como se
muestra en la imagen.
• Atornille los extremos con las tuercas grandes en forma de estrella.

18
ES
Paso 4: Acoplado a la bicicleta
• El enganche se conecta a la bicicleta de forma rápida y sencilla:
desenrosque la tuerca del buje de la rueda trasera e introduzca el gancho
entre el cuadro de la bicicleta y el buje de la rueda trasera (como una
arandela adicional).
• Vuelva a enroscar la rueda trasera de su bicicleta.
• El gancho debe colocarse con la parte "macho" apuntando hacia atrás y
lejos de la bicicleta, como se muestra en la ilustración.
• Coloque el enganche detrás de la bicicleta e integre la pieza "macho" en el
ojalprevisto("piezahembra",véaselailustración).
• Asegurelaconexiónconelcinturóndeseguridadenvolviéndolounavez
alrededor del cuadro de la bicicleta (asegúrese de que no se enganche en
los radios) y fíjelo al enganche.
Paso 5: Coloque a su mascota en el remolque
• Cargue siempre a su mascota por la puerta trasera del remolque y
mantenga cerrada la puerta delantera.
• Pídale a otra persona que sostenga la bicicleta mientras tanto.
• Debeconectarlacorreadeseguridadsuministradaaunarnésparaperros
y no a un collar.
• Cierre la puerta trasera antes de empezar a conducir.

19
ES
TRANSPORTE DE MASCOTAS
Carga y descarga de mascotas
• Cargue y descargue la mascota exclusivamente por la puerta trasera con la
puerta delantera cerrada y el remolque ya sujeto a la bicicleta.
• Cuandolamascotaestéenelremolque,jeunextremodelacorreade
seguridad(incluida)alarnésdelamascotayelotroextremoalaanilla
en forma de «D» del remolque. Ajuste la longitud de la correa para que
lamascotanopuedaescaparporlapartefrontalcuandolacorreaesté
suelta.
• Asegúrese de que la puerta trasera se mantenga cerrada en todo momento
mientras conduce.
Familiarizarse con el remolque
Familiarice poco a poco a su mascota con el remolque, abra y cierre las puertas
y permita que su mascota salga solo cuando se lo ordene.
En movimiento
Acostumbre a su mascota al movimiento del remolque empujándolo
lentamente. Si la mascota se queda quieta y tranquila, conduzca una distancia
corta.Siseinquieta,detengaelmovimiento,cálmelayrecompénselacon
golosinas en cuanto se calme.
A buen ritmo
Asegúrese de que su mascota permanezca tranquila y se acostumbre al
remolque. Aumente gradualmente la duración de los viajes.

20
ES
FABRICANTE E IMPORTADOR (REINO UNIDO)
Fabricante:
Chal-Tec GmbH, Wallstraße 16, 10179 Berlín, Alemania.
Importador para Gran Bretaña:
Berlin Brands Group UK Ltd
PO Box 1145
Oxford, OX1 9UW
United Kingdom
This manual suits for next models
2
Table of contents
Languages: