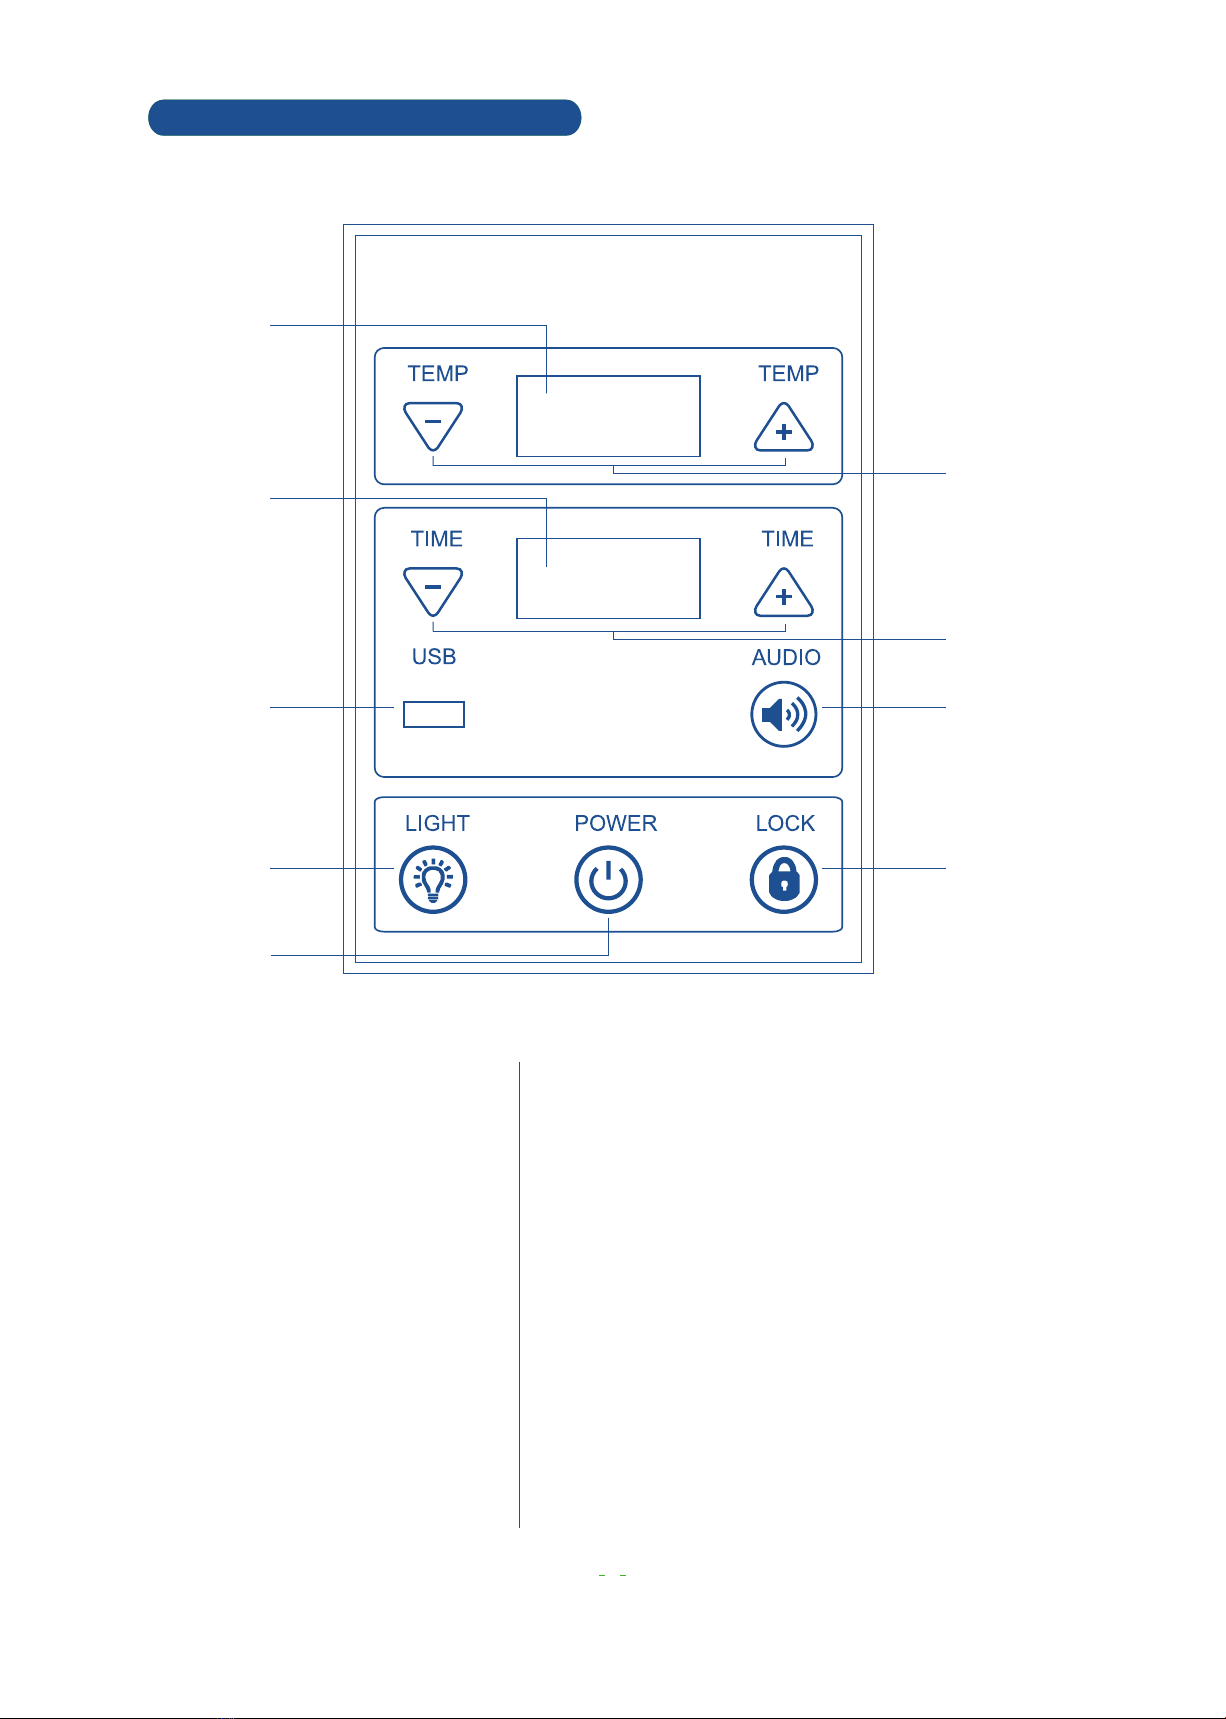
Durasage FRB-2F3 User manual

Wooden Infrared Sauna
User Guide and Instruction Manual
FRB-2F3
WARNING: Read all instructions carefully before
using this sauna. This product should
always be used with care.


Contents
Important safety guides 1
………………………
Structure of infrared sauna 2……………………
Installation process 3……………………………
Installation precautions 4………………………
Control panel operation 5
………………………
Control box 7
……………………………………
Maintenance 8
…………………………………
Trouble shooting 9
………………………………
Customer Support 11
………………………………

Important safety guides
Please strictly follow safety precautions when using!
1
1. Children must be using the sauna under the supervision of an adult.
2. Do not insert objects or touch the heating board to prevent danger.
3. Never pour water onto the equipment or the heating board.
4. Do not store flammable gas or liquids such as hair spray, oil paint, gaso-
line, etc near the sauna to avoid fire.
5. Do not place items inside or on top of the sauna.
6. Do not touch the power control panel or any electrical components with
wet hand to prevent electrical shock.
7. Do not use the sauna during thunderstorms to prevent electrical shock.
8. Do not tilt or lean on the equiopment to prevent damage or injury.
9. Shut down the sauna for 30 minutes after 4 hours of continuous use.
10. Do not operate the sauna in a high temperature environment.
11. Use caution when drinking alcohol.
12. Avoid using if you have hemophilia or are prone to bleeding.
13. Please consult with your doctor before using if you have health con-
cerns and/or taking prescribed medicine.
14. Do not use immediately after intense exercise, wait until the body’s
core temperature returns to normal before use.
15. If you feel any discomfort stop using the sauna immediately.
16. Mind your head when you step in and out of the sauna.
17. Do not sleep inside the equipment while it is on.
18. Do not use any bath products inside the sauna.
19. If you have any questions, please call support.
Disclaimer: This product is not a medical device and it is not intended to diagnose, treat, cure or prevent
diseases. If a condition persists, contact a doctor. We recommend that you do not rely solely on the infor-
mation presented and that you always read labels, warnings, and directions before using or consuming a
product. This statement has not been evaluated by the Food and Drug Administration.

Structure of infrared sauna
2
Speaker
Left board
Control panel
Hinge
Handle
1
2
3
4
Control box
Duster cover
5
Temperature sensor
Top board
Backboard
Heater frame
11
12
Right board
13
14
15
Door glass
10Ventilation
6
8
9
7
Front board
Foot rest board
Bench front board
Bench
Bottom board
16
17
18
19
1
2
3
4
5
6
7
8
9
10
11
12
13
14
16
15
17
18
19

Installation process
Back board Left board
BenchBench front board
Bottom board
Right board
Top boardFront boardFoot rest board
3

Installation precautions
Large plate assembly
Outer buckle installation method
4
Electrical connection
1 2
Conection cable Connection plug

5
1
2
6
7
8
9
5
3
4
Control panel operation
1
2
3
4
5
6
7
8
9
Temperature display
Displays temerature.
Temp control
After heater is turned on, press TEMP- and TEMP+
to adjust the heater temperature.
See the next page for details.
Time control
Touch the ‘+’ and ‘-’ buttons to set the timer from
5 to 60 minutes. It will beep 3 times when there is
5 minutes left.
See the next page for details.
Audio function
See the next page for details.
Power lock function
Press and hold LOCK button for 5S, when the indicator light
turns on, the display is now locked. To unlock press and hold
LOCK button for 5S, indicator light will turn off.
Timer display
Displays timer.
USB function
Touch this key to start USB function.
Power button
Touch this key to turn it on or turn it off.
Light button
Touch the key to turn on/off the light
See the next page for details.

6
Audio function
(1) First press AUDIO button, indicator light is on, open Bluetooth, meanwhile open the Bluetooth settings
on your device, search and pair with sauna before it can play music. It takes 6 or 8S to match each other.
Temperature display shows “BLU”. Time display shows “--Db”, or delays 5S to show, press TIME+ or TIME-
to adjust the volume (01-30DB), short press TEMP+- to adjust last and next music. If the sauna is open, no
button press after 8S, display shows temperature and time.
Attention: During mode select, it can not switch between Bluetooth, USB and radio immedietly.
The switch time takes 6 or 7S. If the user would like to switch immediately, please wait 6 or 7S.
(2) Second press AUDIO button, indicator light is on, open USB function, temperature display shows
USB, press TEMP+ to adjust last music, press TEMP- to adjust next one. Time display shows “--Db”. Press
TIME+- to adjust volume, short press TEMP+- to adjust last and next music, no button press after 8S,
display shows temperature and time.
Attention: It takes 3S to read the USB, if haven’t connected to USB, volume will show 00db.
(3) Press the button the third time, open radio, broadcast prompt sound, frequency shows in
temperature display. Time display shows “VOL”, press TIME+- to adjust volume. Press TEMP to adjust
frequency. No button press after 8S, display shows temperature and time.
Attention: While radio is on press and hold AUDIO button ,it will search for frequencies automatically.
The frequency range is (87.5MHZ-108MHZ), when search the effective signal frequency, it will save it.
Using the system for the first time you will need to scan for the local channels.
(4) Press the forth time, turn off sound function
Light button
On the status of system standby, press “LIGHT” button to turn on or turn off the lamp separately.
If the indicator light is on, it means lamp on, if the indicator light is off, it means the lamp is off.
When high voltage lamp is on, press 5S, time display shows 2n, temperature display shows Lx (x is 1-9)
(1)When it displays 2n, short press “ LIGHT” button to change LED light color, pressing one time can
change one color.
(2)Within 8S without pressing “LIGHT” button, time display quits 2n, temperature display quits Lx, the
color of LED lamp remains current status and quits light control logic lock key function.
(3) It can open or close the LED light and high voltage lamp separately. On the status of 2n, press
TIME- and TIME+ separately to turn on or turn off LED light or high voltage lamp.
Temp control
After heater is turned on, press TEMP- and TEMP+ to adjust the heater temperature. Temperature range
is from 30 to 65°C (75°C), Stepping temperature is 1°C. Fahrenheit degree range is from 90 to 150°F
(167°F), stepping temperature is 5°F. When temperature is lower than 30°C or 90°F, it shows LO.Celsius
and Fahrenheit switch: Press “TEMP-” and “LOCK” meanwhile for 5S to switch Celsius and Fahrenheit.
Control panel operation

7
Control Box
This control box is the control center of sauna room, it is installed
on the top board, input/output connections as below.
Heaters power output cable (LOAD A--LOAD F)
Main power of sauna room
Fuse reset
Lamp power output cable
12V output
Control panel connecting
Antenna
USB output
Color lamp power output
Audio output
Temperature sensor connection port
1
2
3
4
5
5
L
A
M
P
AB
LOAD
C
LOAD
D
LOAD
E
LOAD
F
LOAD
4
1
2
3
L
A
M
P
A
LOAD
C
LOAD
D
LOAD
E
LOAD
F
LOAD
B
LOAD
AC POWER
L N
O C P

8
Maintance
Before using
1. Please be sure to follow the instruction manual before
operating the sauna;
2. Prepare a towel on the seat bench to prevent sweat
from dripping onto it.To avoid affecting the quality and
beauty of wood.
After using 1. Please unplug the power plug while not in use;
2. Open the door to let the heat and any humidity
to dissipate and to keep the sauna cabin dry.
Stain on wood
1. The outer cabin can be wiped with a damp towel;
The inner cabin can be wiped by small vacuum cleaner.
2. Do not use organic solvents to clean surfaces, such as
gasoline, alcohol, etc. wipe the sauna surface;
3. Do not use sharp objects in sauna cabin to prevent
scratching woods.
Stain on glass
1. Clean the glass with soft materials;
2. Stubborn stains can be wiped with a damp cloth, then
dry with a dry cloth;
3. Do not scratch the surface with a sharp object to prevent
scratching the glass.
Transportation
and storage
1. Avoid water, snow and intense impact during the
transportation;
2. Do not store it in a humid environment;
3. If local climate is relatively dry, often wipe the
product with a wrung wet towel;
4. If local climate is relatively humid, can be
ventilated and dried frequently.

9
Trouble shooting
Number
1
2
3
4
Indicator light for
powersupply not
working
Indicator light for
function is not
working
Infrared Heater not
heating up
Odor from the sauna
The connector is not
connected properly
No power supply input
Indicator light is broken
The heating indicator light is
broken
The circuit board or components
are broken
The temperature sensor is broken
The heater is broken
The wire junction or the heater’s
wire is loosen
The temperature sensor is broken
The circuit board of the relay is
not working
The circuit‘s problems
Replace the circuit board
1) There is a plastic bag around,
remove it.
2) Some heater’s temperature
too high, turn off the power
supply and replace it.
3) Parts on the circuitry are
broken.
Check if junction of the
temperature sensor is loose
and replace it
Check and make sure they are
tight
Replace with a new one
of the same specifications
Check if the connection is loose
and replace it
Replace the circuit board
Replace the relevant control
panel
Check the connection or
replace a new one
Check the circuitry ( especially
whether there is power supply
input)
Replace the circuitry panel
Problems Possible reasons Solutions
General content

10
Trouble shooting
Problems Possible Reasons Solutions
4
5
6
1
2
3
Poor display
Controller
wont turn on
Temperature
display is not
working
correctly
Radio without
sound
System alarm
7Stops heating
after awhile
Bluetooth is
not paired
properly
Digital tube quality problem
Digital tube driver IC is
damaged
CPU burned out
The controller’s connection is
loose
Temperature sensor damaged
Check if other devices are
paired
Bluetooth driver module is
broken
The screen displays HH and
alarms
The screen displays E1 and
alarms
The screen displays EO and
alarms
Motherboard amplifier is
broken
Replace the display panel
Replace a new CPU
No power input Check for power
Reconnect the control computer cable
Replace the temperature sensor
Disconnect the paired device
Check if the Bluetooth
version is compatible. The
system supports version 2.0
or 4.0
Use device with matcing version
Replace the 4-in-1 audio module
Excessive temperature
Sensor short circuit
The system has overload,
overcurrent protection
Temperature sensor partial
overheating
First check if there is an open circuit, if no
open circuit, restart current limit protec-
tion
Check why the partial area is overheating
Sensor disconnected
Replace the motherboard
Radio module is broken
Speaker cable is broken
or the speaker is broken
Replace the 4-in-1 audio module
Replace the wire or replace the speaker
Applicable to Controller

Claims
Claims must be initiated during the Warranty Period. Claimant will be required to
provide proof of purchase and the date of Product purchase (unless the Product
was registered at the time of purchase) and may be required to return the
Product or component to Seller at Claimant’s expense).
Customer Service Department
Please scan the QR code to send us an email if you have any questions or
concerns.
Angels Investments, L.L.C.
Telephone (480) 878-4789
1609 W 17th St, Tempe, AZ, 85281
Warranty
Angels Investments LLC (“Durasage ”) warrants that its products will be free from
defects in workmanship and materials under normal use for the period listed
below (the “Limited Warranty Period”).
One Year Limited Warranty Period: One and a half Year (1.5) from original
purchase date
All Electronic Durasage Products unless otherwise stated.
During the Warranty Period, Durasage will repair, replace, at no charge, products
or parts of a product that proves defective because of improper material or
workmanship, under normal use and maintenance.
What does this limited warranty not cover?
- Normal wear and tear of product use
- Misuse, lack of care, mishandling, accident, abuse, or other abnormal use
- Use of the Product other than for its intended purpose
- Damage caused by improper or unauthorized repair or maintenance
- Product that has been modified or altered
- Any product that is not manufactured by Durasage
- Any Product that is not purchased from a Durasage authorized retailer
11
Customer Support
Warranty and Customer Support Details
Table of contents
Other Durasage Plumbing Product manuals
Popular Plumbing Product manuals by other brands

American Standard
American Standard SPECTRA+ TOUCH 1698.374 installation instructions

Luxart
Luxart Poydras PO511TOV Installation

Moen
Moen 84426 manual

Fortis
Fortis Scala 8471100 installation instructions

Sterling Plumbing
Sterling Plumbing MCALLISTER 11444 Specifications

Moen
Moen Brushed Bronze 128880BB Illustrated parts list