Duren 321287 User manual

www.duren.co.uk
Part Code: 321287
240V Electric 150mm Dual Ac'o Polisher
Product I struc'o Ma ual
PLEASE KEEP THIS MANUAL SAFE FOR FUTURE REFERENCE
321287_Product nstructions 30/07/2014 08:42 Page 1

321287
I struc'o Ma ual
Dure Tools
T: 01582 484875 E: sales@dure .co.uk
www.dure .co.uk
Sp cification
Voltage: 230-240 ~ 50 Hz
Power Output: 600W
Thread: 5/16”
Pad Size: 150mm/6”
Free Speed: 1500-6800rpm
Weight: 2kg
Vibration Level: 2.3m/s2(uncertainty 1.5m/s2)
Sound Level: LpA: 80dB(A) (uncertainty 3dB(A)
LWA: 91dB(A) (uncertainty 3dB(A)
Tool Us
This electric polisher can be used to polish a large range of painted or varnished surfaces. t is also for use with
compounding liquid.
G tting to know your tool
1 Tool speed is adjusted using the rotary adjuster on the rear of the tool. The tool starts as soon as the
Power Switch is activated.
2 The switch does not need pressure applied to stay in the on position. The switch is pressed again to
turn off the tool.
3 Two handed operation is recommended at all times.
IMPORTANT
Please read through this Manual carefully before using the 32128 .
This tool must o ly be used for polishi g a d withi the parameters
outli ed i this ma ual. All users of the equipme t should be trai ed i
a y risks associated with the products they are polishi g or usi g as
fi ishi g aids.
Speed Adjuster (to rear)
Polishing Pad
Cable Entry
Power Switch
Body
Forward
Handle
Rating Label
WARNING!
Tool not for use in work areas
covered by Ex-protection
regulations.
321287_Product nstructions 30/07/2014 08:42 Page 2

PLEASE KEEP THIS MANUAL IN A SAFE PLACE FOR FUTURE REFERENCE
Dure Tools
T: 01582 484875 E: sales@dure .co.uk
www.dure .co.uk
Saf ty Instructions
These instructions are intended as a guide to the correct use of this equipment. The process or materials being
polished may have risk characteristics requiring additional safety measures and these must be identified by the
user. All users of this polisher must be thoroughly acquainted with this manual.
B for Us and B for Using Tool for th First Tim
- Make sure you have the relevant Personal Protection Equipment (PPE).
Hand Prot ction
The pad revolves at high speed and may cause damage if bought into contact with
exposed flesh. The workpiece and the pad may also get hot after prolonged use. Hand
protection must be strong enough to protect the skin and be a good fit and have no loose
parts that may get caught in rotating parts.
Ey and Br athing Prot ction
The polishing process may create dust and other airborne particles. There is no dust
extraction function on this machine so it is essential that approved eye and breathing
protection is worn.
Nois and Ear Prot ction
Depending on the material being worked on and the type of polishing disc used, noise
levels may cause hearing damage including temporary or even permanent hearing loss.
t is recommended that Ear Protection is worn at all times when using the polisher.
R p titiv Strain Injury (RSI)
All products of this nature can cause RS if used for long period, particulary in an
awkward operating position. Adequate rest periods and working conditions should be
considered for prolonged use.
El ctrical Saf ty Instructions
Th own r and/or th op rator MUST r ad, und rstand and comply all points list d b low.
1 You MUST check all electrical products, before use, to ensure that they are safe.
2 You MUST inspect plugs, sockets, power leads and any other connectors for wear or damage.
3 You MUST have any worn or damaged plugs, sockets and power leads replaced immediately
upon discovery.
4 You MUST ensure that the risk of electric shock is minimised by the installation of appropriate
safety devices.
5 A Residual Current Circuit Breaker (RCCB) should be incorporated in the main distribution board. - f
no RCCB is fitted, use of a Residual Current Device (RCD) is strongly recommended. f you are
unsure, speak to a qualified electrician and have an RCCB fitted if necessary.
6 RCDs are available from most electrical retailers.
7 The Health & Safety at Work Act 1974 makes owners of electrical appliances responsible for the
safe condition of those appliances and the safety of the appliance operators. f in any doubt about
electrical safety, seek advice from the governing body or independent electrical training providers.
8 Ensure that the insulation on all cables and on the appliance are safe and intact before connecting it
to the power supply.
9 Ensure that cables are always protected against short circuit and overload.
10 Regularly inspect power supply cables and plugs for wear or damage and check all connections to
ensure that none is loose or damaged.
11 Ensure that the voltage rating of the compressor matches your power supply and that the plug is fitted
with the correct fuse.
12 Do not yank the plug from the socket as can cause damage to both plug and socket. Any damage to
plugs or sockets is potentially lethal.
13 Never carry any electrical tool by it’s power lead.
14 f you are using an extension reel, ensure that it is fully unwound and that an RCD is fitted. A
minimum cable core of 1.5mm2is recommended although a core of 2.5mm2will ensure that heavy
loads can be handled. Your extension reel needs to be marked for outdoor use if working outside.
*MSDS
Material Safety Data Sheet
321287_Product nstructions 30/07/2014 08:42 Page 3

321287
I struc'o Ma ual
Dure Tools
T: 01582 484875 E: sales@dure .co.uk
www.dure .co.uk
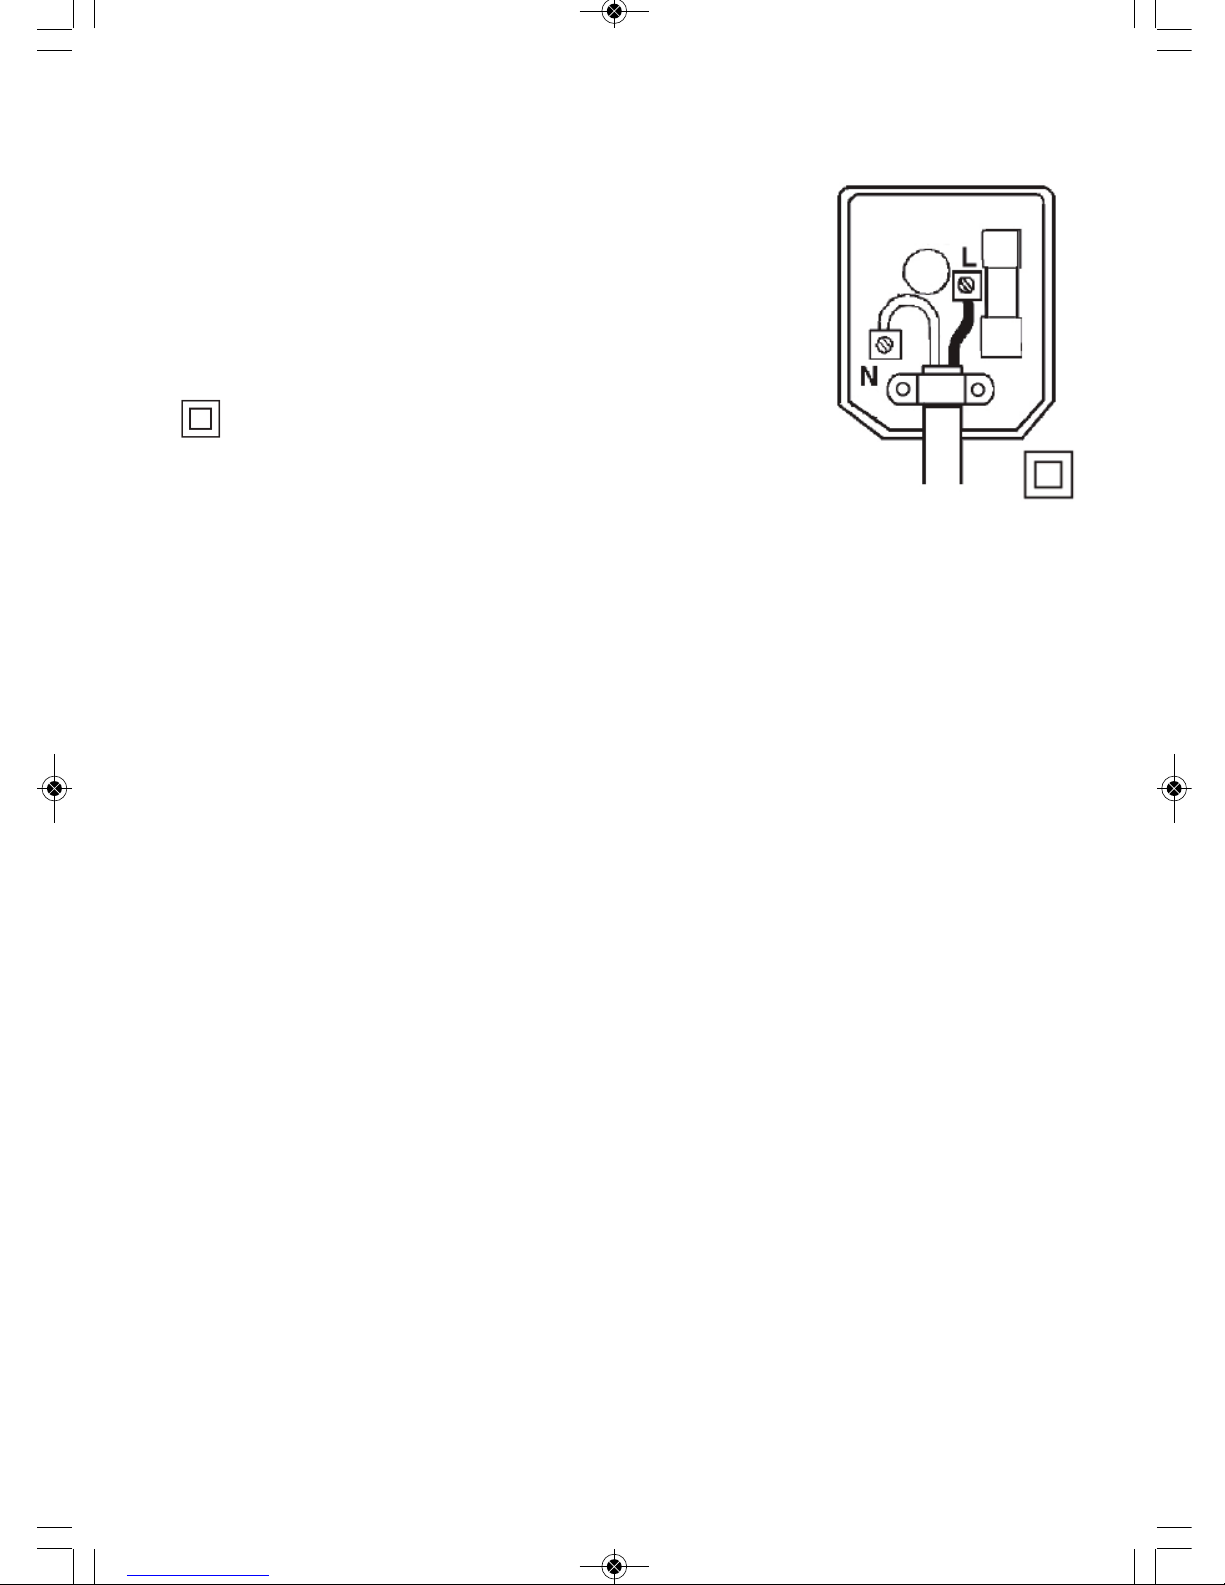
15 When the ASTA/BS approved UK 3 pin plug is damaged, cut the cable close to the plug and dispose
of the it safely. Fit a new plug according to the following instructions;
1: Connect the BROWN live wire to the live terminal ‘L’.
2: Connect the BLUE neutral wire to the neutral terminal ‘N’.
3: After wiring, check that there are no bare wires, that all wires
have been correctly connected, that the cable outer insulation
extends beyond the cable restraint and that the restraint is tight.
The plug fitted to this tool is fitted with a 13amp fuse.
This product is double insulated and marked with this symbol. t is fitted with
live (brown) and neutral (blue) wires only.
G n ral Saf ty Instructions
1 Ensure the polishing pad is equal to or greater than 120% of the stated RPM of the polisher.
2 Keep the workplace clean and tidy.
3 Use the tool in a well ventilated area.
4 DO NOT hold the workpiece by hand, always make sure the workpiece is clamped securely.
5 Keep all flammable and combustible materials away from the work area.
6 Children and other unauthorised persons should be kept away from the work area.
7 NEVER use the polisher whilst the floor underfoot is wet or slippery.
8 NEVER use the polisher when standing on an unstable surface.
9 Keep the polisher out of reach of children.
10 Analyse the material you are polishing. Be aware of the dangers of polishing lead based
paints. Historically, paint contained lead and polishing such paint may cause toxic
particles to enter the atmosphere. f you suspect that lead could be in the paint the
following actions must be observed;
- Alert any other persons in the nearby and keep them away from the working area.
- Use specific air fed respirator, PE coated coveralls and latex gloves.
- Dispose of any dust and paint waste correctly and thoroughly clean the
workpiece and working area after the polishing has finished.
11 NEVER attempt to sand materials containing asbestos.
12 V BRAT ON. Hand electrical tools may produce vibration. Vibration from polishers can
cause disease. The use of gloves will help reduce the risk and can help prevent injury.
13 Disconnect the electrical supply before changing disc or pad.
14 Ensure the polisher has stopped rotating before putting it down or handling the pad or disc.
15 NEVER carry the polisher by the power cord.
16 NEVER point the polisher at other persons.
17 NEVER operate the polisher whilst under the influence or drugs, alcohol or intoxicating medication.
18 Check you have no loose clothing, hair, jewellery or any other items of a personal nature
that might become entangled with the rotating parts.
19 Be aware of the dangers of working in or on and building or material containing asbestos. Always
take a appropriate measures up to an including contracting licensed 3rd parties to remove and/or
make safe and articles or asbestos.
Switch off unit imm diat ly if;
1 There is interruption of mains electrical supply such as in the case of a power cut.
2 There damage occurs to the socket, plug, cable or cable entry into the unit.
3 There is damage to the on/off switch on the unit.
4 There is a smell of burning plastic.
5 There is smoke coming from the motor housing.
If in any doubt as to your own safety, cut the power at the main fuse board. Always familiarise yourself with the
electrical layout of your work area.
321287_Product nstructions 30/07/2014 08:42 Page 4

PLEASE KEEP THIS MANUAL IN A SAFE PLACE FOR FUTURE REFERENCE
Dure Tools
T: 01582 484875 E: sales@dure .co.uk
www.dure .co.uk
Op rating Instructions
During Us
1 When using the polisher for long periods of time, check the polishing pad for wear.
2 Replace worn pads as worn or clogged pads will make the polisher inefficient.
3The polishing operation will cause heat. Check the material that is being worked on that
it is not getting too hot. f this is occurring, stop polishing to allow the material to cool
down.
4 You can adjust the speed of the tool by adjusting the pressure you apply to the throttle.
5 Make regular checks on the polishing pad for wear and damage and replace them
immediately.
6 Due to the potential heat caused by the polishing process, keep flammable liquids and
gases well away from the work area.
Maint nanc
1 Remove plug from the mains power supply before carrying out any maintenance or cleaning.
2 Every 50 hours of operation blow compressed air through the motor while running at no load to clean
out accumulated dust. f operating in especially dusty conditions, perform this operation more often.
3 Periodically blow out all air passages with dry compressed air.
4 All plastic parts should be cleaned with a soft damp cloth. NEVER use solvents to clean plastic parts.
They could possibly dissolve or otherwise damage the material.
5 Wear safety glasses while using compressed air.
Carbon Brush s
1 The carbon brushes are a normal wearing part and must be replaced when they reach their wear
limit. NOTE: Checking and replacing the carbon brushes should be entrusted to a qualified service
centre. The carbon brushes furnished will last approximately 50 hours of running time or 10,000 on/off
cycles. Replace both carbon brushes when either has less than 1/4" length of carbon remaining.
2 Warning:The tool should be unplugged.
3 Unscrew three screw ST3*20. (F G 8)
4 Open the machine body.
5 Pull out the insert spring with pliers(A), and move the coil spring(B). (F G 9), Pull out the Carbon
brush(A) from the brush holder.(F G 10)
6 Pull in the Carbon brush into the brush holder, move back the coil spring, then pull in the insert spring
with pliers. Fold the left and right housing, tighten the screw.
7 Warning:Never extrude the internal cord when you fold the left and right housing to avoid the
damage of insulating of cable.
Environm ntal Prot ction (W.E.E.E.)
The Waste Electrical & Electronic Equipment Regulations (WEEE) requires that any of our products
showing this marking (left) must not be disposed of with other household or commercial waste. To
prevent possible harm to the environment or human health from uncontrolled waste disposal, please
separate any such product from other waste types and recycle it responsibly at your local facilities.
Check with your Local Authority, Recycling Centre or retailer for recycling advice.
321287_Product nstructions 30/07/2014 08:42 Page 5

321287
I struc'o Ma ual
Dure Tools
T: 01582 484875 E: sales@dure .co.uk
www.dure .co.uk
Warranty
We hope that you will be very happy with your purchase. f you do have a problem with your tool, you have the
added peace of mind of a 6 month warranty, which comes into date from the date of purchase (proof of purchase
required).
Scop of Warranty
- The warranty will cover you from all faults cause by defective components or poor workmanship.
- Tools sent outside the EU are not covered by this warranty.
- Product must be returned to us, the warranty does not cover cost of carriage.
- f the product is no longer in manufacture, it will be replaced with a tool of equivalent or higher specification.
What is not cov r d
- Normal wear and tear caused by use in accordance with the operating instructions.
- Replacement of any provided accessories, such as Backing Pads, Carbon Brushes, Blades, handles
Spanners, etc.
- Accidental damage, faults caused by negligent use or care, neglect, misuse or careless operation, handling and
storage of the product.
- Modification of, or change of, any part of this product in any way.
- Faults caused by use of non compatible accessories.
- Tool seizure caused by insufficient servicing and maintenance.
- Faults caused by incorrect installation/assembly.
- Repairs or alterations carried out by non-approved parties.
Validity
- This warranty is valid for 6 months after date of purchase.
- Warranty is rendered invalid if;
- Tool is taken apart for any reason without our consent.
- The points in the Electrical and General Safety nstructions are not observed.
- A warranty claim will not be accepted without an official proof of purchase from your supplier.
D claration of Conformity
We declare that the equipment detail below, to the best of our knowledge and ability, complies with the following
Directives.
2006/42/EC, 2006/95/EC, 2004/108/EC, 2011/65/EU
Equipment Description 240V Electric 150mm Dual Action Polisher
Part Code 321287
Distributed in the EU by Duren Tools, a wholly owned subsidiary of Fast Mover Tools Ltd
Address Unit 1 Frenchs Avenue, Dunstable, Bedfordshire, LU6 1BH, United Kingdom
The following Transposed Harmonised Standards have been applied in the
design and construction of this equipment:
EN 60745-1:2009+A11
EN 60746-2-3:2009+A11
EN 55014-1:2006+A1+A2
EN 55014-2:1997+A1+A2
EN 61000-3-2:2006+A1+A2
EN 61000-3-3:2008
The manufacturer and the distributor, stated above, hold the Technical Construction File for this equipment.
Signed on behalf of the distributor
(the responsible person)
…………………………………………
Name: Brian Moffitt Position: Director
Date and Place: 28/05/14, Dunstable, UK
321287_Product nstructions 30/07/2014 08:42 Page 6

PLEASE KEEP THIS MANUAL IN A SAFE PLACE FOR FUTURE REFERENCE
Dure Tools
T: 01582 484875 E: sales@dure .co.uk
www.dure .co.uk
No. Code Description Q’ty
1 321287/1 Right Housing 1
2 321287/2 Speed Controller 1
3 321287/3 Brush Assembly 2
4 321287/4 Brush 2
5 321287/5 Screw 2
6 321287/6 Bearing Cap 1
7 321287/7 Bearing 1
8 321287/8 Armature 1
9 321287/9 Bearing 1
10 321287/10 Small Gear 1
11 321287/11 O-Ring 1
12 321287/12 Gear Case 1
13 321287/13 Screw 3
14 321287/14 Dust Cover 1
15 321287/15 Big Gear 1
16 321287/16 Gear Washer 1
17 321287/17 Gear Shaft 1
18 321287/18 Forward Handle 1
19 321287/19 Screw 2
20 321287/20 Gear Cover 1
21 321287/21 Screw 4
22 321287/22 Spring Washer 4
23 321287/23 Shield 1
24 321287/24 Bearing Washer 1
25 321287/25 Screw 3
26 321287/26 Upper Eccentricity 1
27 321287/27 Eccentric Washer 1
28 321287/28 Washer 1
29 321287/29 Screw 1
30 321287/30 Check Ring 1
No. Code Description Q’ty
31 321287/31 Bearing 2
32 321287/32 Shaft 1
33 321287/33 Lower Eccentricity 1
34 321287/34 Washer 3
35 321287/35 Screw 3
36 321287/36 Rotating Plate 1
37 321287/37 Bearing 1
38 321287/38 Outer Bearing Cover 1
39 321287/39 nner Bearing Cover 1
40 321287/40 Bearing 1
41 321287/41 Cover 1
42 321287/42 Screw 2
43 321287/43 Spring Washer 2
44 321287/44 Stator 1
45 321287/45 Switch 1
46 321287/46 Bobbin 1
47 321287/47 Screw 2
48 321287/48 Cable Plate 1
49 321287/49 Left Housing 1
50 321287/50 Cable Sleeve 1
51 321287/51 Cable 1
52 321287/52 Screw 3
Parts List
321287_Product nstructions 30/07/2014 08:42 Page 7

321287
I struc'o Ma ual
Dure Tools
T: 01582 484875 E: sales@dure .co.uk
www.dure .co.uk
Copyright (c) 2014 Duren Tools. No part of this manual may be copied or altered without the permission of the
owners of the Duren brand.
321287_Product nstructions 30/07/2014 08:42 Page 8
Table of contents
Other Duren Sander manuals
Popular Sander manuals by other brands

Far Tools
Far Tools DWS 180C Original manual translation

Central Pneumatic
Central Pneumatic 93742 Assembly and operating instructions

Central Pneumatic
Central Pneumatic 4495 Set up and operating instructions

Far Tools
Far Tools one MS 105E Original manual translation

Ryobi
Ryobi CORNER CAT CFS1503G Operator's manual

Metabo
Metabo ES 7700 Original operating instructions

Hamach
Hamach HD 98 user manual

Aircat Pneumatic Tools
Aircat Pneumatic Tools 6700-DCE-6 Operating instructions, parts list & warranty

Wen
Wen 6508 manual

Clarke
Clarke METALWORKER CBB200E Operation & maintenance instructions

Draper
Draper Stormforce SFAS50 instructions

Clas Ohlson
Clas Ohlson KPSA0101-UK Original instructions