Duro Dyne SSFU User manual

OWNER’SOWNER’S
MANUALMANUAL
SSFU
SSFU
®
SUPER SPRAYFAST UNIVERSAL
ADHESIVE APPLICATOR

UNIT INSTRUCTIONSUNIT INSTRUCTIONS
Please follow all SSFU Safety Instructions.
Contact your Duro Dyne Tech Service if you have any operating questions. Please report any problems or mal-
functions to Duro Dyne Tech Service.
LIMITED WARRANTYLIMITED WARRANTY
Duro Dyne warrants all equipment manufactured by it and bearing its name to be free from defects in material
and workmanship on the date of sale by an authorized Duro Dyne Distributor to the original purchaser for
use. As purchaser’s sole remedy for breach of this warranty, Duro Dyne will, for a period of 90 days from
date of sale, repair or replace any part of the equipment proven defective. This warranty applies only when the
equipment is installed, operated, and maintained in accordance with Duro Dyne’s written recommendations.
This warranty does not cover, and Duro Dyne shall not be liable for, any malfunction, damage, or wear caused
by faulty installation, misapplication, abrasion, corrosion, inadequate or improper maintenance, negligence,
accident, tampering, or substitution of non-component parts. Nor shall Duro Dyne be liable for malfunction,
damage or wear caused by the incompatibility with Duro Dyne equipment of structures, accessories, equipment
or materials not supplied by Duro Dyne, or the improper design, manufacture, installation, operation or
maintenance of structures, accessories, equipment or materials not supplied by Duro Dyne.
This warranty is conditioned upon the prepaid return of the equipment claimed to be defective to an authorized
Duro Dyne Distributor for verification of the claim. If the claimed defect is verified, Duro Dyne will repair or replace
free of charge any defective parts. The equipment will be returned to the original purchaser transportation
prepaid. If inspection of the equipment does not disclose any defect in material or workmanship, repairs will
be made at a reasonable charge, which charges may include the cost of parts, labor, and transportation.
DISCLAIMER AND LIMITATIONSDISCLAIMER AND LIMITATIONS
The terms of this warranty constitute purchaser’s sole and exclusive remedy and are in lieu of any other
warranties (express or implied), including warranty of merchantability or warranty of fitness for a particular
purpose, and of any noncontractual liabilities, including product liabilities, based on negligence or strict liability.
Every form of liability for direct, special, or consequential damages or loss is expressly excluded and denied. In
no case shall Duro Dyne’s liability exceed the amount of the purchase price. Any action for breach of warranty
must be brought within 1 year of the date of sale.
EQUIPMENT NOT COVERED BY DURO DYNE WARRANTYEQUIPMENT NOT COVERED BY DURO DYNE WARRANTY
Duro Dyne makes no warranty, and disclaims all implied warranties of merchantability and fitness for a particular
purpose. With respect to accessories, equipment, materials, or components sold but not manufactured by
Duro Dyne. These items sold, but not manufactured by Duro Dyne (such as electric motor, switches, hose,
etc.) are subject to the warranty, if any, of their manufacture. Duro Dyne will provide purchaser with reasonable
assistance in making any claim for breach of these warranties.
TABLE OF CONTENTSTABLE OF CONTENTS
Warranty 2
Warnings 3
Technical Data 3
Assembly 4
Operation 5-6
Replacement Parts List 7
2

TOXIC FLUID HAZARD
Hazardous fluid or toxic fumes can cause serious
injury or death if splashed in the eyes or on the skin,
inhaled, or swallowed
• Know the specific hazards of the fluid you are
using.
• Store hazardous fluid in an approved container. Dispose of haz-
ardous fluid according to all local state and national guidelines.
• Always wear protective eyewear, gloves, clothing, and respira-
tor as recommended by the fluid and solvent manufacture.
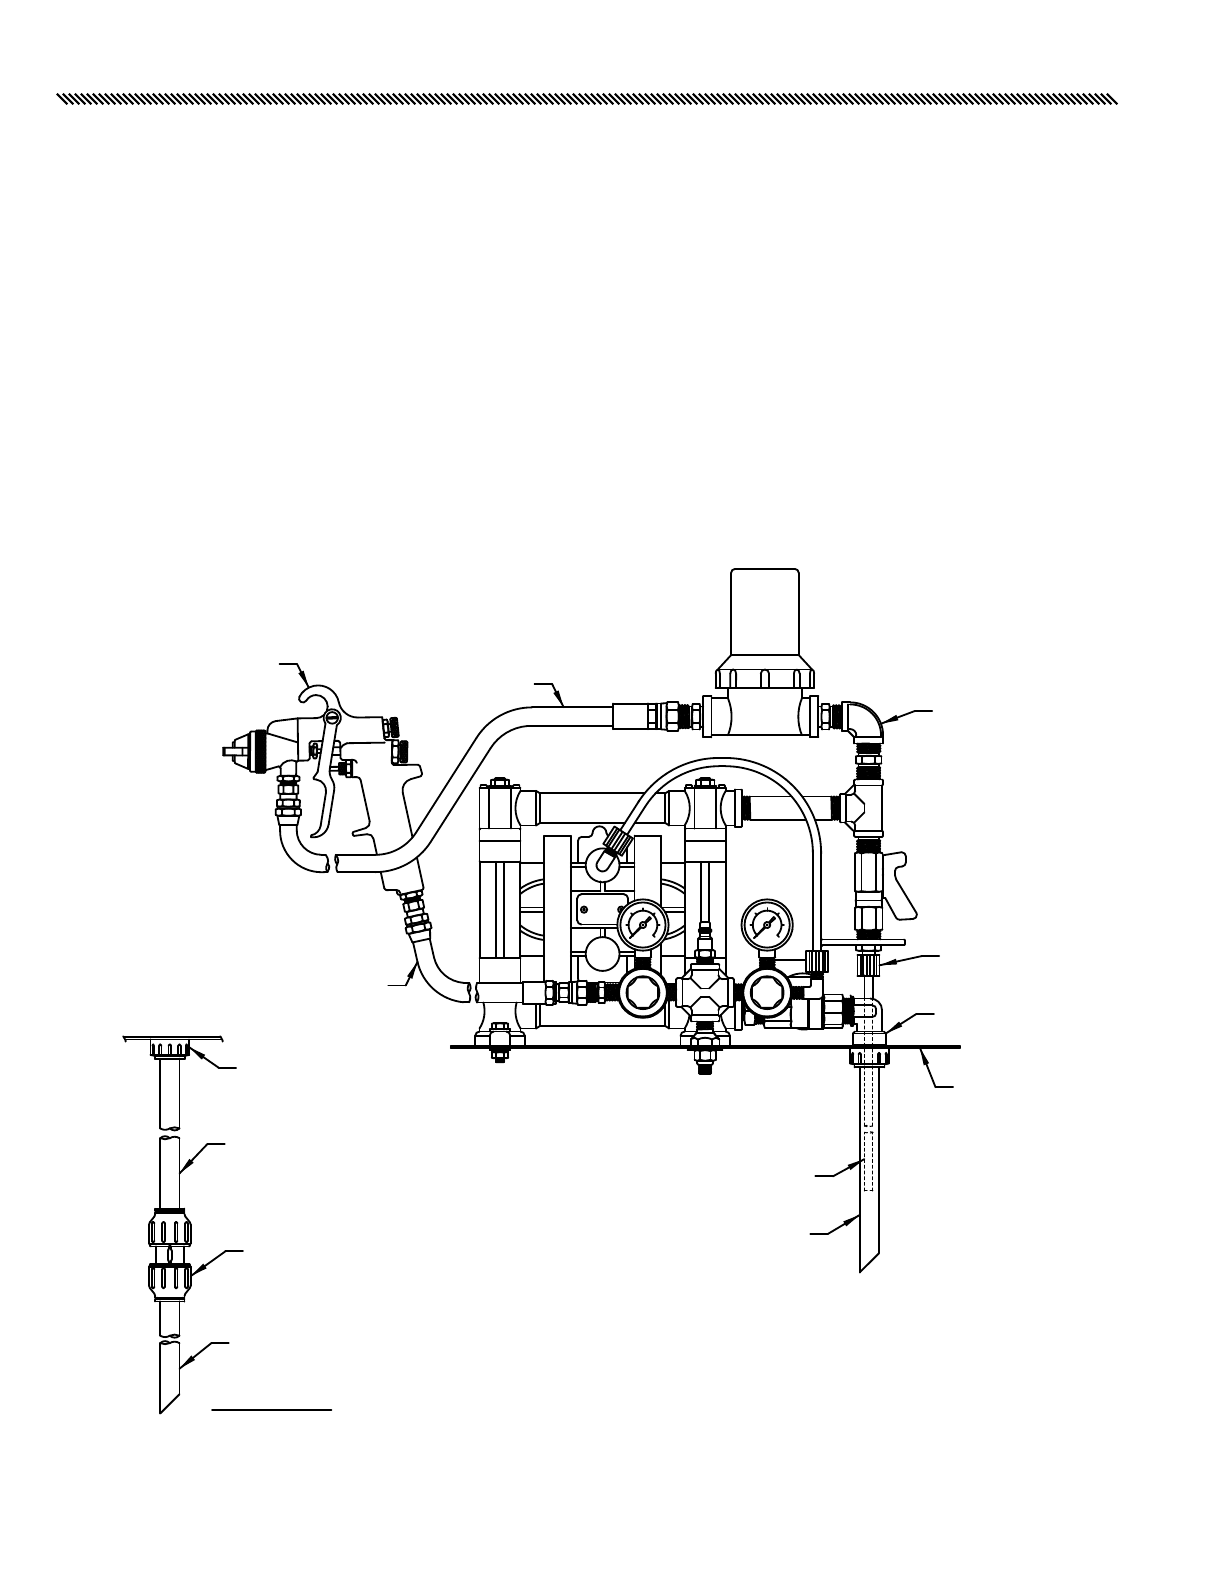
• Pipe and dispose of the exhaust air safely, away from people,
animals, and food handing areas. If the diaphragm fails, the fluid
is exhausted along with the air. See Air Exhaust Ventilation in
the separated pump manual 308-553.
FIRE OR EXPLOSION HAZARD -
Improper grounding, poor ventilation, open flames,
or sparks can cause a hazardous condition and
result in a fire or explosion and serious injury.
• If there is any static sparking or you feel an elec-
tric shock while using the equipment stop pumping
immediately. Do not use the equipment until you identify and
correct the problem.
• Provide fresh air ventilation to avoid the buildup of flammable
fumes from solvents or the fluid being pumped.
• Pipe and dispose of the exhaust air safely, away from all
sources of ignition. If the diaphragm fails, the fluid is exhausted
along with the air.
• Keep the work area free of debris, including solvent, rags, and
gasoline.
• Electrically disconnect all equipment in the work area.
• Extinguish all open flames or pilot lights in the work area.
• Do not smoke in the work area.
• Do not turn on or off any light switch in the work area while
operating or if fumes are present.
• Do not operated a gasoline engine in the work area.
EQUIPMENT MISUSE HAZARDEQUIPMENT MISUSE HAZARD
3
Equipment misuse can cause the equipment to rupture or malfunction and result in serious injury.
• This equipment is for professional use only.
• Read all instruction manuals, tags and labels before operating the equipment.
• Use the equipment only for its intended purpose. If you are not sure, call Duro Dyne’s Technical Service
department at 1-800-899-3876
• Do not alter or modify this equipment.
• Check equipment daily. Repair or replace worn or damaged parts immediately.
• Do not exceed the maximum working pressure of the lowest rated component in your system. This equipment
has a 100 psi (7 bar) maximum working pressure at 100 psi (7 bar) maximum incoming air pressure.
• Use fluids and solvents which are compatible with the equipment wetted parts. Refer to the Technical Data
section of all equipment manuals. Read the fluid and solvent manufacturer’s warnings.
• Do not use hoses to pull equipment.
• Route hoses away from traffic areas, sharp edges, and hot surfaces. Do not expose hoses to temperatures
above 82°C (180°F) or below -40°C (-40°F).
• Wear hearing protection when operating this equipment.
• Do not lift pressurized equipment.
• Comply with all applicable local, state, and national fire, electrical, and safety regulations.
TECHNICAL DATATECHNICAL DATA
Wetted Parts
Pump……....... ……...............Acetal/Teflon*
Spray Gun...… ……...............Stainless/Aluminum
Fluid Hoses….……................Nylon
Surge Tank…..……....……......Nylon
Fluid Regulator
Fittings
235-366…….............Acetal, Carbon Steel
Tubling……......……......……....Nylon
Maximum Fluid Working Pressure….. 100 psi (7 bar)
Maximum Operating Range…........... 15-100 psi (1-7 bar)
Pump Air Inlet Size..........................1/4 npt (f)
Pump Fluid Inlet and Outlet Size.......3/8 npt (f)
*Sound Data
Pump sound level at 100 psi (7 bar), full flow….
…………………………………………..…..85 dB(A)
Pump sound level at 70 psi (4.8 bar)
1 gpm (3.8 lpm…………………………..78 dB(A)
Operating Temperature Range; 40° to 150°F (4.4°-65.5° C)
*Tested to CAGI-PNEUROP-1969

ASSEMBLYASSEMBLY
4
Black Hose
Pump
Red Hose
Re-Circulation Tube
Short Suction Tube
Elbow
Connector
Long Suction Tube
Coupling
Short Suction Tube
Elbow
DETAIL-A
Spray Gun
Lid
Figure 1:
Assembling for the 5 Gallon unit: (see Figure-1 below)
1 - Insert the Suction Tube through the hole into the Elbow to its full depth.
2 - Insert the Re-circulation Tube (shown as hidden) through the hole into the Connector to its full depth.
Tube may be as shown or on other side of the Elbow. Tighten the nut securely.
3 - Place the assembled unit over a 5 gallon pail and use as required.
Hose Connections: (see Figure-1 below)
1 - Read the entire Spray Gun manual before connecting the Hoses and operating the sprayer.
2 -Connect the Black and Red Hoses between the Pump and the Spray Gun as shown.
Assembling for the 55 Gallon unit: (see Figure-1 below)
1 - Pre-assemble the Long and Short Suction Tubes as shown in DETAIL-A using the Coupling supplied.
2 - Insert the assembled Suction Tube through the hole into the Elbow to its full depth.
3 - Insert the Re-circulation Tube (shown as hidden) through the hole into the Connector to its full depth.
Tighten the nut securely.
4 - Place the assembled unit on a 55 gallon drum with the tubes inserted through the hole of the lid and use
as required.

OPERATIONOPERATION
5
General Information:
1 - The typical assembly and installation shown on pages 4, 5 and 6 are only a guide for selecting and in-
stalling system components.
2 - Always use genuine Duro Dyne Super Sprayfast Universal parts and accessories, available from your
Duro Dyne Distributor. Refer to the Product Data Sheet for the pump. If you supply your own accessories,
be sure they are adequately sized and pressure rated for your system.
3 - Use a compatible, liquid thread sealant or Teflon tape on all male threads. Tighten all connections firmly
to avoid air or fluid leaks. Do not over-tighten plastic threads.
Short Suction Tube
Flush Hose
Lever-B
Lever-A
Flush Hose
SIDE VIEW
TOP VIEW
Pump
Flush
Fitting
Re-Circulating
Valve
PRESSURIZED EQUIPMENT HAZARD
The system pressure must be manually relieved to prevent the
system from starting or spraying accidentally. To reduce the risk
of an injury from accidental spray from the gun, splashing fluid or moving parts, follow the
Pressure Relief Procedure whenever you:
- Are instructed to relieve the pressure,
- Stop spraying,
- Check or service any of the system equipment,
- Or install or clean the spray tips.
WARNING
1. Shut off the air to the pump.
2. Trigger the spray gun.
3. Open the Re-circulating Valve (see Figure-3) to relieve all fluid pressure, having a container ready to
catch the drainage.
To reduce the risk of serious injury whenever you are instructed to
relieve pressure, always follow the Pressure Relief Procedure.
WARNING
Pressure Relief Procedure:
Pump Shutdown:
To reduce the risk of serious injury whenever you are instructed to
relieve pressure, always follow the Pressure Relief Procedure.
WARNING
Flushing and Storage:
Flush the Pump when necessary to prevent the fluid you are pumping from drying or freezing in the pump
and damaging it. Use a compatible solvent/mineral spirit.
Before storing the Pump, always relieve the pressure as noted at left and flush the Pump as follows:
(see Figure-2 below)
1 - Ensure the Re-Circulating Valve is in the “OFF” position.
2 - Open the Flush Fitting and secure the Flush Hose properly. Place the open end of the Flush Hose into a
container of water.
3 - Rotate Lever-A 90deg, then rotate Lever-B 90deg.
4 - Trigger the Spray Gun into another container until only clear water comes through.
5 - Store the Pump and Spray Gun properly until its next use.
Figure 2:

6
OPERATIONOPERATION
Pump
Re-Circulation Tube
Suction Tube
Spray Gun
Air Inlet
Fitting
Re-Circulating
Valve
Gun Air
Regulator Pump Air
Regulator
Black
Fluid Hose
Red
Air Hose
Starting and Adjusting the Pump: (see Figure-3 below)
1 - Check that all fittings are tight. Be sure to use a compatible liquid thread sealant or Teflon tape on all
male threads. Tighten the Fluid Inlet and Fluid Outlet fitting into the Pump.
2 - Place the finished Pump Assembly onto either a 5 gallon pail or a 55 gallon drum with tubing into the
fluid. Ensure stability when placing on a 5 gallon pail.
3 - Make sure the Air Regulators are closed. Open the Re-circulating Valve.
4 - Connect the air-line quick disconnect to the Air Inlet Fitting.
5 - With the Gun Air Regulator closed, open the Pump Air Regulator.
6 - Allow the Pump to cycle slowly until all air is pushed out of the Re-circulation Tube and the Pump is
primed.
7 - Trigger the Spray Gun. Open the Gun Air Regulator and close the Fluid Drain Valve. Allow the Pump to
cycle slowly until all air is pushed out of the Fluid Hose and Spray Gun.
If Pump Fails: (see Figure-3 below)
Lower the air pressure with a 1/8” flat-head screwdriver. Give the reset valve on the front of the Pump a
1/16” turn left or right. Pump should reset and begin cycling. This may need to be repeated 2 or 3 times.
Re-circulating Line: (see Figure-3 below)
The Re-circulation Tube drains unused fluid back into the fluid container, ensuring an even flow at the Gun.
Re-circulation also provides gentle fluid agitation. Tore-circulate fluid, open the Re-circulating Valve while you
are spraying. To stop re-circulation, close the valve.
Operating Pressure:
Air………….60-70psi
Fluid……….60-70psi
Figure 3:

PARTS LISTPARTS LIST
39033 SSFU P/U Tube - Short
39034 SSFU P/U Tube - Long
39035 SSFU P/U Tube Coupler
39052 SSFU Flush Fitting Assembly
39053 SSFU Flush Hose Assembly
39054 SSFU Lid Complete
5120 CAG SSFU Adhesive Gun Only
5144 15’ Black Fluid Hose
5145 15’ Red Air Hose
7

Please Visit Our Website
www.durodyne.com
for the most up to date product information.
®
®
Duro Dyne Corporate Headquarters, Bay Shore, NY
631-249-9000 • Fax: 631-249-8346
Duro Dyne Midwest • Duro Dyne West • Duro Dyne Canada
MACHINERY DIVISION
© 2017 Duro Dyne Corporation
Printed in USA 2/7/2017
BI060010
Table of contents
Other Duro Dyne Paint Sprayer manuals