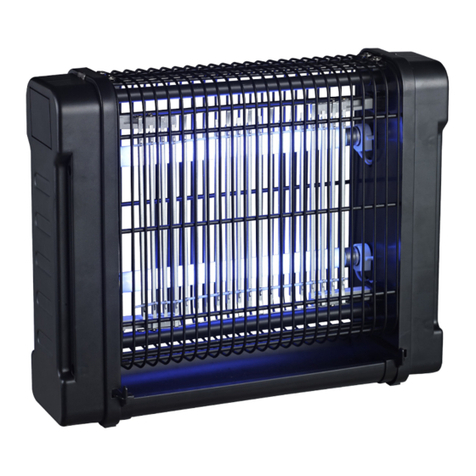
Duronic FKWS18 User manual

FKWS18 - Wall Sconce
PLEASE READ ALL THE INSTRUCTIONS BEFORE USE

2
English Manual
Manuel d’utilisation en français
Gebrauchsanleitung auf Deutsch
Manual de Instrucciones en Español
Manuale D’istruzioni In Italiano
Instrukcja obsługi. Polski
3
13
23
33
43
53
Contents

3
English Manual

4
• This appliance is for indoor/household use only. Do not use outdoors.
• This y trap is not to be used in garages, sheds, barns, horse stables or
any out-house building where ammable material is present, or in any
locations where ammable vapour or explosive dust may exist.
• This appliance is not designed for commercial or industrial use; it is for
household use only.
• Make sure the electrical voltage is the same as that indicated on the rating
plate of the appliance.
• This appliance is not intended for use by persons (including children) with
reduced physical, sensory or mental capabilities, or lack of experience
and knowledge, unless they have been given supervision or instruction
concerning use of the appliance by a person responsible for their safety.
• Children should be closely supervised at all times to ensure that they do
not play with the appliance.
• Never carry the appliance by the power cable.
Safety Information
Please read these instructions fully and keep for future reference.
WARNING: If the machine is operated with a defective or damaged
mains cable, there is a potential danger of fatal electric shock.
Never use a machine which is damaged or has a damaged mains
cable.
• If either the appliance or power cable are damaged, return it to Duronic for
service or repair by professional technician.

5
• Only connect the appliance to an electrical outlet with the voltage and
frequency mentioned on the appliance label.
• Never try to replace the parts and repair the unit by yourself, apart from
replacing the bulb and adhesive boards.
• Do not modify the machine in any way that is not described in the
instructions for use. The machine contains live parts. Repairs may only be
carried out by Duronic, using original spare parts and accessories.
• Always operate the appliance on a dry, smooth, even and stable surface.
Do not place the unit on a damaged wall or a wall covered in damp/mould.
• Do not operate the machine or handle the plug with wet hands.
• Do not immerse in water or other liquids. Cleaning should be done as per
instructions in this manual.
• Keep the light away from ammable objects such as curtains, and away
from ammable liquids of gases as there is a danger of explosion.
• When installing, position the light away from windows or doors to avoid
interference from draft and daylight.
• For hygeine reasons, it is best that this light is not positioned near places
where food will be prepared or served.
• This appliance is only suitable for wall mounting.

6
Specications
Included in the Box
Model: FKWS18
Power: 18W
Size: 37.5 x 14 x 19.6 cm
Weight: 1.16 kg
Bulb type: UV bulb: 18W PL BL
Glue boards included: 5
• Wall sconce xture
• 2x screws
• 2x raw plugs
• 5x glue boards
• 1x UV bulb

7
About the FKWS18 Wall Sconce
Before Installing
Flying insects are naturally attracted to ultra-violet light. This y catcher has
an ultra-violet (UV) bulb that prooves to be utterly irresistible to ying insects.
Once the ies are attracted into the device, they will come to rest on the
adhesive-coated glue board inside and become permanently captured. Once
the board is full, it can quickly and easily be replaced. It is easy to check as the
front of the device lifts up to enable easy access to the adhesive board.
Your FKWS18 comes with 5 adhesive sheets. If you need more, you can order
these separately from Duronic (Shine-Mart Ltd).
Designed with an ornate elegant design, this light xing will t in beautifully
with any interior design.
No chemical substances are involved, so this appliance is safe to use for
humans and pets. The ultra-violet light provides an odorless, noiseless and
safe method of ridding your home of pesky ying insects.
1. Remove the device from the package carefully. Check the body and parts
for any potential shipping damage.
2. Check the posistion of the bulb and the glue board to see if they are
positioned correctly.
3. Connect the device to the nearest mains electrical socket to test the light.
4. If the bulb lights up immediately, proceed to installing the lamp.
5. If the bulb doesn’t light up, refer to the troubleshooting section to
determind the issue.

8
Installation
Preparation:
• Ensure that the light is installed above eye level (at least 70 inches from
the oor) so that it is out of the line of anyones sight, and so that no one
can bump into the xture.
• Install the light close to the area where ies come in, but away from any
draft or wind.
• Choose a location with high insect density, close to an electrical outlet
(hard wired availability) and easy serviceability.
• Do not install the lamp near any competing light sources, such as bright
sunlit windows, indoor lighting xtures etc. as this will render the FKWS18
light useless.
• The distance between the lamp and the ceiling should be 24” or more for
maximum light attraction.
Instruction:
1. Lift the front cover and remove the UV bulb to avoid causing any damage
to it during the installation.
2. Hold the back plate of the xture against the wall in your chosen location.
Determine the location you would like to install the light and mark the
screws’ locations with a pencil.
3. Place the xture aside. Drill holes on the marked locations and insert the
plastic raw plugs.
4. Next reposition the light xing over the top of the holes you have prepared,
and insert one screw and tighten with a screw driver. Then repeat this for
the next screw.
5. Install the bulb and the sticky glue board. Note that the sticky side of the
board should be placed facing up.
6. Close the cover of the light.
7. Plug in the power cable into the mains power socket and switch on. Your
light should immediately illuminate.
NOTE: If you do not use the appliance for an extended period, ensure you
remove the plug from the electrical socket.

9
Maintenance
Replacing the Adhesive Glue Board
It’s recommended to replace the glue board every 1-2 months.
To replace the glue board:
1. Unplug the power cable and wait for 5 minutes for the bulb to cool
down.
2. Lift the front cover and remove the old sticky glue board.
3. Install a new sticky glue board with the sticky side facing the bulb.
4. Close the front shell.
5. Re-connect the power cable by plugging it back into the mains
socket and switching on.
Replacing the UV Bulb
It is recommended to replace the UV bulb after around 5000 hours of normal
operation.
To replace the bulb:
1. Unplug the power cord and wait for 5 minutes for the bulb to cool
down.
2. Lift the front cover and remove the old UV bulb by rotating it.
3. Insert the new UV bulb in reversed rotation.
4. Close the front cover.
5. Re-connect the power cable by plugging it back into the mains
socket.
IMPORTANT: Ensure that disposal of the old UV bulb is done
responsibly and in line with the local council’s waste and recycling
regulations.

10
Maintenance (continued)
Troubleshooting Guide
Cleaning:
Before cleaning, ensure the power cable is unplugged from the mains socket.
To clean the light xing, use a dry dusting cloth to remove any dust and dirt
that has collected over time.
When nished, check the bulb and glue board are in the correct position, then
plug the cable back into the plug socket.
Issue Solution/s
The bulb doesn’t light up when I
connect it to the mains socket.
A. Check if the bulb has popped out
of the correct seating position during
shipping.
B. Check if the power cable is plugged
into the mains plug socket.
C. Unplug the power cable, lift the
front cover of the light and rotate the
bulb slightly to adjust the contact point
between the bulb and the bulb holders.
The light ickers when it lights up. It’s normal for a new uorescent light
bulb to icker when used for the rst
time.
Unplug the power cable and plug it
back after a few seconds. Leave the
lamp on for 48 hours and the icker
should not occur again.
If the issue persists after 48 hours,
please contact Duronic Customer Care
Team for further assistance.

11
Warranty
1 Year Guarantee from Shine-Mart Ltd, Trademark owners of Duronic Products.
NOTE: THESE STATEMENTS DO NOT AFFECT YOUR STATUTORY RIGHTS AS A
CONSUMER
This product has been manufactured under the strictest or quality control procedures, and
using the highest quality of materials, to ensure excellent performance and reliability. It will
give very good and long lasting service, provided it is properly used and maintained. The
product is guaranteed for 1 years from the date of original purchase. If any defect arises due
to a faulty materials or poor workmanship, the faulty product must be returned to the original
place of purchase. Refund or replacement is at the discretion of that company.
Duronic Products are offered with a 1 year guarantee under the following conditions:
1. The product must be returned to the retailer with original proof of purchase.
2. The product must be installed and used in accordance with the instructions
contained in this operating manual.
3. It must be used only for domestic purposes.
4. It does not cover wear and tear, malicious damage, misuse, neglect,
inexpert repairs or consumable parts.
5. Shine-Mart Ltd has no responsibilities for accidental or consequential loss or damage.
6. Shine-Mart Ltd are not liable to carry out any type of servicing work,
under the guarantee
7. Valid in the UK only
This product is tted with CE:1363 plug and fuse
Imported by Shine-Mart Ltd, RM3 8SB
Information on waste Disposal for Consumers of
Electrical & Electronic Equipment.
This mark on a product and/or accompanying documents indicates that when it
is to be disposed of, it must be treated as Waste
Electrical & Electronic Equipment, (WEEE).
Any WEEE marked products must not be mixed with general household waste,
but kept separate for the treatment, recovery and recycling of the materials used.
For proper treatment, recovery and recycling; please take all WEEE marked
waste to your Local Authority Civic waste site,
where it will be accepted free of charge.
If customers dispose of Waste Electrical & Electronic Equipment correctly, they
will be helping to save valuable resources and preventing any potential negative
effects upon human health and the environment, of any hazardous materials that
the waste may contain.

12

13
Manuel d’utilisation en Français

14
• This appliance is for indoor/household use only. Do not use outdoors.
• This y trap is not to be used in garages, sheds, barns, horse stables or
any out-house building where ammable material is present, or in any
locations where ammable vapour or explosive dust may exist.
• This appliance is not designed for commercial or industrial use; it is for
household use only.
• Make sure the electrical voltage is the same as that indicated on the rating
plate of the appliance.
• This appliance is not intended for use by persons (including children) with
reduced physical, sensory or mental capabilities, or lack of experience
and knowledge, unless they have been given supervision or instruction
concerning use of the appliance by a person responsible for their safety.
• Children should be closely supervised at all times to ensure that they do
not play with the appliance.
• Never carry the appliance by the power cable.
Safety Information
Please read these instructions fully and keep for future reference.
WARNING: If the machine is operated with a defective or damaged
mains cable, there is a potential danger of fatal electric shock.
Never use a machine which is damaged or has a damaged mains
cable.
• If either the appliance or power cable are damaged, return it to Duronic for
service or repair by professional technician.

15
• Only connect the appliance to an electrical outlet with the voltage and
frequency mentioned on the appliance label.
• Never try to replace the parts and repair the unit by yourself, apart from
replacing the bulb and adhesive boards.
• Do not modify the machine in any way that is not described in the
instructions for use. The machine contains live parts. Repairs may only be
carried out by Duronic, using original spare parts and accessories.
• Always operate the appliance on a dry, smooth, even and stable surface.
Do not place the unit on a damaged wall or a wall covered in damp/mould.
• Do not operate the machine or handle the plug with wet hands.
• Do not immerse in water or other liquids. Cleaning should be done as per
instructions in this manual.
• Keep the light away from ammable objects such as curtains, and away
from ammable liquids of gases as there is a danger of explosion.
• When installing, position the light away from windows or doors to avoid
interference from draft and daylight.
• For hygeine reasons, it is best that this light is not positioned near places
where food will be prepared or served.
• This appliance is only suitable for wall mounting.

16
Specications
Included in the Box
Model: FKWS18
Power: 18W
Size: 37.5 x 14 x 19.6 cm
Weight: 1.16 kg
Bulb type: UV bulb: 18W PL BL
Glue boards included: 5
• Wall sconce xture
• 2x screws
• 2x raw plugs
• 5x glue boards
• 1x UV bulb

17
About the FKWS18 Wall Sconce
Before Installing
Flying insects are naturally attracted to ultra-violet light. This y catcher has
an ultra-violet (UV) bulb that prooves to be utterly irresistible to ying insects.
Once the ies are attracted into the device, they will come to rest on the
adhesive-coated glue board inside and become permanently captured. Once
the board is full, it can quickly and easily be replaced. It is easy to check as the
front of the device lifts up to enable easy access to the adhesive board.
Your FKWS18 comes with 5 adhesive sheets. If you need more, you can order
these separately from Duronic (Shine-Mart Ltd).
Designed with an ornate elegant design, this light xing will t in beautifully
with any interior design.
No chemical substances are involved, so this appliance is safe to use for
humans and pets. The ultra-violet light provides an odorless, noiseless and
safe method of ridding your home of pesky ying insects.
1. Remove the device from the package carefully. Check the body and parts
for any potential shipping damage.
2. Check the posistion of the bulb and the glue board to see if they are
positioned correctly.
3. Connect the device to the nearest mains electrical socket to test the light.
4. If the bulb lights up immediately, proceed to installing the lamp.
5. If the bulb doesn’t light up, refer to the troubleshooting section to
determind the issue.

18
Installation
Preparation:
• Ensure that the light is installed above eye level (at least 70 inches from
the oor) so that it is out of the line of anyones sight, and so that no one
can bump into the xture.
• Install the light close to the area where ies come in, but away from any
draft or wind.
• Choose a location with high insect density, close to an electrical outlet
(hard wired availability) and easy serviceability.
• Do not install the lamp near any competing light sources, such as bright
sunlit windows, indoor lighting xtures etc. as this will render the FKWS18
light useless.
• The distance between the lamp and the ceiling should be 24” or more for
maximum light attraction.
Instruction:
1. Lift the front cover and remove the UV bulb to avoid causing any damage
to it during the installation.
2. Hold the back plate of the xture against the wall in your chosen location.
Determine the location you would like to install the light and mark the
screws’ locations with a pencil.
3. Place the xture aside. Drill holes on the marked locations and insert the
plastic raw plugs.
4. Next reposition the light xing over the top of the holes you have prepared,
and insert one screw and tighten with a screw driver. Then repeat this for
the next screw.
5. Install the bulb and the sticky glue board. Note that the sticky side of the
board should be placed facing up.
6. Close the cover of the light.
7. Plug in the power cable into the mains power socket and switch on. Your
light should immediately illuminate.
NOTE: If you do not use the appliance for an extended period, ensure you
remove the plug from the electrical socket.

19
Maintenance
Replacing the Adhesive Glue Board
It’s recommended to replace the glue board every 1-2 months.
To replace the glue board:
1. Unplug the power cable and wait for 5 minutes for the bulb to cool
down.
2. Lift the front cover and remove the old sticky glue board.
3. Install a new sticky glue board with the sticky side facing the bulb.
4. Close the front shell.
5. Re-connect the power cable by plugging it back into the mains
socket and switching on.
Replacing the UV Bulb
It is recommended to replace the UV bulb after around 5000 hours of normal
operation.
To replace the bulb:
1. Unplug the power cord and wait for 5 minutes for the bulb to cool
down.
2. Lift the front cover and remove the old UV bulb by rotating it.
3. Insert the new UV bulb in reversed rotation.
4. Close the front cover.
5. Re-connect the power cable by plugging it back into the mains
socket.
IMPORTANT: Ensure that disposal of the old UV bulb is done
responsibly and in line with the local council’s waste and recycling
regulations.

20
Maintenance (continued)
Troubleshooting Guide
Cleaning:
Before cleaning, ensure the power cable is unplugged from the mains socket.
To clean the light xing, use a dry dusting cloth to remove any dust and dirt
that has collected over time.
When nished, check the bulb and glue board are in the correct position, then
plug the cable back into the plug socket.
Issue Solution/s
The bulb doesn’t light up when I
connect it to the mains socket.
A. Check if the bulb has popped out
of the correct seating position during
shipping.
B. Check if the power cable is plugged
into the mains plug socket.
C. Unplug the power cable, lift the
front cover of the light and rotate the
bulb slightly to adjust the contact point
between the bulb and the bulb holders.
The light ickers when it lights up. It’s normal for a new uorescent light
bulb to icker when used for the rst
time.
Unplug the power cable and plug it
back after a few seconds. Leave the
lamp on for 48 hours and the icker
should not occur again.
If the issue persists after 48 hours,
please contact Duronic Customer Care
Team for further assistance.
Table of contents
Other Duronic Lawn And Garden Equipment manuals