Dycon DC23 User manual

dyson stowaway
The full size cylinder with hygienic bin emptying
helpline manual

helpline manual
Contents Page
Features and benets 3
Assembling and Operating 4
Carrying the machine 6
Bin emptying and Cleaning the shroud and washing the bin 7
Washing the pre-motor lter 8
Parts guide 9
Parts recognition (exploded diagrams) 12
Airow 16
Filtration 16
Helpline diagnostics 17
The Dyson 5 year guarantee 24

Combines Root Cyclone™ technology
with a core separator - an extra
cyclonic stage between the outer and
inner cyclones - to separate particles
as small as 0.5 micron from the
airow.
Features and benets
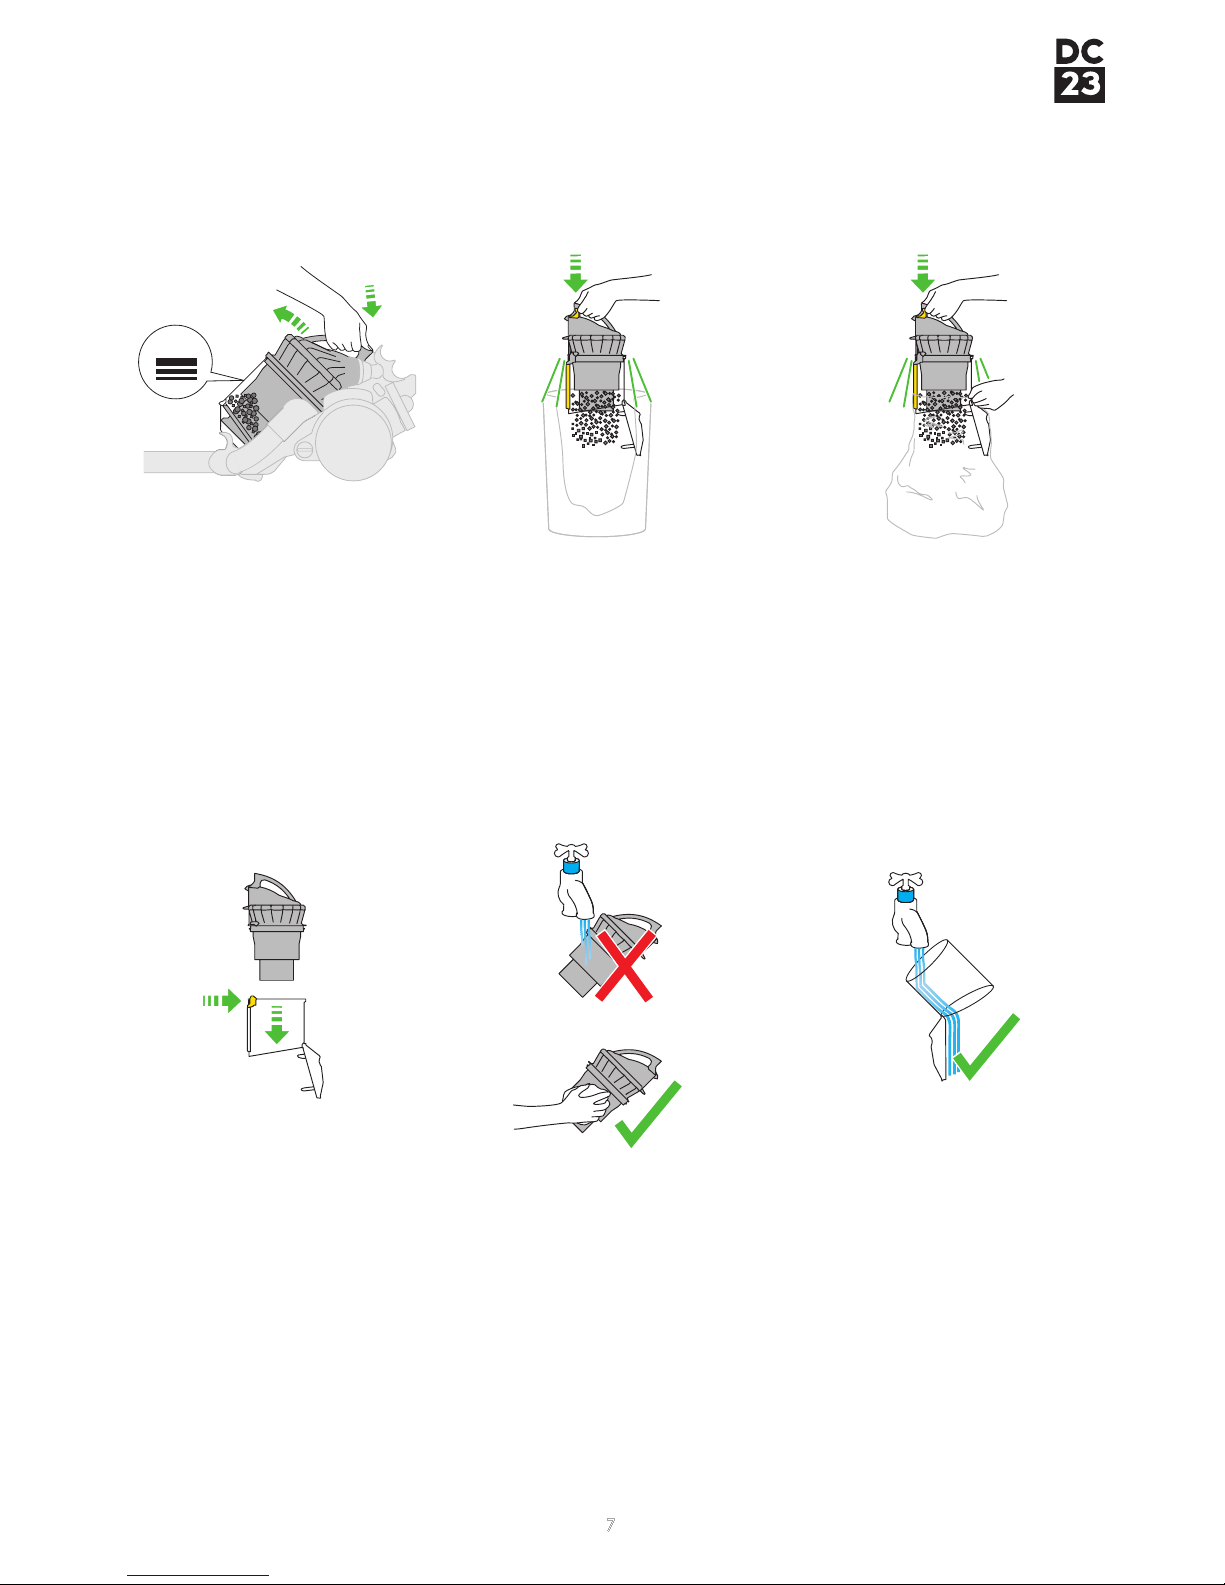
Hygienic bin emptying
No need to touch the dirt just
push the button.
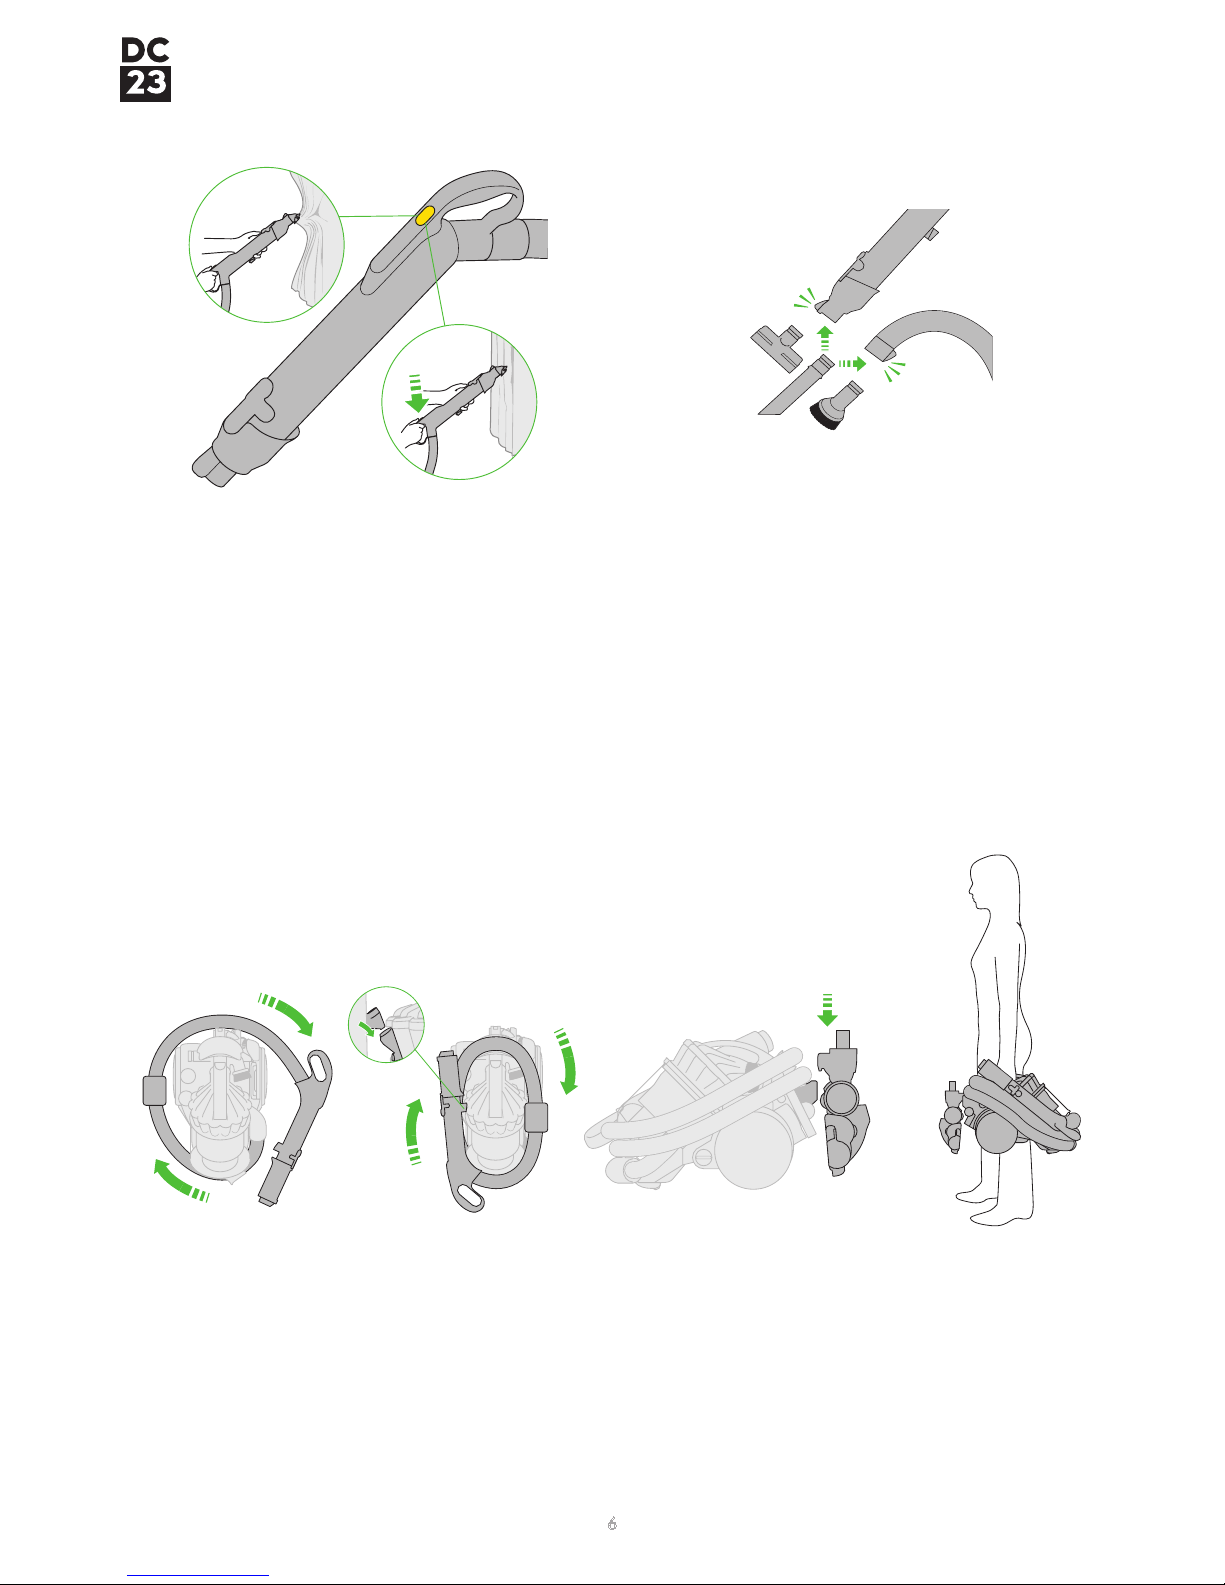
Telescope Wrap system
Hose and wand compress and
wrap for easy storage.
Low prole contact head
Enables more thorough cleaning
under furniture and appliances.
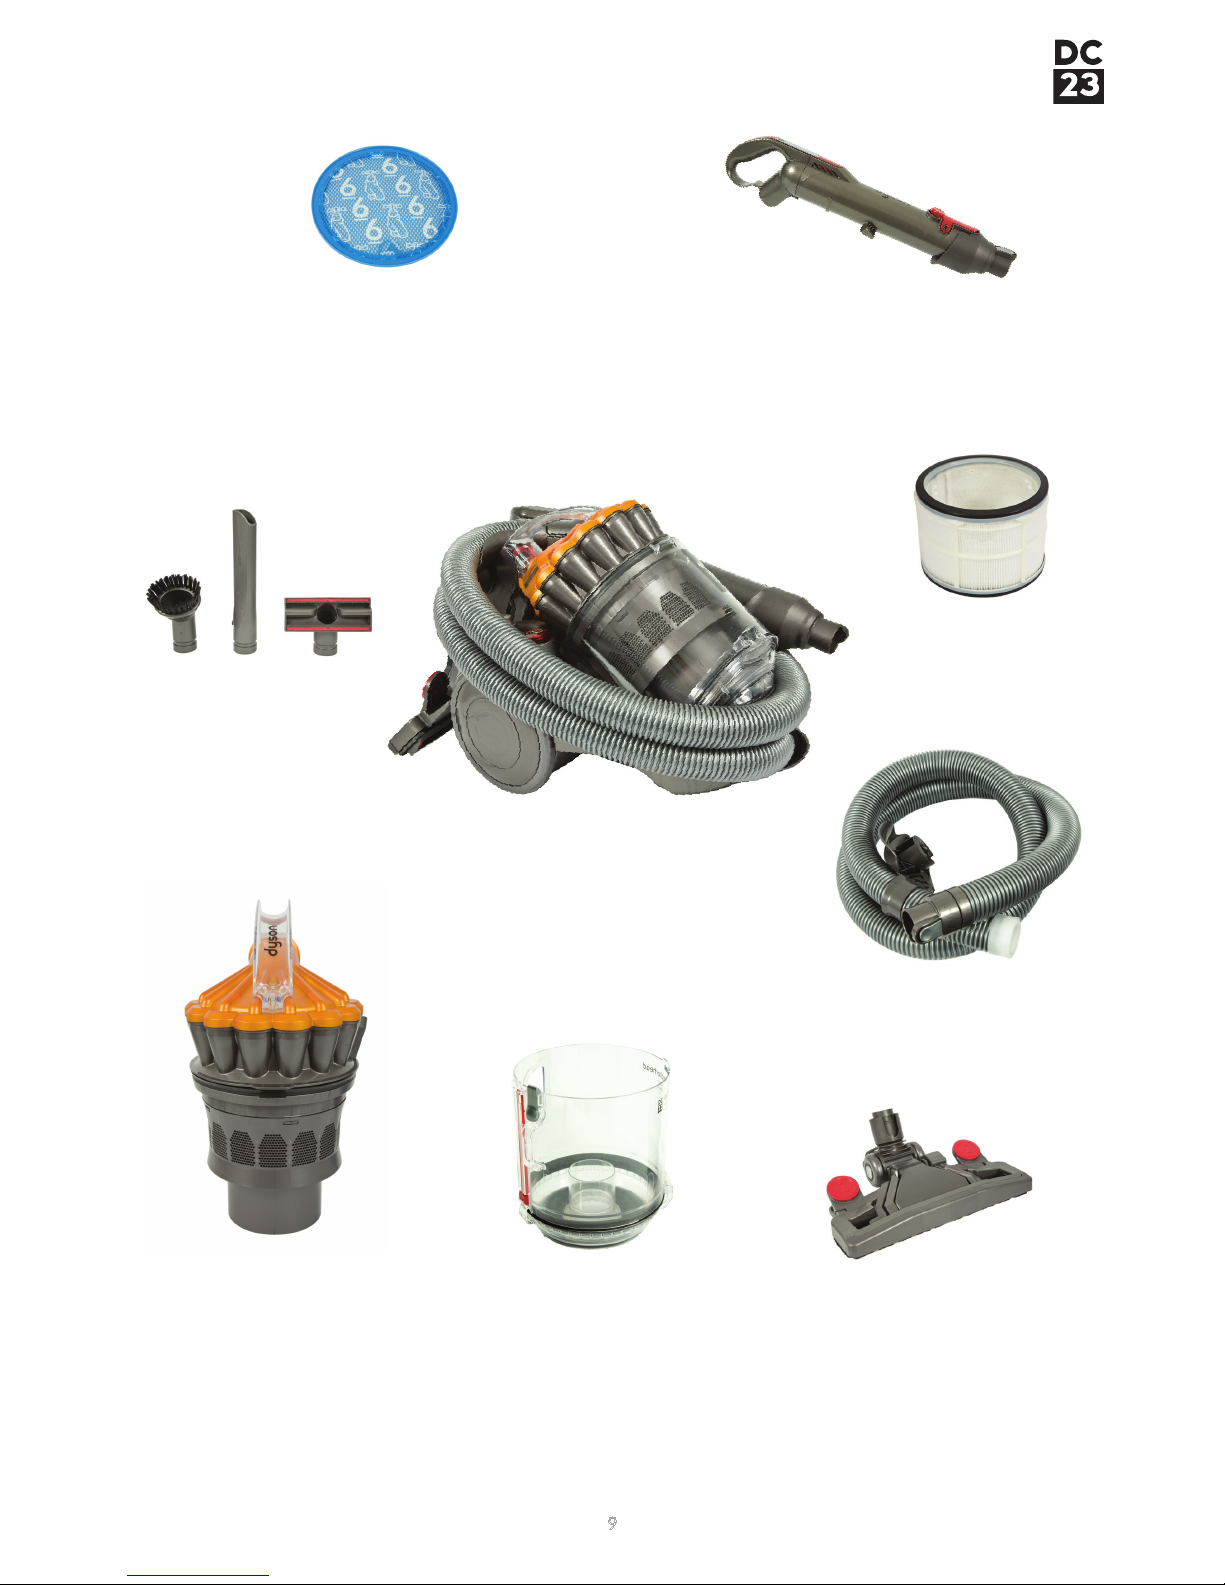
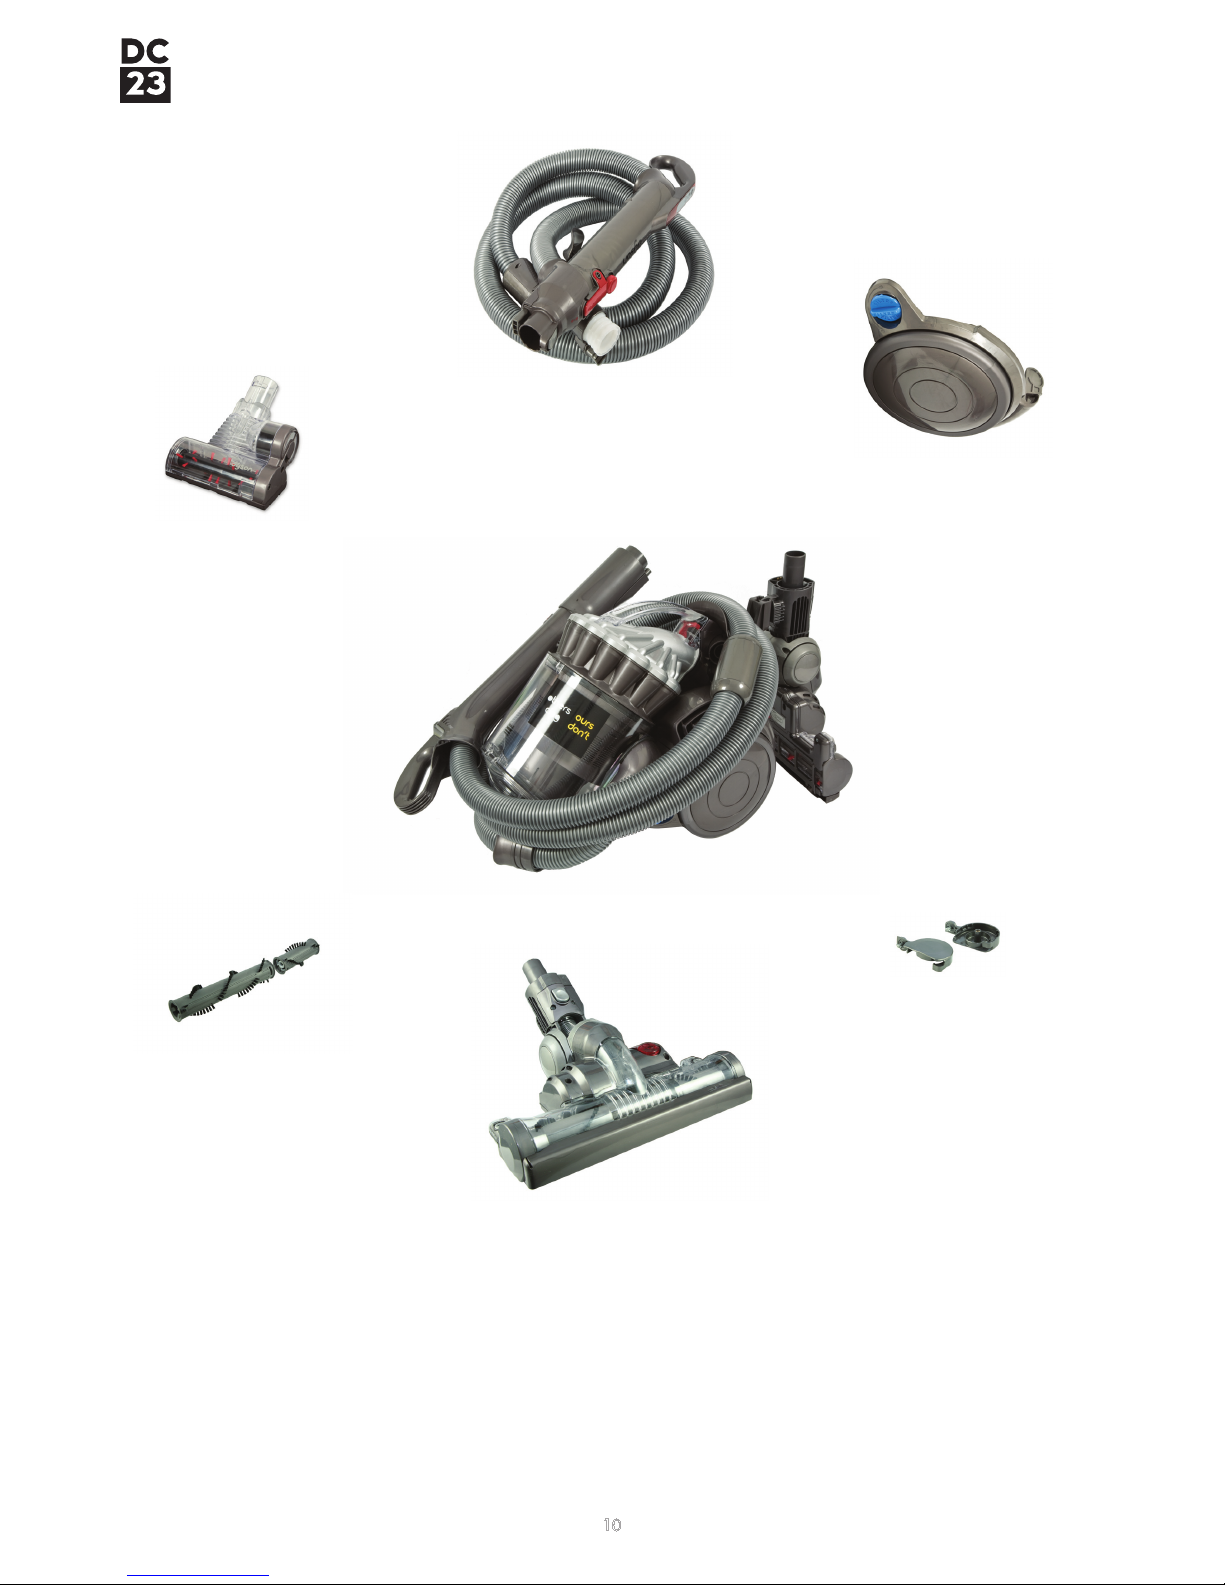
The full-size cylinder with hygienic bin emptying
Root Cyclone technology™ + core separator
Doesn’t lose suction and captures more microscopic dust than any other.
Cleaner exhaust air
Air expelled from a Dyson has up to 150 times less mould and bacteria than the
air you breathe.
Lifetime HEPA lter
Ideal for allergy sufferers.
*More airwatts
An extra 100 airwatts. Allows a bigger cleaner head for cleaning larger spaces.
*Longer cable
An extra 0.5 metres of cable. Clean a wider area without unplugging.
*Bigger bin
An extra 0.8 litres of bin capacity, so you don’t have to empty it so often.
*Compared to DC22
Sits on the stairs
Follows you up the stairs as you
clean them.
Shroud
core separator
root cyclone
Doesn’t lose suction and captures
more microscopic dust.

helpline manual
4
clik
clik
clik
clik
Assembling
Operating
Extend telescopic wand handle
ensuring both sections lock in place.
(NB. The length of the telescopic
wand handle is not adjustable.)
Insert the oor tool into
wand handle.
Clip hose retaining bracket
into front of machine.
Slide hose into inlet.
To rewind cable, hold down the rewind button.To start the machine press on/off button on the machine.
Attach cyclone top
and bin assembly.

helpline manual
5
Operating
Low prole contact head
Press pedal to change between settings for delicate rugs/hard
oors and carpets.
To prevent the low prole contact head from sticking to loose
rugs open the bleeds on the underside.
Power oor tool. (Motorhead variant only.)
When you start the machine, the power oor tool is set
to the brush ON mode.
For delicate surfaces press the pedal to turn the brush
bar off.
To return to brush ON mode, press the pedal again.

helpline manual
6
Wrap the hose around the machine and x the wand handle in place on the side of the cyclone assembly. Place the
oor tool in the parking yoke at the rear of DC23. Always carry the machine by the handle on the cyclone assembly.
Carrying the machine
Accessory tools can be tted to wand
handle or hose as required.
clik
clik
Operating
Press the suction reduction button
to prevent the wand handle from
sticking to loose fabrics such as
curtains.

helpline manual
7
Cleaning the shroud and washing the bin
To access the shroud, ensure the bin is
empty and bin base is open.
Press release button to remove bin.
Clean shroud with a dry cloth or brush to
remove uff and debris.
Do not use water.
You may rinse the clear bin with water
(optional).
Ensure bin is completely dry before
retting.
Do not use detergents, polishes or
freshening products. Do not immerse
whole machine in water.
Bin emptying
Press catch to release cyclone and bin
from the machine.
Empty directly into dust bin. Emptying carefully into a bag is
recommended for allergy sufferers.
Option 1 Option 2
Empty bin as soon as the MAX mark is
reached.
MAX
MAX
MAX

helpline manual
8
24
Unplug and place machine on its side for
ease of access.
Turn release catch, lift the pre-lter cover
and remove the pre-lter.
Washing the pre-motor lter
Allow 24 hours to dry. Ensure lter is
completely dry before retting into
machine.
Rinse and squeeze lter under cold tap.
24

helpline manual
9
Parts guide
1. Brush tool
2. Crevice tool
3. Stair tool
Cyclone assembly
Contains the shroud, which lters out
uff and hair, the core separator and
the inner cyclones.
Bin assembly
Made from tough polycarbonate and
is easy to empty (see page 7).
13
Low prole contact head
Enables more thorough cleaning
under furniture and appliances.
Hose
The hose wraps around the machine for
easy storage.
Telescopic wand
The wand is telescopic and compacts for
convenient storage.
Pre-motor lter
Lifetime pre-motor lter. The pre-lter
separates particles as small as cigarette
smoke (0.1 microns). Should be washed
every 3-6 months.
2HEPA Post lter
Kills bacteria and mould.

helpline manual
10
Parts guide
Pre-lter cover
Can be easily removed and
retted. (Supplied with wheel.)
Brush bar
(Motorhead variant)
Can be taken out to remove hair
and bre.
End cap
(Motorhead variant)
Can be sent out and tted
by customer.
Power oor tool
(Motorhead variant)
Uses direct drive belt that never
needs replacing. Powerful bristles
remove dirt and pet hair from
carpet.
Telescopic wand and Hose
(Motorhead variant)
The hose wraps around the
machine for easy storage.
Mini turbine head
Ideal for removing pet hair and
bres from conned spaces.

helpline manual
11
Hard oor tool
Improved pick-up
on hard oors.
Flexi crevice tool
Extends and exes to
clean awkward gaps.
Soft dusting brush
Soft bristles to gently
dust around the home.
Up top tool
Revolving, multi-angular
head designed to ease
cleaning in awkward spaces.
Mini Flat-out Head
Compact and low for cleaning
under furniture and awkward
spaces.
Car turbine head
Rotating bristles improve pick-up
of pet hair in conned spaces.
Stubborn dirt brush
With stiff bristles for dried-in
and stubborn dirt.
Mattress tool
Removes dirt and dust mites from
mattresses and upholstery.
DC23 Parts guide: additional accessory tools

helpline manual
12
Parts recognition: Main body
Cable Rewind Actuator
On/Off Actuator
Cable
Rewind
Assy
Cyclone
Exhaust Seal
Wheel
Assy
PCB Assy
Cyclone Inlet
(Passive)
Cyclone Inlet
(Motorhead)
Motor Wiring Assy
Castor
Body
Castor
Roller
Main
Chassis
Wheel Assy
Pre-Filter Door Assy
Screw
Bleed Valve Cap Assy
O-Ring
Bleed Valve Housing
Bleed Valve Spring
Axle
Spring
Switch
Screw
Screw
Screw
Screw
Screw
Screw
Upper
Chassis
Rear Hose Guide
Switch Housing
Spring
Duct Cover Seal
Duct Cover
Motor Bucket Assy
Post Filter Seal
Post Filter Assy
Pre-Filter
Assy
Post Filter
Exhaust Seal
Pre-Filter
Housing Assy
Cyclone Release Catch Housing
Tool Storage
Park Yoke
Park Yoke (Motorhead)
Screw
Screw
Cyclone Release Catch
Spring

helpline manual
13
Parts recognition: Cyclone assembly
Bin Base Assy
Cyclone Assy
Bin Assy
Bin Base Seal
FDC/IDC Seal

helpline manual
14
Parts recognition: Wand and hose
Instruction Pack
Fastener
Mini Turbine
Head Assy
Hard Floor
Tool Assy
Universal Fit
Adaptor
Universal Fit
Adaptor
Stubborn Dirt
Brush Assy
Flexi Crevice
Tool Assy
MTH Brushbar Assy
MTH End
Cap Assy
Turbine
Head Assy
Brushbar
Assy
Crevice Tool
Stair Tool
Brush Tool
Soleplate
Assy
Wand Handle
Assy
Swivel Catch
Spring
Swivel Catch
Spring
Hose Assy
Screw
Soleplate
Wheel
Axle
Low Profile
Contact Head
Screw
Wand Handle
Cover
Screw
Screw
Power Wand
Hose Assy
Wand Handle
Wand Cuff Cover
Screw

helpline manual
15
Screw
Internal Hose Assy
Floor Tool
Bumper Strip
Ropeseal
Brush Housing
Ropeseal
Brushbar Assy
Soleplate
Wheel
Screw
End Cap
Assy Right
Washer
Glamour Cap
E-Clip
Outer Wheel Hub
Axle
Gimble Cover
Brushbar Actuator
Spring
Screw
Stow Microswitch Cam
Stow Neck Cover
Stow Wheel
Brushbar Motor
Screw
Brushbar Microswitch
Brushbar Motor Mount Front
Brushbar Motor Cover Lower
Screw
End Cap Assy Left
Soleplate Assy
Power Floor Tool Assy
Axle
Brushbar Motor
End Mount
Axle
Parts recognition: Motor head oor tool

helpline manual
16
DC23 has a 6-stage ltration process:
1. Outer cyclone: as the air enters the clear bin, large dirt and debris is separated from
the airow.
2. Shroud: the air is then directed up through the shroud, which acts as a uff and hair
separator.
3. Core separator: small/ne dust particles are then separated from the airow in the
core separator.
4. Inner cyclones: smaller/microscopic dust particles are then separated from the airow
in the inner cyclones. The air ows out of the cyclone assembly and into the duct, before
reaching the pre-motor lter.
5. Pre-motor lter: traps the last remaining particles of microscopic dust, allowing only
clean air to pass through.
6. Post-motor lter: lastly, as the clean air passes through the motor, it collects carbon
dust particles from the motor brushes. The post-motor lter traps these particles before
the air is then exhausted back into the atmosphere, thoroughly clean.
DC23 Filtration
The dirty air ows through the wand and hose and then continues up the inlet and into the clear bin.
The ltration process starts in the clear bin. Larger debris is separated from the airow. The air is then directed through the shroud
and up through the core separator and on into the smaller cyclones in the cyclone top. The air then travels down the exhaust
duct before continuing through to the pre-motor lter and into the motor housing and up through the post-motor lter, where it is
exhausted into the atmosphere, thoroughly clean.
This section illustrates the direction of airow through DC23.
DC23 Airow
Lifetime pre-motor lter. The pre-
lter separates particles as small
as cigarette smoke (0.1 microns).
Should be washed every 3-6
months.
Lifetime HEPA post-motor lter.
Never needs washing or replacing.
1
6
5
4
2
3

helpline manual
17
This section is a Helpline Operators guide to DC23 fault diagnostics and a checklist of procedures that should be carried out before
booking a repair.
In some cases, DC23 can be easily repaired over the telephone. If a customer reports any of the following faults listed below, go to
the relevant page number.
Helpline diagnostics
Always make sure you ask the customer to unplug the machine before carrying out any maintenance or checks (unless otherwise
specied).
Contents Page
Loss of pick-up from the low prole contact head 18
Power oor tool brush bar not operating 20
Turbine head brush bar not operating 21
Machine cutting out: thermal cut-out 27
Unusual noises and smells 27
Power failure 28
CAUTION: If the fault is related to
any electrical or mechanical issues,
please ask the customer not to use
the machine until a repair has been
carried out.
Important advice

helpline manual
18
Loss of pick-up from the low prole contact head
Carry out these checks if the customer reports low suction or loss of pick-up from the low prole contact head.
For turbine head variants carry out the ‘Turbine head brush bar not operating’ checks on p.21 before continuing with checks from
this section.
Switch off and unplug the machine before carrying out these checks:
Remove hose from the inlet and switch
machine ON.
Test suction from the inlet. If suction is
weak continue with checks, if strong
go to step 10. Switch machine OFF.
Remove the cyclone and bin assembly.
Check bin and cyclone for blockages
or obstructions and make sure the
shroud is clear of debris.
Check bin entry and cyclone exhaust
for blockages.
Check duct for blockages in the area
shown.
Open the pre-lter cover by turning
the release catch. (The machine
can be placed on its side for easier
access.)
Remove the pre-lter. Ask the customer
to wash if necessary (when the call has
ended). Ensure pre-lter is completely
dry before retting.
Ask the customer to ret the cyclone
and bin assembly.
2 31
5
4
9
8
7
Cyclone exhaust
Bin entry
Intermediary
FDC
Open bin base and check
intermediary and FDC for blockages.
Check seal is tted correctly.
6
Seal

helpline manual
19
Reconnect the hose. Switch machine
OFF and separate the low prole
contact head from the telescopic
wand.
Ret hose back into the inlet. Separate the hose from the wand
handle. Switch machine ON and test
suction from the end of the hose. If
weak this indicates a blockage or
possible damage to the hose.
Loss of pick-up from the low prole contact head
14 15
13
12
10
Check low prole contact head for
blockages or damage. Check position
of the bleed tabs.
Ensure that both sections of the
telescopic wand are fully extended
and locked into place. Check length of
wand for damage. Check the suction
release button for damage. Switch
machine ON and test suction from the
end of the wand. If weak this indicates
a blockage or possible damage to the
wand handle. Switch machine OFF.
Reassemble the machine and switch
ON. If the machine operates as
normal end the call. If not arrange a
repair.
11
Bleed tab Bleed tab

helpline manual
20
Power oor tool brush bar not operating
The brush bar on DC23 Motorhead is powered by its own motor.
The brush bar will stop rotating if it becomes obstructed. If the customer is advising that the brush bar is not operating or rotating,
this maybe due to the brush bar motor cut-out. The brush bar motor will operate immediately, once the obstruction is cleared and
the power oor tool reset.
Ask the customer to plug the machine
in and switch ON.
Press the release catch and separate
the telescopic wand from the power
oor tool.
2 31
Ask the customer to check if the
brush bar is spinning. If spinning and
customer is happy, end the call. If not
ask customer to switch machine OFF
and continue with these checks.
Check that the pins on the hose are
not broken or bent and the connector
on the inlet is not damaged.
Undo fasteners with a coin and
remove both end caps.
56
4
Pins
Connector
Check that the pins on the power oor
tool are not broken or bent and the
connector on the telescopic wand is
not damaged.
Remove both brush bar sections and
clear any hair/bre. Check power oor
tool for blockages.
Check the stow micro-switch is not
broken or obstructed.
9
8
7
Ask the customer to ret the brush bar
and end caps. Switch machine ON,
press brush bar ON/OFF button and
test. If customer is happy end the call.
If not arrange a repair.
Stow micro-switch
Table of contents