Dynamic DYN-6119-01 User manual

Infrared Sauna Instruction Manual
Models: DYN-6119-01
1-2 Person FAR Infrared Sauna
CARBON MODEL SAUNA
FOR INDOOR USE ONLY
120VAC 15AMP Dedicated Circuit Required
Carefully and thoroughly read this Owner’s Manual before using/operating the
sauna. We recommend keeping this Owner’s Manual for regular review and
future reference.

What Are Infrared Rays?
Infrared is the band of light we perceive as heat. We cannot see this band of light with the
naked eye, but we can feel this type of light in the form of heat. Our sun produces most of
its energy output in the infrared segment of the spectrum. Infrared rays heat your body
without having to heat the air in-between. This process is called conversion.
The infrared is divided into 3 segments by wavelengths measured in microns: Near
Infrared –0.76-1.5 microns; Middle Infrared –1.5-5.6 microns; and Far Infrared –5.6-1000
microns. Among these segments, Far Infrared penetrates organic substances such as the
human body two to three inches so that the warming effect is very uniform.
Health Benefits
Because infrared rays penetrate the body through conversion, there is a deep heating
effect in both the muscle tissues and internal organs without putting too much burden on
the heart.
Our body reacts to the increased heating through the natural cooling process of perspiring.
Through the perspiration process, acid and waste residue like toxins, sodium, alcohol,
nicotine, cholesterol, and the potentially carcinogenic heavy metals are removed from the
cells (especially zinc, lead, nickel, cadmium, etc.). The pores of our skin open and
discharge waste products shedding any old skin cells leaving the skin glowing and clean,
with improved tone, elasticity, texture, and color.
Page 1

Health Benefits Include, But Are Not Limited To:
*Pain relief from Rheumatoid Arthritis
*Relaxes muscle spasms
*Increases blood circulation
*Cardiovascular conditioning
*Clears rashes, acne
*Reduces cellulite
*Removes toxins and mineral waste
*Reduces stress and fatigue
*Enhances skin tone
DISCLAIMER
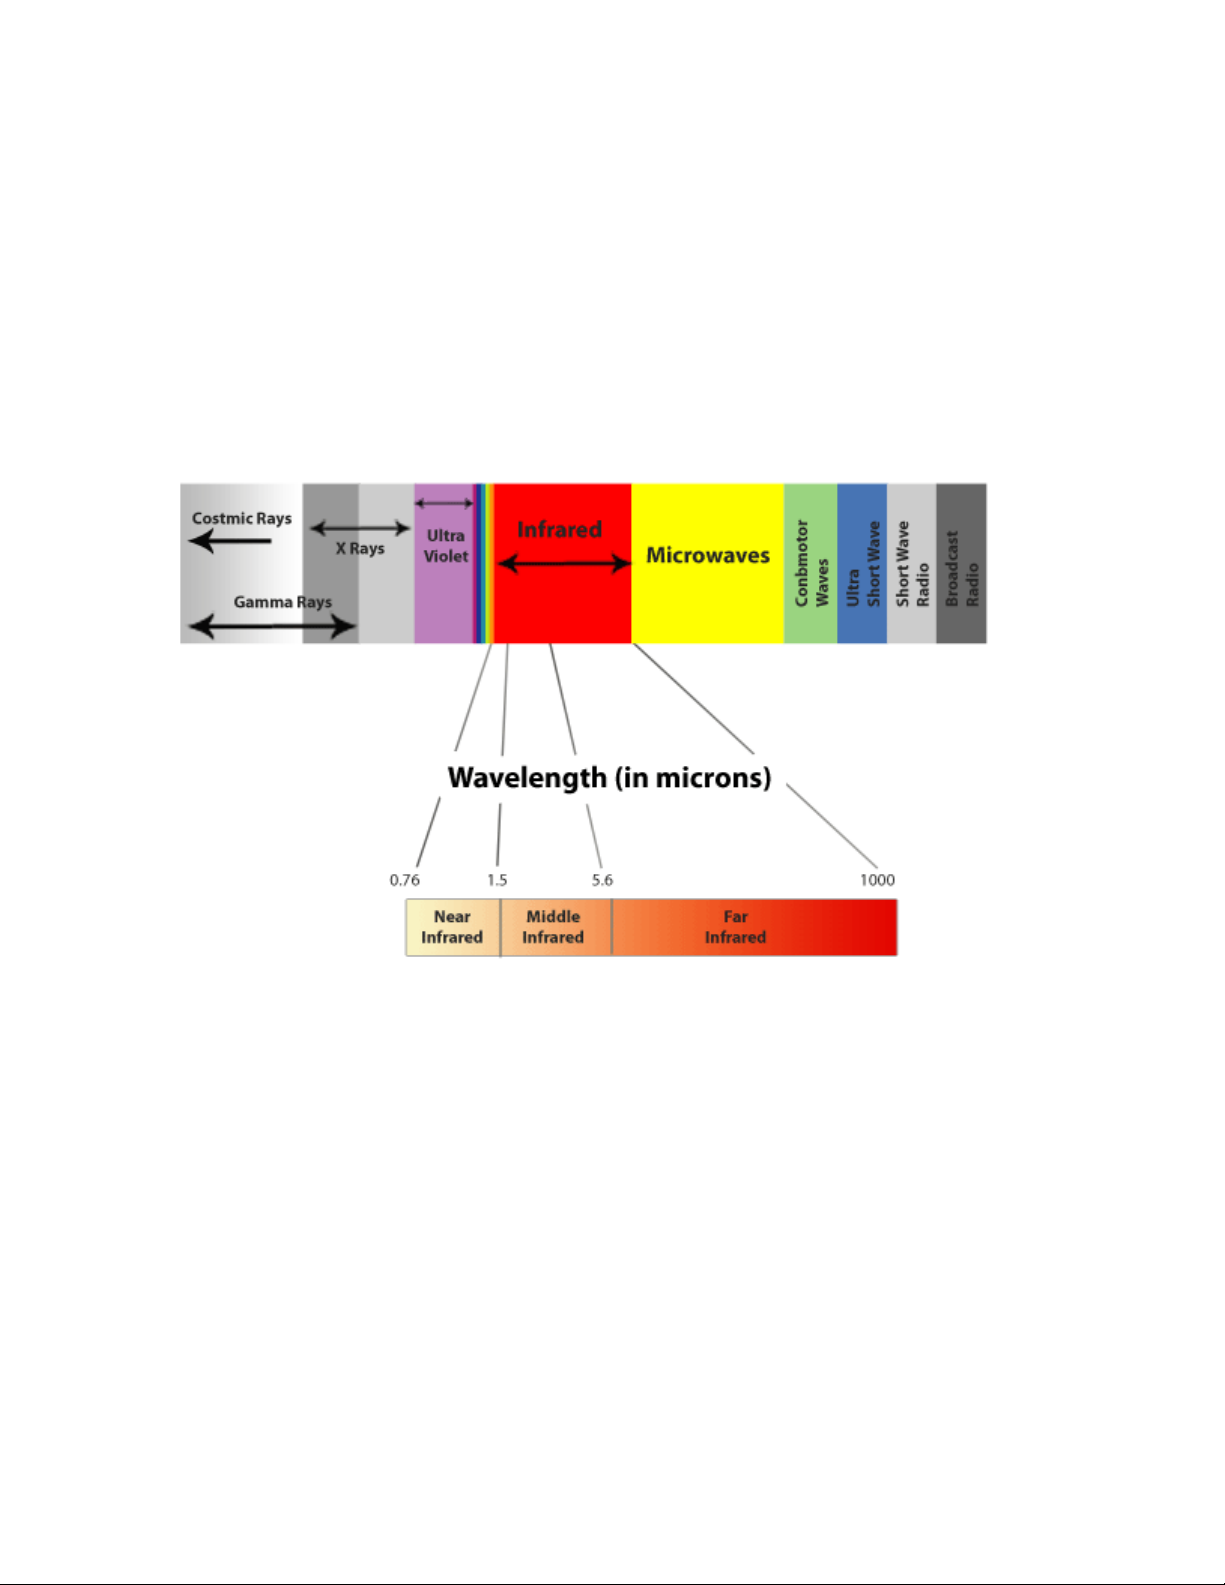
The infrared rays emitted by your sauna are reported to offer a wide range of possible
therapeutic benefits based on research completed over the last 40 years from all around
the world. These benefits are presented for reference purposes only and no implication of
infrared saunas creating a cure for or treating any disease is implied nor should it be
inferred. If you have a medical/health condition, are taking prescription drugs, or have
acute joint injuries, please consult with your medical physician before using the sauna.
Persons with surgical implants (metal pins/rods, artificial joints, silicone, or other types of
surgical implants) typically do not experience any adverse effects, but should also consult
their medical physician or surgeon before using the sauna room.
What are electric and magnetic fields?
Electric and magnetic fields are a basic force of nature (like gravity), generated by
electricity. They are found almost everywhere. Electric and magnetic fields are found in
nature, where they are created by such things as lightning and static electricity. Manmade
fields are found wherever people use electricity, such as near powerlines and electrical
appliances. Like sound, electric and magnetic fields are made of a mixture of components
and so can be described in many different ways. Both have wave-like properties
such as strength and “frequency” (how often they cycle back and forth). Sound can be
loud (strong) or soft (weak), high or low pitched (different frequencies), suddenly loud or
constant in tone, and pure or jarring. Similarly, electric and magnetic fields are a mixture
of components. They can be strong or weak, have a high or low frequency, have sudden
increases in strength (“transients”) or a constant strength, and consist of one pure
frequency or several (called “harmonics”). For example, the strength of a field can be weak
and constant, as in most nighttime home environments, or it can be strong and vary from
high to low every few seconds, as from an electric blanket set on high. Powerlines and
wiring in buildings and appliances generate 50 and 60 Hertz fields, sometimes referred to
Page 2

as “power frequency” fields. Hertz is the unit for measuring the frequency of fields in the
number of wave cycles each second. The lower the frequency of a field, the lower its
energy. Power frequency fields are low frequency fields and have low energy levels.
Microwave and x-ray fields are high frequency fields and have high energy levels. Below
are some EMF measurements.
EMF Levels from Common Homes Sources
After many years and numerous studies on EMF exposure, no government body including
the Occupational Safety and Health Administration (OSHA) have established permissible
exposure limits (PEL). Currently, there is no consensus on the potential health hazard from
any exposure to EMF. The mainstream scientific evidence suggests that low-power, low-
frequency, electromagnetic radiation associated with household currents like that of the
infrared sauna does not constitute a short or long term health hazard.
Sauna Maintenance
Since infrared saunas do not require hot rocks, water, or steam to operate, they require
very little maintenance. You can simply wipe it down with water –use a damp, soft, and
clean cloth. Do not use any chemical based cleaning agents as they can be absorbed
into the wood and be released into your sauna during use.
Page 3

*PLEASE READ INSTRUCTIONS THOROUGHLY BEFORE ASSEMBLY*
DYN-6119-01
*THE ABOVE ASSEMBLY DIAGRAM IS FOR A QUICK REFERENCE VISUAL
GUIDE ONLY. ALL SAUNA MODELS MAY NOT BE SHOWN. PARTS AND
ACCESSORIES DO VARY AND ARE SUBJECT TO CHANGE.
Page 4

TABLEOFCONTENTS
PackingList 5
Highlights 6
Assembly 7
OperatingtheSauna 12
TipsforUsingyourSauna 15
SafetyInstructions 15
SafeguardsforyourSauna 17
TroubleshootingGuide 18
Warranty 20
WarrantyCard 22
WARNING: Visually inspect all heaters before assembly to make sure they are
not damaged. Any excessive vibrations during transport could cause damage to
the heating elements. DO NOT START the sauna if damage is detected! Contact
your dealer or manufacturer for troubleshooting and replacement parts.
Packing List (main panels)
1pc Front Panel 1pc Rear Panel 1pc Right Side Panel
1pc Left Side Panel 1pc Roof Panel 1pc Roof Cover
1pc Bench 1pc Bench Heat Emitter Panel
NOTE: Your model sauna has been completely assembled and tested prior to
packaging. The rear wall panel is intentional warped as part of the overall design.
Two adults will be needed to assemble the sauna room.
CAUTION: Exit Sauna Immediately If You Feel Dizzy, Sleepy, Or
Any Discomfort.
Page 5

Highlights
A. High quality craftsmanship
B. Temperature control
C. Timer
D. Infrared carbon heat emitter panels
E. Control Panel:
F. Power supply:
G. MP3 Jack:
H. Guide and Guide Insert brackets:
Page 6

I. Buckles:
Assembly
Please note the following:
A. You will need a Philips screwdriver, ladder, and two adults to assemble.
B. Do not plug any other appliances into the power supply of the sauna room other
than the designated sauna connections/plugs.
C. Assemble the sauna room on a completely level surface.
D. Do not spray or get water on the exterior/interior walls of the sauna room. If the floor
which the sauna will sit on is damp or wet, install a barrier between your floor and
the sauna floor to keep the sauna’s floor from becoming damp or wet.
E. Do not store flammable objects or chemical substances near the sauna.
F. 1-person model is packed into one single carton.
1. First, locate where the sauna is going to be assembled. Make sure you have plenty
of room to move around the sauna during assembly. Remove the front wall panel
from the carton and stand it upright at the location where it will be assembled. One
adult will need to continue to hold the front wall panel. (see FIG 1)
FIG 1 Front Panel
Page 7

2. A second adult can now remove the left side panel from the carton. The left side
panel will need to be placed next to the front wall panel. Next, the left side panel will
need to be lifted upward in order to connect the guide and guide insert brackets on
both wall panels. Once inserted, the left side panel will need to slide downward. Be
sure that it slides all the wall down so that the top of the front panel and left side
panel are flush at the top. (see FIG 2)
FIG 2 Assembling Front Panel and Left Side Panel
3. As with the left side panel, the right side panel will need to be removed from the
carton. The right wall panel will need to be placed next to the front wall panel. Next,
the right side panel will need to be lifted upward in order to connect the guide and
guide insert brackets on both wall panels. Once inserted, the right side panel will
need to slide downward. Be sure that it slides all the wall down so that the top of the
front panel and right side panel are flush at the top. (see FIG 3)
FIG 3 Assembling Front Panel and Right Side Panel
4. The floor panel can now be installed. Remove the floor panel from the carton and
lay it on the floor at the rear of the sauna room. You will push the floor panel
Page 8

between the left wall panel and right wall panel. Push it all the way and against the
front panel. Please note that the front and rear are the long side and it doesn’t
matter which is the front or rear. (see Figure 4)
FIG 4 Assembling Floor Panel
5. The rear panel is ready to be installed. Remove the rear panel from the carton and
take it to the rear of the sauna room. Place the rear panel up against the left side
panel and right side panel. Use the buckles to latch the wall panels together. Pleae
note that the buckles have a guide tab that must be placed in the guide slot for
alignment. (see Figure 5)
FIG 5 Assembling Rear Panel
6. Locate and remove the roof panel from the carton if not already done so. Before
installing the roof panel, flop the heater cords at the top of the wall panels to the
outside of the sauna room. Open the door, lift the roof panel up and over the sauna
room, and gently lower it into place resting it on the wall panels. Make sure that all
cords/wires are slipped through the corresponding holes in the Roof Panel. (see
FIG 6)
Page 9

FIG 6 Assembling Roof Panel
7. Connect all the wires and connectors to the corresponding outlets on the Roof
Panel. Be sure that all the plugs are connected snug and tight. (see FIG-7)
FIG-7 Connecting cords/wires connectors
6. It is now time to install the door handle, bench heat emitter panel and bench. Locate
the door handle and screw it to the glass door. Next, slide the bench heat emitter
panel vertically downward. Be sure that the heat emitter panel slides downward into
the slots on the side wall panels. After installing the bench heat emitter panel, you
can connect the heater cord. Next, you can slide the bench over the top of the
bench heat emitter panel. Be sure to slide the bench all the way back against the
rear panel. Use the provided screws to secure the bench in place. (see FIG-8)
FIG-8 Assembling Bench Heat Emitter Panel & Bench
Page 10

8. Make sure all steps are completed correctly. Next, plug in the power cord to your
wall outlet. Turn on the sauna at the control panel to confirm that the control panel
is responding. If the control panel responds accordingly, then proceed in putting the
roof cover onto the roof panel. Make sure to pull the power cord through the
corresponding hole in the roof cover. Proceed in screwing down the roof cover to
the roof panel. (see FIG 9)
FIG 9 Slip the power cord through Roof Cover
9. Enter the sauna and remove the protective masking tape (if present) from the
TEMPERATURE SENSOR. Situate the TEMPERATURE SENSOR so that it is
vertical, pointing downward. (see FIG 10)
FIG 10 Temperature Sensor
Installation Completed.
Page 11

Operating the Sauna
1. Precautions
A. Please make sure your wall outlet meets the specifications required.
Failure to meet the requirements may cause safety risks.
B. Set the temperature and time to a comfortable level. Please keep in mind that you
can either preheat the sauna to the set temperature before entering or sit inside the
sauna as the temperature rises. Please note that you will increase the time it takes
for the sauna to reach the set temperature if you enter the sauna room before it
has reached the set temperature. Also, the most commonly used temperature
setting is between 118 degrees Fahrenheit / 48 degrees Celsius and 122
degrees Fahrenheit / 50 degrees Celsius. The way the sauna room works is when
you set the Control Panel to say 120 degrees F / 49 degrees C, the heat emitters
will turn off when that set temperature is reached. And even though the sauna
does allow the user to set the Control Panel to 150 degrees F/65 degrees C, this
is specifically for those users who do not want the heat emitters to ever turn off as
the sauna room will most likely never achieve 150 degrees F / 65 degrees C
(depending on your room ambient temperature). Please further not that if the
ambient temperature is below 72℉, the sauna will take longer to pre-heat. It is not
recommended to use the sauna in an environment with an ambient temperature
below 60℉.
C. Drink water prior to, during, and after your sauna session to replenish body fluids.
D. After 3 hours of continuous use, the sauna needs to be shut down for one hour.
E. To avoid burns, do not touch the heating element.
2. Operating The Sauna
A. Review the electrical label on the sauna and then plug the sauna into the proper
wall outlet. No other appliance can be operated on the same electrical breaker as
the sauna when the sauna is in use. Proceed in turning on the sauna room using
the ON/OFF button to activate the sauna.
Page 12

B. The sauna should be unplugged when not in use.
C. To set the temperature, press the temperature buttons to increase or
decrease the temperature to the desired temperature. If the “Heat" light is on, the
temperature setting will increase one degree every time the button is pressed.
If pressed for three seconds, the setting will increase quickly. Decrease the
temperature in the same manner by pressing the button. After the sauna
reaches the desired temperature, the “Heat” light will turn off.
D. Press the button to turn the light ON. If you want to use the Color Light
Therapy System:
A. While the interior light is ON, press and hold down the button
for 2 seconds. You will notice “2n” in the LED display. This indicates you are
in the “light” mode. If you do not press any buttons for approximately 15
seconds, the “2n” will change back to the Timer mode.
B. While the “2n” is displayed, you can now turn the exterior light ON/OFF by
pressing the button in the section of the control panel.
C. You can also turn the interior light ON/OFF by pressing the button in
the section of the control panel.
D. While the interior light is on and the “2n” is still displayed in the LED display,
you can press the button to scroll through the different colors within
the Color Light Therapy System. You will notice that you have two selections
for “white”:
A. The first selection for “white” will allow the colors to go through a
sequence of the different shades of colors.
B. The second selection for “white” will continue to display the white
light.
To return back to the Timer mode, press the button.
Page 13

E. You can operate the sauna with the ceiling vent in the open or closed position.
F. After your sauna session is over, you can turn the control panel off by pressing the
ON/OFF button. You can unplug the sauna cord if the sauna will not be used for an
extended period of time.
G. To set the time, press the buttons. Press and buttons to set
the timer from 5 to 60 minutes. If pressed for three seconds, the timer will
increase/decrease quickly. To extend the sauna session, reset the timer again by
pressing the .
H. The Fahrenheit and Centigrade display can be switched by pressing and holding
simultaneously the temperature button & at the same time and then
pressing the and then letting go of all three buttons together.
I. The Bluetooth function is built into the Control Panel. For the Bluetooth function,
you first will need to pair your device with the sauna room. Open your device’s
Settings Menu and then locate and open Bluetooth. You will find BT-AUDIO. Now
you can pair your device. Once pairing is successful, your device will be connected.
You will control the volume and choose the music on your device.
J. The MP3 Jack will allow you to connect your musical device using the AUX wire.
Plug one end of the AUX wire into your musical device and the other end into the
MP3 Jack at the ceiling. Do not leave the AUX wire connected at the ceiling when
not using this function as it may cause static interference at the speakers. You will
control the volume and choose the music on your device. When you disconnect the
MP3 wire, the sound system will automatically return back to the Bluetooth mode.
CAUTION: Exit sauna immediately if you feel dizzy,
sleepy, or any discomfort.

Page 14
Tips for using Your Sauna
1. If you take a hot/warm shower or bath before using your sauna, you may perspire
more and experience more comfort.
2. Drink water prior to, during, and after your sauna session to replenish body fluids.
3. To regulate the set temperature inside the sauna to your comfort level, use the
movable roof vent or leave the door slightly open. The roof vent is installed on the
sauna and used based on personal preference.
4. Use 2 towels during your sauna session. Fold the first towel several times and place
it on the bench. As you sit on this towel, it will absorb a majority of your perspiration
while adding comfort as you sit on the bench. Use the second towel to either
constantly wipe the perspiration from your body to perspire faster and also to avoid
having too much perspiration dripping onto the floor or placing it on the floor to catch
your dripping perspiration. If your legs become cold, you can use a third towel to
drape over your legs to trap the heat.
5. This is a non-commercial sauna. For every three hours ON, the sauna must be
turned OFF for one hour to cool down.
6. At the first sign of a cold or flu, increasing your sauna sessions may be beneficial in
boosting your immune system and decreasing the reproductive rate of the virus.
7. To help relieve sore and tense muscles, massage the affected areas during your
sauna session.
8. To treat your ankles and feet more effectively, you can elevate them and move them
close to one of the heat emitters to achieve a deep heating effect.
9. To utilize the sauna’s heat therapy effect, put oil and treatment into your hair and
wrap it with a towel. After your sauna session is over, rinse your hair thoroughly.
10.The peaceful and relaxed state rendered by a sauna session may help you to sleep
easier and deeper.
11.To conserve energy consumption, please unplug your sauna when not in use –
especially if you do not plan on using the sauna for an extended period of time.
12.After the sauna session is over, do not jump into the shower or bath immediately.
Because your body was heated up during the sauna session, it will continue to
perspire even after the heat emitters are off. Sit in the sauna with the door slightly
opened and let your body cool down. Once your body has cooled down and you feel
comfortable, you can exit the sauna. After about fifteen minutes and when your
body has completely cooled down, you can take a shower or bath to clean your
body.
Safety Instructions
1. Read and follow all instructions carefully before using the sauna.
2. When assembling and using the electrical equipment, safety precautions should
always be followed.
3. To reduce the risk of injury, do not allow children to use the sauna unless they are
closely supervised at all times by an adult. Children should not use the sauna
unless prescribed or advised by their medical doctor.

Page 15
4. Do not use the sauna immediately following strenuous exercises. Wait at least 30
minutes to allow the body to cool down completely.
5. Pregnant or possibly pregnant women should contact their medical physician prior
to using the sauna. Excessive temperatures have a high potential for causing fetal
harm during pregnancy.
6. Hyperthermia Danger: The normal body temperature can’t rise above 103°F
(39°C). Symptoms of excessive hyperthermia include dizziness, lethargy,
drowsiness, and/or fainting. The effects of excessive hyperthermia may include, but
are not limited to failure to perceive heat, physical inability to exit the sauna,
unawareness of impending hazards, unconsciousness, and/or fetal harm in
pregnant women. Hyperthermia could make your body’s core temperature rise.
Setting the desired temperature to an excessively high temperature is not
recommended.
7. The use of alcohol, drugs, or medications (prescribed or non-prescribed) prior to or
during the sauna session may lead to unconsciousness and/or other harmful
physical injuries.
8. Persons suffering from obesity or with a medical history of heart disease, low or
high blood pressure, circulatory system problems, diabetes, or other medical
conditions should consult with a medical physician prior to using the sauna.
9. Persons using medications should consult with a medical physician before using the
sauna. Some medications may induce drowsiness while other may affect the heart
rate, blood pressure, and/or blood circulation.
10. Use care when exercising before and after sauna use.
11. Never sleep inside the sauna
12.Do not use any type of cleaning agents on the interior of the sauna. Only wipe down
the sauna room with water and a damp cloth. Never use any chemical based
cleaners.
13.Do not stack or store any objects on top of or inside the sauna.
14.If the power supply cord becomes damaged, it must be replaced immediately by the
manufacturer or its agent. If you find the power cord is too hot (normally it will
become warm) or that the electrical equipment may be experiencing technical
problems, please contact the manufacturer or its agent immediately to avoid
hazardous situations.
15.Make sure that the electrical outlet is in good working order. A common problem
with electrical outlets is loose wiring on the connection points of the terminals of the
outlet. A loose wire will also make for a bad connection and cause an unusual
amount of heat buildup. Loose connections can also cause sparking in the junction
box that can result in arcing. You'll likely see burn marks around the terminals if this
occurs. If this happens, do not use the sauna and have the outlet replaced by a
certified electrician. If the power cord is damaged, please contact Customer
Support.
16.Do not use the sauna during an electrical storm to avoid risk of shock or injury.
17.Do not continuously switch the power ON and OFF excessively as it will
compromise the life of the electrical components.
18.Your hands must be dry and free of moisture before plugging and unplugging cords
and wiring harnesses from the power supply and circuit boards. Never operate the

Page 16
sauna with wet hands or wet feet to avoid the risk of electrical shock or injury.
Never touch the metal prongs of the plug.
19.Do not attempt to make any repairs yourself unless authorized by the manufacturer
or its agent. If a problem occurs with the sauna, please contact the manufacturer or
its agent immediately to avoid safety risks. Unauthorized repair attempts will void
the manufacturer’s warranty.
20.Please make sure the outlet power supply meets the specifications required.
Failure to meet the requirements may cause safety risks.
21.Some sauna models are equipped with reading and/or roof lamps. Because the
lamp temperature will become very hot once powered ON, do not attempt to touch
the lamp to avoid being burned. Do not attempt to touch it for at least 20 minutes or
until it cools down completely if a need to touch it arises.
22.Do not pour water or any other liquids onto the infrared heat emitters. Do not bump,
hit, or break the heating elements as it may cause an electrical short and pose a
safety risk.
23.Do not make any modifications to the sauna, the sauna structure, or the sauna
components.
24.Prior to each sauna session, the sauna room is to be inspected for correct
operation. If for any reason your sauna does not seem to be operating properly,
discontinue use and contact Customer Service.
Safeguards For Your Sauna
1. Do not install the sauna near water, near a bathtub (if water will splash on the
sauna), near a shower (if water will splash on the sauna), in a wet basement, or
near a swimming pool (if water will splash on the sauna).
2. Do not use liquid cleaners or aerosol cleaners on the sauna. Unplug the sauna
from the wall outlet before cleaning. Use plain water and a soft damp cloth for
cleaning.
3. The power supply cord should be routed so that it is not walked on or pinched by
any object that may be placed against it.
4. When replacement parts are required, be sure they meet the specified
requirements of the manufacturer. Unauthorized substitutes may result in a fire,
electrical shock, or other hazardous situations. After any repairs, please ask the
service technician to perform a safety check to determine that the sauna is in good
working order.
5. Do not use any wall receptacle adapter, surge protector, or extension cord between
the sauna cord and wall outlet.

Page 17
Troubleshooting
problem
possible reason
countermeasure
1
indicator light for
power supply not
working
The connector is not
connected properly
Check the connector or
replace a new one
No power supply input
Check your circuit breaker to
confirm power at the wall
outlet
Indicator light is broken
replace the circuit panel
2
Indicator light for
function is not
working
The heating indicator light is
broken
Replace the relevant control
panel
The circuit board or
components are broken
Replace the circuit board
The temperature sensor is
broken
check the connection of the
temperature sensor
3
Infrared Heater not
heating up
The heater is broken
Replace heater panel
The wire junction or the
heater’s wire is not
connected
Check that the connections
are sung and tight
The temperature sensor is
broken
check the connection of the
temperature sensor
The circuit board or the relay
is not working
replace the circuit board
4
Odor from the
sauna
Power supply problem
Power supply may need to
be replaced
5
Light bulb is not
working
Light bulb is burned out
Remove burned out light
bulb and replace it
Light bulb wiring is loosen
Check connection and/or
replace the lamp assembly
Problems with electrical
control panel
Replace the relevant control
panel
6
Sauna is not
powering up
Power cord is unplug
Plug the power cord into
wall outlet
Outlet has no power
Check your circuit breaker to
confirm power at the wall
outlet
Power supply or circuit
panel is broken
Replace the power supply or
related circuit board

7
The temperature
display shows "EP"
The connector of
temperature sensor is loose,
not connected, or sensor is
damaged
Disconnect and reconnect
the connector of
temperature sensor or
change to a new
temperature sensor
8
The temperature
display shows "H"
The temperature inside the
sauna room is too
high
Turn off the unit, and contact
the manufacturer
9
Speaker does not
work
The speaker is broken
Replace with a new one of
the same specifications
The speaker wire is loose
Disconnect and reconnect
the speaker connections
The power indicator light for
CD is off
Turn on the switch to start
work
10
CD-Player doesn’t
work
Power connector is loose or
damage
Disconnect and reconnect
the connection
DC power supply has no
power to the CD-player
Check DC power supply
wiring or replace the power
supply
CD-player is defective
Replace the CD-player
CD-player protection fuses
is burnt out
Replace the fuses
Maintenance
Cleaning
Do not use liquid cleaners or aerosol cleansers inside the sauna. Unplug the sauna from
the wall outlet before cleaning. Use plain water and a soft cloth for cleaning. Do not use
benzene, alcohol, or strong cleaning chemicals in or on the sauna. NOTE: Any
chemical that can damage wood or be absorbed into the wood will damage the
sauna.
Table of contents
Other Dynamic Plumbing Product manuals
Popular Plumbing Product manuals by other brands

A.O. Smith
A.O. Smith AO-MF-B owner's manual

Graff
Graff BALI 2368200 Instructions for assembly and use

American Standard
American Standard SERIN 2064.461 installation instructions

Sanela
Sanela SLUN 26A Mounting instructions

Moen
Moen Brushed Bronze 128880BB Illustrated parts list

Franke
Franke CMPX551GE Installation and operating instructions

AIR GAP
AIR GAP Tap-a-tap AG250-503 Installation procedures

Grohe
Grohe Zedra 33738 user manual

Delta
Delta TALBOTT 35960LF quick start guide

Powers
Powers HydroGuard T/P e700 Series Technical instructions

Bradley
Bradley Terreon TDB3104 installation instructions

Dornbracht
Dornbracht 26 023 661-FF installation instructions