Dynex DX-SC7.1 User manual

USER MANUAL / MANUEL DE L’UTILISATEUR / MANUAL DEL USUARIO
Ver. 1.0

Contents
Welcome ................................................................ 3
Dynex DX-SC71 Overview ........................................ 4
Hardware installation ............................................ 6
Installing the driver software .................................. 7
Installation under Windows XP/2000/ME ................................. 7
Installation under Windows 98SE ............................................. 9
Remove the driver under
Windows XP、2000、ME、98SE ........................... 9
Dynex DX-SC71 Control Panel ................................. 9
Main Setting ............................................................................... 9
Mixer ........................................................................................... 10
Sound Effect ............................................................................... 12
Karaoke/Magic Voice ................................................................. 12
Information ................................................................................. 13
USER MANUAL2

USER MANUAL 3
Welcome
We are pleased that you have chosen this high quality sound card from Dynex. The
Dynex 7.1 Sound Card represents our commitment to high-quality, state-of- the-
art sound card technology. With this product you have acquired a power packed 3D
audio accelerator that also knows how to “aim to please” when it comes to digital
I/O’s.
We’re sure that your new 7.1 Sound Card is just the ticket to bring a whole new
dimension of fun to your music, movies, and more, as well as offering comfortable
and exible functionality.
This manual covers the Dynex DX-SC71 7.1 Sound Card and its uses in great detail.
But rst, here‘s a quick overview.

Dynex DX-SC71 7.1 Sound Card
Overview
The following gure shows an example for the port design of a sound card bracket
and also illustrates how to connect your audio devices to the sound card.
USER MANUAL4

A1 - Microphone In (Pink) 3.5mm Jack
A2 - Line In (Bright Blue) 3.5mm Jack
A3 - Front Out (Light Green) 3.5mm Jack
A4 - Side Surround OUT (Light Green) 3.5mm Jack
A5 - Center/Subwoofer OUT (Light Green) 3.5mm Jack
A6 - Back Surround OUT (Light Green) 3.5mm Jack
D1 - Optical digital output
D2 - Optical digital input
JP2 - Game Port
JP3 - Connect to the front box for SPDIF_IN (OUT)
JP4 - Connect to the front box for 8CH_OUT
JP5 - Connect to the front box for Mic (Line)_In
JP7 - Connect to the front box for slave card
J6 - Aux In
J3 - CD In (Sony)
J4 - Panasonic CD In
USER MANUAL 5

Hardware installation
Installing the Card.
Before opening the case, unplug the AC power cable from the wall socket as well as
from PC.
• Switch off your PC and all connected peripheral devices such as your
printer and monitor. Leave AC cable connected for the time being, so that
your computer is still with ground.
• Touch the metal chassis at the rear of the PC to ground and to discharge
static. Now unplug the cord from the AC socket.
• Remove the cover from the case of your PC.
Installing the PCI card.
• Find a free PCI slot, remove the screw securing the metal cover over the
slot and remove the cover itself. If it is necessary to break a plate out of the
case, do so with great care avoiding injury.
• Carefully remove the PCI card from its package. Pick it up by the edges
with one hand while your other hand is resting on the metal of the PC case.
This will ensure that your body is completely discharged via your computer
without affecting the card. Please do not touch the components of the
board.
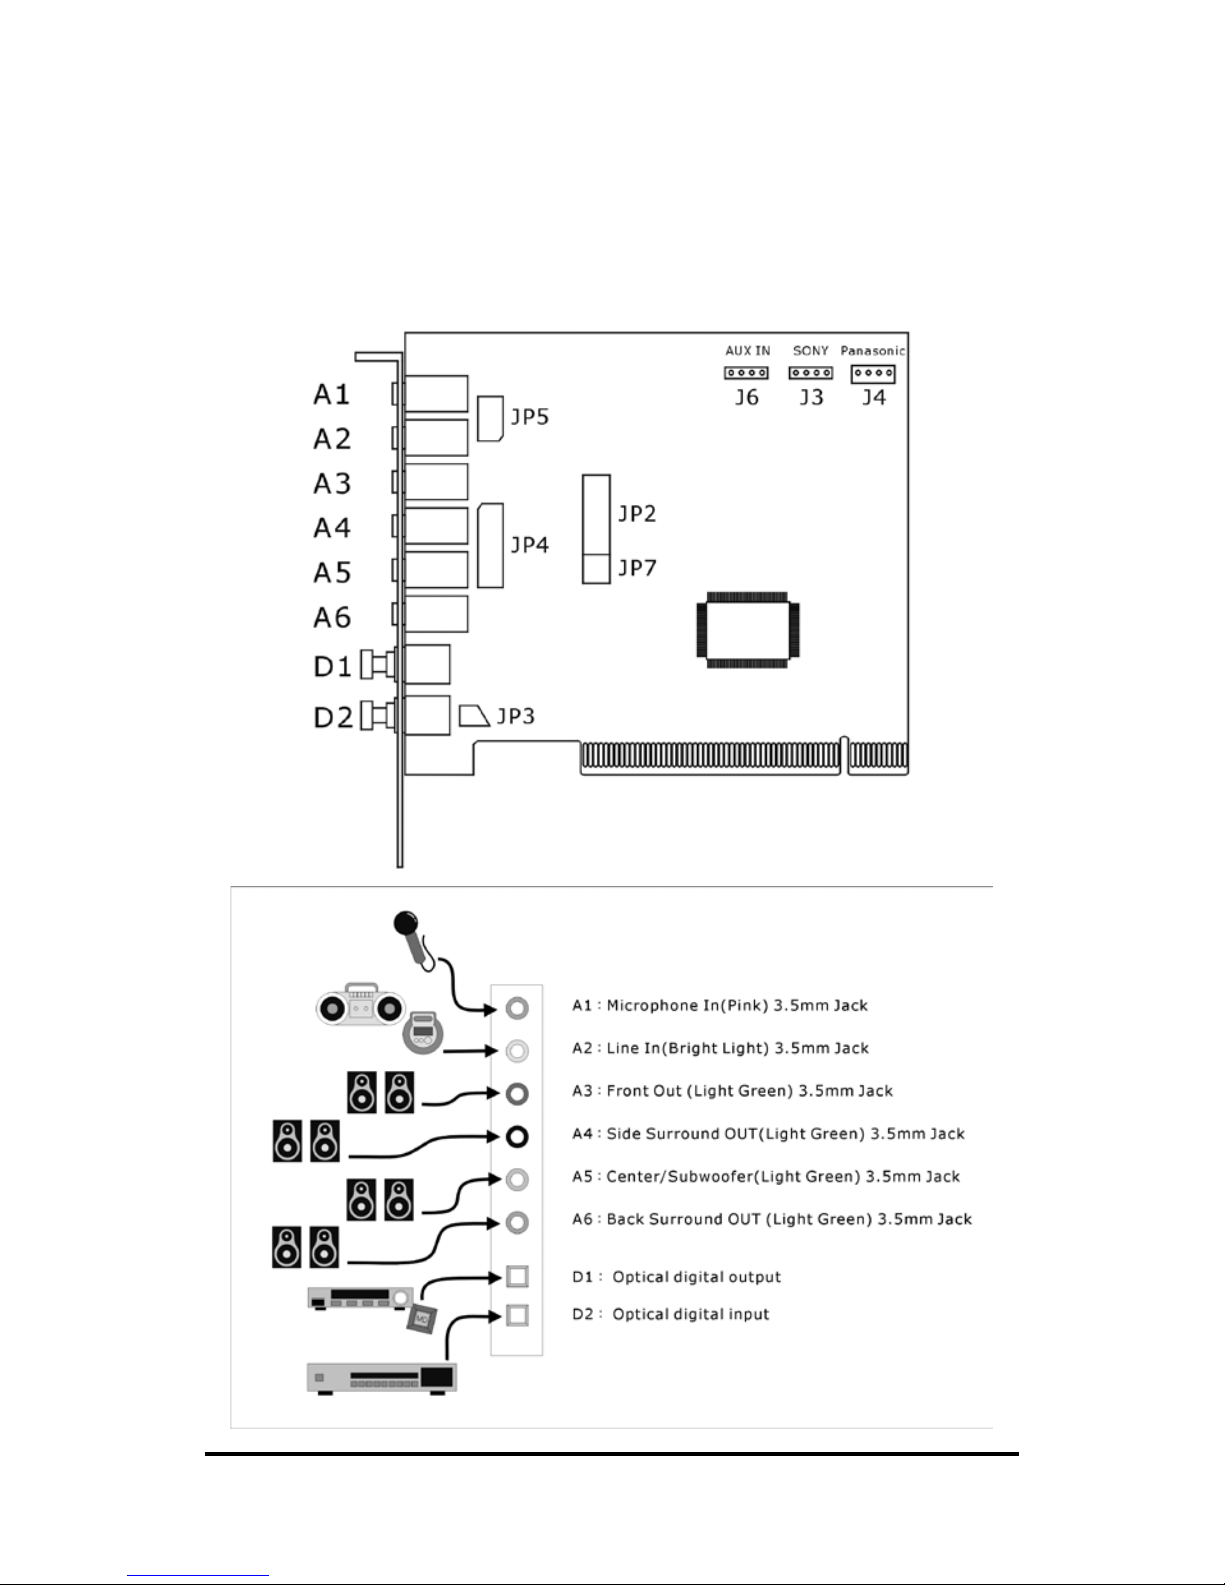
• Next connect the internal cables (e.g. from the CD drive). For further
information on the various connectors, please see page 5.
• Align the audio card so that the strip with the golden connector pin is
located exactly over the PCI slot. Insert the card into the slot. You might
have to press the card firmly into the slot to make good contact. Take
care to ensure that the contacts are precisely in the line in order to avoid
damaging the audio card or the motherboard in your PC.
• Secure the card with the screw from the slot plate (these screws are
generally also included with PC cases).
Finishing up.
• Reinstall the cover of your PC case.
• Connect your audio peripherals (HIFI amp, active speakers, mixer, mic,
etc.) to the 7.1 Sound Card.
• Reconnect the AC power cable as well as all other cables and turn your PC
on. Make sure that your speaker or HIFI system is set to low volume.
• Start your computer. The installation of the driver software is the next step.
USER MANUAL6

Installing the driver software.
The Dynex DX-SC71 currently comes with the drivers for Windows 98SE, Windows
Me, Windows 2000 and Windows XP. Please check which operating system you are
using before installing the card.
Installation under Windows XP/2000/ME
1. Once the computer has been restarted, the new hardware has been detected by
the Windows hardware wizard, the following window will appear. Please select
“Cancel”.
2. Please insert the accompanying driver CD-ROM into your drive. Following the
instruction hint, select the correct language then click the “Install Driver” and
follow the dialogue window to install the driver.
3. Click “Next”.
USER MANUAL 7

4. Select the “Install Driver” and other two items if needed then click “Next” .
5. Click “Next” to start the driver installation.
6. After installation the system will reboot.
USER MANUAL8

Installation under Windows 98SE
Please refer to the Windows XP installation from step 1 to 6 and installation system
will ask you to insert Windows 98SE CD-ROM. Please follow the instructions and
the system will reboot after installation.
Removing the driver under
Windows XP/2000/ME/98SE
To remove the driver of the DX-SC71, please click Starta Program lesaC-Media
PCI AudioaUninstall C-Media PCI Audio and follow the system instruction.
Dynex DX-SC71 Sound Card
Control Panel
• Main Setting
Here you can set the levels of the individual speakers.
Output Device
Analog Output
Headphone/Headphone Output Mode
2 Mode/2 Channel Output
USER MANUAL 9

USER MANUAL10
4 Mode/4 Channel Output
6 Mode/6 Channel Output
8 Mode/8 Channel Output
S/PDIF Output
Digital Source 44.1KHz Transfer Digital Signal in 44.1KHz
Digital Source 48KHz Transfer Digital Signal in 48KHz
Digital Source 96KHz Transfer Digital Signal in 96KHz
S/PDIF Input to Output: Digital Input Signal directly sends to Digital output
DSP MODE:
Xear 3D: Enable Xear 3D 7.1 Virtual Speaker Shifter
None: Disable Xear 3D
• Mixer
Each signal source level can be muted or adjusted individually by clicking on its
button and slider bar.
Volume control: Master Volume Control and speaker balance
Wave: Volume control of WAV, MP3, WMA, etc format.
SWsynth: Volume control of MIDI.
Mono In: Volume control of mono channel input.
Microphone In: Volume of Microphone.
CD Player: Volume control of analog out of CD-ROM drive which is
connected to the soundcard.
AUX: Volume control of AUX input analog source.
Line In: Volume control of Line In.
Recording Gain

S/PDIF In
Select S/PDIF-IN Source
Coaxial (S/PDIF-IN #1): The DX-SC71 does not support the coaxial in/out
function.
Optical (S/PDIF-IN #2): This can offer the digital source to DAT/MD player or
AC3/DTS decoder.
Reverse S/PDIF-IN Format: The format of some S/PDIF signal sources may
be inverse and will hear the noise. This can offer an option to
reverse the format for normal reception.
Validity Check: It will assure to neglect the non-PCM audio to avoid the noise.
Monitor S/PDIF-IN to Analog Output: When you are recording S/PDIF-In
Audio, you can choose to monitor it. However it may stop the
usual playback function. *Please remember to keep it unchecked
when you don’t need to monitor.
Stereo Mixer: It can control and mix all of the audio sources.
Microphone In: Only select recording Microphone as gain control.
Microphone Setting
Mute Microphone: You can click the checkbox to mute the microphone. Default
setting is mute.
Microphone Boost: If you think the microphone sound is too quiet, click the
checkbox of “Boost” to enable the +20db boost option. It is
natural that the background noise will be louder.
CD Player: Select onboard CD-audio as recording source.
AUX: Select onboard audio input (AUX ) as recording source.
Line In: Select Line In as recording source.
Wave: Select control of WAV, MP3, WMA, etc. as recording source.
USER MANUAL 11

• Sound Effect
Environment: It can offer environment emulation that is implemented by
producing the sound and reverberation.
Equalizer: Select a pre-set mode for equalizer, there are 12 preset modes such as
Bass, Treble, Live, Rock, Jazz, etc.
Environment Size: You can change the “Environment Size” to Large or Small
(default setting is Medium)
• Karaoke/Magic Voice
Microphone Echo: Special effect for the microphone Echo effect in singing.
Magic voice: Effect to disguise your identication such as cartoon, male, female,
etc.
Key shifting: For Karaoke or the music to make it suitable for your voice pitch.
The range is –4b to +4b
Vocal cancellation: to cancel the original singer’s voice.
USER MANUAL12

• Information
The “Information” window contains a number of details.
USER MANUAL 13

Table des matières
Bienvenue ............................................................. 15
Présentation de Dynex DX-SC71 .............................. 16
Installation du matériel .......................................... 18
Installation du pilote ............................................. 19
Installation sous Windows XP/2000/ME ................................... 19
Installation sous Windows 98SE ................................................ 21
Désinstallation du pilote sous
Windows XP - 2000 - ME - 98SE ............................. 21
Panneau de commande de Dynex DX-SC71 .............. 21
Conguration principale ............................................................ 21
Console de mixage ...................................................................... 22
Effets sonores .............................................................................. 24
Karaoké/Magic Voice ................................................................. 25
Informations ............................................................................... 26
MANUEL DE L’UTILISATEUR14

MANUEL DE L’UTILISATEUR 15
Bienvenue
Nous sommes heureux que vous ayez choisi cette carte son Dynex de haute qualit
é. La carte son Dynex 7.1 témoigne de notre engagement envers la technologie de
carte son avancée de haute qualité. En achetant ce produit vous avez acquis un accé
lérateur audio 3D puissant qui sait également « cibler pour plaire » en matière d’E/S
numériques.
Nous sommes convaincus que cette nouvelle carte son 7.1 vous apportera une expé
rience inédite dans les domaines de la musique, du cinéma et d’autres, tout en vous
assurant des fonctionnalités souples et conviviales.
Ce manuel traite de la carte son Dynex DX-SC71 7.1 et de son fonctionnement de fa
çon détaillée.
Mais voici tout d’abord un aperçu du produit.

Présentation de la carte son
Dynex DX-SC71 7.1
La gure suivante offre un exemple de l’agencement des ports d’un support de carte
son et montre comment connecter des périphériques audio à une carte son.
MANUEL DE L’UTILISATEUR16

JP2 – port Jeux
JP3 – brancher sur le boîtier frontal pour la connexion SPDIF_IN/OUT
(Interface numérique Sony/Philips.
JP4 – brancher sur le boîtier frontal pour la sortie 8 canaux (8CH_OUT).
JP5 – brancher sur le boîtier frontal pour Mic (Line)_In (Entrée microphone).
JP7 – brancher sur le boîtier frontal pour la carte esclave.
J6 – Aux In (Entrée prise auxiliaire).
J3:CD In (Entrée CD) Sony
J4:CD In (Entrée CD) Panasonic
A1 : Microphone In (Entrée microphone) (rose) ; che mâle 3,5 mm.
A2 : Line In (Entrée ligne) (lumière brillante) ; che mâle 3,5 mm
A3 : Front Out (Sortie avant) (vert pâle) ; che mâle 3,5 mm
A4 : Side Surround OUT (Sortie ambiophonique latérale) (vert pâle) ; che
mâle 3,5 mm
A5 : Central/caisson d’extrêmes graves (vert pâle) ; che mâle 3,5 mm
A6 : Back Surround OUT (Sortie ambiophonique arrière (vert pâle) ; che m
âle 3,5 mm
D1 : Sortie numérique optique
D2 : Entrée numérique optique
MANUEL DE L’UTILISATEUR 17

Installation du matériel
Installation de la carte.
Avant d’ouvrir le boîtier, débrancher le cordon d’alimentation CA de la prise murale
ainsi que du PC.
• Mettre hors tension le PC ainsi que tous les périphériques branchés tels que
imprimante et moniteur. Laisser le cordon CA connecté pour le moment,
an que le PC soit toujours relié à la terre.
• Toucher le châssis métallique à l’arrière du PC et la terre an de décharger
l’électricité statique. Débrancher maintenant le cordon de la prise murale
CA.
• Enlever le couvercle du boîtier du PC.
Installation de la carte PCI
• Trouver une fente PCI libre, dévisser la vis de fixation du couvercle mé
tallique de la fente et enlever le couvercle. S’il s’avère nécessaire de briser
une plaque du boîtier, le faire avec précaution pour éviter de se blesser.
• Retirer soigneusement la carte PCI de son emballage. La soulever par les
bords d’une main tout en reposant l’autre main sur le métal du boîtier du
PC. Ceci an de s’assurer que l’électricité statique du corps se décharge
par l’ordinateur sans affecter la carte. Ne pas toucher les composants de la
carte.
• Connecter ensuite les fils internes (en provenance du pilote du lecteur
de CD). Pour de plus amples informations sur les divers connecteurs, se
reporter à la page 5.
• Aligner la carte audio de façon à ce que la bande comportant le connecteur
doré soit située exactement au-dessus de la fente PCI. Insérer la carte dans
la fente. Il peut être nécessaire d’enfoncer fermement la carte dans la fente
pour établir un bon contact. S’assurer que les éléments de contact sont pré
cisément alignés an d’éviter d’endommager la carte audio ou la carte mè
re du PC.
• Fixer la carte en place au moyen de la vis du couvercle de la fente (ces vis
sont généralement incluses dans les boîtiers de PC).
MANUEL DE L’UTILISATEUR18

Pour nir
• Réinstaller le couvercle du boîtier du PC.
• Connecter les périphériques audio (amplificateur haute fidélité,
haut-parleurs actifs, console de mixage, microphone, etc.) à la carte son
7.1.
• Rebrancher le cordon d’alimentation CA ainsi que tous les autres fils et
mettre le PC sous tension. Vérier que le haut-parleur ou le système haute
délité est réglé à un bas volume.
• Mettre l’ordinateur en marche. L’installation du logiciel pilote est l’étape
suivante.
Installation du logiciel pilote
La carte son Dynex DX-SC71 est équipée à cette date de pilotes pour les systèmes d
’exploitation Windows 98SE, Windows Me, Windows 2000 et Windows XP. Vérier
quel système d’exploitation est installé sur l’ordinateur avant d’installer la carte.
Installation sous Windows XP/2000/ME
1. Une fois que l’ordinateur a été relancé, que le nouveau matériel a été détecté par l
’Assistant Windows pour matériel, la fenêtre suivante s’afche à l’écran. Please
select [Veuillez sélectionner] Cancel [Annuler]
2. Insérer le CD-ROM du logiciel joint à carte dans le pilote. À l’invite, sélectionner
la langue appropriée puis cliquer sur « Install Driver » (Installez le pilote) et
suivre les instructions de la fenêtre de dialogue pour l’installation du pilote.
MANUEL DE L’UTILISATEUR 19

3. Cliquez sur « Next » (Suivant).
4. Sélectionner l’option « Install Driver » (Installer le pilote) et les deux autres
options selon le besoin, puis cliquer sur « Next » (Suivant).
5. Cliquer sur « Next » (Suivant) pour démarrer l’installation du pilote.
MANUEL DE L’UTILISATEUR20
This manual suits for next models
1
Table of contents
Languages:
Popular Sound Card manuals by other brands

DigiDesign
DigiDesign Mbox 2 Micro Getting started guide

Syba
Syba SD-AUD20040 user manual

DigiDesign
DigiDesign Mbox 2 Getting started guide

Creative Structures
Creative Structures Sound Blaster 16 Getting started

Cobalt Digital Inc
Cobalt Digital Inc 3G Fusion 9921-FS product manual

Vivanco
Vivanco PCI SOUNDCARD 5.1 CHANNEL - PROGRAMMING user guide