E-BELLOW EBelaire 2 User manual

1
EBelaire [Model 2]
Adaptive Air Supply System for Bagpipes
OPERATING INSTRUCTIONS

2
Table of Contents
PRODUCT INTRODUCTION ........................................................................................................................................... 3
LIST OF ACCESSORIES ...................................................................................................................................................... 4
EBELAIRE DETAILS ........................................................................................................................................................... 5
OPERATION ................................................................................................................................................................... 6
ASSEMBLING THE EBELAIRE ................................................................................................................................................... 6
USING YOUR EBELAIRE .......................................................................................................................................................... 7
INITIAL USE AND CALIBRATION .................................................................................................................................. 8
SAFETY INSTRUCTIONS / WARNINGS ....................................................................................................................... 10
USAGE PRECAUTIONS ................................................................................................................................................ 10
TROUBLESHOOTING .................................................................................................................................................. 11
MAINTENANCE AND STORAGE .................................................................................................................................. 11
CHARGING THE EBELAIRE M12 BATTERY .................................................................................................................. 12
WIRELESS CONTROL UNIT SERVICING ............................................................................................................................ 13
DISASSEMBLE THE WCU ......................................................................................................................................................... 13
REASSEMBLE THE WCU .......................................................................................................................................................... 14
EBELAIRE LIMITED WARRANTY ...................................................................................................................................... 15

3
Product Introduction
What is the EBelaire?
EBelaire, by E-Bellow, is an innovative product that enables players of the Highland Bagpipe
who have become unable to inflate the instrument due to injury, disease or age, to once
again enjoy the thrill and satisfaction of presenting the music they love on the instrument
they love.
EBelaire is a patented adaptive air supply and control system that replaces the flow of air
and pressure to the bagpipe. To operate, the user needs only to provide a gentle ‘puff’ to
start and stop the system.
EBelaire is completely portable. It enables normal movement and performance control
while in use. It can successfully be used for solo and band performances, in the practice hall,
on parade and at other venues.
Who needs the EBelaire?
The EBelaire is intended to allow experienced pipers to overcome the limitation on their
practice and performance imposed by their disability. The EBelaire assists experienced
players regain the ability to stand or march in any formation and perform.
Instructors can use the EBelaire as an education tool. The EBelaire provides a sanitary way
to teach proper reed adjustment and instrument tuning techniques by providing the
students a direct experience that correlates to the sound of the instrument when the reeds
are sounded optimally.

4
List of Accessories
Please ensure the following accessories are in the box before using. If any
parts are missing, please contact us at Info@E-Bellow.com
What is included with the EBelaire:
• EBelaire Pump
• 1-M12 – Removable, and Rechargeable, 12 Volt 6.0 AH Lithium Battery
• Lithium Ion Battery charger (110v)
• Carry bag w/shoulder strap
• Hose with secure pump connector and GHB Blowpipe stock Adapter with Flap valve
• Patented Wireless Control Unit (WCU) with replacement mouthpiece
• 25 mm and 55 mm stems sections
• Supplemental Wireless Control Transmitter
Recommended Accessories (not included):
• 1 - Easy or very easy chanter reed rated for 28 Inches of water
• 1- Set of adjustable drone reeds
• 3- Drone top stoppers
• 1- Pressure gauge manometer for the bagpipe
! Link: How to Make a Manometer for Bagpipes

5
EBelaire Details
Token
Description
1
Zippered Carry Case with shoulder strap
2
M12 – Removable, and Rechargeable, 12Volt, 6.0 Ah. Lithium Ion Battery
3
Variable Pressure Control: Rotate Clockwise to increase pressure and
Counter Clockwise to Decrease pressure.
4
Round Rocker Switch: The EBelaire ON/OFF Control. Lighted when on.
5
Air Intake with filter and threaded Retention Ring.
6
D-Ring attachments for performance Carrying Strap (Included)1
7
Threaded Air Outflow Port.
8
Flexible Air Supply Hose Adapter
9
Flexible Air Supply Hose – 3 feet
10
Blowpipe Adapter with rubber flap valve
11
Interchangeable Adapter Stem – Two adapters (25mm/55mm) are supplied
with each unit.
12
Wireless Control Unit (WCU) – Used to Start, and Stop, the EBelaire
wirelessly.
13
WCU Air Tube Guide for EBelaire ‘Puff’ switch, on/off wireless control.
14
Air Tube Guide lock Nut - Secures Airtube Guide to the WCU.
1 Extends to allow the EBelaire to be carried on the hip while performing.
2 Puff Switch Remote Starter (On/Off Control).
The Puff Switch Remote Starter resembles the traditional blowstick and requires only a soft puff from the mouth to activate.
Note: Do not blow into the WCU as if to inflate! Simply ‘puff’ as though to blow out a single small candle. This action is
necessary to engage the sensor that will start, and stop, the EBelaire.

6
Operation
The EBelaire is a flexible tool. In order to get the most benefit from it you must understand
the EBelaire’s basic assembly and installation on the bagpipe. In this section we will discuss
each of these important areas. We encourage you to carefully read and follow these
instructions.
Assembling the EBelaire
1. Unpack the Wireless Control Unite (WCU) assembly, the Universal Blowpipe Adapter
with its attached hose and connector, and the included Adapter Stems from the
zippered carrying case.
2. Select the appropriate Adapter Stem that best suits your comfort.
3. Thread the Adapter Stem into the Blowpipe Adapter until snug. (Do not over
tighten!).
4. Thread the WCU onto the Adapter Stem and tighten until snug. (Do not over
tighten!).
5. Remove the standard blowpipe from the bagpipe and set it aside.
WCU
Adapter Stem
Blowpipe Adapter

7
6. Insert the Universal Blowpipe Adapter into the Blowpipe stock of the bagpipe. Add or
remove Hemp to the blowpipe adapter as needed to achieve a snug fit exactly as you
would with a normal blowpipe.
7. Attach the supplied strap to the D-Rings on either side of the EBelaire case. The Strap
can be extended to allow a cross chest carry with the EBelaire resting above the Right
Hip.
8. Connect the Hose Adapter to the EBelaire Outflow Port by twisting the threaded
connector in a clockwise direction until snug. DO NOT OVERTIGHTEN!
9. Slide the M12 Battery into the receptacle on the top of the EBelaire. Press it firmly
into the socket until the base of the battery is flush with the top of the EBelaire.
10. Insert a chanter reed that is rated as ‘Easy’ or ‘Very Easy’ into your chanter.
Tip: Select a reed that has been rated at 20-30 inches of water for difficulty if other
ratings are unavailable.
If the reed is new moisten your finger slightly and gently wipe the blades from the
staple to the blade tips. This will make the reed a bit more compliant. Do NOT
soak the reed!
Using your EBelaire
1. Set the Round Rocker Switch to ON. The colored LED will glow.
M12
Battery
Battery
Socket

8
2. Place the EBelaire on your shoulder using a cross chest placement with the
EBelaire resting above your right hip.
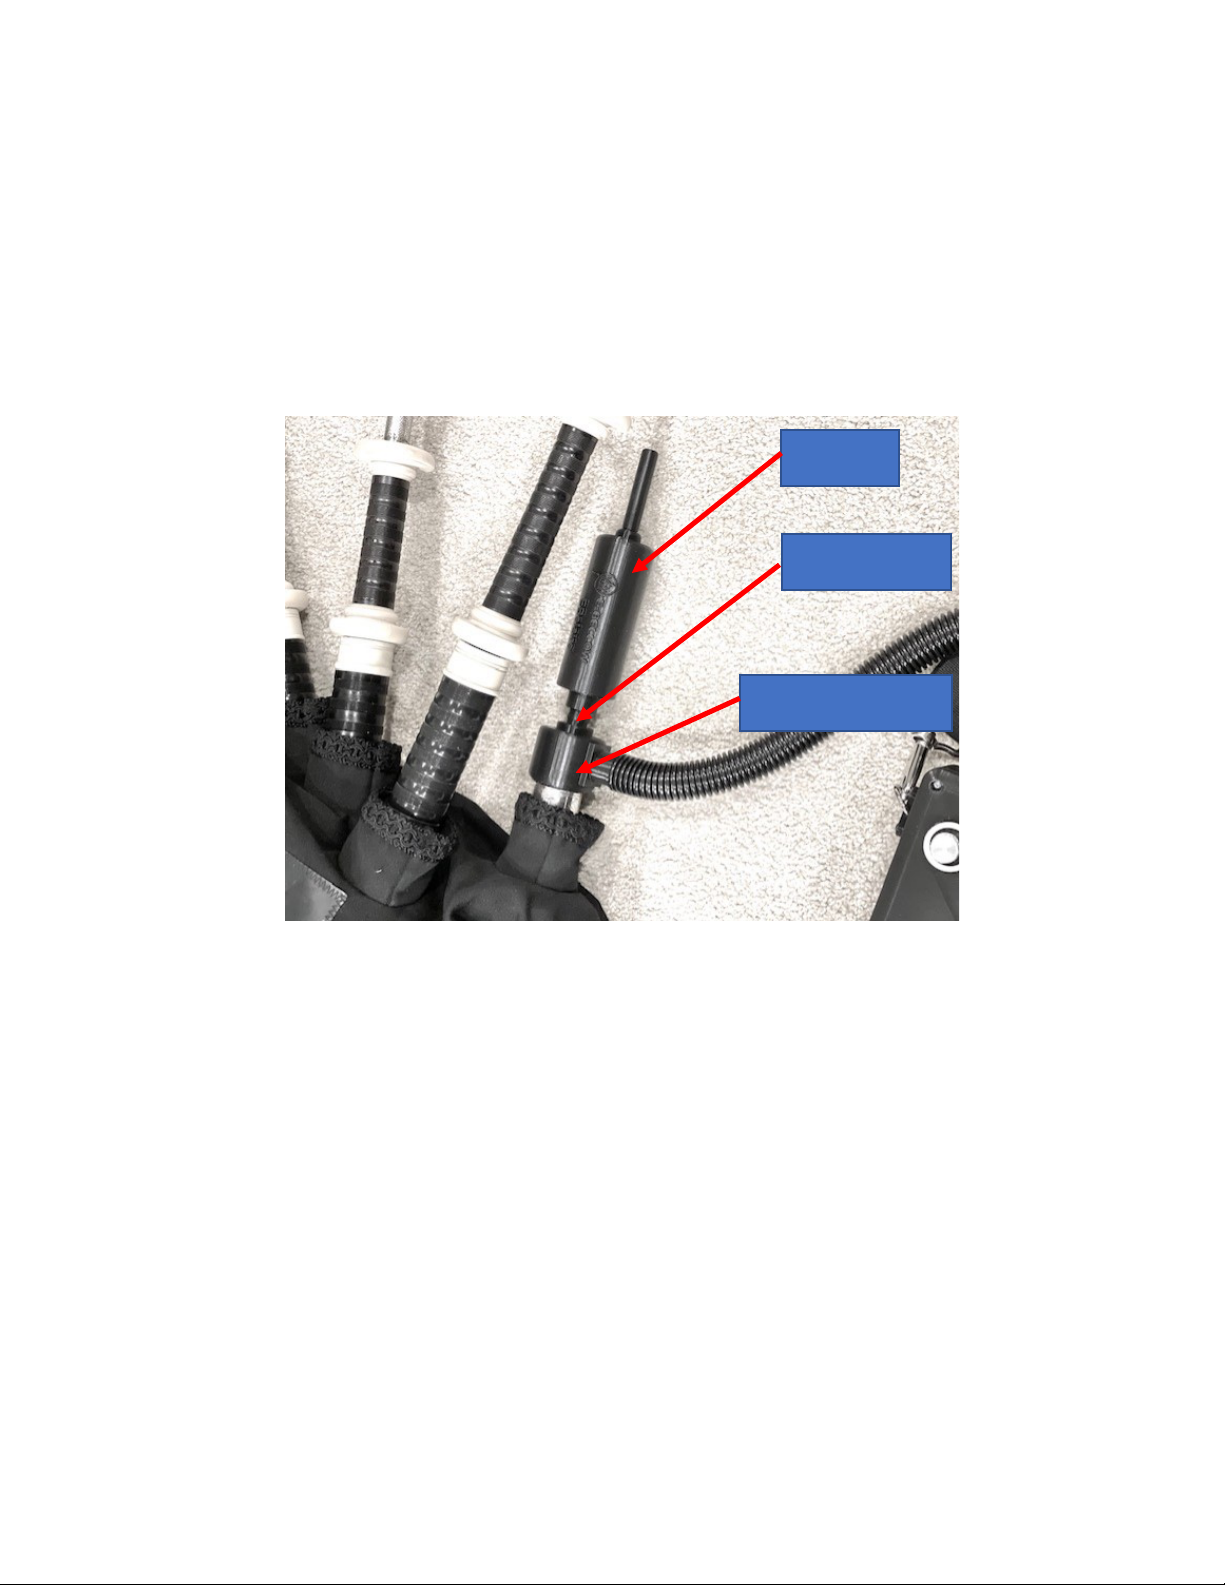
3. Place your bagpipe on your left shoulder as normal and place the tube from the
WCU between your lips.
4. Using your Lips and Cheeks create a short ‘Puff’ into the WCU. This will turn
the EBelaire ON which will inflate your bagpipe. *
5. To Stop the airflow simply create a Second ‘Puff’ into the Mouthpiece Tube.
This will stop the EBelaire.
6. When finished playing Set the Rocker Switch back to the ‘OFF’ position. The
colored LED will no longer glow.
*The Puff Switch Remote Starter resembles the traditional blowstick and requires only a soft
puff from the mouth to activate. Note: Do not try to blow as if to inflate, but simply puff
into it as though to blow out a single small candle using a straw. This action is only
necessary to engage the sensor that will start, or stop, the EBelaire.
Initial Use and Calibration
The first time the EBelaire is used, adjustments to all reeds will be required to achieve
optimal performance from your instrument. It is strongly recommended that you take an
incremental approach to setup. Begin with your chanter. Once you are satisfied with your
chanter sound you can move to introducing, and calibrating, the drones.
Chanter Setup
1. Place stoppers into each drone top and inspect all joints to ensure they are properly
Hemped.
2. Insert the chanter with a seated reed into the bagpipe.
3. Shoulder your bagpipe. With the battery in place and the Rocker ON/Off switch in
the on position, give one ‘puff’ to the mouthpiece to activate the EBelaire.
4. Adjust the pressure delivered to the chanter using the ‘Variable Pressure’ control
knob.
5. The Chanter should sound and allow you to assess its tone once the bag is filled
with air.
6. Use one ‘Puff’ to turn off the EBelaire when satisfied.
a. Adjust the reed and any tape to properly balance the sound from the chanter as
you would if you were playing without the aid of the EBelaire.
b. Repeat as needed to achieve a balanced sound.
Note: This is a trial-and-error process. Patience is needed to achieve optimal
performance.
Reeds that require more than 30 inches of water pressure may not sound
properly.

9
Drone Calibration
Once the chanter has been setup, the drones will need to be calibrated to take the least
amount of air possible AND still allow proper tuning to the chanter. The Process for that is
outlined below.
TIP/Note: This process is very important but can be tedious. If you have little experience, or a
heightened fear of working with drone reeds, seek help. My trick is a silver marking pen. Before
I start moving things I mark where they were so I always have a recovery point. My second rule
is move only one thing at a time and then only in small increments. When you have gone too
far … you will know it! Just reverse course and you should recover nicely.
1. Lay the Bagpipe and EBelaire on a work table that will support both.
2. Remove Stopper from the outside Tenor drone and adjust the slide to the bottom of the
Hemp.
3. Start the EBelaire using the mouthpiece of the WCU (or the FOB) and allow the chanter
to sound
4. Gently lean on the bag on the table adding pressure until the drone stops.
Tip/Note: If you have a manometer, note the pressure needed to sound the chanter and
work to set the drone shut off pressure about 2-3 inches of water pressure above that point.
a. If the drone continues to sound proceed to step 5.
b. If you own a manometer, plug it into one of the other drones before starting the
calibration. The cut-off pressure we are seeking is about 32 inches of water.
5. Remove the Drone from the Stock and shorten the bridal on the reed tongue. Small
increments are best, then return the drone to the stock and retest (step 3).
6. Once the drone is calibrated roughly tune the outside drone to the chanter (low-A.
7. Remove the stopper from the middle tenor drone. Turn on the EBelaire and tune the
outside drone.
8. Repeat Step 4 and 5. The middle tenor is calibrated when BOTH Tenor drones stop when
gentle causes both drones to stop together.
9. Repeat steps 3 to 5 until all three drones shut off when pressure is applied and all three
drones operate with the chanter sounding when the EBelaire is active.

10
Safety Instructions / Warnings
The following actions invalidate the Warranty.
• Connect the supplied charger to 110-120 Volt outlets only.
• Keep children away from this product and plug/wires.
• DO NOT allow children to operate the EBelaire.
• DO NOT submerse pump in water or expose to rain.
• DO NOT disassemble the pump or attempt to open the hard plastic pump casing. This
may cause damage to the product and invalidate the warranty.
• DO NOT place this product in a high-humidity environment, to do so may cause the
product to be short-circuited causing damage to the product.
• DO NOT put this product near fire as it may explode or cause other damage.
• DO NOT leave this product in strong sunlight or a hot automobile as this will damage the
product.
• DO NOT use or store this product in extreme temperatures (>350 Celsius)
• If product (battery) is swelling or leaking, STOP using this product and contact E-Bellow
LLC immediately.
• The purpose of this product is limited to the description set forth in the User Manual.
Usage Precautions
• DO NOT leave pump alone while running
• DO NOT run the pump for more than 20 minutes at a time due to overheating which
may cause internal product damage. The pump needs 30 minutes to cool down if run for
its design maximum of 20 minutes
• DO NOT use this product with a damaged hose
• DO NOT disconnect the hose while the pump is running
• DO NOT place air hose or intake port near ears or eyes.
• Pay attention to heat dissipation and ventilation during use to avoid danger of
overheating.

11
Troubleshooting
Fault Description
Inspection
Solution
The EBelaire will not start
1. Low Battery Charge
2. Overheating
3. Round Rocker Switch
LED light is illuminated.
1. Charge Battery
2. Let unit cool for 30
minutes.
3. Verify the Round Rocker
switch is in the On
Position.
Wireless Control Unit (WCU)
does not start the EBelaire
1. ‘EBelaire Mode’ is set
properly
2. Use Wireless Fob to turn
on the EBelaire.
1. Set unit to ‘EBelaire
Mode’
2. Check WCU top is
securely tightened to
base avoiding air leakage.
(Do not overtighten)
3. Check/replace battery in
WCU (see below)
Bagpipe does not inflate
1. Check for kinks,
blockages or holes in
Hose and Universal
Blowpipe Adapter
2. Verify Check Valve is
installed
3. EBelaire is running
4. Check Bagpipe is airtight.
1. Clear blockages or kinks
in hose. Repair or replace
hose.
2. Close Air Maintenance
Valve
3. Use the WCU to start the
EBelaire
Maintenance and Storage
• Store the EBelaire in a dry ventilated place when not in use.
• Prevent the unit from coming in contact with metal objects for fear of short circuiting.
• Avoid keeping the EBelaire in strong sunlight or a hot automobile. This will damage the product and
void our warranty.
• Clean the EBelaire using a damp cloth and gentle soap cleaners. DO NOT IMMERSE ANY PART OF
THIS PRODUCT IN WATER!
• DO NOT use or store this product in extreme temperatures
• DO NOT store this product in a high-humidity environment, doing so may cause damage to the
product.
• DO NOT Dispose of the EBelaire in the trash. The EBelaire contains a Lithium-Ion Battery that
must be disposed in accordance with local laws and ordinances.

12
Charging the EBelaire M12 Battery
The supplied M12 Lithium Ion Battery is recharged using the supplied Charger.
1. Place the charger (cube) securely onto the top of the M12 battery.
2. Plug the charger into a 110-120 Volt outlet. The LED on the charger glows ‘Red’
initially.
3. When the battery if fully charged the LED color changes to ‘Green’. Remove
Battery from Charger.
4. Store Charger in a cool and dry environment.

13
Wireless Control Unit Servicing
The Following section describes the procedures for cleaning the air tube and replacing the
battery in the Wireless Control Unit for the EBelaire Adaptive Air Supply for the Bagpipe.
Disassemble the WCU
1. Hold the barrel of the WCU and unscrew the mouthpiece by turning it counter clockwise.
Remove the Air Tube for cleaning. The Air Tube should be washed in soapy water and left
to completely air dry before reassembling. Only reinstall after it is full dry.
2. Hold the WCU by the narrow part of the base and carefully rotate the threaded cover
counter clockwise to unscrew.
3. Gently pull the Threaded Cover off to expose the circuit board.
4. To change the transmitter battery, very carefully lift the circuit board out of its receptacle.
Two CR2016 battery cells are required. IMPORTANT: DO NOT PULL ON THE WIRES
CONNECTED TO THE TRANSMITTER CIRCUIT BOARD!
Threaded Cover
Air Tube
Transmitter /Battery
Compartment
Pressure
Sensor
Mouthpiece
Transmitter

14
Reassemble the WCU
1. Carefully guide the Threaded Cover over the base until the control top is resting on
the top of the threads of the base. Apply a small amount of silicone lubricant (T-Zip)
to the threads to facilitate assembly.
2. Carefully rotate the Threaded Cover clockwise making certain the base threads are
properly engaged. DO NOT CROSS THREAD! DO NOT FORCE! If you encounter
resistance rotate counter clockwise to disengage and retry.
3. Complete the reassembly by making sure the cover is snugged to the base.
4. Insert the clean and dry Air Tube. Press it carefully onto the air switch nipple that can
be seen below the top of the threaded cover.
5. Slide the Mouthpiece over the Air Tube threaded end down. Tighten the threads by
rotating the tube clockwise. Use the provided lock nut to position and secure the
Mouthpiece.

15
EBelaire Limited Warranty
EBelaire by E-Bellow, LLC Limited Warranty
What is Covered
This limited warranty covers defects in materials and workmanship in The EBelaire product.
What is Not Covered
This limited warranty does not cover:
• Damage caused by the owner modifying, attempting to repair or otherwise altering the product.
• Damage caused by power sources other than 110-115 Volt for the supplied battery charger or 12V DC
automobile power source.
• Damage caused by water or excessive humidity.
• Damage caused by an impact or other misuse.
• Damage caused by excessive heat from running the unit for more than 20 minutes continuously or
from excessive environmental heat.
How Long Does this Coverage Last
This limited warranty lasts for ONE (1) year from the date of original purchase of this product.
Who is Covered
This limited warranty covers only the original purchaser of the product. This limited warranty is not
transferable to subsequent owners or purchasers of this product.
What E-Bellow Will Do
At E-Bellow’s discretion, we will do one of the following, whichever is deemed most appropriate:
• Repair the item.
• Replace the item if it can’t be repaired within a reasonable amount of time.
• Issue a refund for the item.
What E-Bellow Will Not Do under this Limited Warranty
• This limited warranty does not assume the risk of loss or damage during shipment.
• Any condition resulting from incorrect or inadequate maintenance or care
• Resolve damage resulting from incorrect or inadequate maintenance or care
• Issue a refund due to buyer’s remorse.
• Resolve damage due to normal wear and tear
• Repair damage resulting from misuse, abuse, negligence or accident.
No Other Express Warranty Applies
This warranty is the sole and exclusive warranty. No employee, agent, dealer, or other person is authorized
to alter this warranty or make any other warranty on behalf of E-Bellow, LLC.
The Company makes no express warranty or condition whether written or oral and the company expressly
disclaims all warranties and conditions not stated in this limited warranty. To the extent allowed by the local

16
law of jurisdictions outside the United States, the Company disclaims all implied warranties or conditions,
including any implied warranties of merchantability and fitness for a particular purpose. For all transactions
occurring in the United States, any implied warranty of condition of merchantability, satisfactory quality, or
fitness for a particular purpose is limited to the duration of the express warranty set forth above. Some
states or countries do not allow a limitation on how long an implied warranty lasts or the exclusion of
limitation of incidental or consequential damages for consumer products. In such sates or countries, some
exclusions or limitations of this limited warranty may not apply to the Purchaser. For consumer transaction,
the limited warranty terms contained in this statement, except to the extent lawfully permitted, do not
exclude, restrict, or modify but are in addition to the mandatory statutory rights applicable to the sale of
this Product to the Purchaser.
Limitation of Liability
E-Bellow, LLC shall not be responsible for any incidental or consequential damages, to persons or property,
related to the use of its products.
How to Obtain Services
To obtain the benefit of this warranty, deliver the complete product via prepaid transportation to E-Bellow,
LLC.
Arrange for warranty service by emailing Support@E-Bellow.com
Claim Procedures:
• Claims for defective merchandise must be made within ONE year from invoice date. Claims for
missing parts must be made within 60 calendar days after the merchandise is received.
• We reserve the right to specify that items to be returned be inspected by our representative.
• Pictures are required to claim defective merchandise, along with a copy of the original invoice.
This warranty gives you specific legal rights. You may have other rights, which vary from state to state.
EBelaire is a product of E-Bellow LLC
Assembled in the USA
Patent Pending
Table of contents