E-Image MAGIC PTZ User manual

www.eimagevideo.com
MAGIC PTZ
2017.1
V1.1
The official QR code
For more information, please visit the EIMAGE official website:
Contact Information
NINGBO EIMAGE STUDIO EQUIPMENTCO.,LTD
Address: No.373 South Hangyong Rd, Luotuo Industry Zone, Zhenhai,
Ningbo, China. 315202
Tel:86-574-86590061,86-574-86590031
Fax:0574-86590078
E-mail: sales@eimagevideo.com
Website: www.eimagevideo.com
EIMAGE official QR code

Disclaimers And Warnings
Thanks for choosing EIMAGE MAGIC PTZ. Please make sure strictly observe according to this user
manual.
Please read this manual and disclaimer carefully before using this product. By using this product,
you hereby agree to this disclaimer and signify that you have read it fully. You agree that you are
responsible for your own conduct and any content created while using this product, and for any
consequences thereof. You agree to use this productonly for purposes that are proper and in accordance
with EIMAGE regulations, terms and any applicable policies and guidelines.
Do not modify or adjust the PTZ. As EIMAGE has no control over use, setup, final assembly, modification
or misuse, no liability shall be assumed or accepted for any resulting damageor injury. By the using,
setting up, or assembling of the product, the user accepts all resulting liability. EIMAGE assumes
no liability for damages or injuries incurred directly or indirectly from the use of this product.
There is a special page for Magic PTZ on Eimage offcial website:www.eimagevideo.com. Please
check if your user manual is the newest one,if not, please download and use the the newest one.
This user manual if there is any updates without prior notice!
If you have any questions when you assembling the PTZ, please ask help from the authorized agent
of EIMAGE.
All names of products, brands, etc., appearing in this manual are trademarks or registered trade
marks of their respective owner companies. This product and manual are copyrighted by EIMAGE,
with all rights reserved. No part of this product or manual shall be reproduced in any form without
the prior written consent or authorization of EIMAGE.
1. Please do not bare the equipment in the rain or be affected with damp, to avoid fire, electric shock
accidents.
2. Do not close to the high magnetic field, medical, aircraft and other equipment, to avoid any interfere.
3.The power supply voltage need with in 12v and 24v, it might damage the equipment higher than 24v, or
the equipment can not work properly less than 12 v.
4. It will cause Equipment failure when using it in sand ,dust and rain .
5. Don't change the emission frequency, and never use an external antenna or use other antenna.
For Apple Users
Search for " EIMAGE" on the APP Store and then follow the instructions for iOS installation.
For Android users
Search for " EIMAGE" on the Google Play and then follow the instructions for Android
installation.
IOS 7.0 or above
6. Please use the voltage between 12 and 24 V, with a "V" lock batteries or use the power adapter
connected to the household power ,please guarantee the power is enough before using when
the power is low, please recharge in time, if cut off the power in the work, it might damage the
equipment and the camera.
7. Do not put hands in PTZ during working , in order to avoid any damage.
8. Never disassemble the equipment privately, use it roughly and knock the product.
9. Please make sure all parts are locked before power on.
10..Please adjust the center of gravity of camera before power on.
Android 2.0 or above
2016 EIMAGE ALL RIGHTS RESERVED
12
2016 EIMAGE ALL RIGHTS RESERVED
Download And Install The EIMAGE APP
EIMAGE Power Using And Safety Precautions:

Contents
01
01
02
04
03
05
07
07
07
08
08-11
12-13
14
14
14-15
15
16
17
18-19
20
20
20
21
21
21
24
24
24
24
25
25-30
25
26
27
27
28
29
30
31
32
32
32
34
Disclaimers And Warnings
Download E-image App
Shown with the safety box
Introduction
In The Box
EIMAGE PTZ Diagram
Ptz Main Part
Wireless Remote Shutter
Assemble Notes
Assemble(for Tripod As Example)
Download And Install Eimage App
EIMAGE PTZ App
Trace Record Diagram
Motus Diagram
Time-lapse
Stop-motion Diagram
Config
Professional Vocabulary Explanation
The Main Function Of E-image App
Attention
A-b Trace
Trace Mouts
Time-lapse
Stop-motion
EIMAGE Controller Diagram
Controller Main Body
Import Notes Of Controller
EIMAGE Controller
Home Page
Joystick
Rec
Motus
Stopmotion
Setting
Wireless Shutter Channel Settings
Maintenance
Troubleshooting
Specifications
EIMAGE Power Using And Safety Precautions
Connect EIMAGE App To Controller
Connect Controller To PTZ / Motor
Timelapse
Warranty And Support
2016 EIMAGE ALL RIGHTS RESERVED
34
2016 EIMAGE ALL RIGHTS RESERVED
Shown With The Safety Box

Wireless Shutter x1 Cable release x1
Receive the 2.4 G order,and then control camera
shutter by cabels,and complete the whole process.
Transfer the instructions from wireless shutter
to camera.
For protecting whole set motor, and to achieve
convenient transportation.
Safety box x1 Extra accessories
Allen Wrench x 1
USB charger cable x1
Standard USB charger for controller.
Receive the APP or the joystick signal.
Antenna x2
Power cable x1
Connect battery and PTZ.
Power adapter x1
110-240V.
Bowl locking for hang-up x1
(such as in jib arm)
Introduction
Innovative multi-axis 360° movement system with rem ote con troller on sli der & 360°
movement in pan & tilt &zoom separtely. It can be taken action smoothly on any distance,
speed,acceleration and dirention.
Built in motor for zoom control, with standard gear to
drive the movment of zoom.
Stand rod with 15mm or 19mm dia, for attaching
zoom and others.
In The Box
PTZ main part x1
Standard Lens Motor x1 15/19mm rods for zoom x2
It built in E-IMAGE motors for Pan and tilt drive
modules, an independent IMU module, a 32-bit
DSP processor power supply module, a bluetooth
module, a wirless module and a power breakout
box.
Wirless c o n t r o l sy s t e m , wi t h 2. 4 G
communication channel. Control the
movement both for slider and PTZ.
Controller x1
Connect zoom and PTZ , with Lemo connector.
Zoom Cable x1
A set,total 3 rings with different size ,
to fit different lens.
(62/72/82mm)
Focus gear ring x3
2016 EIMAGE ALL RIGHTS RESERVED
5
6
2016 EIMAGE ALL RIGHTS RESERVED

Move the whole base part to near the battery,by loosing bottom 4 screws, in order to save more room for
the balance adjustment of camera. Then tighten them.
2
2
1
34
Install the PTZ part on tripod with flat base or slider with standard 3/8" screw, then fix it.
1
Assemble(For tripod as example)
1.Please make sure the power is off before finishing installation (power cable is dis-connected).
2.Before locking the plate , please make sure the the plate is inserted in right position, and the
insurance lock is locked.
3.Adjust balance:
(1)Please make sure the camera is fixed tightly.
(2)Please
(3)Please make sure the power cable is dis-connected to battery. Because if only press down
the power button, the motor is still on lock condition and will influence the balance adjustment.
4.If any screw is loosed during installation, please make sure to tighten it finally.
5.Before using, please make sure all locks should be locked tightly.
6.If zoom is used, please make sure the gear of zoom against the focus ring tightly.
7.Please choose correct shutter release according to your camera when do time-lapse,stop-motion.
loosen the screws a few turns to allow the tubes to slider. Do not loosen them excessively,
in order to avoid any damage.
Assemble Notes
E-IMAGE MAGIC PTZ Diagram
1.PTZ Main Body
1. PTZ part
2. Athenna
3. Tilt motor
4. Power on/off button
5.
6.
Plug holes
Wireless shutter
7. Cable release
8. Focus gear ring
1
3
4
2
15
16
2.Wireless Shutter
Wireless Shutter
123
1
2
3
9.
10.
11. Quick release plate
V-lock
14. Power cable
15. Pan motor
Zoom Cable
Zoom motor
12.15mm/19mm rods
13. Battery(not included)
16. Base locking part
5
Zoom cable
Power cable
Pan motor cable
9
7
8
11
12
13
14
6
10
2016 EIMAGE ALL RIGHTS RESERVED
78
2016 EIMAGE ALL RIGHTS RESERVED

Move the plate part by loosening two screws , until the center align with the center of bottom circle, see
the picture.
3
Attach the camera mouting plate to your ca mera
using the provided correct camera screws. Secure
the camera tightly. Then insert the plate into plate
base, and tighten the locking screw.
4
6For time-lapse & Stop-motion,please attach
the wireless shutter to the camera and connect
then with right cable release.
7
E-IMAGE
Attach the 15mm/19mm rod to the hole, and
adjust it to appropriate location, then tighten
the locking screw.
5
Attach the Zoom motor to the rod, adjust it
to appropriate location. Attach proper gear
ring to the camera and lock it, then push the
motor gear against the camera’s.
E-IMAGE
Adjust the camera gravity in back&forth
8
8-1: As picture showed, to adjust the center of gravity
of camera in back& forth.
A: by adjusting the base(back & forth)
B: by adjusting the camera plate( back & forth)
A
B
8-2: As picture showed, to adjust the center of gravity
of camera in back& forth.
Balancing the vertical tilt
To adjust the vertical balance,you will need to
change the camera's vertical position.
9
9-1:Loose the two screws of verti ca l tubes,slide
two crossbars forwards or backwards until
adjust it to appropriate location, like picture.
9-2:Tighten the screws, rotate the tilt axis and make
the camera rotate to any tilt angle with lens up
forward (between +45°- -45°),if it can stopped,
means the vertical balance is achieved. like picture.
Balance
10
2016 EIMAGE ALL RIGHTS RESERVED
910
2016 EIMAGE ALL RIGHTS RESERVED

1.Android users Search for " EIMAGE" on the Google Play and then follow the instructions for Android
installation
>
Bluetooth
Turn on or turn off
Turn on Blurtooth
Visibilit y
Visible to all nearby Bluetooth devices(01:45)
Bluetooth pairin g request
To pair with:
EIMAGE SLD ER
Make sure the deci ce is showing this passkey:
749012
Cancel
pair
i
Sil der3
Availa ble decices
EIMAGE SLDER
Pairin g...
2.Turn on Bluetooth and search the "EIMAGE "and "Pair" with it.
3.Open the EIMAGE APP, click"Device" or Menu tab, there is "connect",then click it.
Download And Install Eimage App
4.There are many devices, please find "EIMAGE PTZ” and click it.
5.After successful connection, in the upper right,there will show"connect to EIMAGE PTZ".
Menu tab
EIMAGE SLIDER
EIMAGE PTZ
EIMAGE CONTROLLER
Sel ec devi ce
Par ied dev ices
Note1:Some android phones will appear two names, please select the one with the phone
logo or don't choose the one with "?".
connect to EI MAGE PTZ
4 5
Install the battery with v-mount lock until lock it. Connect the power cable.
12
Connect the cable of zoom to zoom and main part, like picture.
11
Install the anthenna
13 Finish
14
2016 EIMAGE ALL RIGHTS RESERVED
11 12
2016 EIMAGE ALL RIGHTS RESERVED

eimage 1个结果
E - I M A G E
打开
EIMAGE电控滑轨控制器
深圳疤痕网络信息有限公司
Route
Frame
Exposure
300
1
300
?
Go
P
Sec
Pre Shoot Next
A-B Rec A-B Rec
Route
Route ID
Duration
Acceleration
60
10
Sec
%
SropStartInitialize
1 2 3 40
Blackmoco Fail Reconnect Blackmoco Fail Reconnect
Reset&Init
IOS 7.0 or above
2. Open the Bluetooth of your mobile device, switch on the power, click the EIMAGE APP,click
the “EIMAGE PTZ”then connect it.
Please click " " if you can't find the PTZ.
E-IMAGE
-E-image PTZ-S3 i
iOS 7.0以上
: Let the camera back to the Begin point A
: make the camera move to End B according to your
set time and acceleration
: Stop movement
: Repeat movement between AB
Route - A - B: trace from Begin A to End B. Please set the
A-B route in Define interface.
REC: trace record. It is only can be created by wireless remote
controller.Max.5pcs
Following options will appear when click the REC
Time: set the rough shooting time from A to B.
Acceleration
Navigator area
Control area
Center circle - White Circle: on behalf of Joystick.
Center position -Black Circle: movement range far
away from center position, the speed will be faster.
Loose finger, the center circle could be return to
center position automatically.
Slider control movement of Slider in Horizontal direction
Pan– control movement of PTZ in Horizontal direction
Tilt – control movement of PTZ in tilt direction
Zoom – control camera lens zoom
–
1
3
2
Route
Route ID
The camera will stop automatically when it
run to switch A or B position, avoiding any
bump, for safety insurance.
4
EIMAGE APP
Define
Mouts
Limit A
Limit B
-Set Limit B
-Set Limit A
-set beginning point A
Begin A
End B
-set the Ending point B
Set AB point as the moving trace.
Init.
submit
Loop demo
stop
Welcome to use E-IMAGE slider
Visit website
Limit A-B
Safety of movement
A-B Trace
2016 EIMAGE ALL RIGHTS RESERVED
13 14
2016 EIMAGE ALL RIGHTS RESERVED

:make the camera take pictures according to
set parameters
Please refer to Motus" interface"
Time-lapse
The picture quantity you want to take
The camera's exposure time
:shooting
Zoom:length be moved in Zoom
Quick action to create your request trace / take extra
more videos or pictures after last trace is finished.
Slider:distance be moved on Slider
Pan:degrees be moved in Pan direction
Tilt:degrees be moved in tilt direction
: Confirm above change
: Let the camera back to the start point
Set
Init.
Preview
Picture quantity that you want to shoot
The camera's exposure time
End time of time-lapse
Spacing proportion
Waiting time before exposure
Movement time
: Let the camera back to the Begin point A
: Make the camera take pictures according to set
parameters
: Stop movement
: Check shooting process
Init.
submit
stop
Monitor
: Preview the movement
submit
stop
2016 EIMAGE ALL RIGHTS RESERVED
15 16
2016 EIMAGE ALL RIGHTS RESERVED

Motor segmentation parameters
Set the speed and sound of the motor.
8------ fastest speed ,
64-----slowest speed.
Limit AB is safety moving distance that you set.
Slider: the max. moving distance from one side to other side.
Pan: the max. angle of camera rotates left or right
Tilt: the max. angle of camera rotate up and down
Zoom: the longest zoom length
Note: 1.
It will be effective only when Limit A & Limit B are all set.
2. Previous limit set will be failed if PTZ is restarted. Please reset it.
3. When Limit A & Limit B are all set, the character of dir ection that yo u set will change
the color from black to red, which means limit setting is successful,to avoid any accident
during mis- operation.
4.
The LIMIT A and LIMIT B can be set separately.
Begin point A and end point B represent the shooting start time and end time,(After setting, the character
“Begin point A” and “End point B” will change the color from black to red.
The set of Begin point A and end point B is effective for all current equipments synchronously.
A-B : Simple A-B trace, just need to set the Beginning A and Ending B.
Rec: Trace records, it only could be recorded by Controller. Max. 5pcs trace, and max. time of each
trace is 20s.
Rec-Trace record
3
Begin A - B = Route A - B
Befor any operation please set “Limt A&B”at fist.
Make the camera stop suddenly or smoothly
when Joystick stops, bigger number means
more quick.
Set the 2.4G channel No.
PS: If you want to use controller to control PTZ
or PTZ & Slider, please make sure to set the
channel no. the same. Such as all in "2".
Used to set the max.speed of PTZ in every
directions
Used to set the max.acceleration of PTZ in
every directions
Used to adjust every directions of movement
of camera if control by Controller's Joystick,
same direction or against direction
Used to adjust every directions of movement
of camera if control by APP, same direction or
agai st directionn
Joystick acceleration
Joystick stop range
Lower acceleration number means the response action of motor is gentle, for example, if the joystick
back to the central point (means stop), the response action of motor is reduce speed slowly until stop.
If acceleration number is max., the response action of motor is stopped immediately without any
cushioning. Acceleration number of each direction could be set separately.
When camera is under M mode,the APP exposure time should be longer than the camera exposure
time. For example, camera exposure time is 1/100 s, at this time the App exposure time should be
equal or longer than 1/80 s. When camera is under B mode, the real exposure time is decided by
APP, now, there is no special requirement for App exposure time.
Limit setting
2016 EIMAGE ALL RIGHTS RESERVED
17 18
2016 EIMAGE ALL RIGHTS RESERVED
Professional Vocabulary Explanation

Slider ZoomPan Tilt
The Main Functions Of EIMAGE App
Please pay attention to the following notes before formal operation:
1. Before power on, please make sure to adjust the camera in good balance in every directions.
2. If the camera need to be rotated in tilt direction,please make sure the lens will not against the
bottom base tube.
3. Please make sure your battery is with enough power before using.
4. Please make sure all cables are connected correctly.
5. Open the bluetooth of mobile device,run software "E-IMAGE APP",switch on the power of MAGIC
PTZ.
6. Connect the APP with your MAGIC PTZ.
Note: During first using, first, please pair up “Magic PTZ “with your bluetooth options.
APP will ask to open the bluetooth of mobile device automatically when it is enabled,please
click “YES”.
1. In the define interface, please select “Pan/Tilt/Zoom”
channel separately, to control the movement of PTZ .
Note 1: if you want to do trace records, please use the CONTROLLER (optional) to do it.
1 2 34 5
2. Touch joystick to control the camera move to your
request beginning point hen click the ” “
the color of" "will change color from black to
red.
,
,t Begin A
Begin A
3. Touch the joystick again,to control the camera move
to your request ending point hen click the " ",
the color of " "will change color from black to
red. AB trace is finished.
, t Set B
Set B
Interval Rate: used to set the interval between exposure and movement
Track: Previous set trace from A to B
The motor stop
- waiting for the exposure
- wait for Y seconds
Time- lapse working principle is as below
Begin to expose
- expose Z seconds
- End expose
After exposure
- waiting for motor running
- Wait for W seconds
One unit cyclic: take an example
of shooting 1 picture
Motor move 1
unit distance
Interval Rate
Joystick stop time
2.4G Channel
2016 EIMAGE ALL RIGHTS RESERVED
19 20
2016 EIMAGE ALL RIGHTS RESERVED

Time factor
Acceleration
1.
2.Click to set the time and acceleration.
OR
In the Define interface, please set A-B trace at first.
For REC( trace record), please use controller to make it.
REC:choose the trace ID that you want to run,
and then set time and acceleration.
3.Click " " after camera back to Begin A, then
click " "
4.If you want to show the movement repeatly, please
use " ".
1.
Please refer to “Motus”Page
4.
Note 1: Rec-trace records only can be finished by wireless remote CONTROLLER(optional).
Please choose trace number on your APP to continue your following operations
Zoom: please input the number of extra length, or click + /- to
adjust it.
Slider : please input the number of extra length, or click + /-
to adjust it.
Pan: please input the number of extra degree, or click + /-
to adjust it.
Tilt: please input the number of extra degree, or click + /- to
adjust it.
Target mode
Init.
submit
loop demo
: Let the camera back to the Begin point A
: make the camera take pictures according to set
: stop movement of camera
Set
Preview
Init.
2.In time-lapse interface, please set the shooting number,
exposure time,end date and time, the percentage of
the waiting time and movement time.
Click " ", you could check the shooting process.
Click , you could cancel the current operation." "
3.
Click the ” “ ,let the camera move back to the
beginning point A , and then click , make
the camera shoot according to the parameters that
you set up.
” “
Init.
monitor
stop
No need to be set. System will
be changed automatically.
Note 2: Rec-trace records only can be finished by wireless remote CONTROLLER(optional).
Please choose trace number on your APP to continue your following operations
Note 3: APP exposure time set should follow the following rules:
When camera is under M mode, the APP exposure time should be longer than the camera
exposure time. For example, camera exposure time is 1/100 s, at this time
the App exposure time should be equal or longer than 1/80 s.
When camera is under B mode, the real exposure time is decided by APP, now,there is
no special requirement for App exposure time.
1
2
1: At first, please make sure the shutter and cable is connected correctly.
Second,please make sure the channel of shutter is same as motor, PTZ.
Note
submit
2016 EIMAGE ALL RIGHTS RESERVED
21 22
2016 EIMAGE ALL RIGHTS RESERVED

Init.Positioning1
Stop-Motion
30/300
Pre shoot Next
Init.Positioning1
Stop-Motion
30/300
Pre shoot Next
E-IMAGE Controller Diagram
4
5
6
1
2
3
78
1.In the Define interface, please set A-B trace at first.
2.In the Stop-Motion interface, please set the photo
quantity you want to take and exposure time.
9
1. Main Bodycontroller
1. Dia wheel:
change parameters
6. Power
7. Neck strap hole
8. USB charger hole
9.1/4" standard hole
5. Right joystick
Left/right-control the pan movement of PTZ
Up/down-control the tilt movement of PTZ
CH:2
45%
2. Left joystick:
Left/right-control the movement of slider
Up/down-control the Zoom movement of PTZ
3. Antenna
4. LED screen
:Channel
:Battery power
2. Connect E-IMAGE APP To Controller
Please refere to PTZ, same operations, just search " Controller" in device list , then connect it.
For this function, you could adjust the parameters of Motor and PTZ in APP , or set AB
at same time,but just in one device.
3.Connect Controller To PTZ/Motor
Please set the channel no. of Motor & PTZ & Controller the same.
For factory setting, they are
all in 2. If different, please adjust it as following:
2.4G Channel
12
34
5 6
78
1.For Controller, please check the channel No. in Setting interface:
Note:
2.For PTZ or Motor, please check the channel No. in Config /Setting interface.
1: At first, please make sure the shutter and cable is connected correctly.
Second,please make sure the channel of shutter is same as motor, PTZ.
Note
Note 2: In the shooting process, if you find there are some photos are not satisfied, you
could input the picture number, then click "Positioning", the camera will move
to that picture position automatically, then re-shoot it.
Note 3: APP exposure time set should follow the following rules:
When camera is under M mode, the APP exposure time should be longer than the camera
exposure time. For example, camera exposure time is 1/100 s, at this time
the App exposure time should be equal or longer than 1/80 s.
When camera is under B mode, the real exposure time is decided by APP, now,there is
no special requirement for App exposure time.
1
2
5. After adjustment of shot scenes and character’ sactions,
click the " ", the color of number will become
red, it means this picture is finished. If white, it means
no shooting. Please click for following
shooting.
" "
3.Click the " ", following interface will appear.
4.Click the , let the camera move back to the
beginning point A.
" "
Init.
shoot
next
2016 EIMAGE ALL RIGHTS RESERVED
23 24
2016 EIMAGE ALL RIGHTS RESERVED
Joystick
Setting
Rail
Pan
FB
Joystick direction
CH:245%
FB
Tilt
Zoom
FB
FB
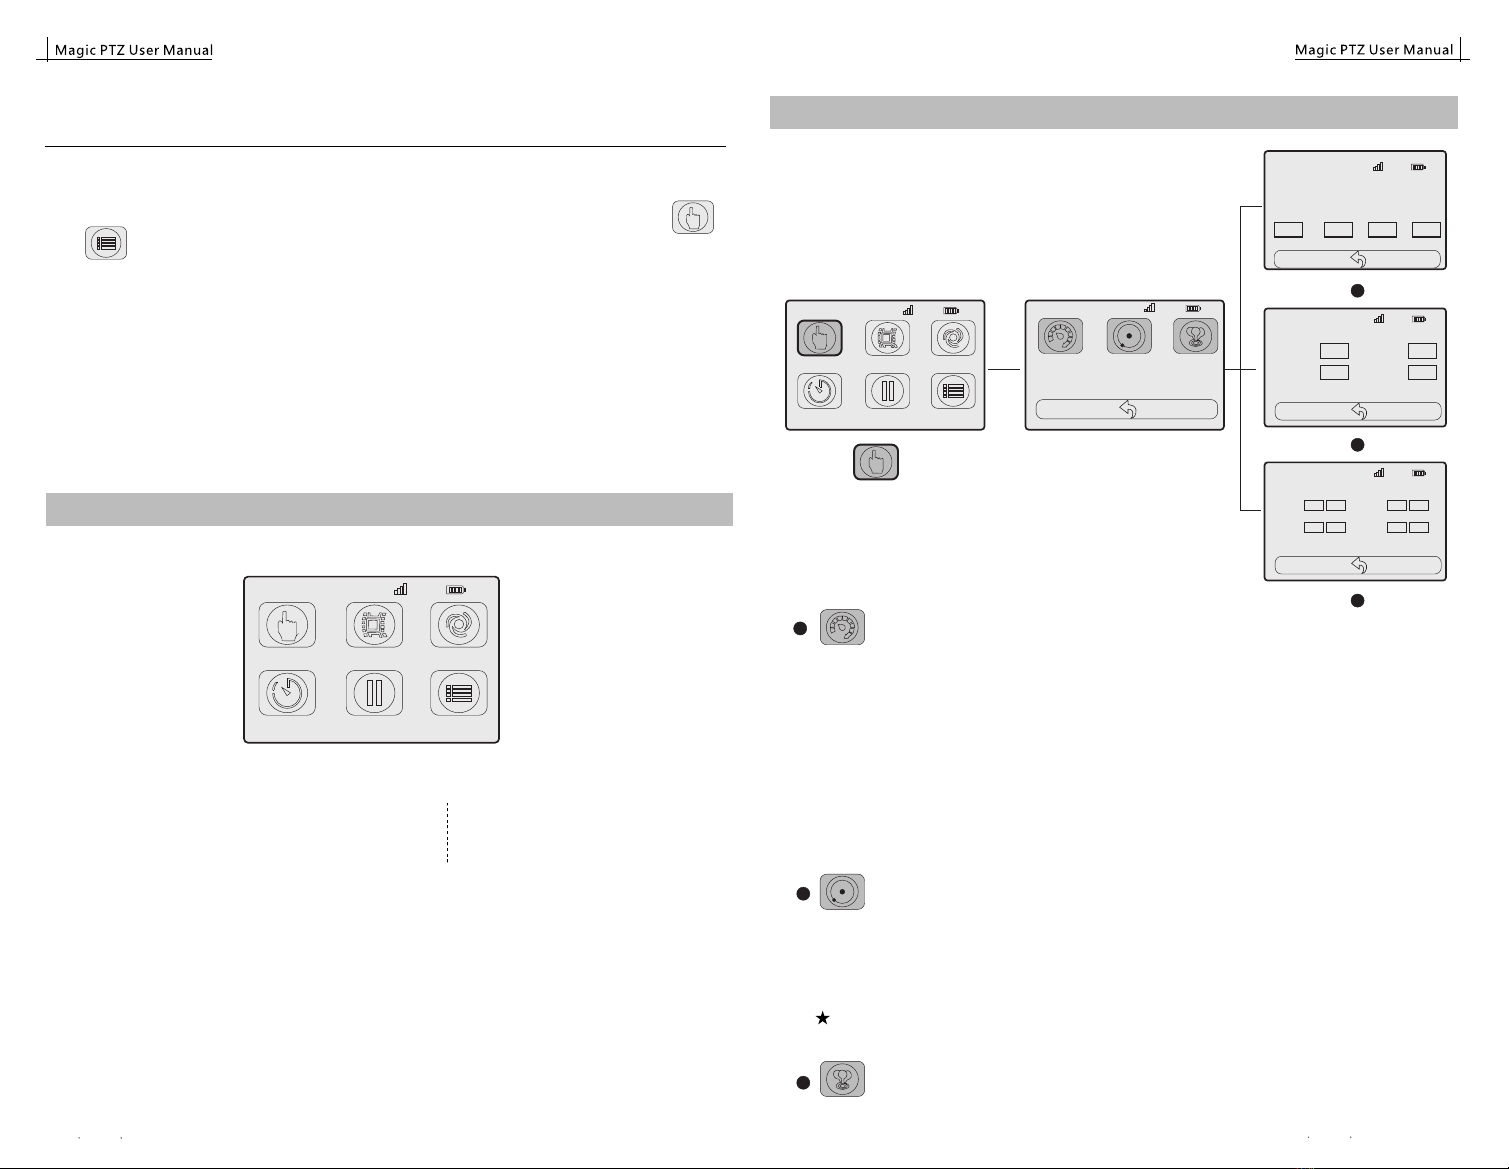
EIMAGE CONTROLLER
Home page
CH:245%
Joystick Rec
Motus
TimeLapse StopMotion
Setting
Joystick:control movement
Rec: trace record
Motus: play movement of AB trace or recorded trace
Stopmotion: make stop-motion
Setting: set up parameters
Timelapse: make timelapse
1.Before using, please make sure to adjust the 2.4G channel of PTZ ,MOTOR and Controller in same
one.
2.Please make sure antenna is installed and battery is full.
3.Please noted that if you want to use APP to control devices, Controller should NOT stay at " "
or " " page, Otherwise App will be conflicted with Controller.
4. Important Notes Of Controller: Joystick
CH:245%
Joystick Rec
Motus
TimeLapse StopMotion
Setting
CH:245%
Variable Constant Setting
CH:245%
Slider 100% Pan 100%
Zoom 100% Tilt 100%
setA setB limitA limitB
CH:245%
Rail
Pan
Tilt
Zoom
constant speed
100
100
100
100
1
2
3
Click the there are 3 options: Variable/ Constant /Setting
: Adjust directions of movements.
3
Set Limit A-B
Set the max. distance of movement for safety using.
Please make the equipment move to your request start point, click " Limit A"
Same operation to set “Limit B”
Limit A-B is finished
b:Set A-B trace
: means the speed will be changed according to your joystick's movement.
In the page, AB trace could be setted.
Operation of adjusting speed:
a: Big step: please press down the right joystick, meanwhile, dial orange wheel, the speed will changes on
multiple as 100.
b: Small step: only dia the orange wheel.
2
Note 1: If you want to control the PTZ/Motor in fixed speed, it is better to use this function.
1
4. For more detail adjustment of parameters, we recommend to change it by APP.
5. We suggest to keep the Controller off when charge the battery.
6. Please noted there is SAFETY PROTECION in PTZ:
if battery power is still connected, it means the PTZ is still under working, and every axis is still
under lock position. In order to avoid camera be damaged because of suddenly falling if not in
balance, after you switch off the power. If battery power is not connected, it means the PTZ is not
working.
Variable
Constant
Setting
Please make the equipment move to your request start point, click " Set A"
Same operation to set “Set B”
A-B trace is finished
a:Operation of set Limit A-B and A-B route
Joystick
: In the page, it means the speed of every directions is fixed.
2016 EIMAGE ALL RIGHTS RESERVED
25 26
2016 EIMAGE ALL RIGHTS RESERVED

A-B: AB trace record (it is made in Variable page)
Rec: recorded trace
Time: set rough shooting time
Accel: Acceleration
Trace ID: ID number of each trace.
Please choose the one you would like to play.
init: let the equipment back to Start point
play: start shooting
Stop: stop shooting
Motus
Click , here is the page:
Time
Accel
Sec
%
start
stop
50
10
TraceID 01 2 34
CH:245%
Trace Rec init
A-B
please remember to click "stop" no matter stop in it in the middle play or after whole play.Note 1:
Operation of Rec
Please click Trace ID at first, such as "0", then click " start Rec", please use the controller to control
movement for the trace that you want, then click "end Rec".
Rec
Trace ID: ID number of each trace.Total max. 5 traces.
Start Rec: the start of record.
End Rec: the end of record.
20s: current shooting length, from 0-20s.
TraceID
startTec
init
endRec
play stop
20 s
01 2 34
CH:245%
Click ,here is the page:
init: let the equipment back to start point
play: start shooting
Stop: stop shooting
Timelapse
Trace A-B: A-B trace. Please set it in "Variable" page.
Trace Rec: Recorded trace. Please set it in "Rec" page
Trace ID : ID number of trace.Please choose the one
you would like to play.
Click , here is the page 1:
Time:shooting time
Photos: photo quantity you want to take
Click ,here is the page2:
CH:245%
Trace
TraceID
Time
Photos
A-B Rec
0
1000 Sec
300 P
Return Next
1 2 34
1
2
1
2
CH:245%
EXP
Before
After
miliSec
miliSec
miliSec
300
500
500
init
start
stop
Previous
EXP: exposure time
Before: waiting time before exposure
After: waiting time after exposure
Init: let the equipment back to begin point
Start: make shooting
Stop: stop movement
Note 1: APP exposure time set should follow the following rules:
When camera is under M mode, the APP exposure time should be longer than the camera
exposure time. For example, camera exposure time is 1/100 s, at this time
the App exposure time should be equal or longer than 1/80 s.
When camera is under B mode, the real exposure time is decided by APP, now,there is
no special requirement for App exposure time.
1
2
Operation of Motus
Selection the trace that you want to run, such as A-B . If trace record, please choose the trace ID at first,
set the "Time" & "Accel", then click "init", let camera back to Begin point, click "start", the camera will
move.
Operation of
Selection the trace that you want to run, such as A-B . If trace record, please choose the trace ID at first,
set all parameters, then click "init", let camera back to Begin point, click "start", the camera will take
pictures according to set parameters.
Timelapse
Note2: Please make sure to adjust the channel of wireless shutter to the same as PTZ.
Then it can receive order and take pictures.
CH:245%
Joystick Rec
Motus
TimeLapse StopMotion
Setting
CH:245%
Joystick Rec
Motus
TimeLapse StopMotion
Setting
CH:245%
Joystick Rec
Motus
TimeLapse StopMotion
Setting
CH:245%
Trace
TraceID
Time
Photos
A-B Rec
0
1000 Sec
300 P
Return
1 2 34
Next
Next
Rec
Motus
TimeLapse
2016 EIMAGE ALL RIGHTS RESERVED
27 28
2016 EIMAGE ALL RIGHTS RESERVED

Stopmotion
Photos:photo quantity you want to take
EXP: exposure time
init: let the whole system back to begin point
: the 1st picture. Picture quantity you have take
Click , here is the page:
Before using, please set A-B trace in Variable page at first.
: previous picture
: if there is a picture that not satisfied, please set the n umber at first, then click "goto",
the equipment will move to that position automatically ,then re-shoot it.
Max speed : set the max. speed of each directions. Please click number box, then dia the orange
wheel to change it, then click“OK”.
1
Max Speed Set
Rail
Pan
Tilt
Zoom
100
100
100
100
Return OK Next
CH:245%
Setting
Max Accelertion Set
Rail
Pan
Tilt
Zoom
100
100
100
100
Return OK Next
CH:245%
Max. Acceleration Set: set the max. acceleration of each directions. Please click number box,
then dia the orange wheel to change it,then click”OK”.
2
2.4G channel: please set the channel of controller.
4
CH:245%
2.4G Channel
1 2
34
5 6
78
Return
Language: Chinese or English
3
CH:245%
Language
中文 English
Return Next
Operation of
For this function, only A-B trace can be used. Please set " photos" and " EXP", then click "shoot", then click
"next". The camera will take pictures according to set parameters.
Stopmotion
1
Note 1: APP exposure time set should follow the following rules:
When camera is under M mode, the APP exposure time should be longer than the camera
exposure time. For example, camera exposure time is 1/100 s, at this time
the App exposure time should be equal or longer than 1/80 s.
When camera is under B mode, the real exposure time is decided by APP, now,there is
no special requirement for App exposure time.
1
2
Note2: Please make sure to adjust the channel of wireless shutter to the same as PTZ.
Then it can receive order and take pictures.
CH:245%
Joystick Rec
Motus
TimeLapse StopMotion
Setting
CH:245%
Photos 300 P EXP 300 miliSec
init
Prev Shoot
goto
Next
1
StopMotion
CH:245%
Joystick Rec
Motus
TimeLapse StopMotion
Setting
CH:245%
Joystick Rec
Motus
TimeLapse StopMotion
Setting
CH:245%
Joystick Rec
Motus
TimeLapse StopMotion
Setting
CH:245%
Joystick Rec
Motus
TimeLapse StopMotion
Setting
1
2
3
4
goto
Prev
Shoot
Next
: take picture
: next picture
2016 EIMAGE ALL RIGHTS RESERVED
29 30
2016 EIMAGE ALL RIGHTS RESERVED

Maintenance
MAGIC PTZ is precision electronic equipment and is not waterproof. Keep it away from sand and
dust when in use. After use, it is recommended that you wipe the PTZ with a soft dry cloth. Never
spray any cleaning liquids on to the PTZ.
Warranty And Support
MAGIC PTZ enjoy 1 year of hardware warranty period. These service could be get from E-IMAGE
official dealers or contact with E-IMAGE company directly.
The power light is on, but
PTZ can't work
Plea se check if the cabl es are con nec ted cor rec tly, please
re-connect it.
(1)
Big noise during working
of zoom motor
(1) The max. zoom is reached, and motor against the locking screw
of ring gear. Please sent limit A-B of zoom at first.
In tilt direction, the PTZ
can't rotate a full 360°
circle
(1) The vertical balance is not achieved, please re-adjust it.
Controller can't control
PTZ or slider (1) The channel is not same, please change it to same one.
(2) Please check if the antenna is installed
(3) Please check if the APP is connected with E-IMAGE PTZ or
Motor sucessfully. If failed many times, please re-start the PTZ
or Motor.
Troubleshooting
Wireless shutter channel settings
No. Problem Solution
(1) Please check if the power of the device is on and the power
is enough.
(1) The situation may be due to set the maximum speed value or
the maximum acceleration value too big, please lower the
parameters then can resume normal work.
APP can’t control the
equipment
Picture shakes unusually
(4) Please check if there is other mobile devices has connected
to the equipment.
(5) Please check if operation channels(such as Slider, PAN,
tilt,etc.) is correct
2016 EIMAGE ALL RIGHTS RESERVED
31 32
2016 EIMAGE ALL RIGHTS RESERVED

Specifications
Technical parameters
Pan
Focus
Movment
Tilt
Roll
Focal length
360° continuous
360° continuous
360° continuous
No-limit
No-limit
60°/s
Min.Speed
0.01°/s
60°/s
60°/s
50mm/s
50mm/s
Max.Speed
0.01°/s
0.01°/s
0.05mm/s
0.05mm/s
Battery
Control mode
Motor Power
Wireless controller or App control
8-32W
2*AA battery(LR6)
Positioning Accuracy
Volatage Range
0.0025°
DC14.8V-24V or power adapter
20m
Radio Frequency 2.4GHz Operating Voltage 3.7V
Endurance time 50h
PTZ-S/PTZ-M
Wireless Controller
Built-in Rechargeable Lithium Battery
Net weight 0.42kg/0.9lbs Communication Distance 20m
Radio Frequency 2.4GHz Operating Voltage 3V
Endurance time 50h
Wirless Shuttter
Net weight 0.04kg/0.10lbs Communication Distance 20m
Product parameters
Product Size
PTZ-S
Net weight(PTZ-S)
43.5x32x11cm
4.15kg/9.15lbs
Max.Pay Load 8kg/17.6lbs
Working temperature -20℃-40℃
PTZ-M
Product Size
Net weight(PTZ-M)
46.5x33x12cm
5.54kg/12.21lbs
Max.Pay Load 15kg/33lbs
Working temperature -20℃-40℃
Standard packing
In the box
PTZ-S
Packing weight
PTZ-S -1 set/Wirless controller -1 set/Wirelss shutter with cables -1 set
16.65kg/36.71lbs Box Dimensions 64.3x48.3x28cm
PTZ-M
In the box
Packing weight
PTZ-M -1 set/Wirless controller -1 set/Wirelss shutter with cables -1 set
18.01kg/39.71lbs Box Dimensions 64.3x48.3x28cm
Radio Frequency 2.4GHZ/Bluetooth Communication Distance
34
No. Problem Solution
Equipment can’t move
forward in some point.
Plea se check if Limit AB is set.(1)
Limit AB can’t be set up Plea se check whet her the de vice is restart, if restart ed,
pl ease set a new limit AB.
(1)
Wireless shutter is not
lighted up when switched
on
Plea se check whet her bat ter y is insta lled or installat ion
di rection is right.
(1)
Wireless shutter could
not respond
Plea se check whet her the sh utter rele ase is loo se or the
no t plug in.
(2) Ple ase res tar t.
(3) P le ase c h ec k w het he r t h e wir el e ss shu tt e r and APP a re
in the same cha nnel.
(1)
If PTZ works too slowly
even if App Joystick is
in max.speed
Plea se re-set the (1)"max-speed config " & " max.
Acceleration config " in CONGIG page, change it more
than original set or more than 100.
2016 EIMAGE ALL RIGHTS RESERVED 2016 EIMAGE ALL RIGHTS RESERVED
33
Table of contents
Other E-Image Camera Accessories manuals


Popular Camera Accessories manuals by other brands


Trojan
Trojan GC2 48V quick start guide

Calumet
Calumet 7100 Series CK7114 operating instructions

Ropox
Ropox 4Single Series User manual and installation instructions

Cambo
Cambo Wide DS Digital Series Main operating instructions

Samsung
Samsung SHG-120 Specification sheet

Ryobi
Ryobi BPL-1820 Owner's operating manual