E.L.B. FT-30 Guide

FT-30
Technical Documentation
FT-30
Rev. 1.9
CordlessDesktop

FT-30
5.10.01 © E.L.B. Ex-Geräte Bachmann Rev. 1.9 Page 2
Index:
Topic Page
Basic Information’s
1 Commissioning ............................................................................. 3
2 Amount of delivery / System requirements ................................... 4
3 Installing the Batteries ................................................................... 4
4 Connecting the Receiver ............................................................... 6
5 Installing the Software ................................................................... 7
6 Using the Cordless EEx-Desktop .................................................. 8
7 EEx-Desktop maintenance ............................................................ 12
8 Troubleshooting ............................................................................ 13
System
9 Realizations .................................................................................. 14
10 Connecting Examples ................................................................... 15
Technical Data
11 Technical Data .............................................................................. 16
12 Safety Advice ................................................................................ 17
Appendix
13 Dimensions ................................................................................... 18
14 Certificate of Conformity ............................................................... 19

FT-30
5.10.01 © E.L.B. Ex-Geräte Bachmann Rev. 1.9 Page 3
1 Commissioning
Please follow the steps listed before install the desktop in the Ex-area:
• Equipment or machine has to be stress-free !
• Connect the interconnection cable between receiver and keyboard-, mouse port of
the PC.
• Check all function of the desktop.
• Power the equipment.
• Log on keyboard and mouse at the PC.
• Check functions of the whole equipment.
Instructions and warning notes
• Parts working under voltage with the exception of intrinsically safe current circuits are
forbidden as a matter of principle because of the given explosion risk.
• Before switching on it has to be ensured that the batteries correspond with the named
type.
• Energized parts can be exposed when opening guards or removing parts except
when this is possible by hand. Connection parts can also be under voltage.
• If it is supposed that a operation without danger is not possible, than the equipment
has to be set out of operation and secured against reclosing.
• For the installation of the equipment notice the main ordinance and regulations in Ex-
areas.

FT-30
5.10.01 © E.L.B. Ex-Geräte Bachmann Rev. 1.9 Page 4
2 Delivery amount / System requirements
System Requirements:
- IBM- or compatible PC
- Windows95, Windows98 or
WindowsNT 4.0/5.0 required for Scrolling
- With Windows3.1 the Mouse acts like a Cordless three-button-mouse
- 3,5“-Floppydisk
The Package contains:
- EEx-Mouse Type FM-20
- EEx-Keyboard Type FT-30
- Receiver Type FR-10/30 (EEx or non-Ex)
- 2x AAA Batteries (Duracell type MN2400)
- 2x AA Batteries (Duracell type MN1500)
- 2x Softwarediscs
- Technical documentation
3 Installing the Batteries
Cordless Wheel Mouse
The Cordless EEx-Mouse uses two AAA alkaline batteries (Duracell Alkaline-
Batteries Type MN2400). It's not allowed to use other types of batteries.
1. Remove the battery compartment cover
outside the Ex-area on top of the mouse.
To release the cover, press the tab on the
bottom of the mouse.
2. Slide the cover away from the mouse.
3. Insert the two AAA batteries. A diagram in
the battery compartment shows the correct
battery installation.
4. After the batteries are installed, carefully replace the cover.

FT-30
5.10.01 © E.L.B. Ex-Geräte Bachmann Rev. 1.9 Page 5
Cordless Keyboard
The EEx-Keyboard uses two AA alkaline batteries (Duracell Alkaline-Batteries type
MN1500). It's not allowed to use other types of batteries.
1. Remove the battery compartment cover outside
the Ex-area on the bottom of the Cordless
Keyboard. To remove the cover, squeeze the cover
in from the tab to release it..
2. Place the flat end (negative pole) of one AA
battery against the spring, then insert the next
battery as shown. A diagram in the battery
compartment shows the correct battery installation.
3. After the batteries are installed, carefully put the cover back into place.
Battery Warning – Important!
When battery power is low for the
mouse or keyboard, the
MouseWare’ software displays a
dialog box under Windows’
95/Windows’ 98 and Windows
NT’4.0 suggesting that you change
the batteries. It is recommended
that when you change batteries
you change them for the mouse
and keyboard at the same time to
optimize performance. When
replacing the batteries, use only
Duracell alkaline batteries. Note
that the battery level indicator in
the Cordless tab of the Keyboard
Properties or the Mouse Properties
is calibrated for Duracell alkaline batteries only.
Discard all used batteries according to the battery manufacturer’s instructions.
Exercise care when handling batteries. When batteries are misused, they may
explode or leak, causing burns and personal injury. Do not open a battery or
mutilate, dispose of in a fire, expose to heat above 212° F (100° C), immerse in
water, install improperly, or recharge. Conducting materials, such as rings,
bracelets, and keys, can short out a battery causing it to overheat and possibly
leak or explode. When you are not using your cordless device for long periods of
time, remove the batteries and store them in a dry place at normal room
temperature.

FT-30
5.10.01 © E.L.B. Ex-Geräte Bachmann Rev. 1.9 Page 6
4Connecting the Receiver
The Logitech Cordless Desktop uses digital radio technology. Communication
between the Logitech Cordless Desktop – keyboard and mouse – and your computer
is achieved with great reliability using radio waves. The Cordless Keyboard and
Cordless Wheel Mouse do not have bulky cables that can get in the way, nor do they
use infrared technology, which requires line-of-sight placement and usage. Instead,
both the keyboard and mouse with radio frequencies as a means of communicating,
which are picked up by the receiver and passed on to your computer.
The receiver is connected to your computer via two color-coded cables. The cable
with the orange end is for the keyboard, and it plugs into your computer’s keyboard
port. (A 5-pin DIN adapter is provided should you need to plug this cable into an IBM
AT keyboard port.) And the cable with the green end is for the mouse, and it plugs
into your computer’s mouse port. A 9-pin serial port adapter is provided should you
need to connect this cable to your computer’s serial port.
CAUTION: Before installing the receiver’s cables, turn off your computer.
Plugging or unplugging cables to your computer’s mouse port
while the computer is on can damage the mouse port or your
computer.
1. Make sure that your computer is turned
off.
2. Note the difference between the mouse
and keyboard cable ends. The mouse
cable end is green and has a mouse icon.
The keyboard cable end is orange and has a
keyboard icon. You will plug each cable end
into different ports on your computer. (Also
note the serial port adapter for the mouse
cable and the AT adapter for the keyboard
cable.)
3. Connect the receiver’s
green mouse cable to the
computer’s 6-pin mouse
port or its 9-pin serial port
using the 9-pin adapter.
Make sure to match up the
mouse icon on the cable end with the mouse icon next to the mouse port on your
computer. (Some computers may not have this mouse icon.)
If you are connecting the mouse cable to the mouse port, remove the serial port
adapter. When using the 9-pin serial port adapter, connect the adapter to the
computer port, tighten the thumb screws, and connect the mouse cable to the
adapter. Be sure to line up the arrows on both the cable and the adapter.

FT-30
5.10.01 © E.L.B. Ex-Geräte Bachmann Rev. 1.9 Page 7
4. Connect the receiver’s orange keyboard cable to the computer’s keyboard
port. Make sure to match up the keyboard icon on the cable end with the
keyboard icon next to the keyboard port on your computer. (Some computers
may not have this keyboard icon.)
If you are installing the keyboard cable to an IBM AT keyboard port, use the 5-pin
DIN connector already attached to the keyboard cable. If you are connecting the
cable to a 6-pin mini-Din port, remove the AT adapter.
5 Installing the Software
To take advantage of all the features of your Cordless Desktop, please install the
software that comes with the product.
1. Turn on your computer and Start Windows 95/Windows 98 (or Windows
3.1x or Windows NT 4.0).
2. Insert the software diskette into drive A or B.
3. For Windows 95, Windows 98 or Windows NT 4.0, press Start on the
Taskbar and select Run.
4. For Windows 3.1x, open the File menu and choose the Run command.
Windows displays the Run dialog box.
5. For Windows 95, Windows 98, or Windows NT 4.0, from the Run dialog box,
select (or type) A:\SETUP or B:\SETUP in the Run dialog box. Click OK.
6. For Windows 3.1x, in the Command Line text box, type: A:\SETUP (or
B:\SETUP). Click OK.

FT-30
5.10.01 © E.L.B. Ex-Geräte Bachmann Rev. 1.9 Page 8
7. Follow the on-screen instructions.
Note: If either the mouse or keyboard do not work properly after you have
installed the Cordless Desktop, please refer to ”Troubleshooting” later in
this manual. You will notice if the mouse or keyboard is malfunctioning
because for the mouse the screen cursor will not move when you move
the mouse. And for the keyboard, your keystrokes will not register when
you type.
6 Using Your Cordless Desktop
By assigning the scrolling function to a mouse button, you can scroll in Windows 95,
Windows 98, and Windows NT4.0 using your Cordless Wheel Mouse. The following
table tells you how to scroll.
Using Your Cordless Wheel Mouse
Your mouse has a wheel that functions both as a wheel and as a button. Simply click
the wheel like you would with a standard mouse button.
To scroll, simply move the wheel.
To use the wheel like a standard mouse
button, click (press down) the wheel.

FT-30
5.10.01 © E.L.B. Ex-Geräte Bachmann Rev. 1.9 Page 9
Scrolling and Zooming with the Mouse
Task What is It? How to Do It?
Wheel Scroll Use Wheel Scroll for precise up
and down movement,
To scroll up, move the wheel forward; to
scroll down, move the wheel back.
AutoScroll Use AutoScroll in Windows 95,
Windows 98, Windows NT 4.0, and
Microsoft’ Office 97 compatible
applications to scroll through large
documents.
AutoScroll allows you to scroll a
document automatically without
having to move the mouse
continuously.
Assign AutoScroll to a button on the mouse if
it is not already assigned.
Place the cursor in an application. Press the
mouse button assigned to AutoScroll. The
AutoScroll icon appears.
Move the mouse once in the direction you
want to scroll (vertical, horizontal, or
diagonal). The farther you move the pointer
from the starting point, the faster the
scrolling.
To stop AutoScroll, press any mouse button.
Zoom Use Zoom to either magnify
or demagnify the view of a
document in an application that
supports it.
Place the cursor in an application that is
Microsoft Office 97 compatible. Press and
hold the Ctrl key on the keyboard, then to
zoom in, move the wheel forward; to zoom
out, move the wheel backwards.
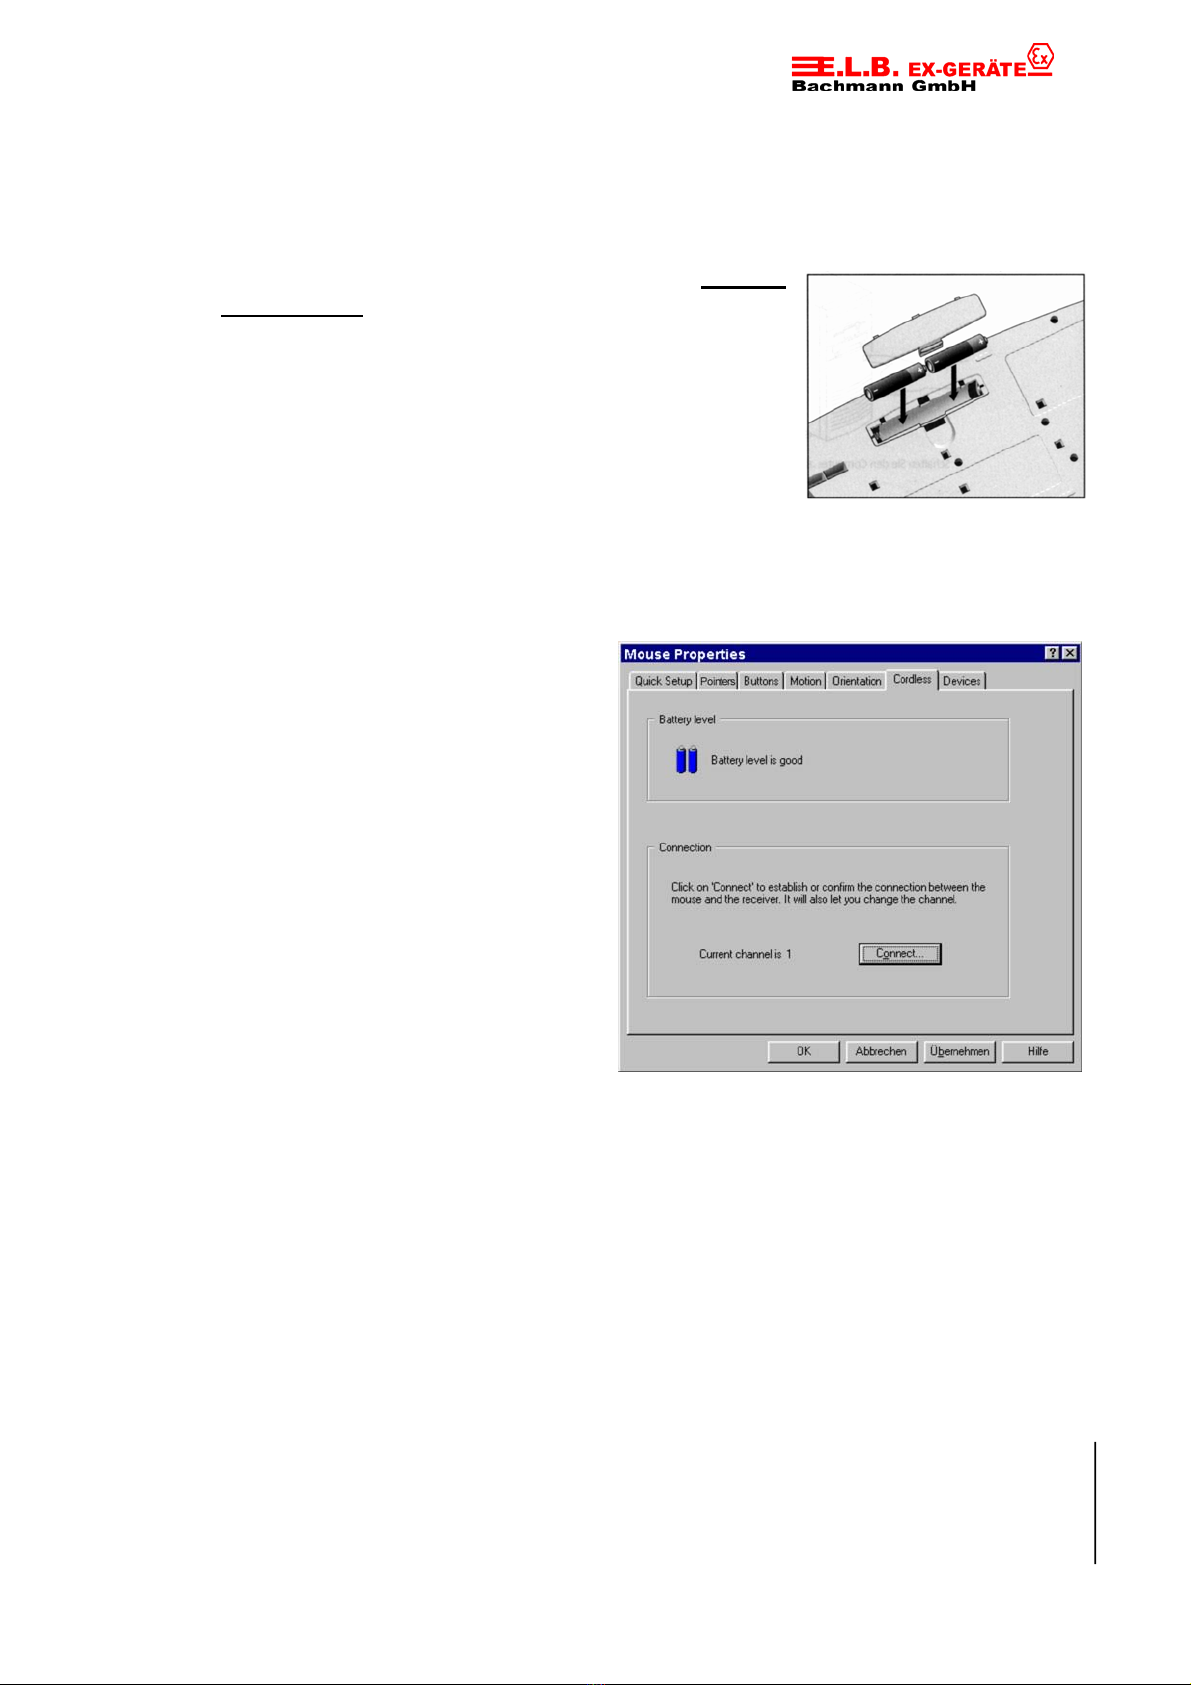
Using the Software under Windows 95, Windows 98, and Windows NT 4.0
The Mouse Ware software includes features
for making button assignments, controlling
cursor movement, and setting up the mouse.
To access the MouseWare software, double-
click the mouse icon on the Windows
Taskbar, or start MouseWare from the
Control Panel. The Mouse Properties tabs
display, as shown below. Choose from the
available options to configure the mouse.
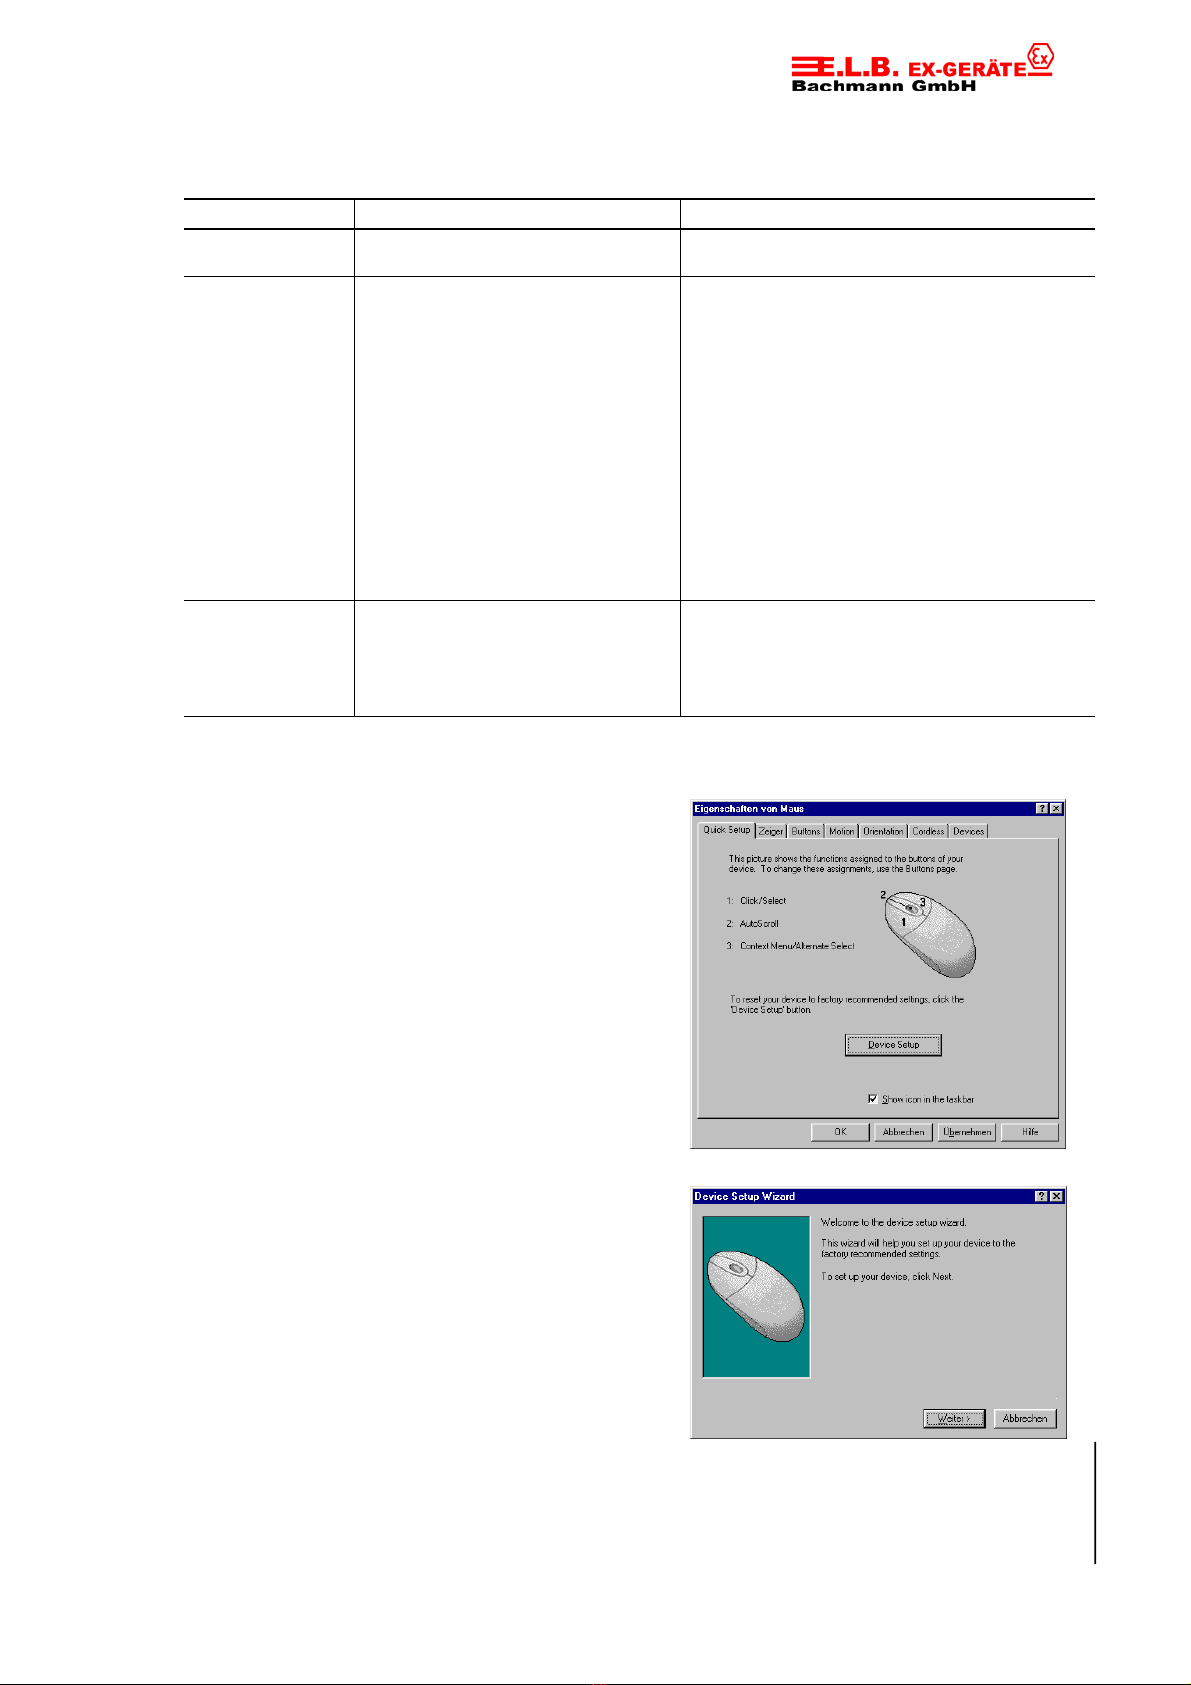
Choosing Options for the Mouse
Need help choosing options? Let the Mouse
Wizard show you how. To begin, go to Mouse
Properties. To do this, click Start on the
Windows Taskbar, then select Settings,
Control Panel, then double-click the Mouse
icon. Now choose the Quick Setup tab and
click the Device Setup button. Follow the on-
screen instructions.

FT-30
5.10.01 © E.L.B. Ex-Geräte Bachmann Rev. 1.9 Page 10
Making Button Assignments
Assign special functions to mouse buttons, by
using the Buttons tab. The Buttons tab is part of
Mouse Properties. Click the down arrow to select
a function for a button. Click the Options button
to specify settings for AutoScroll, Universal
Scroll, CyberJump’ and HyperJump, and double-
click Timing. For more information click the Help
button.
Using the Cordless Tab for the Cordless Keyboard
Access the Windows Keyboard Properties tabs by selecting Start on the Windows
Taskbar, followed by Settings, Control Panel, then Keyboard. To display the page
shown, click the Cordless tab. The Cordless tab shows battery level for the keyboard
(alkalines only), and allows you to display icons on the Windows Taskbar for the
keyboard and for Caps Lock, Num Lock, and Scroll Lock. By clicking the Connect
button, you can use the software to help you establish communication between the
keyboard and the receiver.
Using the Cordless Desktop Icons on the Windows Taskbar
Various Cordless Desktop icons appear on the Windows Taskbar. These icons
provide valuable information about the Cordless desktop, and make it possible for
you to display keyboard and mouse property sheets easily and quickly. Clicking either
the keyboard or mouse icon launches its respective property sheet in which you can
specify options. Standard keyboard functions are also conveniently displayed on the
Taskbar, which give the status of Num Lock, Caps Lock, and Scroll Lock. When
mouse or keyboard battery power is low, a warning icon appears to let you know that
it is time to change the batteries. Whenever you change the batteries, it is a good
idea to change the batteries in both the keyboard and mouse at the same time for
best performance.
Executing CyberJump and HyperJump Commands
CyberJump and HyperJump combine eight commonly used tasks for Windows 95,
Windows 98 and Windows NT 4.0 into one convenient grid so you do not have to
point to various parts of the screen to execute commands. Before you can use
CyberJump or HyperJump, you must first assign either function to a mouse button.
With your mouse, press the assigned button to display the CyberJump or HyperJump
grid. (Both grids are shown on the next page.) Move the cursor to an icon on the grid,
then click to execute a command.
Note: To perform a double-click with the button assigned to CyberJump or HyperJump,
first choose the Double-Click Option in the CyberJump or HyperJump options dialog box.
(You can access this options dialog box by displaying the Buttons tab of the Mouse
Properties, by clicking the Options button on the Buttons tab, then by selecting the
HyperJump/CyberJump tab within the Options dialog box.) then press and release the
button quickly. To display the CyberJump or HyperJump grid, press and hold down the
assigned button.

FT-30
5.10.01 © E.L.B. Ex-Geräte Bachmann Rev. 1.9 Page 11
CyberJump for the Internet’ under Windows 95, Windows 98, and Windows NT 4.0
Designed for Netscape 3.x/4.0, Microsoft Internet Explorer 3.x.
Menu Activates the HyperMenu.
Go to Bookmark Displays bookmark window.
Add Bookmark Adds current page to bookmark window.
Vertical Scroll Jumps to the vertical scroll bar.
Stop Halts current page from downloading.
HorizontaI Scroll Jumps to the horizontal scroll bar.
Start Activates the Windows Start Menu.
Go Back Returns to previous page.
HyperJump for Windows 95, Windows 98, and Windows NT 4.0
Menu Activates the HyperMenu.
Minimize Minimizes the window.
Close Closes the window.
Vertical Scroll Jumps to the vertical scroll bar.
Resize Jumps to the Size Grip (resizes window).
Horizontal Scroll Jumps to the horizontal scroll bar.
Start Activates the Windows Start Menu.
Recall Recalls the last active window.
Using the Software under Windows 3.1x
Double-click the MouseWare icon located in the Logitech MouseWare group window
(or in the Windows Control Panel). Choose from the available options to configure the
mouse.
The MouseWare Control Center under Windows 3.1x

FT-30
5.10.01 © E.L.B. Ex-Geräte Bachmann Rev. 1.9 Page 12
Cursor Enhancement under Windows 3.1x
Use the Cursor Enhancement dialog box to customize the cursor. To display the
dialog box, click the Cursor button in the MouseWare Control Center.
Button Assignments under Windows 3.1x
MouseWare allows you to assign functions to three mouse buttons only and replaces
frequently used tasks, such as Double-Click, DragLock, etc., to a single button click.
To override a button assignment temporarily so you can use an application specific
feature, press the Control key while clicking the button to be overridden.
Note that scroll and zoom functions are not supported under Windows 3.1x, as
well as Cordless Desktop battery warning icons and keyboard status icons on
the Windows Taskbar.
7 Desktop Maintenance
If the cursor skips or moves abnormally, clean the ball of
your mouse.
1. Remove the retainer ring to remove the ball. On
the bottom of the Cordless Wheel Mouse, press in the
direction of the arrow imprinted on the retainer-ring
cover.
2. Wipe the ball with a clean, lint-free cloth, then
blow carefully into the ball-cage to dislodge dust
and lint. Look for a build-up of dirt on the rubber
roller(s) inside the ball-cage.

FT-30
5.10.01 © E.L.B. Ex-Geräte Bachmann Rev. 1.9 Page 13
3. If dirty, clean the roller(s) using a cotton swab moistened lightly with isopropyl
(rubbing) alcohol. After cleaning, make sure the roller(s) are still centered in their
channels. Make sure that fluff from the swab is not left on the roller(s).
4. Replace the ball and retainer ring.
8 Troubleshooting
Mouse or Keyboard Does Not Work upon Installation
Try one or more of the following:
Make sure you have connected the receiver correctly. The orange cable end goes into
the computer’s keyboard port and the green cable end goes into either a mouse or serial
port.
For optimal performance, place the receiver at least eight inches or 20 centimeters
away from the keyboard, mouse, or other electrical devices, such as the computer, the
computer monitor, or external drives.
Make sure you have installed the batteries correctly.
Manually establish communication between the receiver and the mouse/keyboard:
Non Ex version of receiver (FR-30):
Press the Connect button on the receiver, then press the channel button on the mouse
(see picture). Press the Connect button again on the receiver, then press
the channel button on the keyboard.
Ex version of receiver (FR-10):
Open the cover of the EEx receiver box type FR-30 and connect terminal 1 with terminal
2 for a short moment until a message box appears on the screen,
then press the channel button on the mouse.
Connect terminals again on the EEx receiver, then press the channel button
on the keyboard.
If you are working on a metallic surface, try using a mouse pad and turning the receiver
on its side for better reception.
Refer to ”Mouse Not Detected” for additional remedies.

FT-30
5.10.01 © E.L.B. Ex-Geräte Bachmann Rev. 1.9 Page 14
Mouse Not Detected
When using the mouse, it may not be detected by the computer. To remedy this
problem, try the following:
Make sure the mouse receiver cable (with the green end) is plugged into the right
port – serial or mouse port.
Make sure your serial (or mouse) port has the proper configuration. Refer to your
computer documentation for the correct port configuration.
You may have other system devices (e.g. a modem card) that conflict with the
mouse. Check the IRQ/address settings of these devices for conflicts, and
change the settings as required.
The Screen Cursor Does Not Move Properly or the Keyboard Does Not Display
Characters on the Screen When You Type
Clean the mouse ball and roller(s). See ”Mouse Maintenance” for more information.
Also change the position of your radio receiver, because it may be too far from the
mouse or keyboard or the computer monitor or a large metal object may be
interfering with the receiver’s radio reception. Try moving the receiver and/or mouse
to improve reception. Or the mouse batteries may be nearly dead. Check the mouse
batteries as described in ”Mouse or Keyboard Does Not Work upon Installation,” and
replace the batteries if required.
You may also need to change the channel for the keyboard/mouse. The computer
must be on and the receiver plugged in correctly. Press and release the Channel
button on the keyboard; the green Connect light on the receiver should blink. Press
and release the Channel button on the mouse; the green Connect light should blink
on the receiver.
9 Realizations
The Cordless EEx-Desktop (keyboard and mouse) can be delivered in the
following versions:
Description Order Nr.
Ex-Mouse with EEx-Receiver FM20-ER
Ex-Mouse with Receiver FM20-NE
EEx-Cordless Desktop with EEx-Receiver US Layout FT30-ER
EEx-Cordless Desktop with EEx-Receiver German Layout FT30-ED
EEx-Cordless Desktop with Receiver US Layout FT30-NE
EEx-Cordless Desktop with Receiver German Layout FT30-ND
In case of an order please mention the length of the cable (1 m, 5 m, 10 m)
of the EEx-Receivers!

FT-30
5.10.01 © E.L.B. Ex-Geräte Bachmann Rev. 1.9 Page 15
10 Connecting examples

FT-30
5.10.01 © E.L.B. Ex-Geräte Bachmann Rev. 1.9 Page 16
11 Technical Data
EEx-Keyboard Type FT-30
Voltage: 3 VDC (2x AA primary cells á 1,5 VDC)
Current: 1 mA
Capacity of Batteries: 2850 mAh
Transmitting power: <25 mW
Transmitting frequency: 26.995 – 27.195 MHz
Ex-approval: II 2G EEx ia IIC T4
T
amb= -20...+40° C
DMT 00 ATEX E 048
other approvals: FCC ID: DZL122799
CEPT LPD-D BZT-G133-003K
SRD-MPT- 1346-GB
BAKOM 98.0013.K.P.
EEx-Mouse Type FM-20
Voltage: 3 VDC (2x AAA primary cells á 1,5 VDC)
Current: 1 mA
Capacity of Batteries: 1150 mAh
Transmitting power: <25 mW
Transmitting frequency: 26.995 – 27.195 MHz
Ex-approval: II 2G EEx ia IIC T4
T
amb= -20...+40° C
DMT 00 ATEX E 047
other approvals: FCC ID: DZL201135
ICP-032TC-98
CEPT-LPD I-DGPGF/4/2/03/339503/F0/0002097
CEPT/LPD/DK/9814
CEPT LPD-D CTC-R000-003K
CEPT LPD-NL ISC: RSS/CNR210 RTT/D/X 1624
SRD-MPT- 1346-GB
BAKOM 98.0085.K.P.L 2438/10371-01l
EEx-Receiver Type FR-10
Voltage: 5 VDC
Current: 20 mA
Connection: 2, 5, 10 m cable
Port: Serial, PS/2, (USB)
Ex-approval: EEx de IIC T6
T
amb= -20...+60° C
PTB 89.C.1018
other approvals: FCC ID: DZL201125
CEPT LPD-I-DGPGF/4/2/03/339505/F0/0002096
CEPT LPD-NL ISC: RSS/CNR210
CEPT LPD-D BZT-G133-807H

FT-30
5.10.01 © E.L.B. Ex-Geräte Bachmann Rev. 1.9 Page 17
12 Safety Advice
• It is highly recommended to read this technical documentation before putting the
devices into operation.
• Only instructed personnel is permitted to install and operate the devices!
• The devices are in accordance with the technical standards and might only be
connected to systems which are in accordance with E.L.B. Ex-Geräte Bachmann
GmbH.
• It is not permitted to open the devices res. only from authorized personnel of E.L.B.
Ex-Geräte Bachmann GmbH.
E.L.B. Ex-Geräte Bachmann GmbH is not responsible for any damage which
results in disregard of this direction.
• Use only battery type Duracell Alkaline MN1500 for keyboard and MN2400 for
mouse.
• Change the batteries only outside the Ex-area.
• Alterations and changes on the devices are not allowed.
E.L.B. Ex-Geräte Bachmann GmbH is not responsible for any damage which
results in disregard of this direction.
• Only the newest technical documentation or technical supplement is valid.
• The operating voltage of the device has to be in the limits that are given in this
technical documentation under technical data. In case of not complying E.L.B. Ex-
Geräte Bachmann GmbH is not responsible for any damage which results in
disregard of this direction.
• The valid Ex-Regulations (VDE 0160, VDE 0165 e.g. EN 60079-14, EN 50014 –
50039) and the accident safety codes of your country have to be observed .
• The above-mentioned technical data accords with the certificated data of the
European EEx admission. The verification of suitability for the usage and the
environment applies to the user. E.L.B. Ex-Geräte Bachmann GmbH gives
therefore no warranty.

FT-30
5.10.01 © E.L.B. Ex-Geräte Bachmann Rev. 1.9 Page 18
196
48481
23
38
124
60
92.3
106.3
122
139.1
120
70
113
100
25
13 Dimensions
EEx- Cordless keyboard FT-30 EEx-Cordless mouse FM-20
Non EEx-receiver FR-30 EEx-receiver type FR-10

FT-30
5.10.01 © E.L.B. Ex-Geräte Bachmann Rev. 1.9 Page 19
14 Certificate of conformity

FT-30
5.10.01 © E.L.B. Ex-Geräte Bachmann Rev. 1.9 Page 20
Certificate of conformity for Ex receiver
Table of contents