E-line ELI-IP5-APTZ21-30X User manual

800.683.6835
800.683.6835
800.683.6835
800.683.6835
800.683.6835
800.683.6835
800.683.6835
800.683.6835
800.683.6835
800.683.6835
800.683.6835
800.683.6835
800.683.6835
ELI-IP5-PTZ21-12X
ELI-IP5-PTZ21-20X
IP Network PTZ Cameras User’s Manual
eLineTechnology.com
eLineTechnology.com
eLineTechnology.com
eLineTechnology.com
eLineTechnology.com
eLineTechnology.com
2yr
Warranty
Motion
Activated
Recording
Free
Tech-Support
IP
Network
ELI-IP5-PTZ21-12X-I
PTZ
Control
ELI-IP5-APTZ21-30X

i
Table of Contents
1FEATURES AND FUNCTIONS ..........................................................................................1
1.1 General Introduction...................................................................................................................................................1
1.2 Features.......................................................................................................................................................................1
1.2.1 On-Screen Menu....................................................................................................................................................1
1.2.2 Proportional Pan and Tilt......................................................................................................................................1
1.2.3 On-screen Tips.......................................................................................................................................................1
1.2.4 Preset Setup and Call...........................................................................................................................................1
1.2.5 Auto Scan................................................................................................................................................................1
1.2.6 Auto Touring...........................................................................................................................................................1
1.2.7 Auto Pattern............................................................................................................................................................1
1.2.8 3D Privacy Masking...............................................................................................................................................1
1.2.9 Defog.......................................................................................................................................................................2
1.2.10 3D noise reduction............................................................................................................................................2
1.2.11 Action on Alarm.................................................................................................................................................2
1.2.12 Auto Flip .............................................................................................................................................................2
1.2.13 Self-diagnosis....................................................................................................................................................2
1.2.14 Day/Night Mode (B/W & Color Mode)............................................................................................................2
1.2.15 Auto Focus.........................................................................................................................................................2
1.2.16 Backlight Compensation..................................................................................................................................2
1.2.17 Pan Tilt and Zoom.............................................................................................................................................2
1.2.18 FD 3D Intelligent Positioning...........................................................................................................................2
1.2.19 Idle Status ..........................................................................................................................................................2
1.2.20 Image Stabilizer/Flip.........................................................................................................................................2
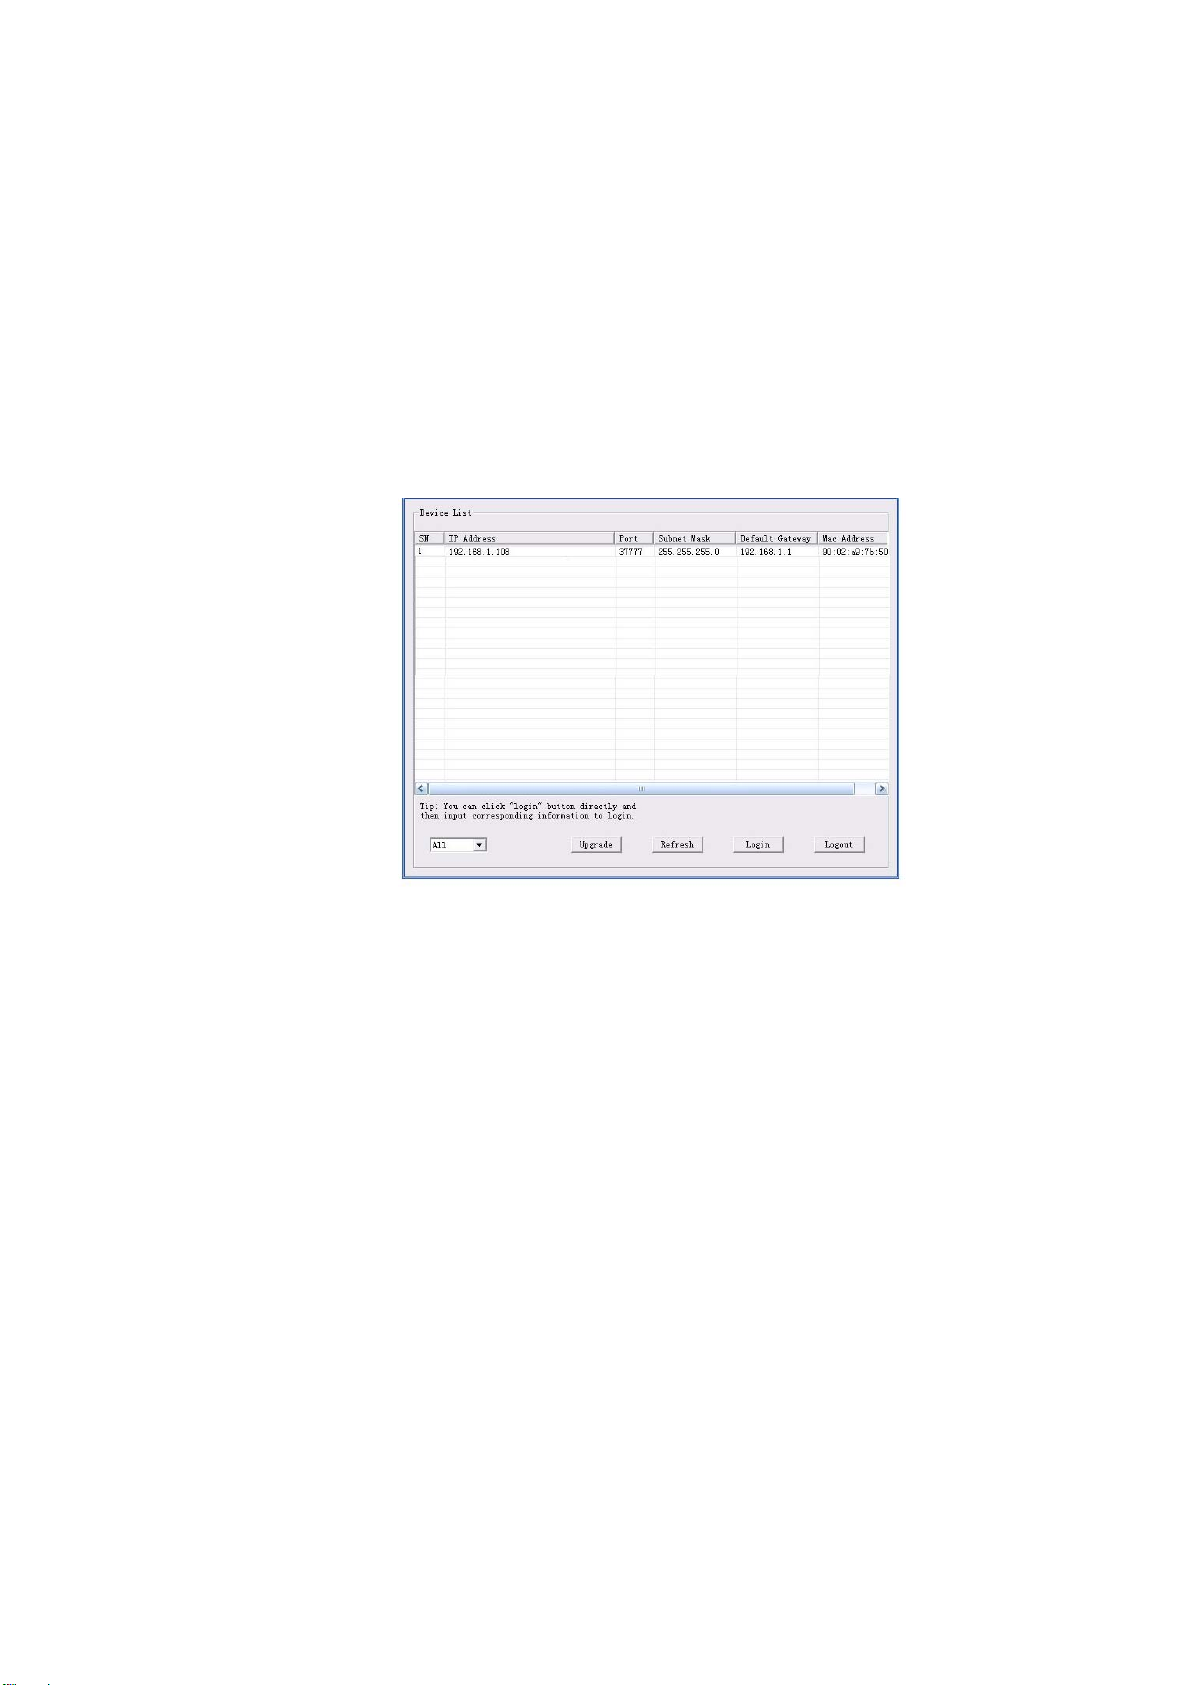
2QUICK CONFIGURATION TOOL .......................................................................................3
2.1 Overview ......................................................................................................................................................................3
2.2 Operation .....................................................................................................................................................................3
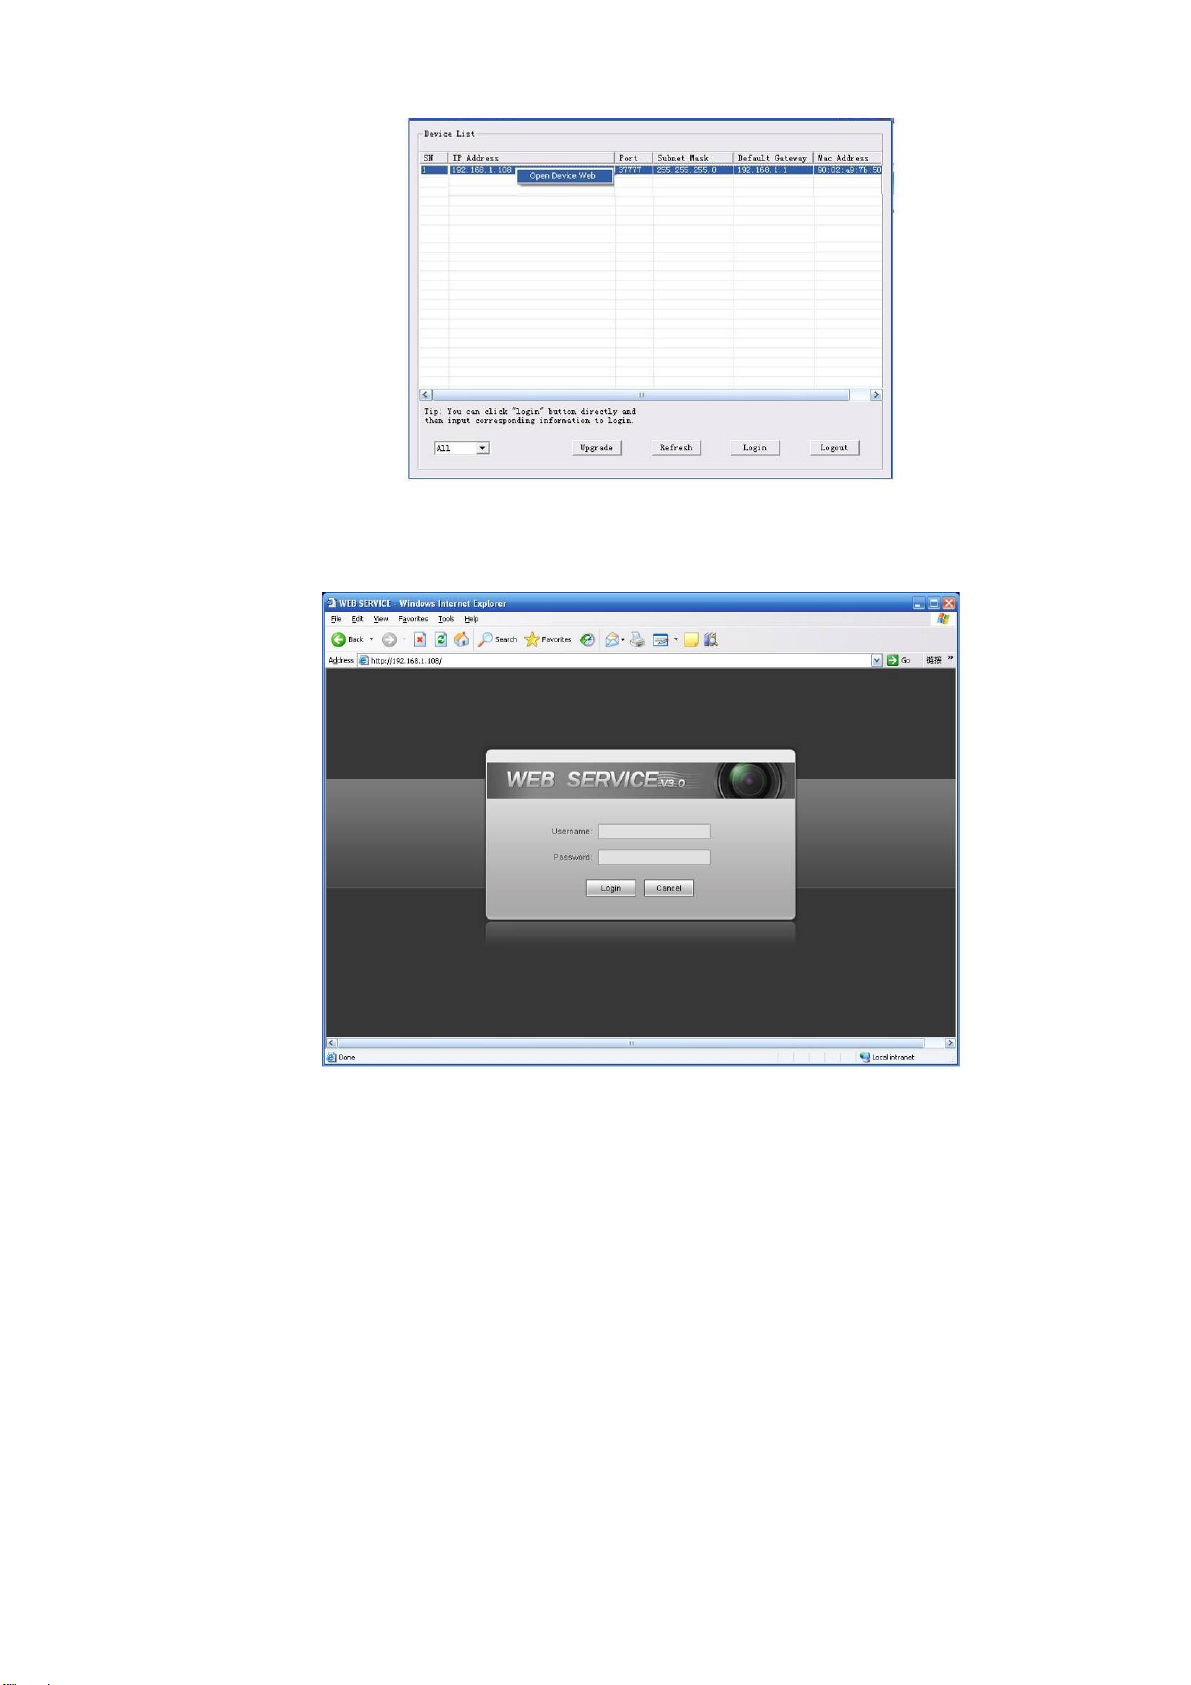
3WEB OPERATION..............................................................................................................6
3.1 Network Connection...................................................................................................................................................6

ii
3.2 Login and Logout........................................................................................................................................................6
4MENU .................................................................................................................................9
4.1 Screen Menu Index ..................................................................................................................................................9
4.2 Self-diagnosis System Information ........................................................................................................................10
4.3 Main Menu .................................................................................................................................................................10
4.4 Menu Operation ......................................................................................................................................................10
4.4.1 System Information..............................................................................................................................................11
4.4.2 Display Setting .....................................................................................................................................................12
4.4.3 Camera Setting....................................................................................................................................................12
4.4.4 Function Setting...................................................................................................................................................18
4.4.5 IR Light Setting.....................................................................................................................................................26
4.5 Dome Abnormal Phenomenon Operation........................................................................................................26
4.5.1 Restore to Factory Default Setup......................................................................................................................26
4.5.2 PTZ Movement is not smooth............................................................................................................................26
5CABLE CONNECTION .....................................................................................................27
5.1 Combination Cable Connection............................................................................................................................27
5.2 System Layout ........................................................................................................................................................27
5.2.1 System Connection .............................................................................................................................................28
5.2.2 Alarm Connection................................................................................................................................................28
6FAQ...................................................................................................................................29
6.1 Daily Maintenance..................................................................................................................................................29
6.2 Problems and Solutions.......................................................................................................................................29
7APPENDIX Ⅰ THUNDER PROOF AND SURGE PROTECTION .......................................30
8APPENDIX 2 TOXIC OR HAZARDOUS MATERIALS OR ELEMENTS ...........................31

iii
Welcome
Thank you for purchasing our product!
This user’s manual is designed to be a reference tool for the operation of your system.
Here you can find information about this speed dome features and functions, as well as a detailed menu tree.
Please keep it well for future reference!
Before installation and operation, please read the following safeguards and warnings carefully!

iv
Important Safeguards and Warnings
1.Electrical safety
zAll installation and operation here should conform to your local electrical safety codes.
zWe assume no liability or responsibility for all the fires or electrical shock caused by improper handling
or installation.
zWe are not liable for any problems caused by unauthorized modification or attempted repair.
2.Transportation Security
zNo heavy stress, violent vibration or water splash are allowed during transportation, storage and
installation.
zPlease use the original packing material (or the material of the same quality) when you ship it back to
the manufacturer.
3.Installation
zDo not apply power to the product before completing installation.
zDo not put object on the product.
4.Environment
zThis series product should be installed in a cool, dry place away from direct sunlight, inflammable,
explosive substances and etc.
zPlease keep it away from the electromagnetic radiation object and environment.
zPlease keep the sound ventilation.
zDo not allow the water and other liquid falling into the device. This series product complies with the IP66
standard specified in the Degrees of Protection Provided by Enclosure.
zPlease make sure the CCD (CMOS) component is out of the radiation of the laser beam device.
Otherwise it may result in CCD (CMOS) optical component damage.
zUsually we recommend thunder-proof device to prevent thunder strike.
zThe GND port of the product shall be grounded to further enhance the reliability of the device.
5. Daily Maintenance
zCurrent series product has no power button. Please unplug all corresponding power cables before your
begin installation or daily maintenance work.
zPlease keep the dustproof cap back to protect the CCD or CMOS part if the device does not work for a
long time.
zDo not touch CCD (CMOS) component. You can use the blower to clean the dust on the surface of the
device. You can use the dry cloth with some alcohol or mild detergent to clear if necessary.
zDo not use the volatility solvent such as the benzene or thinner, or detergent with strong abradibility. It
may result in lens damage or it may adversely affect the device performance.
zIf there is too much dust, please use the water to dilute the mild detergent first and then use it to clean
the device. Finally use the dry cloth to clean the device.

v
6. About Accessories
Always use all the accessories recommended by manufacturer.
Before installation, please open the package and check that all the components are included in the package:
Contact you local retailer ASAP if something is missing in your package.

1
1Features and Functions
1.1 General Introduction
This series IR network intelligent speed dome product is an integrated high intelligent speed dome. It adopts
new configuration design and is easy for the project construction. This is a digital and intelligent product of
vivid video. The installation is convenient.
Comparing with the previous series product, this series IR network intelligent speed dome has added some
new features. It supports 120M IR night vision, intelligent analytics, and the PTZ rotation speed can
automatically adjust according to the zoom rate of the lens. It supports various languages, real-time clock
function and protocol auto recognition. It supports 360° continuously pan, 100°tilt(-10°-90°) and 180° auto
flip. It can realize no blind spot monitor.
1.2 Features
This series speed dome has the following features:
1.2.1 On-Screen Menu
This series product menu supports multiple languages.
It is easy for you to view dome information and configure dome, camera parameters.
1.2.2 Proportional Pan and Tilt
This function keeps the image from moving too fast when there is a large amount of zoom.
The IR high definition speed dome continually decreases or increases pan and tilt speeds in proportion to
depth of zoom. When zooms speed is increasing, the camera moving speed becomes slow. When zooms
speed is decreasing, the camera moving speed becomes fast.
1.2.3 On-screen Tips
Here you can view:
zDome title and system version (Software and hardware)
zDome system temperature. (Optional. You can disable this function)
zDome pan/tilt coordinates, preset ID.
1.2.4 Preset Setup and Call
Preset function is to save the address information (such as PTZ pan/tilt, focus and etc) to the memory so
that you can quickly adjust the dome and PTZ to the correct position.
1.2.5 Auto Scan
Camera scans back and forth regularly in a horizontal field. Here you need to set left and right limit and scan
speed.
1.2.6 Auto Touring
Add addresses into a routine in a desired order and then set time and stop duration for each address. The
dome will begin an auto touring between these addresses.
1.2.7 Auto Pattern
Memorize dome operation such as pan, tilt, and zoom to repeat. You can call it to repeat the previous
operation.
1.2.8 3D Privacy Masking
Privacy masking is a user-defined, four-sided area that can not be viewed by you. The masking area will
move with pan and tilt functions and automatically adjust in size as the lens zooms.

2
1.2.9 Defog
Customized defog setup in case the fog environment may affect the video quality. It is to enhance video
resolution.
1.2.10 3D noise reduction
Support 3D noise reduction setup to reduce the camera noise under the low illumination environment. It is to
enhance video quality.
1.2.11 Action on Alarm
This series IR high definition speed dome has 7 alarm inputs (normal open or normal close) and 2 alarm
outputs (normal open). Alarms can be individually programmed to associated activation action(s) when
received. .
1.2.12 Auto Flip
As long as you continue to hold the keyboard joystick in the down position, the dome rotates 180 degrees
and repositions itself for uninterrupted viewing of any subjects that passes directly beneath the dome.
1.2.13 Self-diagnosis
There is a self diagnosis procedure when dome boots up.
zTilt and vertical engine check
zCamera diagnostics (mainly zoom function diagnosis)
zDisplay dome information.
1.2.14 Day/Night Mode (B/W & Color Mode)
Auto/manual switches in low illumination. There are several modes such as photoresistor, auto, manual and
etc. This function needs the speed dome driver (camera) supported.
1.2.15 Auto Focus
Support camera auto focus function.
1.2.16 Backlight Compensation
Balance the brightest and darkest sections of a scene to produce a more vivid picture.
1.2.17 Pan Tilt and Zoom
Supports zoom in and zoom out during tilt and pan movement.
You can still get vivid image even you set auto focus and auto iris during this period.
1.2.18 FD 3D Intelligent Positioning
Support 3D intelligent positioning function. The speed dome can auto track to the specified zone.
1.2.19 Idle Status
When there is no available order for specified duration, you can use menu to set dome idle status.
1.2.20 Image Stabilizer/Flip
You can enable image stabilizer function and flip in the menu.
When there is vibration, this IS function can guarantee video stability and when flip, you can view video
more clearly.
This function needs speed dome driver (camera) supported.

3
2Quick Configuration Tool
2.1 Overview
Quick configuration tool can search current IP address, modify IP address. At the same time, you can use it
to upgrade the device.
Please note the tool only applies to the IP addresses in the same segment.
2.2 Operation
Double click the “ConfigTools.exe”icon, you can see an interface is shown as in Figure 2-1.
In the device list interface, you can view device IP address, port number, subnet mask, default gateway,
MAC address and etc.
Figure 2-1
Select one IP address and then right click mouse, you can see an interface is shown as in Figure 2-2.
Note:
You can set the IP address, subnet mask and gateway for the network camera and PC. Please note network
camera IP address and PC IP address shall be in the same network segment if there is no router. Network
camera default IP address is 192.168.1.108. If there is a router, please set the corresponding gateway and
subnet mask.
The factory default user name is admin and password is admin. For security reasons, please modify your
password after you first login.
For detailed WEB operation, please refer to the Web Operation Manual in the resource CD.

4
Figure 2-2
Select the “Open Device Web” item; you can go to the corresponding web login interface. See Figure 2-3.
Figure 2-3
If you want to modify the device IP address without logging in the device web interface, you can go to the
configuration tool main interface to set.
In the configuration tool search interface (Figure 2-1), please select a device IP address and then double
click it to open the login interface. Or you can select an IP address and then click the Login button to go to
the login interface. See Figure 2-4.
In Figure 2-4, you can view device IP address, user name, password and port. Please modify the
corresponding information to login.
Please note the port information here shall be identical with the port value you set in TCP port in Web
Network interface. Otherwise, you can not login the device.
If you are using device background upgrade port 3800 to login, other setups are all invalid.

5
Figure 2-4
After you logged in, the configuration tool main interface is shown as below. See Figure 2-5.
Figure 2-5
For detailed information and operation instruction of the quick configuration tool, please refer to the
Quick Configuration Tool User’s Manual included in the resources CD.

6
3Web Operation
This series speed dome product supports the Web access and management via PC.
Web includes several modules: live view, PTZ, setup, alarm, logout and etc.
Speed dome factory default setup:
zIP address: 192.168.1.108.
zUser name: admin
zPassword: admin
3.1 Network Connection
Please follow the steps listed below for network connection.
zMake sure the speed dome has connected to the network properly.
zSpeed dome IP address and PC IP address shall be in the same network segment. Speed dome default
IP address is 192.168.1.108. If there is router, please set the corresponding gateway and subnet mask.
zUse order ping ***.***.***.***(* speed dome address) to check connection is OK or not.
3.2 Login and Logout
Open IE and input speed dome address in the address bar.
For example, if your speed dome IP is 192.168.1.108, then please input http:// 192.168.1.108 in IE address
bar. See Figure 3-1.
Figure 3-1
System pops up warning information to ask you whether install control webrec.cab or not. Please click OK
button, system can automatically install the control. When system is upgrading, it can overwrite the previous
Web too.
If you can’t download the ActiveX file, please check whether you have installed the plug-in to disable the
control download. Or you can lower the IE security level. See Figure 3-2.
Input your IP
address here

7
Figure 3-2
After installation, the interface is shown as below. See Figure 3-3.
Please input your user name and password.
Default factory name is admin and password is admin.
Select the network connection type.
Note: For security reasons, please modify your password after you first login.
Figure 3-3
After you logged in, you can see the main window. See Figure 3-4.

8
Figure 3-4
Please refer to the Web Operation Manual included in the resource CD for detailed operation instruction.

9
4Menu
4.1 Screen Menu Index
Note:
ERR means current setup is invalid; you need to restores speed dome factory default setup.
Slight difference may be found due to different series.
The above diagram illustrates the overall structure of the speed dome setup menu.
PRESET
AZIMUTH DISP
TIME DISP
POSITION
ZOOM DISP
INSIDE TEMP
TITILE DISPLAY
BACK EXIT
DISPLAY
SET
TING
SYSTEM
SETTING
CAMERA
SE
TTING
FUNCTION
SET
TING
EXIT
WB
SETTING
EXPOSURE SETTING
DAY/NIGHT SETTING
FOCUS SETTING
IMAGE ADJUST
ZOOM SPEED
APERTURE
APERTURE RESTRAIN
DEFOG SETTING
NEXT PAGE
BACK EXIT
PRESET
AUTO PAN
AUTO SCAN
TOUR
PATTERN
IDLE MOTION
AUTO RUN
NEXT PAGE
BACK EXIT
IR
LIGHT
SET
TING
IR
SEN
SITIVITY
:
IR LIGHT CTRL:
NEAR LIGHT:
FAR LIGHT:
IR LIGHT COMP:
BACK EXIT
SYSTEM
INFORMATION
…
ADDR INFORMATION…
SET NORTH
LANGUAGE
FACTORY DEFAULT
RESTART
BACK EXIT

10
ADDR :001-S
BAUD RATE :9600
PARITY :NONE
SOFTWARE :V1.02.0.R
BACK EXIT
SYSTEM SETTING
DISPLAY SETTING
CAMERA SETTING
FUNCTION SETTING
IR LIGHT SETTING
EXIT
Note:
zERR means current setup is invalid.
zPlease make sure all the cable connections are right.
4.2 Self-diagnosis System Information
After installation, please connect speed dome to power. The system goes on a self-diagnosis, and then it
pops up the above interface to show the system information.
The above interface disappears after speed dome received the first command (or the display time lasts for
20 seconds.)
zADDR: Here you can view dome address information. For example, 001-S, 1 is the address number, –S
is software address mode.
zBaud rate: Dome communication baud rate.
zParity: Communication parity bit format.
zSoftware: Dome PTZ software version.
When you are using the control keyboard or the matrix host to control the device, please make sure
the control parameter of the keyboard or the matrix host is the same with the speed dome OSD
(including address, baud rate, parity). Please make sure the cable connection is OK.
4.3 Main Menu
You can open the IP dome menu via control keyboard, matrix, or speed dome control terminal.
zSYSTEM SETTING:Display speed dome system information, address information. Here you can set
north direction, language, factory default setup, reboot and so on.
zDISPLAY SETTING: Display dome preset title, azimuth display, time, direction, dome internal
temperature, title information, zoom information and etc.
zCAMERA SETTINGS:Set dome white balance, camera parameter, day/night setup and etc.
zFUNCTION SETTING: Set preset, pan, auto scan, auto tour, pattern, idle function, time task and
privacy mask function.
zIR LIGHT SETTING: Set dome IR sensitivity, IR control principle, medium and far light bright, far light
bright, IR light compensation and etc.
zEXIT: Log out the system menu.
4.4 Menu Operation

11
SYSTEM INFORMATION
ADDR INFORMATION
SET NORTH
LANGUAGE
FACTORY DEFAULT
RESTART
BACK EXIT
ADDR :001-S
BAUD RATE :9600
PARITY :NONE
SOFTWARE :V1.02.0.RHNDDC
BACK EXIT
In the speed dome main menu, you can use the left/right button on the keyboard or in the speed dome
terminal menu to configure the system menu. Before setup, please move the cursor to the current item you
want to configure.
zIn main menu, please click confirm button to go to the sub menu or use left/right key to configure setup.
zUse up/down button to select back option and then click confirm button to go back to the previous menu.
zUse up/down button to select exit option and then click confirm button to log out system menu.
zAll setup here will not lose when encounter power failure.
4.4.1 System Information
Move the cursor to SYSTEM SETTING and then click confirm button, you can go to the third submenu.
Please use the left/right button on the keyboard or in the speed dome terminal menu to set. After completed
setup, please click save button to save current setup.
zSYSTEM INFORMATION: Move the cursor to SYSTEM INFORMATION and then click confirm button
to go to the third submenu.
zADDR INFORMATION: Move the cursor to SITE INFORMATION and then click confirm button to go to
the third submenu.
zSYSTEM TIME SETTING: Move the cursor to SYSTEM TIME SETTING and then click confirm button
to go to the third submenu.
zSET NORTH DIRECTION: Set dome benchmark direction so that you can know the angel between the
benchmark and then current location. Please move the cursor to the option and then click confirm
button until you see O.K. Now you have set north direction.
zLANGUAGE: The dome menu language. There are several languages for you to select. Please use the
left/right button on the keyboard or in the speed dome terminal menu to set.
zFACTORY DEFAULT: Restore dome factory default setup. Please move the cursor to the option and
then click confirm button until you see O.K. Now you can see the IP dome begin rebooting to restore
factory default setup.
zRESTART: Reboot the speed dome.
zBACK: Go back to the previous menu.
zEXIT: Log out system menu.
4.4.1.1 System information
Move the cursor to SYSTEM INFORMATION and then click confirm button, you can see the above interface.
Here you can view dome basic information.
4.4.1.2 Address Information
ADDR TYPE :SOFT
ADDR-SOFT :001
BACK EXIT

12
Move the cursor to SITE INFORMATION and then click confirm button.
zADDR TYPE: System supports software address only.
zADDR-SOFT: It is to display speed dome software address. Please use the left/right button on the
keyboard or in the speed dome terminal menu to set. The value ranges from 1 to 255.
zBACK: Go back to the previous menu.
zEXIT: Log out system menu.
4.4.2 Display Setting
Before the operation, please make sure you purchased camera supports zoom function.
Move the cursor to DISPLAY SETTING and then click confirm button, you can go to the third submenu.
Please use the left/right button on the keyboard or in the speed dome terminal menu to set. After completed
setup, please click save button to save current setup.
zPRESET: Display dome preset title or not. Please use the left/right button on the keyboard or in the
speed dome terminal menu to set. You can go to Function Setup->Preset section to set corresponding
preset value and preset title.
zAZIMUTH DISP: Display dome current coordinates or not. Please use the left/right button on the
keyboard or in the speed dome terminal menu to set
zTIME DISP: Display dome system time or not. Please use the left/right button on the keyboard or in the
speed dome terminal menu to set.
zPOSITION: Display the angel between the benchmark and then current location. Please use the
left/right button on the keyboard or in the speed dome terminal menu to set.
zZOOM DISP: Display speed dome optical zoom speed or not.
zINSIDE TEMPERATURE: Display dome internal temperature or not. There are three options: ℃/F/Off.
Please use the left/right button on the keyboard or in the speed dome terminal menu to set.
zTITLE DISPLAY: Here you can set to display speed dome position information and etc. You can use the
speed dome control terminal to set the detailed title information. Please use the left/right button to set.
zBACK: Go back to the previous menu.
zEXIT: Log out system menu.
4.4.3 Camera Setting
Before the operation, please make sure your camera supports the corresponding function.
PRESET :
AZIMUTH DISP :
TIME DISP :
POSITION :
ZOOM DISP :
INSIDE TEMP :
TITLE DISP :
BACK EXIT
WB SETTING
EXPOSURE SETTING
DAY/NIGHT SETTING
FOCUS SETUP
IMAGE ADJUST
ZOOM SPEED
APERTURE :
APERTURE RESTRAIN: 8
DEFOG SETTING
NEXT PAGE
BACK EXIT

13
Move the cursor to CAMERA SETTING and then click confirm button, you can go to the submenu.
zWHITE BALANCE SETUP: Move the cursor to current option and then click confirm button, you can go
to the third menu.
zEXPOSURE SETTING: Move the cursor to current option and then click confirm button, you can go to
the third menu.
zDAY/NIGHT: Set day/night mode. Move the cursor to current option and then click confirm button, you
can go to the third menu. There are three options: auto/manual/off. Please use the left/right button on
the keyboard or in the speed dome terminal menu to set. Please make sure your product supports this
function.
zFOCUS SETUP: It is to set the camera focus mode, focus limit and etc. Please move the light to
highlight current item and then click the OK button to go to the next level menu.
zIMAGE ADJUSTMENT: It is to set the camera hue, saturation, color control, gamma and etc. There is
the third menu. Please move the light to highlight current item and then click the OK button to go to the
next level menu.
zZOOM SPEED: The bigger the value, the faster the speed. Please use the left/right button on the
keyboard or in the speed dome terminal menu to set.
zAPERTURE: It is to adjust the lens to achieve clear video. Please use the left/right button on the
keyboard or in the speed dome terminal menu to set.
zAPERTURE RESTRAIN: System can auto reduce the aperture to lower the video noise when it is in low
illumination environment. Please use the left/right button on the keyboard or in the speed dome terminal
menu to set.
zDEFOG: It is to set camera defog mode and intensity. It can enhance the camera video quality under
the fog environment. There is the third menu. Please move the light to highlight current item and then
click the OK button to go to the next level menu.
zNEXT PAGE: It includes the following options: DIGITAL ZOOM, PICTURE FLIP, FREEZE FUNCTION,
STABLE, CAMERA FACTORY DEFAULT SETUP, and CAMERA RESTART. Please use the left/right
button on the keyboard or in the speed dome terminal menu to set.
zBACK: Go back to previous menu.
zEXIT: Log out system menu.
4.4.3.1 White Balance Setup
Move the cursor to WHITE BALANCE MODE and then click confirm button, you can go to the submenu.
zWHITE BALANCE MODE: Set white balance adjustment mode. There are several modes such as auto,
auto trace white balance, indoor, outdoor, and manual and etc. Please use the left/right button on the
keyboard or in the speed dome terminal menu to set.
zR GAIN: Before you set R GAIN option, please note the mode shall not be auto. Please use the left/right
button on the keyboard or in the speed dome terminal menu to set.
zB GAIN: Before you set B GAIN option, please note the mode shall not be auto. Please use the left/right
button on the keyboard or in the speed dome terminal menu to set.
zBACK: Go back to previous menu.
zEXIT: Log out system menu.
WB MODE :AUTO
R GAIN :220
B GAIN :150
BACK
EXIT

14
4.4.3.2 Exposure Setting
zAE MODE: Here you can set the camera exposure mode. It includes: auto/manual/AV (iris priority)/TV
(shutter priority). Please use the left/right button on the keyboard or in the speed dome terminal menu to
set. oAuto: The gain, iris and shutter is under auto setup mode
oManual: You need to set gain, iris and shutter manually.
oAV: You can set iris manually. Gain and shutter is under auto setup mode.
oTV: You can set shutter manually. Gain and iris is under auto setup mode.
zGAIN SETTING: It is to set camera gain. Please use the left/right button on the keyboard or in the
speed dome terminal menu to set.
zSHUTTER: It is to set camera shutter speed. Please use the left/right button on the keyboard or in the
speed dome terminal menu to set.
zIRIS SETTING: It is to set camera iris value. Please use the left/right button on the keyboard or in the
speed dome terminal menu to set.
zEXPOSURE COM: It is to set camera exposure compensation. Please use the left/right button on the
keyboard or in the speed dome terminal menu to set.
zSLOW AE: In the strong light environment, you can lower the camera exposure speed to capture the
image and enhance the definition. Please use the left/right button on the keyboard or in the speed dome
terminal menu to set.
zSLOW SHUTTER: In lower illumination environment, you can lower the cameras auto exposure time to
capture the image and enhance the definition. Please use the left/right button on the keyboard or in the
speed dome terminal menu to set.
zNEXT PAGE: It includes: GAIN MAX LIMIT, SLOW SHUTTER LIMIT, NOISE REDUCTION, 3D NOISE
REDUCTION, BLC, WDR, AE resume time, BACK, and EXIT. Move the cursor to the item and then
click the left/right button to set.
oAUTO GAIN LIMIT: It is to set auto gain threshold. Please click the left/right button to set.
oHIGH GAIN: It is to set high gain threshold. Please click the left/right button to set.
oSLOW SHUTTER LOW LIMIT: Please click the left/right button to set.
oNOISE REDUCTION: There may noise when the camera is monitoring the low illumination
environments. You can use the digital filter to process the noise to guarantee the clear video.
o3D NOISE REDUCTION: It is to set the speed dome 3D noise reduction setup. There is the
fourth menu. Please move the light to highlight current item and then click the OK button to
go to the next level menu.
oBLC: It is an abbreviation for back light compensation. System can compensate the object in
the dark light to achieve a clear video. Please use the left/right button on the keyboard or in
the speed dome terminal menu to set.
AE MODE :AUTO
GAIN SETTING :02
SHUTTER :1/50
IRIS SETTING :11
EXPOSURE COMP :08
SLOW AE :01
SLOW SHUTTER :ON
NEXT PAGE
BACK EXIT
AGC GAIN LIMIT :03
HIGH GAIN :ON
SLOW SHUTTER LIMIT :1/25
NOISE REDUCTION :03
3D NOISE REDUCTION
BLC :OFF
HIGH LIGHT REDUCE :OFF
WDR SETTING
AE RECOVERY :15M
BACK EXIT
This manual suits for next models
3
Table of contents
Other E-line Security Camera manuals
Popular Security Camera manuals by other brands

Moog
Moog Pressurized FusionDome PFDW75C2NAX Installation and operation instructions

Digital Watchdog
Digital Watchdog MEGAPIX DWC-MB95Wi28T quick start guide

Samsung
Samsung SNV-6013 user manual

Goclever
Goclever Eye Omega quick start guide

Mobotix
Mobotix v26 Quick installation

D-Link
D-Link DCS-3010 Quick installation guide

Lorex
Lorex LEV2724B SERIES quick start guide

Wiseup
Wiseup WIFI39 user guide

Panasonic
Panasonic WV-NW484S - i-Pro Network Camera Setup manual

Bosch
Bosch LTC 0135/10 Specifications

SECO-LARM
SECO-LARM Enforcer EV-2240-N3B manual

Moog Videolarm
Moog Videolarm SM75C12N Installation and operation instructions