E-Song ESR201 User manual

Car DVR User Manual
Preface
Thank you for purchasing this DVR, this device has a unique ultra-portable
design; it can be used in various fields, to bring you convenient, safe, colorful
daily life. Please read this manual carefully before using and place it in a safe
place for future reference use.
Notes
Please strictly follow relevant state laws, this product are not allowed to be used for
any illegal purpose.
●Please use the device under natural temperature, do not work under the
temperature which human body cannot adapt to.
●Please do not place the device in wet environment. The device is not waterproof,
please avoid the water spray, or expose the product under rain
●Do not attempt to open the shell or attempt to repair, if the device or any parts are
defective, please go to the professional maintenance point for repairing.
●Do not use harsh chemicals, cleaning solvents or cleaning agents to clean the
device. Please use a slightly damp soft cloth to clean the device.
●Please use it under sufficient light, please do not make the lens directly face to the
sun or other super-light so as to avoid damage to the optical components.
●Do not use it in dusty environment in order to avoid the lens and other components
to be dusty and affect the camera effects
●Please don’t discard the product at random considering the environment. It is
prohibited to throw this product into a fire as it may cause explosion.
1, Key features
This device is to record video and audio when you are driving, so that you can have
evidence when there is any accident and you can record moving scenery when you
are driving. It could also be used as a portable DV and web camera.
Its key features are as follows:
zHD720P car DVR with 2.5 inch TFT display;
z1/4 inch color CMOS WXGA HD sensor, 300k Pixel;
zMode: video recorder/camera/motion detection/review;
zRecording resolution: VGA(640x480)、QVGA(320x240)、SXGA(1280x960) @30fps
zRecording video format: AVI;
zCamera optional with 12M, 8M, 5M, 3M, 2M, 1.3M, VAG size
zLens angel: 120°
zStorage Medium: SD/MMC card;
zSupport Real-time and date display on video with time stamp.
zRecording automatically after the car powered-up when connect the car adaptor;
zThe device records in cycles, it will automatically cover old memory, scroll and always

keep the newest recording by sections optional with 1 minute, 3 minutes and 5 minutes;
zSupport motion detect, it will automatically record as long as there is any human or objects
movement in front of the device.
zBuilt-in rechargeable battery;
zThe device supports video output, live playback, through the car display you can check the
record video content on the spot. It also supports TV and PC output via AV output and
USB2.0 interface to review recording files;
zBuilt-in MIC and speaker;
zCan be used as Web camera after install the driver in the PC and connect to PC by USB
cable.
2, Operation
1) Appearance and button descriptions
1. SD/MMC card slot 10. USB slot
2. Red/Blue indicator 11.AV Out
3. Microphone 12.Lens
4. REC/OK 13.Speaker
5. Menu/Exit 14.R
eset hole
6. On/Off 15.MountHole
7. Down 16.2.5-inchLCD
8. Up
9. Mode (Record, Camera, MD, Playback)
3.System Settings
Before using this device, it is necessary to make some basic settings, such as date
and time, language, auto power off, reset the system etc.
After power on, press MODE button to switch to camera mode. Double press the
MENU/EXIT key to enter the function setup menu, and press the MENU button again
to enter the system setup menu.
1) Format

Use this feature to format the current storage media; this function will
delete any information in the storage media.
In the system setup menu, press the UP or DOWN button and select
'Format' option. Press the REC/OK button, then press the UP or DOWN
button to select 'Execute ' option, then press the REC/OK button to begin
formatting.
2) Beep
In the setup menu, press UP or DOWN button to select 'Beep'. Press the
REC/OK button to enter the selection screen, then press the UP or DOWN
button to select 'On' or 'Off' option, then press REC/OK to confirm selection
and exit.
When ‘On’ is selected, there will be ‘Beep’ sound comes out when pressing
keys. When ‘Off’ is selected, there won’t be any sound when pressing keys.
3) Language setting
On the setup interface, press the UP or DOWN key to select the 'Language'
option.
Press REC/OK to enter the selection interface, press the UP or DOWN
button to select the following languages: English, French, German, Italian,
Spanish, Portuguese, Traditional Chinese, Simplified Chinese, Japanese,
Russian and etc. Then press REC/OK key to confirm selection of language
and get out to main menu.

4) Auto Off
In the setup interface, press the UP or DOWN button to select the 'Auto Off'
option, press the REC/OK button to enter the auto off interface, press UP or
DOWN to select among 1 minute, 3 minutes, 5 minutes, and Off, then press
the REC/OK button to confirm auto-off time selection and get back to main
menu. For example, when you select 1 minute, if you don’t operate the
device for 1 minute, it will be powered off automatically.
5) Motion Detection
This feature is to set the time of the saving section under motion detection
mode.
In the setup interface, press the UP or DOWN button to select the 'Motion
Detect' option, press the REC/OK button to enter the sub-menu, press UP
or DOWN to select 1 minute, 3 minutes, 5 minutes, then press the REC/OK
button to confirm. For example, when you select 3 minutes, it will save each
recording sections in every 3 minutes.
6) System Reset
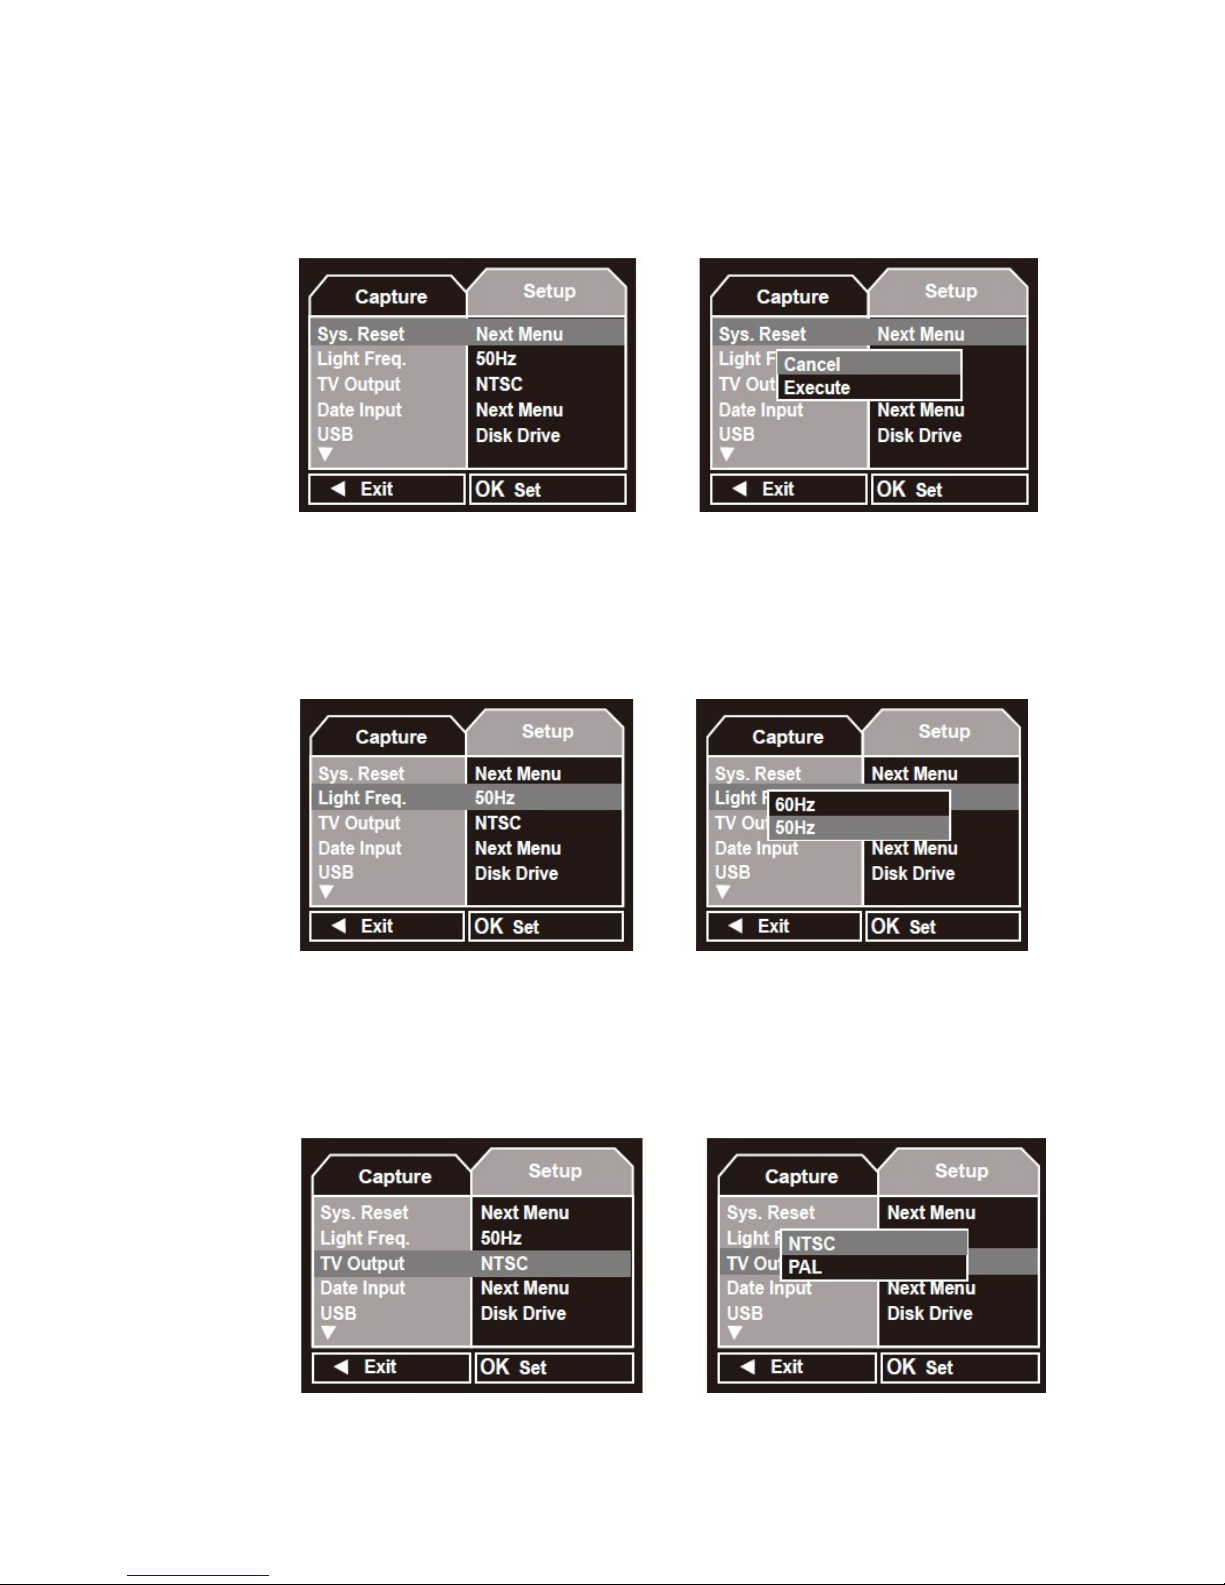
This feature will make all settings back to default.
In the system setup menu, press the UP or DOWN button to select ' Sys.
Reset ' option. Press REC/OK, select 'Cancel' or 'Execute' option, then
press REC/OK button to confirm.
7) Light Frequency
Under the light frequency option, you can set it suitable for local places.
In the system setup menu, press the UP or DOWN button to select 'Light
Freq.' option, press REC/OK, then select 60Hz or 50Hz, press the REC/OK
button to confirm. Make the outside light frequency to be corresponding
light frequency in the device, you will get better display effect.
8) TV Output
In the system setup menu, press the UP or DOWN button to select 'TV
Output' selection, press REC/OK, then press the UP or DOWN button to
select NTSC or PAL, select the TV mode used in your local place, then
press REC/OK button to confirm the selection.
9) Date Input
This manual suits for next models
1
Table of contents


